Image created in Canva
It's been more than 4 weeks since I last brought you a battle strategy, so it's time to bring you valuable content about the gameplay in "Splinterlands" and leave aside the serious topics about new game modes and this kind of things, in that sense, I want to continue bringing you value regarding the game combinations I usually use for different situations; and it so happens that recently I have found and used a card that I like a lot for its great power and versatility.
That's why, in this opportunity I will bring a great battle where I will highlight a good strategy using the "Death Splinter" card called "RAA", which has an impressive set of abilities; and well yes, it has a very similar name to the "Egyptian God the "Winged Dragon of RA", but, it is not the same haha, this last one is a great card from a game called "Yugioh" that coincidentally, my husband plays in some of his free time, but, without going too far from the subject, I will show you how to use this fabulous card mentioned above.
So, if you want to know how to use in battle the powerful card called "RAA" in "Splinterlands", you have to read this complete post so you can find out all the possibilities around it, so, let's start:

What are the best conditions for using RAA?


Before sharing with you what is the battle strategy, I must first put you in context of the card I mentioned before, which has an impressive set of skills capable of taking the reins of a game very easily, however, like everything in "Splinterlands", not every time we can take advantage of it, as there are notable "Weaknesses" that can make us lose, so, what I intend in this section is to teach you the "Conditions" in which using RAA, is our best option:

Combinable equipment
In reality, there are many cards with which to combine "RAA", but there are some very good cards with which it can work perfectly, since the exponential damage it can cause could be greatly increased, but all depending on the context of the battle, by this I mean the "Rule Sets" that are presented to us, although I will talk about this a little later in this section:
Dragon and Neutral:

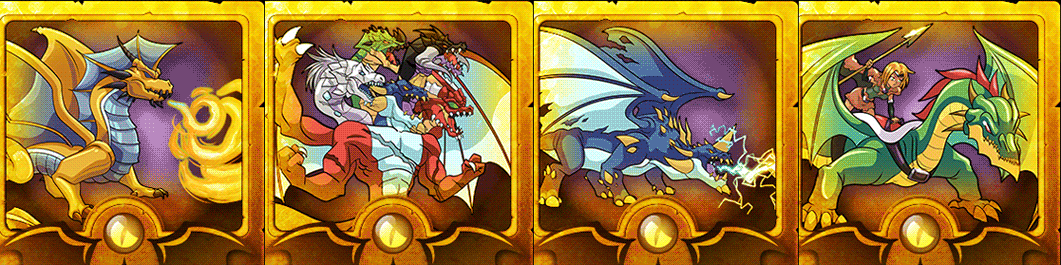
 If at some point in the battle we have the opportunity to play with the "Dragon Splinter" and we choose "Death" for its combination, undoubtedly teaming up with the "Chaos Dragon", can give us an important advantage, since, this aforementioned dragon, possesses the "Scattershot" ability as "RAA", On the other hand, if we can use "Neutral" cards, adding the "Gem Meteor" card to our team can help us to increase this advantage even more, since this card also has the "Scattershot" ability.
Death and Neutral:
 Continuing with the combinations, we have several cards from the same team of "Death" that could work very well in conjunction with "RAA", since, one of the abilities of RAA is to reduce the "Shield" points of the opponent thanks to "Rust", this can be very beneficial to use some cards of "Death" with the ability "Opportunity", which could be a constant damage for our opponent, these cards are "Maggots and Lira the Dark", an additional benefit is that "Maggots" in higher levels has the ability of "Scavenger", on the other hand, we have the card "Neutral Parasitic Growth", also with the abilities "Opportunity and Scavenger".
Favorable rule sets
The battle conditions where RAA is very useful are really diverse, some may work better than others, but, in this opportunity I will describe the ones that I think are better to take advantage and take advantage, of course, this does not mean that you can not defeat it playing in these conditions, since, we have an opponent in front that can also think the same as us. Taking this into account, rules and/or conditions are as follows:
Amount of mana:
 The amount of favorable mana to play with "RAA" is much better if it is high, since, its cost to summon it to the field is 12 points, which is really high, so it goes much better in this kind of battles, the other reason is that, RAA has the ability called "Giant Killer", and there are more chances for players to play with monsters with more than 10 points of mana cost, which could be really beneficial for us.
Lost Magic:
 This is a somewhat basic rule, but, it is very good to take advantage and play with RAA, since the magic attacks are really annoying, and they do not distinguish between if the monsters are "Flying" or not, so, this rule can work very well to align our RAA.
Earthquake:
 We all know how complicated this rule can be, but, RAA having the "Flying" ability, can survive without any problem with it, since it is not affected, which gives him free margin to attack at will any random monster with "Scattershot".
Explosive Weaponry:
 If we take advantage and play RAA right when we have this rule in front of us, we can take advantage of its abilities to do a lot of damage to the enemy team, because, with "Double Strike and Scattershot", we can do damage to 3 enemy monsters.
Fog of War:
 This is a very good rule for our RAA to go out to the battlefield, since, when this is activated, no other card can attack the enemy's backline, the only way is with "Scattershot", which gives many possibilities to defeat our opponent's monsters in the last line.
Note: For me, these are some of the main conditions where using RAA gives us a great advantage in battle, however, this does not mean that they will work perfectly, we must keep in mind other factors, which I have explained in previous publications, especially how to analyze a battle and use our best options to win. There are more favorable rules and combinable cards, but I would like to make a dynamic, in the comments, answer the following question:
In which rules could the RAA chart work well?
Conditions and Strategy
Before explaining my strategy, I will first start by explaining the most important battle conditions I had, so you will see why I played this way:

Lost Magic: For me this is one of the best rules to take advantage and play with RAA as I explained before, the only thing that causes this card is that you can't play any with magic attacks, so, take advantage to play it.
Stampede: A very peculiar and dangerous battle rule if you know how to use it, but, there are possibilities to protect yourself as I did, something that I will explain later, however, what this battle rule does is that those who have the "Trample" ability, have the possibility to attack infinitely if they manage to defeat in one attack each of the cards on the field, something that is a bit complicated.
Mana high: This battle had a really high mana cost of about 57 points, so, using RAA in these conditions is very good.
Game strategy
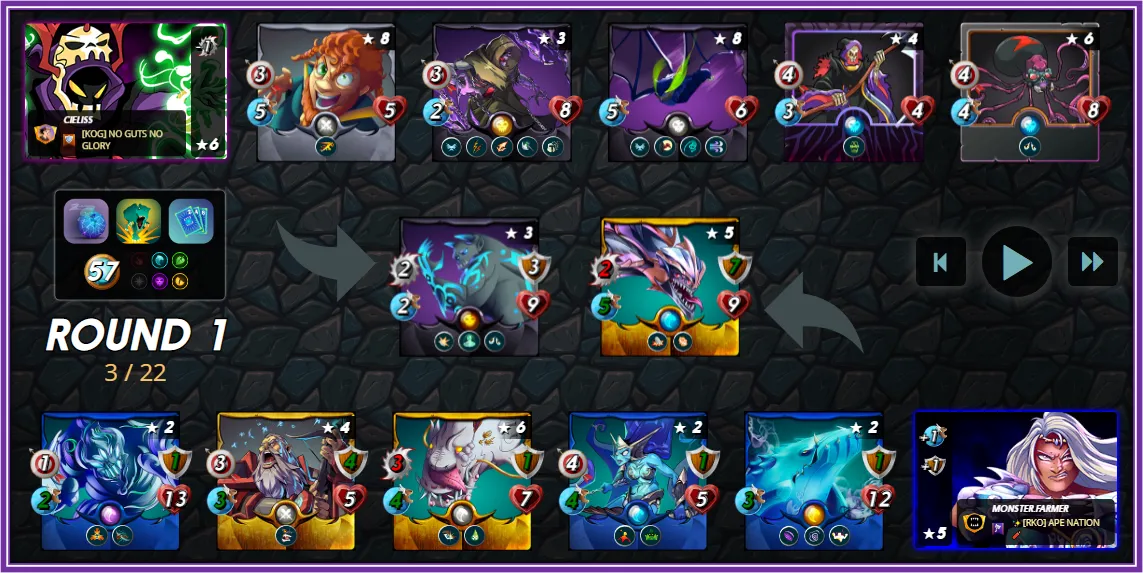
Taking into account this set of rules that I explained above, my idea to alienate my monsters, began by using the "Splinter of Death", this with the aim of reducing the very likely "Melee" attack that my opponent would use to take advantage in the first instance the battle rule "Stampede", so, using my summoner "Zintar Mortalis" in conjunction with "Harklaw" in the first position as "Tank" and his "Shield" ability, was my best option at that time.
On the other hand, believing that my opponent would focus on attacking with the "Melee" attack, I used my "Octopider" in the last position, since, it has a really powerful ranged attack power and the other reason is that it has the "Demoralize" ability like my "Harklaw", I then ended up using my RAA offensively, with the intention of defeating his backline cards early and using some other support cards like my "Riftwing, Grim Reaper and Supply Runner" so that he wouldn't take me by surprise.
Conclusion
With this I have finished today's publication, I hope it helps you to make the most of the card called "RAA", which is extremely strong if we know how to use it correctly, which means that we must pay close attention to the conditions in which we can play it, for example, in my strategy battle, it can completely neutralize their intentions to attack with "Melee", the only thing left was the attack from a distance, but the combination I used and the double and unpredictable attack power of RAA, gave me a comfortable victory.
Note: Remember the question I asked you to answer in the previous section, I look forward to your comments.

Ya hace mas de 4 semanas que no les traigo una estrategia de batalla, así que, ha llegado la hora de volver a traerles contenido de valor en torno a la jugabilidad en “Splinterlands” y dejar un poco de lado los temas serios en torno a nuevos modos de juego y este tipo de cosas, en tal sentido, quiero seguir aportándoles valor con respecto a las combinaciones de juego que suelo utilizar para diferentes situaciones; y da la casualidad que recientemente he encontrado y utilizado una carta que me gusta mucho por su gran poder y versatilidad.
Es por eso que, en esta oportunidad traeré una estupenda batalla en donde resaltare una buena estrategia utilizando la carta del “Splinter de Muerte” llamada “RAA”, la cual, tiene un conjunto de habilidades impresionantes; y bueno si, tiene un nombre muy parecido al “Dios egipcio el “Dragon Alado de RA”, pero, no es la misma jaja, esta ultima es una gran carta de un juego llamado “Yugioh” que casualmente, juega mi esposo en algunos de sus ratos libres, pero, sin desviarme mucho del asunto, les ensañare a utilizar esta fabulosa carta mencionada anteriormente.
Entonces, si quieres saber como utilizar en batalla a la poderosa carta llamada “RAA” en “Splinterlands”, tienes que leer este post completo para que puedas enterarte de todas las posibilidades existentes a su alrededor, así que, comencemos:
¿Cuáles son las mejores condiciones para utilizar a RAA?
Antes de compartirles lo que es la estrategia de batalla, primero debo ponerlos en contexto de la carta que mencione anteriormente, la cual, posee un conjunto de habilidades impresionante capaz de tomar las riendas de una partida de forma muy fácil, sin embargo, como todo en “Splinterlands”, no en todo momento podemos sacarle provecho, ya que existen notables “Debilidades” que puede hacernos perder, así que, lo que pretendo en esta sección es enseñarles las “Condiciones” en las cuales utilizar a RAA, es nuestra mejor opción:
Equipos combinables
En realidad, hay muchas cartas con las que combinar a “RAA”, pero, existen algunas muy buenas con las cuales esta puede funcionar perfectamente, ya que el daño exponencial que puede causar, podría incrementarse muchísimo, pero, todo dependiendo del contexto que tenga la batalla, con esto me refiero a los “Conjuntos de Reglas” que se nos vayan presentando, aunque, de esto hablare un poco más adelante en esta misma sección:
Dragon y Neutral:
Si en algún momento de la batalla tenemos la oportunidad de jugar con el “Splinter de Dragon” y elegimos “Muerte” para su combinación, sin duda alguna hacer equipo con el “Chaos Dragon”, puede darnos una importante ventaja, puesto que, este dragón antes mencionado, posee la habilidad “Scattershot” como “RAA”, lo que puede ser bastante molesto para nuestro oponente, por otro lado, si podemos utilizar cartas “Neutrales”, agregar a nuestro equipo la carta “Gem Meteor”, puede ayudarnos a incrementar mucho mas esta ventaja, ya que, esta carta también posee la habilidad de “Scattershot”.Muerte y Neutral:
Continuando con las combinaciones, tenemos a varias cartas del mismo equipo de “Muerte” que podrían funcionar muy bien en conjunto con “RAA”, ya que, una de las habilidades de RAA es reducir los puntos de “Escudo” del oponente gracias a “Rust”, esto puede ser muy beneficio para utilizar algunas cartas de “Muerte” con la habilidad “Opportunity”, lo que podría ser un daño constante para nuestro oponente, estas cartas son “Maggots y Lira the Dark”, un beneficio adicional es que “Maggots” en niveles mas altos tiene la habilidad de “Scavenger”, por otro lado, tenemos a la carta “Neutral Parasitic Growth”, también con las habilidades “Opportunity y Scavenger”.
Conjuntos de reglas favorables
Las condiciones de batalla en donde RAA es muy útil son realmente diversos, algunos pueden funcionar mejor que otros, pero, en esta oportunidad describiré los que pienso que son mejores para aprovechar y tomar ventaja, por supuesto, esto no quiere decir que no puedan derrotarla jugando en estas condiciones, ya que, tenemos a un oponente en frente que también puede pensar igual que nosotros. Tomando esto en cuenta, reglas y/o condiciones son las siguientes:
Cantidad de mana:
La cantidad de mana favorable para jugar con “RAA” es mucho mejor si esta es alta, puesto que, su costo para poder invocarla al campo es de 12 puntos, los cuales, son realmente altos, así que va mucho mejor en este tipo de batallas, la otra razón es que, RAA posee la habilidad llamada “Giant Killer”, y existen mas posibilidades de que los jugadores jueguen con monstruos de mas de 10 puntos de costo de mana, lo que podría ser realmente beneficioso para nosotros.Lost Magic:
es una regla un tanto básica, pero, es muy buena para aprovechar y jugar con RAA, ya que los ataques mágicos, son realmente molestos, y estos no distinguen entre si los monstruos son “Voladores” o no, así que, esta regla puede funcionar muy bien ara alinear a nuestro RAA.
Earthquake:
Todos sabemos lo algo complicada que puede ser esta regla, pero, RAA al tener la habilidad de “Flying”, puede sobrevivir sin ningun problema con ella, puesto que no es afectada, lo que le da margen libre para poder atacar a voluntad a cualquier monstruo al azar con “Scattershot”.Explosive Weaponry:
Si aprovechamos y jugamos a RAA justo cuando tengamos esta regla en frente, podemos aprovechar las habilidades de este, para hacer mucho daño en el equipo enemigo, esto debido a que, con “Double Strike y Scattershot”, podemos hacer daño a 3 monstruos enemigos.Fog of War:
Esta es una regla muy buena para que nuestro RAA salga al campo de batalla, puesto que, cuando esta se activa, ninguna otra carta puede atacar a la línea de fondo del enemigo, la única manera es con “Scattershot”, lo que da muchas posibilidades de vencer a los monstruos de nuestro oponente en la ultima línea.
Nota: Para mí, estas son algunas de las principales condiciones en donde utilizar a RAA, nos da una gran ventaja en la batalla, sin embargo, esto no quiere decir que, vayan a funcionar a la perfección, debemos tener presente otros factores, los cuales he explicado en anteriores publicaciones, en especial como analizar una batalla y utilizar nuestras mejores opciones para ganar. Existen más reglas favorables y cartas combinables, pero, quisiera hacer una dinámica, en los comentarios, respondan la siguiente pregunta:
¿En qué reglas pudiera funcionar bien la carta RAA?
Condiciones y Estrategia
Antes de explicar mi estrategia, primero comenzare por explicar las condiciones de batalla mas importantes que tuve, de esta forma observaran porque jugué de esta forma:
Lost Magic: Para mi esta es una de las mejores reglas para aprovechar y jugar con RAA como lo explique anteriormente, lo unico que causa esta carta es que no se puede jugar ninguna con ataques mágicos, así que, aproveche para jugarla.
Stampede: Una regla de batalla bastante peculiar y peligrosa si se sabe utilizar, pero, existen las posibilidades de protegerse como yo lo hice, algo que explicare más adelante, sin embargo, lo que hace esta regla de batalla, es que, aquellos que poseen la habilidad “Trample”, tienen la posibilidad de atacar infinitamente si es que logran derrotar en un ataque a cada una de las cartas en el campo, algo que es un poco complicado.
Mana alto: Esta batalla tuvo un costo de mana realmente alto de unos 57 puntos, por lo que, utilizar a RAA en estas condiciones es muy bueno.
Estrategia de juego
Tomando en cuenta este conjunto de reglas que ya expliqué anteriormente, mi idea para alienar a mis monstruos, comenzó por utilizar al “Splinter de Muerte”, esto con el objetivo de disminuir el muy probable ataque “Cuerpo a Cuerpo” que utilizaría mi adversario para aprovechar en primera instancia la regla de batalla “Stampede”, por lo que, utilizar mi invocador “Zintar Mortalis” en conjunto con “Harklaw” en la primera posicion como “Tanque” y su habilidad de “Shield”, era mi mejor opción en ese momento.
Por otro lado, creyendo que mi oponente se centraría en atacar con el ataque “Cuerpo a Cuerpo”, utilice a mi “Octopider” en la ultima posicion, ya que, esta posee un poder de ataque de rango realmente poderoso y la otra razón es que tiene la habilidad de “Desmoralize como mi “Harklaw”, lo que disminuye 2 veces más el poder de ataque cuerpo a cuerpo de sus monstruos, luego termine por utilizar de forma ofensiva a mi RAA, con la intención de derrotar de forma temprana a sus cartas en la línea de fondo y utilizar algunas otras cartas de apoyo como mi “Riftwing, Grim Reaper y Supply Runner” para que este no me tomara por sorpresa.
Conclusión
Con esto he finalizado la publicación de hoy, espero que les sirva para que puedan aprovechar al maximo la carta llamada “RAA”, la cual, es extremadamente fuerte si sabemos utilizarla correctamente, lo que significa que debemos prestar mucha atención en las condiciones en las que podemos jugarla, por ejemplo, en mi batalla de estrategia, puede neutralizar por completo sus intenciones de ataque con “Cuerpo a Cuerpo”, lo unico que le quedo fue el ataque a distancia, pero, la combinación que utilice y el poder de ataque doble e impredecible de RAA, me dieron una cómoda victoria.
Nota: Recuerden la pregunta que les pedí que respondieran en la sección anterior, espero sus comentarios.

¡I invite everyone to join Splinterlands, the best game based on chains of blocks, full of adventures, battles, and strategies where you will have fun and get rewards according to your league!

Join the official Spanish community here Discord