This post has been updated from 1.24.4 to 1.27.2

Used With Permission From @someguy123
Because @someguy123 hasn't written a post about using HIAB I decided to do it, mainly because I use it and always end up referring to discord chats on how to set it up. Much easier to just have it all in one place, and what better place than the chain itself? Im just going over basic setup using p2p sync but theres even more functionality(you can replay the server instead of using p2p, or use a snapshot) which you can read about here: https://github.com/someguy123/hive-docker.
Server
First thing that you'll need is a server for this. Thanks to the efforts from Blocktrades and team, its become quite a bit easier to run I would recommend a Privex server for this because you can pay with Hive and HBD, but because we have a lot of witnesses already on Privex and its important to have our chain be distributed between different datacenter and providers, I would recommend that you find your own. I do run a company which rents out servers so you could potentially use that, check out Ryamer.
I run my main witness(@hextech) node on a server with 32 gigs of RAM and 8 CPUs for the witness along with 1TB(about 400 GB being used right now) on a NVME on Ubuntu 20. You could possibly get by with less threads and 16 gigs of RAM, but please use a fast disk or else it'll take a long time to get caught up.
Setting Up HIAB
I like to update my server as the first thing to do as well as install git and screen.
sudo apt-get update -y
sudo apt-get upgrade -y
sudo apt-get install git -y
sudo apt-get install screen -y
Then we clone the repo.
git clone https://github.com/someguy123/hive-docker.git
And then use it to install docker for you. This shouldn't take too long.
cd hive-docker
./run.sh install_docker
We can then install the latest docker image for the witness with. It will grab whatever is the latest from dockerhub(https://hub.docker.com/r/someguy123/hive/tags).
./run.sh install
CLI Wallet And Keys
Now we are going to want to generate our witness signing keys. You can reuse some keys that you already use, but it's recommended to generate new ones just for signing blocks. To do that, we use the cli_wallet.
We'll be using the remote wallet as our local instance isn't ready yet.
./run.sh wallet
You should get presented with something like this on a fresh install. If it says locked instead of new then you already have a wallet setup(you won't unless you are updating) and you can unlock it and skip the init step.

You can type in set_password to set your password. For example, if I wanted my password to be 123, I'd type in set_password 123 Remember the password as you'll need this to unlock the wallet in the future. You'll want to unlock your wallet after that. Thats as simple as unlock 123. Replace 123 with the password you set.
Once you are unlocked you can use suggest_brain_key to get a public private keypair generated. You'll want to save that as you'll need it in the future. 
You can exit the wallet by pressing control + D. If you ever forget your password, you can wipe the wallet clean and use a new password. A wallet.json file is generated and stored within the data directory. Just delete that and it'll start the wallet fresh again.
Config
First let's increase the shared memory file size.
./run.sh shm_size 24G
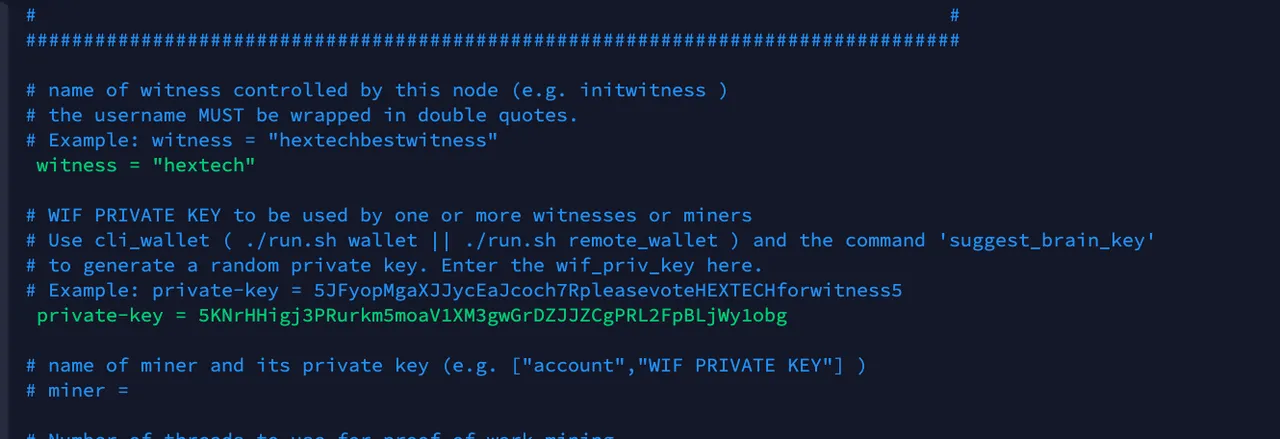
Next we'll need to modify the config file to work with our witness. Its located at data/witness_node_data_dir/config.ini directory. We'll want to modify that.
nano data/witness_node_data_dir/config.ini
Most of the values there are already good. If you want to modify anything go ahead if you know what you are doing.
The place we want to modify is witness = and private-key =. They are already commented out(line begins with #) so we can just go find them and delete the # at the start of the line. For the witness, you'll want to type in the username of the account that the witness will be running under. This value must go in quotes. The private key should be the private key that we generated from the cli wallet. This should not go in quotation marks. Use the image below as an example.
Starting Up
We are going to start the node up, and to do that, run the following command
./run.sh start
This does take some time, on my machine I mentioned above, it took about a day to sync to head. You can monitor what step of the process this is at by using ./run.sh logs.
Once the older blocks are synced up, it'll automatically start syncing up to live. You can check the sync progress using ./run.sh monitor. It'll tell you how long it'll take to get synced up. Again this is a time to wait. You'll know that you are live when you see individual blocks being produced in ./run.sh logs. That'll look like this:
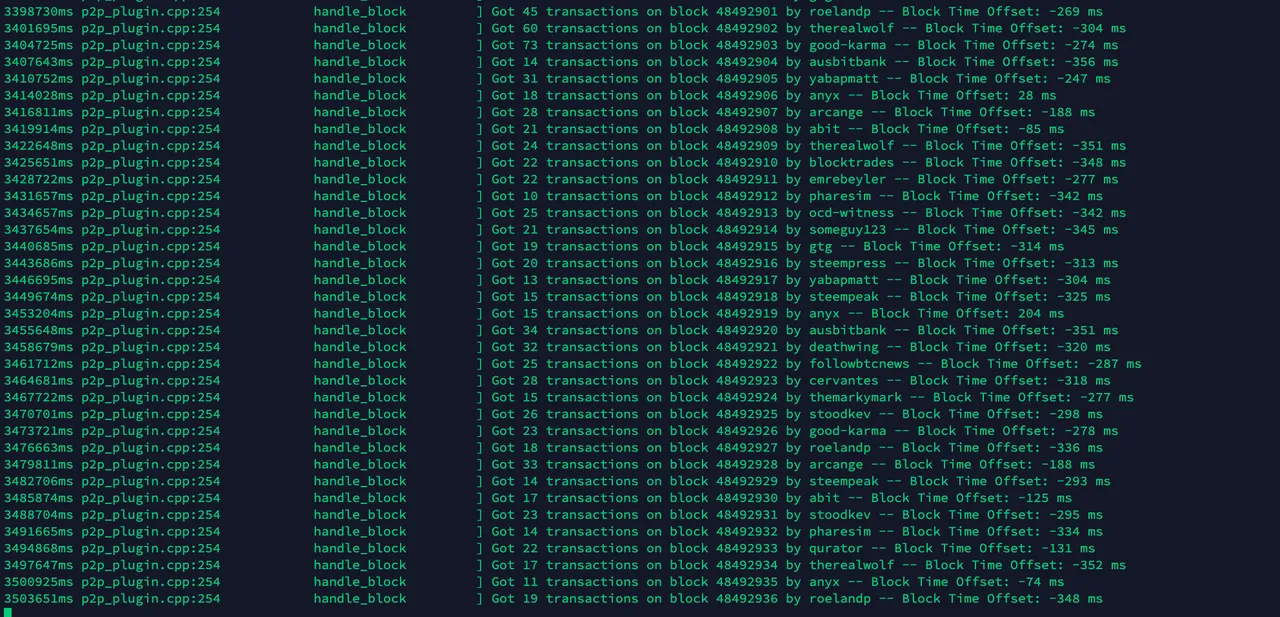
The block numbers will be going up by one. Nows the big time, time to enable as a witness.
Enabling Your Witness
Let's enable the witness, you can do so using the wallet. Run the following to open it up:
./run.sh wallet
Unlock the wallet with the password set before using unlock 123 where 123 is the password. We'll want to import in your active key to sign the transaction that we'll be broadcasting. Find the private active_key using your preferred choice. If your private active key is 5KNrHHigj3PRurkm5moaV1XM3gWGrDZJJZCgPRL2FpBLjWy1obg you'd import it by typing in import_key 5KNrHHigj3PRurkm5moaV1XM3gWGrDZJJZCgPRL2FpBLjWy1obg
Now we want to broadcast enabling the witness. Modify the following command to match what you want and type it into the wallet. Replace username with the name of your witness, the https://example.com part with the url you want to use for your witness and STM1111111111111111111111111111111114T1Anm with the public key generated for your private signing key when we first got into the wallet. Following that are your witness parameters, modify them to your liking, but these are the current standard ones being used by witnesses and so it's wise to follow along.
update_witness "username" "https://example.com" "STM1111111111111111111111111111111114T1Anm" {"account_creation_fee":"3.000 HIVE","maximum_block_size":65536,"hbd_interest_rate":0} true
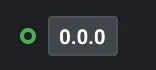
After that gets broadcast, you are up and running as a witness. You can check that you are enabled somewhere like https://peakd.com/me/witnesses. The green ball means that you are enabled. Your version will not report to the version that you are using until you sign your first block so don't worry if it says 0.0.0. Just get the word out there that you are being a witness and get more votes.
I was following along on a fresh server and it took me 2 hours and 15 minutes to get to the point where I could broadcast the enable witness transaction. The latest updates and the work from someguy to make HIAB exist has made it a lot easier to be a witness.
Future & Questions
You'll want to setup a pricefeed and failover script as well. For pricefeed, I recommend someguy's hivefeed-js (can be found here https://github.com/someguy123/hivefeed-js) as well for failover script(watcher by therealwolf works https://github.com/therealwolf42/hive-witness-essentials/tree/master/essentials/watcher)
As time goes on, you'll need to update. The update process might involve a replay or it might not. Hard forks involve a replay and soft forks usually don't. You can get information and ask questions about that in the Privex discord which can be found at http://discord.privex.io/. The server requirements might increase as well and you might need to upgrade that.
If you like what I do, feel free to vote for my witness https://vote.hive.uno/@rishi556
Looking for a server to host on? Check out Ryamer