(Want to use the logo yourself? no problem, check out the post I made about My Art Design For Hive Logo)
(Want to use the thumbnail above? you can use it for free, don't forget to leave a credit 😀)
Full project installation at the END of the tutorial
Repository:
https://www.npmjs.com/package/steem-js-patched
All of this tutorial is patched for Hive, so it works for Hive and steem!
All of the examples and results is from the old tutorial but still same for hive!
Helpful tutorials:
[HIVE Patched] SteemJS Full Tutorial - All The Functions - All The Abilities
[Hive Patched Tutorial] SteemJS - Vote, Comment and Follow functions - All In One
Step 1 - Setup The HTML File
I'm using bootstrap, you can use it if you want.
first, make a new HTML-5 document
<!DOCTYPE html>
<html lang="en">
<head>
  <meta charset="UTF-8">
  <title>Document</title>
</head>
<body>

</body>
</html>
at the head add your stylesheet files (not important) and add the steemjs and your js files.
<head>
  <meta charset="UTF-8">
  <title>Vote, Resteem and comment</title>
  <meta name="viewport" content="width=device-width, user-scalable=no, initial-scale=1.0, maximum-scale=1.0, minimum-scale=1.0">
  <meta http-equiv="X-UA-Compatible" content="ie=edge">
<link rel="stylesheet" href="https://maxcdn.bootstrapcdn.com/bootstrap/4.0.0/css/bootstrap.min.css" integrity="sha384-Gn5384xqQ1aoWXA+058RXPxPg6fy4IWvTNh0E263XmFcJlSAwiGgFAW/dAiS6JXm" crossorigin="anonymous">
    <link rel="stylesheet" href="style.css" type="text/css" />
    <link rel="stylesheet" href="https://use.fontawesome.com/releases/v5.2.0/css/all.css" integrity="sha384-hWVjflwFxL6sNzntih27bfxkr27PmbbK/iSvJ+a4+0owXq79v+lsFkW54bOGbiDQ" crossorigin="anonymous">
</head>
title - the HTML page title
meta - these 2 rows make the page work at any type of view, phone, tablet, pc, etc.
stylesheet - the first row is bootstrap, bootstrap is a CSS framework to make your styling easier.
the second row is our CSS file, with this file we going to fix some issues with the bootstrap styling and add our styling.
the third row is the font-awesome stylesheet file, this is font as text, for example, you want a smiley face but not an image, you can use font-awesome to do it as a plain text.
at the end of the body add the javascript scripts
    <script src="https://cdnjs.cloudflare.com/ajax/libs/jquery/3.3.1/jquery.min.js"></script>
    <script src="https://cdn.steemjs.com/lib/latest/steem.min.js"></script>
            <script src="https://cdnjs.cloudflare.com/ajax/libs/socket.io/2.1.1/socket.io.js"></script>

    <script src="js.js"></script>
we're adding Jquery, SteemJS, Socket.IO and our js file.
Step 1.1 - Add Friend Form
we need to make a form to add friends into our SQL database.
<div class="add-friend">
<input type="text" class="form-control" id="friend-name" placeholder="steemit username (without @)" />
<button id="add-friend" class="btn btn-primary"><i class="fa fa-plus"></i> Addbutton>
</div>
<br>
we need only input text and button, at the CSS side we going to work on step 2.
so at the input text, we need the id friend-name to know that this is the friend name input,
at the button, we need the id add-friend so we can know which button the user pressed.
result -

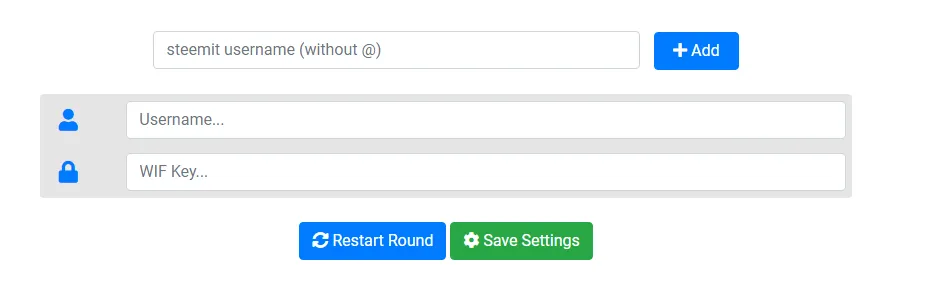
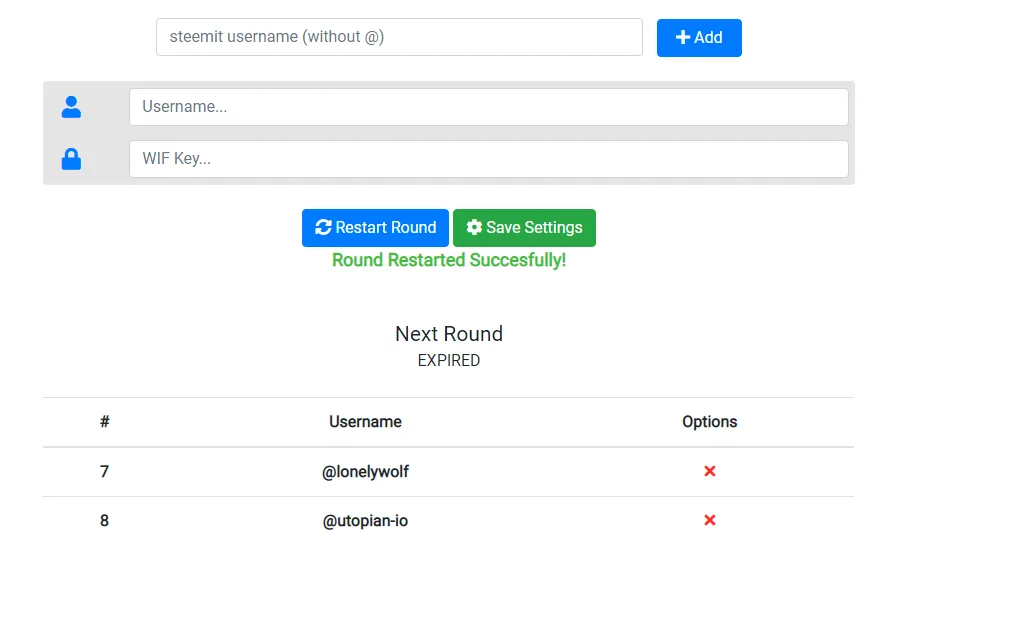
Step 1.2 - Settings Form
so we've done with the first form, now we need a settings form, at this form we need
- account username (the voter username)
- account private posting wif key (the voter wif key)
- round time
so we need 2 input texts, restart round button and save button.
<div class="settings">
<div class="text-input" style="border-bottom-left-radius:0; border-bottom-right-radius:0;">
<i class="fa fa-user"></i>
<input type="text" id="acc_name" placeholder="Username..." class="form-control" />
</div>
<div class="text-input" style="border-top-left-radius:0; border-top-right-radius: 0;">
<i class="fa fa-lock"></i>
<input type="password" id="acc_wif" placeholder="WIF Key..." class="form-control" />
</div><br>
<button class="btn btn-primary" id="restart-round"><i class="fa fa-sync-alt"></i> Restart Roundbutton>
<button class="btn btn-success" id="save-settings"><i class="fa fa-cog"></i> Save Settingsbutton><br>
<span class="label" id="settings-update">Settings Updated Succesfully</span>
</div>
<br>
again, the CSS step is only at step 2, so first, we have the username input text,
second the wif key input text,
then the restart round button and the save settings button.
At the end we have a span with the class label, we going to use it when we restart a round or saving the settings, default it will not be displayed on the page.
result -
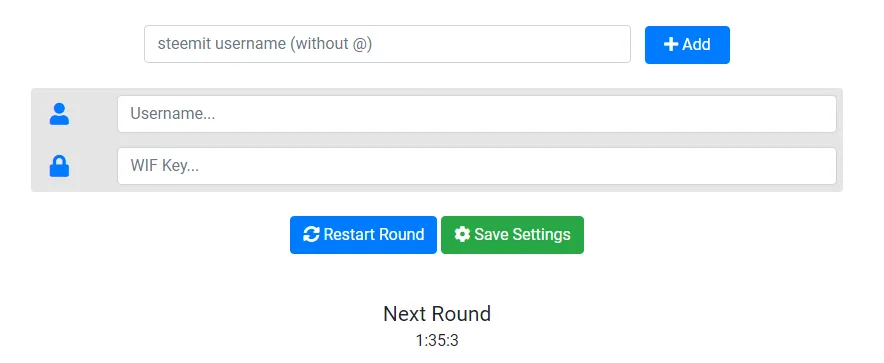
Step 1.3 - Round Timer & Friends List Table
- first, we're going to make the round timer.
<div class="next-round">
<span class="next_round">Next Round</span>
<span id="round-timer">00:00:00</span>
</div>
<br>
so the div class is next-round, inside we have a span with the class next_round and another span with the id round-timer
the round timer is "00:00:00" default but when we go into step 3 we're going to add js to this and it will countdown the time.
result (after js) -
- now we're going to work on the friends list table
<table class="table">
<thead>
<tr>
<th scope="col">#
<th scope="col">Username</th>
<th scope="col">Options</th>
</tr>
</thead>
<tbody>
</tbody>
</table>
here we're making a simple table with #-ID, Username-The Steemit Username,Options-Options Buttons(Delete)
Step 2.0 - Javascript, countdown the next round, Steem API
before everything, we want to use the HIVE api so we broadcast on the hive blockchain and not on steem blockchain!
steem.api.setOptions({ url: 'https://api.hive.blog' });
first, we'll make the actual countdown function
// Update the count down every 1 second
var x = setInterval(function() {
// Get todays date and time
var now = new Date().getTime();
// Find the distance between now and the count down date
var distance = countDownDate - now;
var hours = Math.floor((distance % (1000 * 60 * 60 * 24)) / (1000 * 60 * 60));
var minutes = Math.floor((distance % (1000 * 60 * 60)) / (1000 * 60));
var seconds = Math.floor((distance % (1000 * 60)) / 1000);
document.getElementById("round-timer").innerHTML = hours + ":"
+ minutes + ":" + seconds;
if (distance < 0) {
clearInterval(x);
document.getElementById("round-timer").innerHTML = "EXPIRED";
var newDate = addMinutes(120);
socket.emit("vote_round", newDate);
}
}, 1000);
first, we get the current time, then the distance the time we want to get (example 12:00) and now the time is 10:00, so the distance is 2 hours at date time JS.
then we calculating the hours, minutes and seconds.
then we change the HTML (the text) on round-timer span ID with hours:minutes: seconds, example: 2:30:15
then we check if the distance is 0 or less we make a restart for the round with socketIO
at the top of the script paste this var countDownDate = addMinutes(120); it will make the countDownDate variable for 2 hours from now (example: now the time is 10:30, so the variable will equal to 12:30)
addMinutes Function -
function addMinutes(minutes) {
return new Date().getTime() + minutes*60000;
}
simple enough, we take the minutes and add them to the current time.
60,000 milliseconds = minute.
Step 2.1 - sockets and functions
at this step we're going to make the sockets, I mean, we're going to take actions from the server and send actions to the server, at first we'll start with the actions we get from the server and the actions we send and at step 4 we're going to do that at the server-side.
at first, we're going to get the date that saved at the database.
socket.on("get_date_sql", function(date){
if(new Date().getTime() > date){
var newDate = addMinutes(120);
socket.emit("vote_round", newDate);
}else
countDownDate = date;
});
at the server side when the socket starts we're going to send the date time from the database to the js file and we're loading it to the round timer.
we're checking if the database date is less then the current time, example: DB time = 12:00 and the current time is 14:00
if it's true we're going to make a restart to the round and start a voting round (send the action to the server)
if it's false the variable countDownDate we'll be equal to the DB date.
- restart round
$("#restart-round").click(function(){
const dateNow = addMinutes(120);
socket.emit("update_round", dateNow);
});
very simple, we're sending the action to the server with the new date time, at the server side we're going to update it at the database.
- save settings
$("#save-settings").click(function(){
$acc_name = $("#acc_name").val();
$acc_wif = $("#acc_wif").val();
socket.emit("update_settings", {name: $acc_name, wif: $acc_wif});
});
again, pretty simple, we're getting the account name and wif key and send it to the server and at the server side updating it on the database.
- add friend
$("#add-friend").click(function(){
$name = $("#friend-name").val();
socket.emit("add_friend", $name);
});
we're getting the name from the input text and sending an action to the server, at the server side we're updating the database.
- update timer
socket.on("update_timer", function(date){
countDownDate = date;
$("#settings-update").html("Round Restarted Succesfully!");
$("#settings-update").css("color", "#3bc13b");
$("#settings-update").slideToggle(300);
setTimeout(function(){$("#settings-update").slideToggle(300);}, 3000);
});
at this time we're getting action from the server, the variable countDownDate will be equal to the date from the server,
then we're updating the settings update label and fade it out after 300ms.
- add a friend to list
socket.on("add_friend_to_list", function(data){
var html = ''+data.id+' @'+data.name+' again we're getting action from the server, here it's really easy.
we're making a variable with the HTML data, check it out to get a better look on it.
then we append the variable to the table.
- delete user
socket.on("deleteuser", function(id){
$("#row-"+id).remove();
});
function deleteUser(id){
socket.emit("deleteuser", id);
}
agagin action from the server, at this time we're just deleting a row from the table, this is the reason for the row-id at the add friend to list function.
we're using the function at the delete button on the table, if you didn't saw check out the html
<tr id="row-'+data.id+'"><th scope="row">'+data.id+'</th> <th>@'+data.name+'</th><th><button id="delete" onclick="deleteUser('+data.id+')" class="delete"><i class="fa fa-times"></i></button></th></tr>
- settings updated / failed
socket.on("settings_updated", function(){
$("#settings-update").html("Settings Updated Succesfully!");
$("#settings-update").css("color", "#3bc13b");
$("#settings-update").slideToggle(300);
setTimeout(function(){$("#settings-update").slideToggle(300);}, 3000);
});
socket.on("settings_failed", function(){
$("#settings-update").html("Settings Update Failed!");
$("#settings-update").css("color", "#ff2e2b");
$("#settings-update").slideToggle(300);
setTimeout(function(){$("#settings-update").slideToggle(300);}, 3000);
});
just a simple text with fading in and out.
Step 3 - Setup The Database
note: I'm using XAMPP for the mysql service (and PHPMyAdmin).
first, go to your phpmyadmin localhost/phpmyadmin this is the default URL.
create a new database with the name friend_list
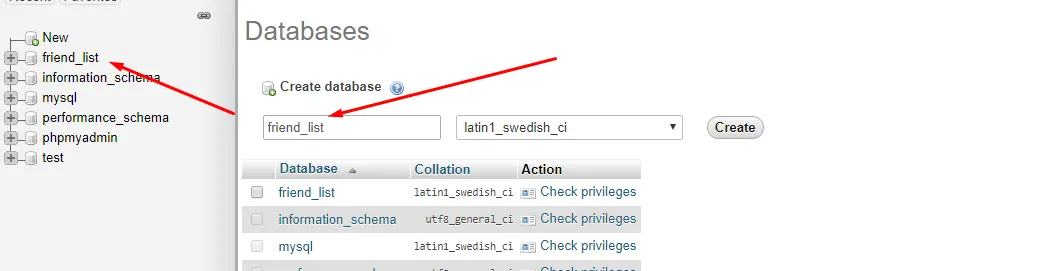
and create 2 tables, first - settings
at settings, you need acc_name, acc_Wif and date
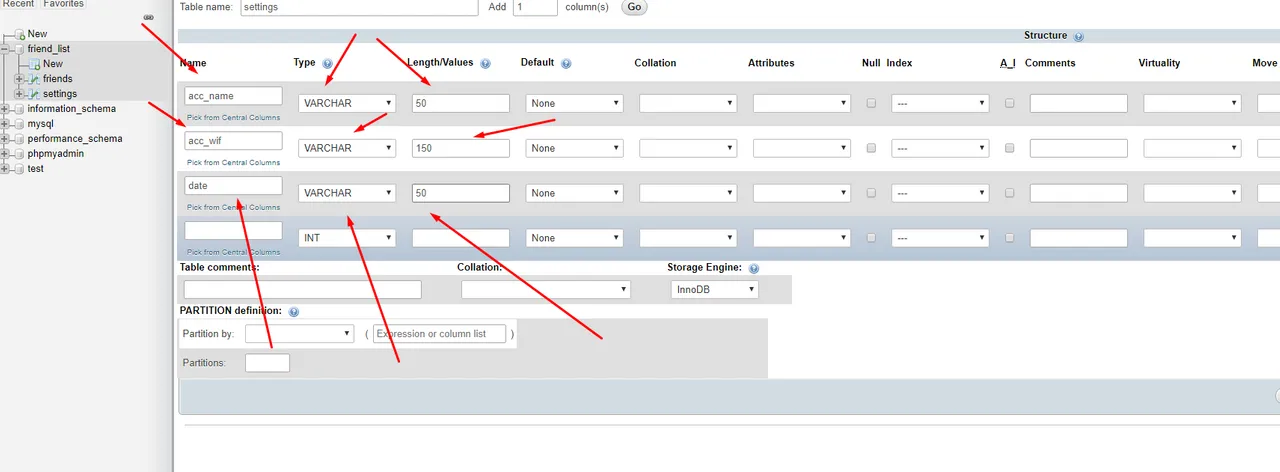
the second table is friends
you need only id and username, the id will be A_I it means that it will be filled automatically

and for this part, we have done.
Step 4.1 - Server Side (Setting Up The Server)
first, we're going to set up the server
install the packages we're going to use:
npm install steem-js-patched socket.io path express mysql --save
const steem = require('steem-js-patched'),
fs = require('fs'),
path = require('path'),
express = require('express'),
socket = require('socket.io'),
mysql = require('mysql'),
port = 8000;
steem.api.setOptions({ url: 'https://api.hive.blog' }); // Setting up the API to HIVE api
you need all those packages to be installed on your node(npm) system and the API of the hive to broadcast to the hive blockchain.
//App setup
var app = express();
var server = app.listen(port, function () {
console.log("listening to port " + port);
console.log("script is running...");
});
var io = socket(server);
here we're making the app variable, this is the basic server using express, then we're listening to the port (port=8000) so we can connect to the server from the web browser.
then we're making a connection with the socket.io with the server variable.
Step 4.2 - Database Connection
first, we're going to make an array with the database name, password, username, and host.
//MySQL setup
const config = {
"host": "localhost",
"user": "root",
"password": "",
"base": "friend_list"
};
now we just need to make the connection with the information.
var db = mysql.createConnection({
host: config.host,
user: config.user,
password: config.password,
database: config.base
});
db.connect(function (error) {
if (!!error)
throw error;
console.log('mysql connected to ' + config.host + ", user " + config.user + ", database " + config.base);
});
at first, we're making a variable called db we're going to using it on the script a lot, this function making the connection with the mysql database.
then we're connecting the database with the script (db.connect)
Step 4.3 - Functions
- vote function
//Vote Post Function
function streamVote(ACC_NAME, ACC_KEY, author, permalink, weight) {
weight = weight * 1000;
steem.broadcast.vote(ACC_KEY, ACC_NAME, author, permalink, weight, function(err, result) {
if(err) return console.log(err);
else
return console.log('Voted Succesfully, permalink: ' + permalink + ', author: ' + author + ', weight: ' + weight / 100 + '%.');
});
}
same as the latest tutorials, we get the user, wif, author, permlink and weight and broadcast it through the broadcast. vote function from steemjs
Step 4.4 - server side sockets
first, we need to make a connection with the socket.io from the client to the server.
io.on('connection', function (socket) {
console.log("socket connected!");
});
simple enough we check when the connection started and sending a comment to the console.
- load friend list + load date time
socket.on("load_list", function(){
db.query("SELECT * FROM `friends`", function(error, result){
if(!!error)
throw error;
result.forEach(function(res){
socket.emit("add_friend_to_list", {id: res.id, name:res.Username});
});
db.query("SELECT * FROM `settings`", function(err, res){
if(!!err)
throw err;
if(res[0].date)
socket.emit("get_date_sql", res[0].date);
});
});
easy enough, we're making a query that loads the list of the users from the database and then adding them to the table on the client-side.
then we're getting the date-time from the settings database and send it to the client-side.
- add a friend to the database
socket.on("add_friend", function(name){
db.query("INSERT INTO `friends`(`Username`) VALUES(?)", [name], function(err, res){
if(!!err)
throw err;
console.log(res);
db.query("SELECT * FROM `friends` WHERE `Username`=?", [name], function(error, result){
if(!!error)
throw error;
socket.emit("add_friend_to_list", {id: result[0].id, name:result[0].Username});
});
});
});
simple enough we're making an insert to the friends table on our database with the username that we get from the client-side and update it on the database and on the client-side table.
- delete a friend from the database
socket.on("deleteuser", function(id){
db.query("DELETE FROM `friends` WHERE `id`=?", [id], function(err, res){
if(!!err)
throw err;
console.log(res);
socket.emit("deleteuser", id);
});
});
again really simple we're just deleting the row from the table and then we're deleting the row from the table at the client-side.
- update round (restart round)
socket.on("update_round", function(dateNow){
db.query("UPDATE `settings` SET `date`=?", [dateNow], function(err, res){
if(!!err)
throw err;
console.log(res, dateNow);
socket.emit("update_timer", dateNow);
});
});
really simple, we're updating the date at the setting table and restarting the timer on the client side to the new date.
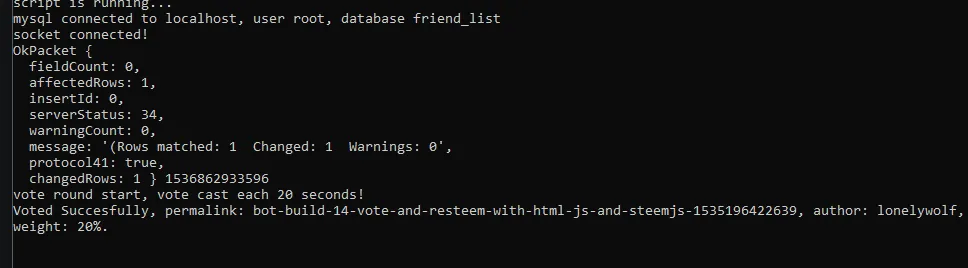
- vote round
socket.on("vote_round", function(date){
db.query("UPDATE `settings` SET `date`=?", [date], function(err, res){
if(!!err)
throw err;
console.log(res, date);
socket.emit("update_timer", date);
});
db.query("SELECT * FROM `friends`", function(err, result){
if(!!err)
throw err;
console.log("vote round start, vote cast each 20 seconds!");
var time = 1;
db.query("SELECT * FROM `settings`", function(err, ress){
result.forEach(function(res){
setTimeout(function(){
if(!!err)
throw err;
steem.api.getDiscussionsByBlog({tag: res.Username, limit: 1}, function(err, result){
streamVote(ress[0].acc_name, ress[0].acc_wif, result[0].author, result[0].permlink, 2);
});
}, (time+=20)*1000);
});
});
});
});
first, we're making an update to the date (timer) as we did at the update round socket.
then we're getting the friend list from the database and making a loop that goes on every user, we're making a 20 seconds vote per user so all the votes will be cast successfully because there is a limit for 1 vote per 20 seconds with steemjs.
- update settings
socket.on("update_settings", function(data){
db.query("SELECT * FROM settings", function(err, res){
if(!!err)
throw err;
if(!res[0]){
db.query("INSERT INTO `settings`(`acc_name`, `acc_wif`) VALUES(?, ?)", [data.name, data.wif], function(errr, ress){
if(!!err)
throw err;
console.log(ress);
socket.emit("settings_updated");
});
}else{
db.query("UPDATE `settings` SET `acc_name`=?, `acc_wif`=?", [data.name, data.wif], function(errr, ress){
if(!!errr)
throw errr;
console.log(ress);
socket.emit("settings_updated");
});
}
});
});
first, we're getting the settings and check if there are any settings inside if there is we're going to make an update to the table if there's nothing inside the table we're going to insert the details to the table.
And here we're done
we did all of that to get this result
Hope I helped you if you have any suggestions for the next tutorials leave a comment and upvote!
thanks a lot, have a good day!
Download The Files
you can download the files from google drive Here
You will need to setup the Hive api to make it work on hive
steem.api.setOptions({ url: 'https://api.hive.blog' });
with that code line in client & server side
Have a good day!