
Hello everybody, already have a nice Weekend? Time to play Splinterlands again after EOS and make another post for the Splinterlands contest Battle Mage Secrets Challenge. This Week theme for this event is What Doesn't Kill You ruleset.
This is my EOS Chest not great but not bad either, enough to boost my spirit to keep playing Splinterlands 😇:

I play in the Modern Format, Champion League, using my scholar account from Balthazar. This is their Discord if u want to join, but u must waitlist first because right now the scholar is full. I'm very happy now I got a 260k SPS delegation from Balthazar for my scholar account.

Battle Link
If you want to watch the full battle link, click Here.
Video link :

Ruleset

- Healed Out, all healing abilities from summoners and monsters are removed.
 What Doesn't Kill You, all monsters have Enrage ability.
- Enrage ability: Has increased Melee attack and Speed when HP is decreased, for range and magic it only increases speed.
 Mana cap.
 Can use element Fire, Water, and Death.
My Lineup and strategy
- For the What Doesn't Kill You ruleset, I will focus on using the melee monster as an attacker, because we get the benefit of Damage and Speed increase if the HP is decreased.
We will boost the melee damage first using the Inspire ability it makes the Enrage status bring greater damage. Enrage multiplies damage and speed by 1.5x round up.
In this battle, we will use the Water element because has a good melee monster with Sneak and Opportunity abilities. We have a great tanker who can handle all types of attacks from Melee, Range, and especially magic attacks.
| Summoner or monster | Abilities | Description |
|---|---|---|
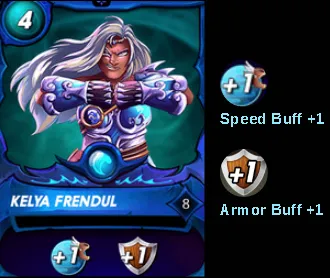 | Summoner Have Speed and armor buff +1 to our friendly monsters | With additional armor, the enemy melee and range attacker need to destroy the armor first before can decrease our HP. The increased speed will increase the chance to attack first and hit the enemy, and hope can kill the enemy before they can attack us. The chance to evade the enemy attack will increase with high speed. |
 | Baakjira, 1st position, Tanker. Has the ability Void, Slow, Strengthen, and Heal. | This monster is capable of defending against melee, ranged, and magical attacks. It has a high amount of health points, along with valuable abilities such as Void (reducing magic damage by 50%), Strengthen (increasing the HP of all allied monsters by 1), and Slow (reducing enemy speed by 1). In this battle The Heal ability is disabled, so it's weaker than usual. |
 | Deeplurker 2nd position, attacker. Has the ability to Opportunity, Poison, and Demoralize. | This monster has impressive offensive capabilities, great damage of 5, and a speed of 4. It can attack from any position because has an ability Opportunity, which allows it to target the enemy monster with the lowest HP. This monster has the ability to inflict Poison, causing the affected enemy's HP to decrease by 2 each round, Moreover, its Demoralize ability reduces all melee attacks from the enemy by 1. Placing this monster in 2nd position because I think Baakjira in the 1st position is a strong defensive monster, so this position will be safe enough from the enemy attack temporarily. |
 | River Hellondale, 4th position, attacker and support. Has the ability resurrect, Inspire, and Dispel. | Put this monster in the 3th position, because I think it's safe enough in here, this monster is weak against any attack. We use this monster mainly because of the 2 abilities he has Resurrect and Inspire. The support ability resurrect will Resurrect the Wave Brood (this is our perfect plan if the enemy does not kill another monster first) if that monster dies, giving more time to our attacker monster to destroy the enemy monster. Inspire will increase our main attacker the melee monster damage by 1 with the effect What Doesn't Kill You Ruleset the boost will be greater. If the enemy monster is hit by this monster, the Dispell ability will clear all positive status effects in the enemy monster. |
 | Uraeus, 4th position, attacker. Has the ability Sneak, and Poison. | Use this monster because of the Poison ability (if inflicted on the enemy will decrease their HP every round**. Will cooperate with Pelacor Bandit to attack the enemy monster in the last position with Sneak ability. This monster defense capability is not great, this position I think will be safe from the enemy attack. |
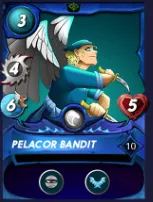 | Pelacor Bandit, 5th position, attacker. Has the ability Sneak, and Flying. | This is our main attacker who has fast speed, great damage, and Flying ability (increases the chance to evade melee and ranged attacks by 25%) with this ability I hope can evade some attacks. This monster will attack the enemy monster in the last position because has Sneak ability. Put in this position as a tanker if the enemy brings monsters with Sneak ability. |
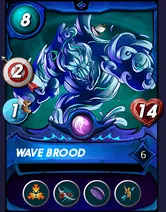 | Wave Brood, 6th position, attacker and tanker. Has the ability Taunt, Close Range, Void, and Return Fire. | With this monster's Taunt ability, we can split/share the damage between Baakjira and this monster. Wave Brood Return Fire capable of reflecting damage back to any ranged monster that attacks it. The monster's Taunt ability ensures that enemy monsters will attack this monster if they can. Although Wave Brood is typically a ranged attacker, its Close Range ability allows it to attack even when positioned in the first slot. |
The Battle

- Round 1:
As usual, the battle starts with buffs and debuffs from both sides.
Kulu Mastermind attacks our Baakjira, while other enemy monsters attack our Wavebrood.
No monsters died in this round, it can be seen that the monsters' attacks after being buffed by River Hellondale were much stronger than the enemy monsters. The enemy's total attack is 11 while our monster has a total attack of 20, even though the enemy carries the armor reducing monster Clockwork Alde but the enemy cannot attack our attacking monster because of Wave Brood. Our Pelacor Bandit and Uraeus focus on attacking Swamp Spitter, while Deeplurker attacks Clockwork Alde the enemy monster that has the smallest HP. River Hellondale attacks the enemy monster Kulu Mastermind which is weak to magic, after receiving an attack from River Hellondale the Kulu Mastermind activates Enrage the Damage increases from 3 to 5, and the speed from 4 to 8.


- Round 2:
In this round, the enemy monster Swamp Spitter was killed by our Pelacor Bandit. All enemy monsters continue to attack Wave Brood leaving only 2 HP remaining at the end of the round. Meanwhile, our Deeplurker continued to attack the enemy monster Clockwork Alde and managed to destroy its armor with only 2 HP remaining. Our monster Uraeus attacks Musa Saline and destroys his armor.

- Round 3:
At the start of the round, Pelacor Bandit our monster with the highest speed immediately attacks Musa Saline and kills him. Meanwhile, our monster Deeplurker killed Clockwork Alde. With the death of Clockwork which has the ability Rush (removes 2 enemy armor) our armor reappears. River Hellondale kills the enemy monster Kulu Mastermind. The enemy's Venator Kinjo advances to the first position. Only 2 enemy monsters left in this round versus our 6 monsters. Victory will certainly be ours.

- Round 4:
Pelacor Bandit and Uraeus attacked Runi and managed to kill him, with his Rebirth ability coming back to life. Runi was attacked by Deeplurker and destroyed his armor. Meanwhile Venator Kinjo who received an attack from River Hellondale finally died at the hands of Wave Brood. Runi advanced to first place and finally died in the 5th round attacked by Pelacor Bandit. With the death of Runi victory is on our side.
Did your Strategy Work?
Our strategy to break up/split the damage from the enemy to our tankers Baakjira and Wave Brood was quite successful. Even though we couldn't heal, these 2 monsters were enough to buy time so our attacking monsters were free to kill the enemy monsters behind one by one. Unfortunately, we cannot optimize the What Doesn't Kill You Ruleset, because the enemy monsters don't have a chance to attack our melee monsters' HP, which makes the Enrage status, is not active.
Analyze The Enemy Strategy
If you look at the enemy formation maybe because we can't Heal, he thinks we will use the Combo Diemonshark and Flying Squid so the enemy use the tanker Kulu Mastermind which has the Shield ability (range and attack). melee reduced by 50%). If we use Diemonshark, Musa Saline will destroy all his armor with 1 attack and will easily be killed by the enemy.

Thank you, my friend, for taking the time to review my battle report. I appreciate your efforts and would be grateful if you could provide me with feedback on any mistakes you find by leaving a comment.
If you are new and want to try this fantastic strategy card battle game feel free to use my referral code https://splinterlands.com?ref=poplar-22 to join.
Credit
- Thumbnail using Canva.
- Divider took from @kyo-gaming.
- Card description, Image, and graphic were taken from https://Peakmonsters.com and https://Splintercards.com