
Hello all Splinterlands players we meet again, I want to write another post in Splinterlands Community in order to join this contest Battle Mage Secrets Challenge. This Week Theme is Fog of War Ruleset.

The guide presents a strategy on how to advance through the ranks by utilizing reasonably priced or cheap-to-rent monsters that can still prove effective. So no Expensive card to rent in my guide.
I play in modern format, Diamond League, using my scholar account from Balthazar.

Battle Link
If you want to watch the full battle link you can click Here.
For the video :

Ruleset

From left to right :
- Healed Out, All healing abilities are removed from Monsters and Summoners.
- Are you not Entertained, one additional Gladius card can be used in this battle.
- Fog of War, monster lose the Sneak, Snipe, and Opportunity ability.
- Sneak ability, targets the last Monster on the enemy team instead of the first Monsters.
- Snipe ability, targets enemy Monsters with Ranged, Magic, or no attack that are not in the first position.
- Opportunity ability, monsters with the Opportunity ability may attack from any position and will target the enemy Monster with the lowest health.
- Mana Cap 53.
- Can use water element.
My Lineup and strategy
With only 1 element, and the Fog of War ruleset, we can predict that our strategy and the enemy will be the same, we will focus fire on attacking the monster in first position. The enemy for sure will bring magic or range-type monsters because no melee monster can attack from positions 3-6.
To ensure that our monster in the first position can hold long enough, we need to split the damage with other monsters we have.
In conclusion, we need a good tanker, we need to split the enemy damage to another monster we have and bring monsters who have high damage. Make sure not to bring any healer because of the Healed Out ruleset.
| Summoner or monster | Abilities | Description |
|---|---|---|
 | Kelya Frendul, Give armor and speed +1 to all friendly monsters. | The ability of this monster is very useful in this battle, armor will be great against the enemy monster with range attack, they need to destroy our monster's armor first before decreasing our monster's HP. high speed will make sure we can attack first, and increase the chance to hit and evade enemy-range and melee monsters. |
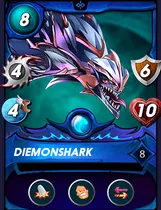 | Diemonshark, 1st position, attacker and tanker. Has the Ability Trample, Enrage, and Retaliate. | This monster has high armor, HP, and good speed, suitable to become a tanker, Enrage ability will increase the damage and speed which is already high enough, to activate enrage ability of the monster's HP needs to be decreased. The Retaliate ability is a dangerous ability when facing the melee monster it has a chance of 50% that this monster will counterattack the attacker. If the enemy we attacked dies then with Trample's ability this monster will attack the monster behind. |
 | Flying Squid, 2nd position, attacker and 2nd tanker. Has the ability Reach, Blind, and Backfire. | This monster's Armor and attack are not as high as Diemonshark, but he can attack from 2nd position with Reach ability. The support ability Blind is very useful because give all friendly monster a 15% increase in chance to evade melee and range monster attack. The backfire ability will be active when the melee/range monster attacks Flying Squid and miss, it will hit back with 2 damage. |
 | Venari Crystalsmith, 3rd position, Attacker and Support. Has the ability Protect and Dispel | Protect ability will add +2 armor to all of our monsters, and Dispel will disable all positive buff from the enemy in the first position, this will weaken the enemy and make our monster can kill it faster. |
 | River Hellondale, 4th position, attacker and support. Has the ability resurrect, Inspire, and Dispel. | Put this monster in the 4th position, because I think it's safe enough in here, at least until Venari Wavesmith dies, this monster is weak against any attack. We use this monster mainly because of the 2 abilities he has Resurrect and Inspire. The support ability resurrect will resurrect the Wave Brood if that monster dies, giving more time to our attacker monster to destroy the enemy monster. Inspire will increase our melee monster damage by 1. It has the same ability as Venari Crystalsmith Dispell. |
 | Nerissa Tridawn, 5th position, attacker. No ability. | This monster is our main attacker, with high magic damage of 5, we put it in 5th position to make sure it's safe until the end. |
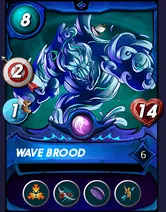 | Wave Brood, 6th position, attacker and tanker. Has the ability Taunt, Close Range, Void, and Return Fire. | With this monster's Taunt ability, we can split/share the damage between the monster in first position and this monster. Wave Brood provides an enhanced level of protection against ranged and magical attacks through its abilities. With Return Fire it is capable of reflecting damage back to any ranged monster that attacks it. Additionally, its Void ability reduces the damage taken from magical attacks by half. The monster's taunt ability ensures that other monsters prioritize attacking this monster if they can. Although Wave Brood is typically a ranged attacker, its Close Range ability allows it to attack even when positioned in the first slot. |
The Battle

- Round 1:
Started with Buff and Debuff from both sides.
In this round, we can see that all of our monsters attack the enemy in 1st position. Venari Crystalsmith dispel the enemy Gargoya Lion buff speed and strengthen, The speed decreased but strangely the HP not decreased. The Enrage buff can't be dispelled though. Our Diemonshark activated Retaliate ability when attacked by the Gargoya lion kill it, activated the Trample ability, and immediately attack the enemy Legionnaire Alvar. We can see in this round the enemy Tatiana Blayde range attack miss when attacking the Wave Brood although has higher speed, because of the Blind ability from our Flying Squid.

- Round 2:
In this round, Legionnaire Alvar dies attacked by our Venari Crystalsmith. After the Legionnaire Alvar dies it's easy to kill the next monster, the enemy Tatiana Blayde it's more attacker type than a tanker, and easy to die when being attacked. It dies killed by our River Hellondale. In this round, we can see the effect of the ability Blind again, although the enemy Supply Runner has higher speed than the Wave Brood but the attack can't hit it.

- Round 3:
Not much the enemy can do in this round, the enemy only has 3 monsters :- Gargoya Devil was killed by our Venari Crystalsmith.
- Supply Runner was killed by our Diemonshark, who activated the Trample ability and attacked the next monster Runi.
- Runi die attacked by our River Hellondale, but with his ability Resurrected again but then kill again by our Flying Squid.
With the dead of Runi victory is ours.
Did your strategy work?
Yes, it works, none of our monsters died, and our two tankers Diemonshark and Wave Brood remained alive until the end of the battle. Judging from the monsters equipped by the enemy it seems he thought we would be using a lot of monster magic, actually, his guess wasn't wrong, we brought quite a number of magic type monsters. But apart from that we also bring monsters that have the ability Taunt Wave Brood, so that the enemy's damage is split into 2, while their tankers Gargoya Lion and Legionnaire Alvar are not strong enough to withstand attacks from all of our monsters, we can quickly kill the enemy tanker monsters and reduce their attack ability, leaving only attack monsters type that are easy to kill.
Thank you, my friend, for taking the time to review my battle report. I appreciate your efforts and would be grateful if you could provide me with feedback on any mistakes you find by leaving a comment.
If you are new and want to try this fantastic strategy card battle game feel free to use my referral code https://splinterlands.com?ref=poplar-22 to join.
Credit
- Thumbnail using Canva.
- Divider took from @kyo-gaming.
- Card description, Image, and graphic were taken from https://Peakmonsters.com and https://Splintercards.com