Saludos queridos amigos de la comunidad Hive DIY!
Espero se encuentren muy bien, muy pronto estaremos celebrando la navidad de antemano les deseo que la pasen muy feliz y en familia; por este motivo me anime a realizar una segunda tarjeta navideña, creo que estoy un poco obsesionada con este tipo de tarjetas que tienen algún truco, juego o movimiento y la de esta ocasión, la hice precisamente para realizar un tipo de tarjeta que tenia un tiempo en lista, es bastante sencilla les explicare el procedimiento, espero sea de su agrado.
Greetings dear friends of the Hive DIY community!
I hope you are very well, very soon we will be celebrating Christmas in advance I wish you a very happy and family time; for this reason I was encouraged to make a second Christmas card, I think I'm a little obsessed with this type of cards that have some trick, game or movement and this time, I did it precisely to make a type of card that had a while in list, it is quite simple I will explain the procedure, I hope you like it.
Materials:
White cardboard
Pencils
Rulers
Compass
Scissors
Glue
Colored paper or patterned paper
Colors or markers
Materiales:
Cartulina blanca
Lapices
Reglas
Compás
Tijeras
Pegamento
Papeles de colores o papeles estampados
Colores o Marcadores
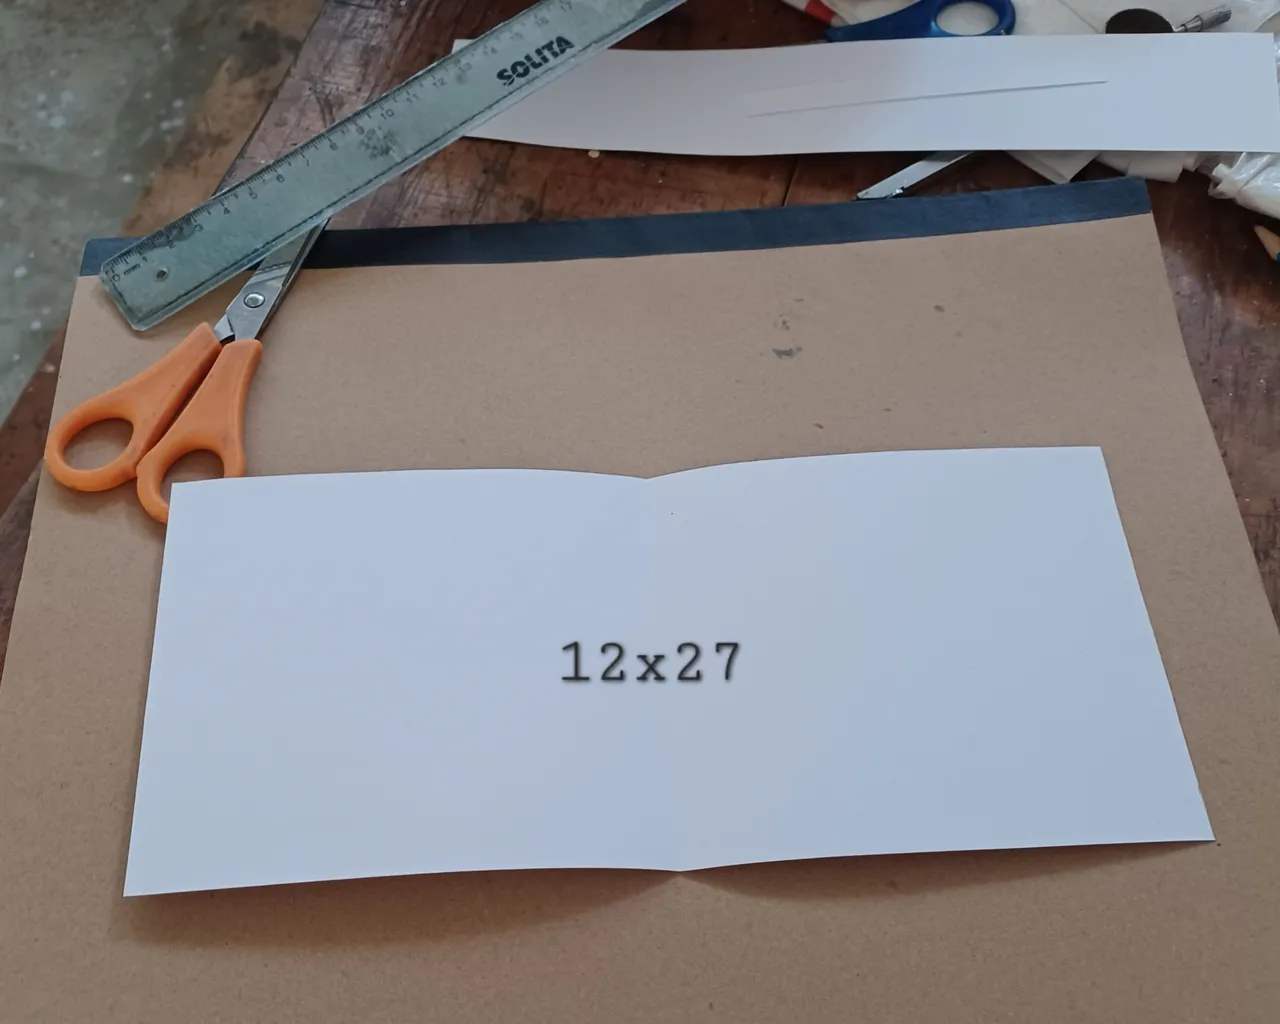
El primer paso para la creación de esta tarjeta es recortar un rectángulo de 12x27 centímetros en la cartulina blanca, hecho esto se dobla a la mitad por el lado mas largo de la cartulina para obtener el cuerpo de la tarjeta.
The first step for the creation of this card is to cut a 12x27 centimeters rectangle in the white cardboard, then fold it in half on the longest side of the cardboard to obtain the body of the card.
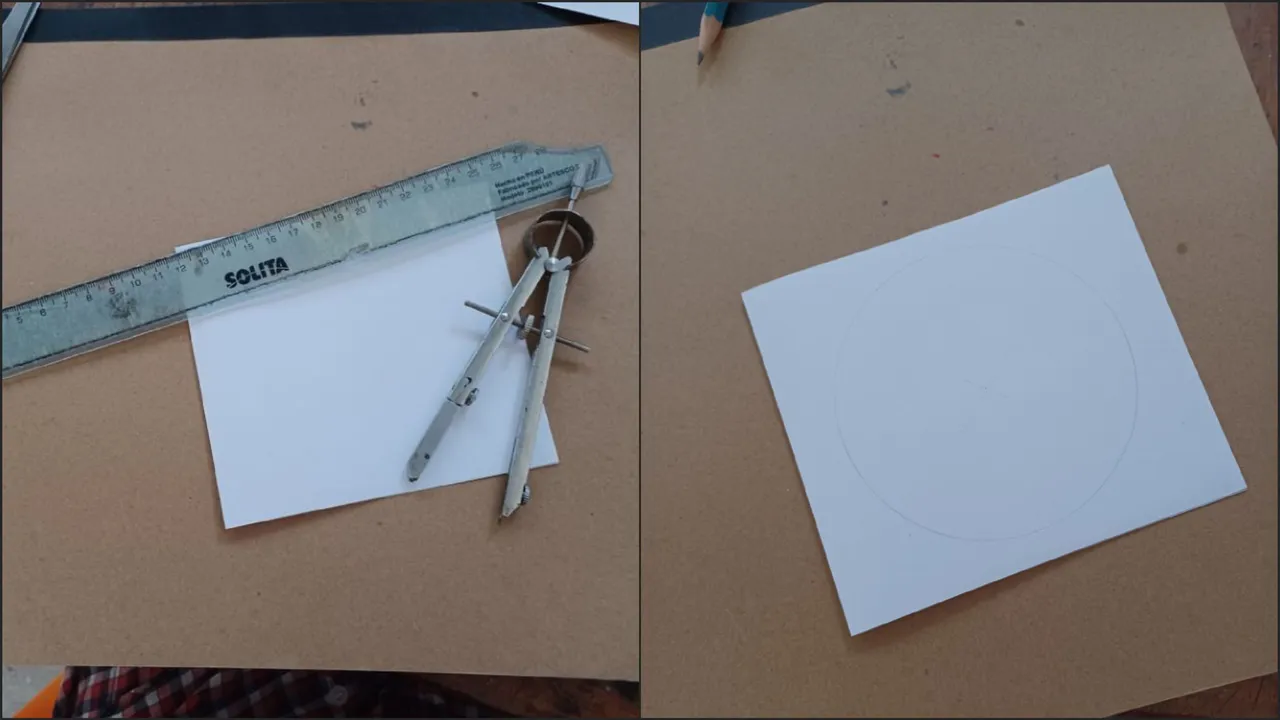
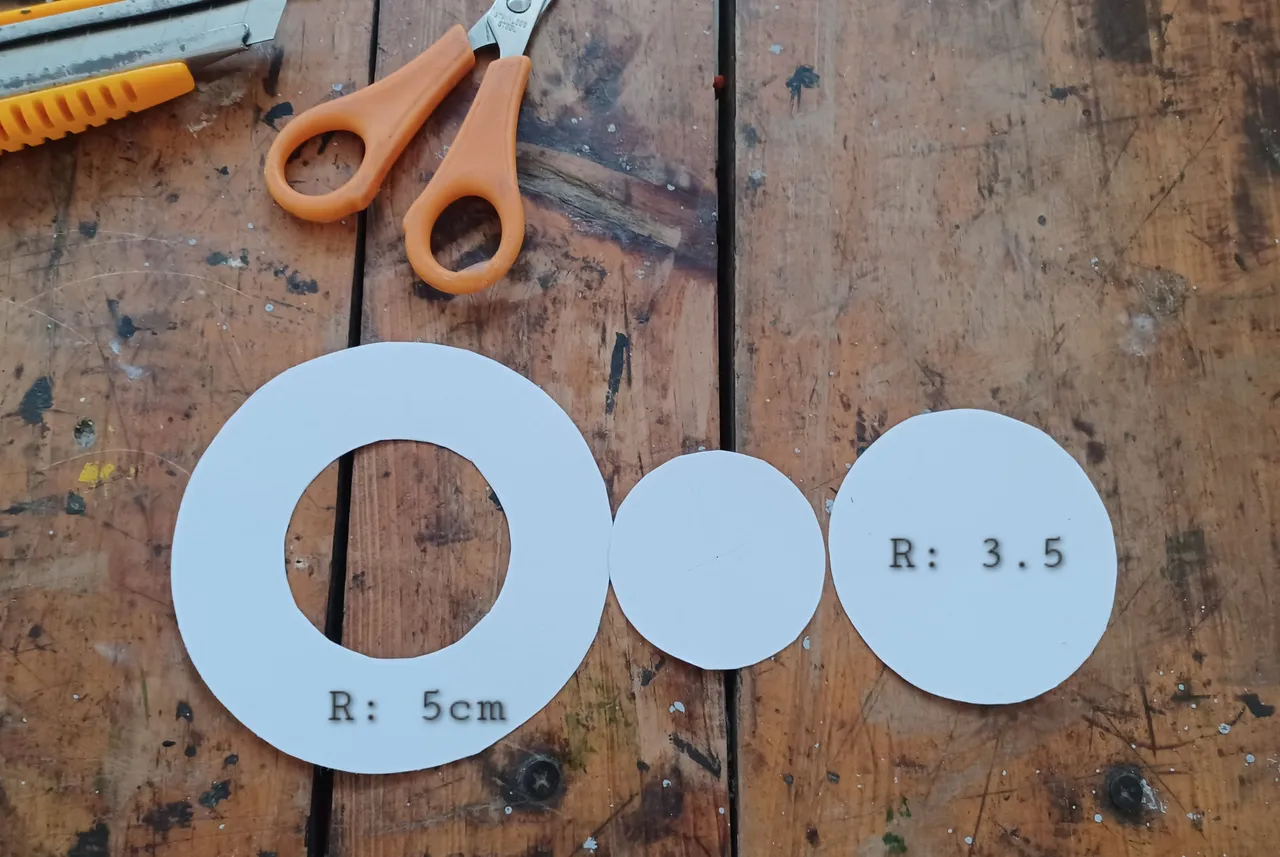
A continuación usando la regla ubique el centro del papel y marque un circulo con el compás con un radio de 5cm para un diámetro total de 10cm, esta cara sera la parte frontal de la tarjeta.
Then using the ruler locate the center of the paper and mark a circle with the compass with a radius of 5cm for a total diameter of 10cm, this face will be the front of the card.
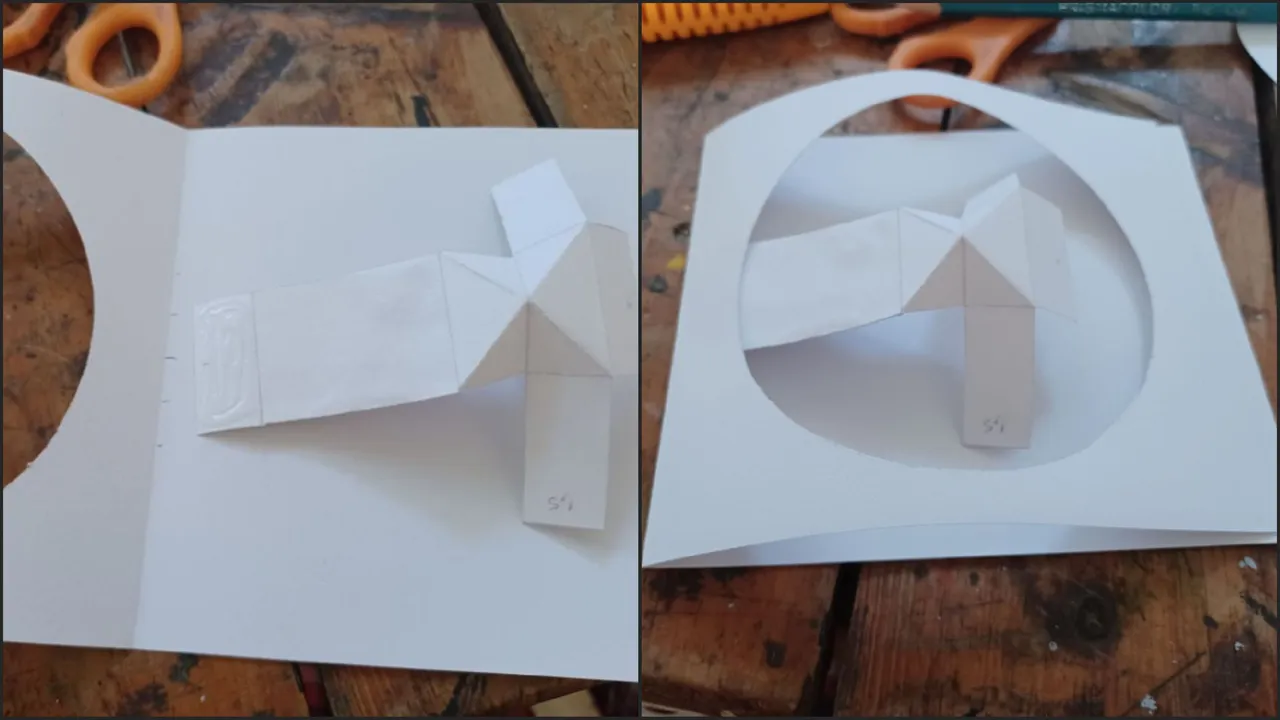
A continuación procederé ha hacer el mecanismo interno que hace girar la parte interna, para ello emplee nuevamente un pedazo de cartulina en el cual hice las siguientes medidas resultando en un rectángulo de 9x9.5cm; los recuadros que tienen una fueron recortados, mas adelante mostrare la forma resultante.
Next I will proceed to make the internal mechanism that rotates the internal part, for this I used again a piece of cardboard in which I made the following measures resulting in a rectangle of 9x9.5cm; the squares that have a were cut, later I will show the resulting shape.
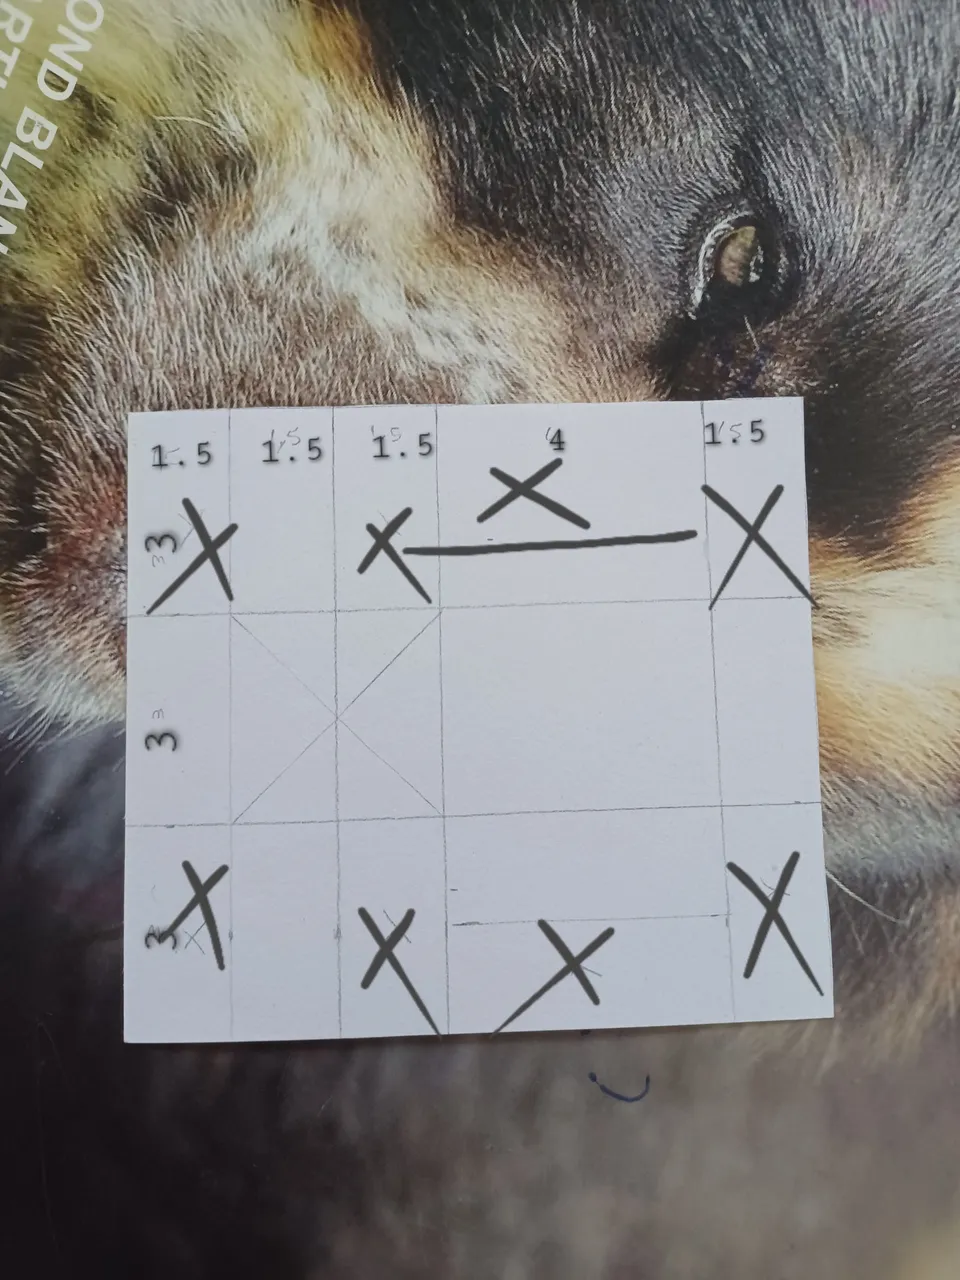
Una vez hecha esta pieza, se procede a doblar por cada una de las lineas todas en un mismo sentido.
Once this piece is made, proceed to fold each of the lines all in the same direction.
En la parte central de la pieza marcamos una "X" esa la doblaremos como se muestra en la imagen, dejando dos de las pestañas ocultas en la parte posterior.
In the central part of the piece we mark an "X" that we will fold as shown in the image, leaving two of the tabs hidden in the back.
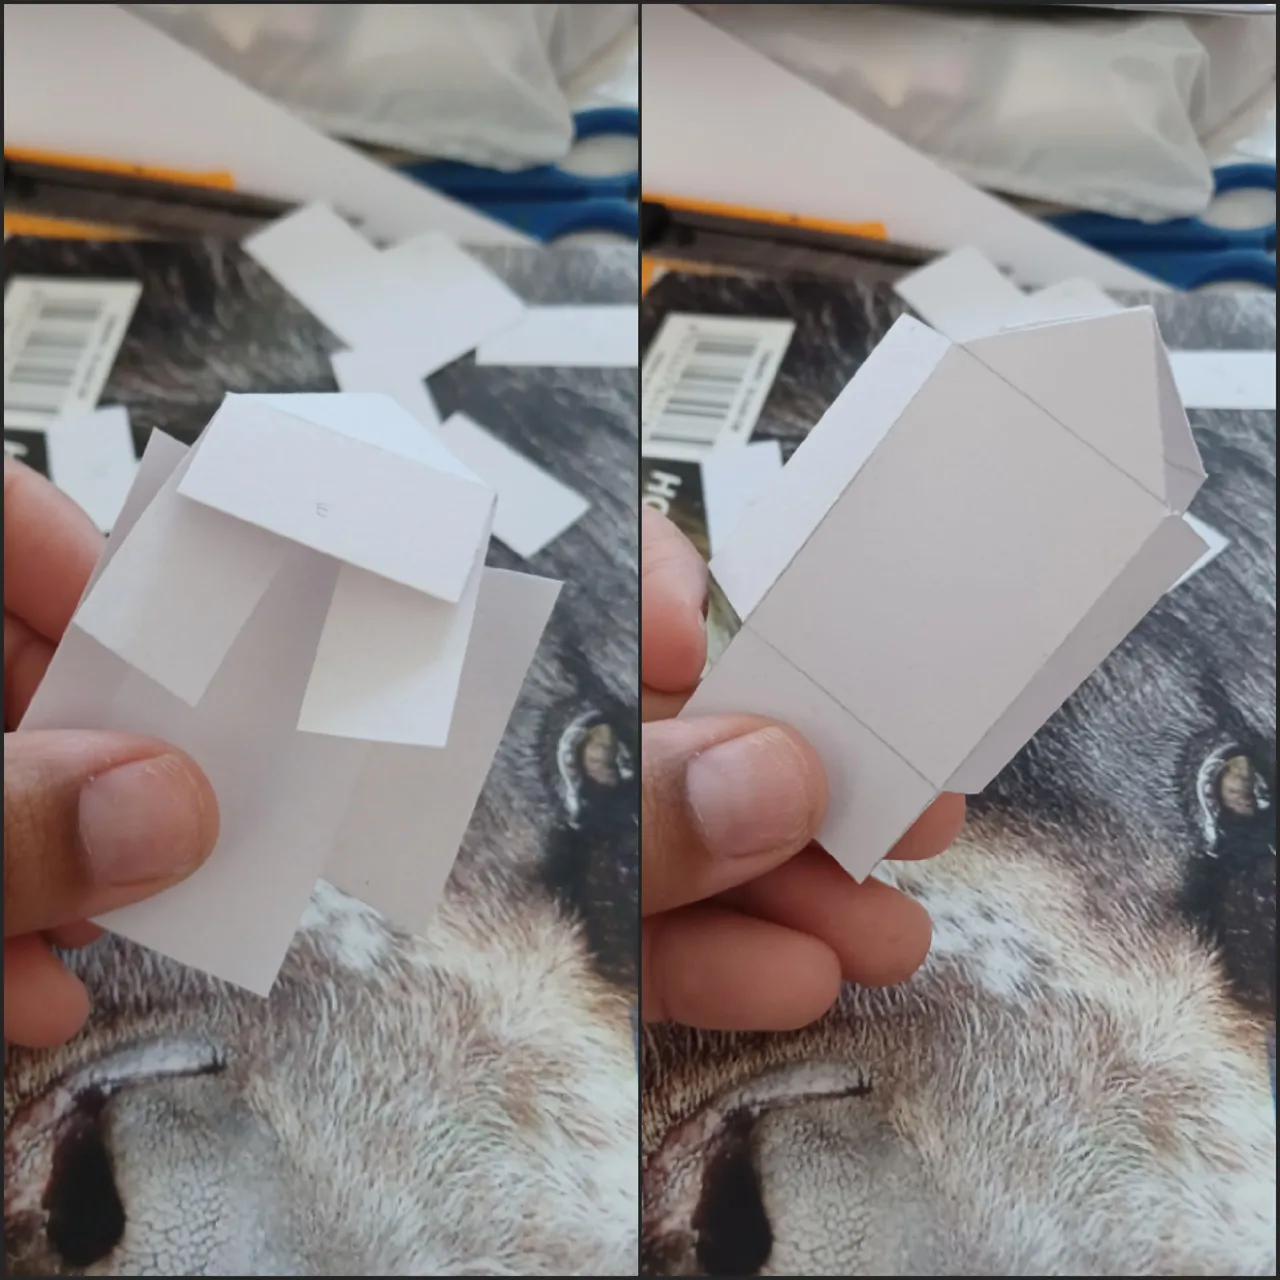
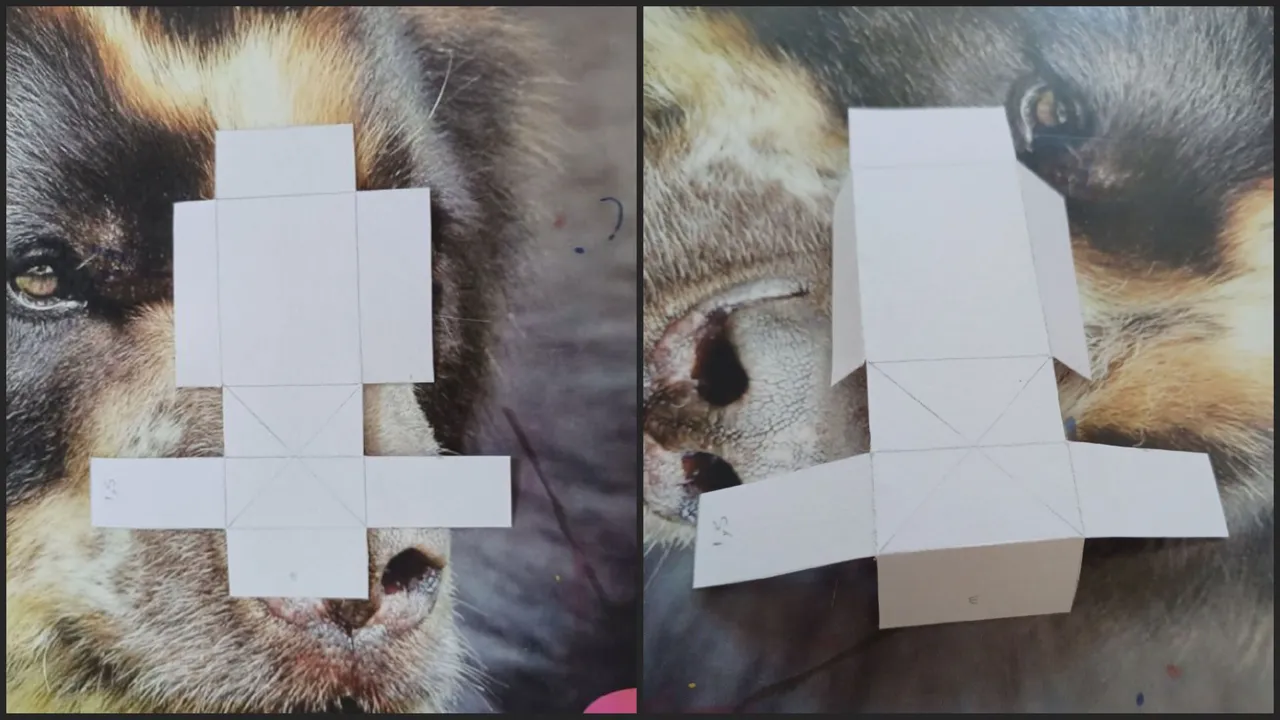
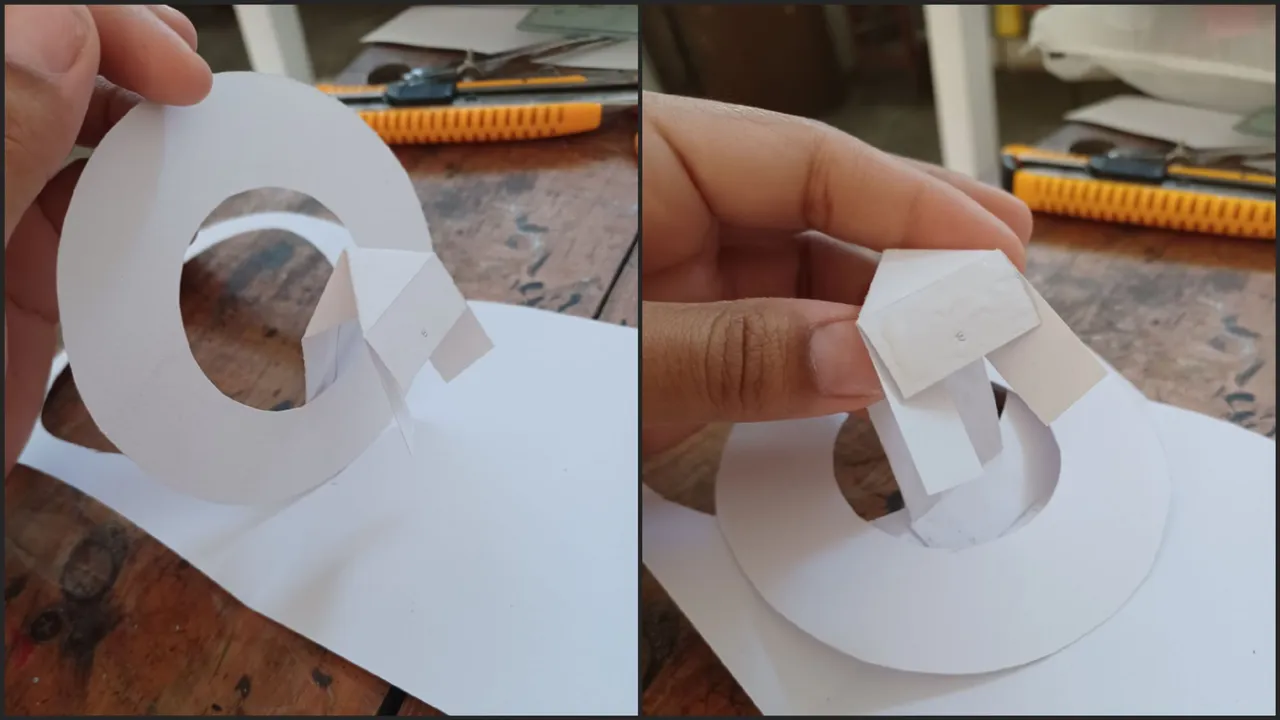
Las dos pestañas restantes en el tramo de 4cm, se doblan hacia adentro y se aseguran con pegamento, para realizar este tutorial seguí el video de Pinterest cuyo enlace dejare aquí adelante Pin
The two remaining tabs in the 4cm section are bent inward and secured with glue, to make this tutorial I followed the Pinterest video whose link I will leave here below Pin
Para las partes móviles internas se usará la parte interna del circulo que se recorto para la tapa de la tarjeta, pero retirando un segundo circulo interno que también sera usado y otro circulo este con un radio de 3,5 para un diámetro de 7cm.
For the internal moving parts we will use the inner part of the circle that was cut out for the card cover, but removing a second inner circle that will also be used and another circle this one with a radius of 3.5 for a diameter of 7cm.
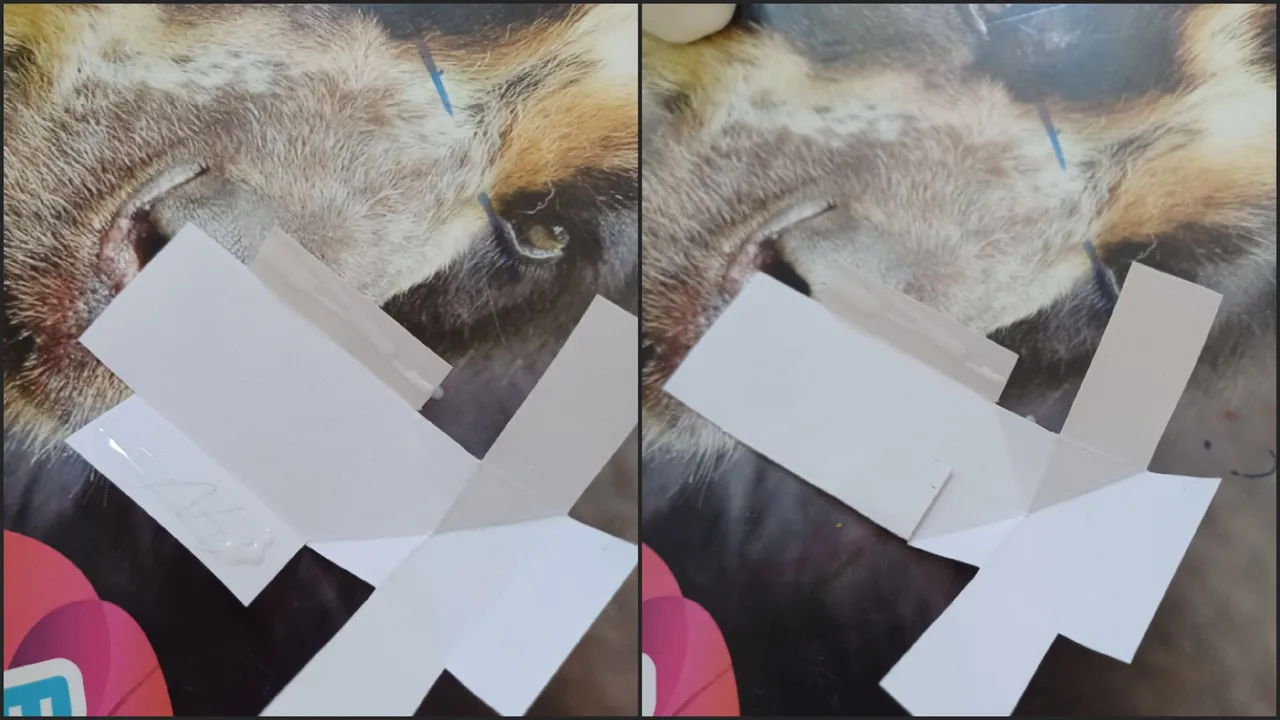
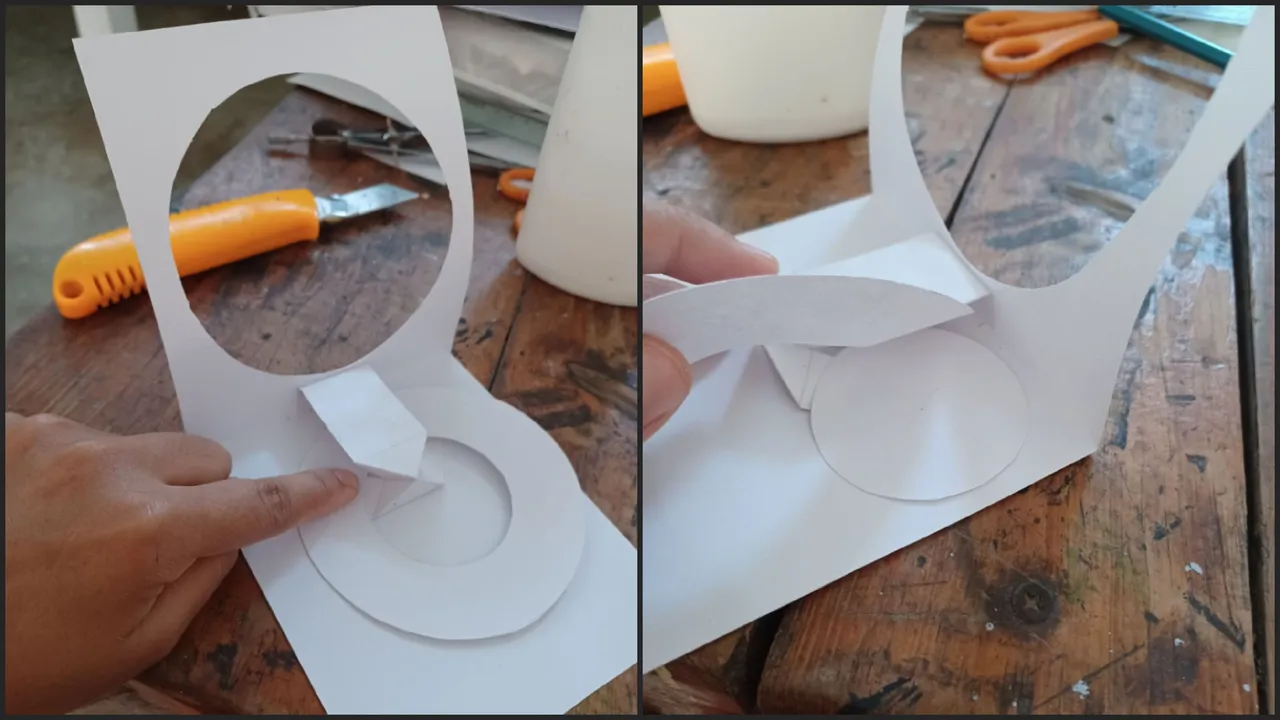
Ahora tomamos nuevamente el cuerpo de la tarjeta y pegamos la ultima pestaña de 1.5cm en la parte interna de la cara de la tarjeta, en mi caso yo tome algunas medidas para que esta quedará justo en el medio del circulo.
Now we take again the body of the card and glue the last tab of 1.5cm on the inside of the card face, in my case I took some measurements so that it will be right in the middle of the circle.
Luego tome la circunferencia mas grande y la ubique debajo de la pieza interna de la tarjeta y pegue la ultima pestaña a la otra cara de la tarjeta, ahí que ser cuidadosos con la pega y solo pegar la pestaña (yo luche para que no se pegaran también las pestañitas jijij)
Then take the larger circumference and place it under the inner piece of the card and glue the last tab to the other side of the card, there you have to be careful with the glue and only glue the tab (I struggled not to glue the tabs too jijij).

Así debería verse, fue muy emocionante para mi llegar a este punto, tenia esta tarjeta como de las mas complejas y tenia algo de temor de enfrentarme a ella y no lograrla
This is how it should look, it was very exciting for me to get to this point, I had this card as one of the most complex and I was a little afraid to face it and not achieve it.
Lo que sigue es pegar esta circunferencia en la pestaña que se despliega de la parte de abajo y la segunda (la mas pequeña) en la pestaña superior y por ultimo el circulo restante se pega en la base superior restante de la pieza interna de la tarjeta, lamentablemente no tome fotografías de esa, pero ya lo verán
What follows is to glue this circumference in the tab that unfolds from the bottom and the second (the smallest) in the top tab and finally the remaining circle is glued on the remaining top base of the inner piece of the card, unfortunately I did not take pictures of that, but you will see it
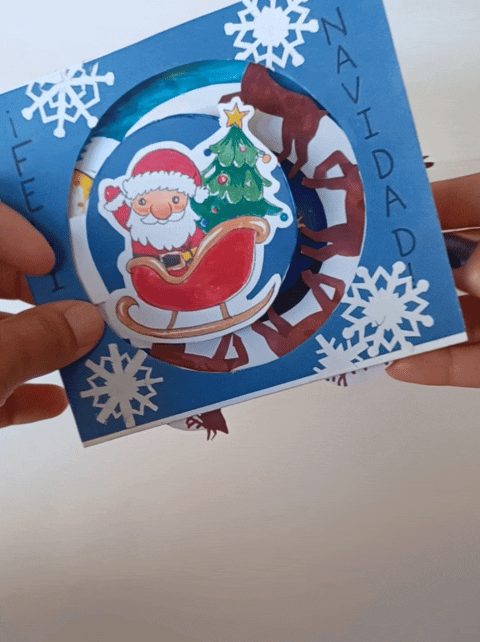
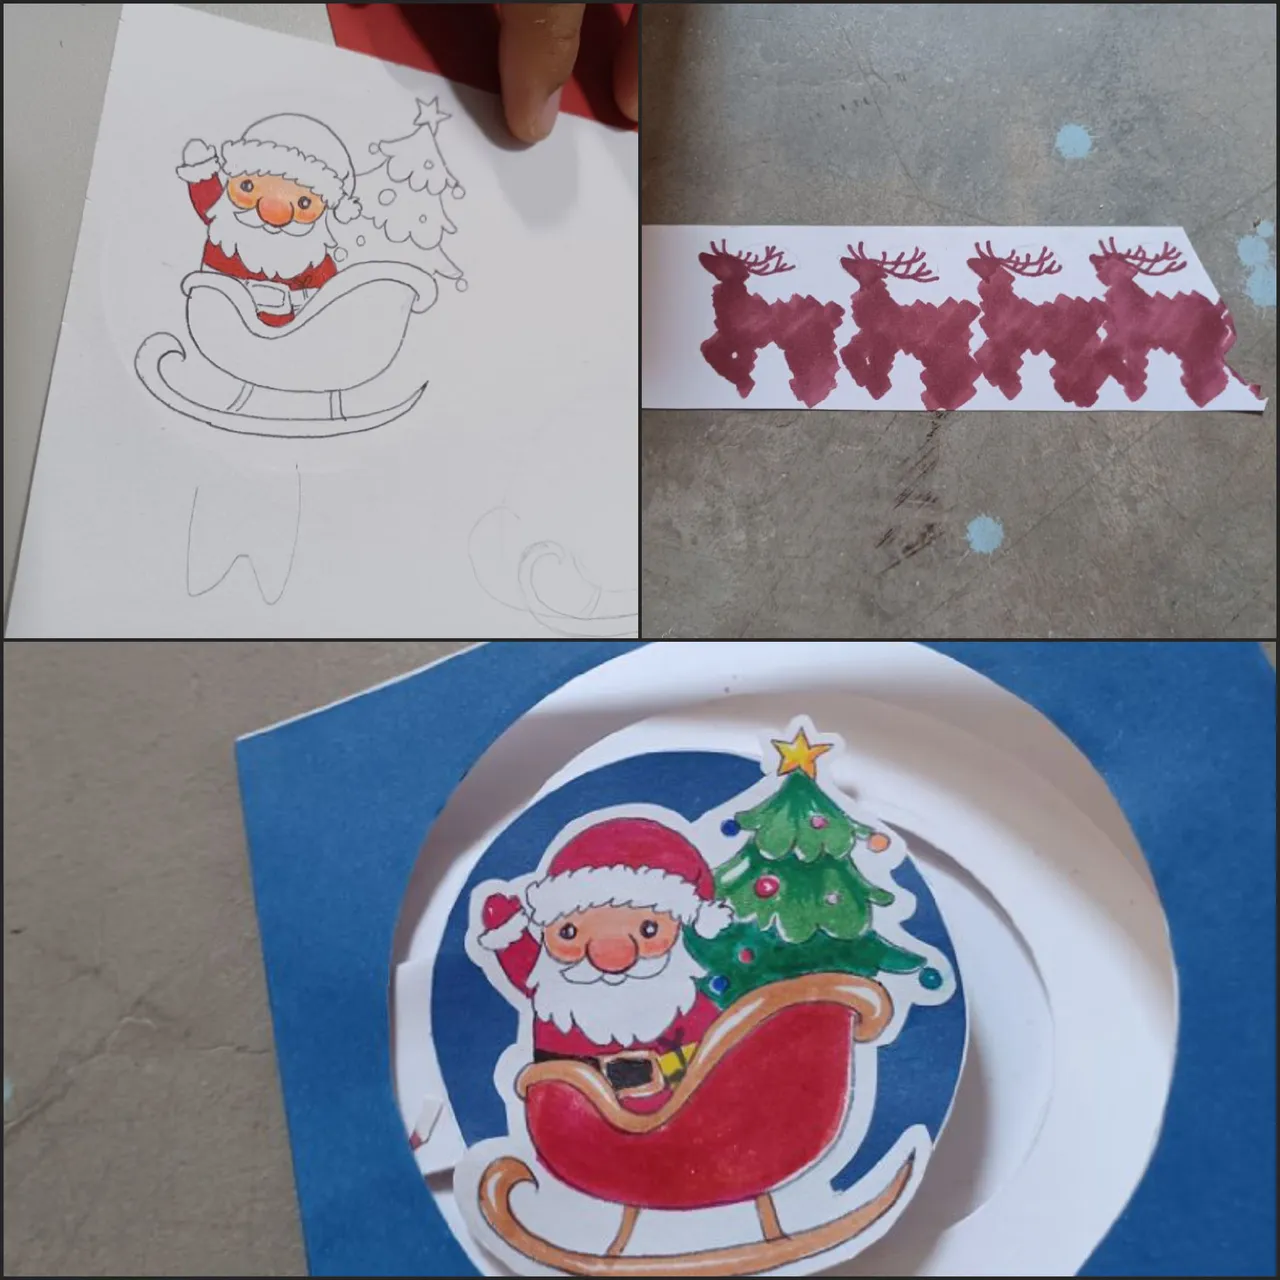
Lo que resta a continuación es decorarla al gusto, a mi se me ocurrió dibujar un Santa sencillo en su trineo como pieza central y unos renos para la parte móvil, como surcando el cielo nocturno halando el trineo de santa; por eso comencé luego a decorar la parte interna de la tarjeta con un cielo nocturno, lleno de estrella y para la ultima pieza móvil del fondo dibuje una luna llena que sigue el recorrido de santa.
The next step is to decorate it as you like, I came up with the idea of drawing a simple Santa in his sleigh as the central piece and some reindeer for the moving part, as if they were crossing the night sky pulling Santa's sleigh; so I then began to decorate the inner part of the card with a night sky, full of stars and for the last moving part of the background I drew a full moon that follows Santa's path.
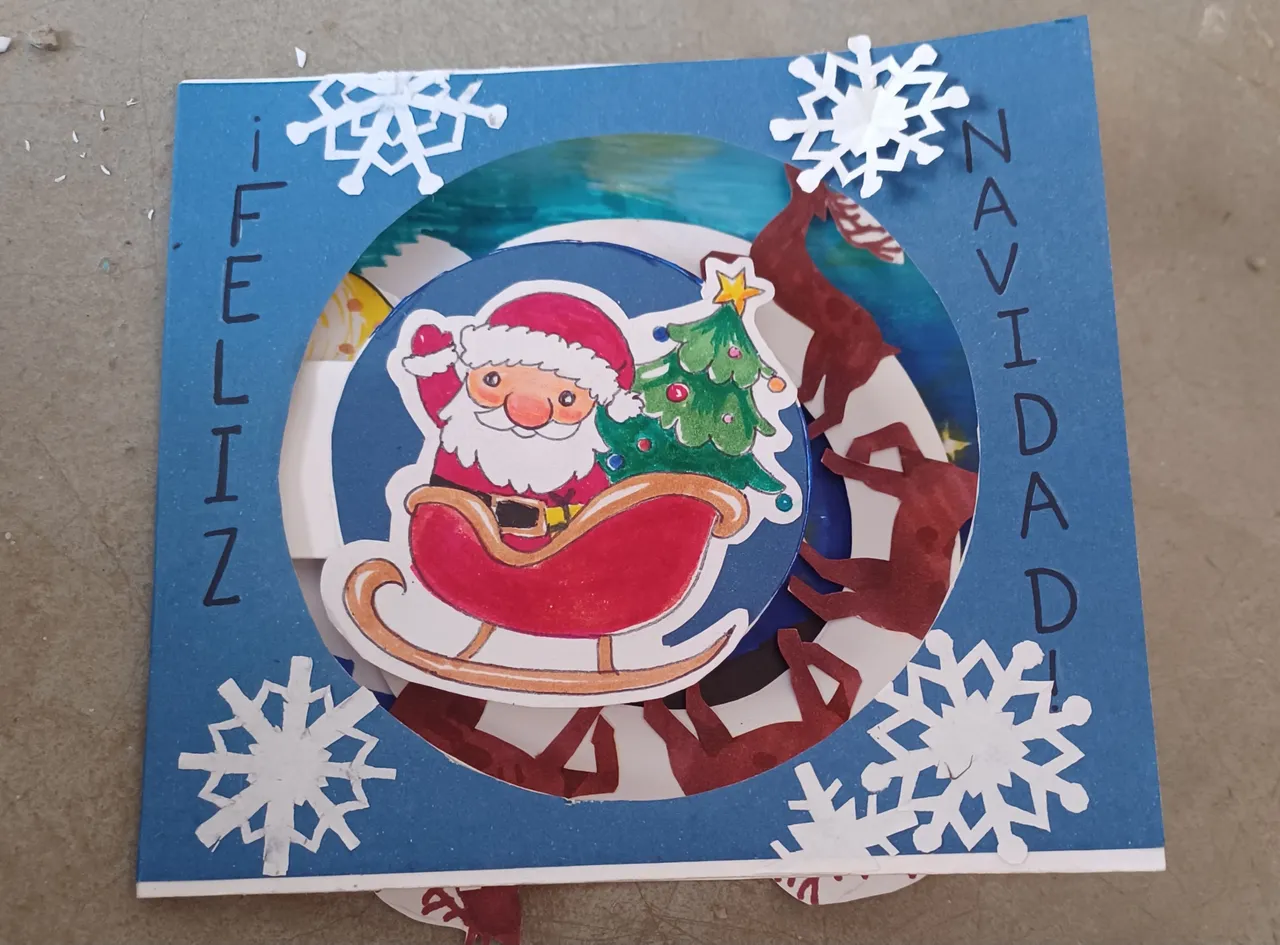
Y este es el resultado final de este nuevo avance en la elaboración de tarjetas con movimiento, espero que haya sido de su agrado y si quieren replicar esta tarjeta y hay un paso que no se entienda me pueden consultar.
y sin mas me despido y les deseo de todo corazón una Feliz Navidad y un prospero Año nuevo!
And this is the final result of this new advance in the elaboration of cards with movement, I hope you liked it and if you want to replicate this card and there is a step that is not understood you can consult me.
And without further ado I say goodbye and I wish you with all my heart a Merry Christmas and a Happy New Year!