¡Bienvenidos, amigos creativos!🎨
VIERNES; así que feliz y bendecido día!
Maykol cumplió años el pasado sábado 21 de enero, días antes me puse en marcha buscar alguna idea para regalarle, el siempre ha valorado mis manualidades, y aún más si son para él y en está ocasión no podía pasarlo por alto.
Luego de pasar días buscando varias ideas para dar el regalo perfecto, conseguí un molde de control de videojuegos (A él le encanta los vídeojuegos, así que me pareció perfecto). Entre a la página y a parte de tener la plantilla contaba con un vídeo explicando cómo lo hizo, lo observé y me encantaron los resultados y no dude en hacerlo. Así que puse manos a la obra en busca de los materiales, luego de haber descargado la plantilla para luego imprimirla.
Acá te dejo el enlace donde descargue la plantilla.

Greetings, creative friends!🎨
FRIDAY; so happy and blessed day!Maykol had his birthday last Saturday January 21, days before I started looking for some ideas to give him, he has always appreciated my crafts, and even more if they are for him and on this occasion I could not overlook it.
After spending days looking for various ideas to give the perfect gift, I got a video game controller mold (He loves video games, so it seemed perfect). I went to the website and besides having the template there was a video explaining how he did it, I watched it and I loved the results and I didn't hesitate to do it. So I got to work looking for the materials, after downloading the template and then printing it.
Here is the link where I downloaded the template.
 |
|---|
| 🎮Cartulina lisa color negro / Plain black cardboard |
| 🎮Cartulina corrugada color morada / Purple corrugated cardboard |
| 🎮Foami escarchado negro / Black frosted foami |
| 🎮Papel de ceda negro / Black silk paper |
| 🎮Plantilla o molde / Template or mold |
| 🎮Silicón / Silicone |
| 🎮Lápiz / Pencil |
| 🎮Regla / Rule |
| 🎮Tijera / Scissors |
| 🎮Foami de varios colores / Foami of various colors |

🎮Paso 1:
Recorte la plantilla la cual es el molde a utilizar, seguidamente marque dos veces el control en una cartulina color negro (Es importante usar una cartulina de material duro o en su efecto un cartón).
🎮Paso 2: Luego recorte lo mencionado anteriormente.
🎮Paso 2: Luego recorte lo mencionado anteriormente.
🎮Step 1:
Cut out the template which is the mold to be used, then mark the control twice on a black cardboard (It is important to use a hard cardboard or cardboard).
🎮Step 2:Then cut out the above.
🎮Step 2:Then cut out the above.

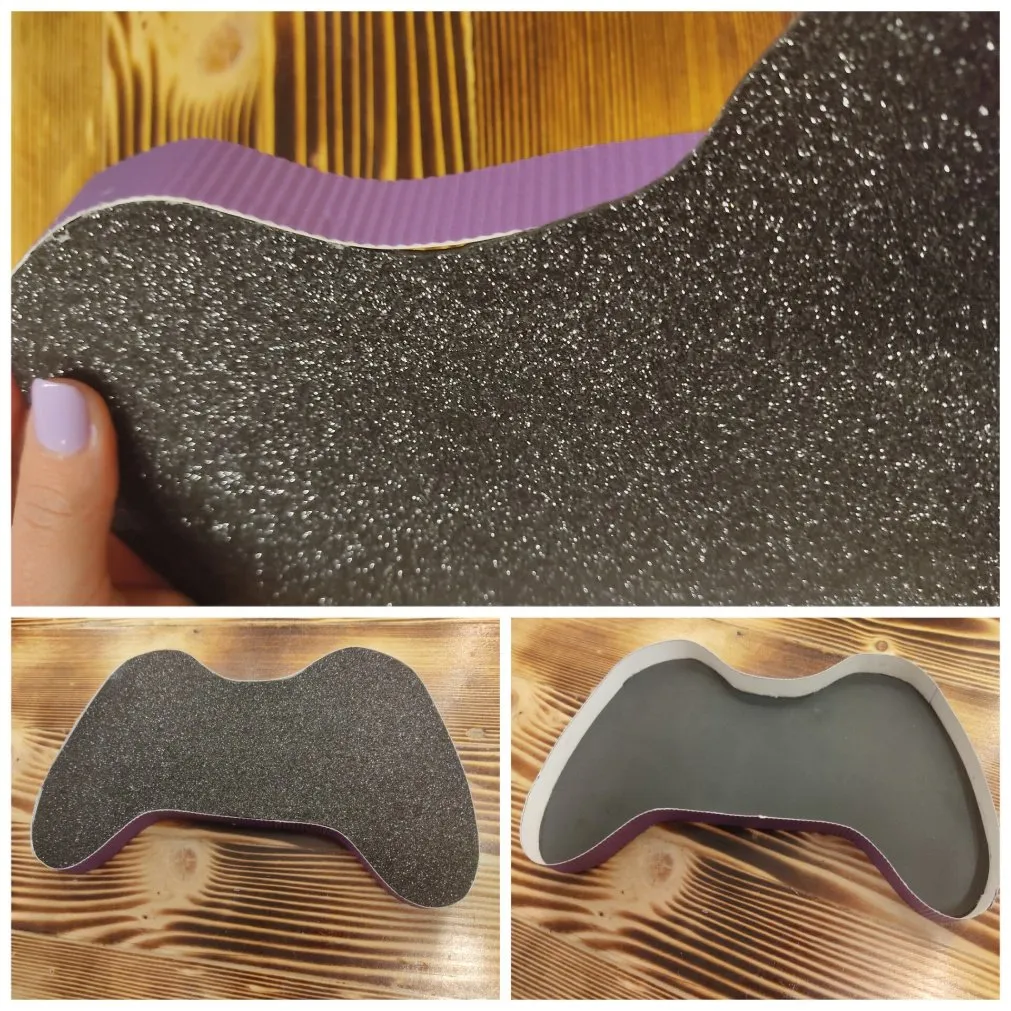
🎮Paso 3:
El control que saque en cartulina negra lo utilice para marcarlo en el foami escarchado y de esta forma quedarán del mismo tamaño, luego recorte.
🎮Step 3:
The control that I took out of the black cardboard I used to mark it on the frosted foami and in this way they will be the same size, then cut it out.

🎮Paso 4:
Pegue el control de foami escarchado en el control de cartulina color negra (Recuerden que de ambos materiales saque dos controloes. Ya que uno será la tapa y el otro la base de la caja.)
🎮Step 4:
Glue the frosted foami control on the black cardboard control (Remember to take two controls out of both materials. One will be the lid and the other the base of the box).

🎮Paso 5:
En la cartulina corrugada marque una línea larga de 2cm de ancho, luego recorte.
🎮Step 5:
On the corrugated cardboard mark a long line 2cm wide, then cut out.

🎮Paso 6:
En una de los controles ya pegados en el paso número 4 pegue alrededor del borde el trozo de 2cm de ancho de cartulina corrugada que recorte anteriormente. De esta forma este sería la tapa de nuestra caja.
🎮Step 6:
On one of the controls already glued in step 4, glue around the edge the 2cm wide piece of corrugated cardboard that you cut out earlier. This way this would be the lid of our box.
🎮Paso 7:
Para la base de la caja repetí lo mismo del paso 5 y 6 pero en este caso la cartulina corrugada es de 8cm para la base de la caja.
🎮Step 7:
For the base of the box I repeated the same from step 5 and 6 but in this case the corrugated cardboard is 8cm for the base of the box.

🎮Paso 8:
Ya en este paso la caja tiene su forma, teniendo lista la base y la tapa.
🎮Step 8:
Already in this step the box has its shape, having ready the base and the lid.

🎮Paso 9:
Recorte los botones del control de la plantilla que había impreso y los marque en foami de diferentes colores (Como pueden apreciarlo en la siguiente imagen).
🎮Step 9:
Cut out the control buttons from the template I had printed and mark them in foami of different colors (as you can see in the following image).

🎮Paso 10:
En orden pegue todos los botones en la tapa del control.
🎮Step 10:
In order, glue all the buttons on the control cover.

🎮Paso 11:
Con el papel de ceda recorte varias tiras y las agregué en el interior de la caja.
🎮Step 11:
I cut several strips out of the wax paper and added them to the inside of the box.

🎮Paso 12:
Compré los dulces favoritos de Maykol y aparte de ello, un reloj que ordené en una tienda virtual y rellene la caja (Este sería el obsequio dentro de la caja).
🎮Step 12:
I bought Maykol's favorite candies and besides that, a watch that I ordered from an online store and filled the box (this would be the gift inside the box).


Palabras finales✨
Me gustaron muchos los resultados, espero y deseo de todo corazón que el amor no les falten y permanezcan los detalles💞
Final words✨
I liked the results very much, I hope and wish with all my heart that love is not lacking and the details remain💞.

Mil gracias por leerme una vez
Nos vemos en una próxima publicación.
Bendiciones y abrazos digitales🤗
Thank you very much for reading me once
See you in an upcoming post.
Blessings and digital hugs🤗