Beautiful and colorful bracelet with four lines of beads

mostacillas (5).jpeg


Blessings to all the members of this fabulous #hivediy community. Delighted to greet you and wish you a happy and blessed Tuesday. May God fill you with much grace and strength.
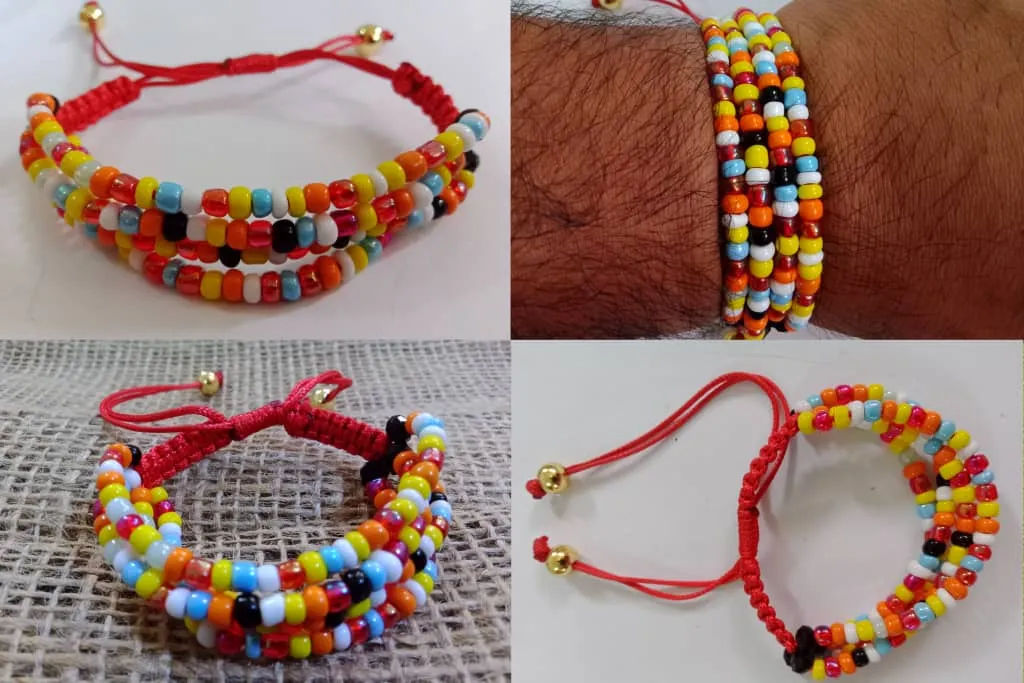
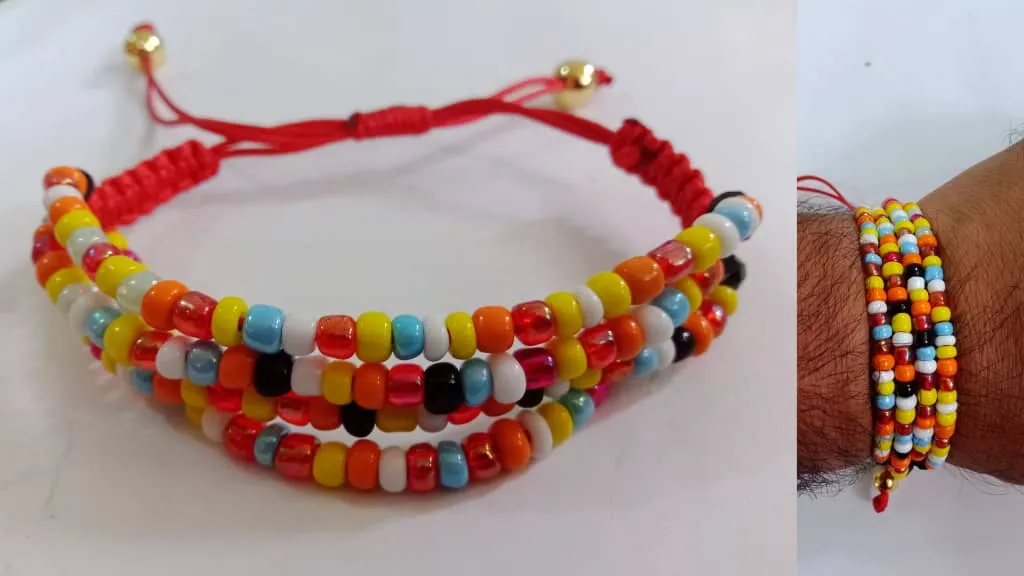
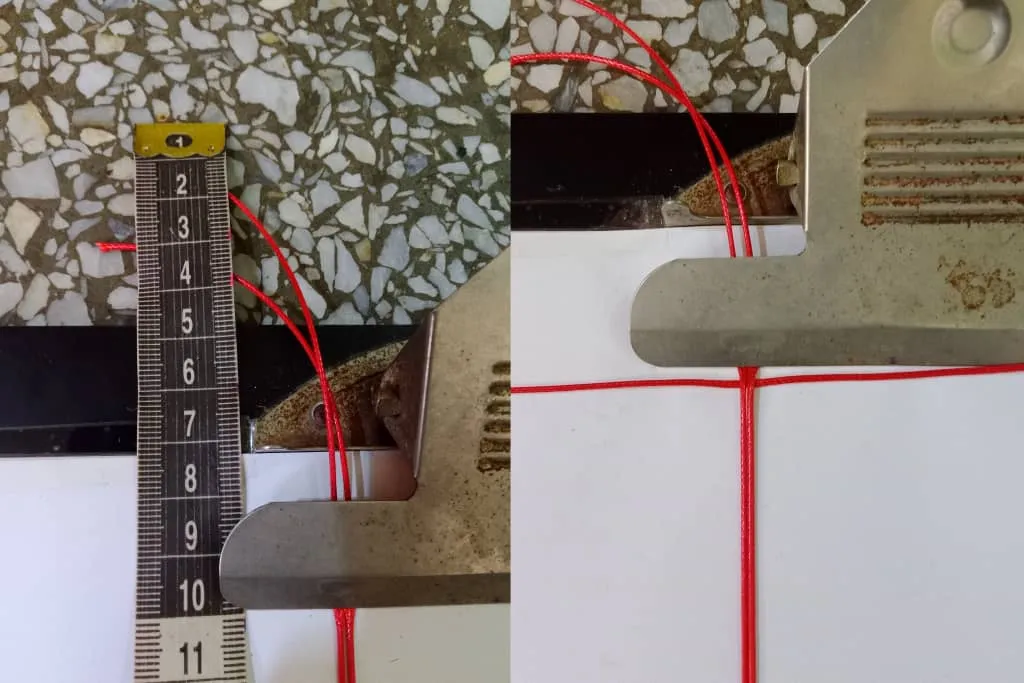
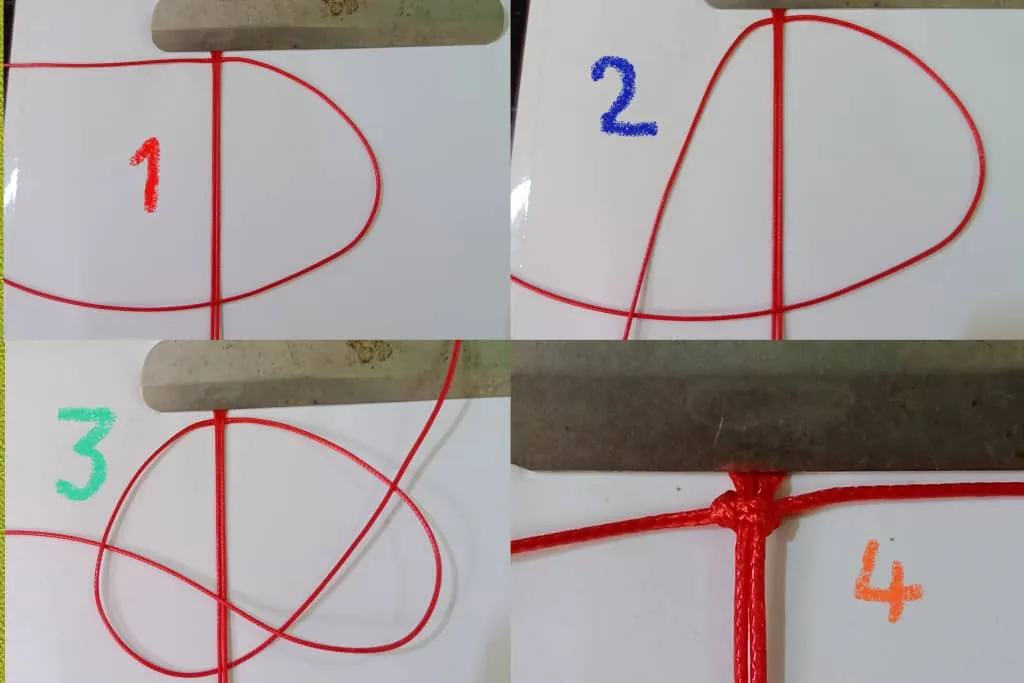
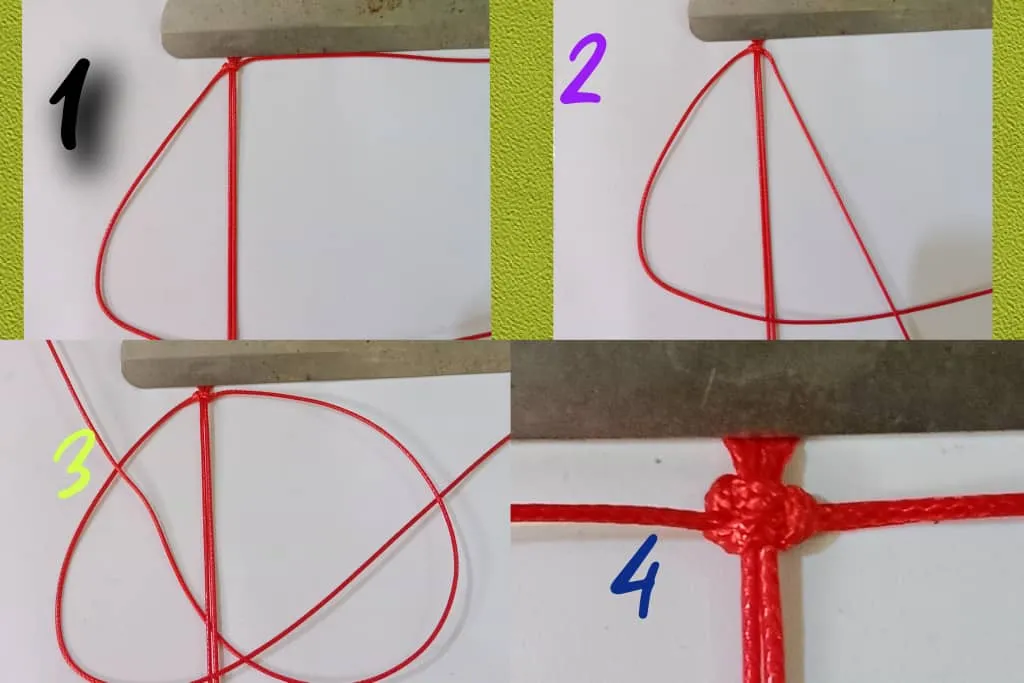
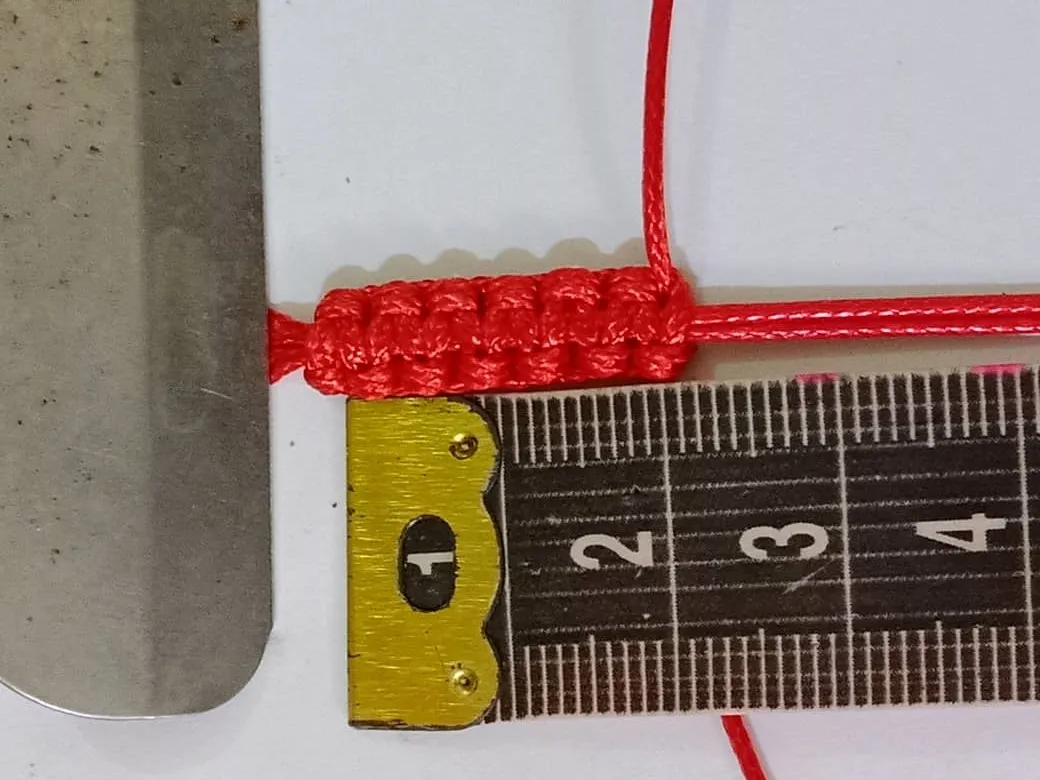
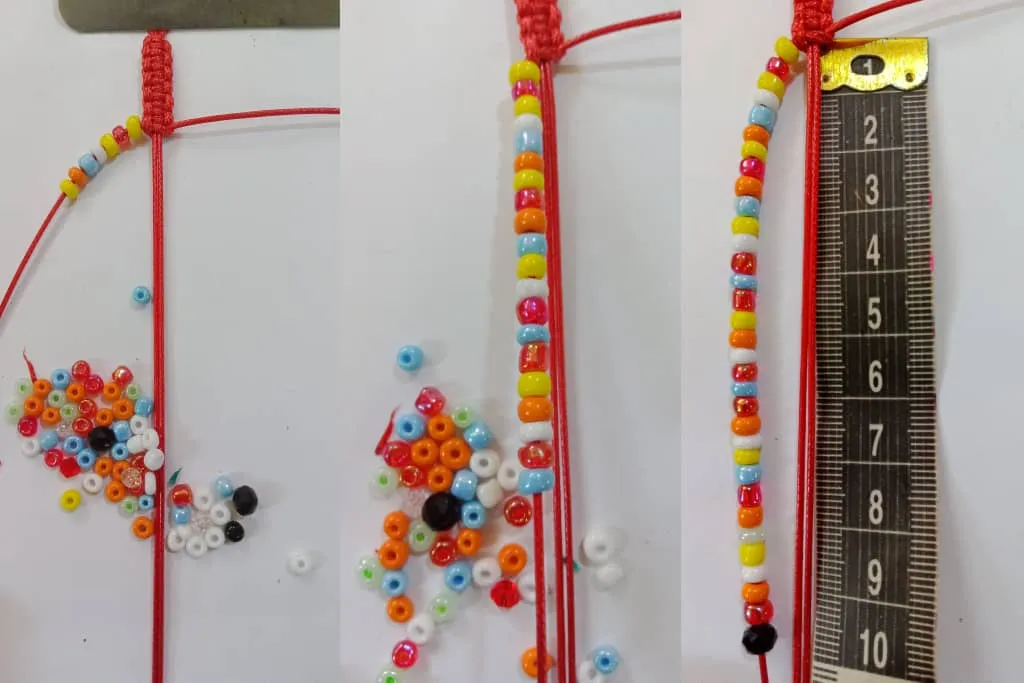
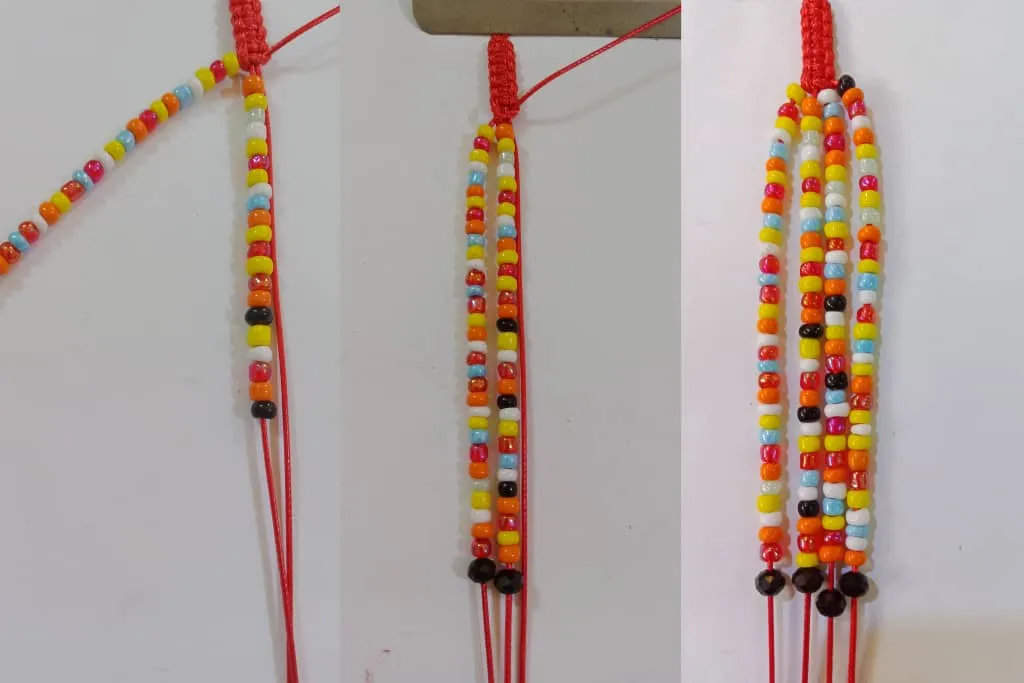
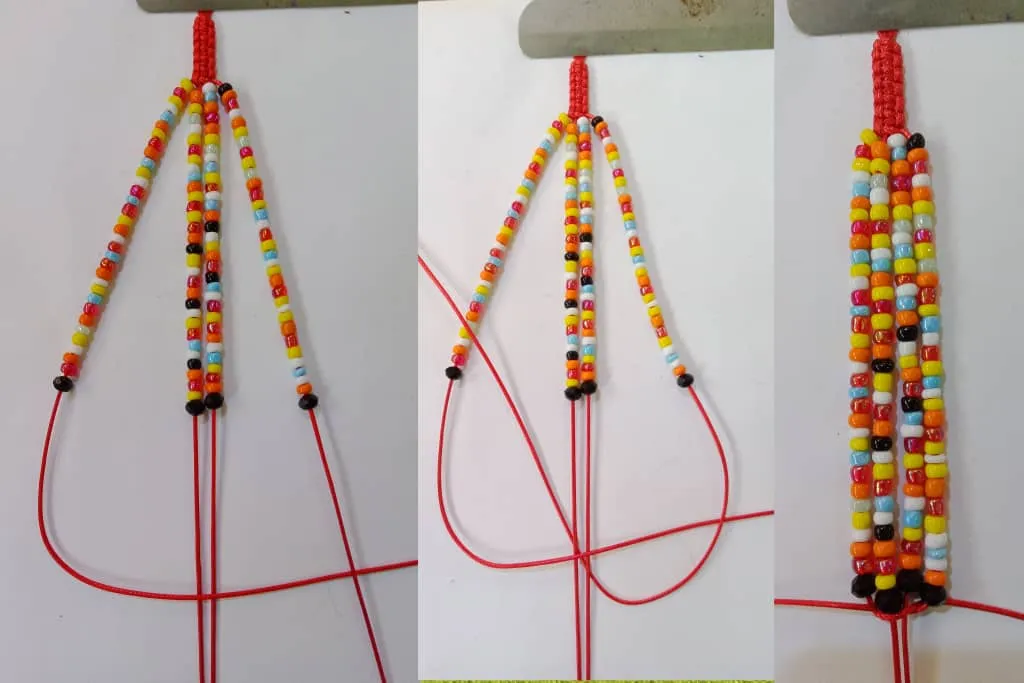
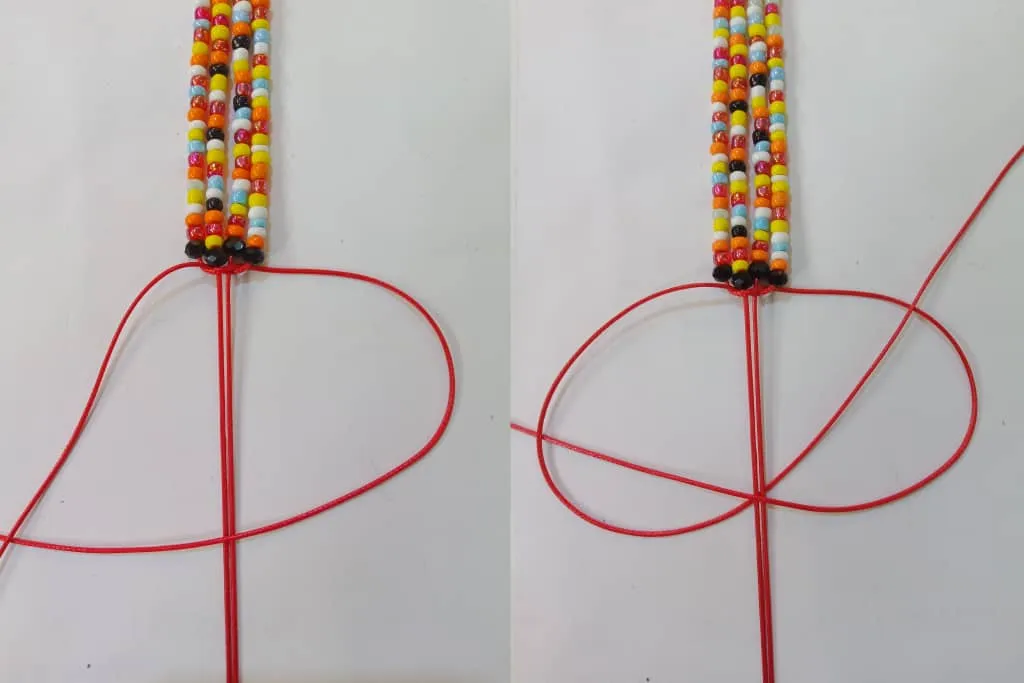
Today I share with you a beautiful bracelet with four lines of beads. This bracelet is very beautiful and it also helps us to decorate our hands. It is very easy to make and in just a few minutes we have it ready to wear.

With no more time to waste, I invite you to join me in this fascinating creation and put your hands to the thread.


Bendiciones a todos los miembros de esta fabulosa comunidad #hivediy. Encantado de saludarles y desearles un feliz y bendecido martes. Que Dios los llene de mucha gracia y fortaleza.
Hoy les comparto una hermosa pulsera con cuatro líneas de cuentas. Esta pulsera es muy bonita y además nos ayuda a decorar nuestras manos. Es muy fácil de hacer y en pocos minutos la tenemos lista para lucir.

Sin más tiempo que perder, te invito a que me acompañes en esta fascinante creación y pongas tus manos al hilo.

mostacillas (8).jpeg

separador virgilio 1.gif


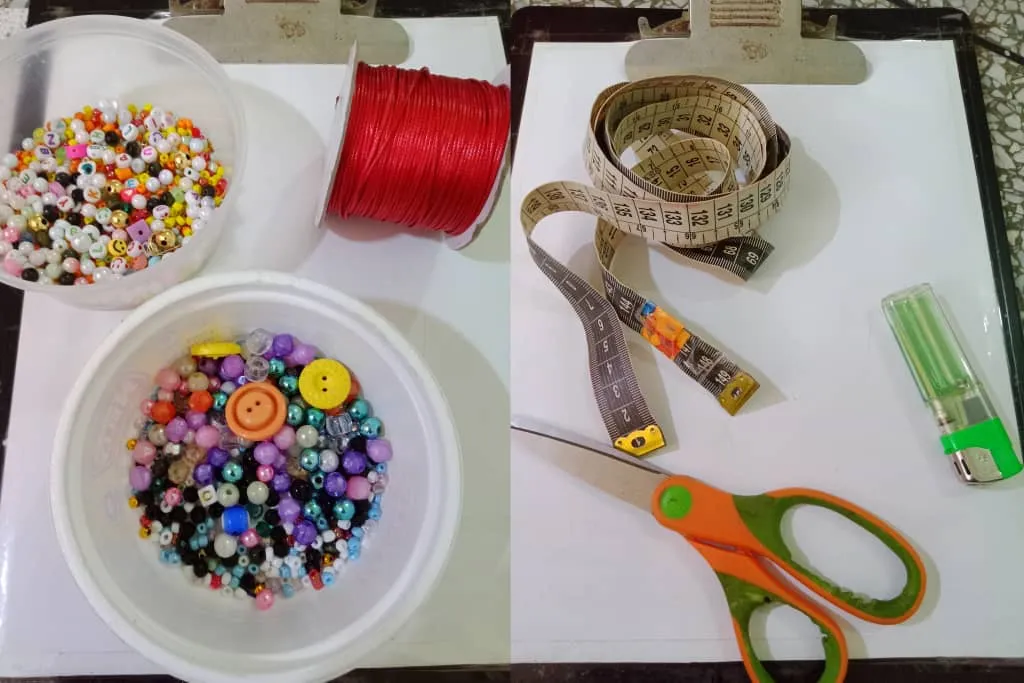
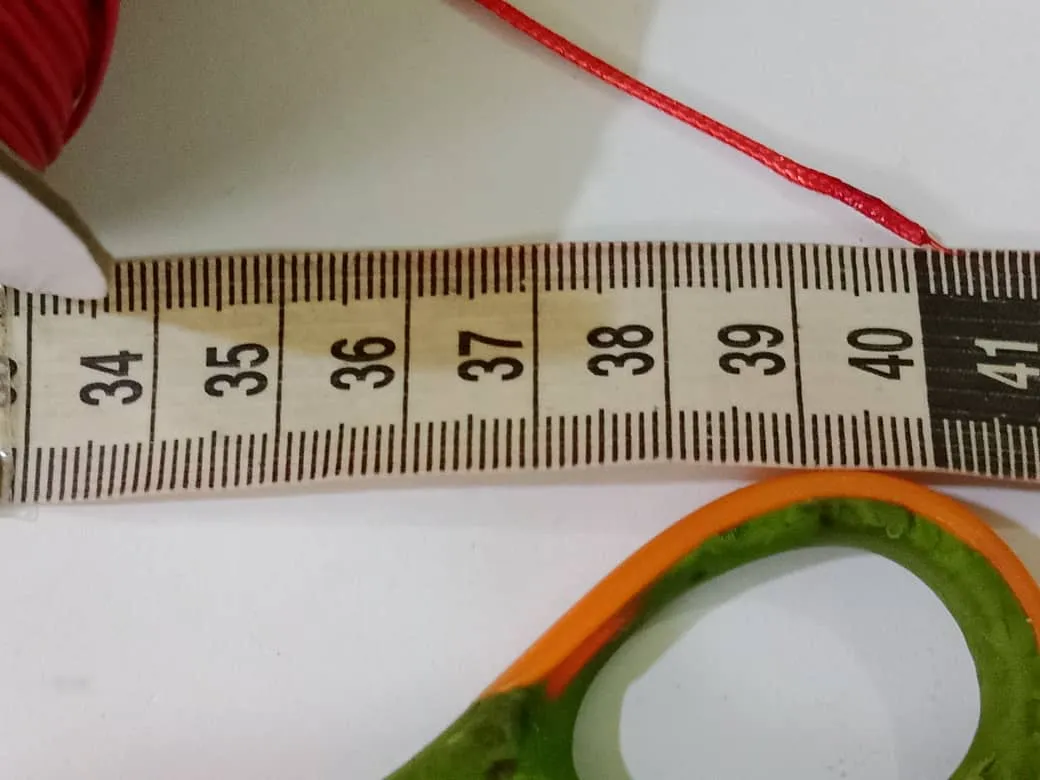
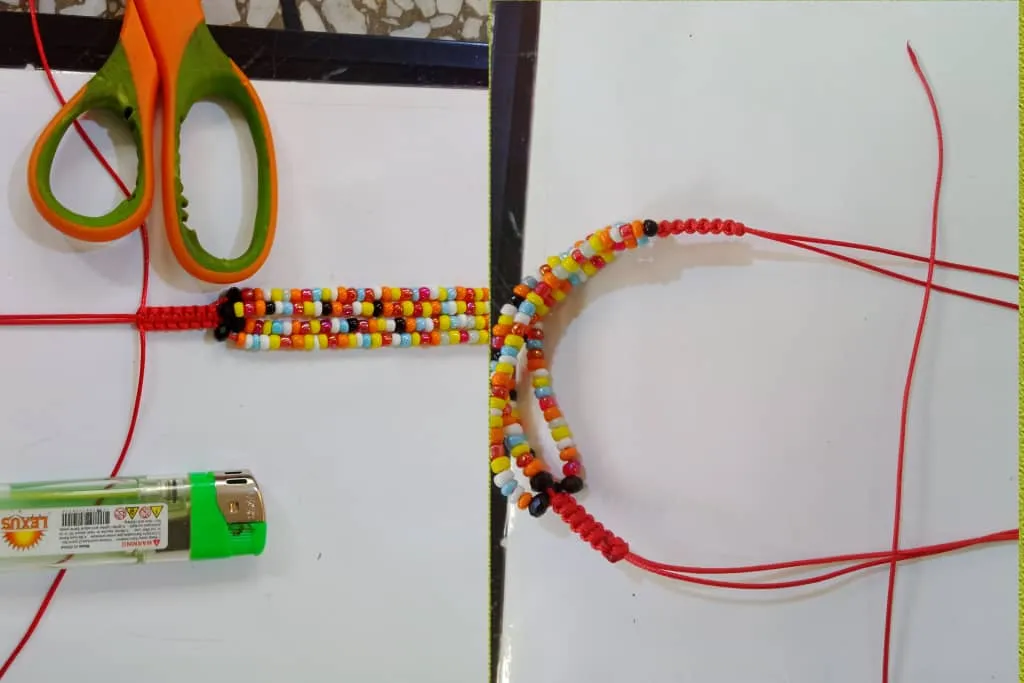
The materials I used to make this beautiful bracelet are as follows, namely:
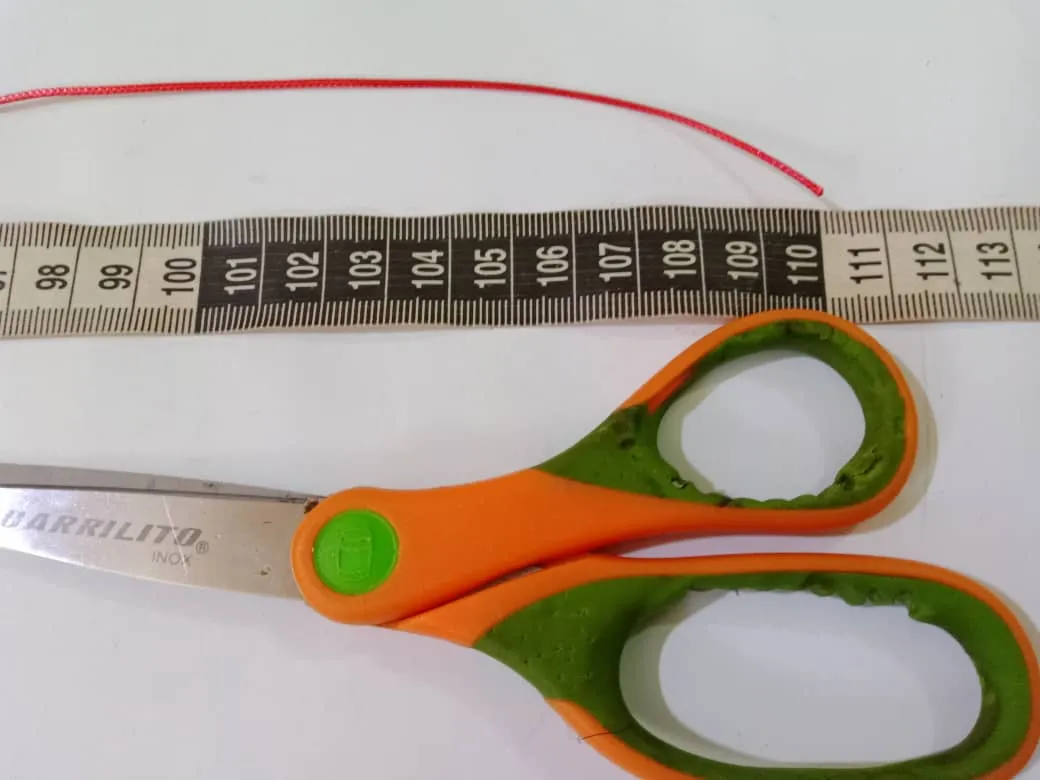
Snakeskin thread
Beads
Scissors
Lighter
Measuring tape
Adhesive tape
Czech glass

Los materiales que utilicé para realizar esta hermosa pulsera son los siguientes, a saber:
Hilo piel de serpiente
Mostacillas
Tijera
Encendedor
Cinta métrica
Cinta adhesiva
Cristal checo

mostacillas (14).jpeg


I started by cutting two 40cm strands of thread for the base of the bracelet
Inicié cortando dos hebras de hilos de 40cm para la base de la pulsera.

mostacillas (4).jpeg


Then I cut a 110cm strand of thread to make the flat weave of the bracelet.
Después corté una hebra de hilo de 110cm para realizar el tejido plano de la pulsera.

mostacillas (2).jpeg

separador virgilio.png


Next I measured 10cm from the top of the base thread down and fastened with a hook, then I took the 110cm strand of thread and passed it under the thread that I will use as a base.
Seguidamente medí 10cm desde la parte superior del hilo base hacia abajo y sujeté con un gancho, Luego tomé la hebra de hilo de 110cm y lo pasé por debajo del hilo que usaré como base.

mostacillas (15).jpeg


Then I started my flat knitting as follows: First I took the right yarn, passed it over the base , made a P shape, then took the left yarn, passed it over the right yarn (which was on the left side) , next passed it over left of the base and pulled it out inside the right yarn (the P shape). Then I stretched the thread on each side evenly to make the knot. With your fingers you press it so that it is even on both sides.
Después comencé mi tejido plano de la siguiente manera: Primero tomé el hilo derecho, lo pasé por encima de la base , hice una forna de P, luego tomé el hilo izquierdo, lo pase por encima del hilo derecho (que estaba del lado izquierdo) , seguidamente lo pasé por dejado de la base y lo saqué por dentro del hilo derecho (la forma de P). Después estiré el hilo de cada lado uniformemente para hacer el nudo. Con los dedos se presiona para que quede igual de ambos lados Así comenzamos nuestro tejido.

mostacillas (12).jpeg


Now we take the thread on the left side and pass it over the base thread, we form a kind of four, then we pass the thread on the right side over the left thread that we have on the right side, then we pass it under the base thread and take it out through the inside or ring of the left thread as shown in the image. Then we press with our fingers so that it is the same on both sides
Ahora tomamos el hilo del lado izquierdo y lo pasé por encima del hilo base, formamos una especie de cuatro, luego pasamos el hilo del lado derecho por encima del hilo izquierdo que tenemos en el lado derecho, después lo pasamos por debajo del hilo base y lo sacamos por el interior o argolla del hilo izquierdo como nos lo señala la imagen. Seguidamente con los dedos presionamos para que quede igual de ambos lados.

mostacillas (11).jpeg


I continued to tie the same flat knot until I reached a distance of 2 cm.
Seguí realizando el mismo nudo plano hasta llegar a una distancia de 2cm.

mostacillas (3).jpeg

separador virgilio 1.gif


Then I started to introduce the beads into the thread on the left side until I reached a distance of 10 cm.
Después empecé a introducir las mostacillas en el hilo del lado izquierdo hasta llegar a una distancia de 10cm.

mostacillas (10).jpeg


Then I continued with the same procedure, i.e. inserting the beads through the base threads and the threads on both sides, and at the ends of the threads I inserted black Czech crystals.
Luego seguí realizando el mismo procedimiento, es decir, introduciendo las mostacillas por los hilos bases y los hilos de ambos lados y en las terminaciones de los hilos introduje cristales checos de color negro.

mostacillas (9).jpeg


I then tied a flat knot
Después realicé un nudo plano

mostacillas (13).jpeg


I continued to tie the same flat knot until I reached a distance of 2 cm.
Seguí realizando el mis mo nudo plano hasta llegar a una distancia de 2cm.

mostacillas (7).jpeg


I then cut the excess threads and sealed. Then I cut a 20cm strand of thread to make a Franciscan knot that I will use as the bracelet's locking ring.
Después corté los hilos sobrantes y sellé. Seguidamente corté una hebra de hilo de 20cm para realizar un nudo franciscano que usaré como trancadero de la pulsera.

mostacillas (6).jpeg


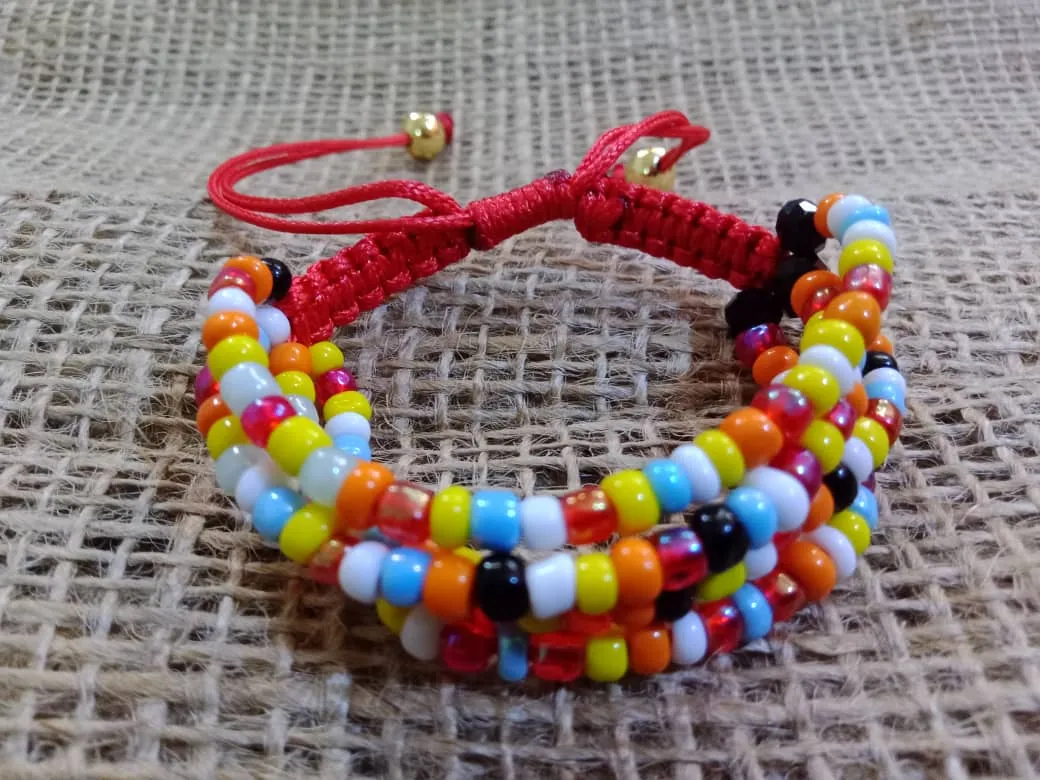
This is how this beautiful four-line bracelet turned out.
Blessings to all!

Así quedó esta hermosa pulsera de cuatro líneas.
Bendiciones para todos!!

mostacillas (1).jpeg


separador virgilio.png


Translated with https://www.deepl.com/translator
                  All images are my own, dividers courtesy of @kattycrochet.

                                                           
             Todas las imágenes son de mi autoría, divisores cortesía de @kattycrochet.
H2
H3
H4
3 columns
2 columns
1 column
18 Comments
Ecency