English

Greetings fellow Hives. I really hope you had a very good end of the year.
I hope and wish that this year that is beginning will be one of much progress and improvement for all the people who fight every day to improve our lives.
In this, which is my first publication of the year, I share the improvements that I applied to a gift that I received at the end of the year for the entrance of my house.
They gave me a 100 W Buyoin headlamp that works with LEDs, it has a voltage range that goes from 85 volts to 265 volts, this is very appropriate for the area where I live where there are constant voltage failures.
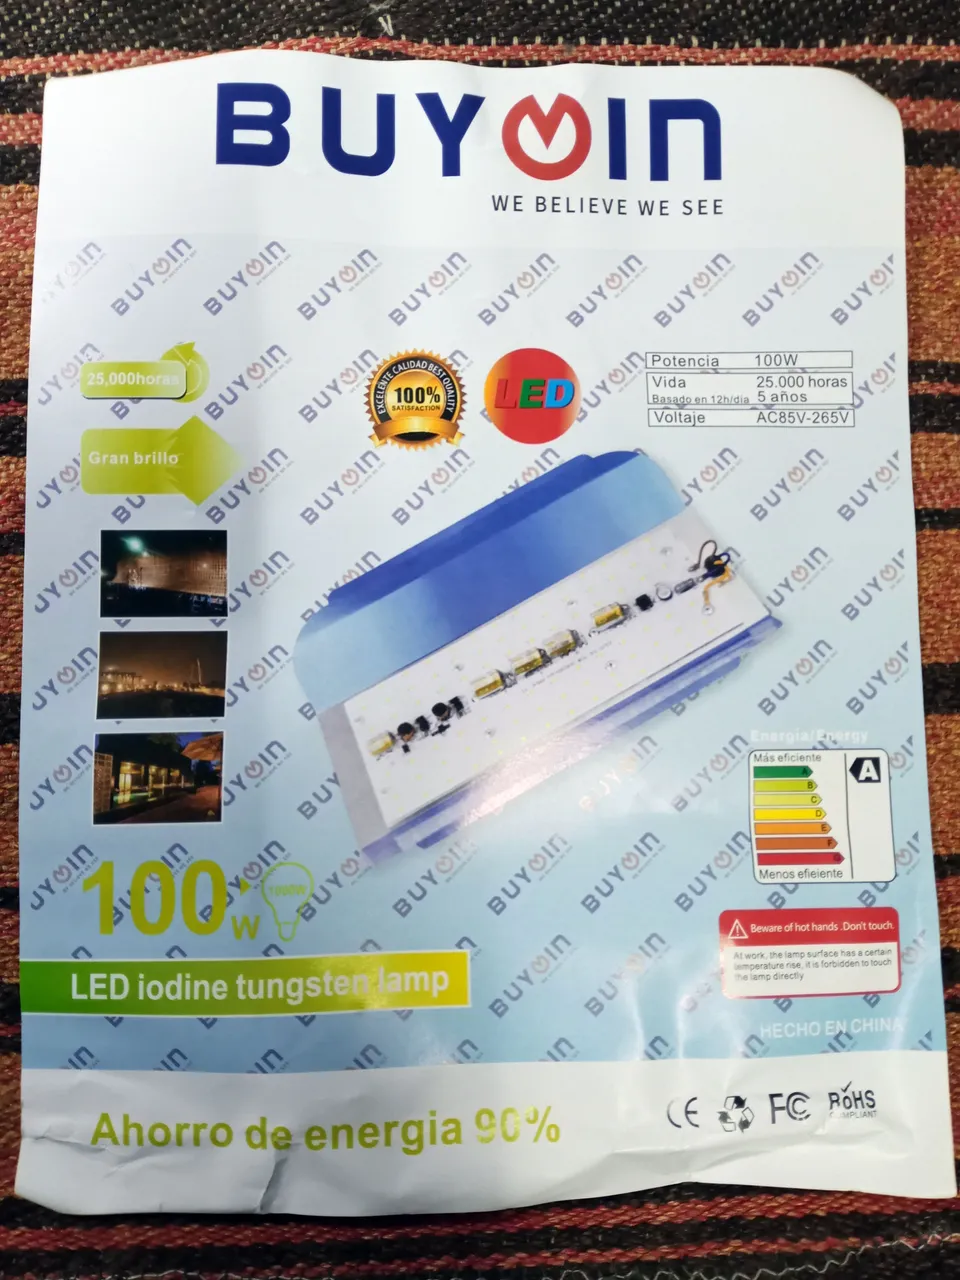
The attached advertising assures me about 25 thousand hours of useful life, if it is used about 12 hours per day. But like LED bulbs, the biggest enemy it can have is the heat that the LEDs are exposed to during operation. He wanted to improve his chances.
I had two alternatives left to improve its service time:
The first was to lower the operating intensity so that the leds generate less heat. The circuit would have to be intervened and the lighting capacity of the headlight would be reduced. But since the team is new, I try not to modify its operation at that point.
The second alternative was to somehow improve the ability to reduce the temperature. In this case you would not need to alter the circuits, and you would not reduce the illumination power of the headlamp.

Searching in my component warehouse I found a Pentium 3 motherboard with its processor and huge heatsink, this was a good option to do the headlight modification.


It's close to what I had planned, but I still looked a little further and got a Celeron motherboard that seemed like a much better option, since this one had a fan that further improves the heatsink capacity. I didn't give it much thought and used it to get the job done.


I wanted to make a source without a transformer, gathering the components to assemble it, I realized that it did not have a Zenner diode for 12 volts, which is the power supply for the fan. I had to go back to the warehouse, to the drawer of the recycled transformers. Luckily I found a 12 volt pair.

Checking the first one, because it didn't work, I found that the power supply to the transformer was interrupted, luckily it was very close to the connection pin.

I only removed the plastic cover a bit and was able to solder the wire. When I tested it, I realized it was 16 volts, not 12 volts. It remains for another job, another day.

The next transformer was from a Panasonic cordless phone, and I verified that it worked well and that it was for 12 volts. I just had to adjust the 12 volt cable a bit and I'm done.

I can't make holes freely in the headlight card, so I have to adapt the assembly with the holes that it already has from the factory. I add some thermal paste to improve the performance of the heatsink.

I assemble the set and solder the transformer pins to the cables, it is safer to do the outdoor assembly.

I make a final check, now I only have to manufacture the support that will hold the lighthouse and fix the assembly at the entrance, but that will be in another publication.

I hope that with the improvements I made to it, it will work well for a long time. This modification is a test, to check which option is the best: alter the circuit or improve heat loss.
I will only know with the practical test and that will take me some time.
Thank you very much for taking a moment and reading.
I have worked with recycled material to make this assembly, it is what I have the most, we give it a new use and help our environment, which will surely thank us.
Have an excellent week.
Peace.

The banner was edited in Canvas.
I have used Google translate for the English language.
The images are captures of the execution of the work in my workshop.
Español
Saludos, compañeros de Hive. Realmente estoy deseando de que hayan tenido un muy buen final de año.
Espero y deseo que este año que empieza, sea de mucho progreso y superación para todas las personas que luchamos día a día por mejorar nuestras vidas.
En esta, que es mi primera publicación del año, les comparto las mejoras que aplique a un regalo que recibí a final de año para la entrada de mi casa.
Me regalaron un faro de 100 W, de marca Buyoin que funciona con led, tiene un rango de voltajes que va desde los 85 volts a los 265 volts, esto es muy apropiado para la zona en que vivo donde constantemente hay fallas de voltaje.
La publicidad adjunta me asegura unas 25 mil horas de vida útil, si se usa unas 12 horas por día. Pero al igual que a los bombillos de led, el mayor enemigo que puede tener es el calor al que se exponen los leds durante su funcionamiento. Quería mejorar sus posibilidades.
Me quedaban dos alternativas para mejorar su tiempo de servicio:
La primera era bajar la intensidad de funcionamiento para que los leds generen menos calor. Tendría que intervenir el circuito y la capacidad de iluminar del faro se vería reducida. Pero siendo nuevo el equipo, procuro no modificar a ese punto en su funcionamiento.
La segunda alternativa era mejorar de alguna manera la capacidad para reducir la temperatura. En este caso no necesitaría alterar los circuitos, y no reduciría la potencia de iluminación del faro.
Buscando en mi depósito de componentes encontré una tarjeta madre de Pentiun 3 con su procesador y su enorme disipador, esta era una buena opción para hacer la modificación del faro.
Es cercano a lo que tenía planeado, aun así busque un poco más y conseguí una tarjeta madre de Celeron que me pareció mucho mejor opción, ya que esta tenía un ventilador que mejora aún más la capacidad del disipador. No lo pensé mucho y lo empleé para hacer el trabajo.
Quería hacerle una fuente sin transformador, reuniendo los componentes para armarla, me di cuenta de que no tenía un diodo Zenner para 12 volts, que es la alimentación del ventilador. Tuve que volver al depósito, al cajón de los transformadores reciclados. Por suerte encontré un par de 12 volts.
Revisando el primero, porque no funcionaba, encontré que estaba interrumpida la alimentación del transformador, por suerte estaba muy cerca del pin de conexión.
Solo retiré un poco la cubierta plástica y pude soldar el cable. Cuando lo puse a prueba, me di cuenta de que era de 16 volts, no de 12 volts. Queda para otro trabajo, otro día.
El siguiente transformador era de un teléfono inalámbrico Panasonic, y verifiqué de que si funcionara bien y de que fuese para 12 volts. Solo tuve que acomodar un poco el cable de los 12 volts y quedo listo.
No puedo hacer perforaciones libremente en la tarjeta del faro, por lo que tengo que adaptar el montaje con las perforaciones que ya trae de fábrica. Agrego algo de pasta térmica para mejorar el funcionamiento del disipador.
Armo el conjunto y soldé los pines del transformador a los cables, es más seguro para hacer el montaje de intemperie.
Hago una comprobación final, solo me queda ahora fabricar el soporte que sostendrá al faro y fijar el conjunto en la entrada, pero eso será ya en otra publicación.
Espero de que con las mejoras que le hice, tenga un buen funcionamiento por un largo tiempo. Esta modificación es una prueba, para ir comprobando que opción es la mejor: alterar el circuito o mejorar la perdida de calor.
Solo lo sabré con la prueba práctica y eso me llevará algo de tiempo.
Muchas gracias por pasar un momento y leerme.
He trabajado con material de reciclaje para hacer este montaje, es de lo que más dispongo, le damos un nuevo uso y ayudamos a nuestro medio ambiente, que seguro nos lo agradecerá.
Que tengan una excelente semana.
Paz.
El banner fue editado en Canvas.
He usado el traductor de Google para el idioma inglés.
Las imágenes son capturas de la ejecución del trabajo en mi taller.