This content was deleted by the author. You can see it from Blockchain History logs.
Saludos hermosa comunidad creativa!!
Greetings beautiful creative community!!
Dios le bendiga de una manera especial y grande, es un gusto compartir con ustedes un nuevo contenido creativo. En esta oportunidad les mostraré como hacer un práctico y creativo juego para que nuestros niños aprendan de una manera fácil y divertida de colores, a reconocer los números y a contar, elaborado con material de reciclaje.
God bless you in a special and great way, it is a pleasure to share with you a new creative content. This time I will show you how to make a practical and creative game for our children to learn colors, recognize numbers and count in an easy and fun way, made with recycling material.
Los juegos didácticos, son juegos llenos de actividades que se utilizan como técnica de enseñanza para fomentar o estimular algún tipo de aprendizaje en los niños. Su objetivo es que los niños obtengan conocimientos o habilidades motrices y sociales de manera simple y lúdica. Hacer esta estrategia de enseñanza en casa, aporta mucho beneficio en nuestros pequeños, además de enseñarlos, los entretienen y los ayuda a desarrollar y a estimular su gran imaginación y creatividad; y para nosostros los adultos permite dedicarles un tiempo y compartir con ellos . Y aunque existen diversos tipos de juegos didácticos que apuntan a estimular uno o varios aspectos del niño hoy te enseñaré a realizar uno muy facil para niños más pequeñitos que recién comienzan a tener interés en los números y los colores. Te invito a leer hasta el final! Vamos!
Didactic games are games full of activities that are used as a teaching technique to encourage or stimulate some type of learning in children. Its objective is that children obtain knowledge or motor and social skills in a simple and playful way. Doing this teaching strategy at home brings a lot of benefit to our little ones, in addition to teaching them, entertaining them and helping them to develop and stimulate their great imagination and creativity; and for us adults, it allows us to dedicate some time and share with them. And although there are different types of didactic games that aim to stimulate one or several aspects of the child, today I will teach you how to make a very easy one for younger children who are just beginning to have an interest in numbers and colors. I invite you to read until the end! Come on!

Materiales que necesitas:
- Cartón.
- Trozos de foami.
- Pintura marrón, azul y negra.
- Tijeras.
- Pincel.
- Cartulina blanca.
- Silicón.
- Lápiz.
Materials you need:
- Paperboard.
- Pieces of foam.
- Brown, blue and black paint.
- Scissors.
- Brush.
- White cardboard.
- Silicone.
- Pencil.
(PROCEDIMIENTO)(PROCEDURE)
Paso 01
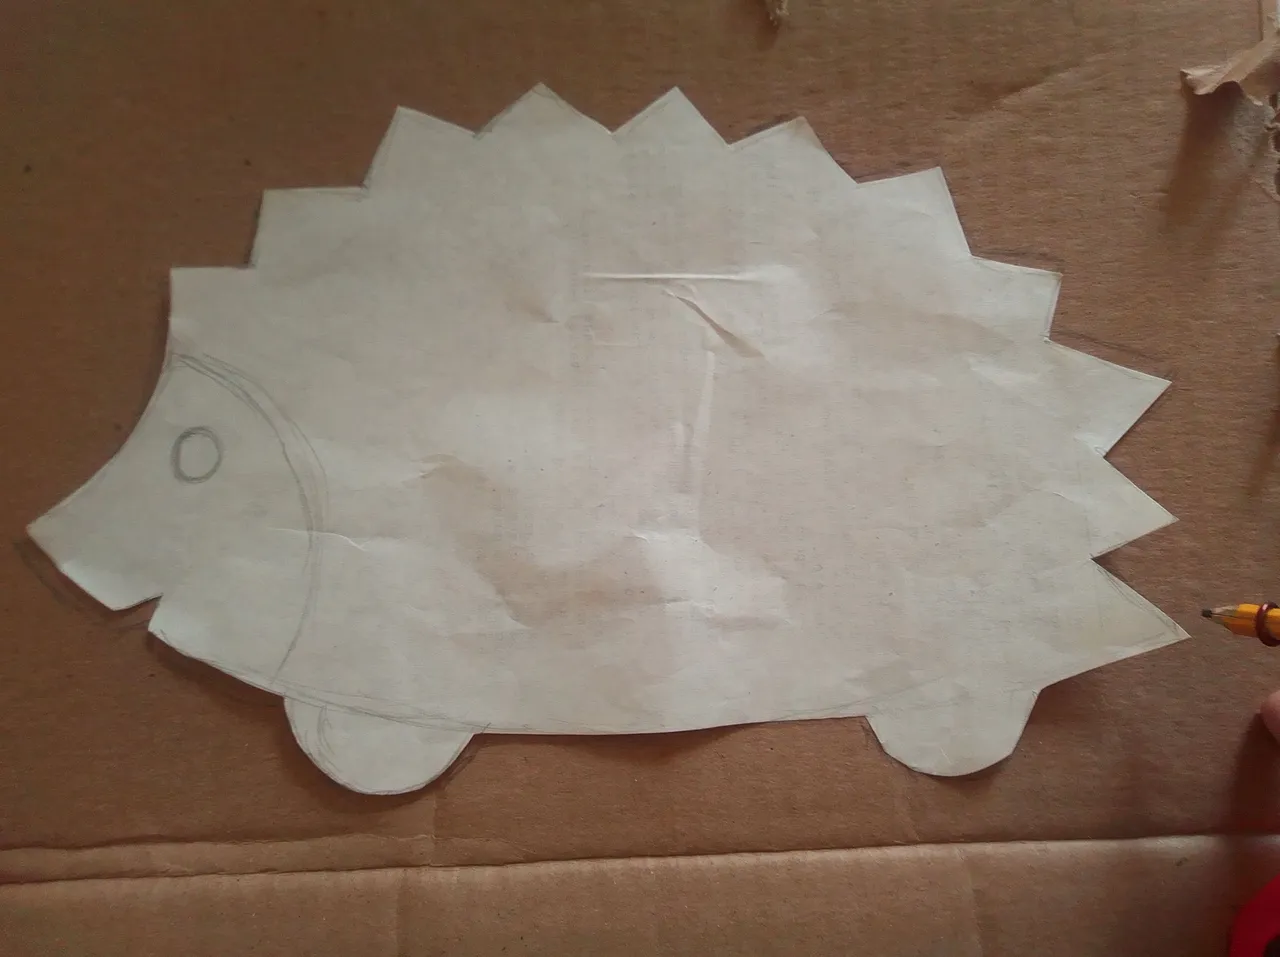
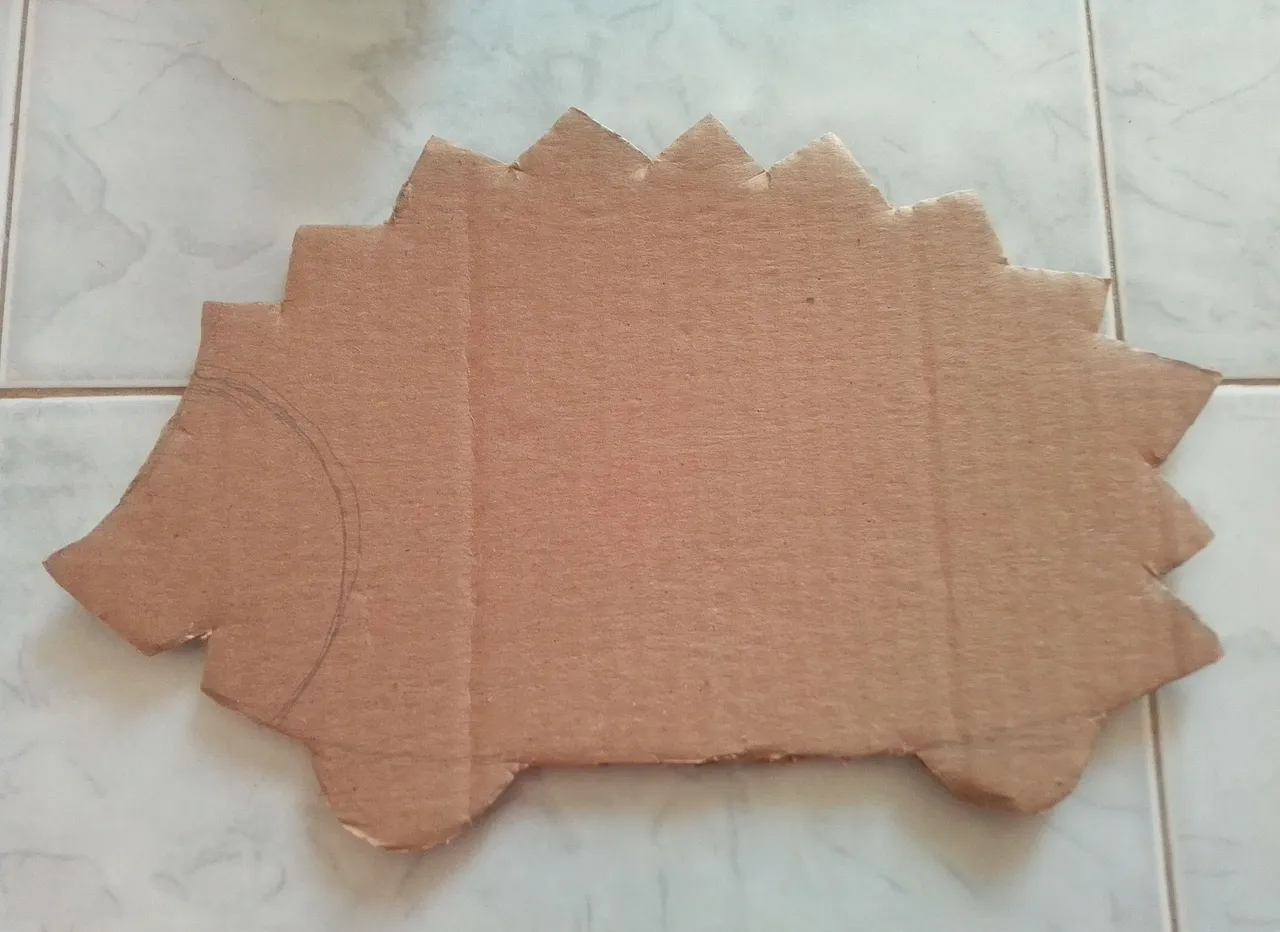
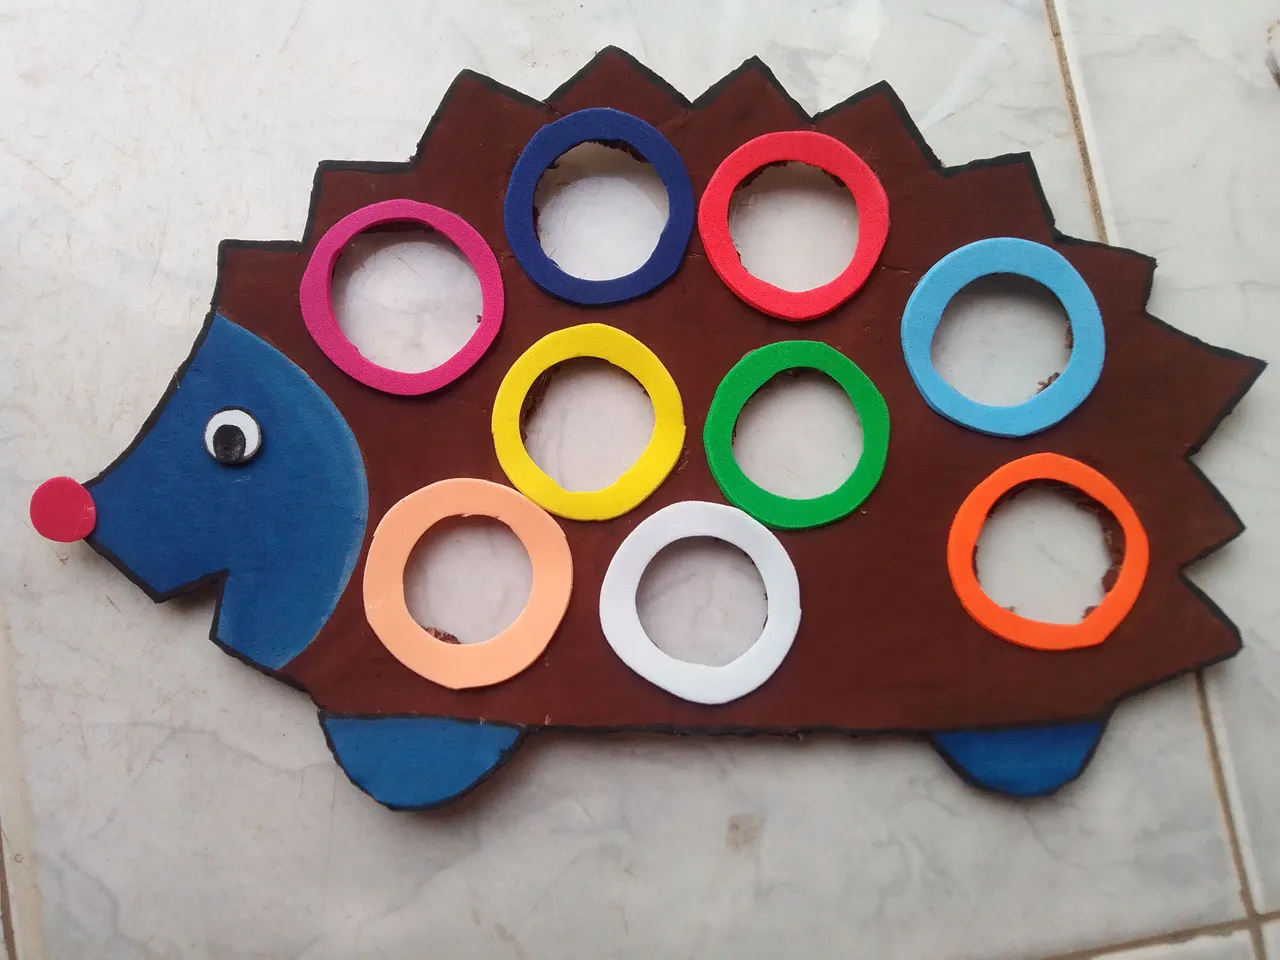
Bien amigos,he escogido un puercoespín como la base de mi juego, por lo que dibujamos la silueta del animal en un papel y luego la transferimos al cartón marcando con el lápiz el borde. Luego cortamos con mucho cuidado. Puedes escoger otra figura si deseas lo importante es que tenga un gran espacio en su cuerpo.
Step 01
Okay folks, I have chosen a porcupine as the base of my game, so we draw the silhouette of the animal on a piece of paper and then transfer it to the cardboard by marking the edge with the pencil. Then we cut very carefully. You can choose another figure if you wish, the important thing is that it has a large space in its body.
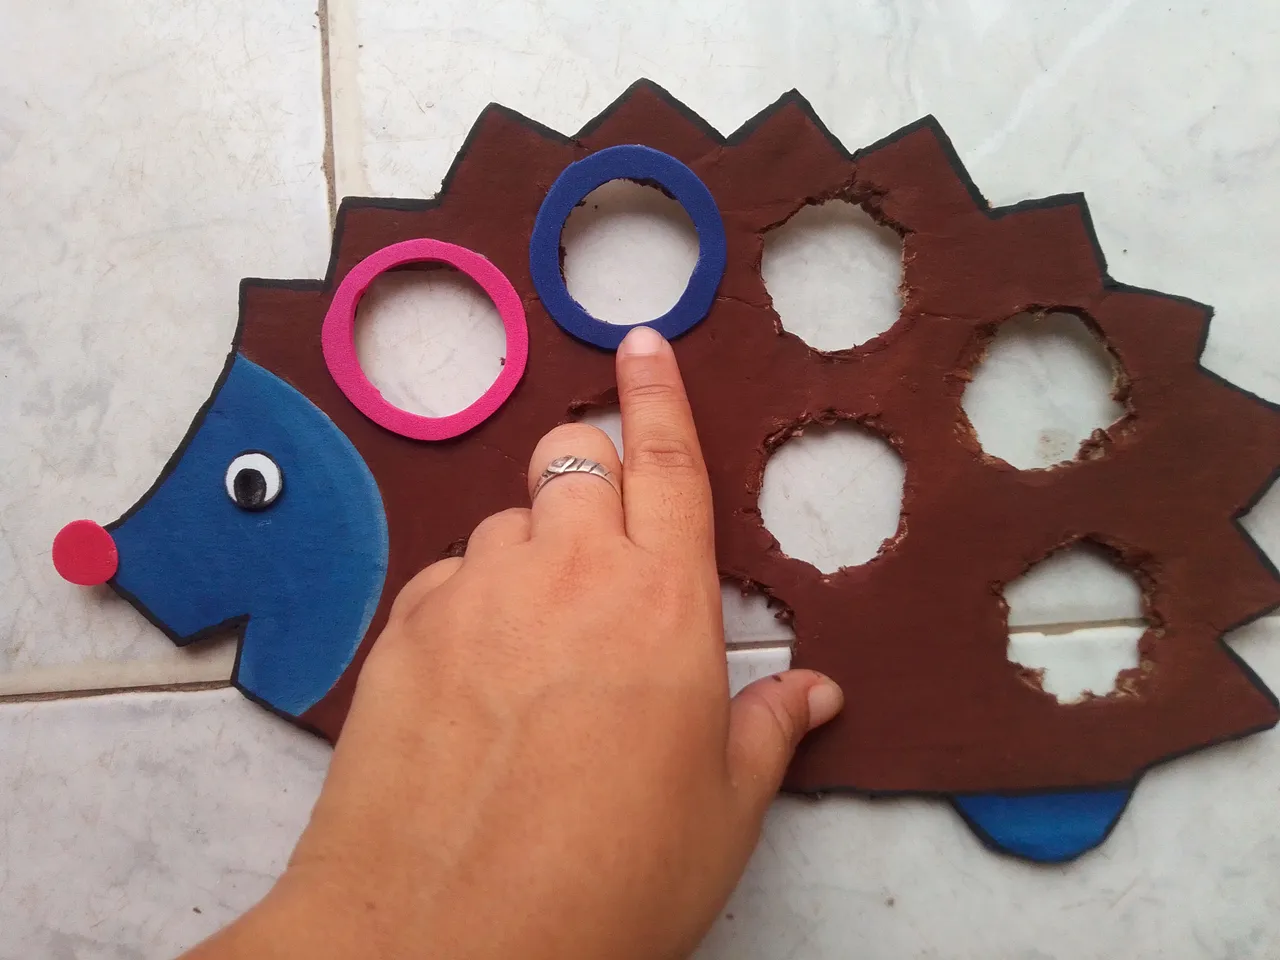
Paso 02
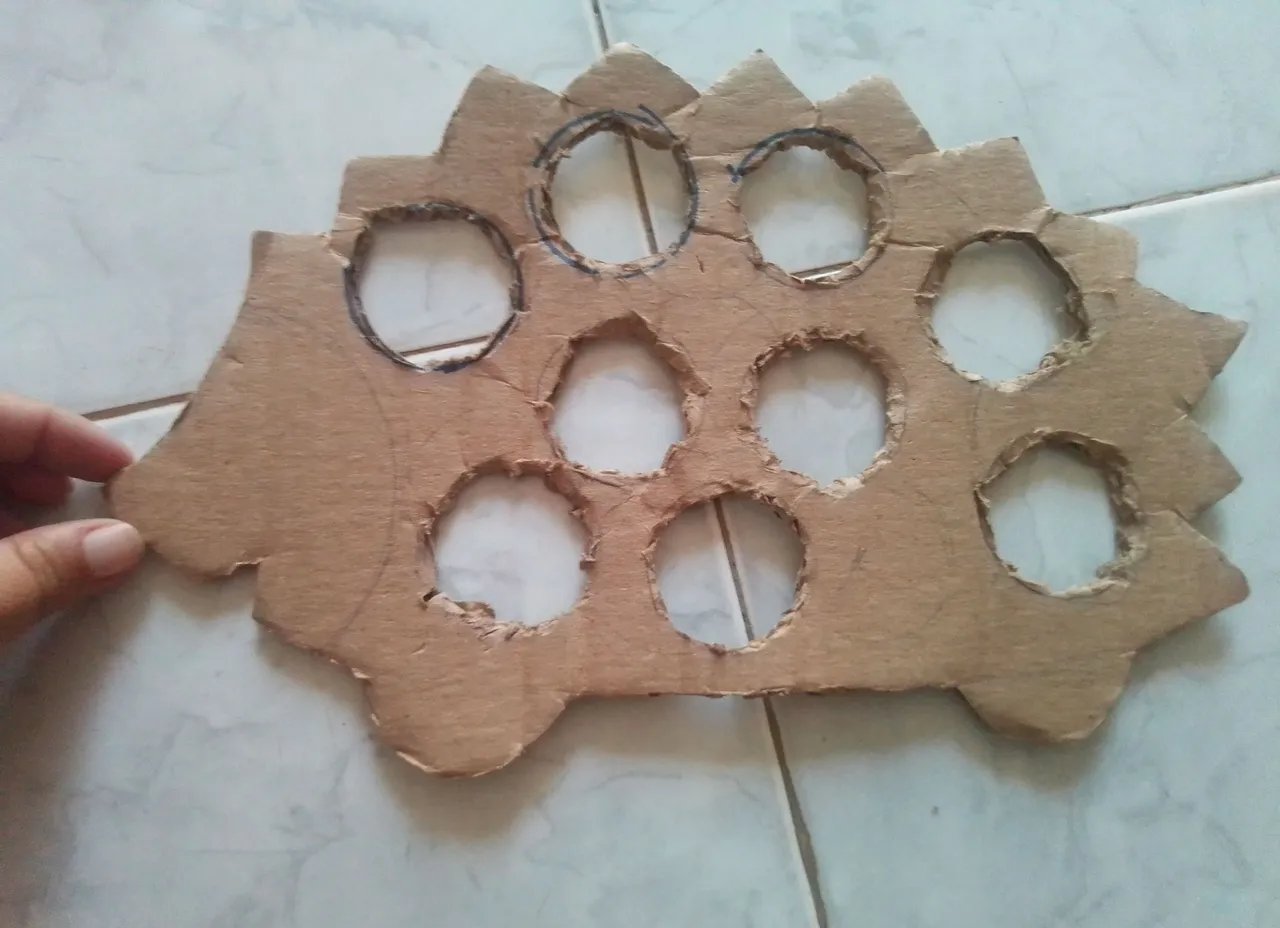
Ahora tomamos una tapa y marcamos nueve círculos en centro del cuerpo y abrimos cada orificio. Si estos cortes no te quedan tan bien no te preocupes, ya luego te mostraré como arreglarlos para que se vean tanto. Ahora toma la pintura marrón y pinta todo el cuerpo del animalito.
Step 02
Now we take a lid and mark nine circles in the center of the body and open each hole. If these cuts do not suit you so well, do not worry, I will show you how to fix them later so that they look as good. Now take the brown paint and paint the whole body of the little animal.
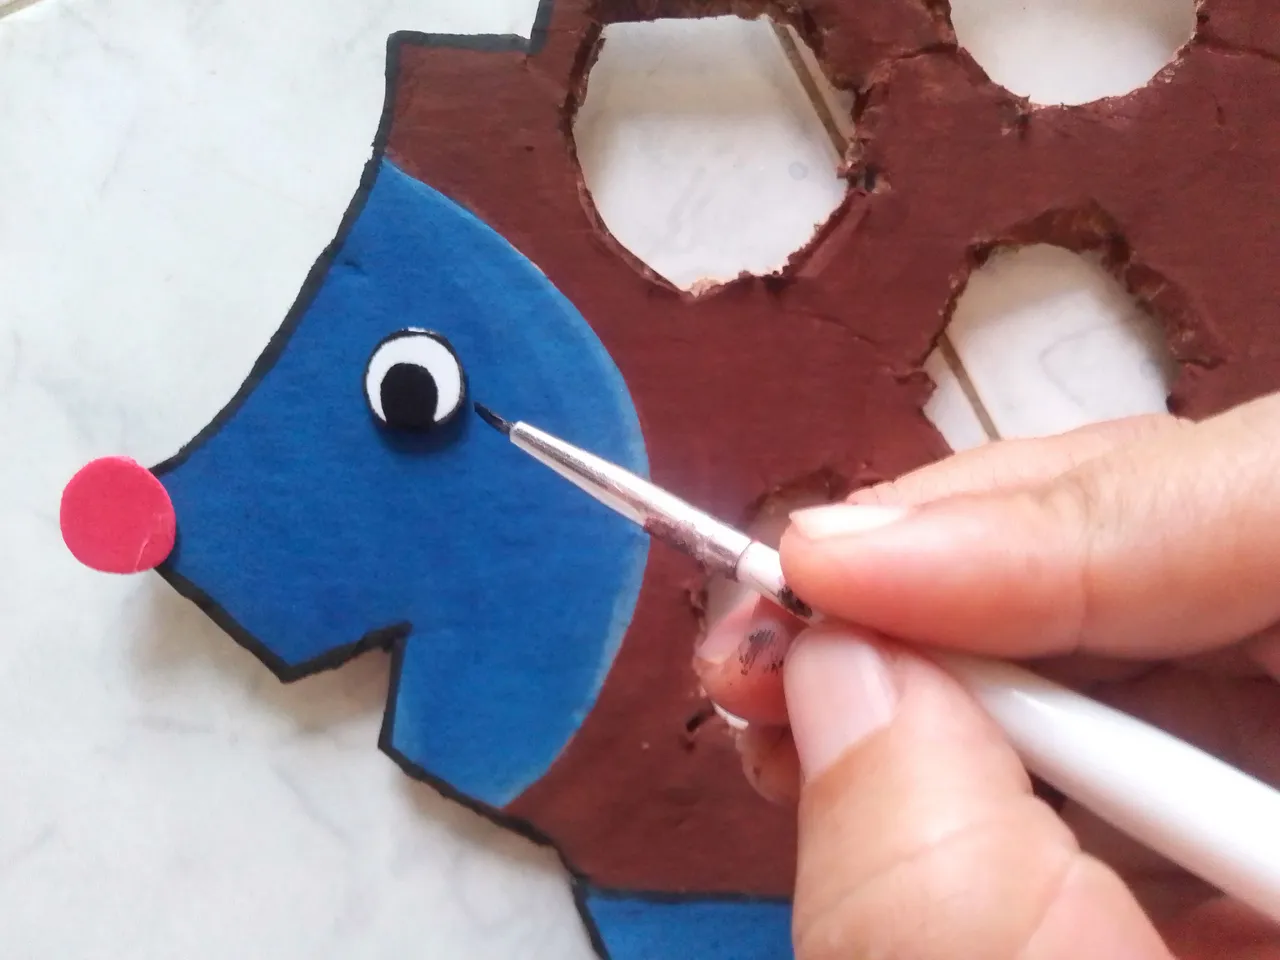
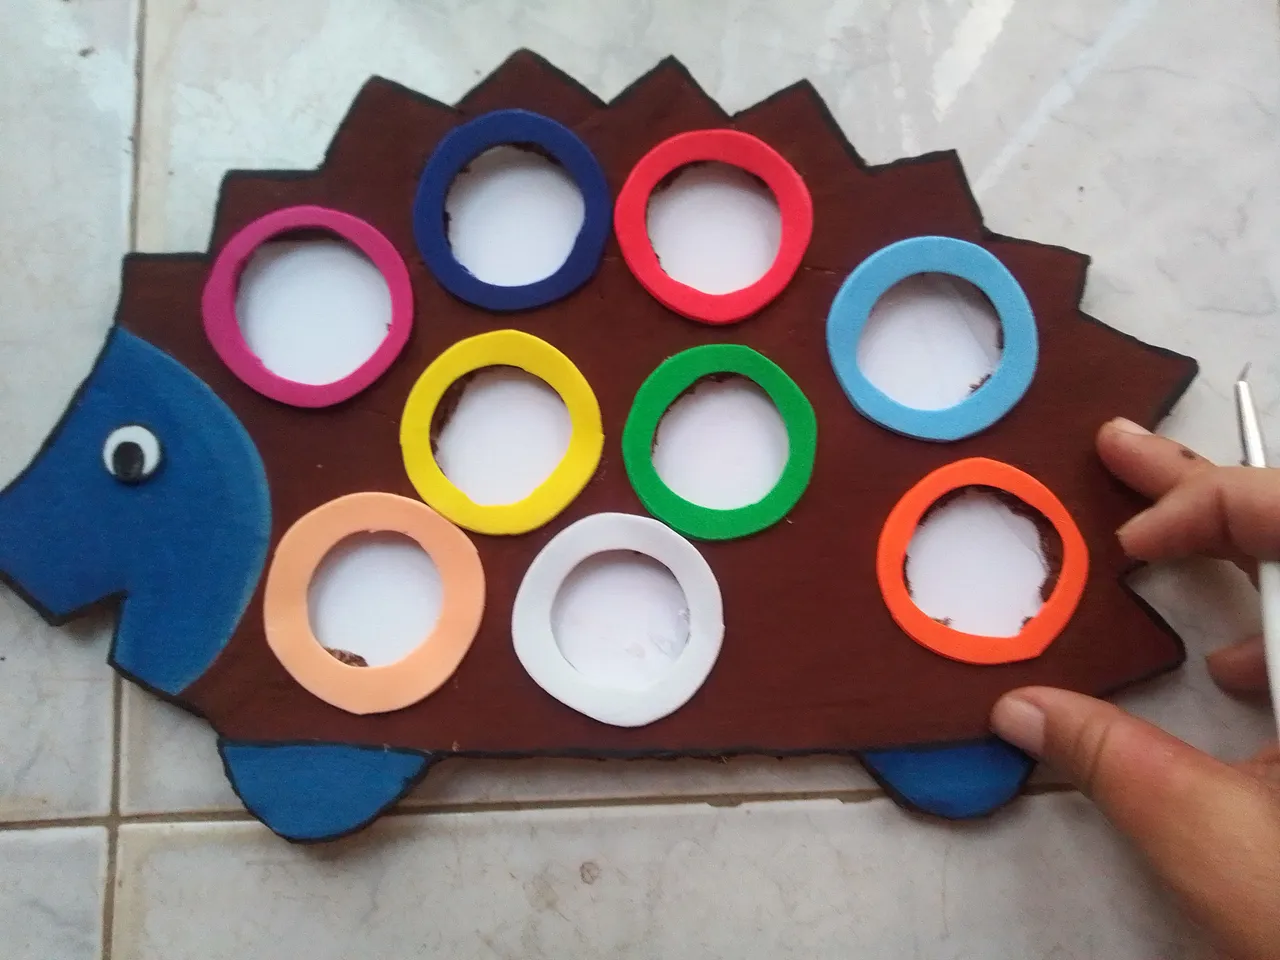
Paso 03
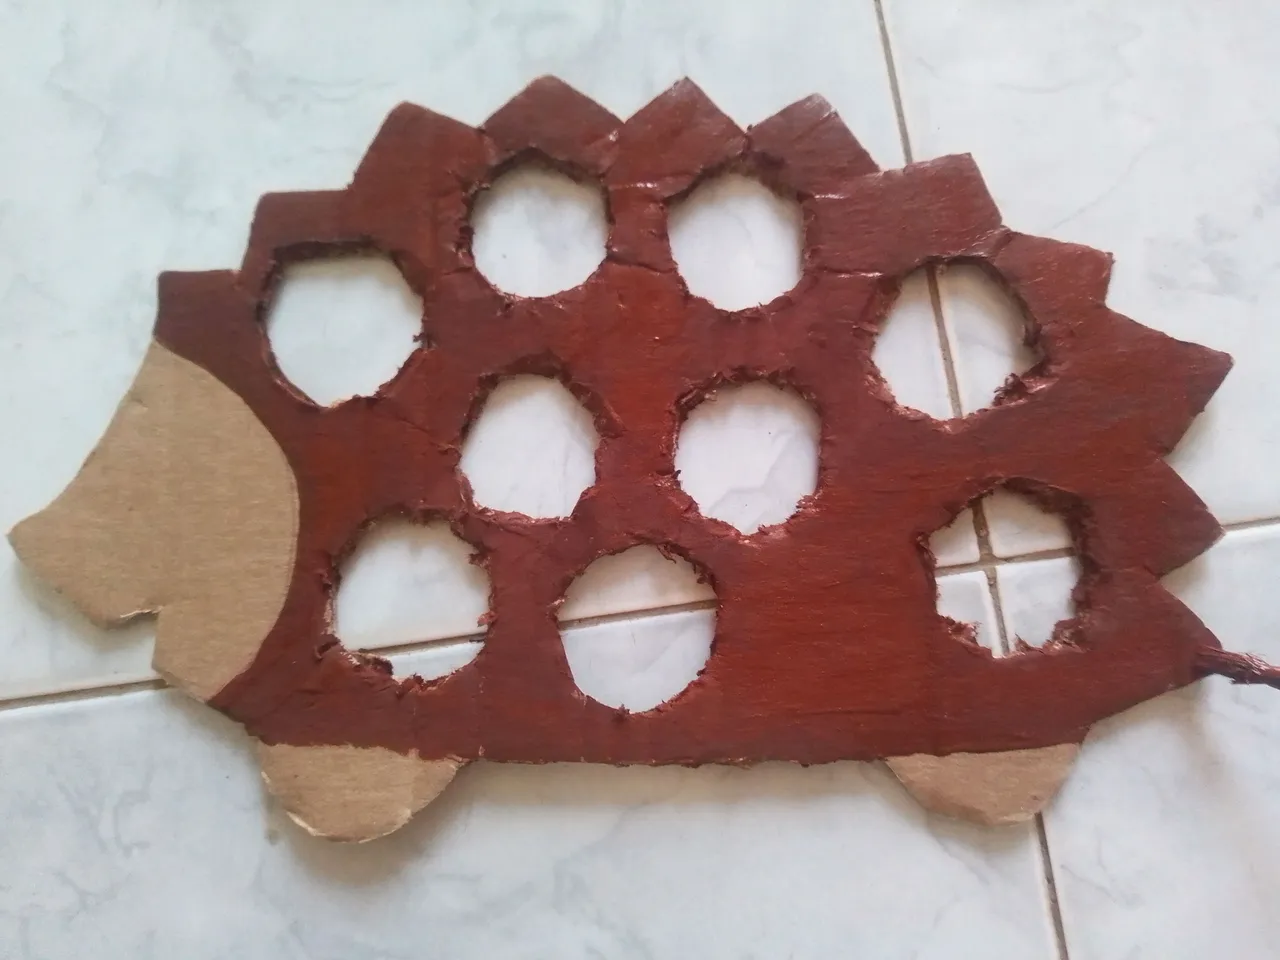
Luego pinta su cabeza y la patitas con pintura azul y pinta los bordes con pintura negra. Pinta un círculo blanco con uno negro en centro para el ojo y coloca con pegamento un pequeño círculo de foami rojo en la nariz . Corta nueve aros de foami en diferentes colores un poquito más pequeños que los círculos que hiciste anteriormente y pega con silicón sobre cada uno ellos.
Step 03
Then paint its head and legs with blue paint and paint the edges with black paint. Paint a white circle with a black center for the eye and glue a small red foam circle on the nose. Cut nine foami rings in different colors a little smaller than the circles you made earlier and glue each of them with silicone.
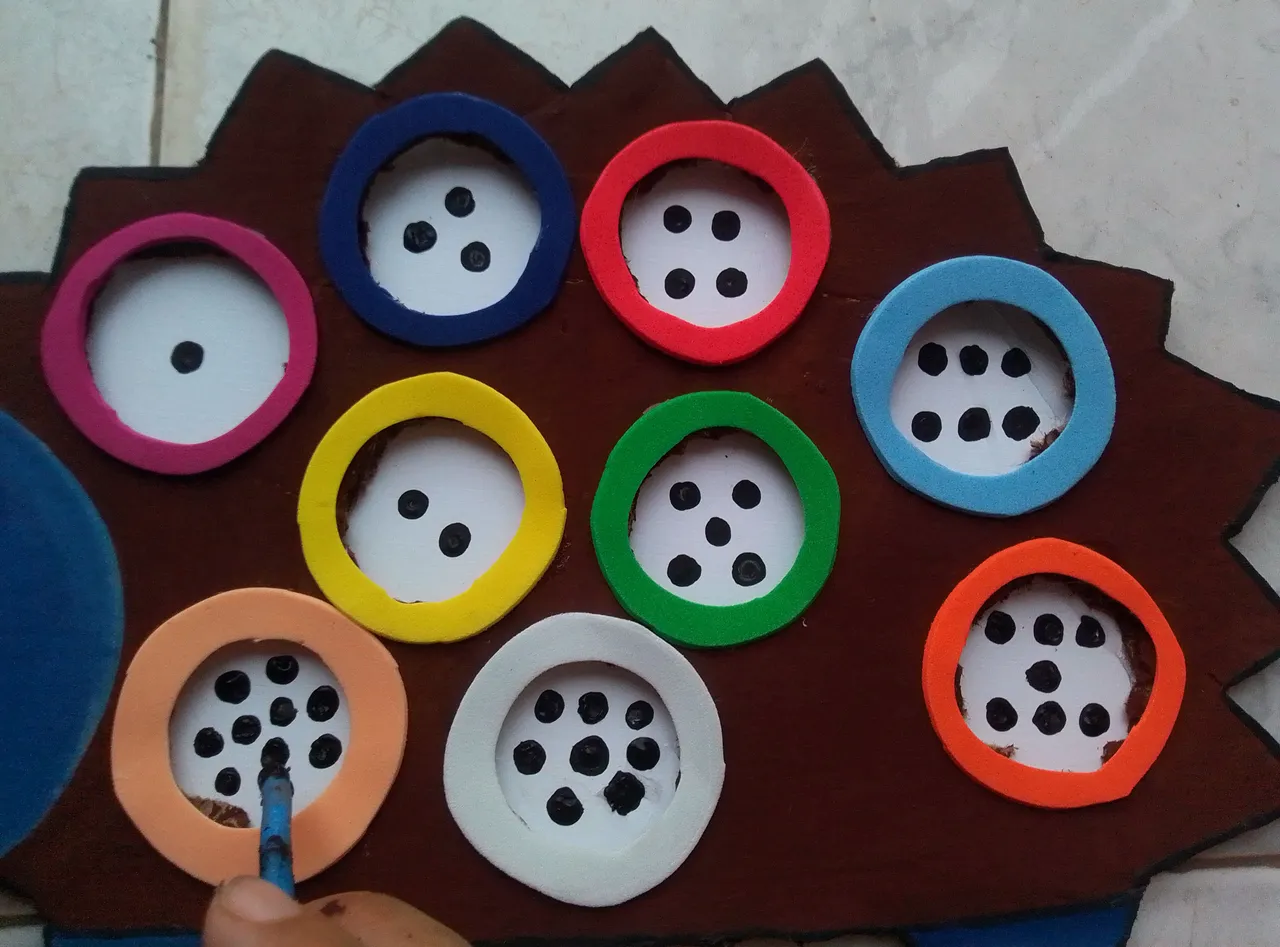
Paso 04
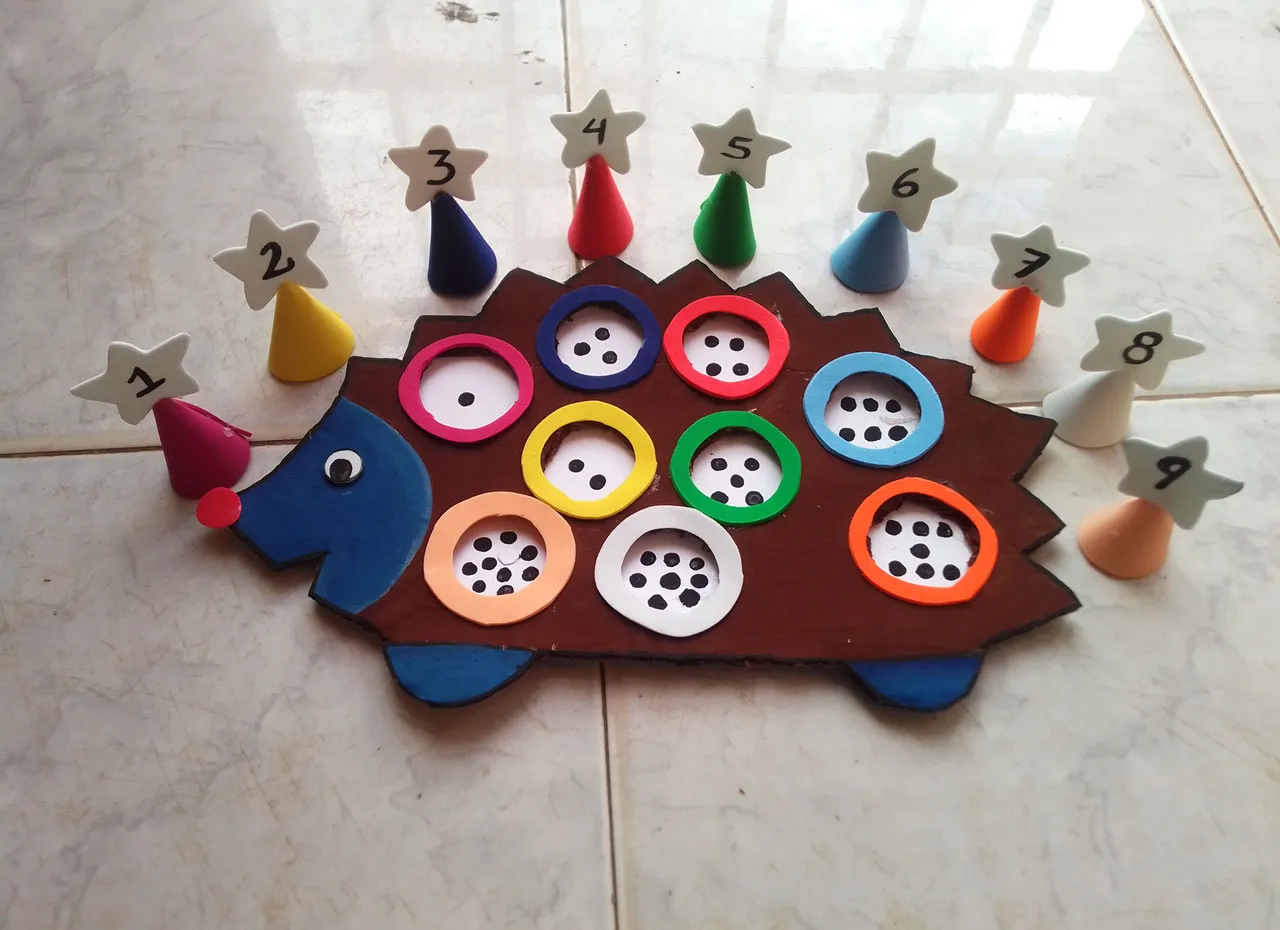
Luego de esto, corta un óvalo de cartulina blanca del tamaño del cuerpo del animal y pega con silicón el la parte trasera( puedes también pegar una hoja de papel blanca en caso de no tener cartulina). En esta base blanca, realiza con pintura negra pequeños puntos contando los orificios de 1 al 9. Puedes hacerlos al azar o seguir la secuencia de los huecos.
Step 04
After this, cut an oval of white cardboard the size of the animal's body and glue it to the back (you can also glue a white sheet of paper if you don't have cardboard) . On this white base, make small dots with black paint, counting the holes from 1 to 9. You can do them randomly or follow the sequence of the holes.
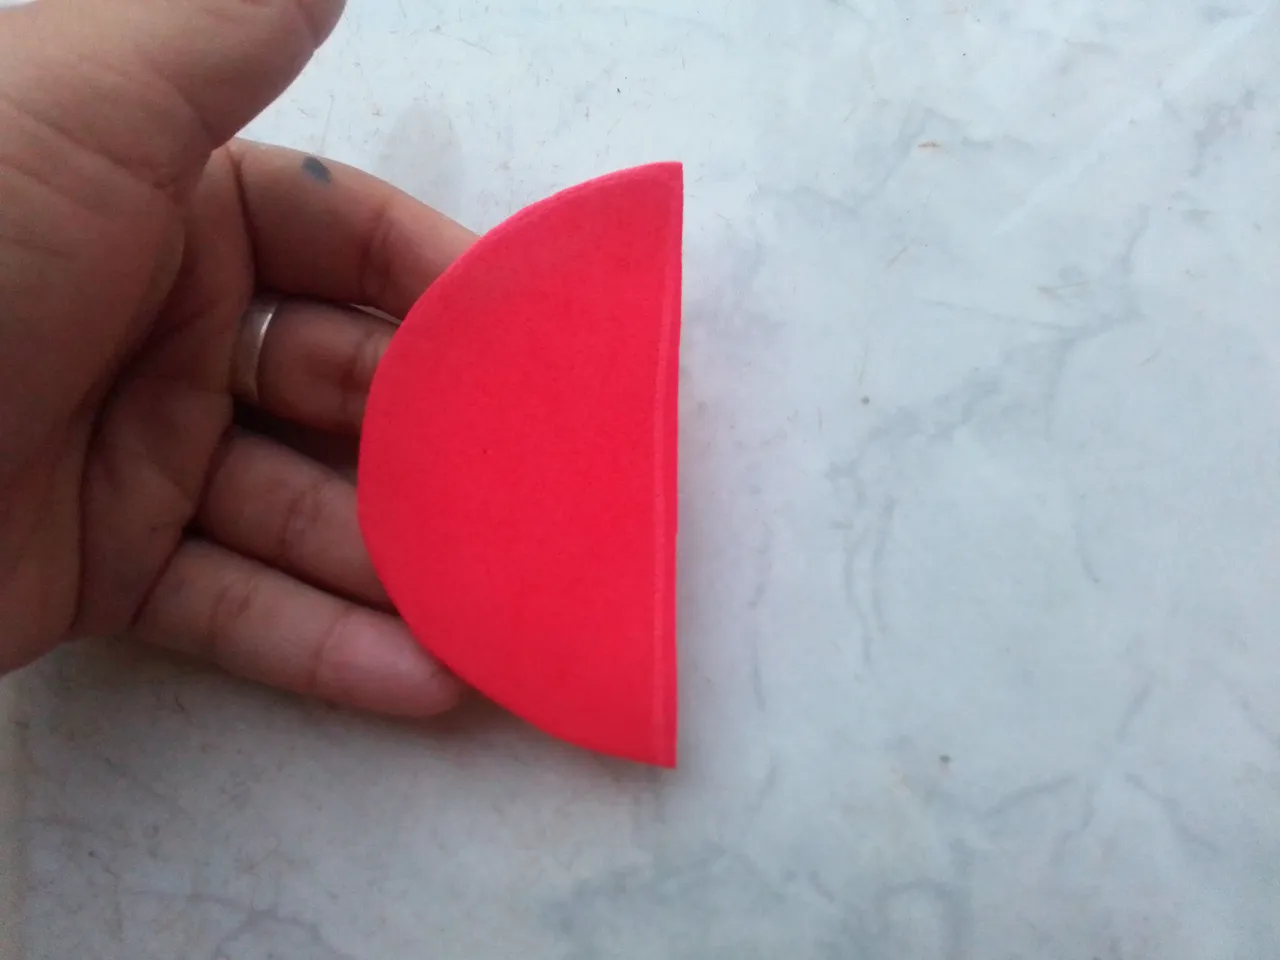
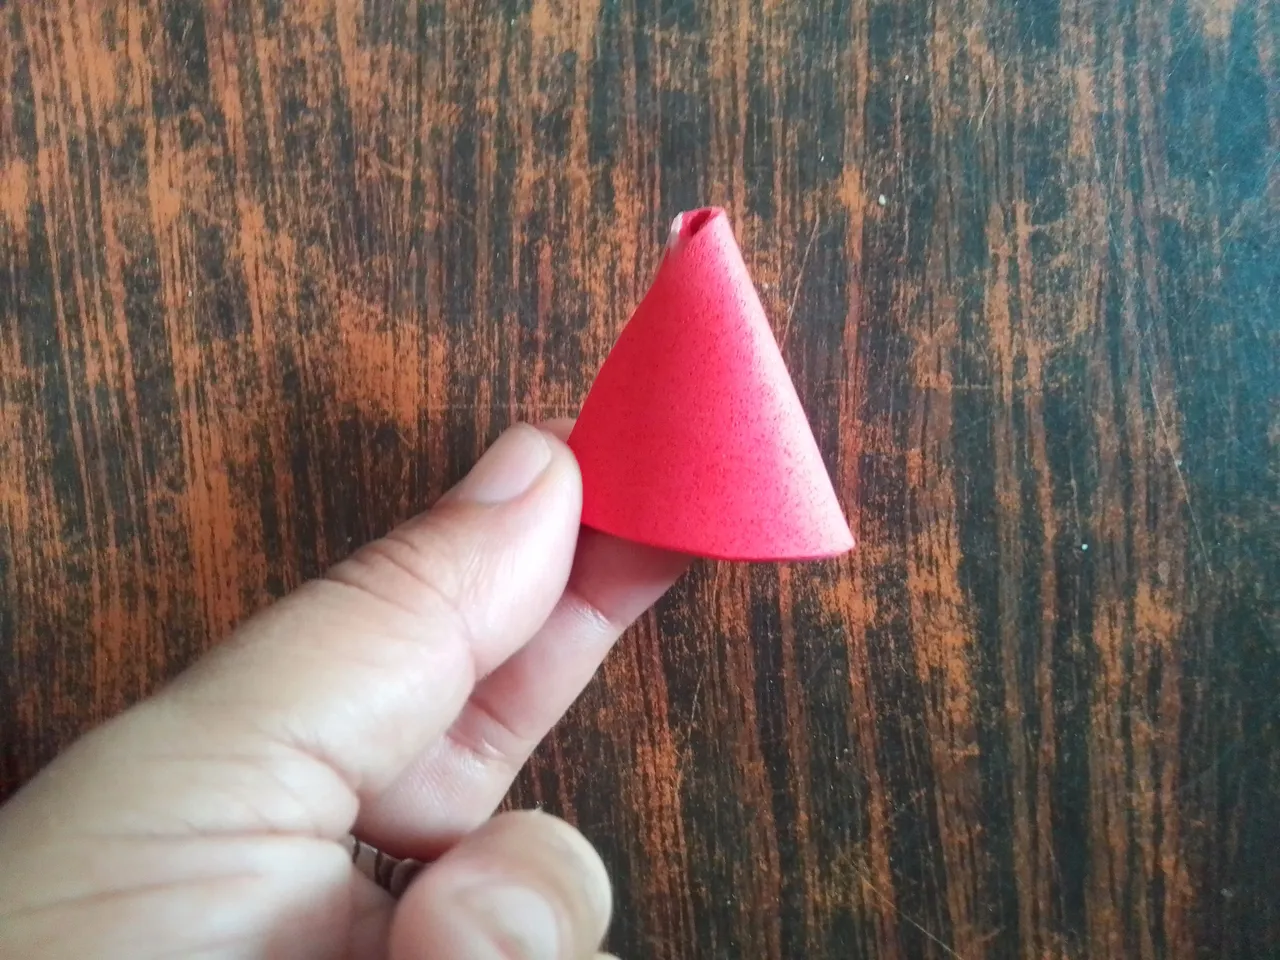
Paso 05
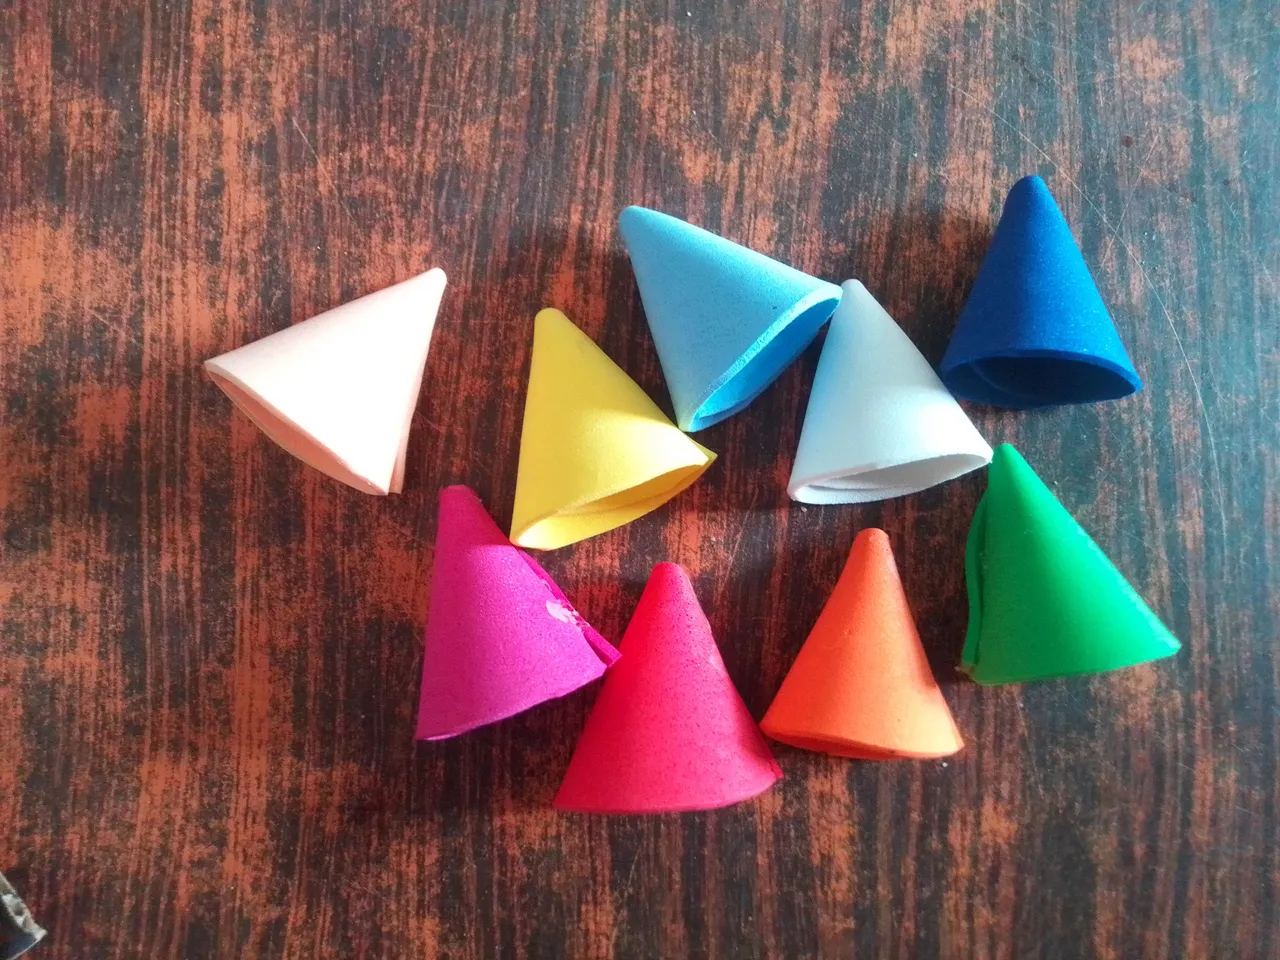
Ahora es momento de combinar los colores, corta piezas de foami con forma de media luga según los colores y el tamaño que usaste para cada círculo y junta las puntas con pegamento para formar nueve conos pequeños que entren en los círculos. Cómo lo ves en las imágenes de arriba.
Step 05
Now it's time to match the colors, cut crescent-shaped pieces of foami based on the colors and size you used for each circle and glue the ends together to form nine small cones that Get into the circles. How you see it in the images above.
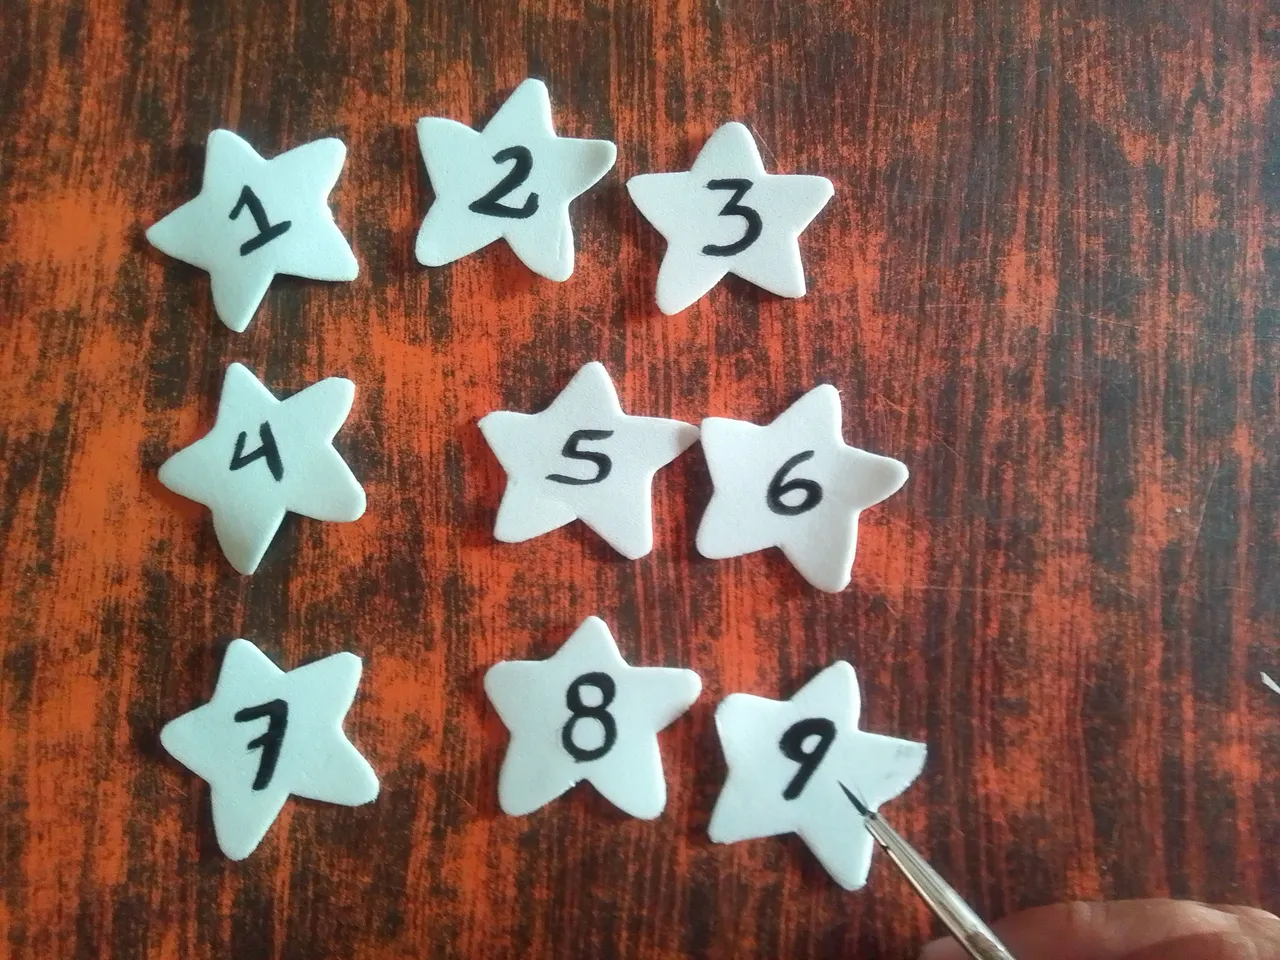
Paso 06
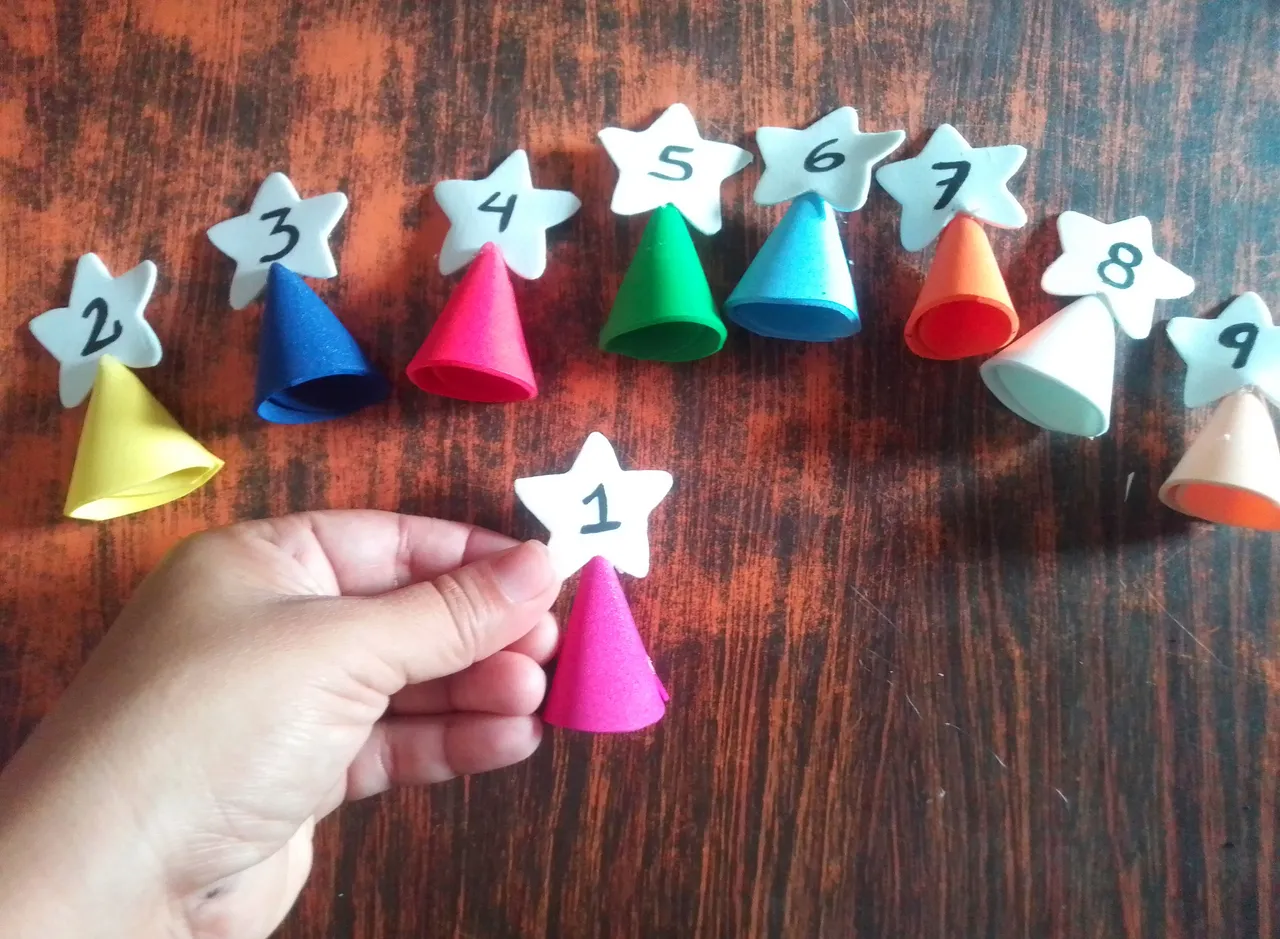
Finaliza este proyecto cortando nueve estrellitas de foami blanco y escribe sobre cada una de ellas los nueve números y las pegas a cada cono dependiendo el color de cada uno de ellos.
Step 06
Finish this project by cutting nine little stars out of white foam and write the nine numbers on each of them and stick them to each cone depending on the color of each of them.
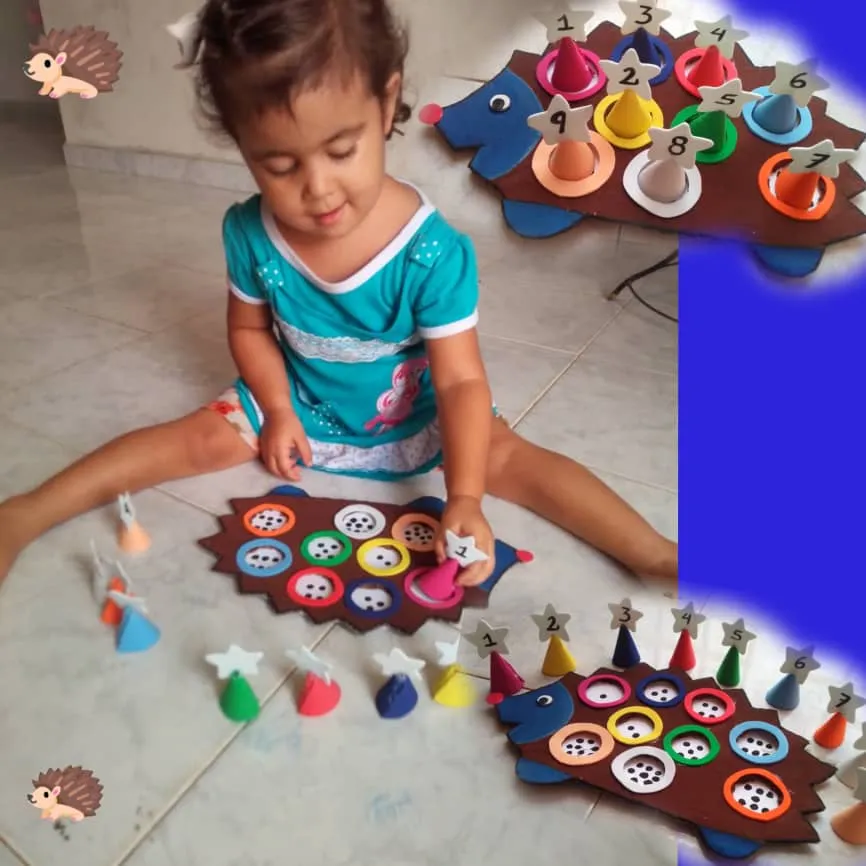
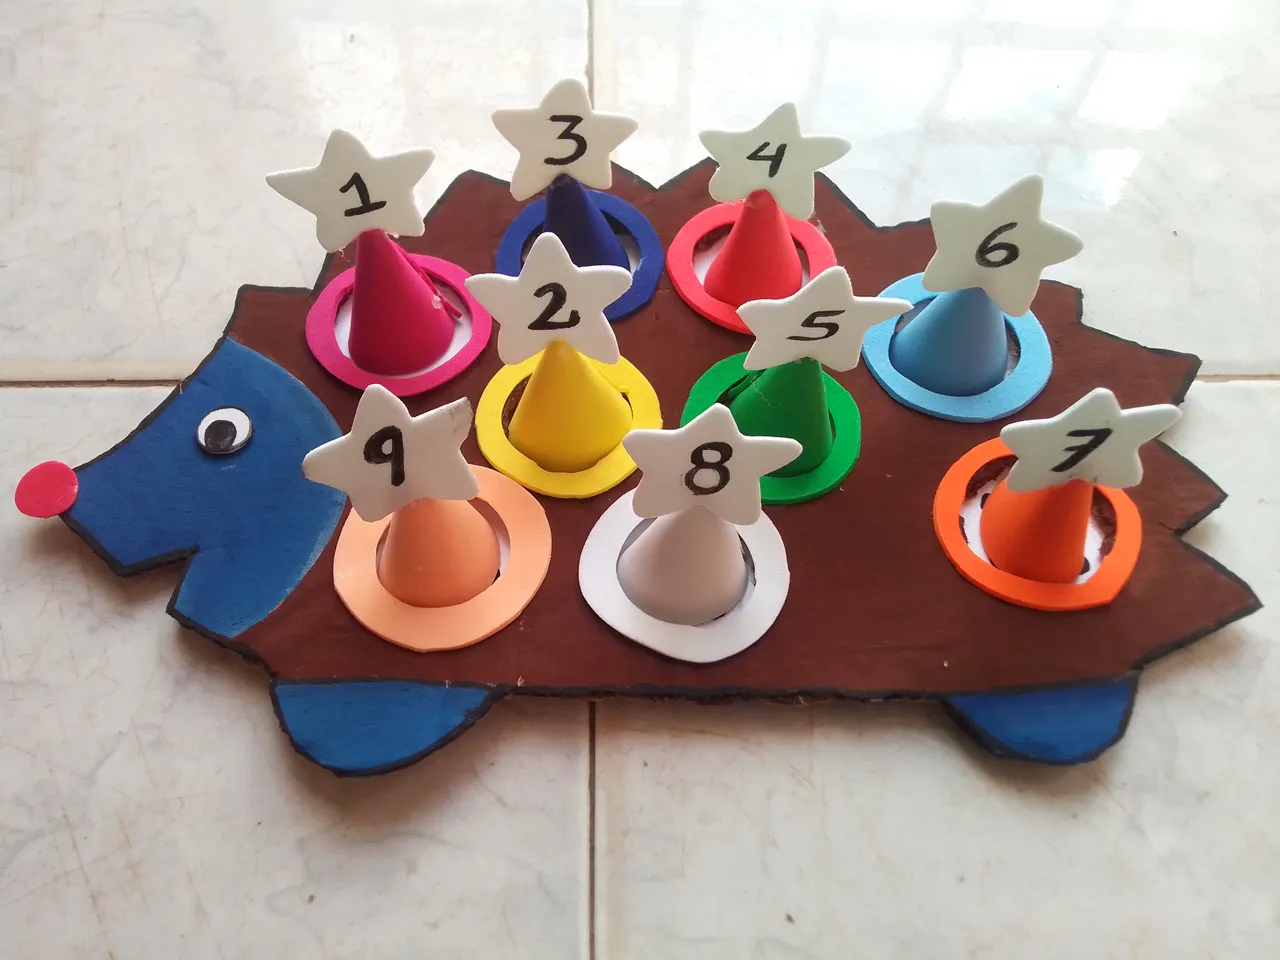
Resultado!
Result!
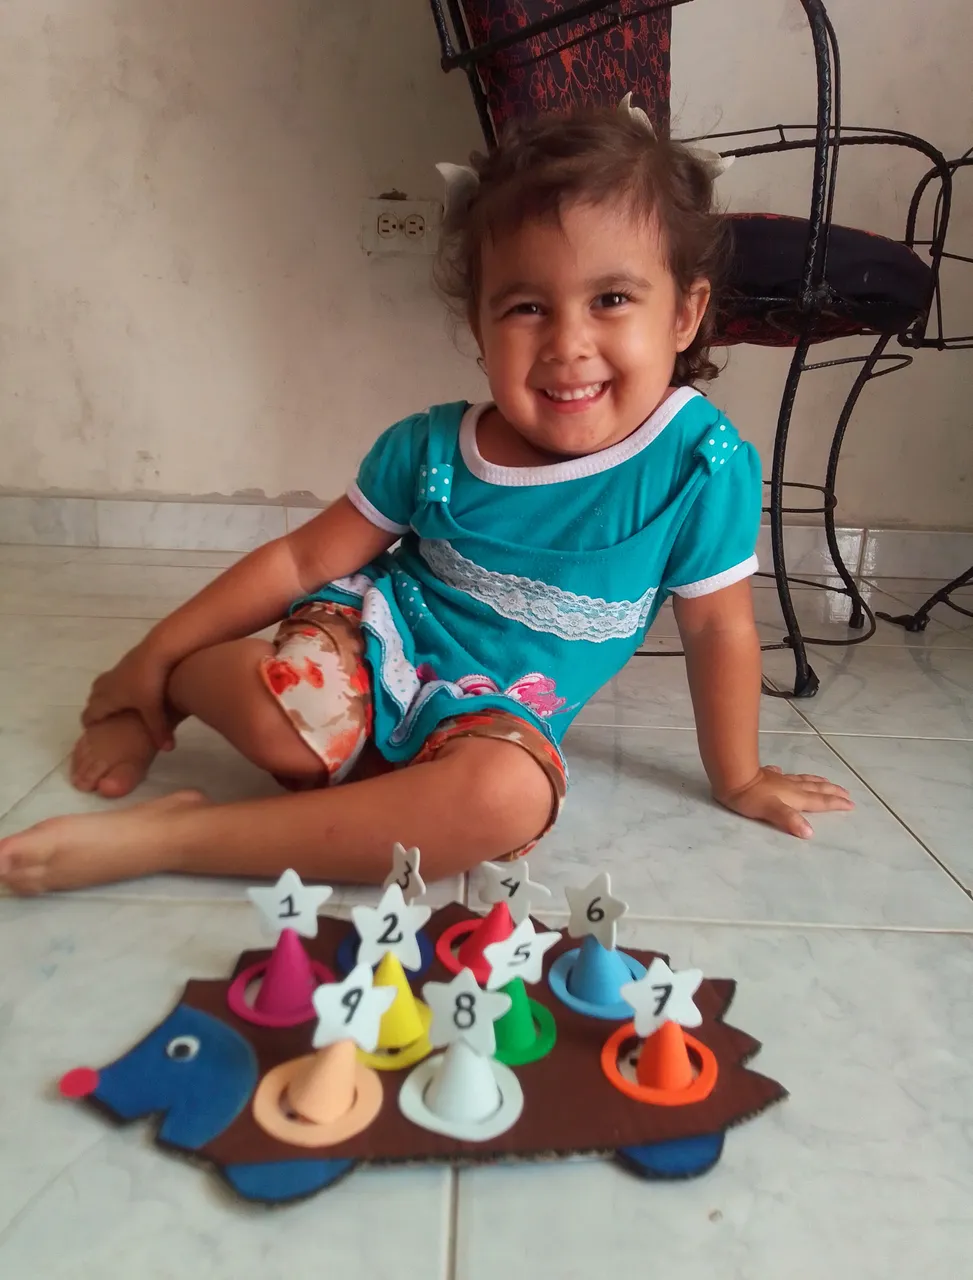
De esta manera ha quedado este proyecto de aprendizaje para nuestros niños. La verdad es que me gustó mucho hacer esto para mi niña y de alguna manera transmitirles está fascinante idea para que también enseñes a tu niño de números y colores. Espero te haya gustado mi trabajo el día de hoy!
This is how this learning project has been for our children. The truth is that I really liked doing this for my daughter and in some way conveying this fascinating idea so that you can also teach your child about numbers and colors. I hope you liked my work today!


☺ Gracias por tu linda visita a mi post! ☺
☺ Thanks for your nice visit to my post! ☺
Me encantaría sabes que te parece esta idea mis amigos, así que no olvides dejar tu comentario. Les deseo mucha suerte, y una feliz elaboración. Hasta pronto!
I would love to know what you think of this idea my friends, so don't forget to leave your comment. I wish you good luck, and a happy elaboration. See you soon!
Todas las imágenes de esta publicación son mías. Tomado de mi dispositivo Smooth 6.5 y editadas en PicsArt| texto traducido en el traductor Google.
All images in this post are mine. Taken from my Smooth 6.5 device and edited in PicsArt| translated text in Google translator.