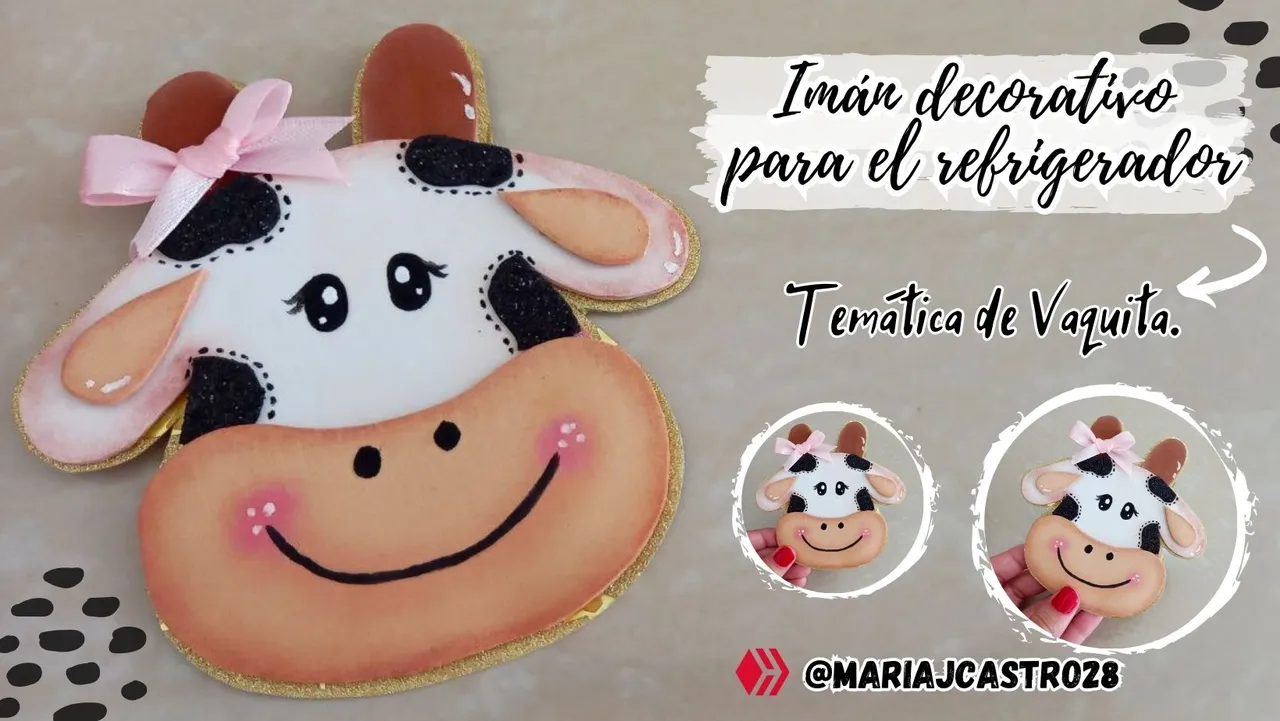

¡Feliz día amigos creativos de Hive Diy! Espero que se encuentren de maravilla, yo por mi parte me he dedicado a elaborar nuevos adornos para mi casa porque después guardar todos los adornos de navidad aun no me acostumbro a lo vacío y simple que se ve todo. En este caso quise hacer algo para mi cocina y después de tanto pensarlo decidí que la temática para decorar este espacio sería de vaquita y el primer adorno que he elaborado es un lindo imán decorativo para el refrigerador el cual les vengo a mostrar hoy y espero que les guste tanto como a mí, ahora sin más, ¡vamos a crear!
¡Happy day creative friends from Hive Diy! I hope you are feeling great, for my part I have dedicated myself to making new decorations for my house because after putting away all the Christmas decorations I still can't get used to how empty and simple everything looks. In this case I wanted to do something for my kitchen and after thinking about it so much I decided that the theme to decorate this space would be a cow and the first ornament that I have made is a nice decorative magnet for the refrigerator which I am going to show you today and I hope that If you like it as much as I do, now without further ado, let's create!

• Cartulina metalizada dorada con estampado.
• Foami escarchado negro.
• Pintura negra y blanca.
• Pincel fino.
• Sombra de ojos color marrón y blanco.
• Cinta de tela rosada.
• Rubor.
• Imán.
• Brocha.
• Tijera.
• Lápiz.
• Silicón.
• Gold metallic cardstock with print.
• Black frosted foam.
• Black and white paint.
• Fine brush.
• Brown and white eye shadow.
• Pink fabric ribbon.
• Blush.
• Magnet.
• Brush.
• Scissors.
• Pencil.
• Silicone.


➮ PASO 1. Lo primero que hice fue elaborar en foami las piezas para formar la vaquita, en este caso hice una figura sencilla sin cuerpo y luego de dibujar las piezas en el color de foami correspondiente las recorté.
➮ STEP 1. The first thing I did was make the pieces in foam to form the cow, in this case I made a simple figure without a body and after drawing the pieces in the corresponding color of foam I cut them out.


➮ PASO 2. Con una brocha tomé un poco de sombra para ojos de color marrón y remarqué los bordes de las piezas de color claro como la cabeza, las orejas y el hocico, mientras que las piezas de los cuernos que son de un color más oscuro las remarqué con sombra para ojos de color blanco.
➮ STEP 2. With a brush I took a little brown eye shadow and highlighted the edges of the light-colored pieces such as the head, ears and muzzle, while the horn pieces that are In a darker color I highlighted them with white eye shadow.

➮ PASO 3. A la pieza del hocico le dibujé 2 puntitos negros con pintura para hacer la nariz de la vaquita, también le dibujé con pintura negra la sonrisa y en los extremos de esta apliqué un poco de rubor para hacer las mejillas, además como detalle le dibujé a esas unos puntitos con pintura blanca.
➮ STEP 3. On the muzzle piece I drew 2 little black dots with paint to make the cow's nose, I also drew the smile with black paint and at the ends of it I applied a little blush to make the cheeks, also as a detail I drew some little dots on those with white paint.


➮ PASO 4. Procedí a pegar el hocico sobre la pieza de la cabeza, también pegué las orejas y en la parte superior trasera pegué los cuernos, luego de tener las piezas principales procedí a darle lugar y pegar a las manchitas negras de la vaca.
➮ STEP 4. I proceeded to glue the snout on the head piece, I also glued the ears and on the upper back part I glued the horns, after having the main pieces I proceeded to give room and glue the little black spots of the cow.


➮ PASO 5. Con un pincel muy fino tomé un poco de pintura negra y dibujé pequeños puntos alrededor de las manchitas de la vaca, además también le hice los ojos con sus respectivas pestañas y le hice pequeños detalles con pintura blanca tanto en los ojos como en ciertas partes de la figura.
➮ STEP 5. With a very fine brush I took a little black paint and drew small dots around the spots on the cow, I also made the eyes with their respective eyelashes and made small details with white paint both in the eyes as in certain parts of the figure.

➮ PASO 6. Ya finalizada la vaquita pegué la pieza completa sobre la cartulina metalizada dorada con estampado y le recorté el exceso de esta dejando un delgado borde a su alrededor como fondo de la vaquita.
➮ STEP 6. Once the cow was finished, I glued the entire piece on the gold metallic cardboard with a print and cut off the excess, leaving a thin border around it as the background of the cow.

➮ PASO 7. Como último detalle hice un pequeño lazo de cinta de tela rosada y lo pegué sobre uno de los cuernos de la vaquita y ya por ultimo pegué el imán en la parte trasera de esta.
➮ STEP 7. As a last detail I made a small bow of pink fabric ribbon and glued it on one of the cow's horns and finally I glued the magnet on the back of it.


¡Y listo! De esta manera tan sencilla fue como elaboré esta linda vaquita de foami como elemento decorativo para mi refrigerador, como ven es muy fácil de hacer y queda muy lindo para decorar esta parte de nuestra cocina, porque además la vaca es una figura que representa muy bien esta área, lo que para mí lo hace perfecto. ¿Qué les pareció a ustedes? ¡A mí me encantó! Gracias por la visita, nos vemos pronto con una nueva idea creativa.
¡And ready! In this simple way, I made this cute little foam cow as a decorative element for my refrigerator. As you can see, it is very easy to make and it looks very nice to decorate this part of our kitchen, because the cow is also a figure that represents very well. this area, which for me makes it perfect. What did you think? I loved it! Thank you for visiting, see you soon with a new creative idea.


Todas las fotografías son de mi propiedad.
Fotografías capturadas con mi Samsung Galaxy A12
Separador de texto elaborado en Canva.
Nos vemos en mi próxima publicación.
¡Tengan un feliz día!
All photographs are my property.
Photos captured with my Samsung Galaxy A12
Text separator made in Canva.
See you in my next post.
¡Have a happy day!