¡Saludos Abejitas Creativas! | ¡Greetings Creative Bees!
¡Feliz mitad de semana! Hoy estoy acá nuevamente para compartir con ustedes una nueva creación para Halloween, se trata de un bello adorno elaborado con una botella de vidrio decorada con estambre formando la figura de Frankenstein, les comento que fue una idea que tenía desde hace días y me tenía muy emocionada por ver cómo quedaría el resultado y debo admitir que lo amé, queda muy lindo y sirve perfectamente para decorar algún espacio durante estas fechas, espero que les guste, aquí les comparto el paso a paso para su elaboración, sin más, ¡a trabajar!
¡Happy midweek! Today I am here again to share with you a new creation for Halloween, it is a beautiful ornament made with a glass bottle decorated with yarn forming the figure of Frankenstein, I tell you that it was an idea I had for days and I was very excited to see how the result would turn out and I must admit that I loved it, it is very nice and it is perfect for decorating some space during these dates, I hope you like it, here I share the step by step for its elaboration, without further ado , to work!


☠ 1 Botella de vidrio pequeña.
☠ Estambre verde y negro.
☠ Foami escarchado blanco y negro.
☠ Pega blanca escolar.
☠ Pintura al frío negra.
☠ Pincel.
☠ Tijera.
☠ Lápiz.
☠ 1 small glass bottle.
☠ Green and black stamen.
☠ Black and white frosted foami.
☠ School white paste.
☠ Black cold paint.
☠ Brush.
☠ Scissor.
☠ Pencil.


☠ PASO 1. Lo primero que debemos hacer es retirarle la etiqueta a la botella en caso de tenerla, podemos usar una botella pequeña de refresco, malta, cerveza o una de salsa de tomate como en mi caso, para despegar la etiqueta la dejé remojando en agua por unas horas y luego con una esponja la eliminé por completo, la secamos muy bien y comenzamos a decorarla, aplicamos un poco de pega blanca en la parte inferior de la botella, es decir, la parte más gruesa y con el pincel la esparcimos mejor, tomamos la punta del estambre verde y comenzamos a pegarlo en la botella dándole la vuelta y asegurándonos de que no quede espacio vacío entre cada una.
☠ STEP 1. The first thing we must do is remove the label from the bottle if it has one, we can use a small bottle of soft drink, malt, beer or a tomato sauce bottle as in my case, to take off the label I left it soaking in water for a few hours and then with a sponge I removed it completely, we dried it very well and began to decorate it, we applied a little white glue to the bottom of the bottle, that is, the thickest part and with We spread the brush better, we take the tip of the green yarn and begin to paste it on the bottle, turning it over and making sure that there is no empty space between each one.


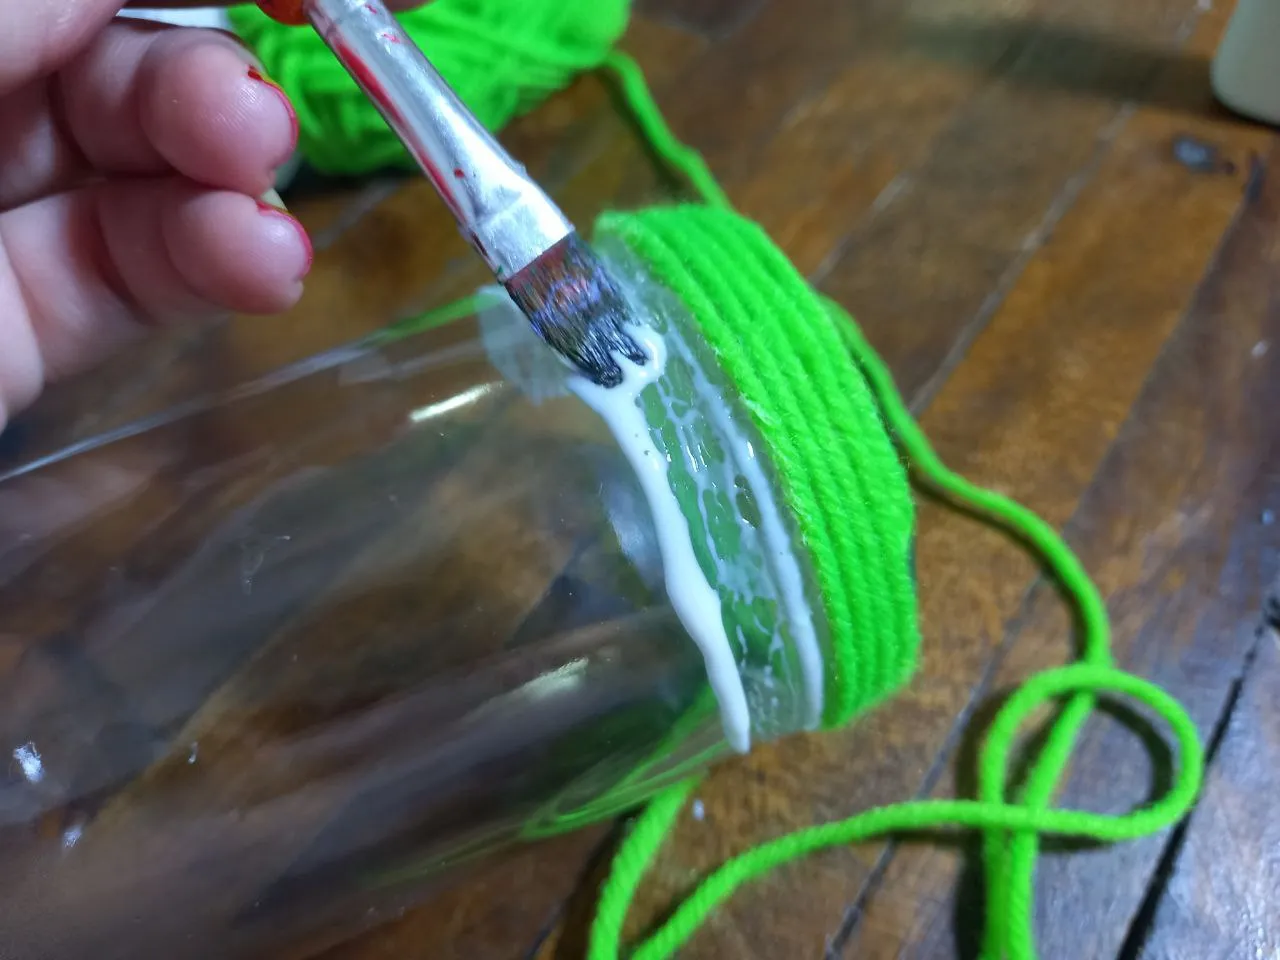
☠ PASO 2. Seguimos aplicando pega blanca y a medida que la esparcimos vamos pegando el estambre, lo haremos hasta llegar al fin de la parte gruesa de la botella, en este punto cortamos el estambre y pegamos la punta asegurándonos de que quede bien adherida para que no pierda toda la forma.
☠ STEP 2. We continue applying white glue and as we spread it we stick the yarn, we will do it until we reach the end of the thick part of the bottle, at this point we cut the yarn and glue the tip making sure that it remains well adhered so that it does not lose all its shape.


☠ PASO 3. Ahora vamos a decorar con el estambre negro, esta vez lo haremos desde la punta de la botella hacia abajo, aplicamos pega en la punta superior (debajo de la rosca de la tapa) y comenzamos a pegar el estambre negro dándole la vuelta de la misma forma que hicimos con el verde, seguiremos pegando hasta unirse con el estambre verde, allí cortamos y pegamos.
☠ STEP 3. Now we are going to decorate with the black yarn, this time we will do it from the tip of the bottle downwards, we apply glue on the upper tip (under the thread of the cap) and we begin to glue the turning the black yarn over in the same way we did with the green yarn, we will continue gluing until it joins the green yarn, there we cut and paste.


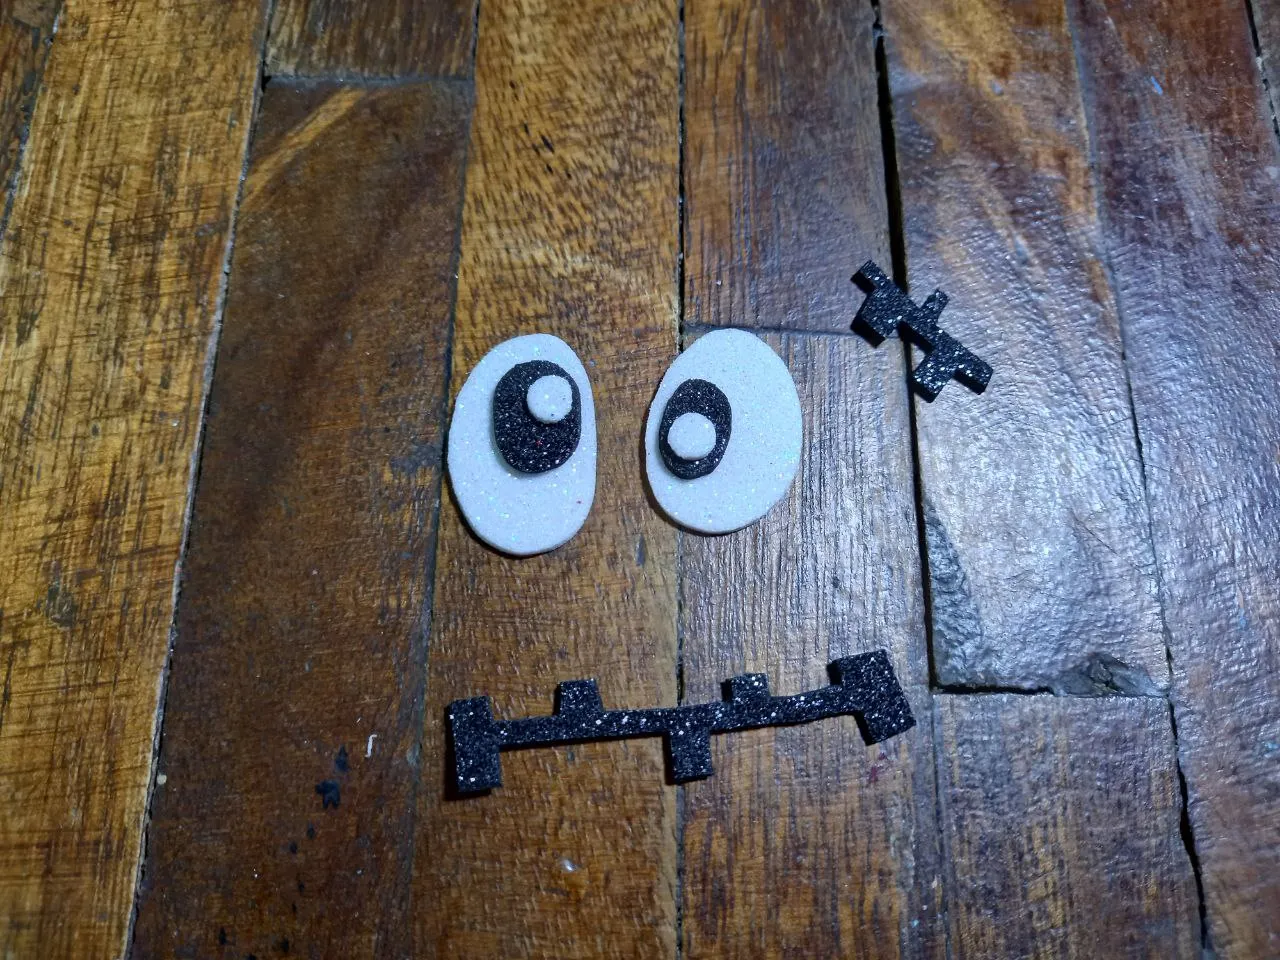
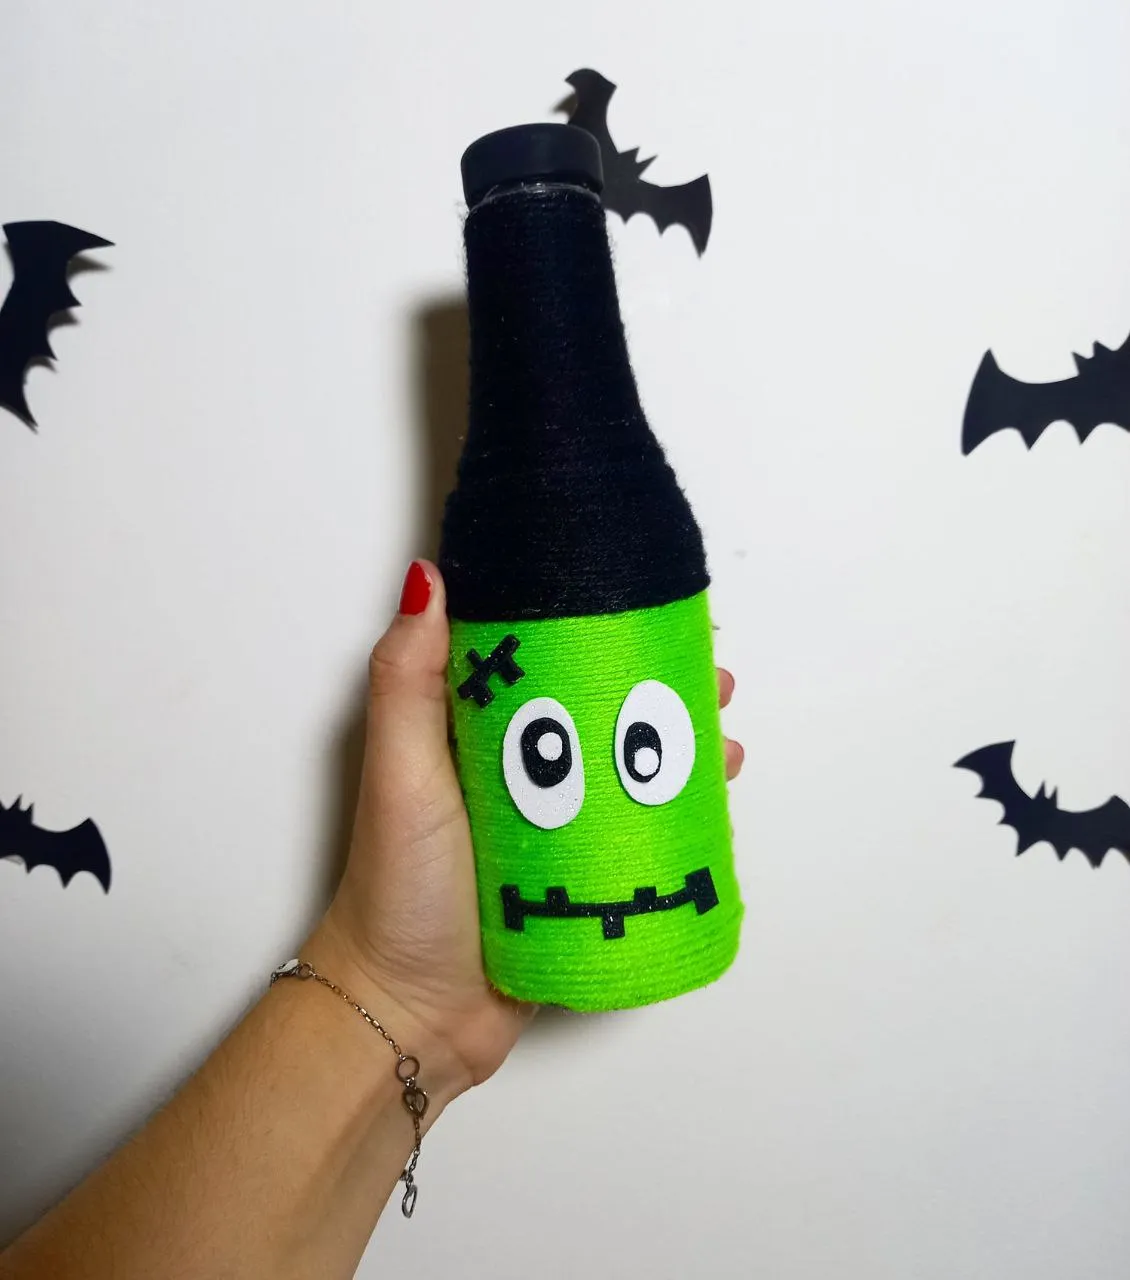
☠ PASO 4. Luego de tener la botella forrada con estambre procedemos a hacer las piezas del rostro en foami escarchado negro y blanco con las formas que más nos gusten, luego pegamos todas las piezas sobre la botella decorada para formar el rostro de Frankenstein.
☠ STEP 4. After having the bottle lined with yarn, we proceed to make the pieces of the face in black and white frosted foami with the shapes that we like the most, then we glue all the pieces on the decorated bottle to form the face of Frankenstein.

☠ PASO 5. Pintamos la tapa de la botella con pintura negra hasta quedar bien cubierta, una vez que se seque se la colocamos a la botella y listo.
☠ STEP 5. We paint the bottle cap with black paint until it is well covered, once it dries we put it on the bottle and that's it.


Así de sencillo he convertido una botella de vidrio de salsa de tomate en un lindo adorno con la figura de Frankenstein, tal vez en las fotos no se aprecie tan bien como en persona pero les aseguro que queda muy lindo, de esta misma forma podemos decorar una botella con estambre con otra temática o incluso podemos pintarla, todo queda muy bonito cuando usamos nuestra creatividad, espero que les haya gustado esta idea, nos vemos en un siguiente post con otra idea creativa para Halloween.
It's that simple that I've turned a glass bottle of tomato sauce into a cute ornament with the figure of Frankenstein, maybe in the photos it doesn't look as good as it does in person but I assure you it's very cute, we can decorate it the same way a bottle with yarn with another theme or we can even paint it, everything is very nice when we use our creativity, I hope you liked this idea, see you in a next post with another creative idea for Halloween.


Todas las fotografías son de mi propiedad.
Fotografías capturadas con mi Samsung Galaxy A12
Separador de texto elaborado en Canva.
Nos vemos en mi próxima publicación.
¡Tengan un feliz día!
All photographs are my property.
Photos captured with my Samsung Galaxy A12
Text separator made in Canva.
See you in my next post.
¡Have a happy day!