Saludos y bendiciones amigos de @hivediy, regreso por esta bonita comunidad en la que tenía un buen tiempo no publicaba, andaba en otras cosas aquí mismo en Hive je, je, je; sin embargo, con ganas de traerle algunos proyectos. Estos días las amigas @yolimarag y @marigerp88 me habían invitado a la iniciativa de la primavera y sus flores. Me dije, esta es la oportunidad para volver hacer una manualidad.
Entre una cosa y otra no pude llegar a tiempo a la iniciativa, ya que quería hacer unas flores en cinta de razo para un cintillo para mi hija. Pero hoy revisando la galería de mi teléfono, para ver de todo el material que tengo pendiente por publicar, me encontré con este paso a paso que hoy les voy a compartir. Si me hubiese fijado, me servía para la iniciativa.
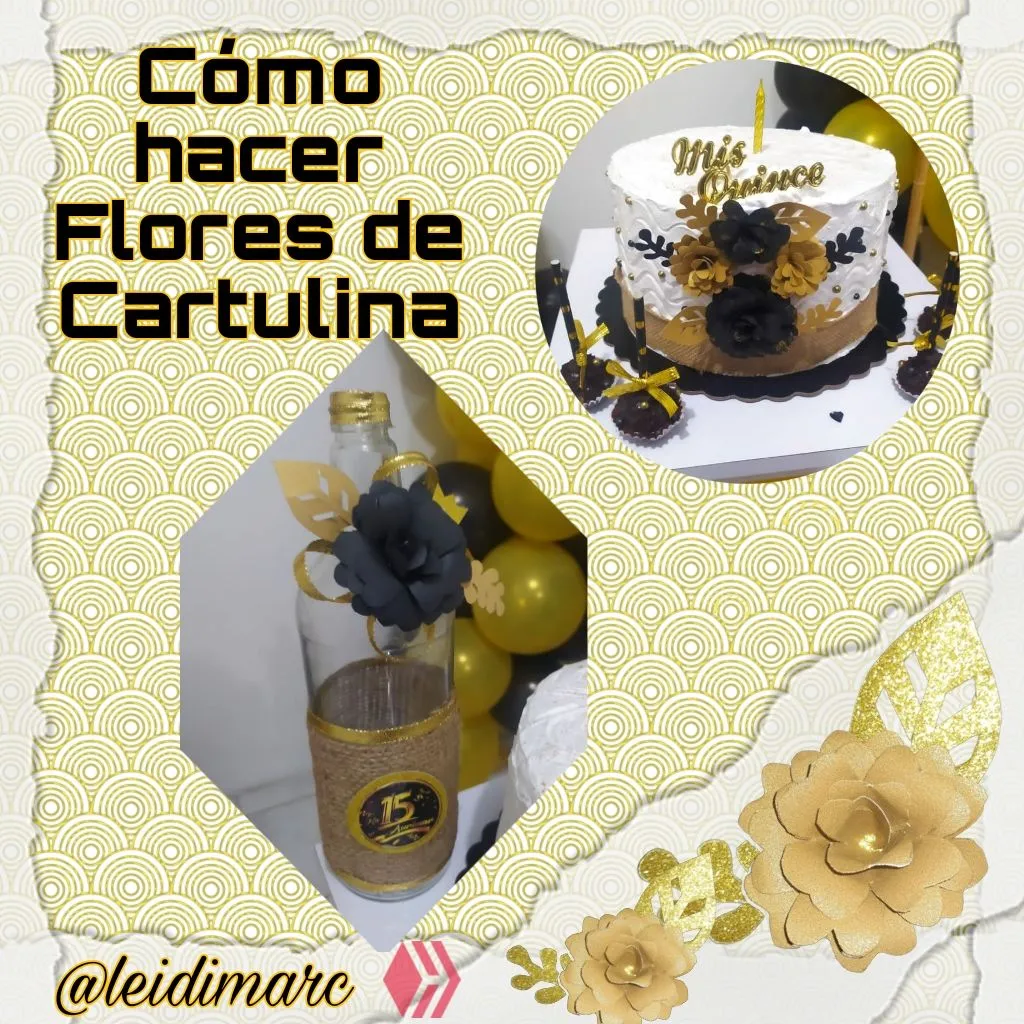
Estas imágenes las tengo guardada desde noviembre, así como tantas otras de esa ocasión especial como son los 15 años de mi sobrina mayor, voy a comenzar con la elaboración de unas lindas flores de cartulina, las cuales las hice para algunas decoraciones de su cumpleaños, en especial para decorar unas botellas que usamos como centro de mesas y para decorar sus tortas.
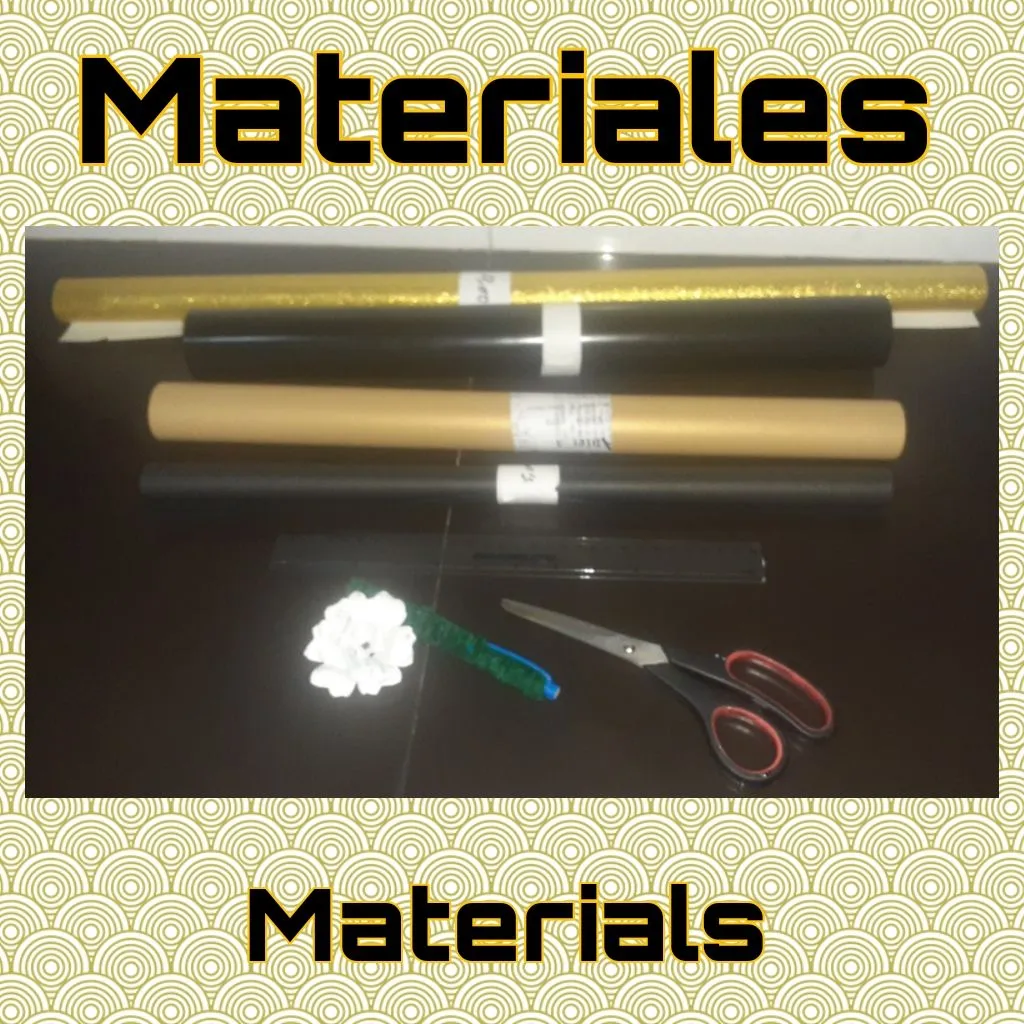
Los materiales que usé para estas flores fueron: cartulinas, las dos que ven de primera son de un material duro, las otras dos de cartulina tipo escolar, que fue las use para las flores, tijera, lápiz, regla, silicona y molde de flor y hojas.
Empecemos con el procedimiento a seguir, que es muy fácil y rápido, eso si repetitivo dependiendo cuantas flores vayamos a hacer.
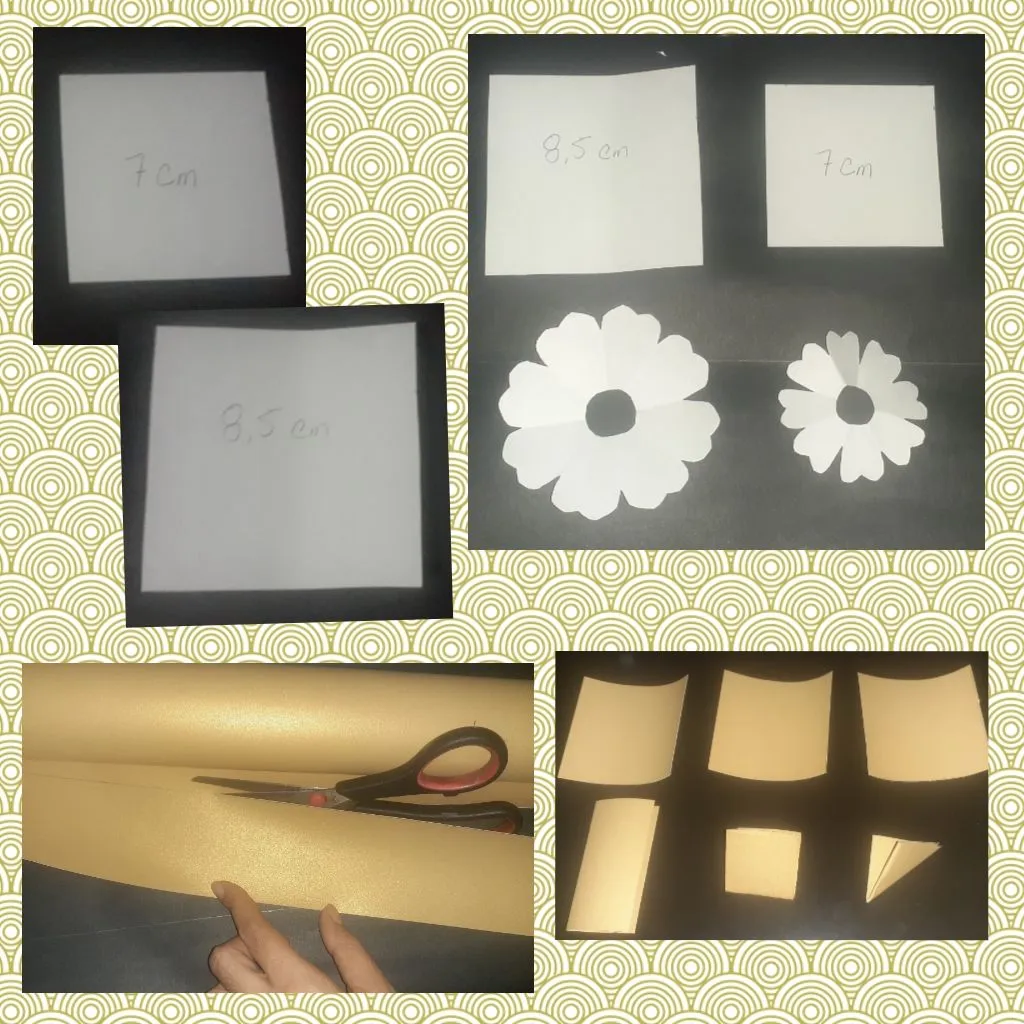
Hice flores de dos tamaños, una de alrededor de 8,5 cm y la otra de 7 cm, para eso con el lápiz y la regla marque líneas en la cartulina con estas medidas, las corte en forma de cuadro.
Cada flor la podemos hacer con 3 de estos cuadros. Para sacar la forma de los pétalos, que se le vean los dobleces por donde se le van a dar forma a los pétalos, debemos hacer lo siguiente.
Por cada cuadro, doblar a la mitad, luego doblar hacia arriba y después se vuelve a doblar quedando como un triángulo.
A ese triángulo le vamos a cortar la punta de abajo y por la parte más ancha le hice la forma de un corazón, al abrir todo el cuadrado se ve una flor completa, de estas sacamos tres, para armar una flor.
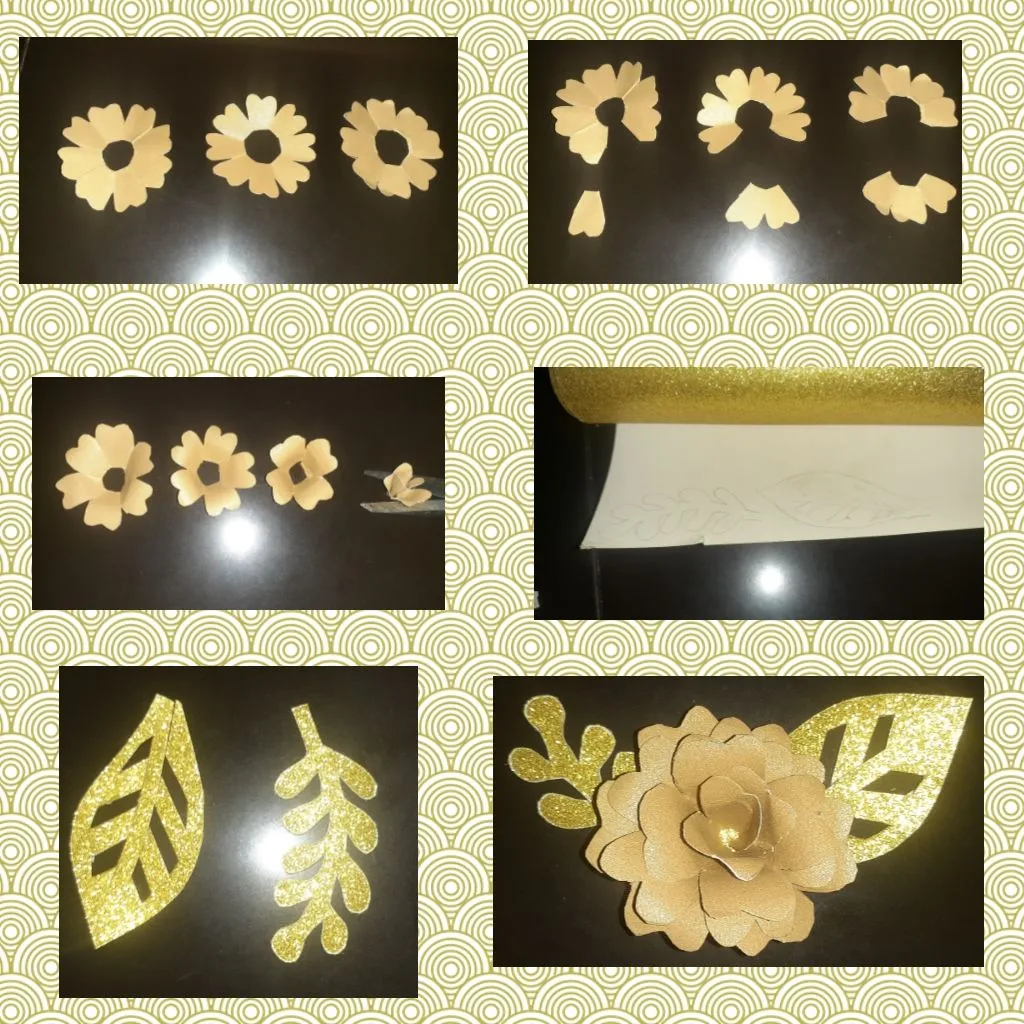
De la primera flor le sacamos 1 pétalo y apartamos.
De la segunda flor le sacamos 2 pétalos y apartamos.
De la tercera flor le sacamos 3 pétalos, que si vamos a utilizar como una capa más de la flor (el capullo).
Con silicona pegamos cada uno de los extremos de las flores y con la tijera le damos forma a los pétalos con sumo cuidado.
Luego en la cartulina dorada más dura saque las hojas, de dos diferentes formas con esos moldes que ven en las imágenes, son muy lindas para realzar la belleza de estas flores.
Luego fui pegando una capa encima de la otra y le coloque las hojas a los extremos, aquí ven la flor más pequeña. Estas florecitas se pueden usar para infinidad de proyectos y manualidades, además se pueden hacer en el tamaño que más le convenga, al igual que los colores a usar.
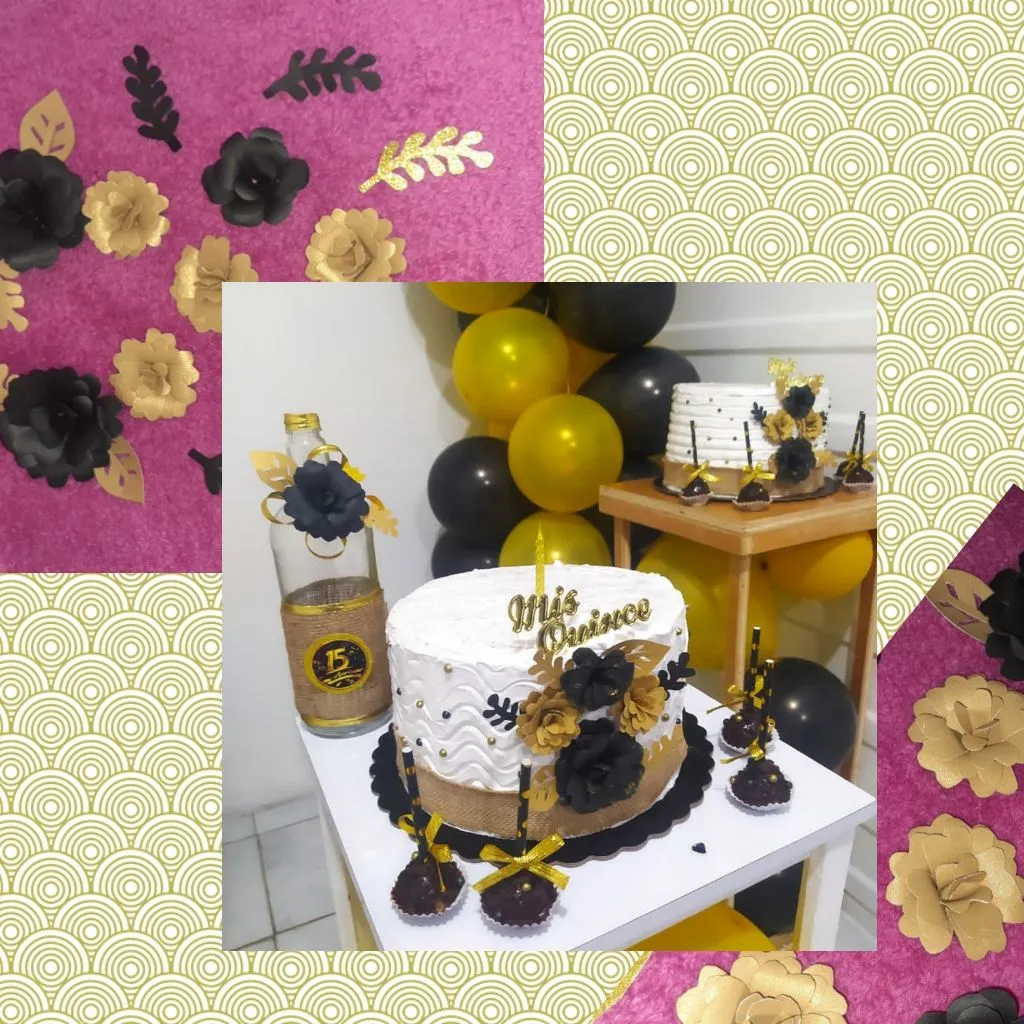
No me acuerdo cuantas flores hice, eran varias y como ven las use para estas decoraciones, mi sobrina quería su fiesta de esos colores negro y dorado, aunque queríamos que fuesen otros colores, cuando todo estuvo listo, se veía bien lindo.
Estaba todo muy sencillo y quedamos contentos y conformes con la decoración. Mi sobrina estaba feliz de celebrar su día especial, estos días les estaré mostrando más de este evento familiar.
Espero que sea de su agrado esto que les comparto y en algún momento lo puedan poner en práctica en sus hogares. Muchas gracias por pasar por mi blog. Dios les bendiga.

How to make Cardboard Flowers
Greetings and blessings friends of @hivediy, I return to this beautiful community in which I had not published for a long time, I was doing other things right here in Hive heh, heh, heh; however, I wanted to bring you some projects. These days my friends @yolimarag and @marigerp88 had invited me to the initiative of spring and its flowers. I said to myself, this is the opportunity to make a craft again.
Between one thing and another I couldn't make it in time for the initiative, since I wanted to make some flowers in ribbon for a headband for my daughter. But today, going through the gallery on my phone, to see all the material I have pending to publish, I found this step by step that I am going to share with you today. If I had noticed it, I could have used it for the initiative.
I have saved these images since November, as well as many others from that special occasion like my eldest niece's 15th birthday, I am going to start with the elaboration of some cute cardboard flowers, which I made them for some decorations for her birthday, especially to decorate some bottles that we used as centerpieces and to decorate her cakes.
The materials I used for these flowers were: cardboard, the two you see first are made of a hard material, the other two are made of school cardboard, which I used for the flowers, scissors, pencil, ruler, silicone and flower and leaf mold.
Let's start with the procedure to follow, which is very easy and quick, although it is repetitive depending on how many flowers we are going to make.
I made flowers of two sizes, one of about 8.5 cm and the other of 7 cm, for that with the pencil and ruler mark lines on the cardboard with these measures, cut them in the shape of a square.
Each flower can be made with 3 of these squares. To get the shape of the petals, so that you can see the folds where the petals will be shaped, we must do the following.
For each square, fold it in half, then fold it upwards and then fold it again to form a triangle.
To this triangle we are going to cut the bottom tip and at the widest part I made the shape of a heart, when we open the whole square we can see a complete flower, from these we take out three, to make a flower.
From the first flower we remove 1 petal and set aside.
From the second flower we take 2 petals and set aside.
From the third flower we take 3 petals, which we are going to use as another layer of the flower (the bud).
With silicone we glue each of the ends of the flowers and with the scissors we shape the petals very carefully.
Then on the harder golden cardboard I made the leaves, in two different shapes with those molds you see in the pictures, they are very nice to enhance the beauty of these flowers.
Then I glued one layer on top of the other and placed the leaves at the ends, here you see the smallest flower. These little flowers can be used for countless projects and crafts, and they can be made in the size that suits you best, as well as the colors to use.
I don't remember how many flowers I made, there were several and as you can see I used them for these decorations, my niece wanted her party in those black and gold colors, although we wanted other colors, when everything was ready, it looked very nice.
It was all very simple and we were happy and satisfied with the decorations. My niece was happy to celebrate her special day, these days I will be showing you more of this family event.
I hope you like what I am sharing with you and at some point you can put it into practice in your homes. Thank you very much for visiting my blog. God bless you.
Fotos tomadas por | Photos taken by @leidimarc
Dispositivo | Device | Samsung Galaxy A20
Fotos editadas en: |Photos edited in | App Picsart
Separadores hechos en | Separators made in | CC Express for Samsung
Traducción con | Translation with| DeepL