

Hello my dear readers, I hope you are well and that you have or have had an excellent and wonderful day. Continuing with the theme of Halloween, in my previous publication I made a table decoration and since we have little time left to make the decorations, I want to share with you how to make a decorative pendant to place it either on the door of the entrance of the house, in an office or in any environment you want to decorate, it is quite easy to do and it is done quickly.
Normally for this type of work is easier to do it with foami, but the idea of using the 3R is better, so we save and recycle and reuse, any material you have and in my case what I have more are scraps of fabric. So I will take advantage of this to the maximum or until I run out of scraps heh, heh, heh.


STEP BY STEP:
I will start by grabbing the cardboard and with the ruler, I will mark 4 squares of 15 x 15 cm and cut out.


Now that I have my squares ready I will proceed to line them all at once to get them ready and then just start decorating.
I will take the orange fabric, spread it out and place the cardboard on top, I will trim the fabric leaving enough fabric to be able to glue it to the back so it will have a better finish and will be well stretched on the front.


I will do the same procedure to line the other squares, in black, white and green fabric.
 |  |  |
|---|
 |  |
|---|
Now that I have all the squares lined, I will proceed to decorate them. I'm going to start decorating the white one, which would be a little ghost. With the black fabric, I will cut out the eyes, two large ovals. I will also cut out a mouth, as shown in the picture and glue it all with the silicone very carefully.


To make the pumpkin, with the black fabric, cut out three triangles, two large ones and a small one that would be for the nose. I also cut out a mouth, a crescent moon from which I removed two pieces that will simulate the teeth, all of this I glued to the orange square.


I will now decorate Frankenstein, I will cut a strip of black fabric to glue on the top, to make what would be the hair. Then I'll make some picks to make the ends of the hair and glue with silicone so that the fabric won't roll up. Cut out two circles in white fabric for the eyes, and two small circles in black for the pupils, two small strips for the eyebrows and a long thin strip to make the mouth. Finally I will cut out two strips of cardboard and glue them on the sides and line them with black fabric, as shown in the picture.
 |  |
|---|
 |  |  |
|---|
To make the legs of the spider, I had some small tubes made of magazine paper from a previous work I had done, what I did was to line them with the black fabric and as they are hollow inside, I inserted the wire so that when it was time to shape the leg, it would stay bent, I fixed the wire with a little silicone inside the tube.


To assemble the spider, I cut out two large circles in white fabric and two small ones in black fabric, a long thin strip in white for the mouth and glued them as shown in the image. On the sides I glued the legs that I had lined.


Now that I have everything assembled, I will cut a long strip, approximately 3 cm wide and I will glue each square on the strip, leaving a separation of approximately 5 cm and when I have glued all the squares at the end I will make a handle so that I can hang it anywhere.
 |  |
|---|
 |  |
|---|
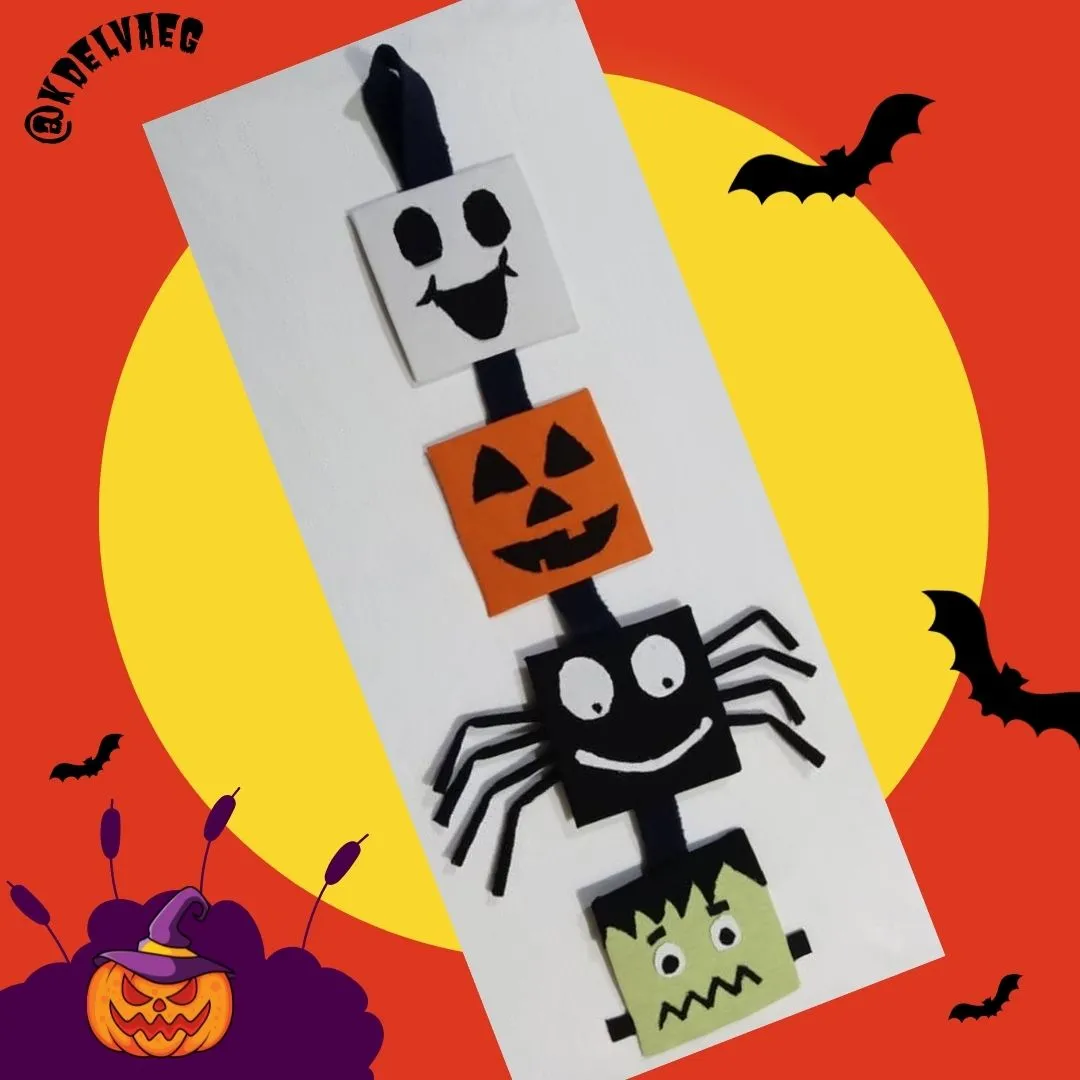
And now I have my pendant ready to show it off wherever I want. I loved the result, I hope you do too, that you can make it and decorate your doors for when they come to ask for "Trick or treat".

I say goodbye as always, but not before thanking you for dedicating a little bit of your valuable time to me. I hope to see you in my next publication, be well and take care of yourselves.

Original creation content:
💀 All photos are my own taken and edited with my Alcatel cell phone.
🎃 The cover image was made with Canva application and edited by me.
⚰️ The divider images were taken from the Canva page and edited by me in Paint.
👻 English translation was done with the help of DeepL.
🎃 The letters indicating the languages, were taken from the Cooltext page.

Hola mis queridos lectores, espero que se encuentren bien y que tengan o hayan tenido un excelente y maravilloso día. Continuando con la temática de Halloween, en mi publicación anterior hice un adorno para mesas y en vista de que, ya que nos queda poco tiempo para realizar los adornos, les quiero compartir como realice un colgante decorativo para colocarlo bien sea en la puerta de la entrada de la casa, en una oficina o en cualquier ambiente que deseen decorar, es bastante fácil de hacer y se hace de manera rápida.
Normalmente para este tipo de trabajo es más fácil de hacerlo con foami, pero la idea de usar las 3R es mejor, así se ahorra y reciclamos y rehusamos, cualquier material que se tenga y en mi caso lo que más tengo son retazos de tela. Por eso aprovecharé esto al máximo o hasta que se me acaben los retazos je, je, je.

PASO A PASO:
Empezaré por agarrar el cartón y con la regla, marcaré 4 cuadrados de 15 x 15 cm y recortaré.
Ahora que tengo mis cuadros ya listos voy a proceder a
forrarlos todos de una vez para tenerlos listo y después solo empezar a decorar.
Tomaré la tela naranja, la extiendo y coloco el cartón encima, recortaré la tela dejando suficiente tela para poder pegarla a la parte de atrás y así quede con un mejor acabado y bien estirado por la parte delantera.
Haré el mismo procedimiento para forrar los demás cuadrados, tanto en tela negra, blanca y verde.
| | |
|---|
| |
|---|
Ahora que tengo todos los cuadrados forrados, procedere a decorarlos. Voy a empezar a decorar el blanco que sería un fantasmita. Con la tela negra, recortaré los ojos, dos óvalos grandes. Recortaré también una boca, tal como se muestra en la imagen y todo eso lo pegare con el silicon con mucho cuidado.
Para realizar la calabaza, con la tela negra, recorte tres triángulos, dos grandes y uno pequeño que sería para la nariz. También recorte una boca, una media luna la cual le quite dos pedazos que van a simular los dientes, todo esto lo pegue al cuadro naranja.
Decoraré ahora a Frankenstein, recortaré una tira en tela negra para pegarla en la parte de arriba, para hacer lo que sería el cabello. Luego haré unos piquetes para poder hacer las puntas de los cabellos y pegaré con el silicón para que la tela no se vaya a enrollar. Recorte dos círculos en tela blanca para los ojos, y dos círculos pequeños en negro para las pupilas, dos tiras pequeñas para las cejas y una tira finita larga para realizar la boca. Por último recortaré dos tiras de cartón y las pegaré en los costados y los forraré con tela negra, tal como se muestra en la imagen.
| |
|---|
| | |
|---|
Para hacer las patas de la araña, tenía unos tubitos hechos en papel de revista de un trabajo anterior que había realizado, lo que hice fue forrarlos con la tela negra y como son huecos por dentro, introduje el alambre para que a la hora de darle forma a la pata, se quede dobladas, fije el alambre con un poquito de silicón por dentro del tubo.
Para armar la araña, recorté dos círculos grandes en tela blanca y dos pequeños en tela negra, una tira larga y fina en color blanca para la boca y las pegué como se muestra en la imagen. A los costados pegué las patas que había forrado.
Ahora que tengo ya todo armado, recortaré una tira larga, de aproximadamente 3 cm de ancho e iré pegando cada cuadro en la tira, dejando una separación de 5 cm aproximadamente y cuando ya haya pegado todos los cuadros en la punta haré una asa para así poder colgarla en cualquier lugar.
| |
|---|
| |
|---|
Y ya tengo listo mi colgante para lucirlo donde quiera. A mí me encantó el resultado, espero que a ustedes también, que lo puedan realizar y decorar sus puertas para cuando vengan a pedirle "Dulce o truco".
Me despido como siempre, no sin antes agradecerles, por dedicarme un poquito de su valioso tiempo. Los espero en mi próxima publicación, pórtense bien y cuídense mucho.
Contenido de creación original:
💀 Todas las fotos son de mi propiedad tomada y editadas con mi celular Alcatel.
🎃 La imagen de portada fue realizada con la aplicación Canva y editada por mi.
⚰️ Las imágenes del separador fueron tomadas de la página Canva y editado por mí en Paint.
👻 La traducción al idioma inglés fue realizada con ayuda de DeepL.
🎃 Las letras de indicación de los idiomas, fueron tomadas de la página Cooltext.