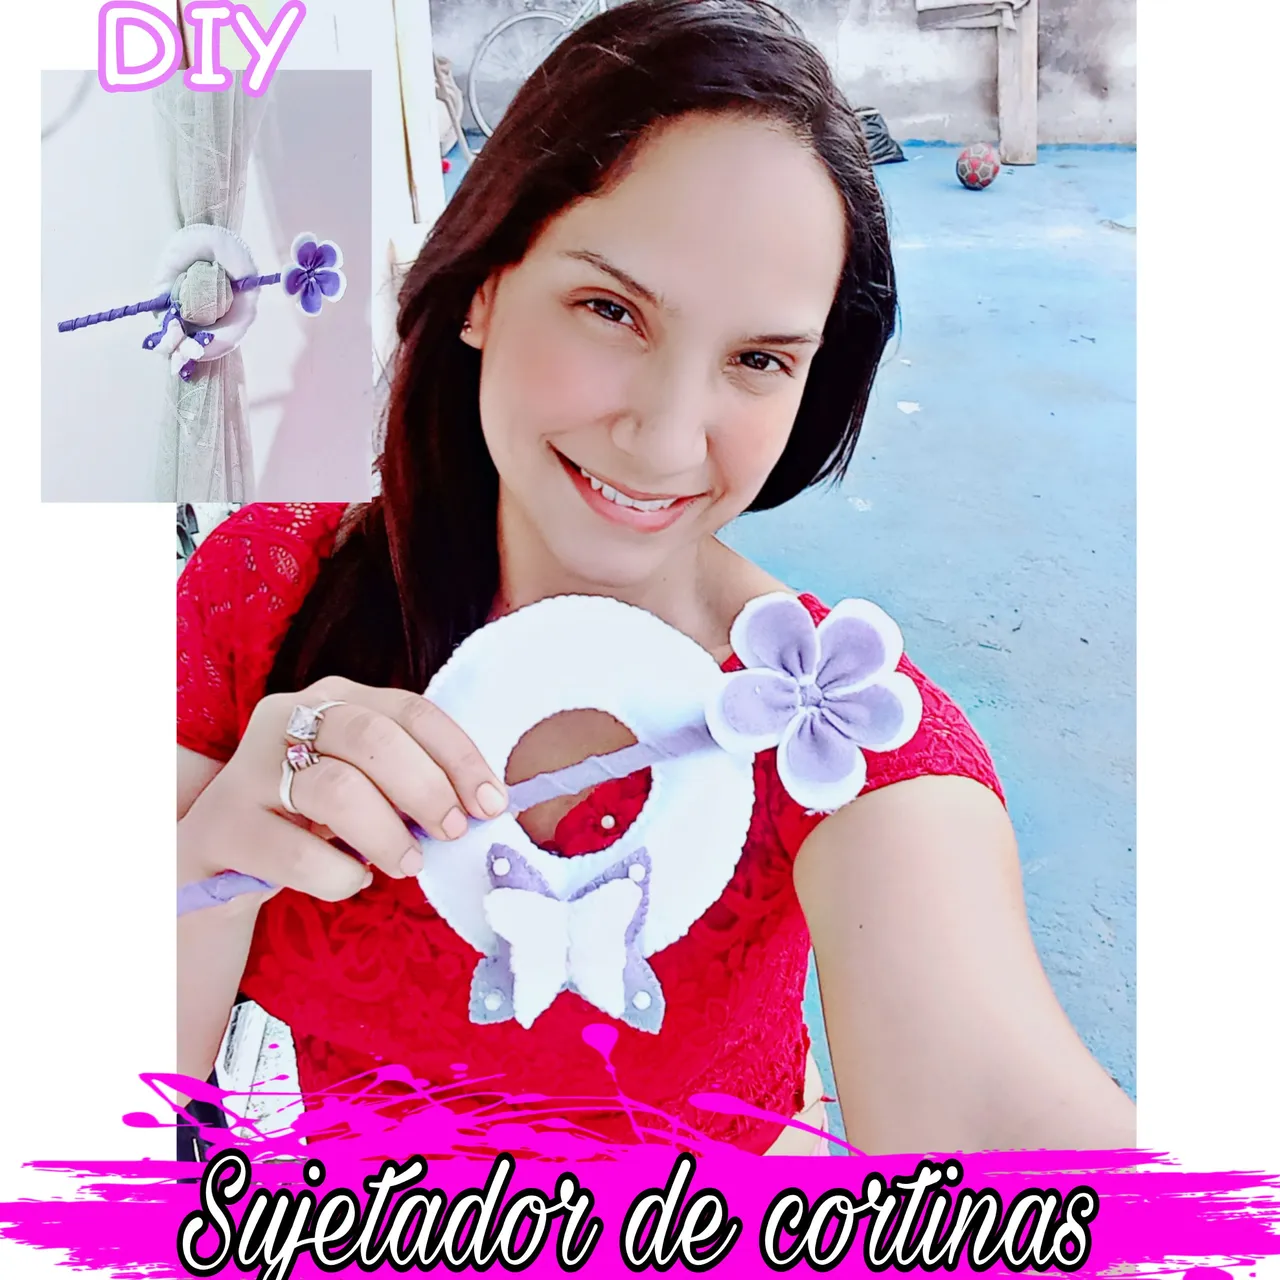
Feliz fin de semana mis queridos amigos de #Hive, deseo que se encuentren bien y gozando de buena salud, hoy les traigo mi participación en el concurso que realiza la comunidad de #HiveDiy, esta semana con el tema: "Felt World" con la elaboración de un "Bello Sujetador de Cortinas".
Happy weekend my dear #Hive friends, I wish you are well and enjoying good health, today I bring you my participation in the contest held by the #HiveDiy community, this week with the theme: "Felt World " with the elaboration of a "Beautiful Curtain Bra".

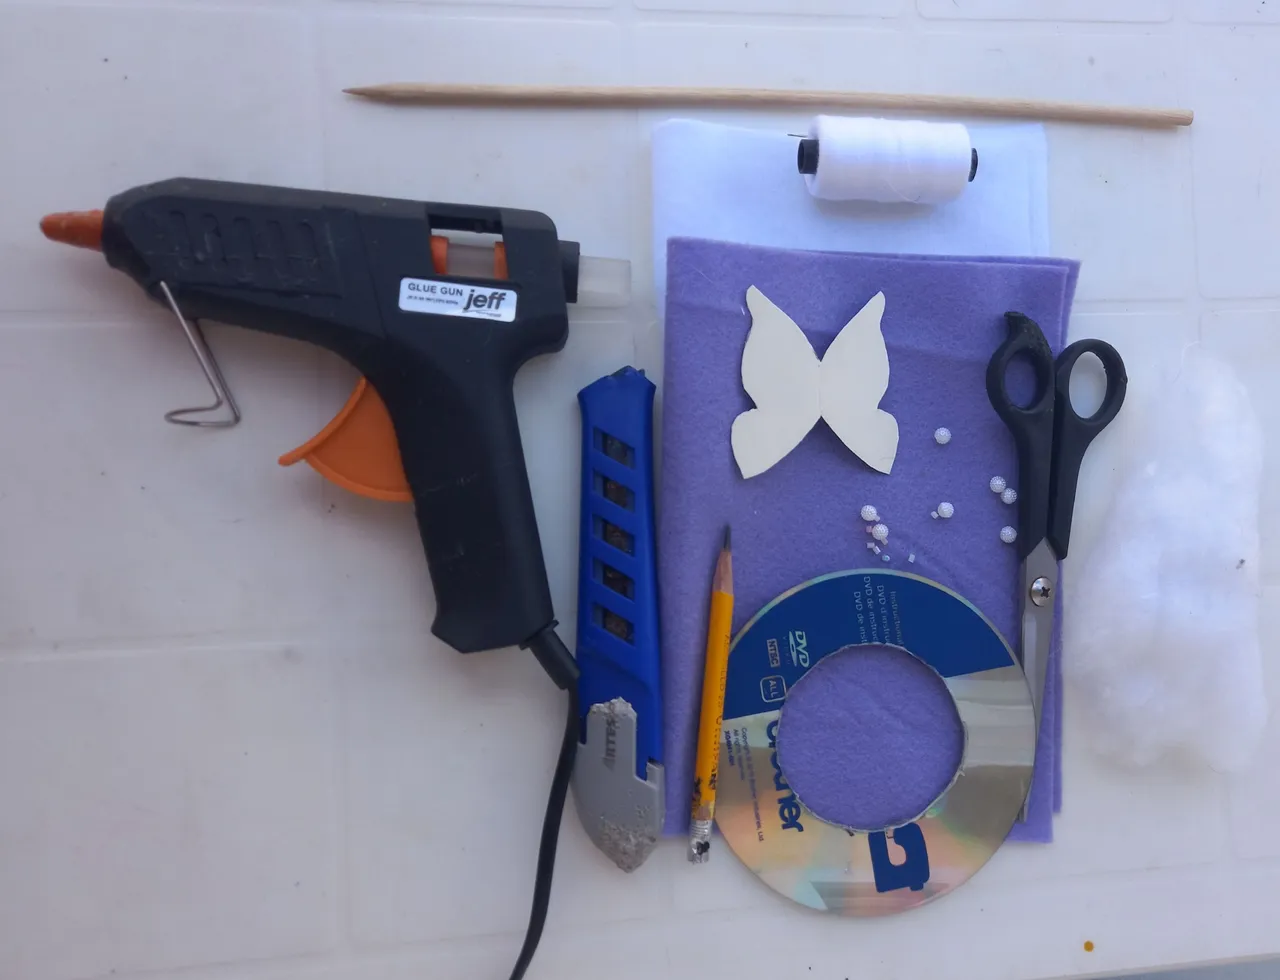
MATERIALES NECESARIOS:
- Fieltro de color blanco y Lila.
- CD.
- Palillo de brocheta 🍢.
- Relleno.
- Tijeras.
- Hilo blanco.
- aguja.
- Cuter.
- Perlas Plásticas.
- Pistola de silicona.
- Silicona en barra.
MATERIALS NEEDED:
- White and lilac felt.
- CD.
- Skewer stick 🍢.
- Stuffing.
- Scissors.
- White thread.
- needle.
- Cutter.
- Plastic beads.
- Silicone gun.
- Silicone stick.
¡AQUÍ LES MUESTRO EL PASO A PASO!
HERE I SHOW YOU THE STEP BY STEP!
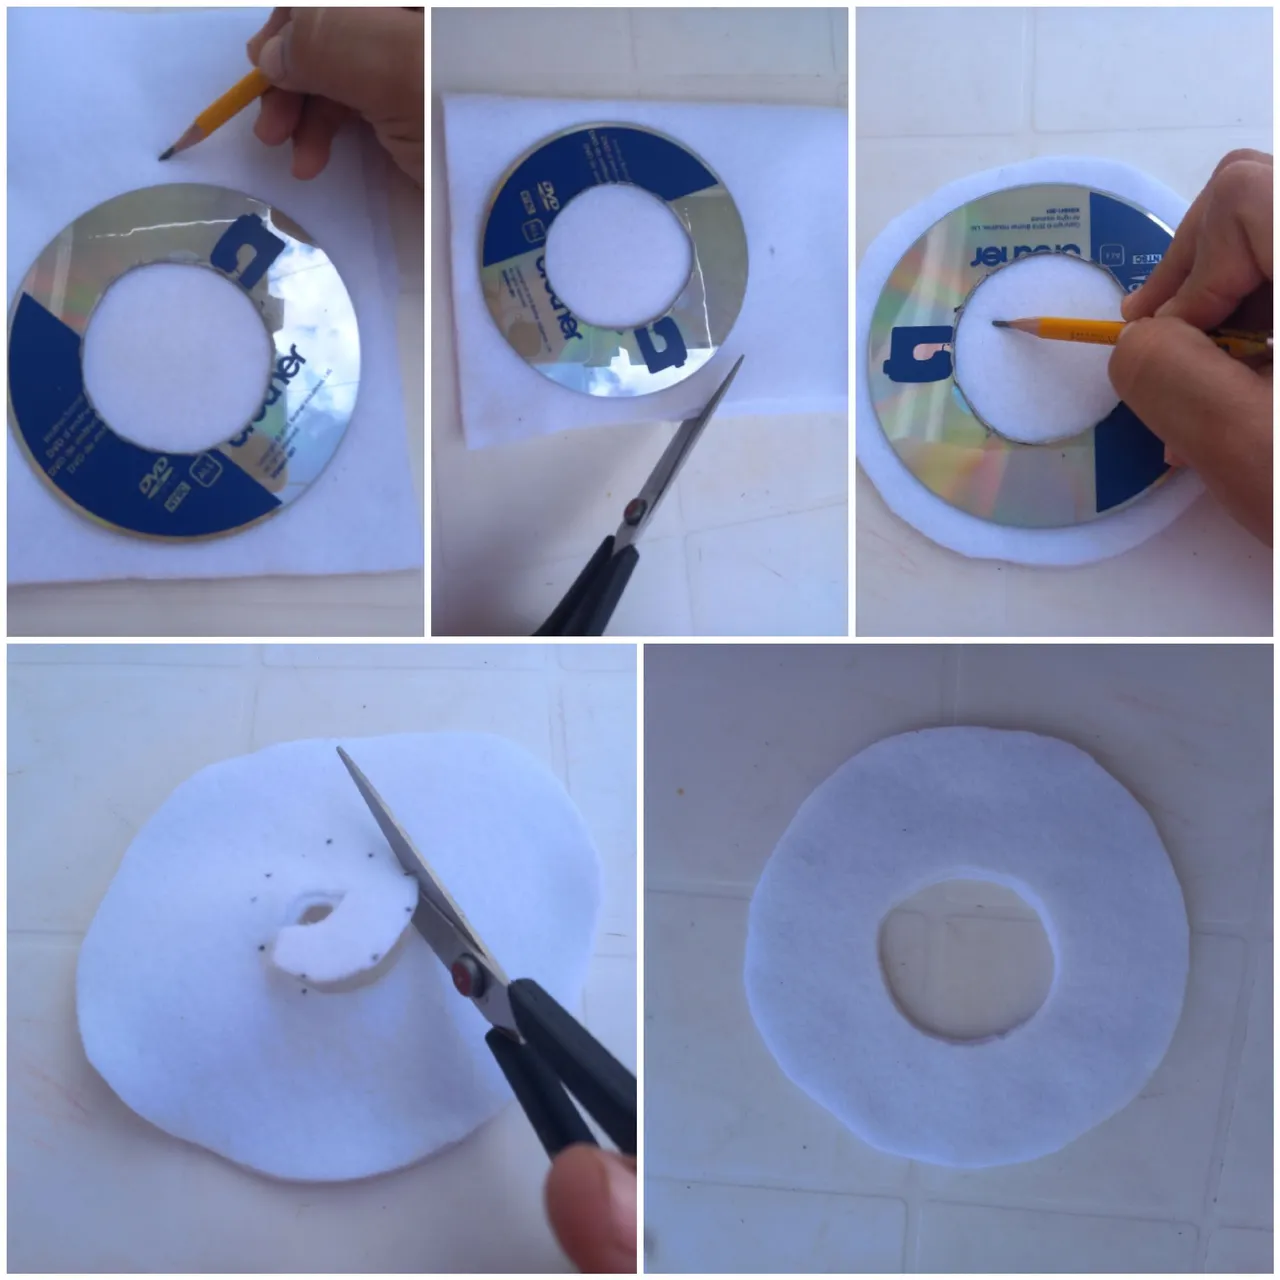
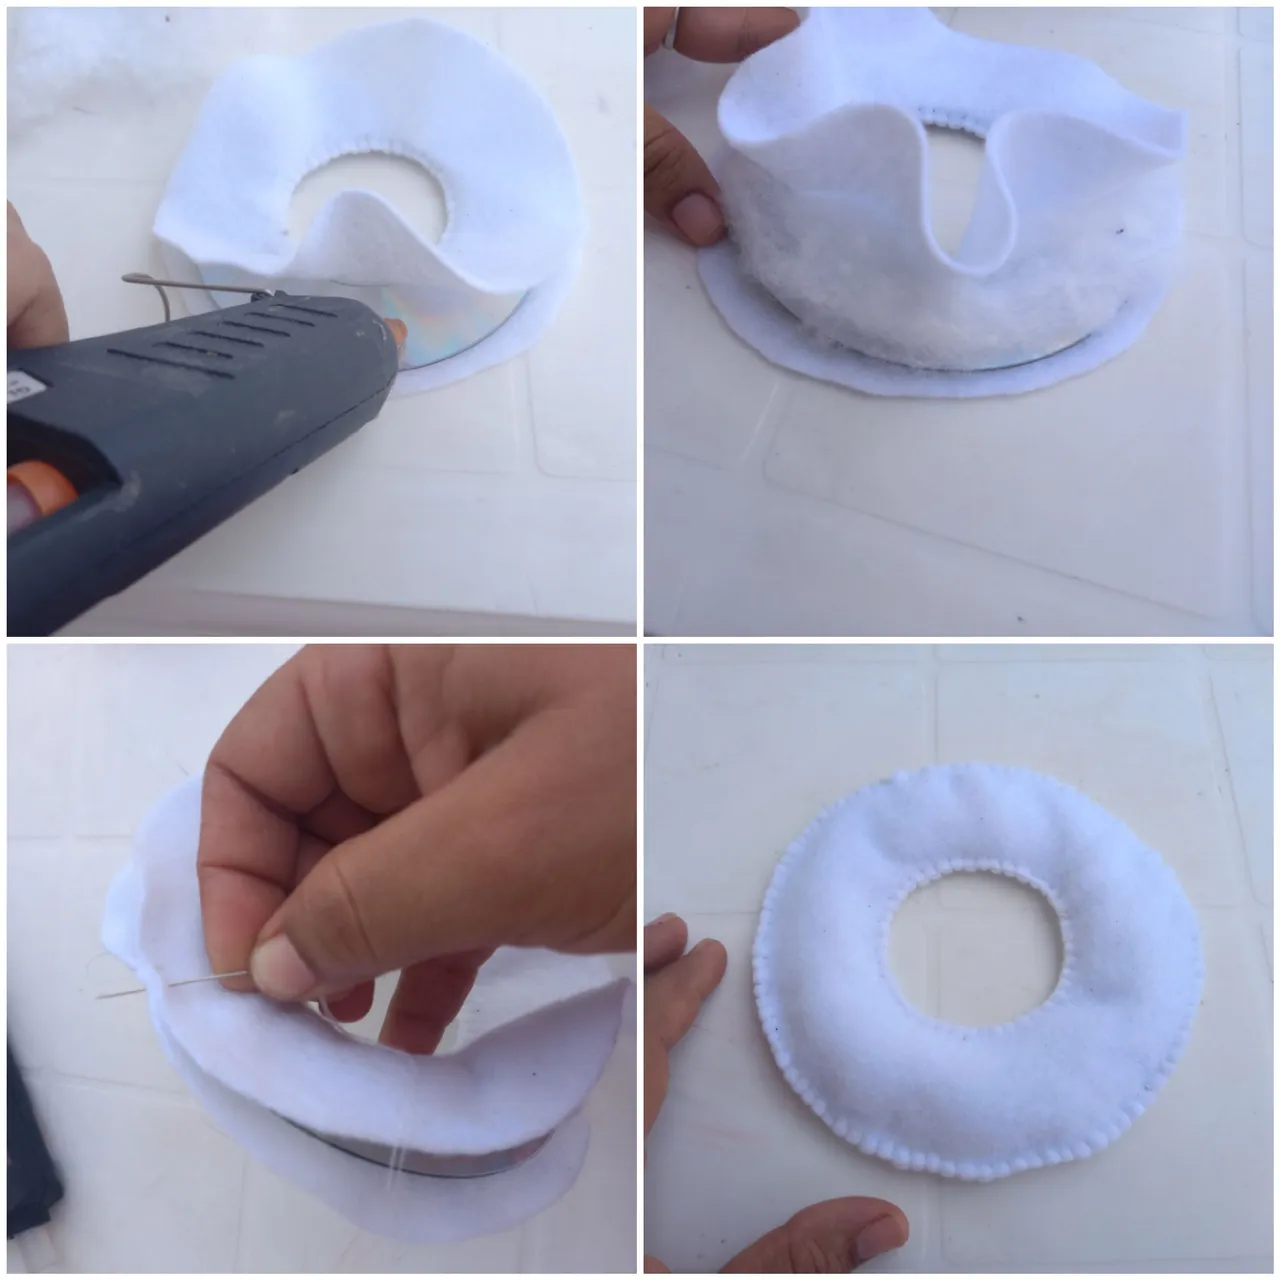
PASO 1:
Crea un aro con el CD de la siguiente manera:
Marca un pequeño círculo en el centro del CD.
Pon a calentar en la estufa 🔥 el Cuter y corta con él, por donde se marcó el círculo.
Retira con cuidado el círculo que quedó en el centro.
Create a ring with the CD as follows:
- Make a small circle in the center of the CD.
- Put to heat in the stove 🔥 the Cutter and cut with it, where the circle was marked.
- Carefully remove the circle left in the center.

PASO 2:
Coloca sobre el Fieltro blanco el Aro de CD, para hacer el forro del mismo, dejando un espacio de 1cm, tanto por la parte de adentro como por la parte de afuera.
Place the CD ring on the white felt to make the lining, leaving a space of 1 cm, both on the inside and on the outside.
PASO 3:
Realiza una costura con punto de Feston, por el borde interno del aro de fieltro y luego introducelo por el agujero del Aro de CD para cubrirlo.
Sew a scallop stitch along the inside edge of the felt ring and then insert it through the hole in the CD Ring to cover it.
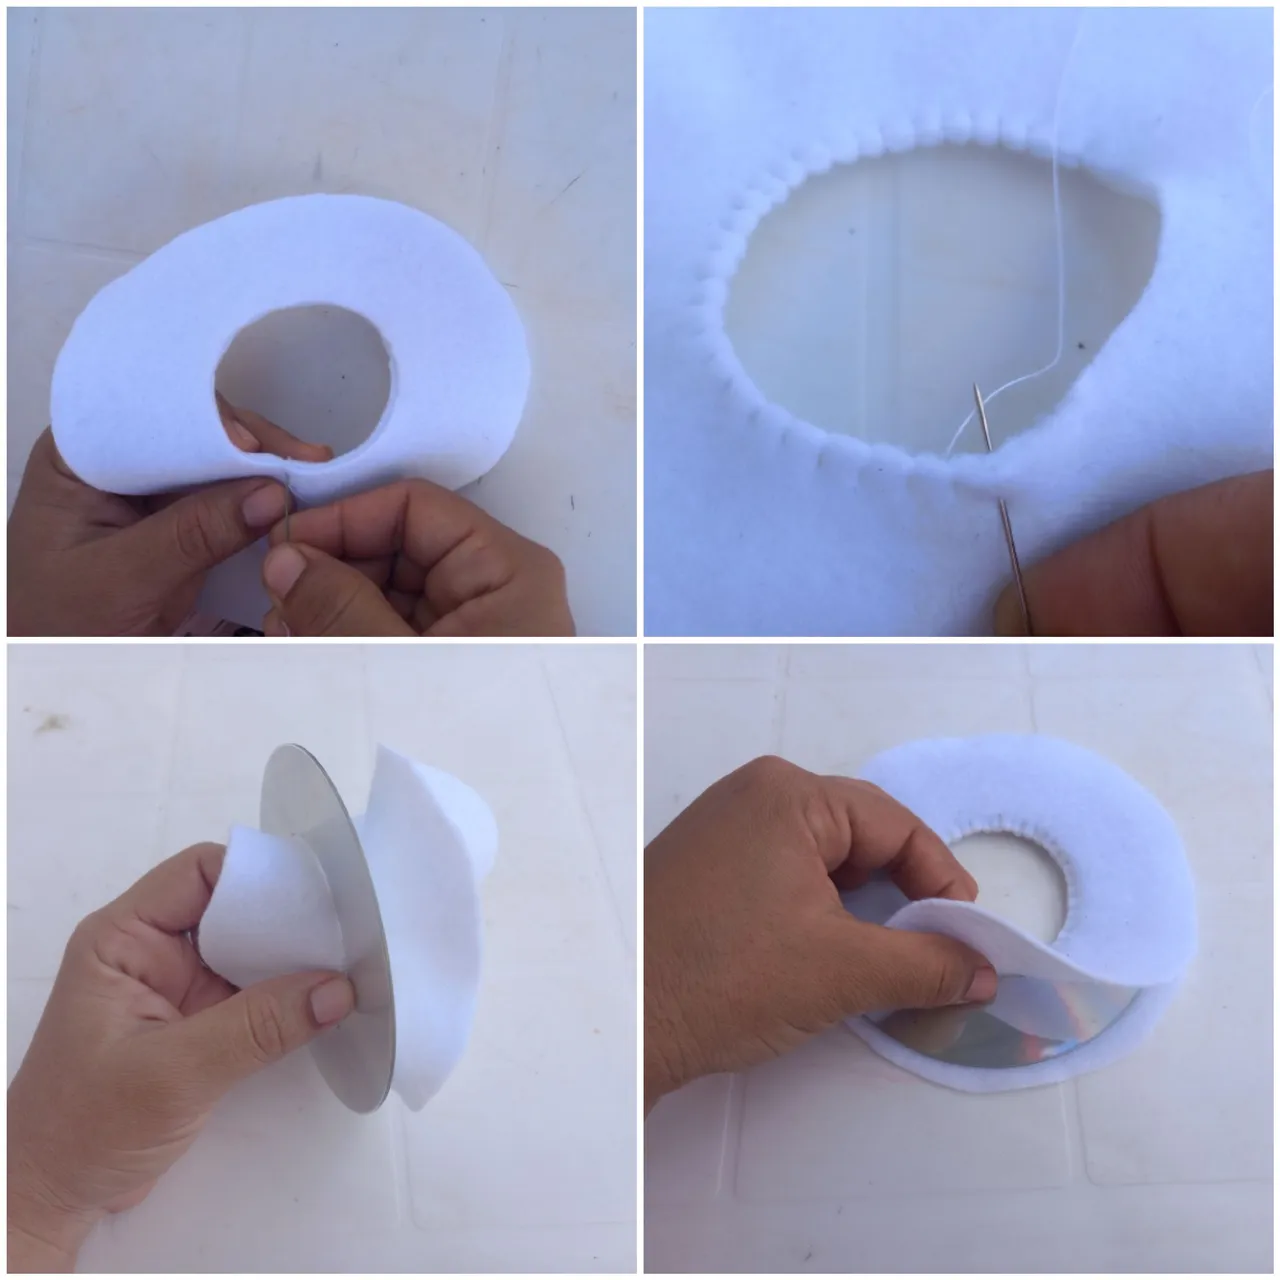
PASO 4:
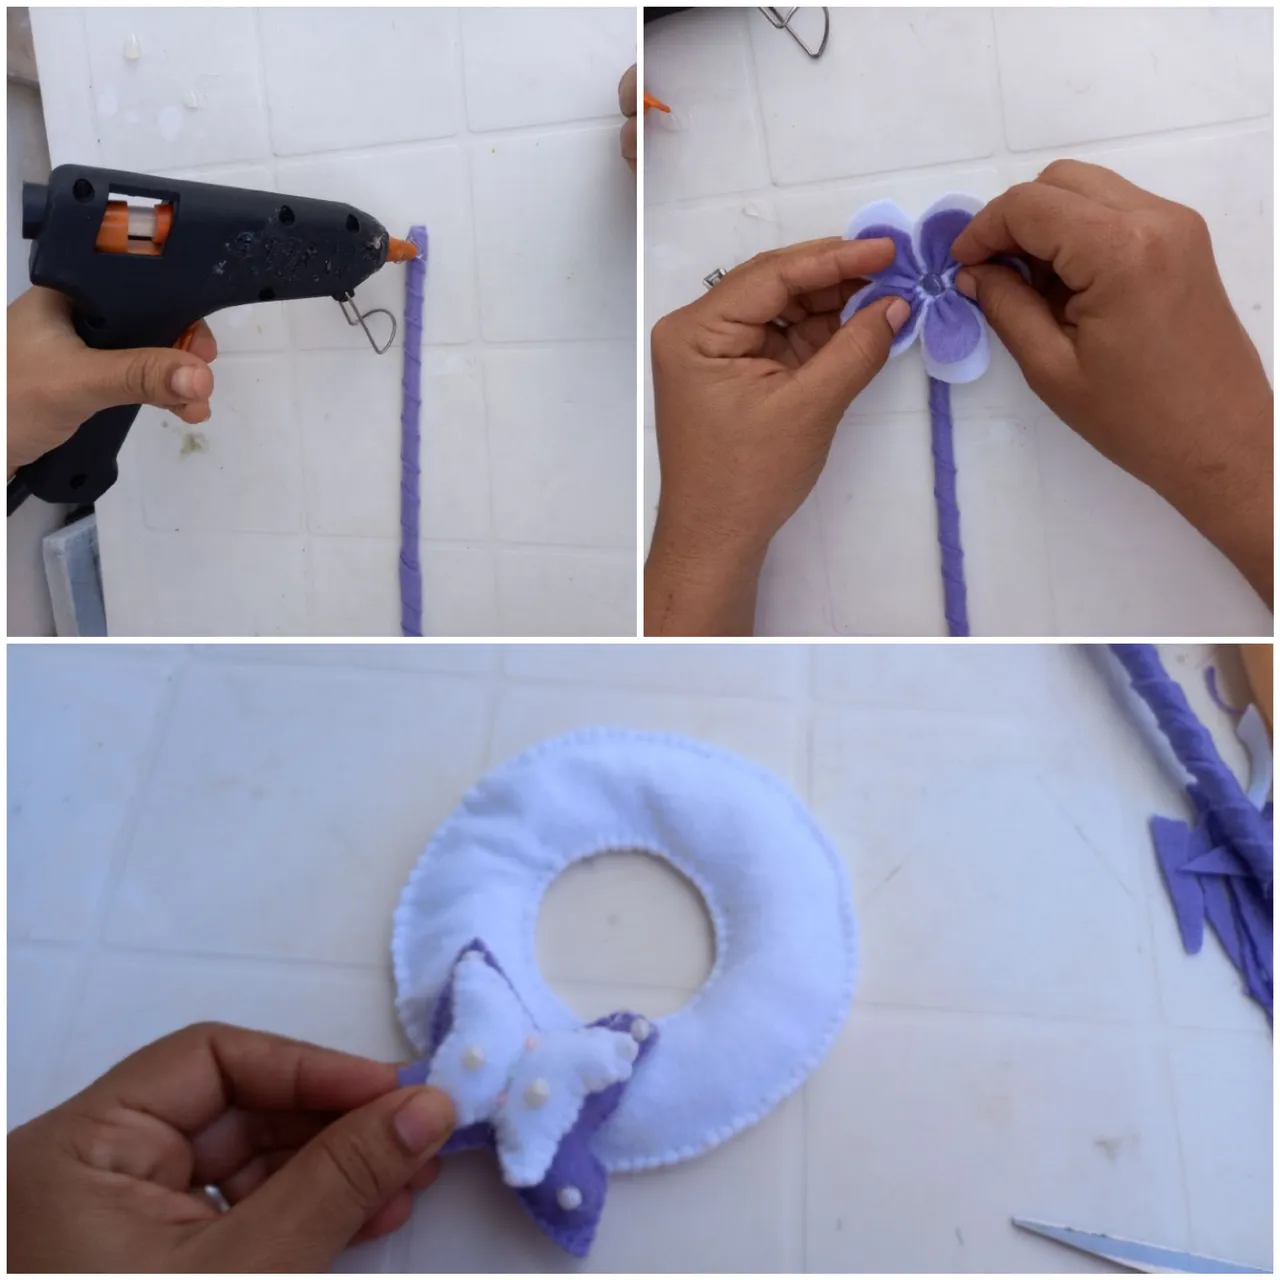
Aplica silicona caliente sobre el CD para fijar un poco el relleno, luego cosa el borde exterior del Fieltro.
Apply hot silicone on the CD to fix the stuffing a little, then sew the outside edge of the Felt.
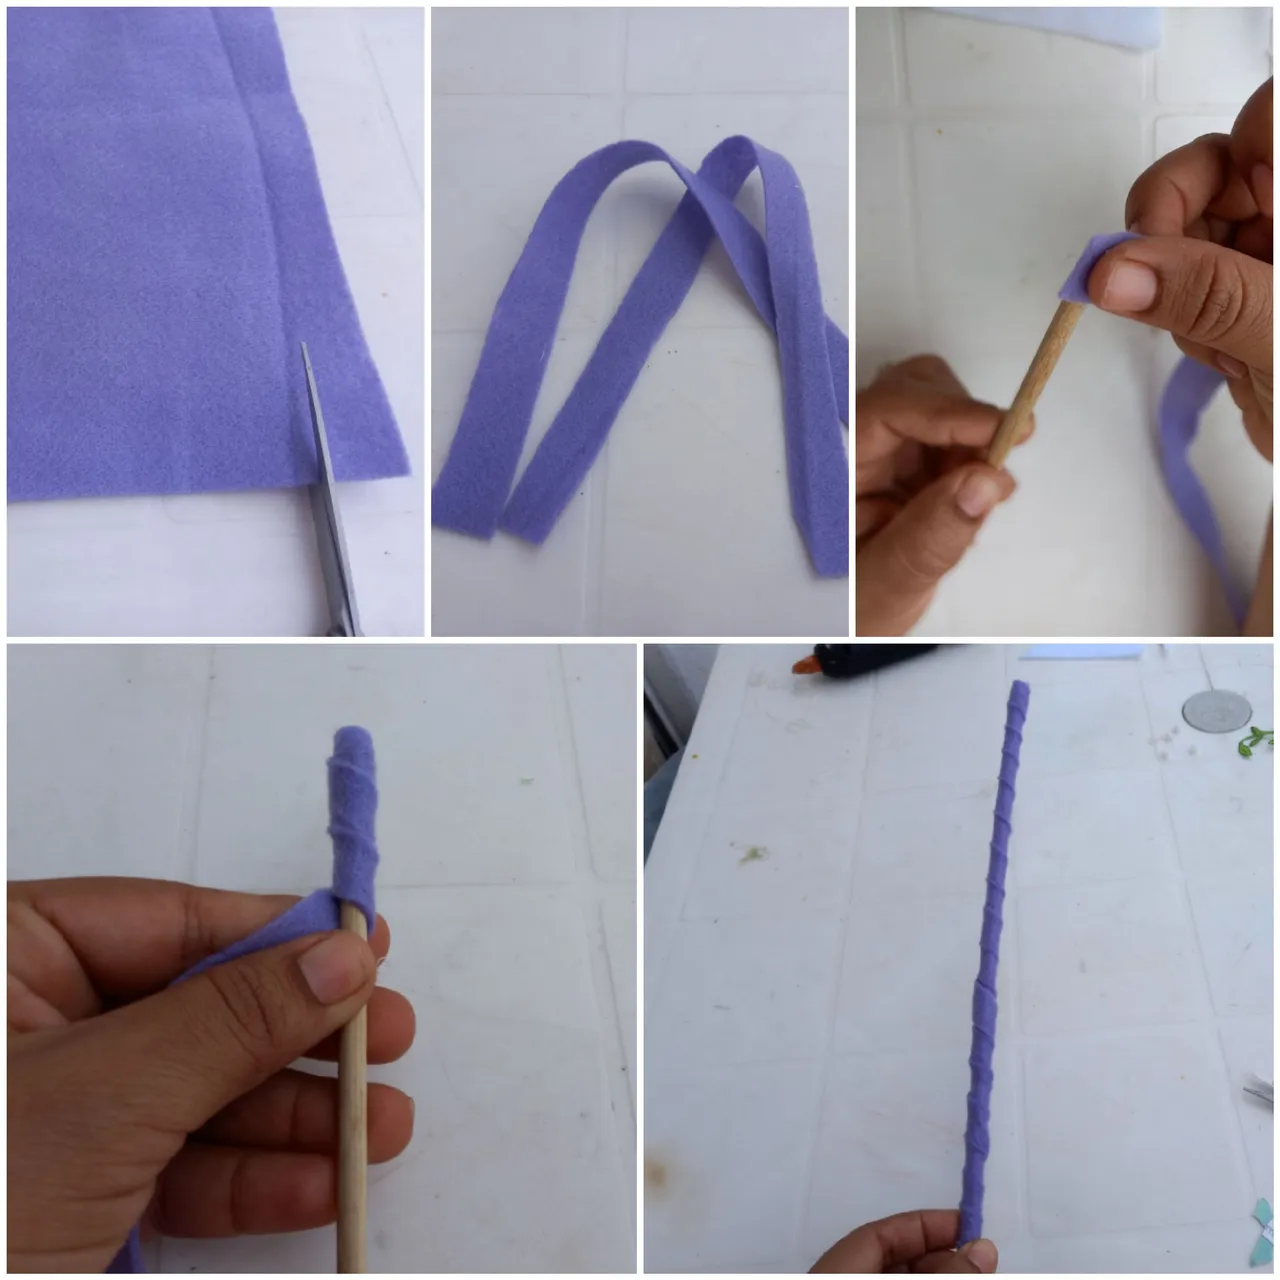
PASO 5:
Recorta dos tiras de fieltro color Lila y forra el Palillo de brocheta con ellas.
Cut out two strips of lilac-colored felt and line the skewer stick with them.
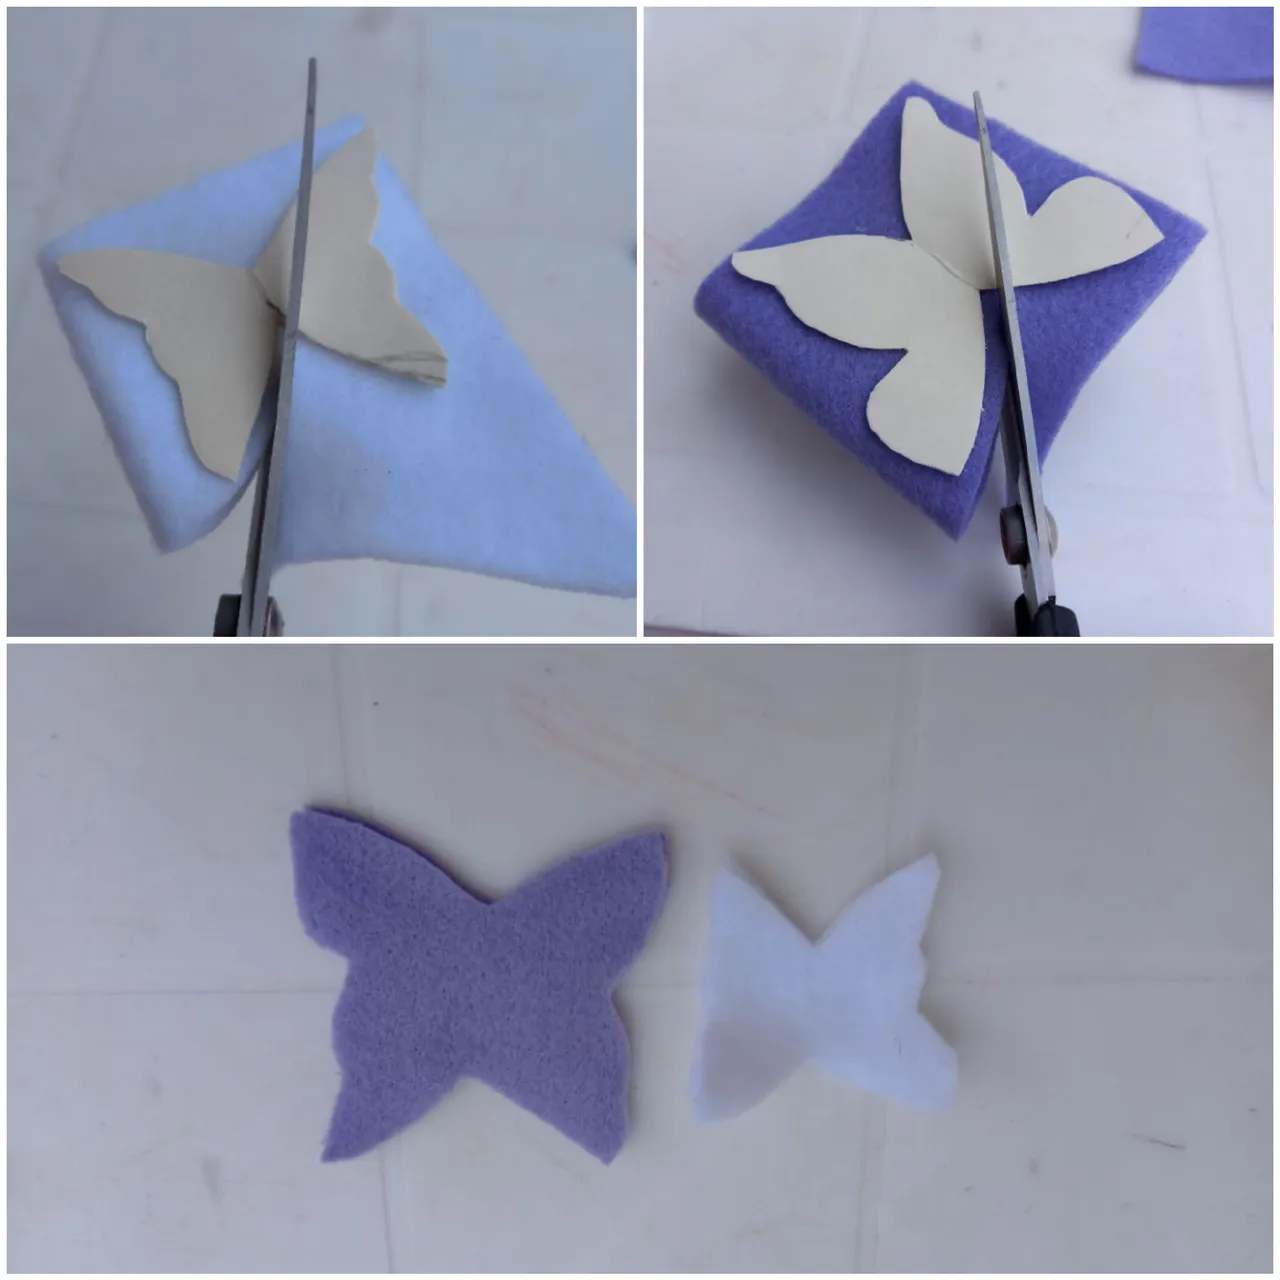
PASO 6:
Realiza dos mariposas 🦋 , una con fieltro blanco y otra con fieltro color Lila. Para esto, coloca cada fieltro en dos, para obtener dos piezas iguales.
Make two butterflies 🦋 , one with white felt and one with lilac felt. For this, place each felt in two, to get two equal pieces.
PASO 7:
Une con costura festoneada las piezas de la mariposa 🦋 color Lila y la mariposa 🦋 de color blanca, deja un pequeño espacio para introducir el relleno y cierra.
Join with scalloped stitching the pieces of the butterfly 🦋 Lilac color and the butterfly 🦋 white color, leave a small space to insert the stuffing and close.

PASO 8:
Fija con costura pespunteada las mariposas 🦋 una encima de la otra y adorna con las Perlas plásticas.
Attach the butterflies 🦋 one on top of the other and decorate with the plastic pearls.

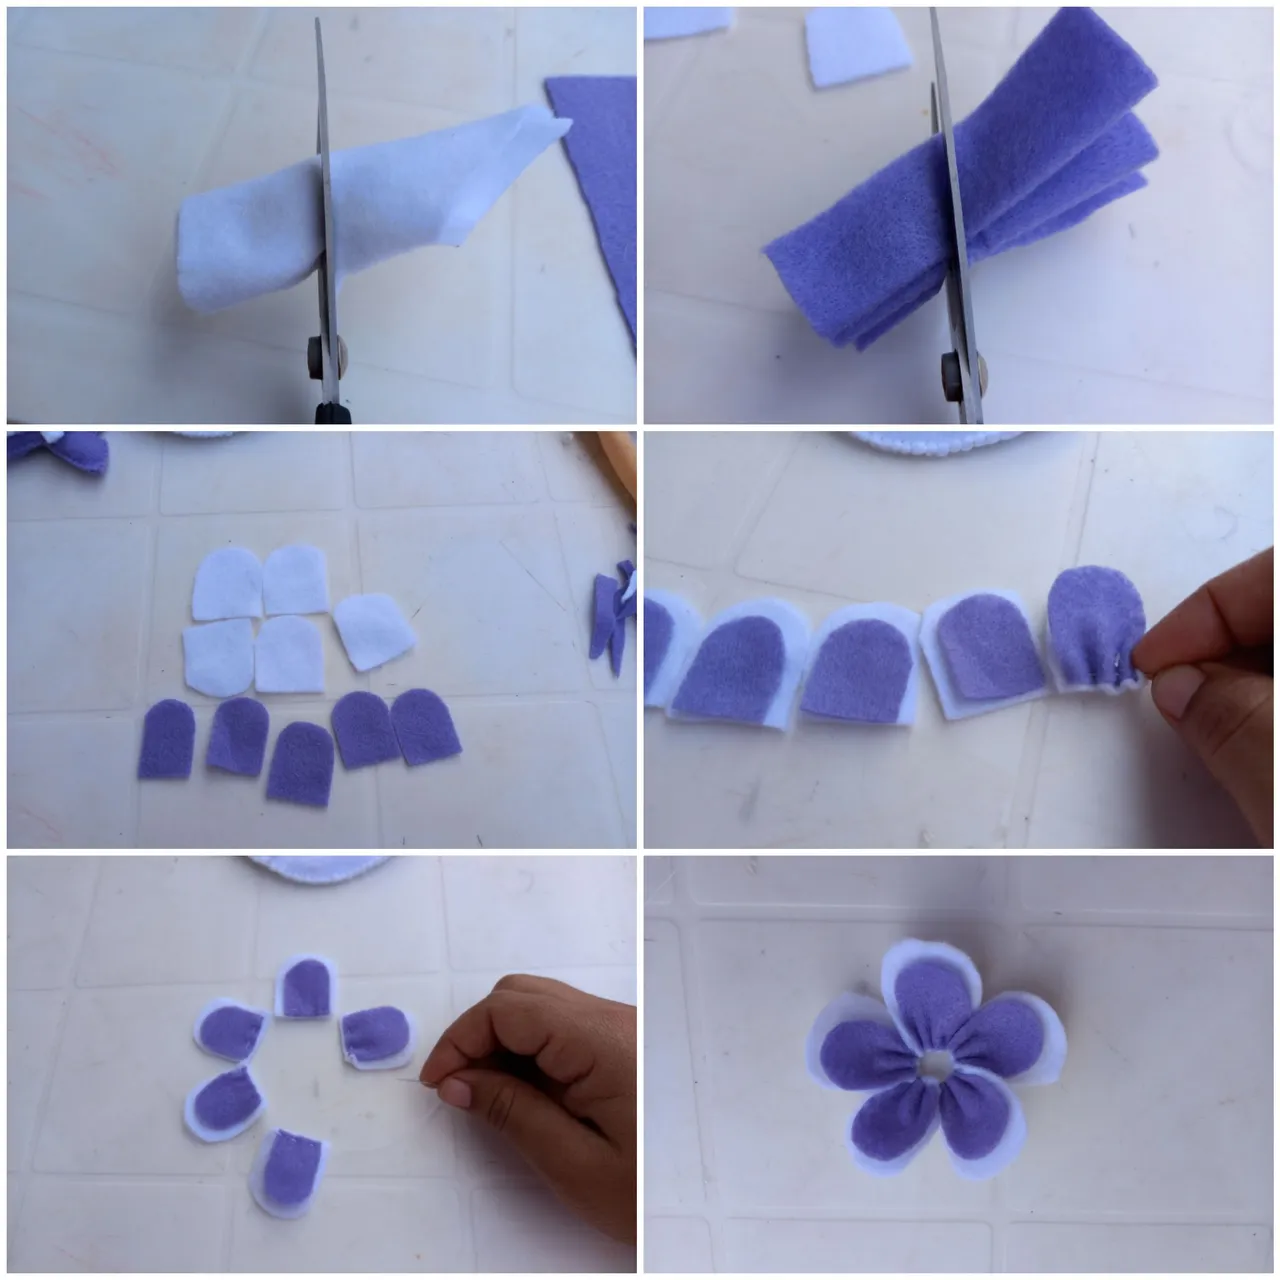
PASO 9:
Crea una flor 🌼 de fieltro, cortando 5 pétalos grandes y 5 pétalos pequeños, coloca los pequeños sobre los grandes y procede a unirlos con una costura de bastilla, hala el hilo hasta que los pétalos queden bien unidos y asegurados.
Create a felt flower, cutting 5 large petals and 5 small petals, place the small ones on top of the large ones and proceed to join them with a bastille stitch, pull the thread until the petals are well joined and secure.
PASO 10:
Por último fija la mariposa 🦋 en el Aro y la flor 🌼 en el Palillo de brocheta 🍢, previamente forrado.
Finally fix the butterfly 🦋 on the ring and the flower 🌼 on the skewer stick 🍢, previously lined.

Así quedó éste bello Sujetador de Cortinas.
Espero les haya gustado éste tutorial y lo pongan en práctica. Agradezco la invitación de mi amiga @gemahernandez, de igual manera, aprovecho la ocasión para invitar a mi amiga @carolina38 y a @chandehc para que formen parte de éste grandioso concurso.
Hasta otra oportunidad queridos amigos 😊
This is how this beautiful Curtain Holder turned out.
I hope you liked this tutorial and put it into practice. I appreciate the invitation of my friend @gemahernandez, likewise, I take this opportunity to invite my friend @carolina38 and @chandehc to be part of this great contest.
Until another opportunity dear friends 😊