La lógica te llevará del punto A al B. La imaginación te llevará a todas partes.
-Albert Einstein
Logic will take you from point A to B. Imagination will take you everywhere.
-Albert Einstein


¡Un saludo amigos de Hive! En esta oportunidad, me complace compartirles una decoración que realicé, como una forma de presentarme ante la maravillosa comunidad de HiveDiy, un espacio repleto de hermosas creaciones únicas, originales y creativas, el cual descubrí la semana pasada en la actividad de curación del servidor de discord de @hivemexico, puesto que ese día tuvo como invitada especial a mi tocaya, la excepcional Hiver @equipodelta, administradora y curadora de dicha comunidad.
Debo decir que esta decoración en particular se encuentra personalizada en relación a mis gustos, pues la elaboré como representación de mi perfil en Hive. Por ejemplo, está el detalle de las mariposas que añadí pues mi foto de portada contiene dicha figura. También predomina el color azul, mi favorito. Cosa que se puede notar en las portadas de mis publicaciones, que normalmente están dotadas de dicho color.


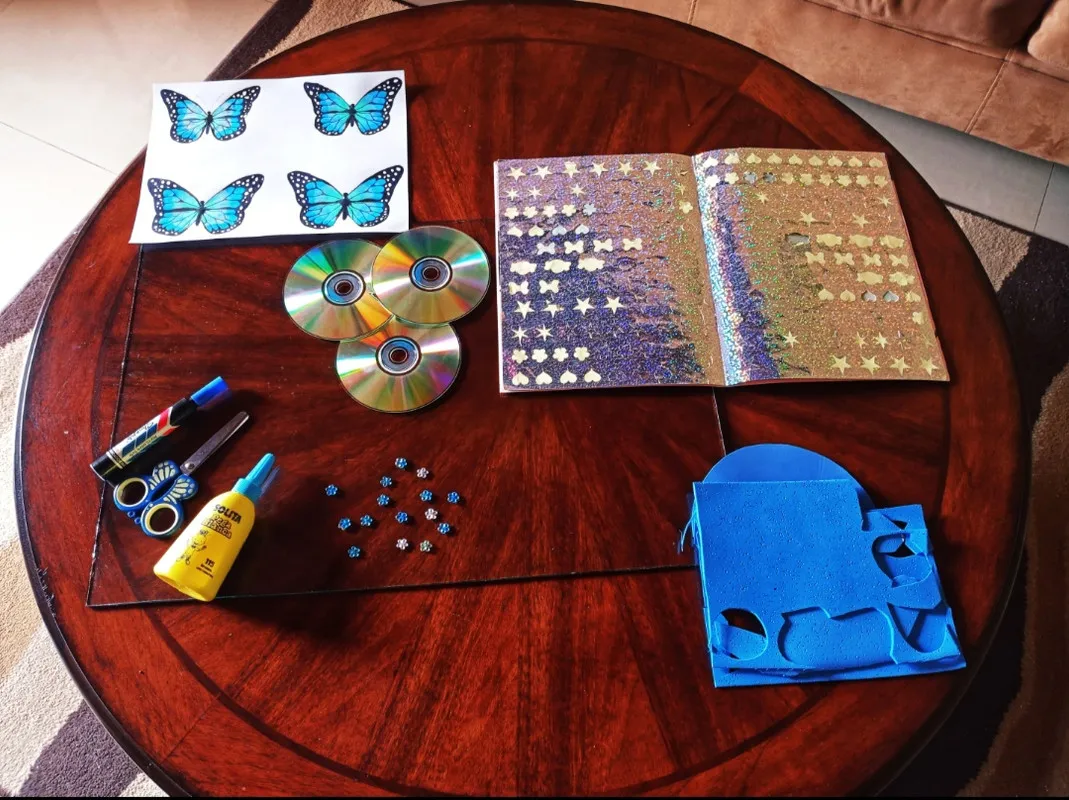
- Una (1) lámina de vidrio (que en este caso fue reciclada). La empleada cuenta con medidas de 37 cm de alto x 45 cm de ancho.
- Cuatro (4) mariposas, en este caso dibujadas. (Puede imprimirlas si lo desea).
- Pegatinas de color plateado provenientes de un libro guardado. Las utilizadas con de material iridescente (propiedad en la que tono de la luz y reflejo varía de acuerdo al ángulo desde el que se observa el objeto).
- Foami del color de su preferencia. En este caso, se emplearon tres (3) láminas recicladas de color azul.
- Un (1) Disco Compacto (CD).
- Pegatinas de pedrería.
- Implementos básicos: tijeras, regla, marcadores del color de su preferencia (azul y negro en este caso), pegamento líquido y hoja de papel bond blanca.

PASO #1
Luego, a estos rectángulos los corté por la parte del medio para separarlos y crear ese espacio en el que ambos rectángulos no coinciden. Luego, dibujé esta misma forma pero sin recortarla para que sirviera como el lado derecho exterior.
Finalmente, corté trozos de CD aleatoriamente para pegarlos en la forma previamente elaborada.

PASO #2

PASO #3

PASO #4


Hello Hivers! Today, I am so pleased and happy to share with you a decoration that I made, as a way to introduce myself to the wonderful community HiveDiy, a space full of beautiful, original, creative and unique creations, which I discovered last week during the activity of the @hivemexico discord server, when my namesake, the exceptional Hiver @equipodelta, administrator and curator of that community, was a special guest.
I must say that this particular decoration is personalized in relation to my tastes, since I made it as a representation of my profile on Hive. For example, there is the detail of the butterflies that I added because my cover photo contains this figure. The color blue also predominates, my favorite. Which can be noticed on the covers of my publications, which are normally endowed with this color.

- One (1) sheet of glass (which in this case was recycled). The one used has measurements of 37 cm high x 45 cm wide.
- Four (4) butterflies, in this case drawn. (You can print them if you want).
- Silver colored stickers from a saved book. Those used are made with iridescent material (property in which the tone of light and reflection varies according to the angle from which the object is observed).
- Foam of the color of your preference. In this case, three (3) recycled blue sheets were used.
- One (1) Compact Disc (CD).
- Rhinestone stickers.
- Basic implements: scissors, ruler, markers of the color of your preference (blue and black in this case), liquid glue and a sheet of white bond paper.

STEP #1
Then, I cut these rectangles in the middle to separate them and create that space in which both rectangles do not coincide. Then I drew this same shape but without cropping it to serve as the outer right side.
Finally, I cut pieces of CD randomly to glue them in the previously made shape.
STEP #2
STEP #3
STEP #4

Listo amigos, esta fue mi publicación. Espero que haya sido de su agrado. ¡Cuéntenme! ¿Qué tal les pareció el resultado? Son bienvenidos a compartirme su opinión en los comentarios ,😄💫💖. Los leo 👀.
That's it guys, this was my post. I hope it has meet your expectations. Tell me! Did you know any of these characters? You are welcome to share your opinion with me in the comments, 😄💫💖. I read them 👀.
Todas las imágenes utilizadas son de mi propiedad. Fueron tomadas y editadas desde mi Redmi Note 9. Los collages fueron realizados con la aplicación Collage Maker. Los separadores y títulos fueron elaborados en Canva.com. Fuente de la imagen de mariposa.
All images used are my property. They were taken and edited from my Redmi Note 9. The collages were made with the Collage Maker application. The tabs and titles were created on Canva.com. Source of the butterfly image.
El texto es original de @isabellav505.
The text is original from @isabellav505.