English version
About a month ago I shared with you a nice figure of a character from a video game called Bomberman. It was a figure that I made for a series of publications that I call Learn with Gabo, where I teach you how to make plasticine figures.
You can see more about this bomberman figurine by following this link:
@gaboamc2393/learn-with-gabo-4-aprende-con-gabo-4-espeng
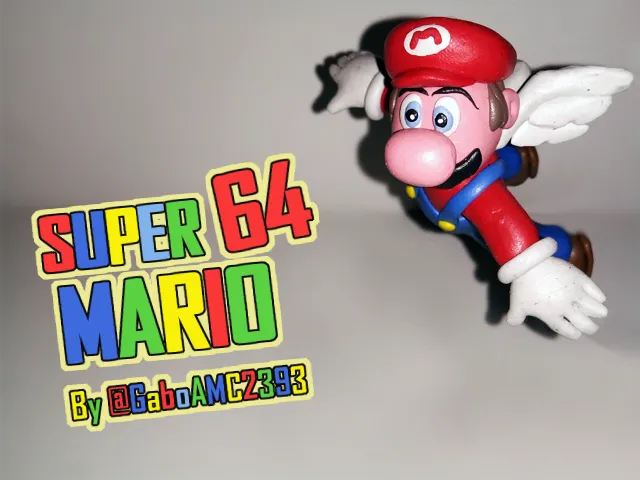
Well, since I made that figurine, my nine year old cousin was insisting that she wanted a Mario Bros or Sonic, the hedgehog figurine, because she loves those characters and she loved the bomberman figurine. At his request, I got down to work and that's how this sculpture was born. I present to you my sculpture inspired by Super Mario 64.
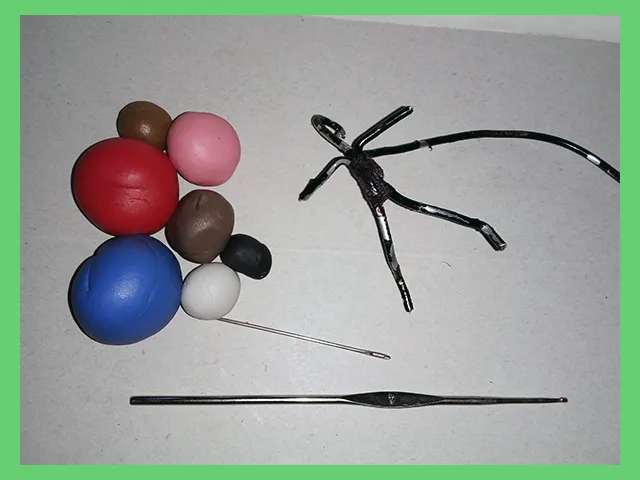
The materials and tools I used for this sculpture are the following:.
-Plastiline of different colors.
-Thread and wire.
-Sewing and knitting needle.
-Pincer to bend the wire.
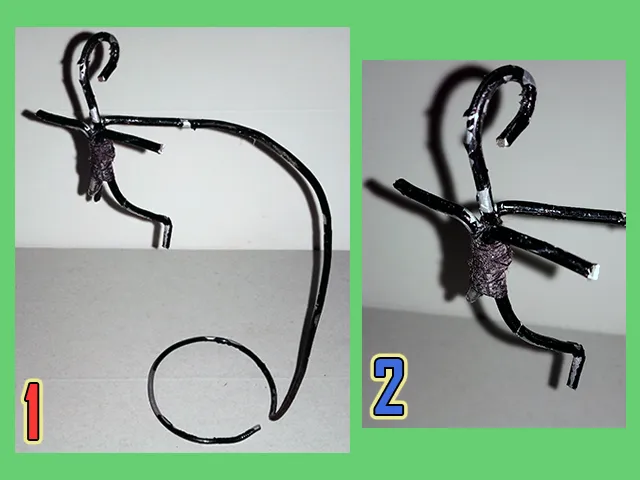
The first thing I did was the skeleton. As many will remember, the cover of the Mario 64 game is a Mario with wings. I thought of doing it in the style of a crane. That is, a long wire arm that would keep the figure floating by threads, as if it were a puppet.
It seemed like a good idea, but when I thought about it, I realized that it would be a problem because the threads could get tangled and eventually break or cut the plasticine. It wouldn't be practical, so I played it safe and made a wire arm in the style of a collectible figure stand.
Below you can see the complete skeleton (1) and in detail the skeleton of the figurine (2).
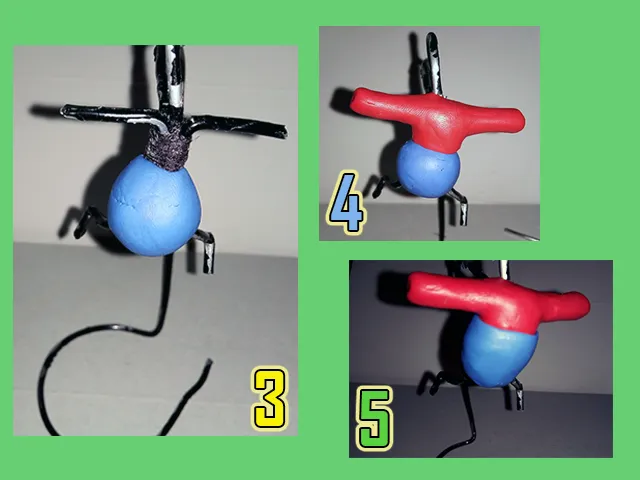
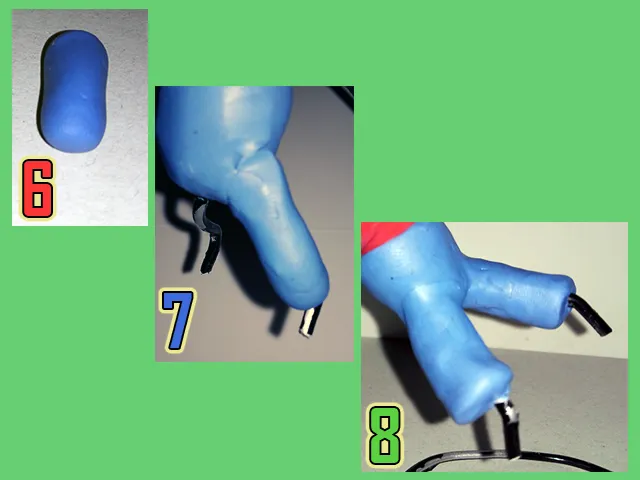
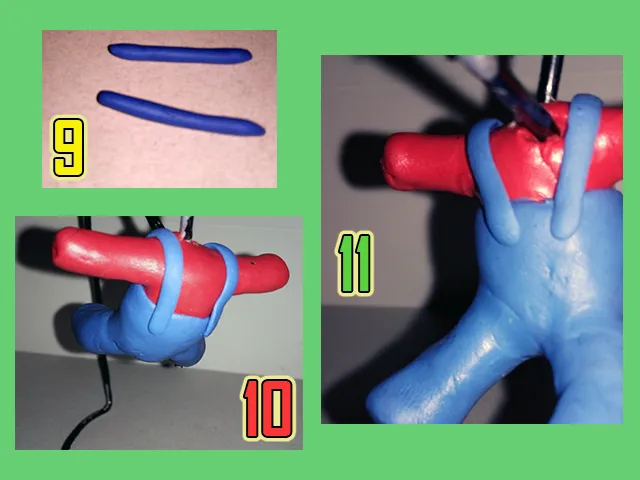
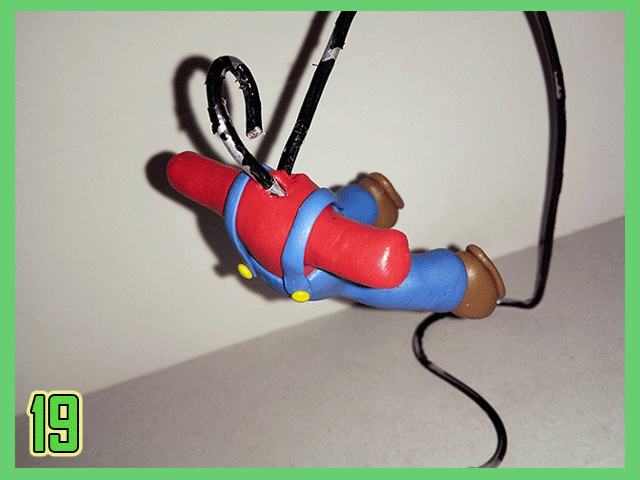
Once the skeleton was made, I started to cover it with plasticine. I used blue plasticine, as this is the color of our character's panties. He is pot-bellied, so I didn't hesitate to make him with a big belly (3). The next thing was to put the chest and arms with red clay (4), then I used blue clay to cover the red clay (5).
Once the torso was finished, I started with the legs. I made plasticine sticks of the same blue color (6), then I covered the wire legs with this plasticine, smoothing the surface of the figure with my fingers (7). I did the same process with the other leg (8).
For the panty straps I used two strips of blue plasticine and flattened them (9). Then I placed them on the shoulders of the figure, attaching them to the sides of the front area of the panty (10) and a little closer together in the back area (11).
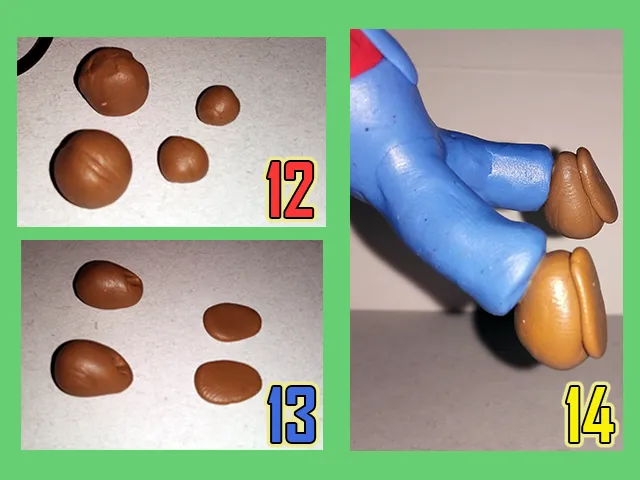
To make the shoes, I simply made four brown spheres, two small and two much larger ones (12). The small spheres I stretched them a little and flattened them, these would be for the soles of the shoes; the large spheres I also stretched and flattened them a little at one end, these would be the shoes (13). Once this pair of shoes was made, I fixed them in place (14).
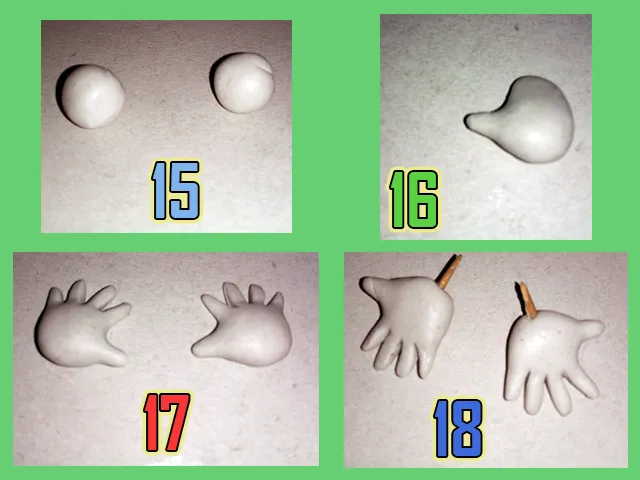
The hands were a little more complicated than the shoes. First I made two spheres of white plasticine (15), then I began to mold them into the shape of a hand (16). I then used the sharp sewing needle to cut out the fingers (17), then simply attached a wooden stick to hold them to the figure.
Below you can see the figure before and after attaching the gloves. By the way, in the picture you can also see the yellow buttons that I placed on the straps of the blue panties.
Once the torso was ready, I started working on Mario's head. First I made a sphere of pink plasticine (20), flattened it a little and pressed it with my thumb in the area where the eyes would go (21). I made his mustache (22), then the hair (23). Also the eyes (24) and finally the pupils (25).
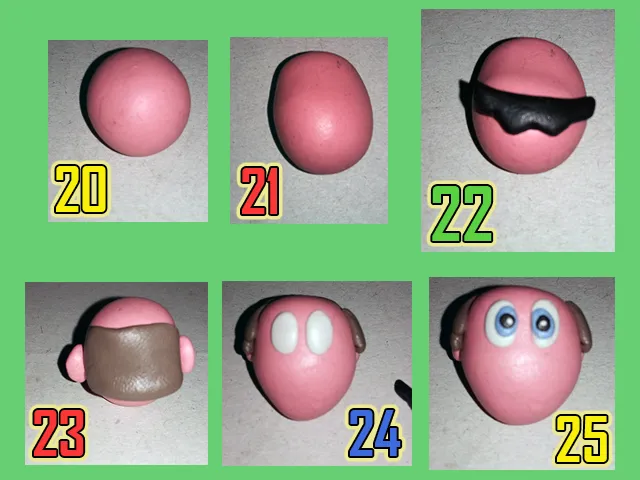
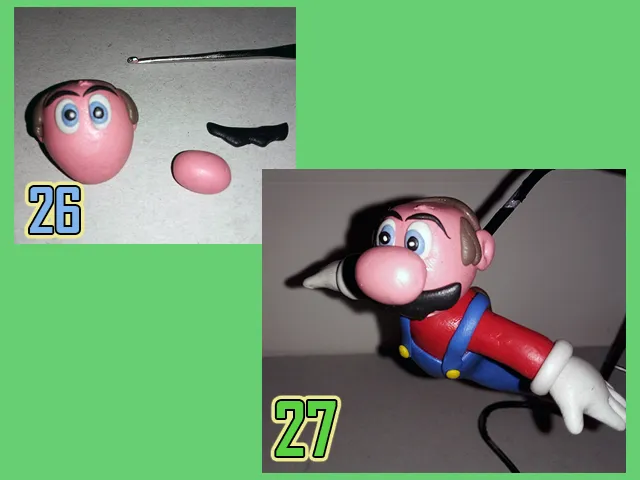
After making other details such as the eyebrows and nose (26), I joined all the pieces of the head (27).
I also made his respective red beanie and the character's wings, as shown in the image below:

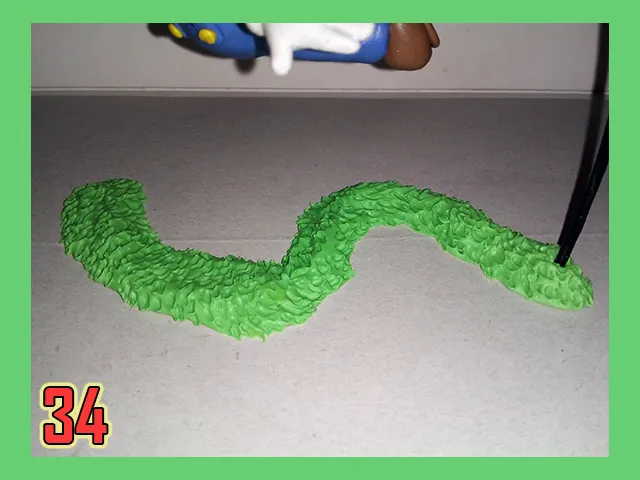
I decided to decorate the wire base with more plasticine, in this case green. Then with a needle I made a relief that reminds me a lot of grass.
Finally, I painted the black wire that keeps the figurine levitating white.
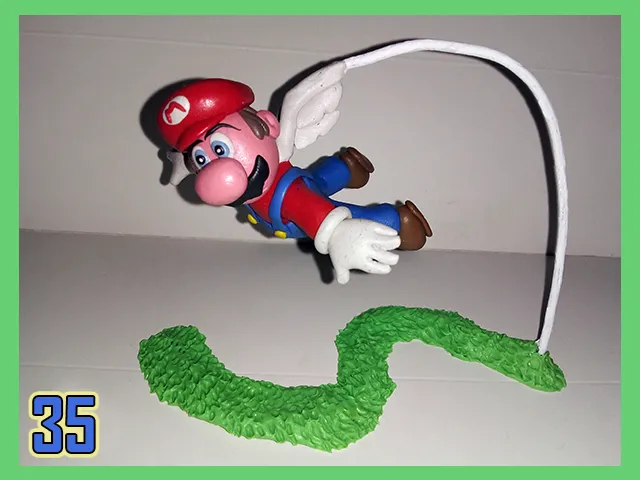
And this is how this beautiful Mario figurine was finished. Here are some pictures of all the work once finished.
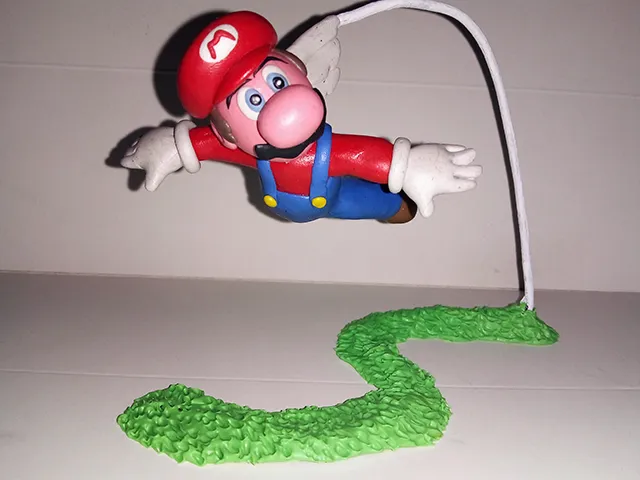
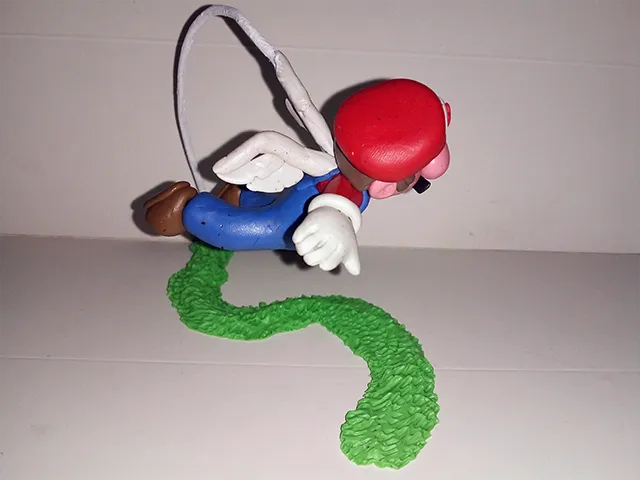
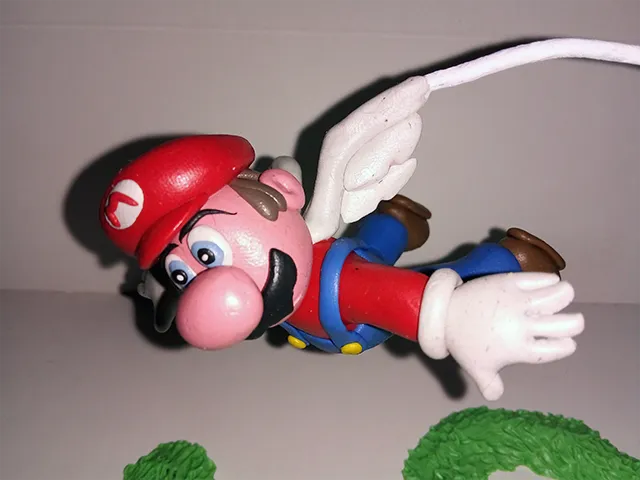
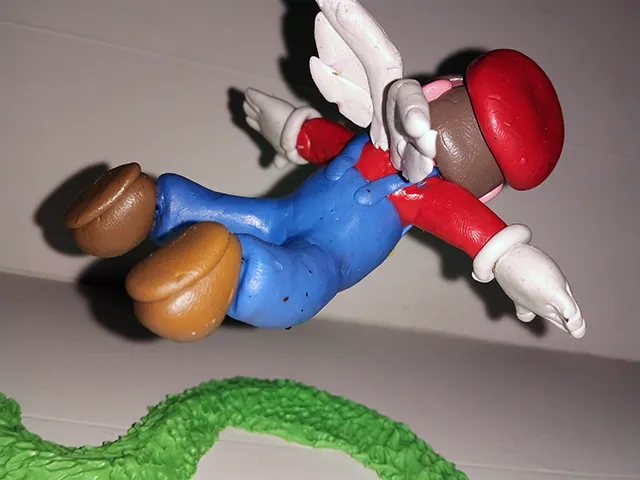
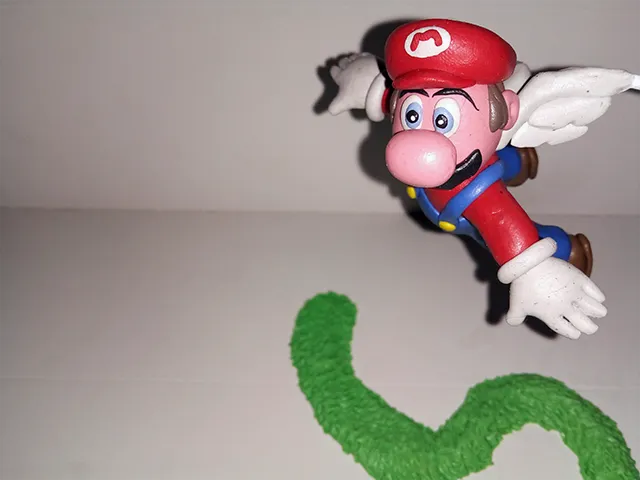
Well friends, this has been all. I really enjoyed doing this work and it was lovely to see the look of happiness on my cousin's face when I gave her the figurine, priceless.
What did you think of it? I would love to see your opinions, so if you like you can leave them in the comments. As always, I'll be happy to read them. I hope you liked my post and were entertained. With nothing more to add, I'll say goodbye then...
See you next time!
Versión en español
Hace aproximadamente un mes compartí con ustedes una bonita figura de un personaje de un videojuego llamado Bomberman. Fue una figura que hice para una serie de publicaciones que yo llamo Aprende con Gabo, donde les enseño a hacer figuritas con plastilina.
Puedes ver más acerca de esa figurita de bomberman siguiendo este enlace:
@gaboamc2393/learn-with-gabo-4-aprende-con-gabo-4-espeng
Pues bien, desde que hice esa figurita, mi prima de nueve años estuvo insistiendo en que quería una figurita de Mario Bros o Sonic, el erizo, pues le encantan esos personajes y le encantó la figurita de bomberman. Ante su petición, puse manos a la obra y fue así como nació esta escultura. Les presento pues, mi escultura inspirada en Super Mario 64.
Los materiales y herramientas que utilicé para esta escultura son los siguientes:
-Plastilina de diversos colores.
-Hilo y alambre.
-Aguja de coser y tejer.
-Pinza para doblar el alambre.
Lo primero que hice fue el esqueleto. Como muchos recordaran, la portada del juego Mario 64 es un Mario con alas. Pensé en hacerlo al más puro estilo de una grúa. Es decir, Un brazo largo de alambre que mantendría flotando a la figura mediante hilos, como si fuese una marioneta.
Me pareció buena idea, pero al pensarlo bien, me di cuenta de que sería un problema porque los hilos podrían enredarse y, con el tiempo, romperse o cortar la plastilina. No sería práctico, así que opté por lo seguro e hice un brazo de alambre al estilo de una peana de figuras coleccionables.
A continuación pueden ver el esqueleto completo (1) y en detalle el esqueleto de la figurita (2).
Una vez hecho el esqueleto, comencé a cubrirlo con plastilina. Usé plastilina azul, pues este es el color de la braga de nuestro personaje. Es barrigón, así que no dudé en hacerlo con una gran barriga (3). Lo siguiente fue colocarle la parte del pecho y los brazos con plastilina roja (4), luego usé plastilina azul para cubrir la plastilina roja (5).
Terminado el torso, comencé con las piernas. Hice bastones de plastilina del mismo color azul (6), luego cubrí las piernas de alambre con esta plastilina, alisando la superficie de la figura con mis dedos (7). Hice el mismo proceso con la otra pierna (8).
Para los tirantes de la braga usé dos tiritas de plastilina azul y las aplasté (9). Luego las coloqué sobre los hombros de la figura, fijándola a los lados de la zona frontal de la braga (10) y un poco más juntas en la zona trasera (11).
Para hacer los zapatos, simplemente hice cuatro esferas de color marrón, dos pequeñas y dos mucho más grandes (12). Las esferas pequeñas las estiré un poco y las aplasté, estas serían para la suela de los zapatos; las esferas grandes también las estiré y las aplasté un poco en uno de los extremos, estos serían los zapatos (13). Una vez hecho este par de zapatos, los fijé en su lugar (14).
Las manos sí fueron un poco más complicadas que los zapatos. Primero hice dos esferas de plastilina blanca (15), luego comencé a moldearlas hasta darle la forma de una mano (16). Posteriormente usé la afilada aguja de coser para cortar los dedos (17), luego simplemente les coloqué un palillo de madera para sujetarlos a la figura.
A continuación pueden ver la figura antes y después de fijar los guantes. Por cierto, en la imagen también se aprecian los botones amarillos que coloqué en los tirantes de la braga azul.
Una vez listo el torso, comencé a trabajar con la cabeza de Mario. Primero hice una esfera de plastilina rosa (20), la aplasté un poco y la presioné con mi pulgar en el área donde irían los ojos (21). Le hice su respectivo bigote (22), luego el pelo (23). También los ojos (24) y por último las pupilas (25).
Tras hacerle otros detalles como las cejas y la nariz (26), uní todas las piezas de la cabeza (27).
También le hice su respectivo gorrito rojo y las alas del personaje, tal como se observa en la imagen a continuación:
La base de alambre decidí decorarla con más plastilina, en este caso verde. Luego con una aguja le hice un relieve que recuerda mucho al césped.
Finalmente pinté de color blanco el alambre negro que mantiene levitando a la figurita.
Y de esta manera quedó terminada esta bella figurita de Mario. Les dejo unas fotos a continuación de todo el trabajo una vez finalizado.
Bien amigos, esto ha sido todo. Disfruté mucho hacer este trabajo y fue encantador ver la cara de felicidad de mi prima cuando le regalé la figurita, algo que no tiene precio.
¿A ustedes qué les pareció? Me encantaría ver sus opiniones, así que si gustan pueden dejarlas en los comentarios. Como siempre, estaré encantado de leerles. Espero que les haya gustado mi publicación y se hayan entretenido. Sin más que agregar, me despido entonces...
¡Hasta la próxima!

Imagenes editadas con Photoshop
Traducido con DeepL
Photos edited with Photoshop
Translated with DeepL
The traveling cat
A small but usefull tool
Learn With Gabo #5 / Aprende con Gabo