

Bienvenidos amigos y creadores de contenido que visitan mi Blog, mis saludos y buenas vibras para todos.
Por aquí nuevamente estoy agradecida y feliz de poder compartir este tutorial con ustedes, les cuento tengo una cortadora de mesa que adquirí hace mucho tiempo mediante un crédito y en la que fuí aprendiendo a recortar piezas en mdf, no me fué fácil pero, como quien dice, querer es poder y poco a poco aprendí y ya corto bien con ella, entonces de vez en cuando la uso ya que está muy costoso el material.
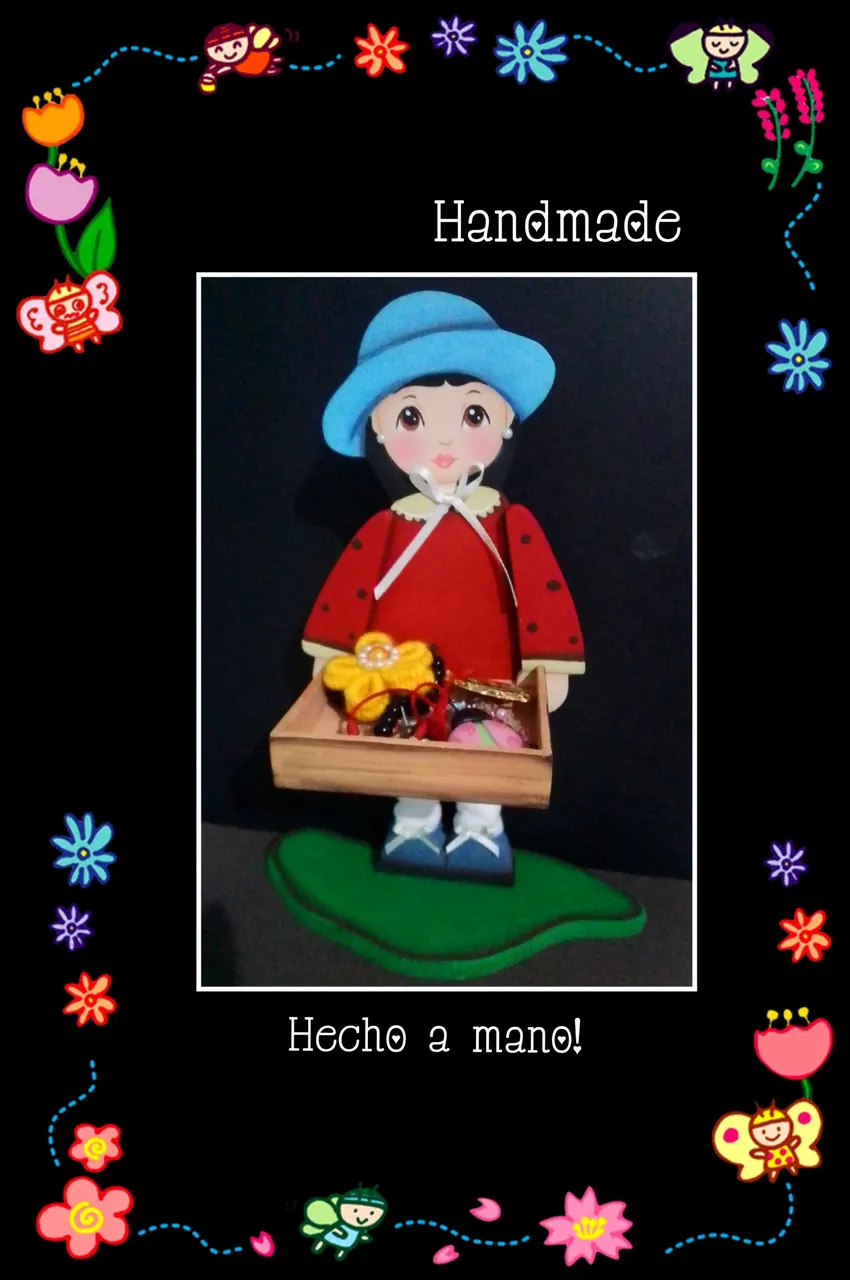
Pero me trajeron un pedazo para recortara unas piezas y me sobró un pedacito y decidí hacer una muñeca, tomé la idea de una que ví en Pinterest pero, le adicioné una cajita, para que además de decorar el cuarto de las niñas, sirviera como organizador ya sea de prendas, bisuterias, o la uses para lo que prefieras.
Una cosa te digo, puedes comprar o mandar a recortar una pieza como esta y pintarla junto a tu hija o sobrina, como hice yo, siempre es bueno enseñar a los niños a realizar cualquier actividad que sirva de aprendizaje para ellos.
Así que como siempre te invito a que me acompañes en el proceso.
Para este tutorial vas a necesitar:

| Pieza de mdf | Pinturas y pinceles |
|---|---|
| Palitos de madera | Lija y cola de madera |
| Retazo de tela y cinta | Perlitas |
| Silicón | Papel carbón y dibujo |
| Taladro |
Es hora de empezar:
Paso 1:

- Marca el borde del dibujo sobre el mdf y también las otras piezas y recorta, luego lija para quitar los bordes.
Paso 2:

- Aplica cola blanca en el borde de la cajita y pega uno a uno los lados. esta la recorté en mdf de 3mm.
- Luego perfora y haz un orificio en los zapatos calculando el ancho de los palitos que serán las piernas.
- Como no tenía una mecha gruesa, traté de ensanchar el orificio haciendo movimientos en forma circular, pero como no entraban bien los palitos, los rebajé un poco en las puntas.
Paso 3:

- Termina de lijar todos los bordes, luego coloca papel carbón y transfiere el dibujo.
- Nota: Cuando no tengas sellador de madera, aplica sobre el mdf una capa de pega escolar por todo el borde, deja secar, lija y repite este paso.
Paso 4:

- Ahora comienza aplicando una mano de pintura color piel, deja secar y lija, luego aplica otra capa de pintura y vuelve a lijar suavemente hasta que no sientas grumos.
- Luego aplica pintura azul por el borde y rellena el sombrero haciendolo en un solo sentido, deja secar y lija.
Paso 5:

- Sigue pintando con los colores claros y después aplica el rojo siempre en un solo sentido, no rellenes los orificios porque se engruesan con la pintura.
Paso 6:

- Mientras dejo secar la pieza, mi sobrinita está siguiendo mis instrucciones...jajajaja... ella lijó, y comenzó aplicando la pintura verde a la base, dejó secar, lijó y volvió a aplicar otra mano de pintura.
Paso 7:

- Ahora toca lijar, volver a pintar y lijar.
- Sugerencia: Cuando vayas a pintar piezas en colores claros tienes que aplicar primero una o 2 capas de pintura blanca, aquí te muestro cuando pintamos con color amarillo directamente sobre el mdf, no queda bien, a el otro lado apliqué blanco y sobre este el amarillo y mira la diferencia de colores. luego pinté en marrón.
Paso 8:

- Ahora con un pincel cuadrado o angular, moja la punta con pintura marrón o negro y pasa por debajo del cuello del vestido para hacer sombra.
- Coloca el papel carbón sobre la cara y marca sus partes, pinta con blanco los ojos, rellena, delinea y pon el punto negro con el pincel o marcador.
- Ahora le toco a la niña pintar los palitos o piernas con pintura piel y yo terminé de pintar el vestido poniendo lunares en las mangas y la parte baja.
Paso 9:

- Después de pintar y lijar, aplica un poco de rubor en las mejillas.
- Ahora toca recortar dos cuadritos de tela de 3x3cm en tela blanca, cose por un lado, voltea e inserta en los palitos, estas serán unas medias, quise poner para darle un toque personal, también puedes hacer lacitos y pegar a los zapatos.. esto es opcional.
- Coloca la cesta para probar que entre bien en las ranuras de las manos, puedes quitar y poner.
- Ahora aplica silicon en la base y pega los zapaticos.
Paso 10:

Por último pega unas perlitas como zarcillo y un lacito en el cuello.
Así quedó!
Fuente:
https://www.pinterest.es/pin/669136457122848890/
Espero hayas aprendido algo de mi tutorial y ojalá te guste y sea útil en cualquier momento.
Mi publicación está traducido con DeepL
Etiquetas HTML
Teléfono BLU G5
Editor de fotos GridArt.
Ahora me despido agradeciendo tu apoyo y si gustas comentar, me encantará responderte.
Hasta mi próximo tutorial.
English:
Welcome friends and content creators who visit my Blog, my greetings and good vibes to all.
But they brought me a piece to cut some pieces and I had a little piece left over and I decided to make a doll, I took the idea of one I saw on Pinterest but I added a little box, so that in addition to decorate the girls room, it would serve as an organizer either for clothes, jewelry, or use it for whatever you prefer.
One thing I tell you, you can buy or send to cut out a piece like this and paint it with your daughter or niece, as I did, it is always good to teach children to perform any activity that serves as learning for them.
So as always I invite you to join me in the process.
For this tutorial you will need:
| Piece of mdf | Paints and brushes |
|---|---|
| Wooden sticks | Sandpaper and wood glue |
| Cloth and ribbon | Beads |
| Silicone | Charcoal paper and drawing |
| Drill |
It's time to get started:
Step 1:
- Mark the edge of the drawing on the mdf and also the other pieces and cut out, then sand to remove the edges.
Step 2:
- Apply white glue on the edge of the box and glue the sides one by one. I cut this one out of 3mm mdf.
- Then drill and make a hole in the shoes calculating the width of the sticks that will be the legs.
- As I didn't have a thick wick, I tried to widen the hole by making circular movements, but as the sticks didn't fit well, I lowered them a little at the ends.
Step 3:
- Finish sanding all the edges, then place carbon paper and transfer the drawing.
- Note: When you don't have wood sealer, apply a coat of school glue all around the edge of the mdf, let it dry, sand and repeat this step.
Step 4:
- Now start by applying a coat of skin colored paint, let it dry and sand, then apply another coat of paint and sand again until you feel no lumps.
- Then apply blue paint around the edge and fill in the hat in one direction only, let dry and sand.
Step 5:
- Continue painting with the light colors and then apply the red paint always in one direction, do not fill the holes because they get thicker with the paint.
Step 6:
- While I let the piece dry, my little niece is following my instructions...hahahaha...she sanded, and started by applying the green paint to the base, let it dry, sanded and reapplied another coat of paint.
Step 7:
- Now it's time to sand, repaint and sand.
- Tip: When you are going to paint pieces in light colors you have to first apply one or 2 coats of white paint, here I show you when we paint with yellow color directly on the mdf, it does not look good, on the other side I applied white and on this the yellow and look at the difference in colors. then I painted in brown.
Step 8:
- Now with a square or angled brush, wet the tip with brown or black paint and go under the collar of the dress to make shadow.
- Place the carbon paper over the face and mark its parts, paint with white the eyes, fill in, outline and put the black dot with the brush or marker.
- Now it is the girl's turn to paint the sticks or legs with skin paint and I finished painting the dress by putting polka dots on the sleeves and bottom.
Step 9:
- After painting and sanding, apply some blush on the cheeks.
- Now it's time to cut out two 3x3cm squares of fabric in white fabric, sew on one side, flip and insert into the sticks, these will be stockings, I wanted to put to give it a personal touch, you can also make bows and glue to the shoes.. this is optional.
- Place the basket to test that it fits well in the grooves of the hands, you can remove and put.
- Now apply silicone on the base and glue the shoes.
Step 10:
Finally, glue some pearls as a tendril and a bow on the neck.
This is how it looks!
Source:
https://www.pinterest.es/pin/669136457122848890/
I hope you learned something from my tutorial and I hope you like it and that it will be useful at any time.
My post is translated with DeepL
HTML tags
BLU G5 phone
GridArt photo editor.
Now I say goodbye thanking you for your support and if you like to comment, I will be happy to answer you.
Until my next tutorial.