

Buenas días mis queridos amigos de esta linda comunidad a mi espacio preferido!
Los materiales para realizar este bonito tutorial son:

| Recortes de Cartulinas lisa y corrugada | Recortes de foami |
|---|---|
| Pinturas y pinceles | Recortes de papel crepé |
| Palito de madera | Mecatillo |
| Goma espuma y tiza | Regla y lápiz |
| Tijera | Círculo de anime de 6x6cms |
Es hora de comenzar con el procedimiento:

- Recorta 2 tiras de cartulina de 30 cms de largo.
Una en cartulina azul y otra en corrugada verde. - Aplica silicón en el medio de la cartulina y pega al círculo, haciendo presión para que peguen los extremos.
- Luego pega la cartulina corrugada verde y la pegas al cilindro que usaremos como porroncito.
- Ahora con el mecatillo das dos vueltas alrededor del porrón y has un lazo al frente.

- Hecho el lazo, recorta 6 cuadros en papel crepé marrón de 8x8cm y pega uno sobre el anime para cubrir el anime.
- Luego los otros cuadritos los meterás uno a uno en el anime, con la ayuda de un palito de madera empujando por el centro del papel hasta rellenar toda la base.

- Marcas el molde de la flor(2) piezas en la cartulina y recortas.
- Con la ayuda de una regla y la punta de la tijera o algo que te ayude para marcar el centro de cada pétalo marcando de una punta a la otra.
- Doblar hacia adentro cada pétalo.
- Marcas un círculo en foami y luego transfieres la carita dibujada en el papel.
- Con la ayuda de la parte de atrás del pincel, mojas en pintura y rellenas los ojos y pintas la boca con un pincel liner o marcador fino.
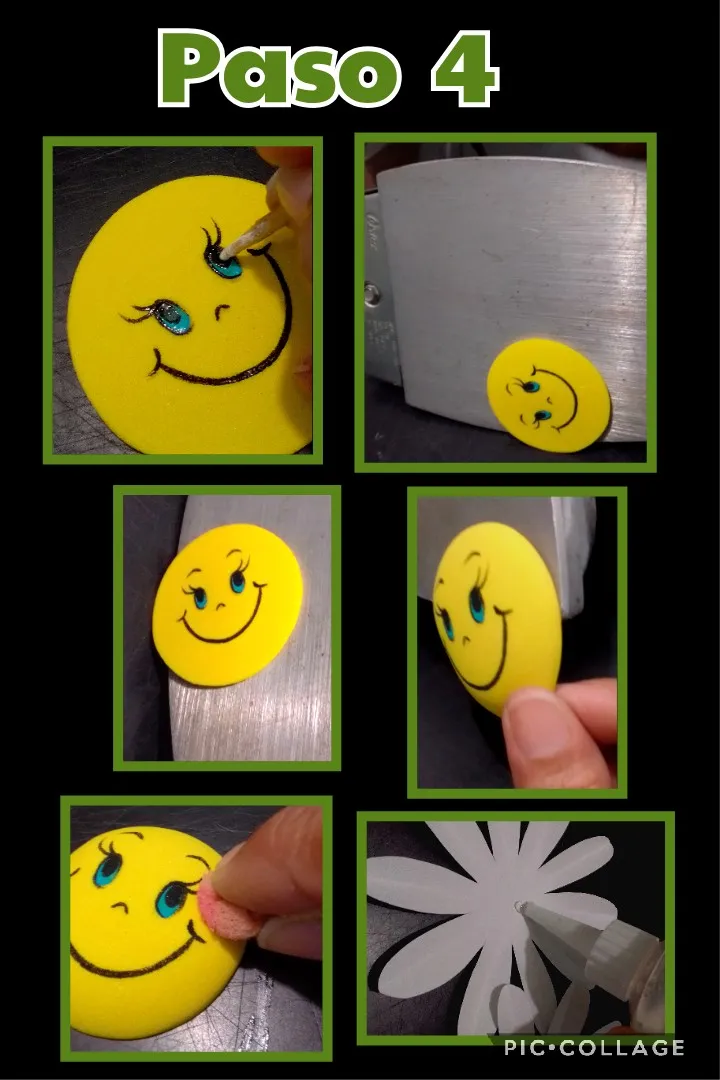
- Luego rellenas el centro del ojo con pintura negra y dejas secar.
- Ahora toca calentar (término medio)la plancha y colocar la carita para que tome forma o relieve.
- Y maquillar con tiza las mejillas.
- Aplica silicón en el centro de la flor.
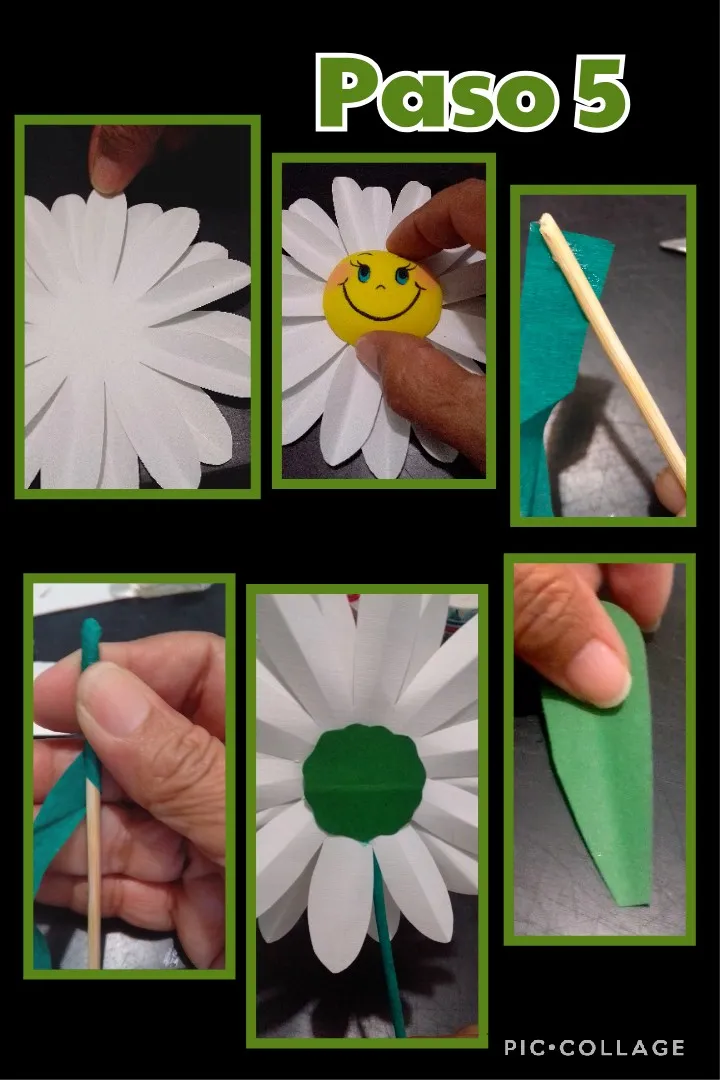
- Pegar una flor sobre la otra pero que los pétalos no coincidan o queden uno exactamente sobre otro.
- Aplicar silicón en la carita y pegar.
- Recortar una tira de papel crepé de 15 cms y pegar al palito de forma diagonal para que al girar el palito vaya bajando y quede bien al forrar.
- Luego aplicar silicón en un extremo y meter entre los pétalos, dejar secar y luego recortar un círculo en cartulina y pegar en la parte posterior de la flor.
- Recorta hojas largas y lisas, doblar igual que se hizo con los pétalos.

- Con la ayuda de la tijera darás forma a las hojas en la punta doblando un poco.
- Pegar aplicando silicón solo en la punta de abajo de la hoja y pegar en el palito para decorar el tallo.
- Observa como va quedando de lindo este trabajo.

- Ahora recorta unos círculos pequeños la cantidad que quieras, de distintos tamaños y pondrás sobre la plancha caliente, para que tomen volumen o forma y dibujas con marcador negro, lo que será la cabeza (ver foto) y pintas una línea en el centro para dividir las alas del coquito y decoras con puntos negros luego marca con pintura blanca los ojitos.
- Por último aplicas silicon por el borde de las mariquitas y pegas.
¡Mira, así quedó ya lista esta fácil, sencilla y muy bonita Flor!
Mi publicación está traducida con DeepL, editada con etiquetas HTML, las fotos son capturadas por mi teléfono Blu G5 y editadas con Pic Collage.
Si te gustó o te fué útil mi paso a paso, me encantará ver tu comentario. Saludos y muchas gracias por tu visita y apoyo.
Hecho con mucho cariño para tí.
Bendiciones y éxitos para todos.
English
Good morning my dear friends of this beautiful community to my favorite space!
The materials to make this cute tutorial are:
| Smooth and corrugated cardboard cutouts | Foami cutouts |
|---|---|
| Paints and paintbrushes | Crepe paper cutouts |
| Wooden stick | Mecatillo |
| Foam eraser and chalk | Ruler and pencil |
| Scissors | Anime circle 6x6cms |
It's time to start with the procedure:
- Cut out 2 strips of cardboard 30 cms long.
One in blue cardboard and the other in green corrugated cardboard. - Apply silicone in the middle of the cardboard and glue to the circle, pressing the ends together.
- Then glue the green corrugated cardboard and glue it to the cylinder that we will use as a little ball.
- Now with the mecatillo you make two laps around the porron and make a loop at the front.
- Once the bow is done, cut 6 squares in brown crepe paper of 8x8cm and glue one on the anime to cover the anime.
- Then stick the other squares one by one into the anime, with the help of a wooden stick pushing through the center of the paper until the whole base is filled.
- Mark the mold of the flower (2) pieces on the cardboard and cut them out.
- With the help of a ruler and the tip of the scissors or something to help you mark the center of each petal marking from one end to the other.
- Fold each petal inward.
- Mark a circle in foami and then transfer the face drawn on the paper.
- With the help of the back of the brush, dip in paint and fill in the eyes and paint the mouth with a liner brush or fine marker.
- Then fill in the center of the eye with black paint and let it dry.
- Now it's time to heat the iron and place the face so that it takes shape or relief.
- And make up the cheeks with chalk.
- Apply silicone in the center of the flower.
- Glue one flower on top of the other but do not place the petals exactly one on top of the other.
- Apply silicone to the face and glue.
- Cut a 15 cm strip of crepe paper and glue it to the stick diagonally so that when you turn the stick it will go down and it will look good when lined.
- Then apply silicone on one end and put it between the petals, let it dry and then cut out a circle in cardboard and glue it on the back of the flower.
- Cut out long, smooth leaves, fold as you did with the petals.
- With the help of the scissors you will shape the leaves at the tip by folding a little.
- Glue applying silicone only on the bottom tip of the leaf and glue on the stick to decorate the stem.
- Watch how beautiful this work is getting.
- Now cut out small circles of different sizes and put them on the hot iron, so that they take volume or shape and draw with black marker, what will be the head (see photo) and paint a line in the center to divide the wings of the coquito and decorate with black dots then mark with white paint the eyes.
- Finally, apply silicone around the edge of the ladybugs and glue.
Look, this is how this easy, simple and very pretty Flower is ready!
My post is translated with DeepL, edited with HTML tags, the photos are captured by my Blu G5 phone and edited with Pic Collage.
If you liked or found my step by step useful, I'd love to see your comment. Greetings and thank you very much for your visit and support.
Made with love for you.
Blessings and success to all.