Hola, hola amigos de esta comunidad.
Materiales:
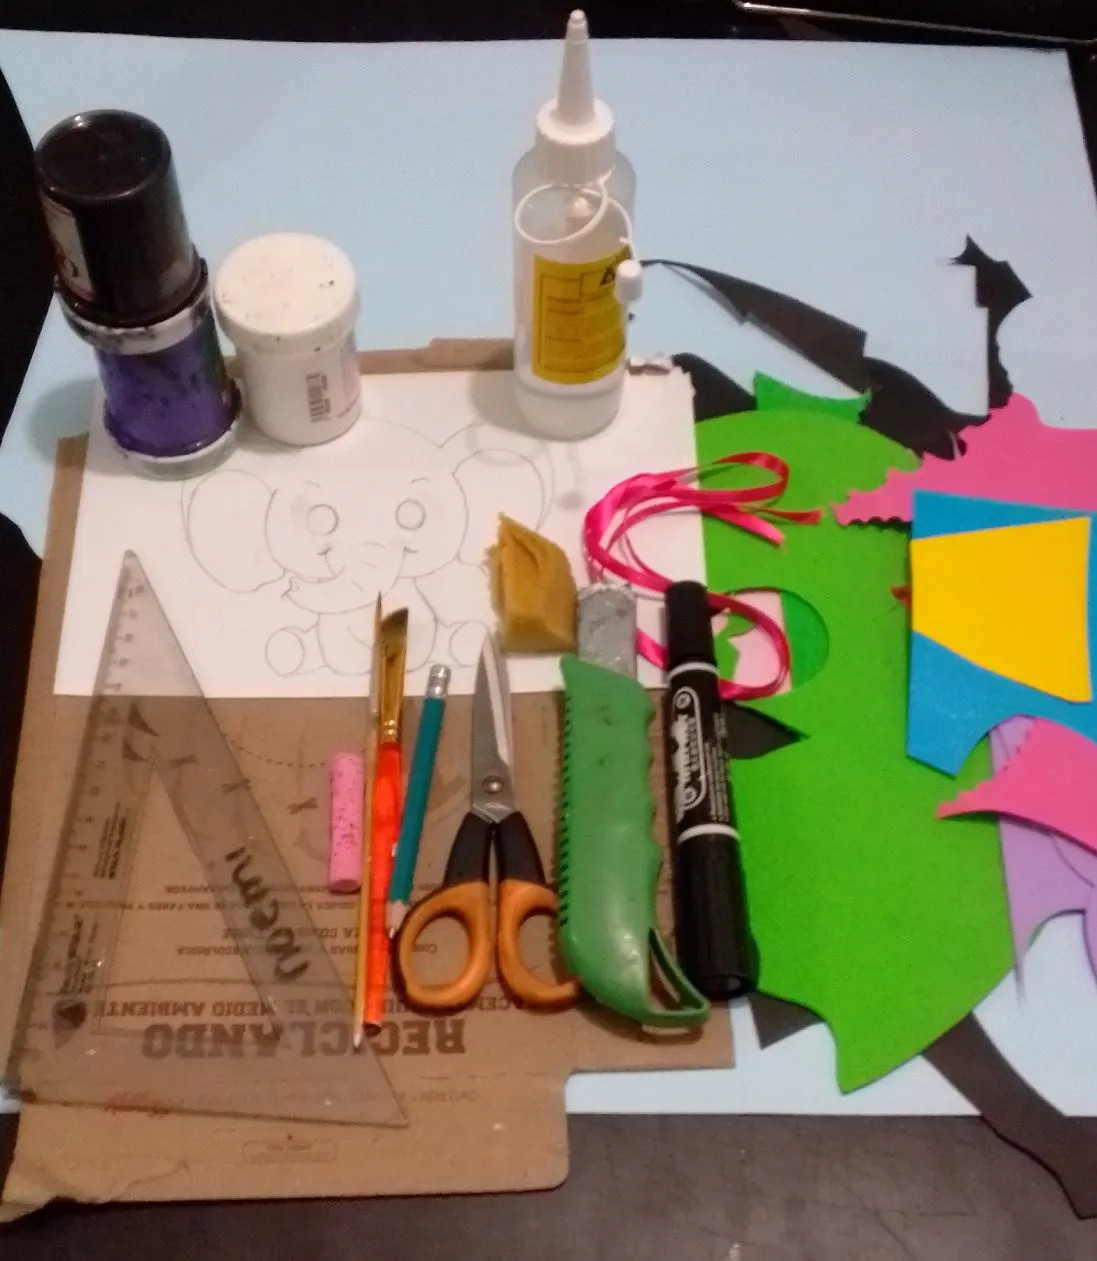
| Cartón de caja | Cartulinas (escolar) | Foami mate y escarchado |
|---|---|---|
| Pinturas | Pinceles | Tiza rosada |
| Silicón líquido | Regla | Cinta de tela |
| Molde o dibujo | Lápiz de mina | Tijera |
| Marcador | Esponja |
Antes de empezar el paso a paso les enseñaré la manera de sombrear las piezas de foami:

1° Puedes utilizar un pincel angular o recto.
2° Mojar el pincel en agua y pasar por un paño seco para quitar el exceso de agua, dejándolo húmedo.
3° Mojar en pintura sólo la punta del pincel, descargar en el paño y empezar a pintar por la orilla de la pieza de arriba hacia abajo hasta donde quieras el sombreado.
4° Si quieres el sombreado más ancho puedes repetir el paso anterior pero al lado del primer sombreado, también puedes repasar de abajo hacia arriba.
Lo húmedo del pincel hará que la pintura se difumine, lo ideal es practicar varias veces hasta que el sombreado te quede bien difuminado.
Ahora empezamos con el procedimiento:
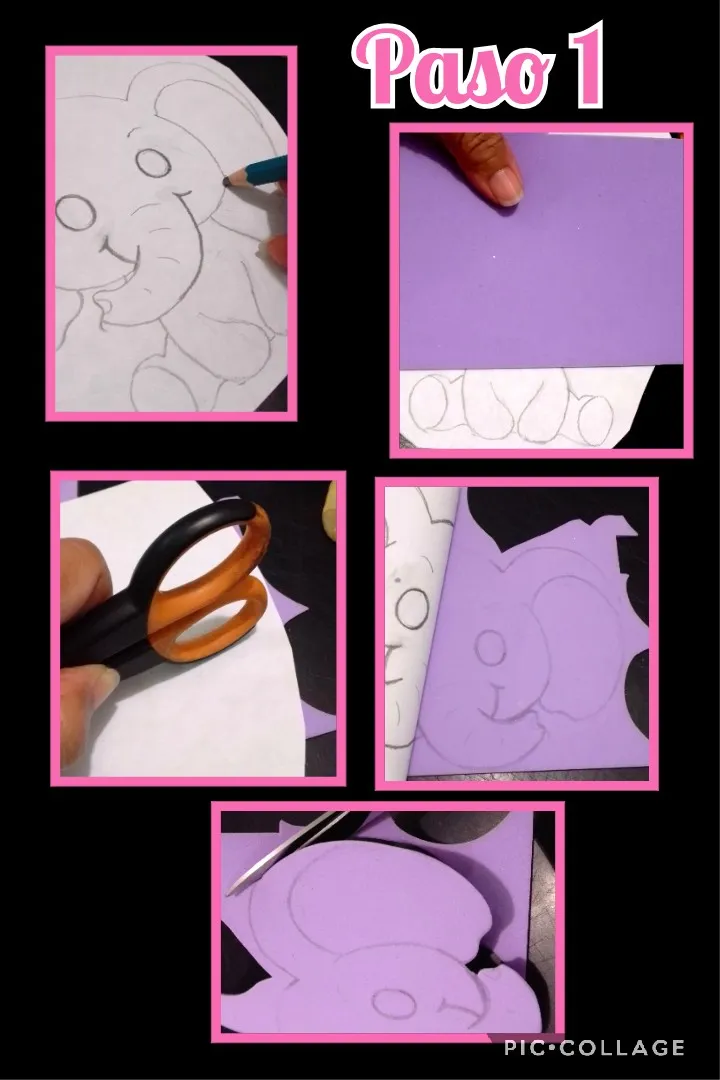
- Remarcar el dibujo o la impresión.
- Para transferir el dibujo, debes colocar el foami sobre el dibujo, dar la vuelta y colocar sobre la mesa y luego con las orejas de la tijera, frota el papel sujetando para que salga bien marcada la pieza.(ver foto)
- Repetir con todas las piezas y luego recortar.
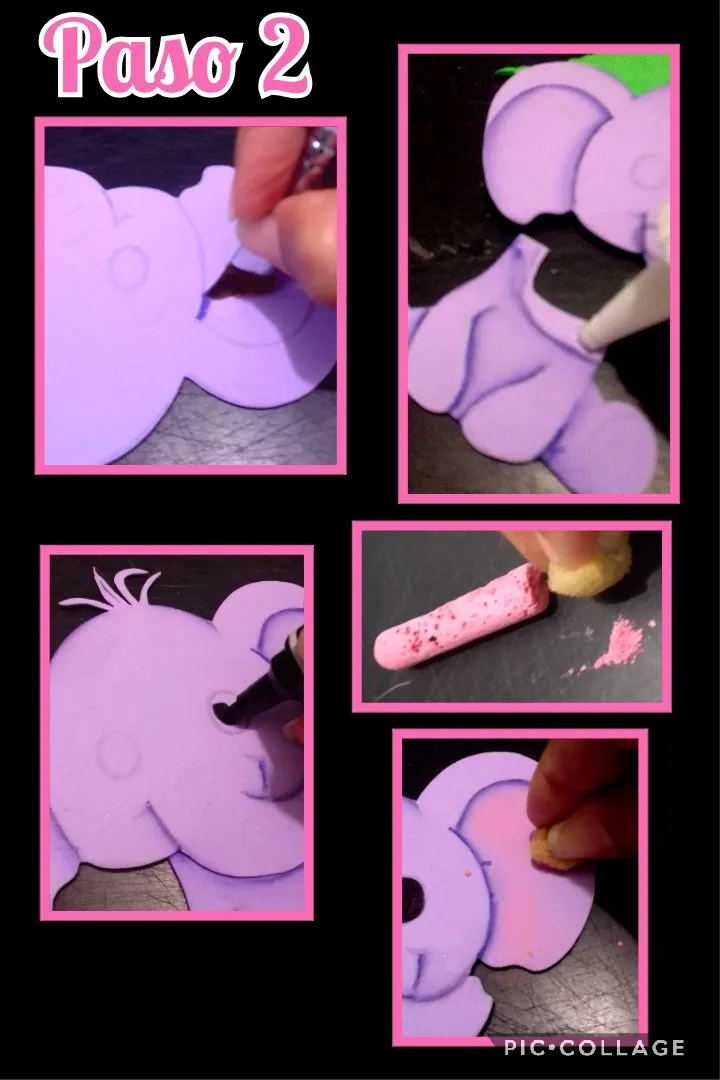
- Sombrear las piezas siguiendo la explicación anterior.
- Aplicar silicón y pegar la cabeza.
- Luego pintar los ojos rellenado con marcador y raspar un poco de tiza para luego tomar con la esponja y pasar en el centro de las orejas y los cacheticos.
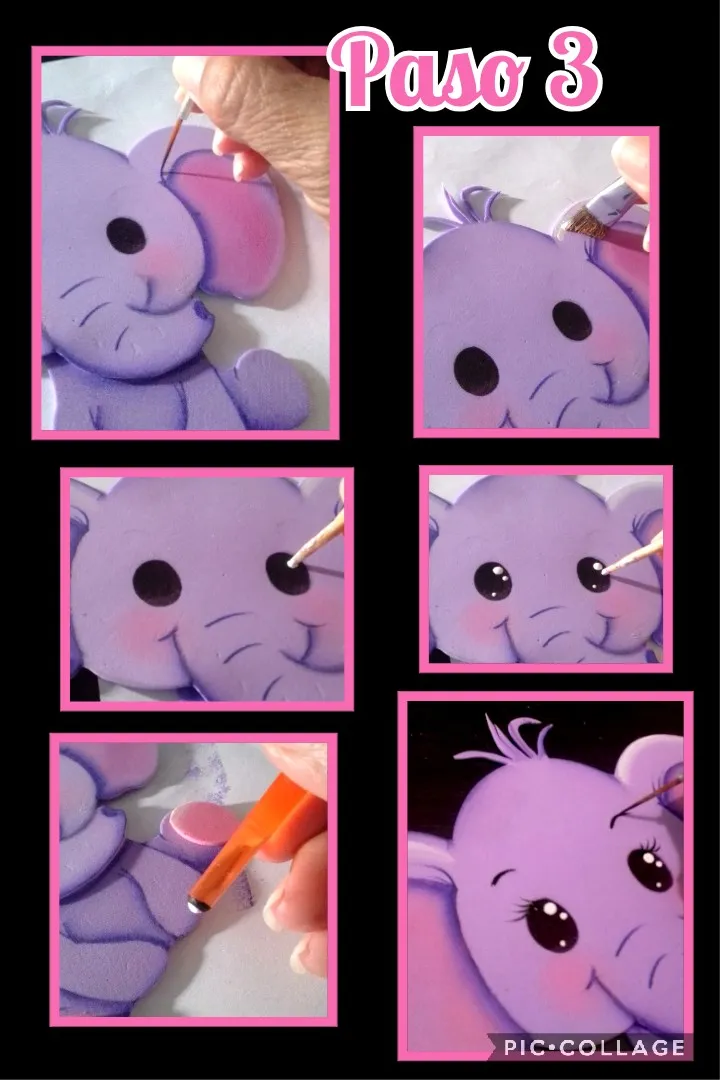
- Con un pincel delgado delinear orejas, trompa y boca.
- Después con pintura blanca pasar por el borde superior de las orejas para dar un poco de luz.
- Con un palito de madera pintar en blanco el brillo de los ojos, esto lo debes hacer en el mismo sitio en cada ojo.
- Luego con la parte de atrás del pincel pintar en blanco las uñas y luego delinear con negro las cejas y pestañas.
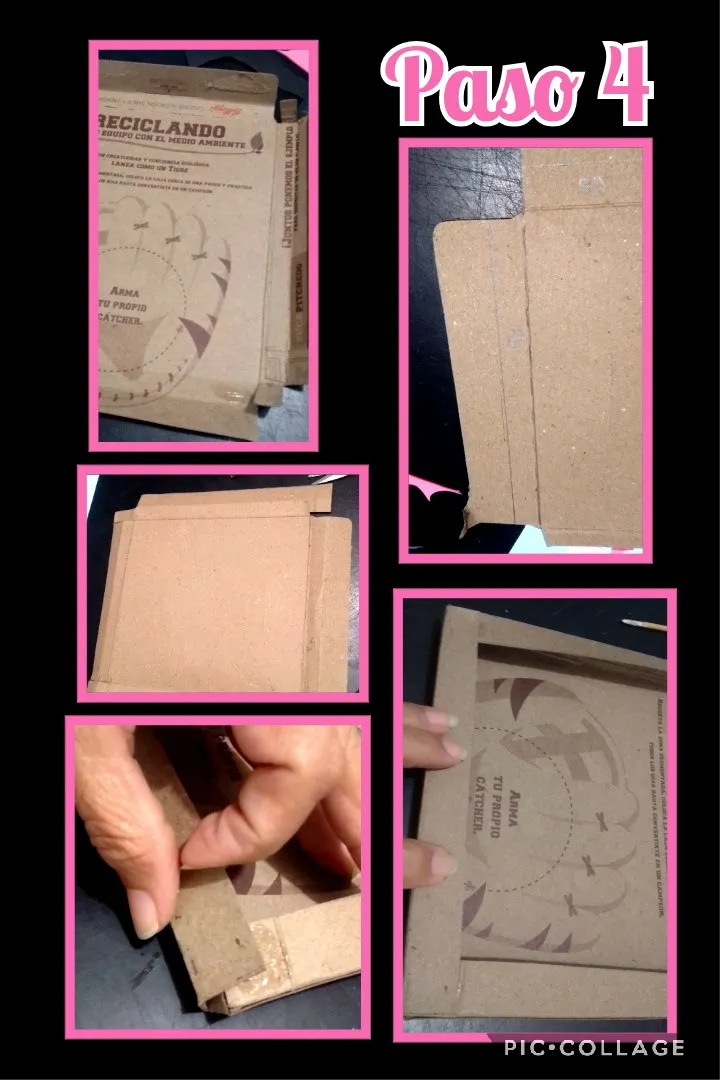
- En este paso marcarás un un rectángulo o un cuadrado en el centro del cartón de la caja.
- Luego marcar una pestaña de 1.5cms por cada lado que son (4).y pasar la punta de la tijera o un bolígrafo sin tinta haciendo un poco de presión para poder doblar.
- Después de la línea del doblés, marcar 2,5cms adicionales igualmente en los cuatro lados.
- Ahora aplicarás silicón en las esquinas y pegarás para formar el cuadro.
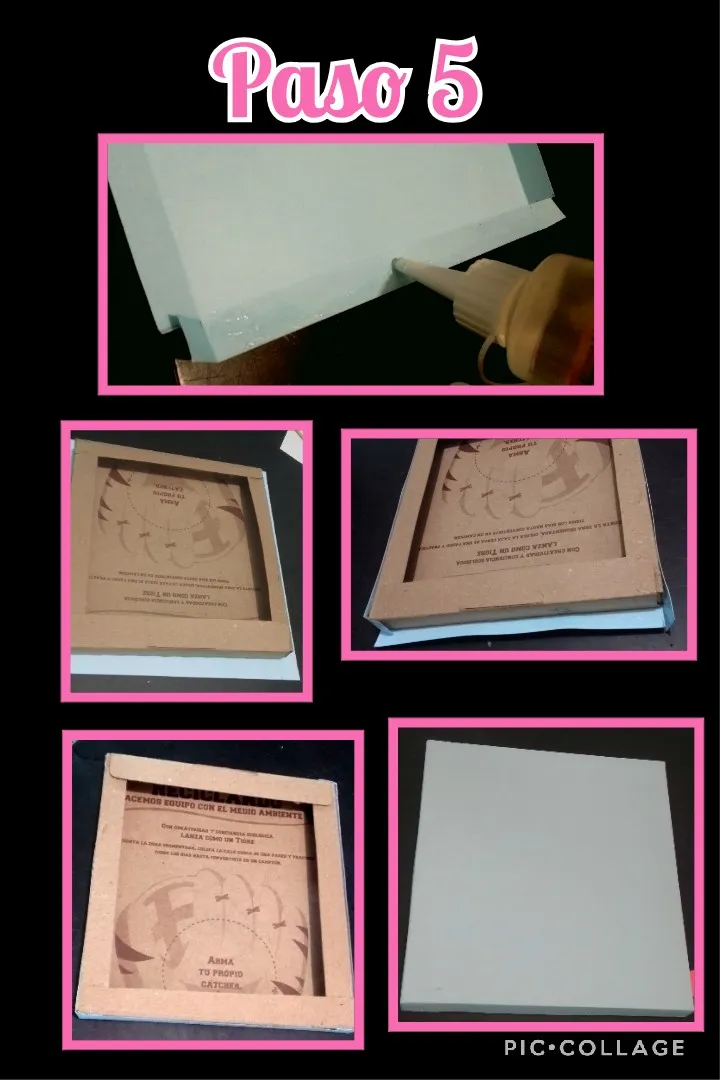
- Marcar el cuadro sobre la cartulina, marcar las pestañas, recortar, pegar y así quedará forrado el cuadro.(Ver foto)
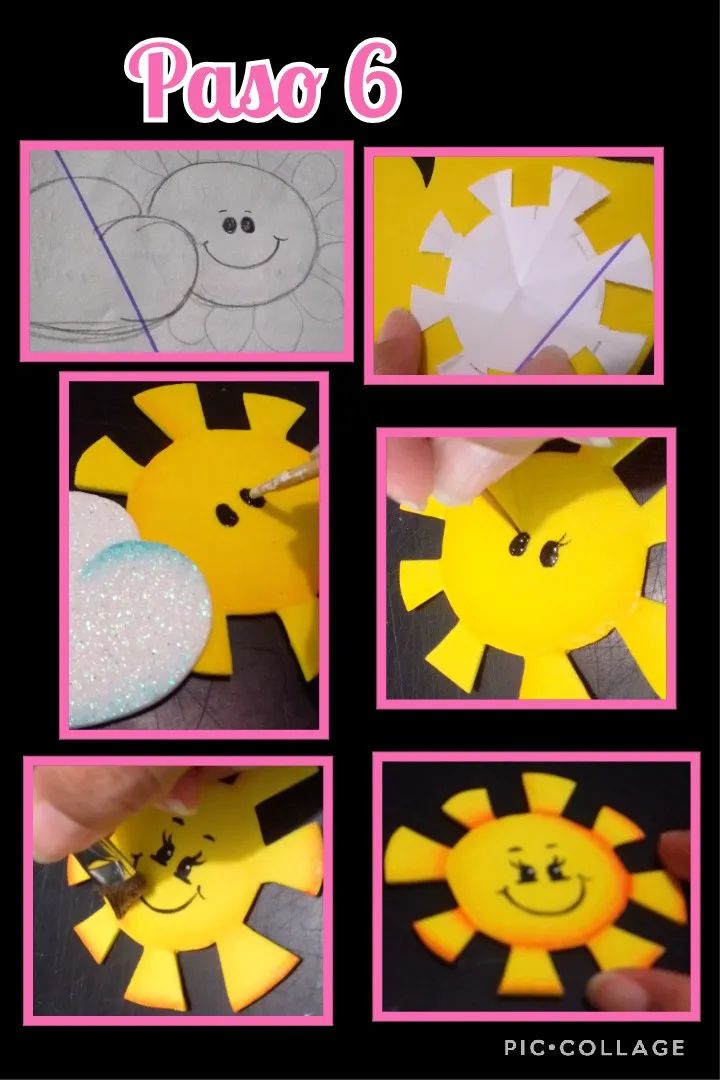
- Dibujar el sol y la nube, dar la forma que quieras y recortar los moldes.
- Marcar sobre el foami, recortar, sombrear y pintar los ojos con marcador o pintura con la ayuda de un palito de madera, luego delinear pestañas, cejas y boca, como el amarillo es muy claro, con mucho cuidado pinté sombreando con naranja para darle más colorido al sol.
La nube la recorté en foami blanco escarchado para darle un toque de brillo.
A veces podemos alternar los foami mate y escarchado en las piezas, se ven muy bonitos.
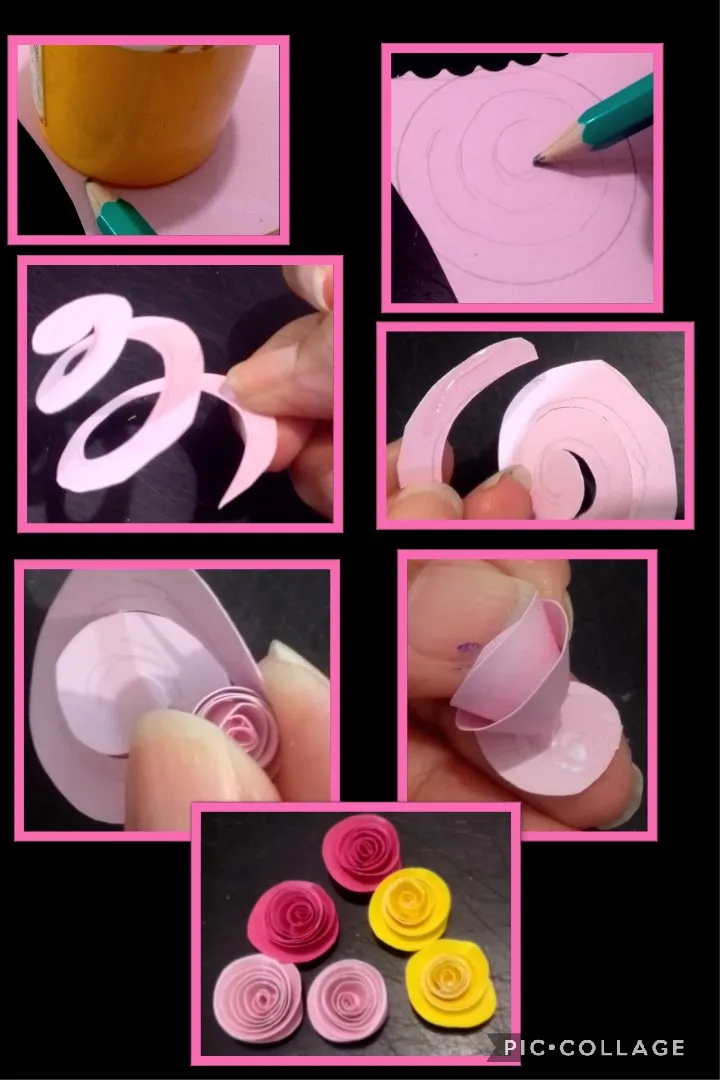
Antes de seguir con el paso 7 voy a mostrarles como hacer unas mini rosas en cartulina.
- Marcas un círculo con la ayuda en una tapa o envase.
- Ahora harás un espiral en el círculo, de afuera hacia adentro tratando que los espacios sean del mismo grueso.
- Igual recortar de afuera hacia adentro.
- Ahora aplicarás un poco de silicón líquido en la punta de afuera y empezar a enrollar ajustando bien hasta llegar al centro donde aplicarás nuevamente silicón y luego haces presión hasta que seque y así de fácil ya quedará lista la rosita.
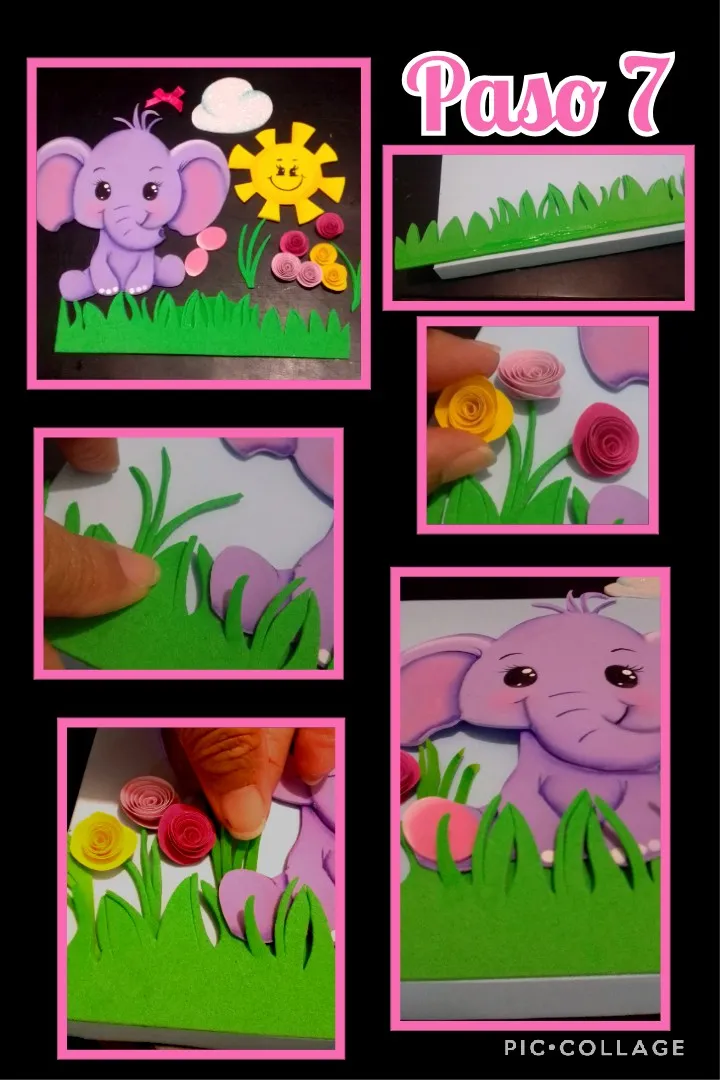
- Pintadas y armadas las piezas anteriores, ahora recortarás un rectángulo del ancho del cuadro y de 5 cms de altura el cual recortarás dando forma de grama, aparte dos (2)ramitas para pegar las rositas y hacer un mini lacito.
- Teniendo listas las piezas empezarás a armar el cuadro.
- Aplicarás silicón en el borde inferior de la grama y pegarás al cuadro.
- Luego aplicas un poco de silicón en el centro del elefante y pegas sobre la grama, dejando unas ramitas por fuera (que parezca que está dentro de ella.
- También meterás las ramitas a cada lado dentro de la grama, pegas las rositas y las paticas rosadas.

- Ahora aplicarás silicón en el borde de afuera de las orejas y pegas a la cartulina.
- Luego ubicas donde puedes pegar la luna con el sol y pegas.
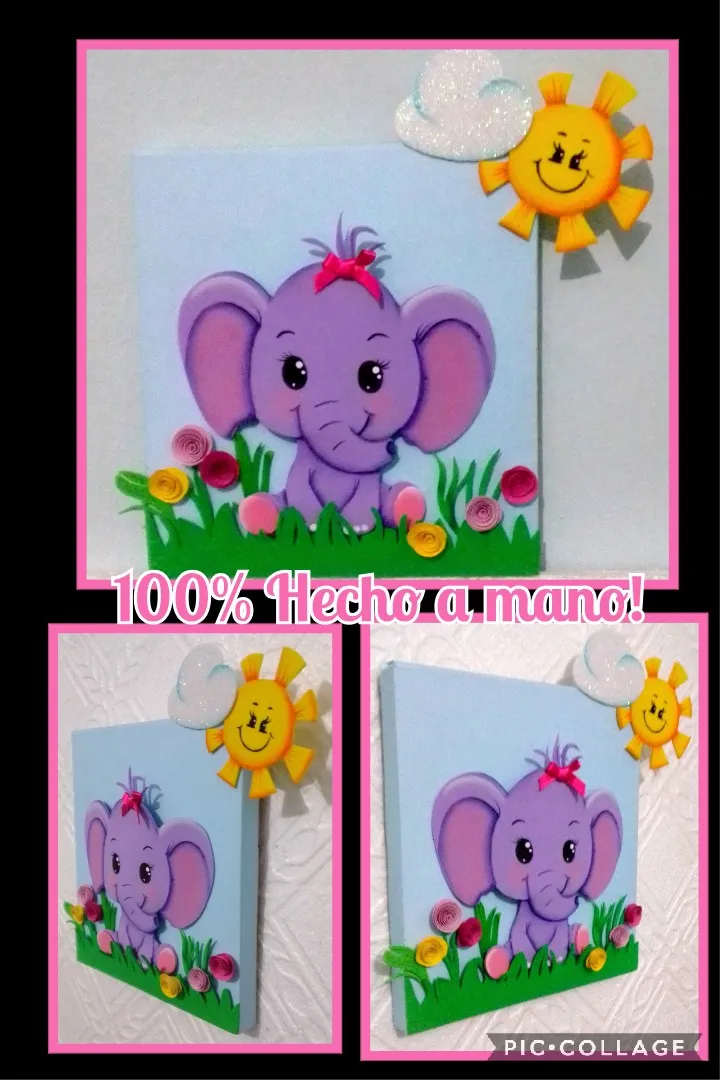
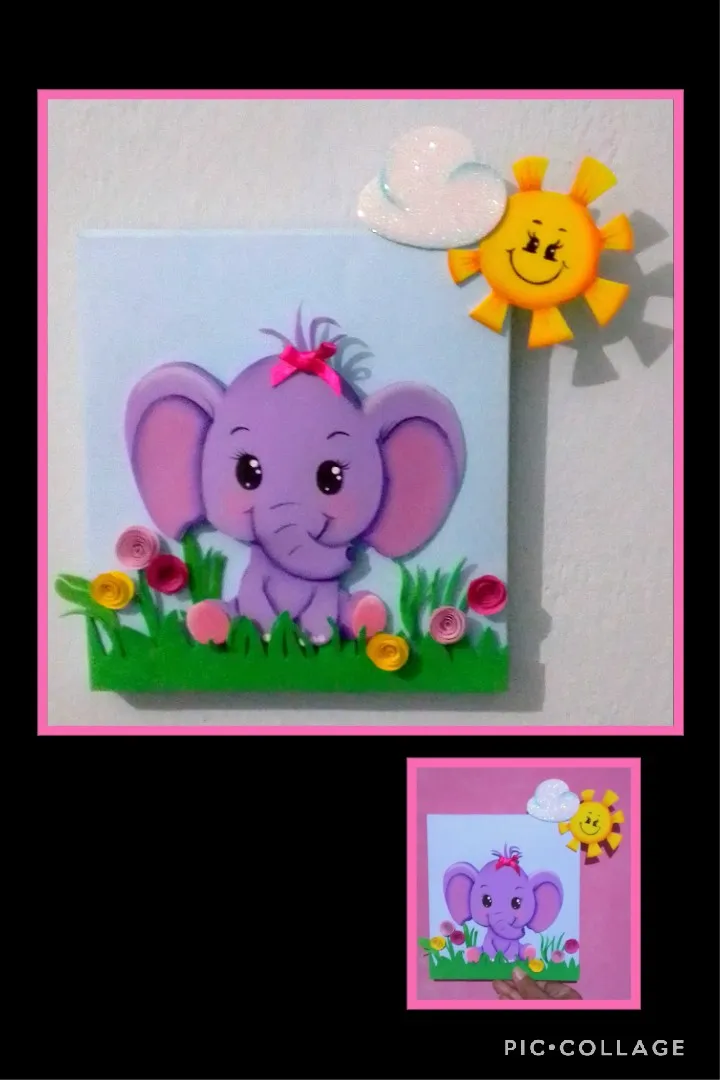
- Por último pegas el lacito en la cabeza del elefante y así quedará terminado este lindo cuadrito.
Ahora llegó la hora de despedirme pero antes debo agregar que mi publicación esta traducida por DeepL, en el texto usé etiquetas HTML,las fotos tomadas por mi teléfono Blu G5 y editadas con Pic collage.
Espero te sea útil mi publicación y me encantará ver tu comentario.
Gracias por tu visita!
Saludos.
English:
Hello, hello friends of this community.
Materials:
| Carton box | Cardboard (school) | Foami matte and frosted |
|---|---|---|
| Paints | Paintbrushes | Pink chalk |
| Liquid silicone | Ruler | Cloth tape |
| Mold or drawing | Lead pencil | Scissors |
| Marker | Sponge |
Before starting the step by step I will show you how to shade the foami pieces:
1° You can use an angled or straight brush.
2° Dip the brush in water and wipe it with a dry cloth to remove the excess water, leaving it damp.
3° Dip only the tip of the brush in paint, unload it on the cloth and start painting along the edge of the piece from top to bottom up to where you want the shading.
4° If you want the shading to be wider you can repeat the previous step but next to the first shading, you can also go over it from the bottom upwards.
The wetness of the brush will make the paint blur, the ideal is to practice several times until the shading is well blurred.
Now we start with the procedure:
- Highlight the drawing or print.
- To transfer the drawing, you must place the foami on the drawing, turn it over and place it on the table and then with the ears of the scissors, rub the paper holding it so that the piece is well marked.(see photo).
- Repeat with all the pieces and then cut out.
- Shade the pieces following the previous explanation.
- Apply silicone and glue the head.
- Then paint the eyes filled with marker and scrape some chalk and then take with the sponge and pass in the center of the ears and the cheeks.
- With a thin brush outline ears, trunk and mouth.
- Then with white paint go over the top edge of the ears to give a little light.
- With a wooden stick paint in white the brightness of the eyes, this should be done in the same place in each eye.
- Then with the back of the brush paint in white the nails and then outline with black the eyebrows and eyelashes.
- In this step you will mark a rectangle or square in the center of the box cardboard.
- Then mark a tab of 1.5cms on each side that are (4).and pass the tip of the scissors or a pen without ink making a little pressure to be able to fold.
- After the folding line, mark an additional 2.5 cm on all four sides.
- Now apply silicone to the corners and glue to form the frame.
- Mark the frame on the cardboard, mark the tabs, cut out, glue and the frame will be lined (see photo).
- Draw the sun and the cloud, give the shape you want and cut out the molds.
- Mark on the foami, cut out, shade and paint the eyes with marker or paint with the help of a wooden stick, then outline eyelashes, eyebrows and mouth, as the yellow is very light, I carefully painted shading with orange to give more color to the sun.
I cut out the cloud in frosted white foami to give it a touch of brightness.
Sometimes we can alternate matte and frosted foami in the pieces, they look very nice.
Before we go on to step 7 I am going to show you how to make mini roses out of cardstock.
- You mark a circle with the help on a lid or container.
- Now you will make a spiral in the circle, from the outside to the inside trying to make the spaces of the same thickness.
- Cut from the outside to the inside.
- Now apply a little bit of liquid silicone on the outside tip and start to roll up tightly until you reach the center where you will apply silicone again and then apply pressure until it dries and just like that the little rose will be ready.
- Painted and assembled the previous pieces, now you will cut a rectangle of the width of the picture and 5 cms of height which you will cut giving form of grass, apart two (2) twigs to glue the roses and make a mini bow.
- Once the pieces are ready, you will start to assemble the frame.
- Apply silicone to the bottom edge of the grass and glue it to the frame.
- Then apply some silicone in the center of the elephant and glue it to the grass, leaving some twigs on the outside (so it looks like it is inside the grass).
- You will also put the twigs on each side inside the grass, glue the little roses and the pink paws.
- Now you will apply silicone on the outside edge of the ears and glue to the cardboard.
- Then locate where you can glue the moon with the sun and glue.
- Finally you glue the bow on the elephant's head and this is how this cute little square will be finished.
Now it's time to say goodbye but first I must add that my post is translated by DeepL, in the text I used HTML tags, the photos taken by my Blu G5 phone and edited with Pic collage.
I hope you find my post useful and I will love to see your comment.
Thanks for your visit!
Greetings.