

Hola, hola como están todos?
Les doy la bienvenida a este mi espacio preferido.
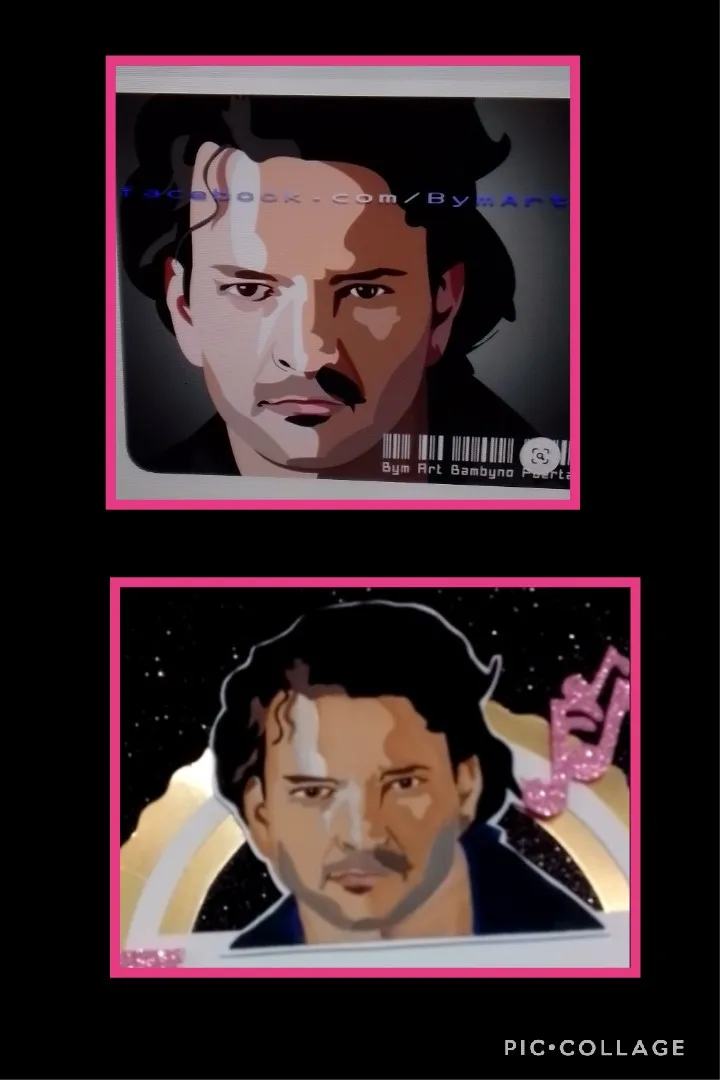
Hoy les mostraré un paso a paso de como hacer un adorno para torta de cumpleaños, me dijo una amiga que se lo hiciera con un Ricardo Arjona, ya que ella y que "Lo Ama" jajajaja.. es fanática de sus canciones, por cierto bien difícil me la puso, pero lo busqué por internet y me gustó esa imagen.
Fuente:

Así que para complacerla utilicé los siguientes materiales:
| Cartulinas mate y metalizada dorada | Foami mate y escarchado |
|---|---|
| Pinturas | Pinceles |
| Tijera | Palo de madera |
| Dibujo calcado | Papel vegetal |
| Silicón líquido |
El procedimiento es el siguiente:

- Imprimir y calcar el dibujo en papel vegetal.
- Transferir al foamy frotando el papel sobre el foamy con las orejas de la tijera.
- Pintar los colores claros primero (blanco) en todas las partes que se les ven claras.
- Después colocar el marrón claro, el gris en bigote y barba.
- Seguir con los ojos, cejas, naríz y bordes de los ojos con marrón oscuro.
- Pintar el iris del ojo con pintura negra.
- Pintar y delinear la boca y la sombra debajo de los labios.

- Continuar pintando las sombras del cabello, guiándote por la imagen original, luego pintar el cabello de negro.
- Pintar con negro y azul la camisa y luego empezar a recortar por todo el borde de la figura.
- Rematar toda la orilla del foami dejar secar y ya quedó listo.

- Marcar una circunferencia, recortar sacando una media luna.
- Transferir un Feliz cumpleaños con papel carbón sobre la circunferencia y luego pintar con pintura rosada.
- Dibujar la orilla de la circunferencia sobre la cartulina metalizada dorada y recortar 2 cms más grande con una tijera de ondas y luego sacar la parte del centro de la cartulina y empezar a colocar silicón.

- Dibujar el nombre de la persona y unas notas musicales y transferirlo al foamy escarchado en los colores de tu preferencia
y recortarlos. - Recortar pedacitos de foamy y pegar detrás de las letras y en el borde superior de la circunferencia para darle altura que queden con relieve.
- Y para terminar, aplicar silicón en los pedacitos de foamy y pegar la imagen, letras, notas musicales haciendo un poco de presión y por detrás el palito de madera.
Y ya quedó listo este hermoso topper para una feliz cumpleañera.
Esta publicación está traducida por DeepL, con etiquetas HTLM, las fotos son de mi teléfono y editadas en Pic Collage y la imagen es de Pinterest.
Fuente:

Y así quedó complacida Romina, con su linda y exquisita torta fría.
Espero les haya gustado este paso a paso, y pido disculpas al autor por tomarla y hacerla en foamy, y a la vez le agradezco ya que con ella me fué posible complacer a esta Fan, con su ídolo Arjona.
Espero les guste y dejen sus comentarios.
Saludos.
**Hello, hello how are you all?
I welcome you to this my favorite space.
Today I will show you a step by step on how to make a topping (Topper) for birthday cake, a friend told me to do it with a Ricardo Arjona, since she and that "Lo Ama" hahahaha ... is a fan of his songs, by the way very difficult to put it to me, but I looked it up online and I liked that image.
Source:
So to please her I used the following materials:
| Matte and gold metallized cardstock | Matte and frosted Foami |
|---|---|
| Paints | Brushes |
| Scissors | Wooden stick |
| Drawing tracing paper | Vegetable paper |
| Liquid silicone |
The procedure is as follows:
- Print and trace the drawing on tracing paper.
- Transfer to foami by rubbing the paper with the ears of the scissors.
- Paint the light colors first (white) on all the parts that look light.
- Then put the light brown, gray on the mustache and beard.
- Continue with the eyes, eyebrows, nose and eye rims with dark brown.
- Paint the iris of the eye with black paint.
- Paint and outline the mouth and the shadow under the lips.
- Continue painting the shadows on the hair, following the original image, then paint the hair black.
- Paint black and blue on the shirt and then start trimming all around the edge of the figure.
- Finish off all the edge of the foamy, let it dry and it is ready.
- Mark a circumference, cut out a half moon.
- Transfer a Happy Birthday with carbon paper on the circumference and then paint with pink paint.
- Draw the edge of the circumference on the gold metallic cardboard and cut out 2 cm larger with a wave scissors and then remove the center part of the cardboard and start applying silicone.
- Draw the name of the person and some musical notes and transfer it to the frosted foamy in the colors of your choice and cut them out.
and cut them out. - Cut out pieces of foamy and glue them behind the letters and on the top edge of the circumference to give them height so that they are embossed.
- And finally, apply silicone on the foamy pieces and glue the image, letters, musical notes with a little pressure and the wooden stick on the back.
And now this beautiful topper is ready for a happy birthday girl.
This post is translated by DeepL, with HTLM tags, the photos are from my phone and edited in Pic Collage and the image is from Pinterest.
Source:
And so was Romina pleased, with her nice and exquisite cold cake.
I hope you liked this step by step, and I apologize to the author for taking it and make it in foamy, and at the same time I thank him because with it I was able to please this Fan, with her idol Arjona.
I hope you like it and leave your comments.
Greetings.