💎 Hello dear friends of Hive and Hive Diy. Good afternoon to all of you! I hope you are feeling well. As always I wish you much success in each of your projects and in your life in general.
Today I want to share with you some beautiful rings that I was able to decorate with an arrangement of white pearls and crystals. The steps to make the rings are very simple and consist of making some flowers with the pearls and then attach them to the rings.
Here is the step by step of the earrings. Be welcome to this blog made with a lot of love and affection:
MATERIALS USED

- Rings
- White pearl and crystals
- Needle and fine copper wire of 0,50 mm.
PROCEDURE
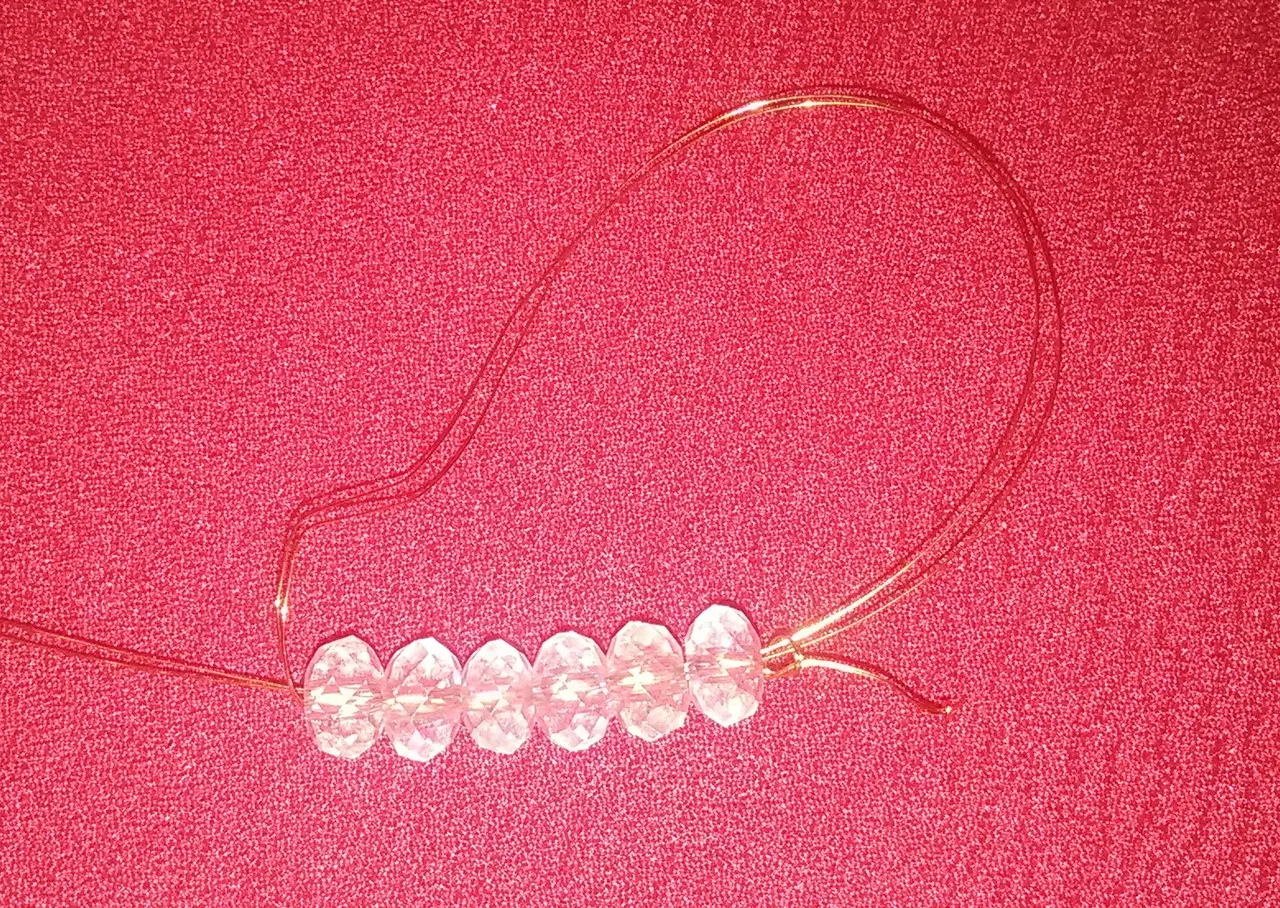
💎 First Step

The first thing to do is to insert 6 crystals into the 0.50 mm fine copper wire, with the help of a needle each pearl is inserted.
💎 Second Step
Afterwards, the tip of the needle will be introduced again through the crystals, but this time the needle will be introduced in reverse where the copper wire was introduced the first time.
💎Third Step

In this way you will create this circle between the beads, to resemble the petals of a flower with each of the crystals. Several turns must be made between the holes of the ring in order to make sure that they are tight together.

This is the way in which the needle is inserted between the holes of the beads. Then a knot is tied and the excess material is cut off.
💎 Fourth Step.

Subsequently a white pearl should be attached right in the middle of the crystals with the copper wire.

The copper material should be inserted several times into the white bead and then the copper wire should be inserted into the crystals, so that it fits tightly.
💎 Fifth Step

This is the way the flower formed by the stones should look like.
💎 Step 6

Finally you should take the flower formed by the pearls and adjust them to the ring. The technique used to fix the flower to the ring consists of making several turns with the copper material.
💎 Seventh Step

Afterwards, two more flowers should be created with the same amount of crystals.

Then one of the flowers is attached to the ring with the copper wire. The flower should be fixed exactly in the central area of the ring and leaving a space of about one centimeter between the two flowers.

💎 Eighth Step

In this space that has been left, the third flower should be adjusted, in such a way that it is adjusted to the ring from the upper beads that make up the crystal flower.


Finally the other pair is created in order to obtain a beautiful crystal earrings. I hope you like the earrings.
Thank you for reading my dear friends! Much success in all that you propose to do and may the energies of the universe be with you always...
The images are my own and were taken with a ZTE BLADE phone.
Translator utilization: Deepl
The editing of the photos was done using the Polish Photo Editor application and separators were edited in canva.

💎
El dia de Hoy quiero Compartirles unas hermosas argollas que pude decorar mediante un arreglo con perlas blancas y cristales. Los pasos para elaborar las argollas son muy simples y consisten en hacer unas flores con las perlas para luego fijarlas a las argollas.

A continuación les presento el paso a paso de las argollas. Sean bienvenidos a este blog realizado con mucho cariño y amor:
MATERIALES UTILIZADOS
- Argollas
- Perla blanca y cristales
- Aguja y alambre de cobre fino de 0,50 mm
PROCEDIMIENTO
💎 Primer Paso
Lo primero que se hace es introducir 6 cristales en el alambre de cobre fino de 0.50 mm, con la ayuda de una aguja se van introduciendo cada perla.
💎 Segundo Paso
Posteriormente se va a introducir la punta de la aguja nuevamente por los cristales, solo que es esta oportunidad se va a meter la aguja en forma inversa por donde se había introducido el alambre de cobre la primera vez.
💎 Tercer Paso
De esta forma se va a crear este círculo entre las perlas, par asemejar los pétalos de una flor con cada uno de los cristales. Se deben realizar varias vueltas entre los orificios de la argolla con el propósito de asegurarnos de que están queden apretadas entre sí.
Esta ens la forma en la que se introduce la aguja entre los orificios de las perlas. Luego se realiza un nudo y se corta el material sobrante.
💎 Cuarto Paso
Posteriormente se debe fijar justo en el medio de los cristales una perla blanca con el alambre de cobre.
Se deben introducir el material de cobre varias veces en la perla blanca y luego meter el alambre de cobre en los cristales, con la finalidad de que esta quede bien ajustada.
💎 Quinto Paso
Esta es la forma en la que debería de quedar la flor formada por las piedras.
💎 Sexto Paso
Finalmente se debe tomar la flor formada por las perlas y se deben ajustar a la argolla, la técnica utilizada para fijar las flor a la argolla consiste en realizar varias vueltas con el material de cobre.
💎 Septimo Paso
Posteriormente se deben crear dos flores más con la misma cantidad de cristales.
Luego una de las flores se fijan a la argolla con el alambre de cobre. La flor se debe fijar exactamente en la zona central de la argolla y dejando un espacio de un centímetro aproximadamente entre ambas flores.
💎 Octavo Paso
En ese espacio que se ha dejado se debe Ajustar la tercera flor, de tal forma que se ajusta a la argolla desde las perlas superiores que conforman la flor de cristales.
Por último se crea el otro par para así obtener unas lindas argollas con cristales. Espero les gusten las argollas.
Gracias por leer mis queridos amigos! Mucho éxito en todo lo que se proponga hacer y que las energías del universo les acompañen siempre.
Las imagenes son de mi autoria y fueron Tomadas a traves de un Telefono ZTE BLADE.
Traductor utilizado: Deepl
La edición de las fotos la realicé mediante la aplicaciones Editor de Fotos Polish y los separadores se editaron en canva.