Hola a todos... 🐱🐾💕
Hola a mis queridos Hiver y a la querida comunidad de artistas #HiveDiy, deseándoles un día de muchas bendiciones, por acá les traigo un nuevo trabajo preparado como siempre con gran cariño y especialmente para ustedes.
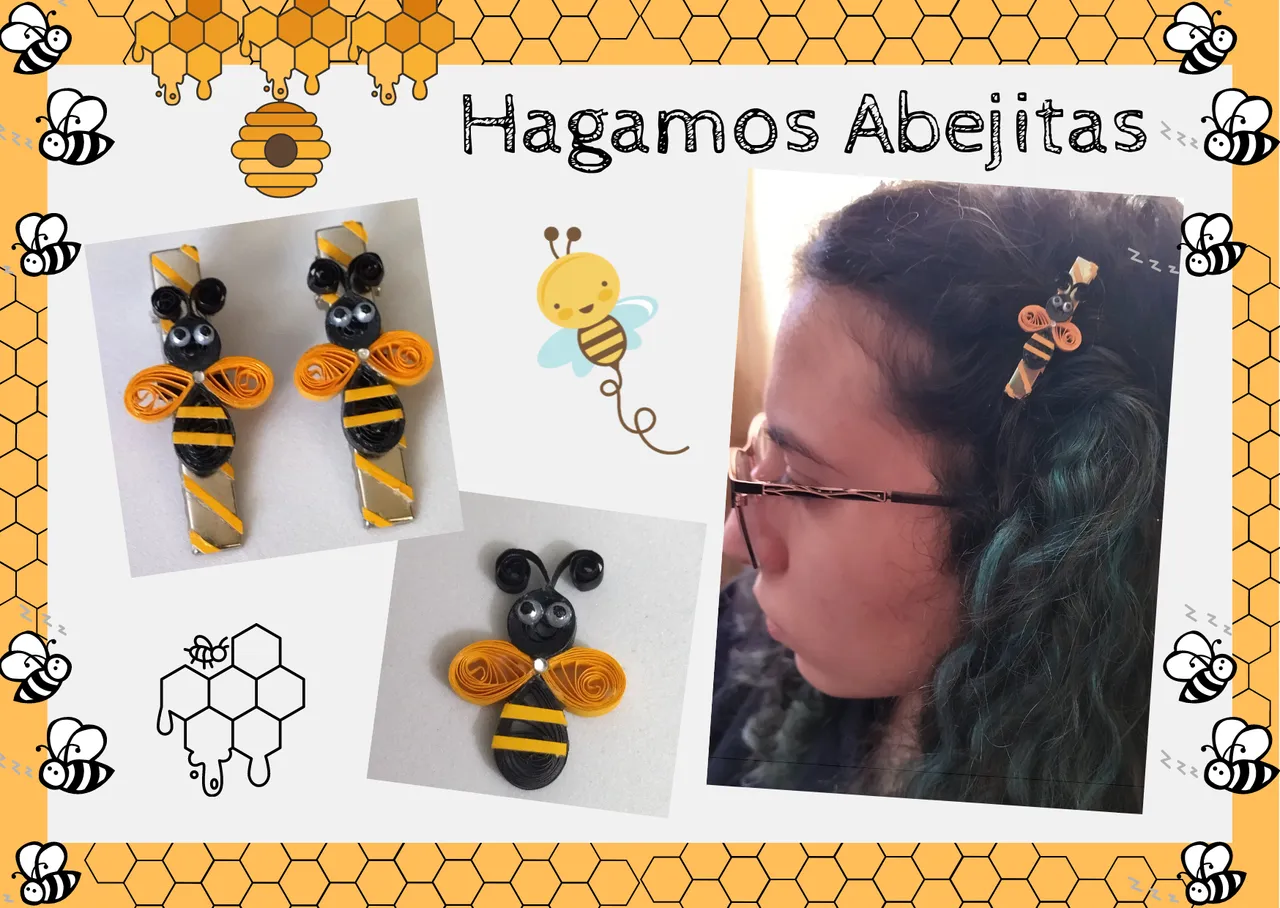
En esta oportunidad les presento un bonito dije de abejita, realizado en la técnica de quilling, el cual decidí colocar en unos ganchitos para lucirlos en el cabello. Esperando sea de su agrado iniciemos con el paso a paso.
Si quieres disipar alguna duda con respecto a la técnica o paso a paso, usado en este post, puedes visitar el siguiente link, por acá abajo te lo dejo:

Hello everyone... 🐱🐾💕
Hello my dear Hiver and the dear community of artists #HiveDiy, wishing you a day of many blessings, here I bring you a new work prepared as always with great affection and especially for you.
This time I present you a nice little bee charm, made in the quilling technique, which I decided to place in some little hooks to wear them in your hair. Hoping you like it, let's start with the step by step.
If you want to dispel any doubts regarding the technique or step by step, used in this post, you can visit the following link, below:

Comencemos:😃
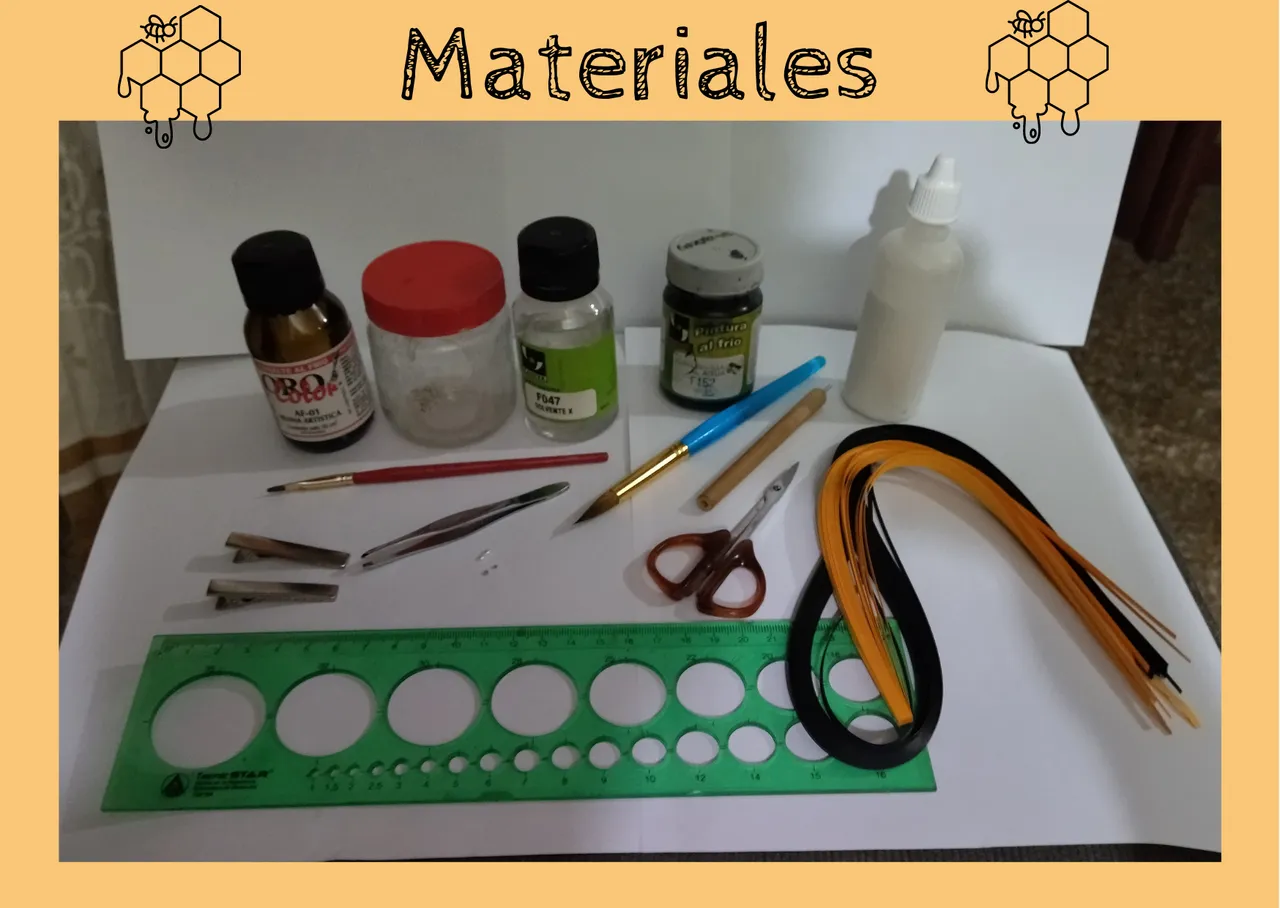
Materiales:📏✏️✂️
• Cintas de quilling de 3mm de ancho, color negro y amarillo tostado. También pueden usar cintas amarillas, naranjas, o cualquier tonalidad de su presencia que asemeje los colores de una abejita, los cuales varían.
• Regla de circunferencia.
• Aguja para quilling.
• Tijera.
• Pega blanca.
• Perlas medias pequeñas color blanco.
• Cristal pequeño de bisutería.
• Pinza punta fina.
• Pinturas negra.
• Pinceles.
• Ganchos plateados.
• Resina.
• Solvente X
• Frasco de vidrio.
Let's get started:😃
Materials:📏✏️✂️.
- 3mm wide quilling ribbons, black and tan yellow color. You may also use yellow, orange, or any shade of your presence that resembles the colors of a little bee, which vary.
- Circumference ruler.
- Quilling needle.
- Scissors.
- White glue.
- Small white medium pearls.
- Small costume jewelry glass.
- Fine tip tweezers.
- Black paints.
- Brushes.
- Silver hooks.
- Resin.
- Solvent X
- Glass flask.
Paso a paso:💖
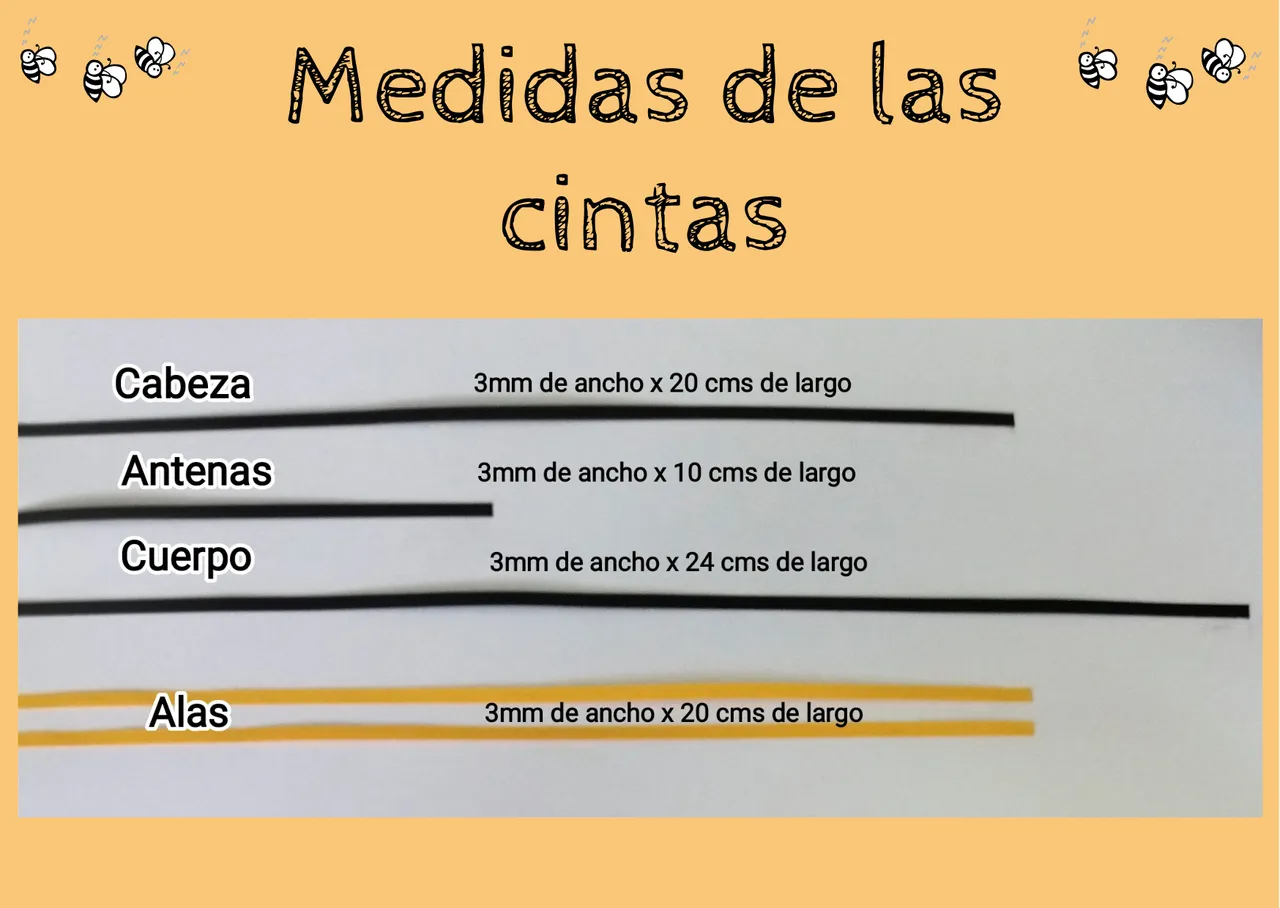
• Medidas de las cintas:🌈
En la imagen tienen especificadas las medidas y los colores a utilizar para cada pieza de una de las abejitas que vamos a llevar a cabo. En mi caso voy a realizar dos dijes ya que voy a elaborar dos ganchitos con dos abejitas.
Step by step:💖
- Measurements of the ribbons:🌈 **
In the image you have specified the measures and the colors to use for each piece of one of the bees that we are going to carry out. In my case I am going to make two charms since I am going to make two little hooks with two little bees.
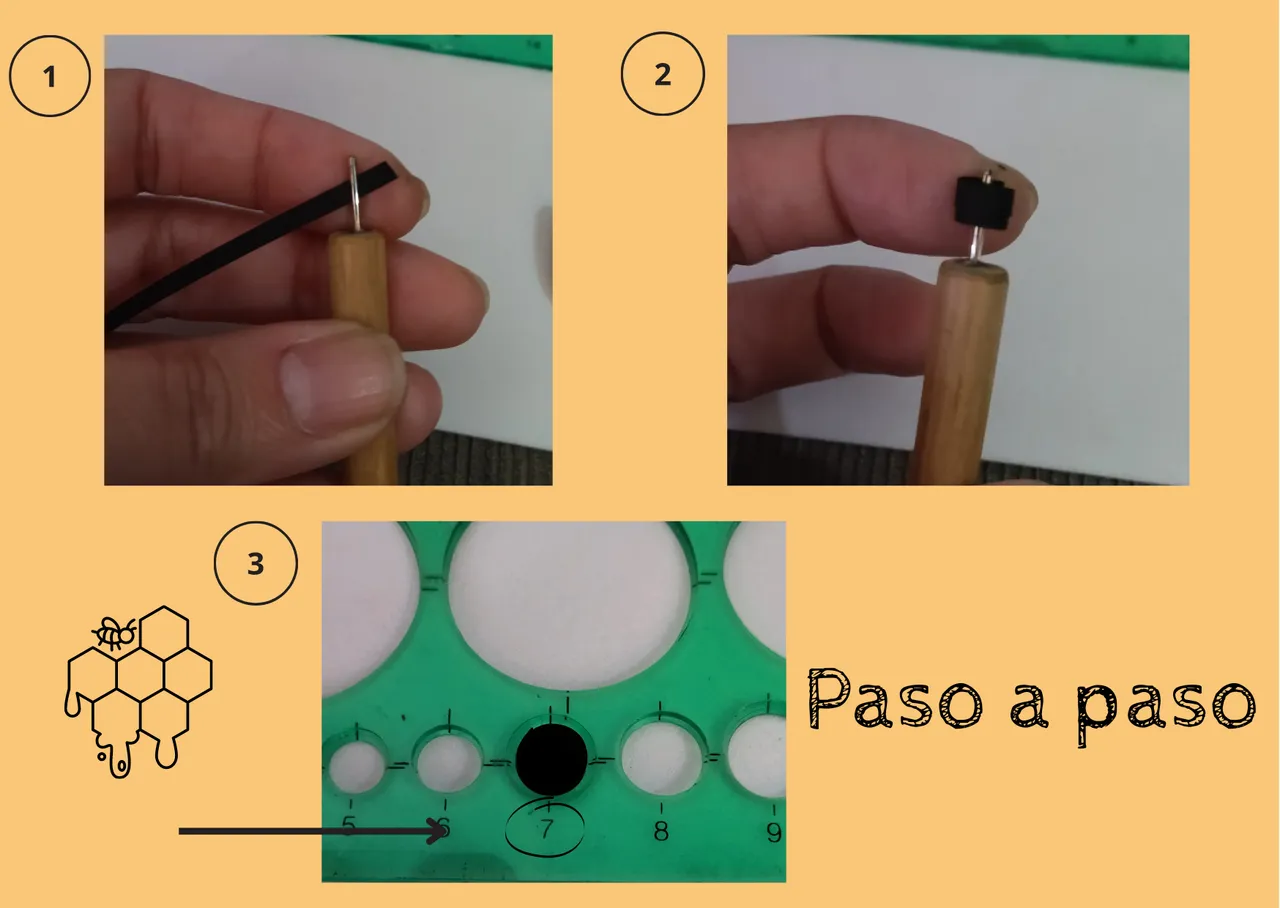
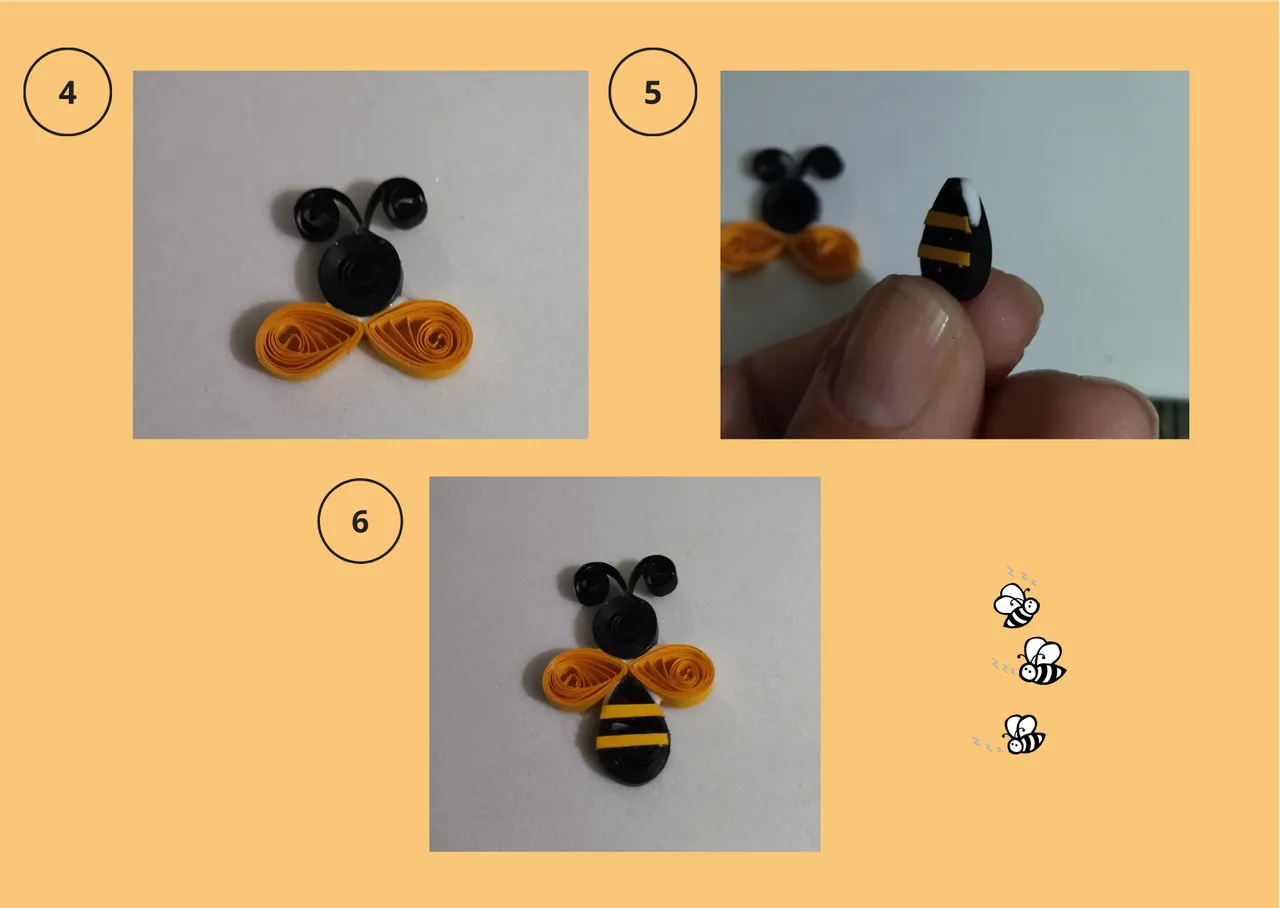
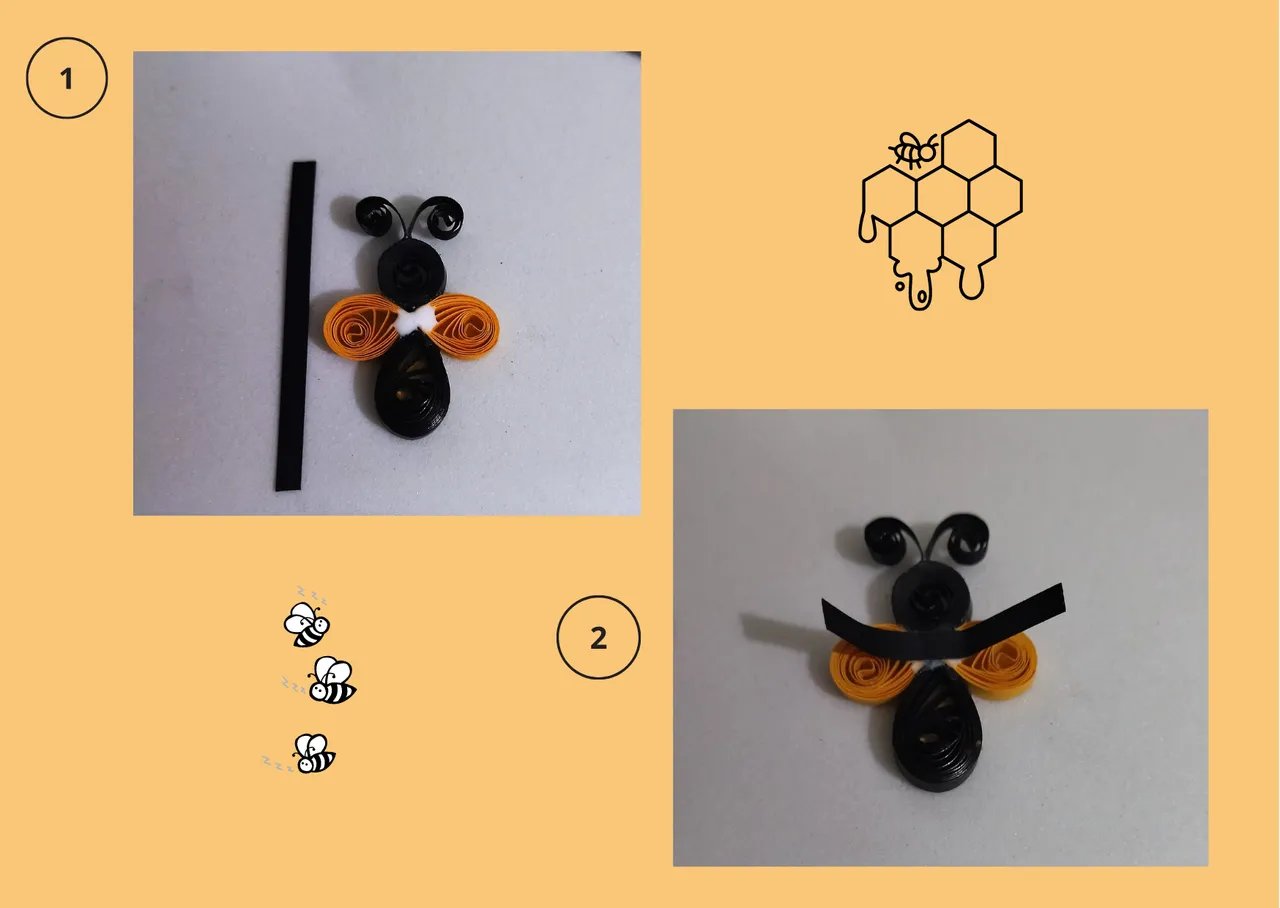
• Empecemos con la cabeza: Vamos a tomar la cinta negra de 3mm de ancho x 20cms de largo, tomamos la aguja para quilling, enrollamos toda la cinta negra en ella y procedemos a realizar un círculo abierto en la medida número 7 de la regla de circunferencia, sellamos con pega.
- Si desean observar el procedimiento de cómo realizar un circulo abierto y otras figuras que se van a llevar a cabo para este trabajo, al principio del post, les deje el link de la publicación en la cual explico cómo realizar algunas figuras básicas de quilling, los invito al ver el procedimiento del círculo cerrado detenidamente en el mismo.
Let's start with the head: Let's take the black ribbon 3mm wide x 20cms long, take the quilling needle, roll all the black ribbon on it and proceed to make an open circle in the measure number 7 of the circumference ruler, seal it with glue.
If you want to observe the procedure of how to make an open circle and other figures that will be carried out for this work, at the beginning of the post, I left the link to the publication in which I explain how to make some basic quilling figures, I invite you to see the procedure of the closed circle carefully in it.
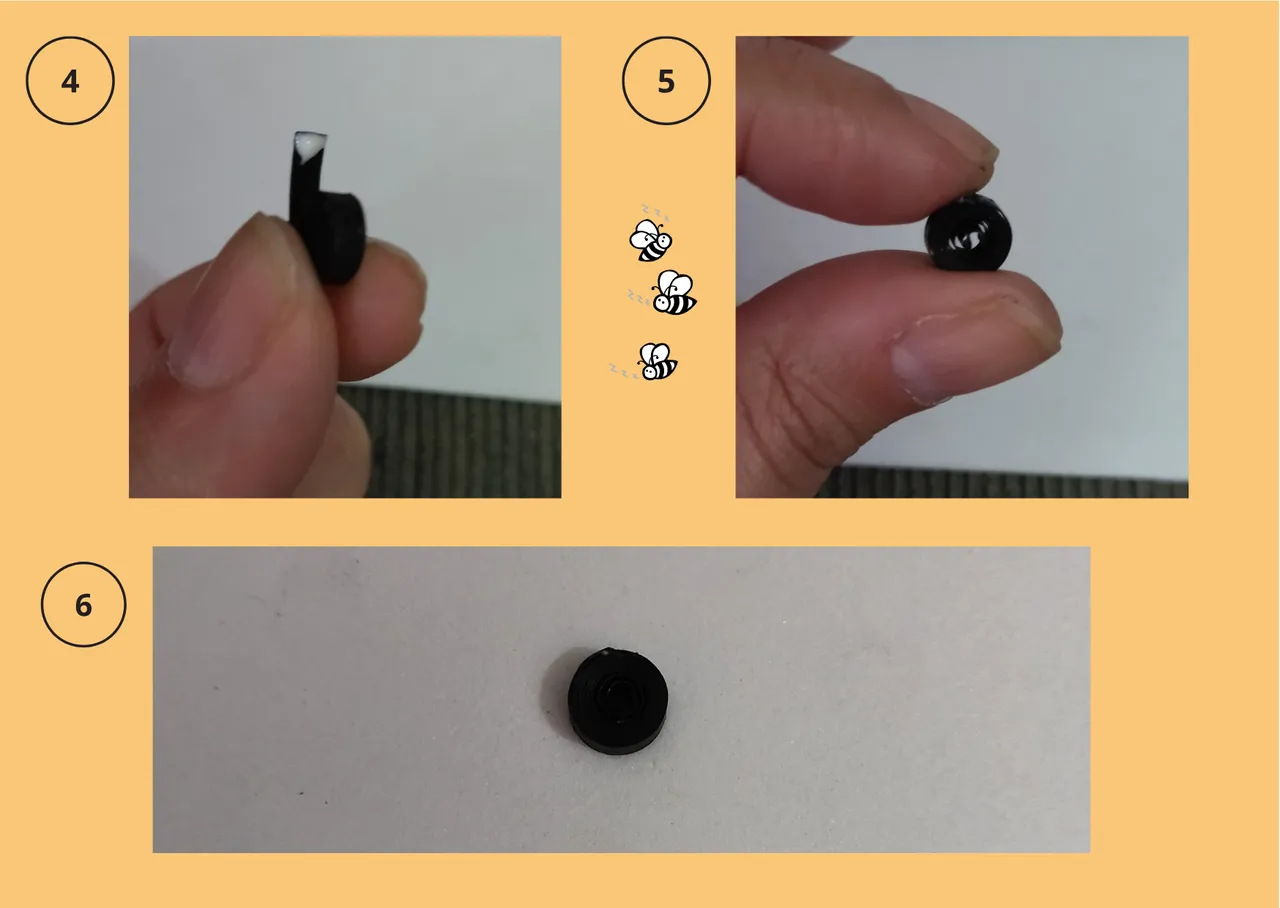
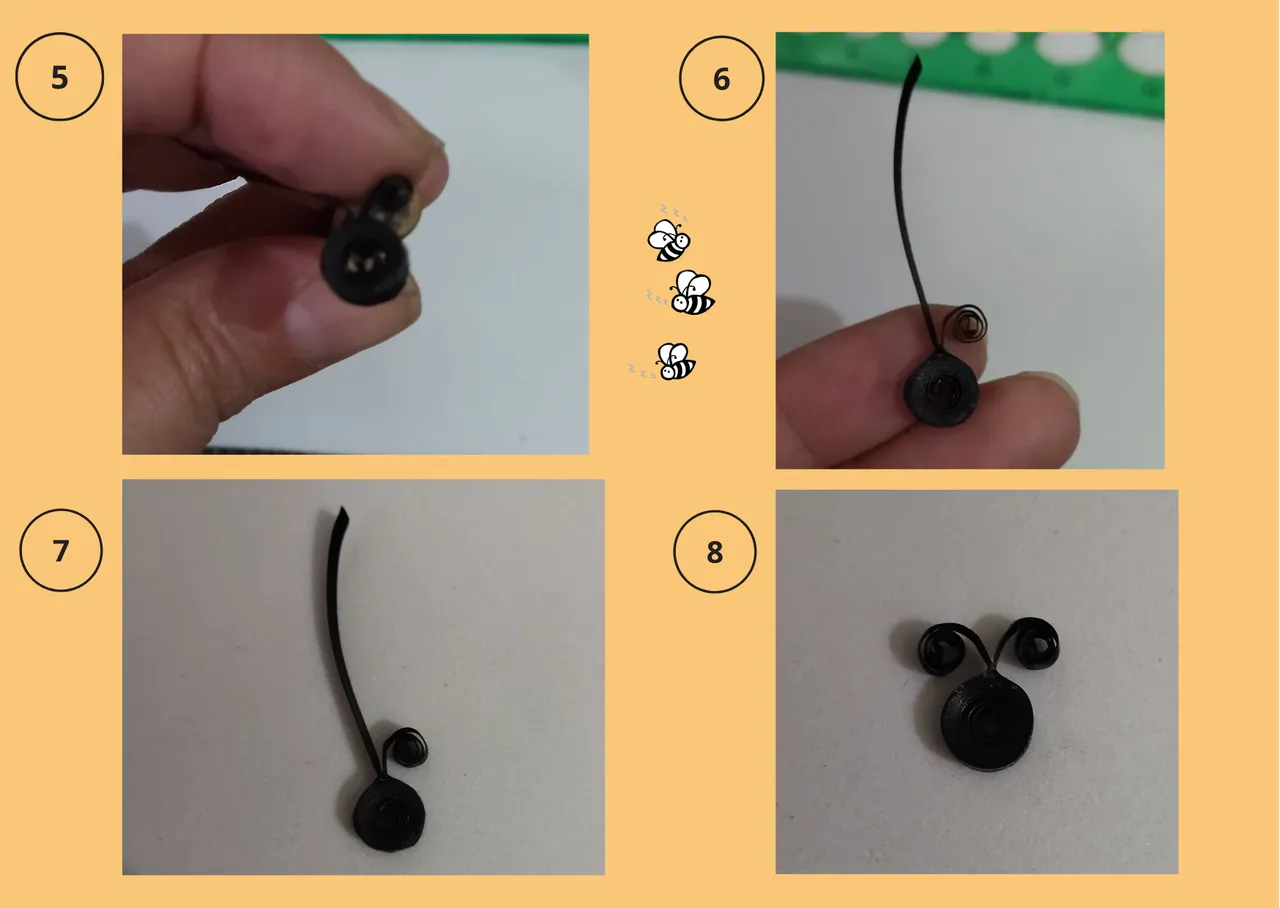
• Vamos a colocar las antenitas de la abeja de una vez y a darle forma, ya que si las pegamos por separado se podrían despegar. Tomemos el circulo abierto que hemos realizado para la cabeza de la abejita y colocamos pega en todo su alrededor, vamos a colocar la cinta negra de 3mm de ancho x 10cms de largo que teníamos reservada para las antenas, vamos a cuadrar que queden de manera uniforme y armónica alrededor del círculo, quedando las dos puntas en medio en la parte de arriba del círculo. Una vez que selle la pega, tomamos la aguja de quilling y vamos a enrollar los extremos que quedaron de manera inversa, haremos uno a la vez, formando un espiral, de esta manera ya tendremos nuestras antenitas con forma.
- Let's place the bee's antennae at once and give it shape, because if we glue them separately they could come unglued. Let's take the open circle that we have made for the head of the bee and place glue all around it, we will place the black ribbon 3mm wide x 10cms long that we had reserved for the antennas, we will square them evenly and harmoniously around the circle, leaving the two ends in the middle at the top of the circle. Once the glue is sealed, we take the quilling needle and we will roll the ends that were left in reverse, we will do one at a time, forming a spiral, in this way we will have our shaped antennas.

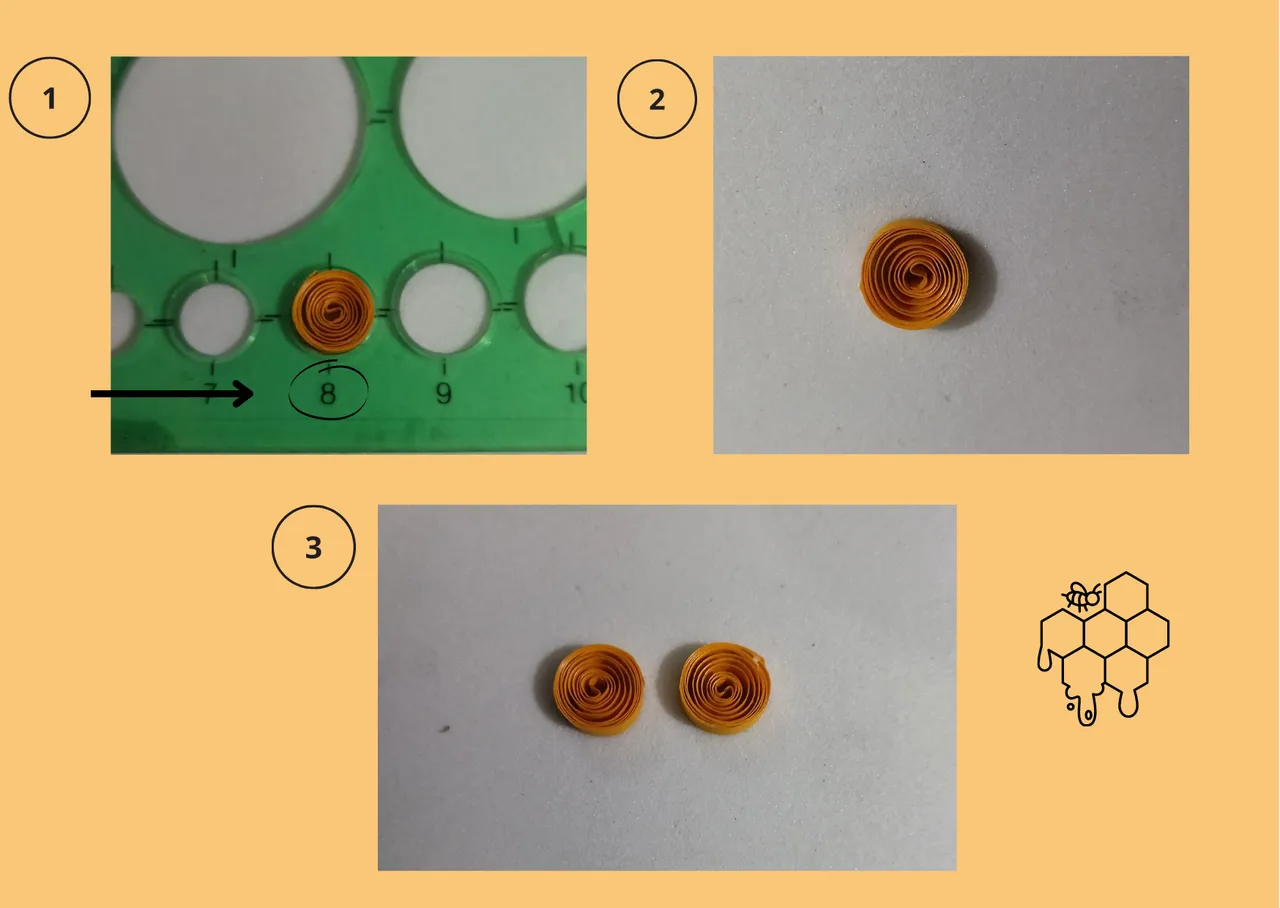
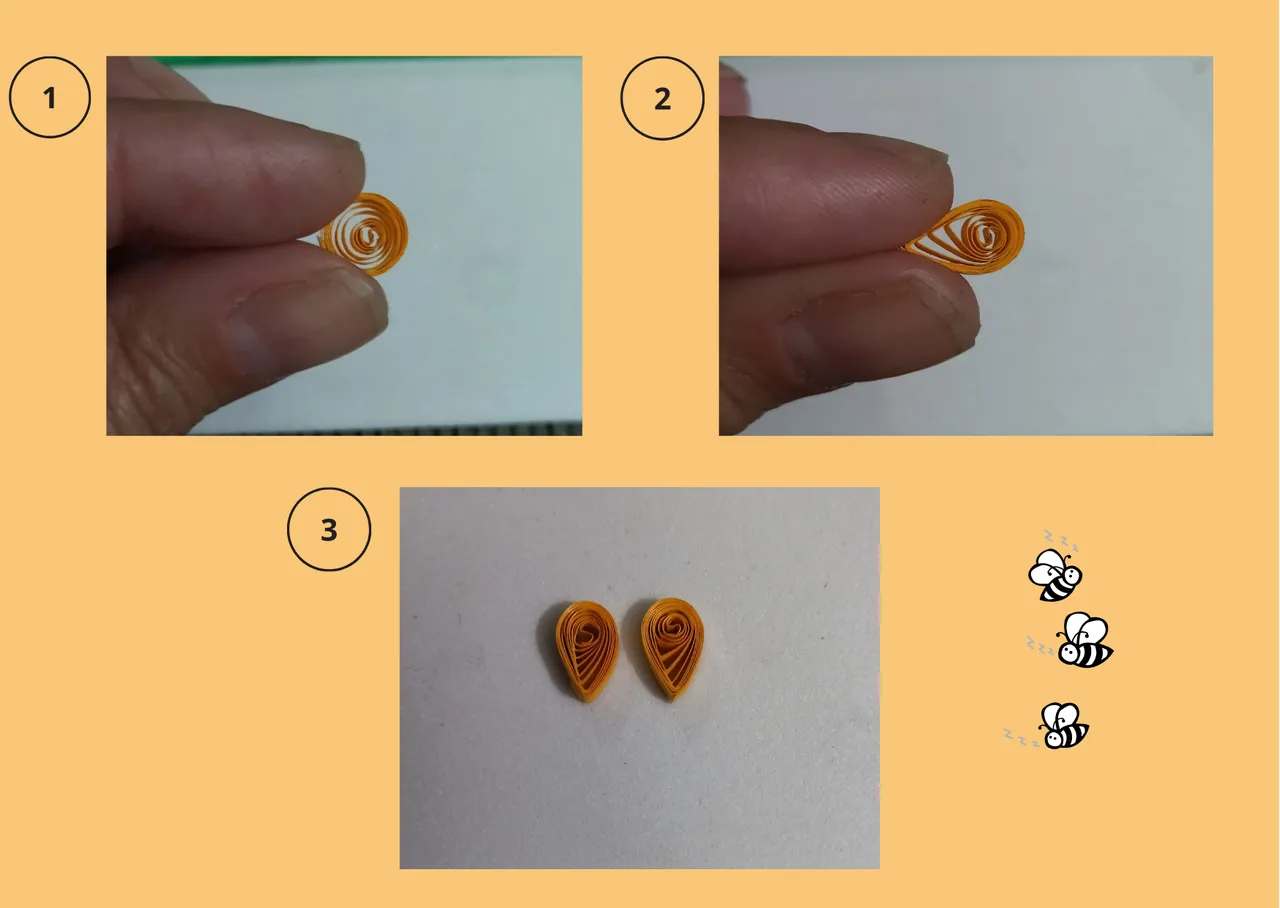
• Ahora vamos con las alas de la abeja, tomamos una de las cintas color amarillo de 3mm de ancho x 20cms de largo y haremos un circulo abierto en la medida 8 de la regla de circunferencia, repetimos el proceso con la otra cinta para forma la otra ala.
- Now we go with the wings of the bee, we take one of the yellow ribbons 3mm wide x 20cms long and make an open circle in the measure 8 of the circumference ruler, repeat the process with the other ribbon to form the other wing.
• Listos los círculos abiertos de nuestras alas, vamos a darle forma de gota a cada círculo, con la ayuda de los dedos índice y pulgar pellizcamos una de las puntas de esta manera ya tendremos la forma de las alas.
- Once the open circles of our wings are ready, we are going to give a drop shape to each circle, with the help of the index finger and thumb we pinch one of the tips in this way we will have the shape of the wings.
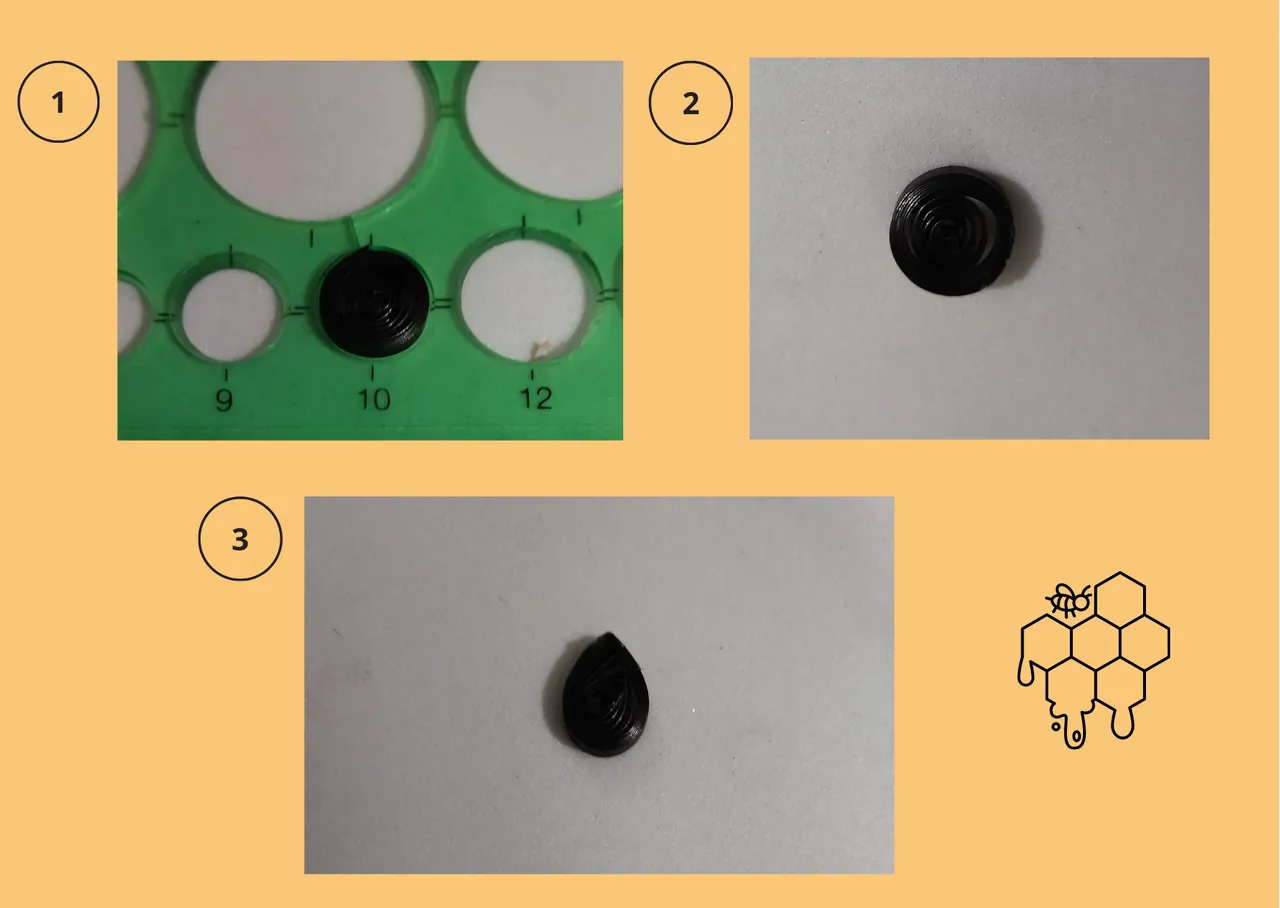
• Vamos con el cuerpo de la abeja, tomaremos la cinta de 3mm de ancho x 24cms de largo, y realizaremos un circulo abierto en la medida 10 de la regla de circunferencia, una vez lista le daremos forma de gota para tener el cuerpo.
- Let's go with the body of the bee, we will take the 3mm wide x 24cms long ribbon, and we will make an open circle in the measure 10 of the circumference ruler, once ready we will give it a drop shape to have the body.
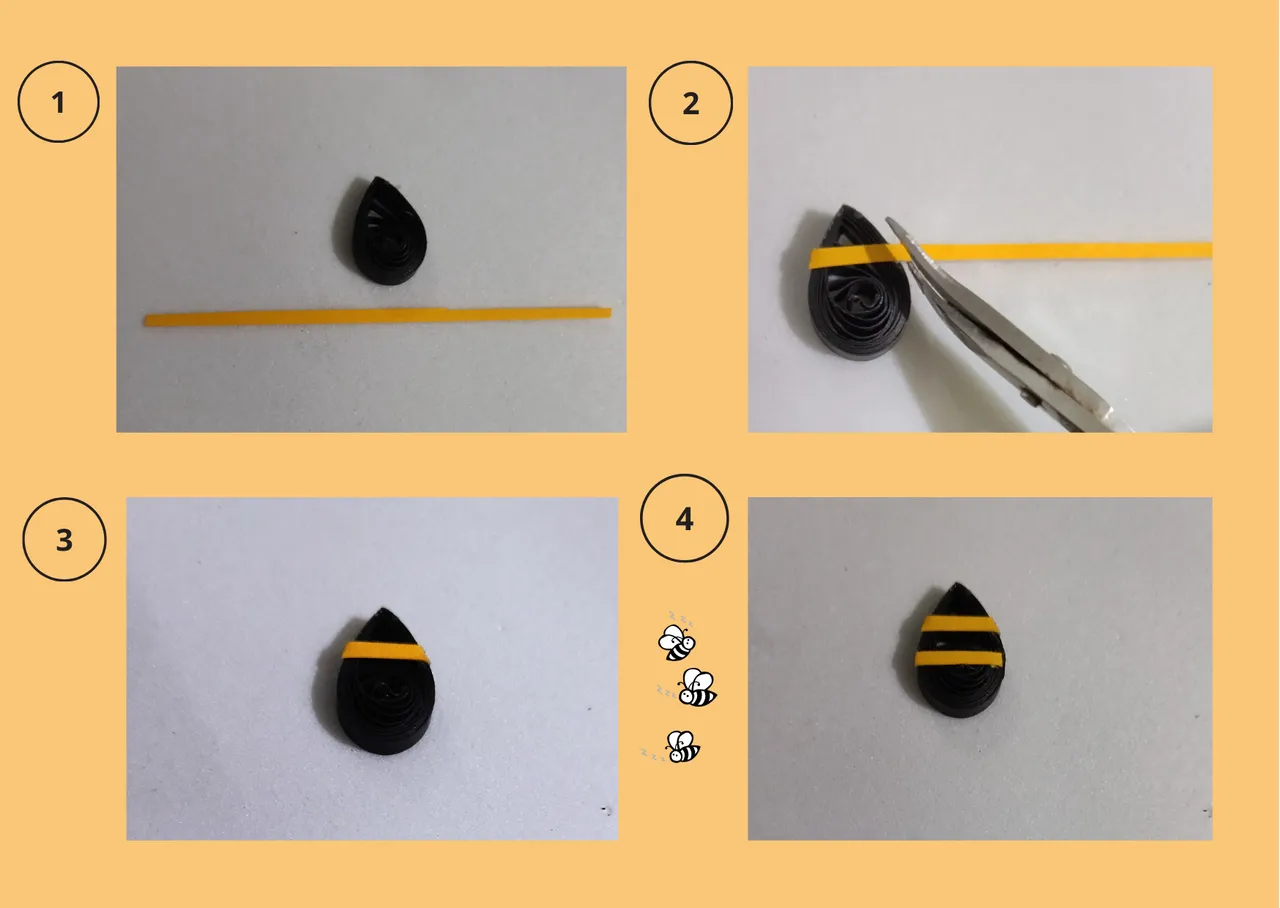
• Aprovechemos y demos detalle al cuerpo antes de unir las piezas, tomemos dos o tres trocitos de cinta amarilla, y se la colocamos a lo largo en la pieza del cuerpo.
- Let's take advantage and give detail to the body before joining the pieces, take two or three pieces of yellow ribbon, and place it lengthwise on the body piece.
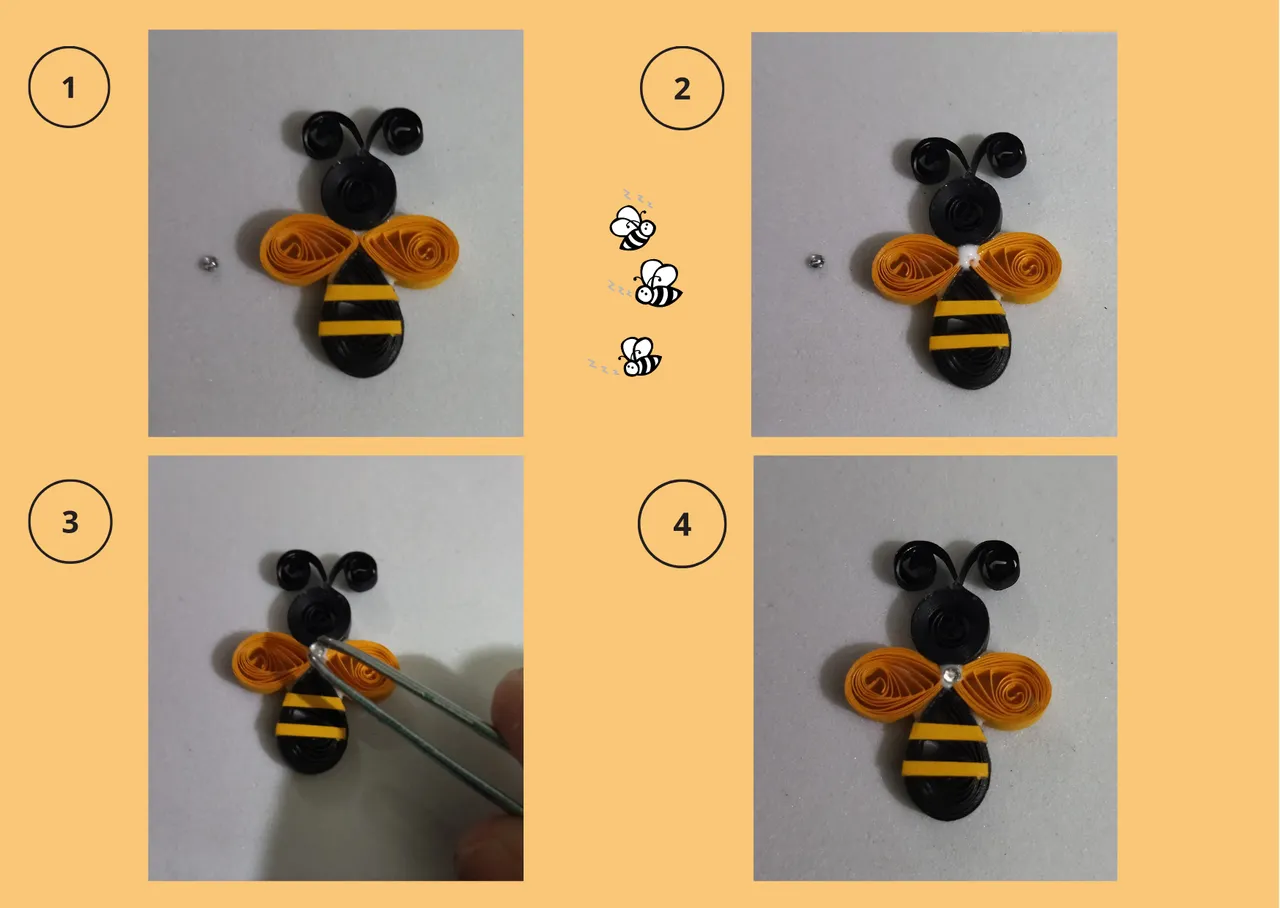
• Ahora vamos a unir todas las piezas para formar la abeja, colocamos pega a las alas uniremos a la cabeza, luego ponemos pega al cuerpo y lo colocamos.
- Now we are going to join all the pieces to form the bee, we put glue to the wings we will join to the head, then we put glue to the body and we place it.
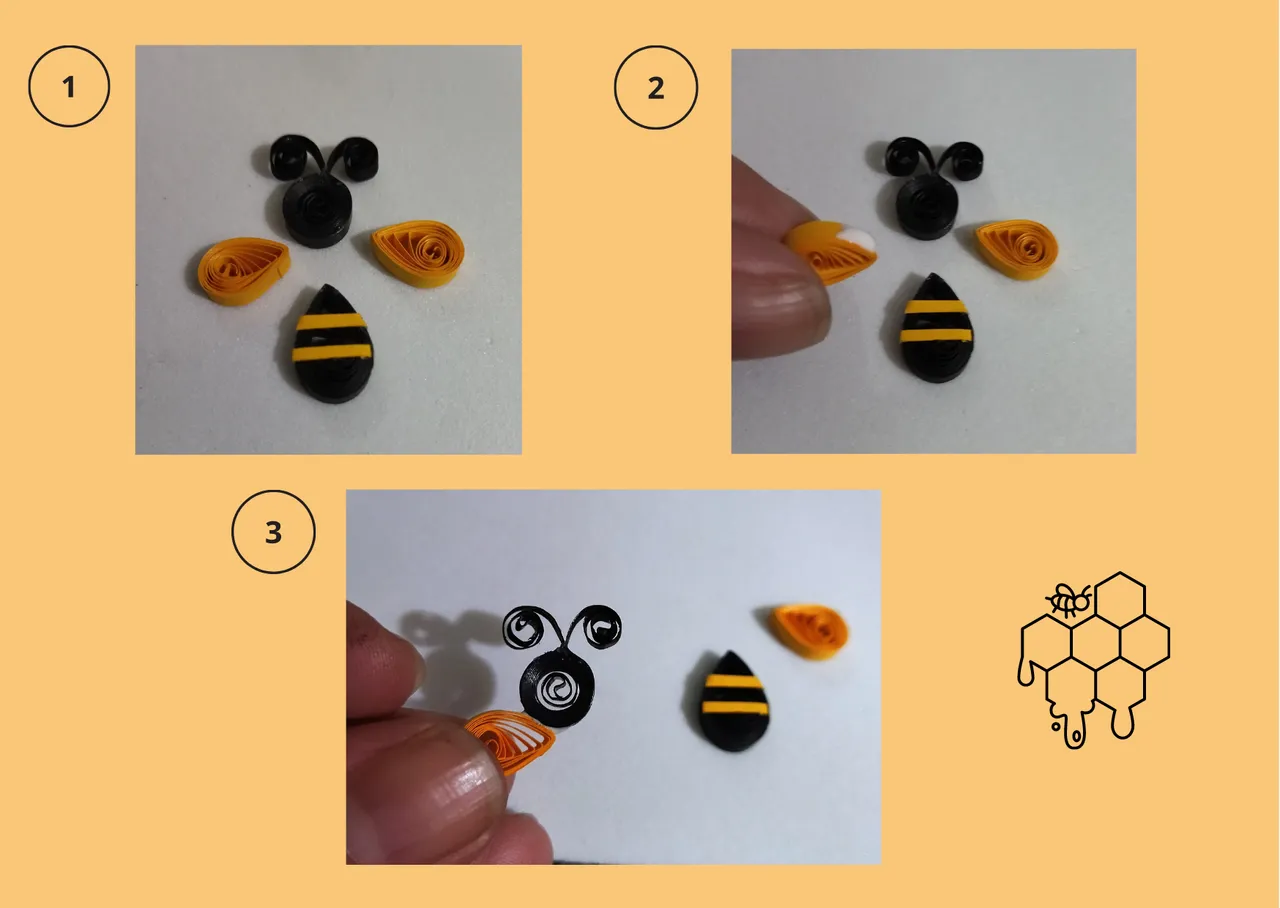
• Coloquemos un cristal de bisutería pequeño en medio de las alas para darle un toque de brillo a la pieza. Ponemos un punto de pega, y con la ayuda de la pinza punta fina agregamos el cristal.
- Place a small costume jewelry crystal in the middle of the wings to give a touch of shine to the piece. Put a point of glue, and with the help of the fine tip tweezers add the crystal.
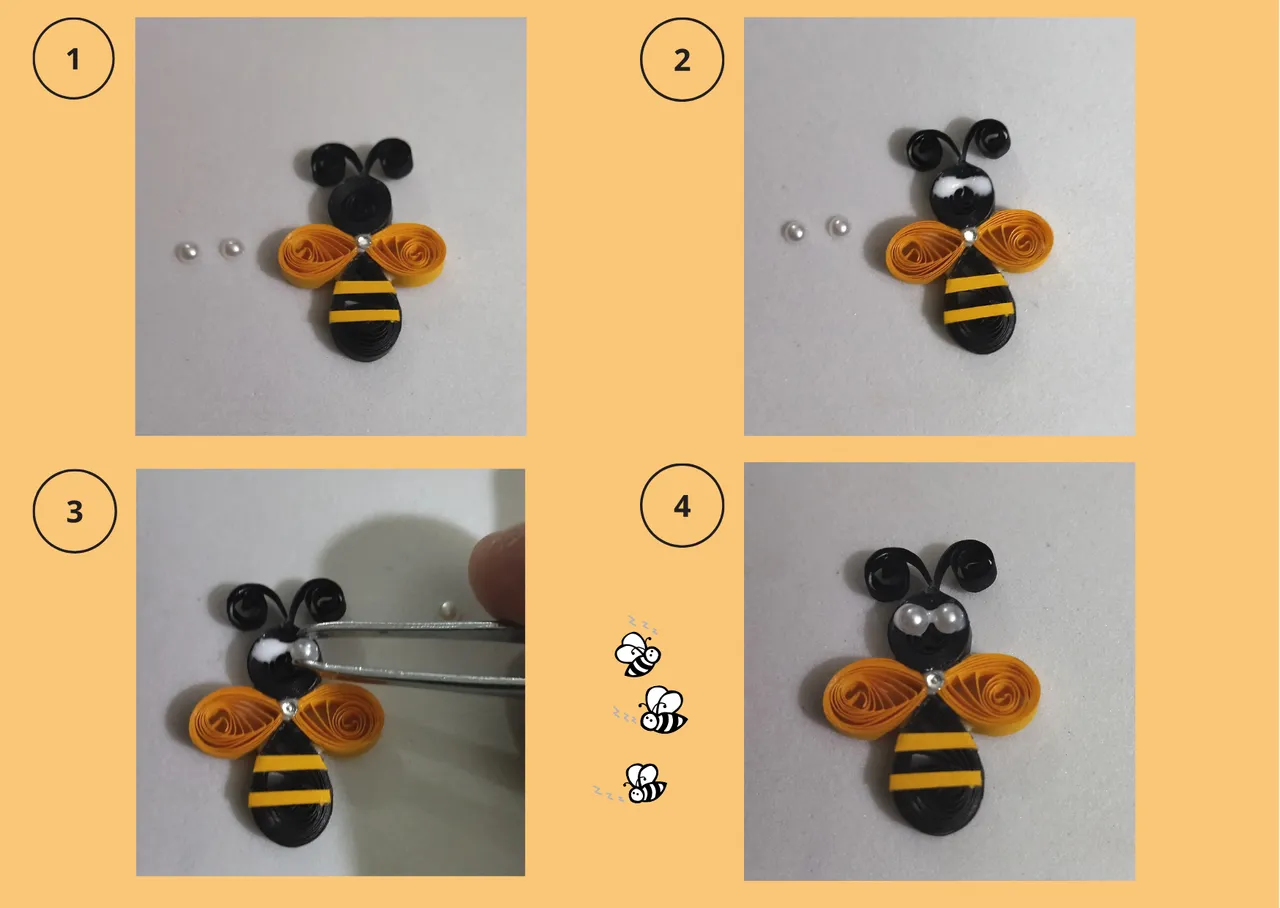
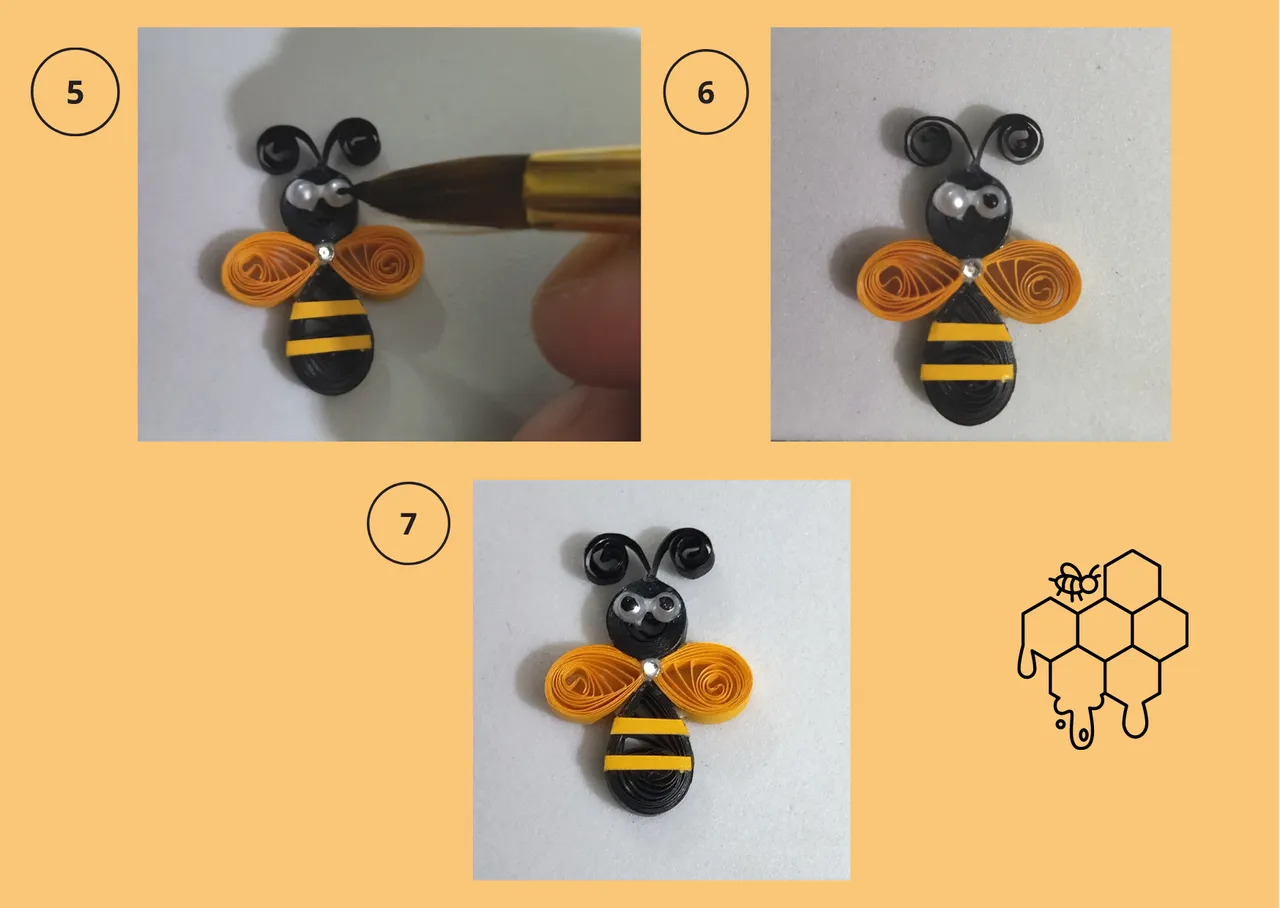
• Coloquemos ojitos a la abejita, tomamos dos perlas medias pequeñas de bisutería, ponemos dos puntitos de pega en medio de la cabeza y colocamos las perlitas, una vez pegadas tomamos un pincel punta fina, la pintura negra y pintamos dos puntitos negros, al secar la pintura agregamos un poco de pega blanca para evitar que se borren los ojitos, dejamos que seque la pega.
- Let's put eyes on the little bee, we take two small medium-sized costume jewelry beads, we put two small dots of glue in the middle of the head and place the beads, once glued we take a fine tip brush, black paint and paint two black dots, when the paint dries we add a little white glue to prevent the eyes from being erased, let the glue dry.
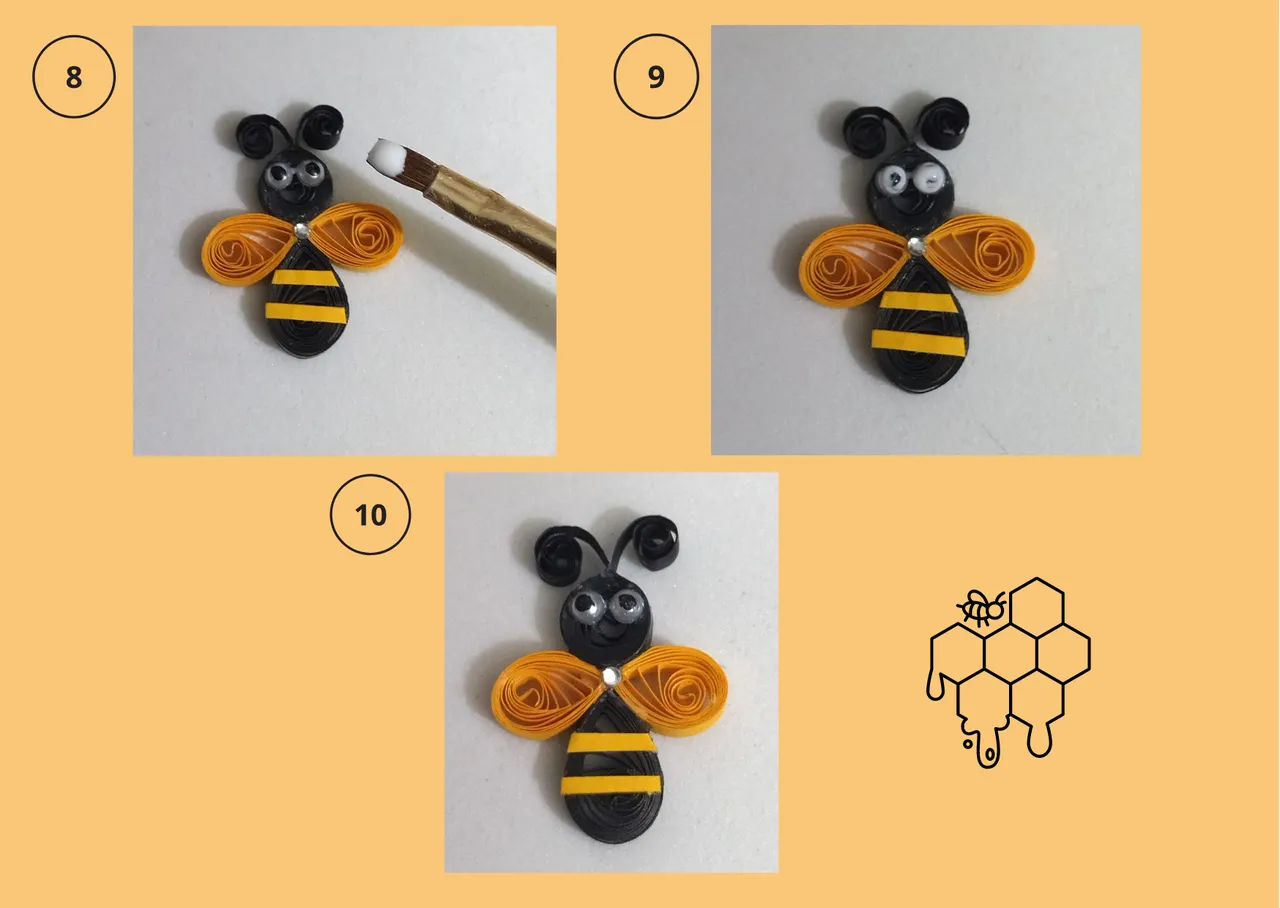
• Vamos a tomar un trozo de cinta puede ser de la negra y la colocaremos en la parte trasera de la abeja, esa es para pegar en el gancho y evitar que se salga la pieza cuando la coloquemos en su gancho.
• Les mostré el proceso para una sola abeja como les dije anteriormente, pero pueden repetir el proceso según cuantas abejitas quieran obtener, o pueden preparar todos sus materiales y realizar varias al mismo tiempo.
We are going to take a piece of tape, it can be a black one, and place it on the back of the bee, this is to stick it on the hook and prevent the piece from coming off when we place it on its hook.
I showed you the process for a single bee as I said before, but you can repeat the process depending on how many bees you want to get, or you can prepare all your materials and make several at the same time.
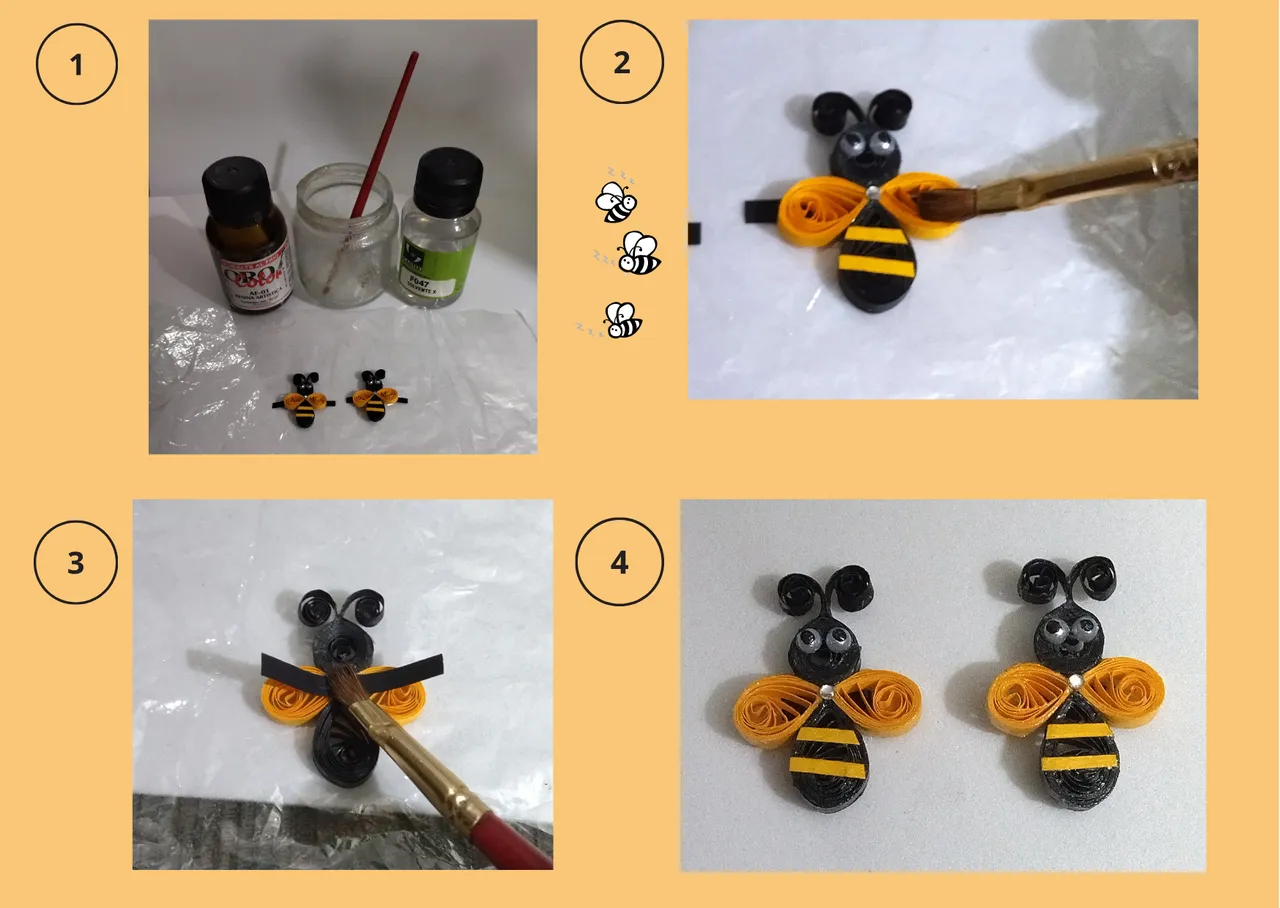
• Ahora le colocaremos su protección liquida a las abejas, tomamos el frasco de vidrio, colocamos una parte de resina artística, otra de solvente x, revolvemos con un pincel y aplicamos en todas las partes de la abeja, dejemos solo los extremos de la cinta que colocamos por detrás sin resina para poder colocar en el gancho con pega, dejamos secar de un día para otro nuestra abejita.
- Now we will place its liquid protection to the bees, we take the glass bottle, we place a part of artistic resin, another part of solvent x, we stir with a brush and apply in all the parts of the bee, we leave only the ends of the tape that we place behind without resin to be able to place in the hook with glue, we let dry from one day to another our little bee.
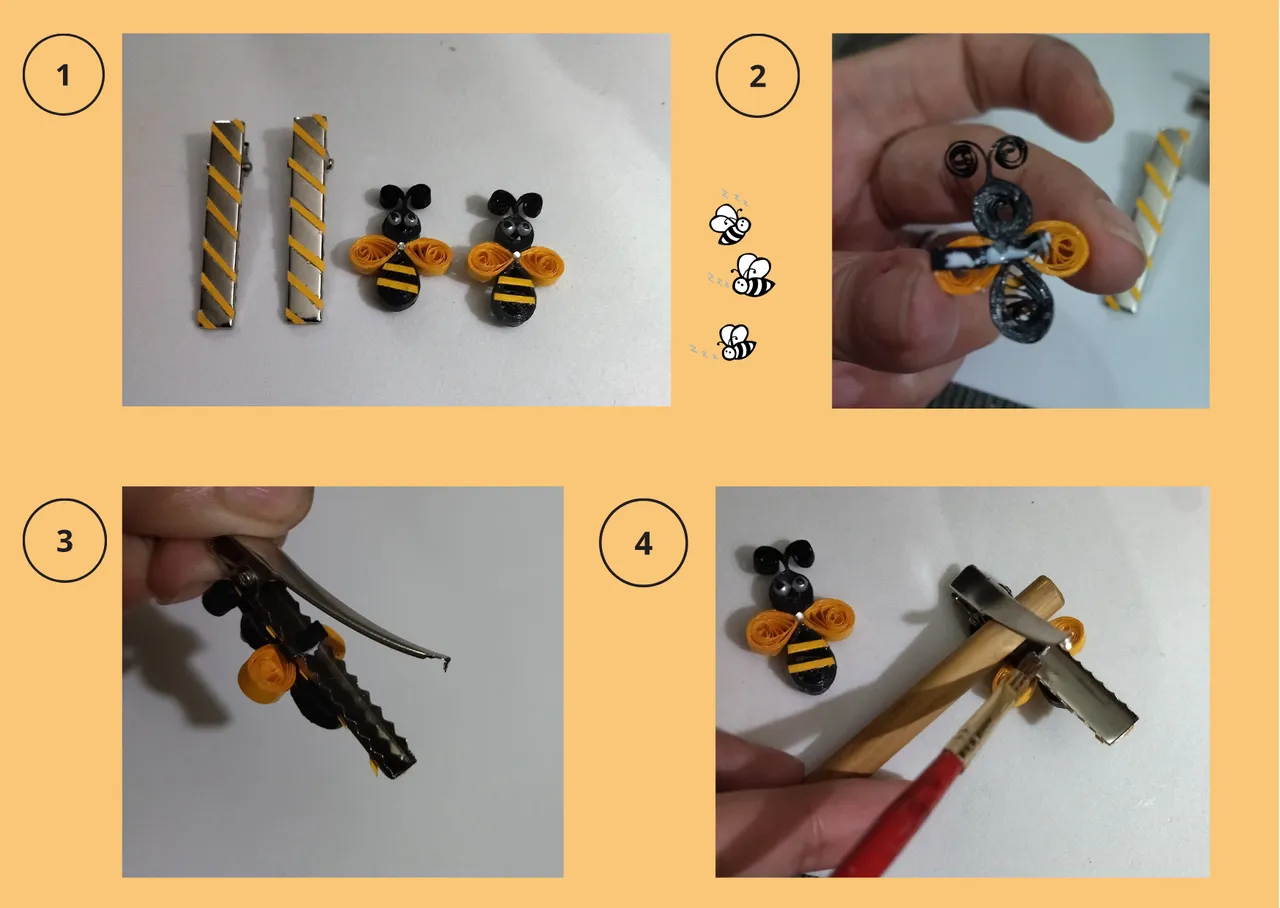
• Vamos a colocar las abejitas a los ganchitos, decidí de manera opcional colocarle a los ganchos unos trocitos de cinta amarillo tostado de manera diagonal para que resalten, ustedes deciden si quieren colocarle algún adorno, forrarlos o colocar las piezas en los ganchitos sin ningún tipo de adorno.
• Para añadir la pieza a los ganchos colocamos pega a los trozos de cinta que se les coloco en la parte trasera, cerramos y esperamos que sellen, una vez sellados, tomamos con el pincel un poquito de resina y le ponemos un poco, de esta manera se va a plastificar la cinta y las piezas no se saldrán de los ganchos, quedaran bien protegidos y resistentes.
• De esta manera tenemos los ganchitos con sus dijes de abejita, listos para su uso.
We are going to place the little bees on the hooks, I decided to optionally place some pieces of yellow ribbon on the hooks diagonally to make them stand out, you decide if you want to place any ornament, line them or place the pieces on the hooks without any kind of ornament.
To add the piece to the hooks we put glue to the pieces of tape that were placed on the back, close and wait for them to seal, once sealed, we take with the brush a little bit of resin and put a little bit, this way the tape will be plasticized and the pieces will not come off the hooks, they will be well protected and resistant.
In this way we have the hooks with their bee charms, ready for use.
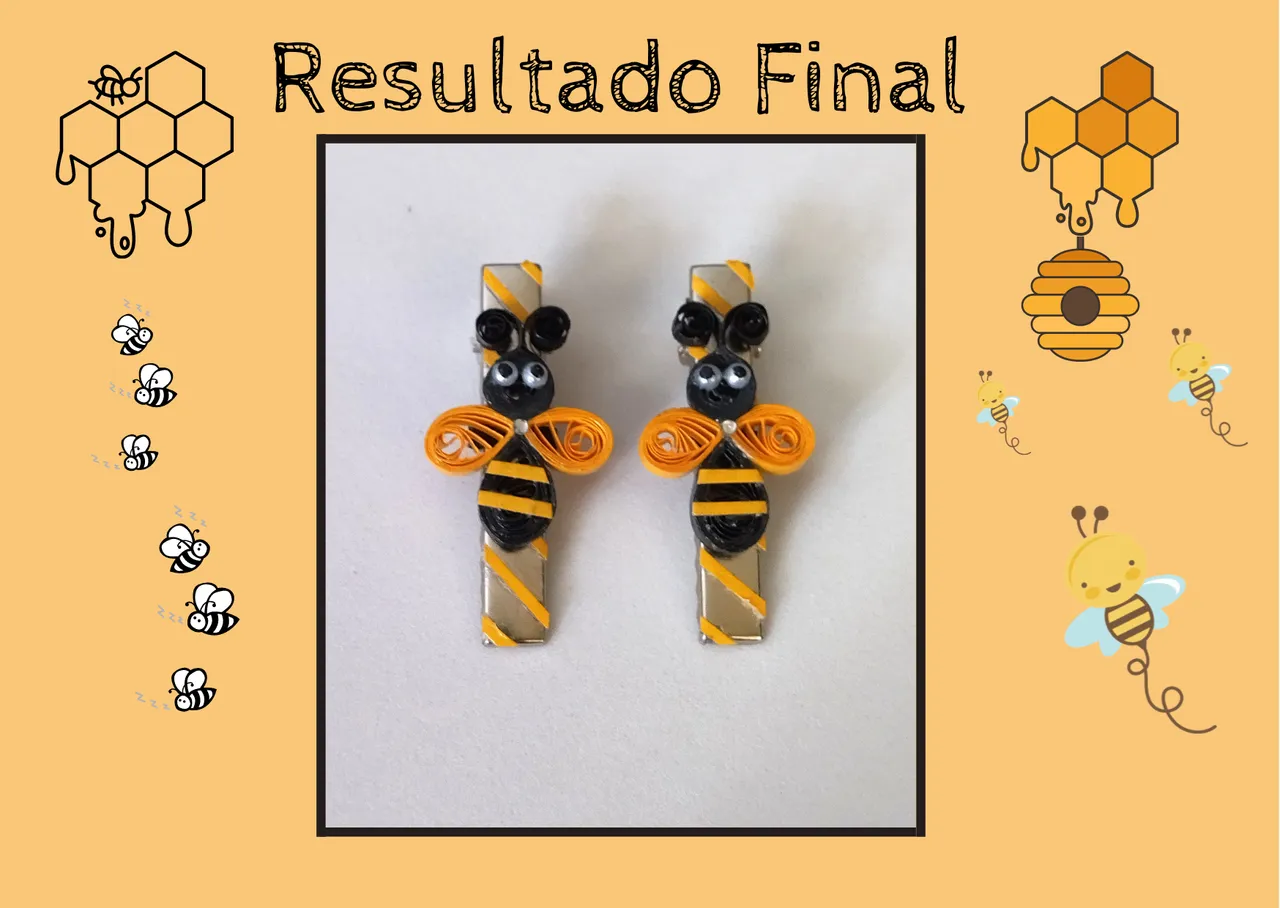
Resultado Final:💕
Final Result:💕
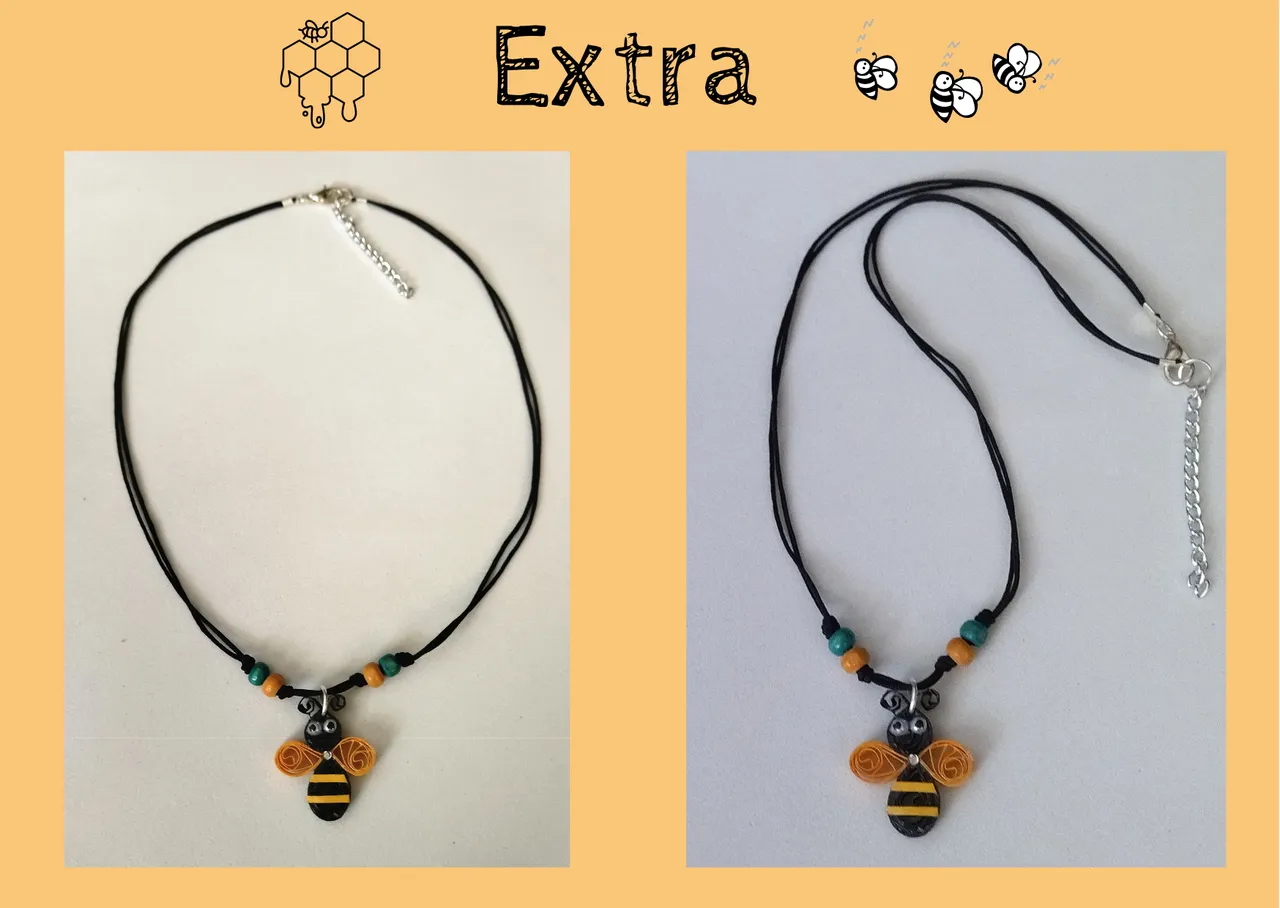
Extra:✨
• En el proceso de elaboración, no resistí la tentación de hacer otra abejita, a la cual le coloqué una argolla entre el medio de la cabeza y antenas, para montarla en un collar para uso personal jajajaja. De esta manera se pueden dar cuenta que el dije nos sirve para la elaboración de cualquier tipo de detalles, para los ganchitos, un cintillo, para colocarlo en un collar, y si se le coloca una base fija o colgante para zarcillos también podemos lucirlos de esa manera. Los zarcillos me los debo, próximamente me los hare para completar el conjunto😁.
Extra:✨.
- In the process of elaboration, I did not resist the temptation to make another bee, to which I placed a ring between the middle of the head and antennae, to mount it on a necklace for personal use hahahaha. This way you can see that the pendant can be used to make any kind of details, for hooks, a headband, to place it on a necklace, and if you place a fixed base or a pendant for earrings you can also wear them that way. I owe the earrings to myself, soon I will make them to complete the set😁.
¿Que les pareció, les gustó?
Espero que sí, que les haya gustado mi explicación, procedimiento y fotos, los hice con mucho cariño por y para ustedes.
"Deja salir esa musa que te inspira, y deja volar tu imaginación".
Gracias a todos, nos vemos en la próxima. 🐾🐱💕
What did you think, did you like it?
I hope you did, I hope you liked my explanation, procedure and photos, I made them with love for you.
"Let out that muse that inspires you, and let your imagination fly".
Thank you all, see you next time. 🐾🐱💕
All photos used in this post are of my authorship and have been taken on my personal cell phone a Redmi 9T and edited in Canva Dividers and banner made by me in Paint Tool Sai Translated with the help of DeepL