
Hello everyone...🎄🎅✨
Hello to my dear Hivers and the dear community of artists #HiveDIY, as always very pleased and excited to be here again, to join the beautiful Christmas contest "The Nutcracker", in which I made a mini "Nutcracker" in 3D in the quilling technique, I invite to participate @sarix and @gaboamc2393, I leave the contest guidelines in the following Link so they can join in.
Hoping you like it, I leave you my creative process:
Let's get started:😃

Hola a Todos...🎄🎅✨
Hola a mis queridos Hivers y a la querida comunidad de artistas #HiveDIY, como siempre muy complacida y emocionada de encontrarme por acá nuevamente, para sumarme al bonito concurso de Navidad "El Cascanueces", en el que elabore un mini "Cascanueces" en 3D en la técnica de quilling, invito a participar a @sarix y a @gaboamc2393, les dejo las pautas del concurso en el siguiente Link para que se sumen al mismo.
Esperando que sea de su agrado, les dejo mi proceso creativo:
Comencemos:😃

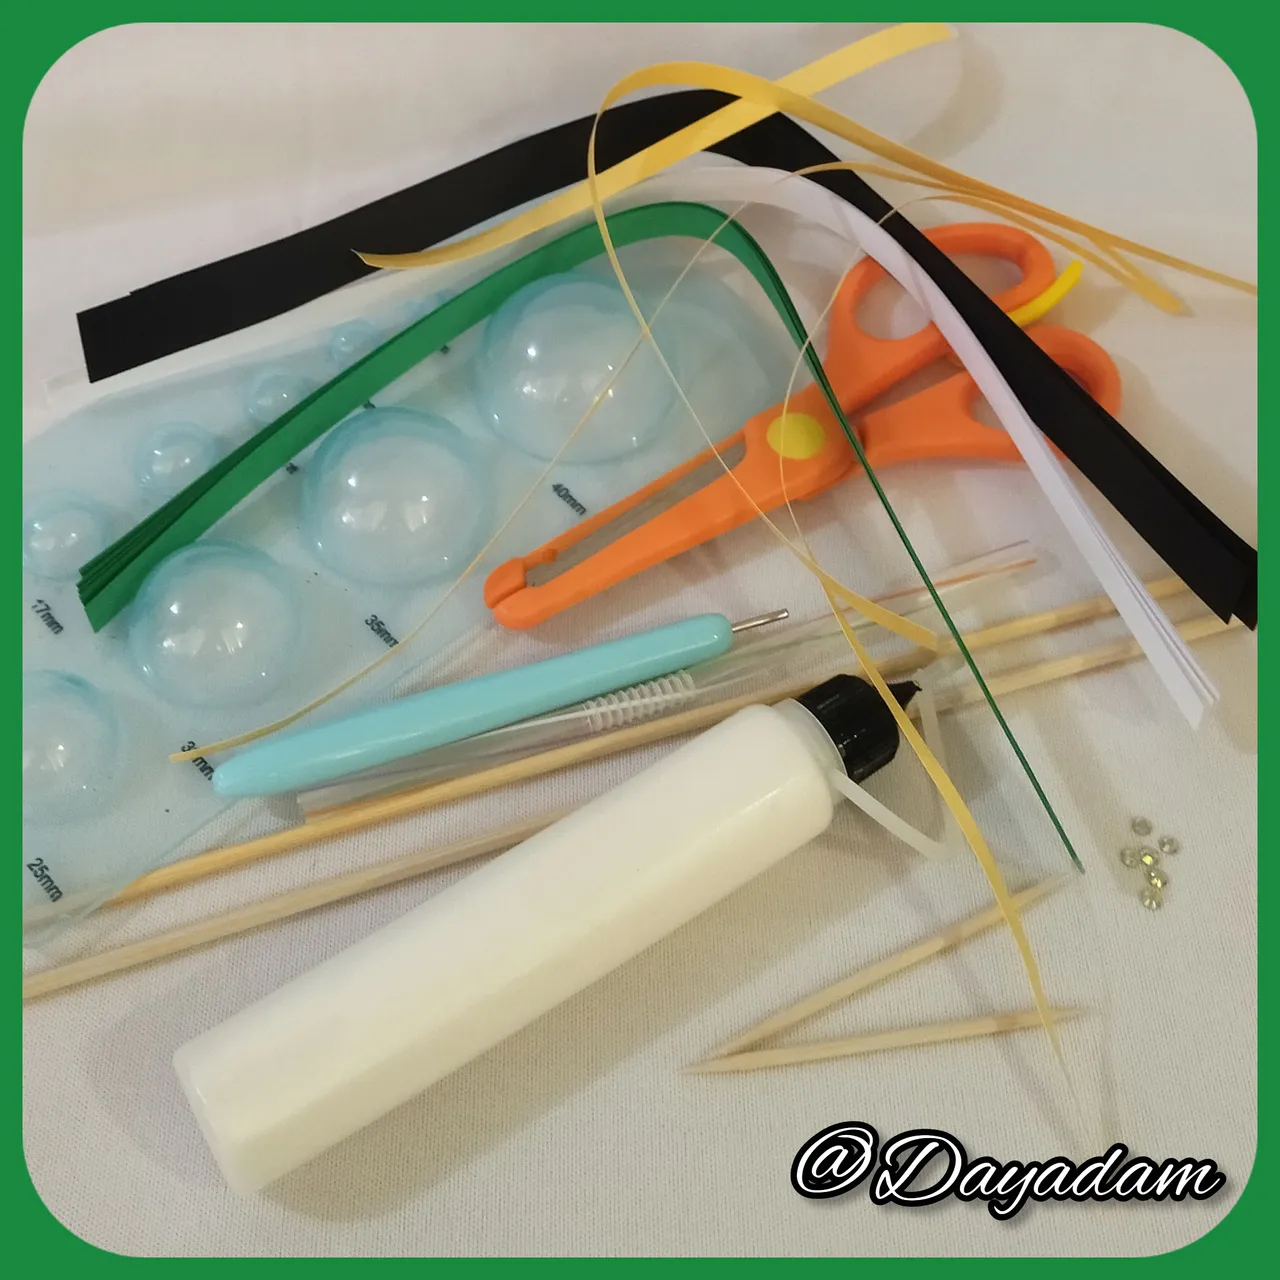
• Cintas de quilling de diversos mm de ancho.
• Aguja para quilling.
• Molde para círculos.
• Pega blanca extra fuerte (de carpintería).
• Cristales de bisuteria.
• Palillos de altura, palillos mondadientes, Pajilla de refrescos.
• Tijera.
• Pincel.
- Quilling ribbons of different widths.
- Quilling needle.
- Mold for circles.
- Extra strong white glue (carpentry glue).
- Jewelry crystals.
- Sticks of height, toothpicks, straw of soft drinks.
- Scissors.
- Brush.

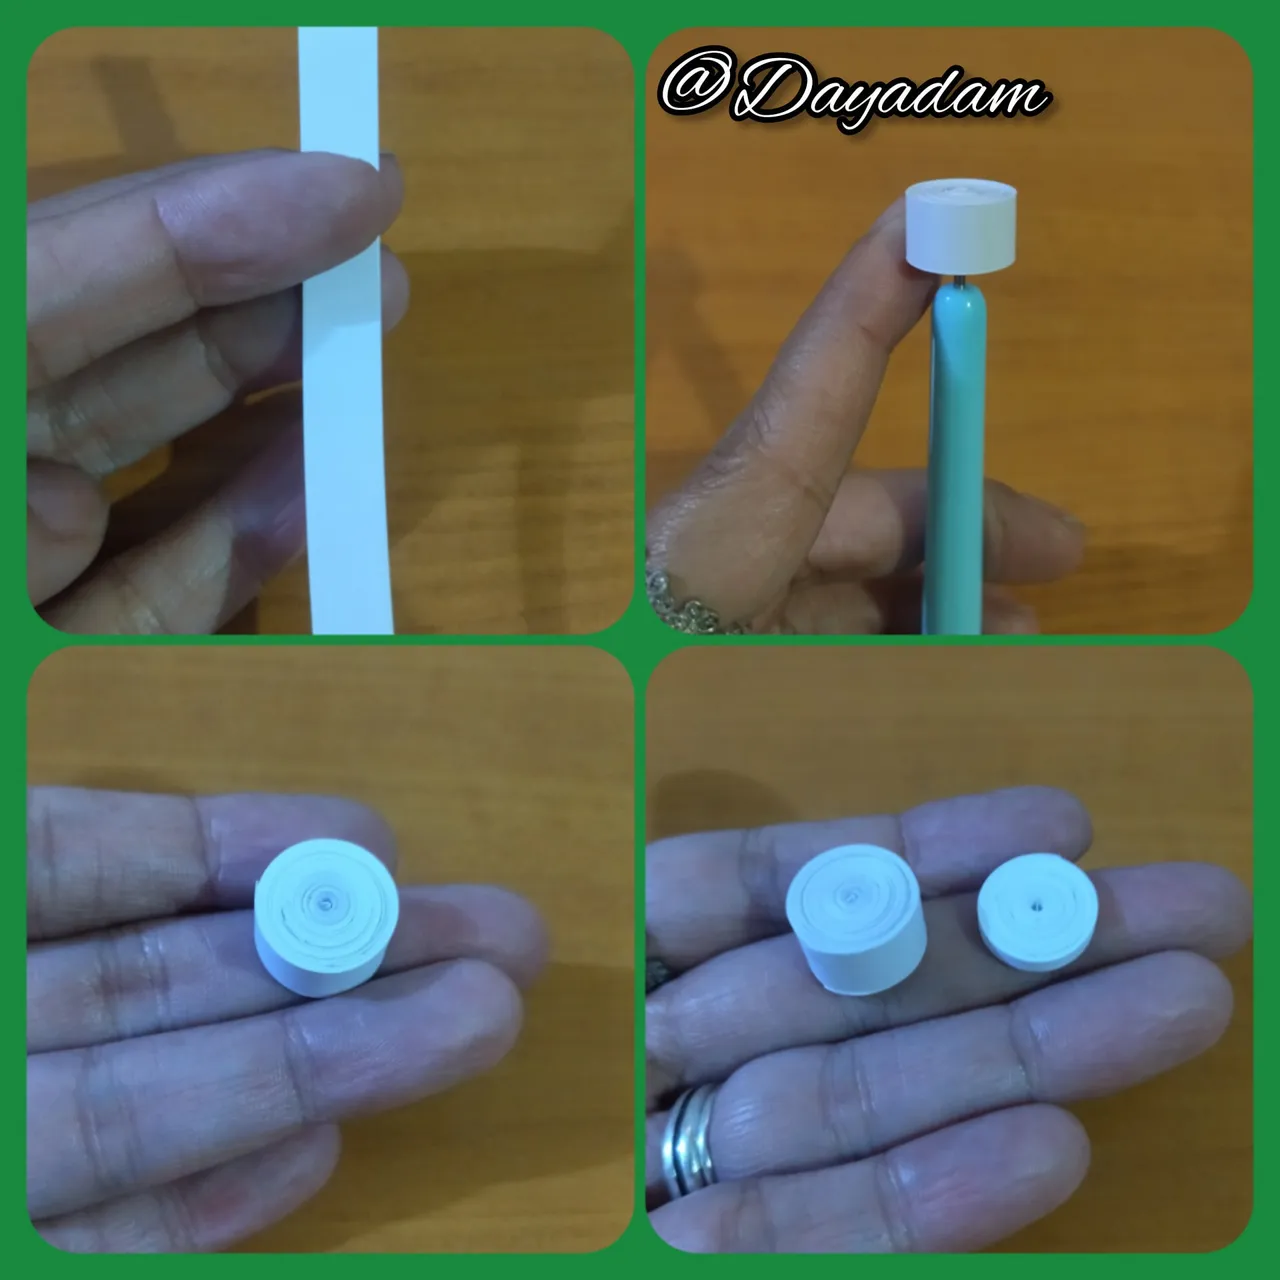
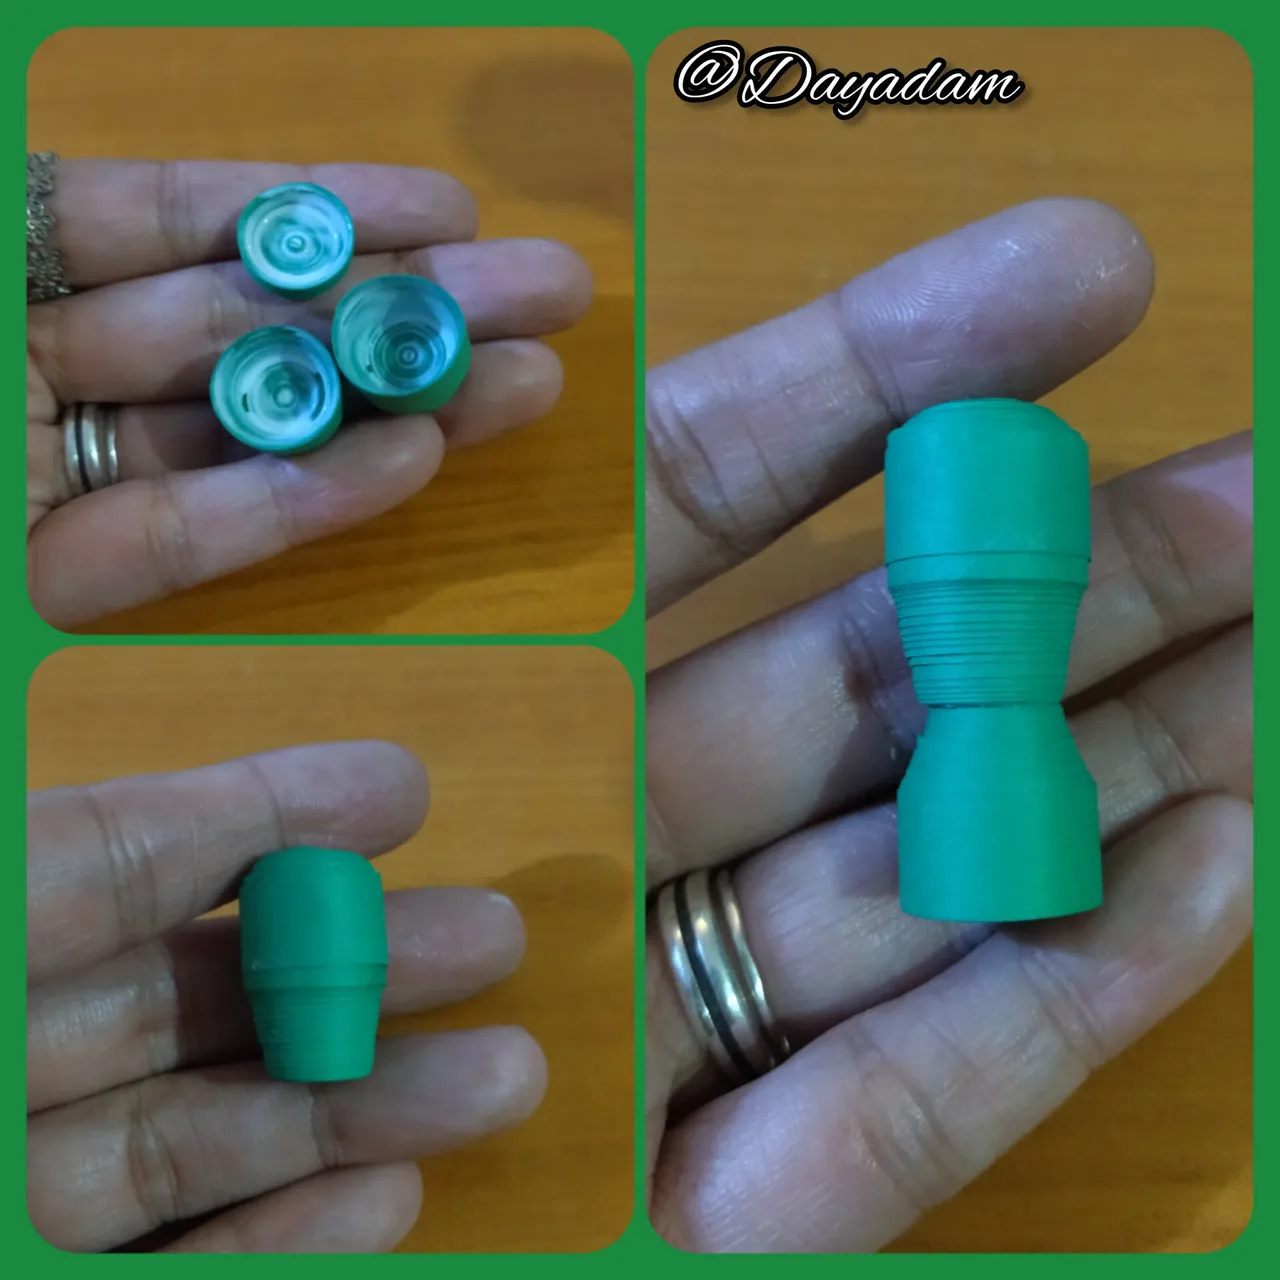
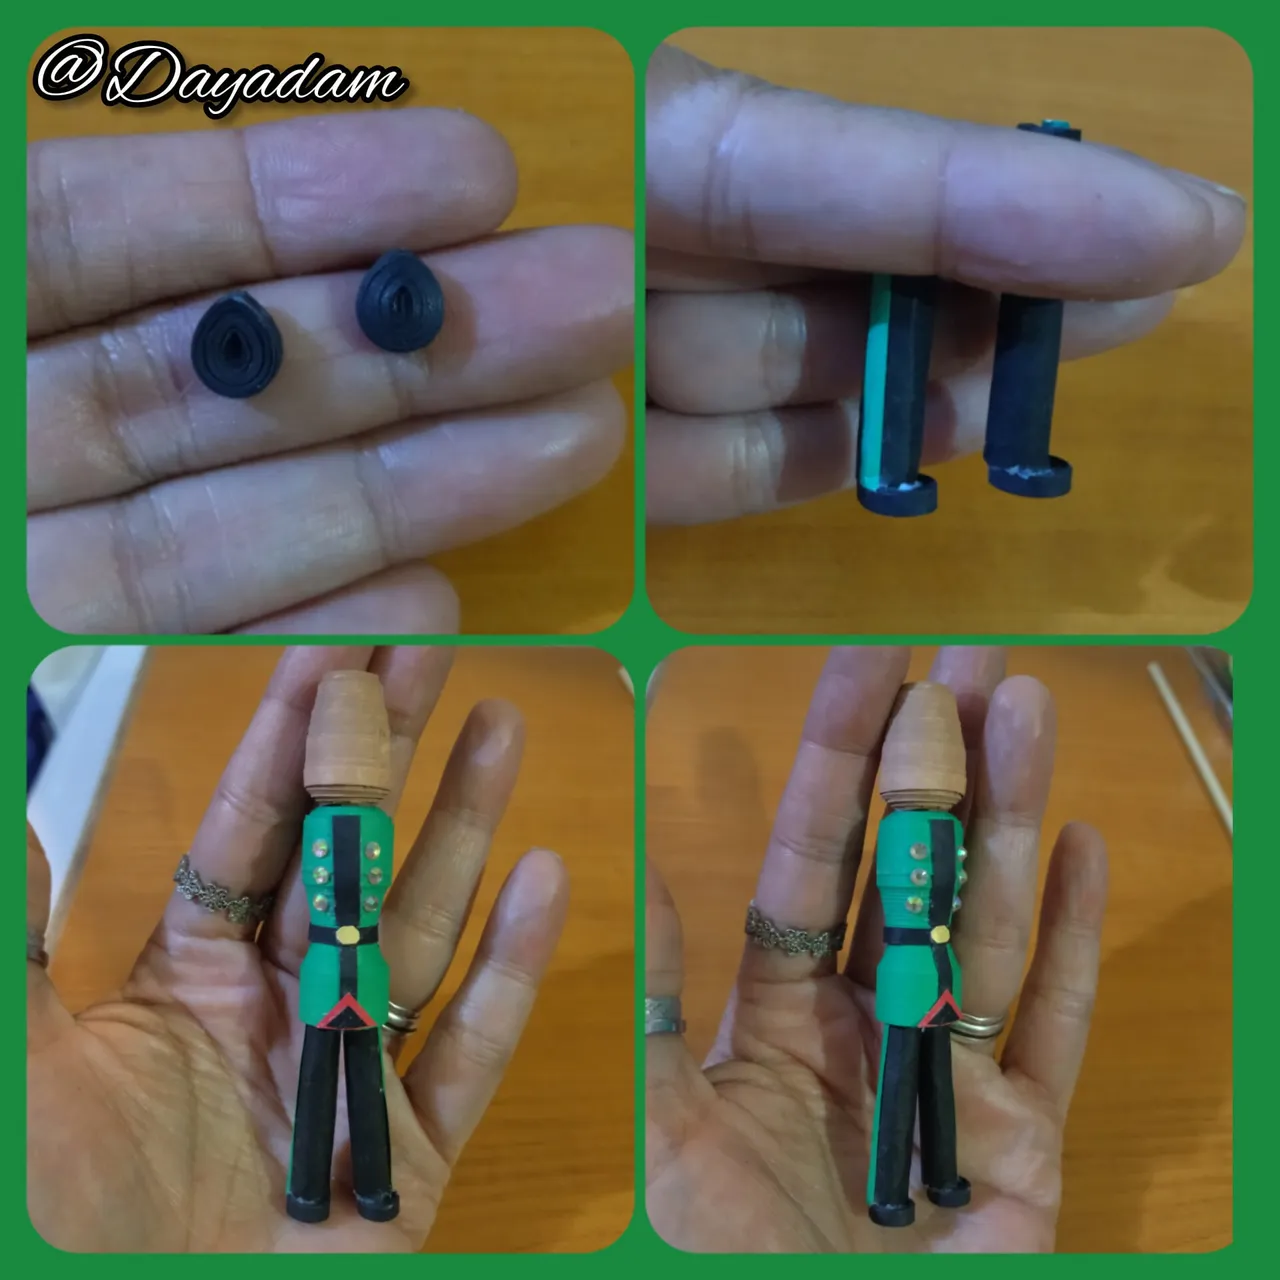
- We start by taking white quilling tape and we will join a strip of 3mm wide and another of 9mm wide x 100cms long, we roll each one separately with the quilling needle until we reach the end of the tape, we seal with extra strong white glue, we take out the needle, we will obtain 2 closed circles.
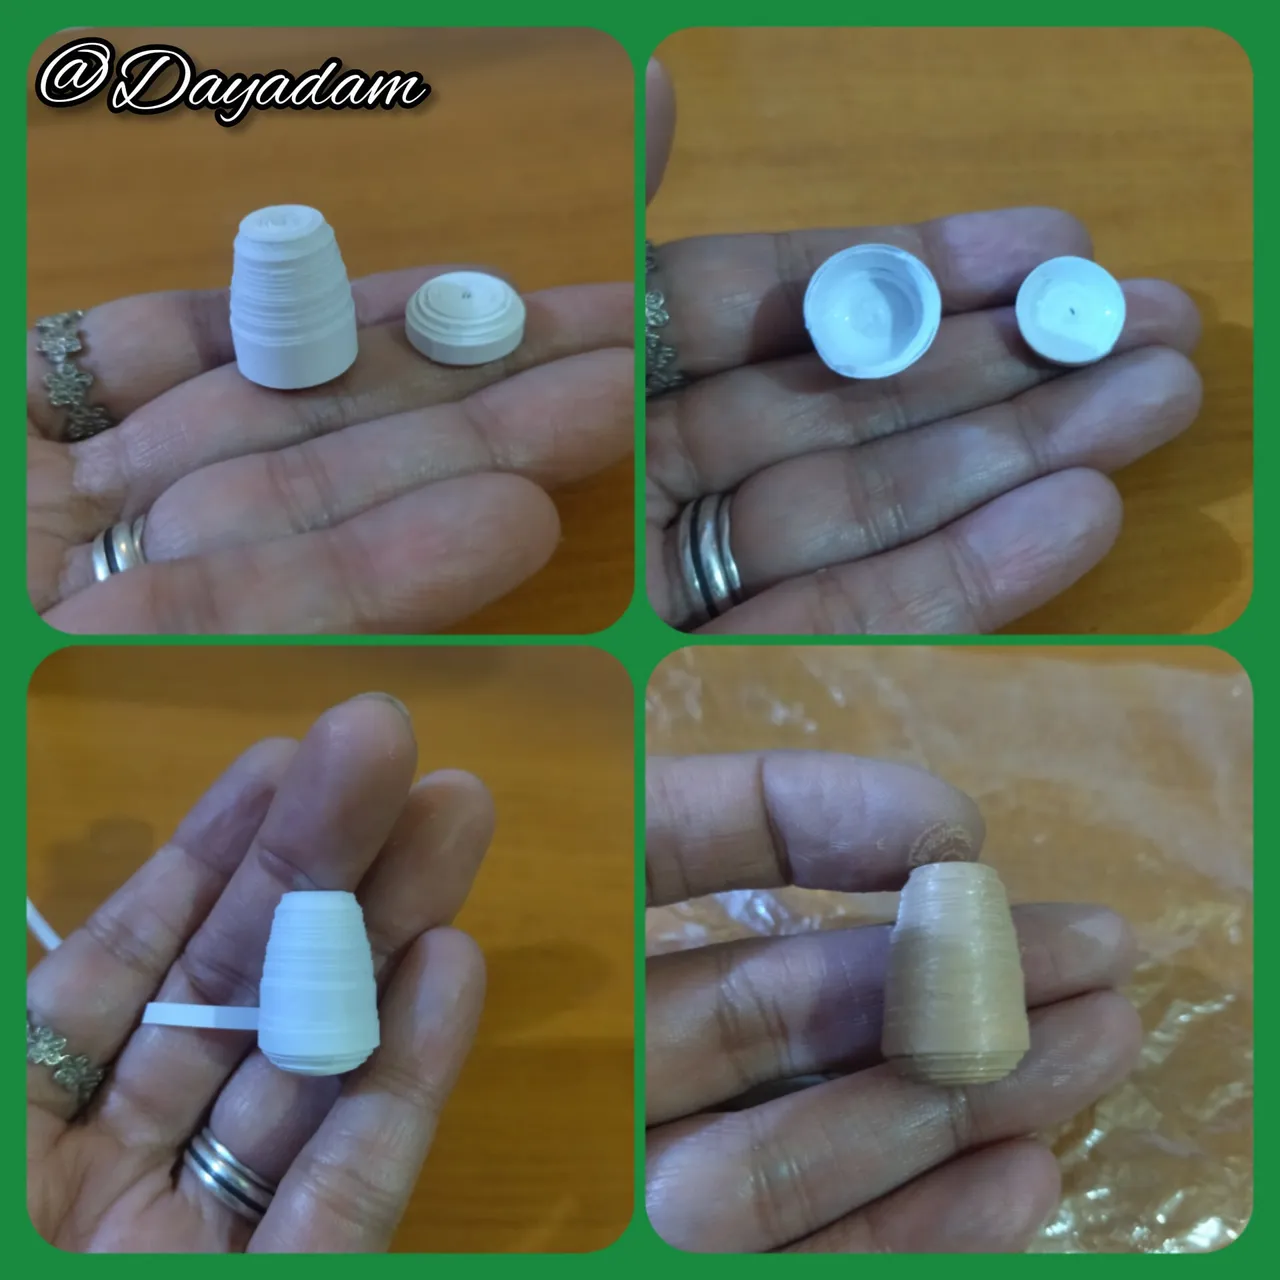
- The 9mm one we will mold it to form a kind of cone, and the 3mm one we will only push down a little, in the internal part we will apply white glue to avoid the pieces to deform, then we will join both with a little glue and a piece of white ribbon.
- Apply skin colored cold paint with a brush to the piece and let it dry.

• Comenzamos tomando cinta para quilling blanca y vamos a unir una tira de 3mm de ancho y otra de 9mm de ancho x 100cms de largo, enrollamos cada una por separado con la aguja para quilling hasta llegar al final de la cinta, sellamos con pega blanca extra fuerte, sacamos de la aguja, obtendremos 2 círculos cerrados.
• La de 9mm la moldearemos para formar una especie de cono, y la de 3mm solo empujaremos un poco hacia abajo, en la parte interna aplicaremos pega blanca para evitar que las piezas se deformen, luego uniremos ambas con un poco de pega y un trozo de cinta blanca.
• Aplique pintura al frio color piel con un pincel a la pieza deje secar.
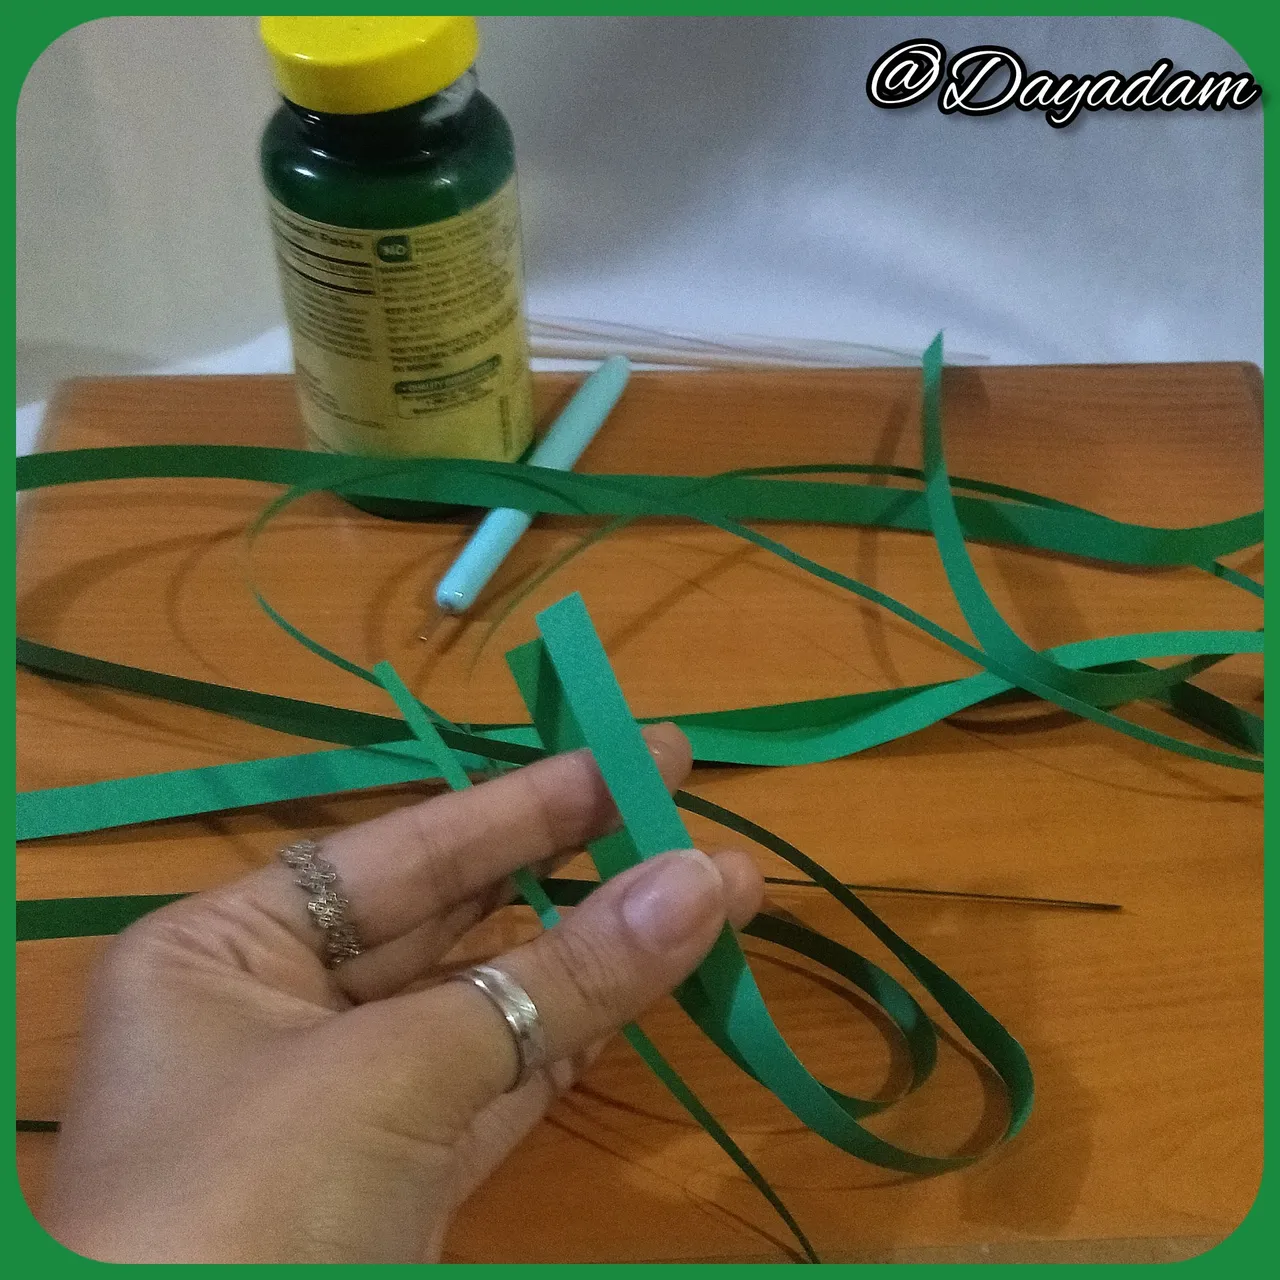
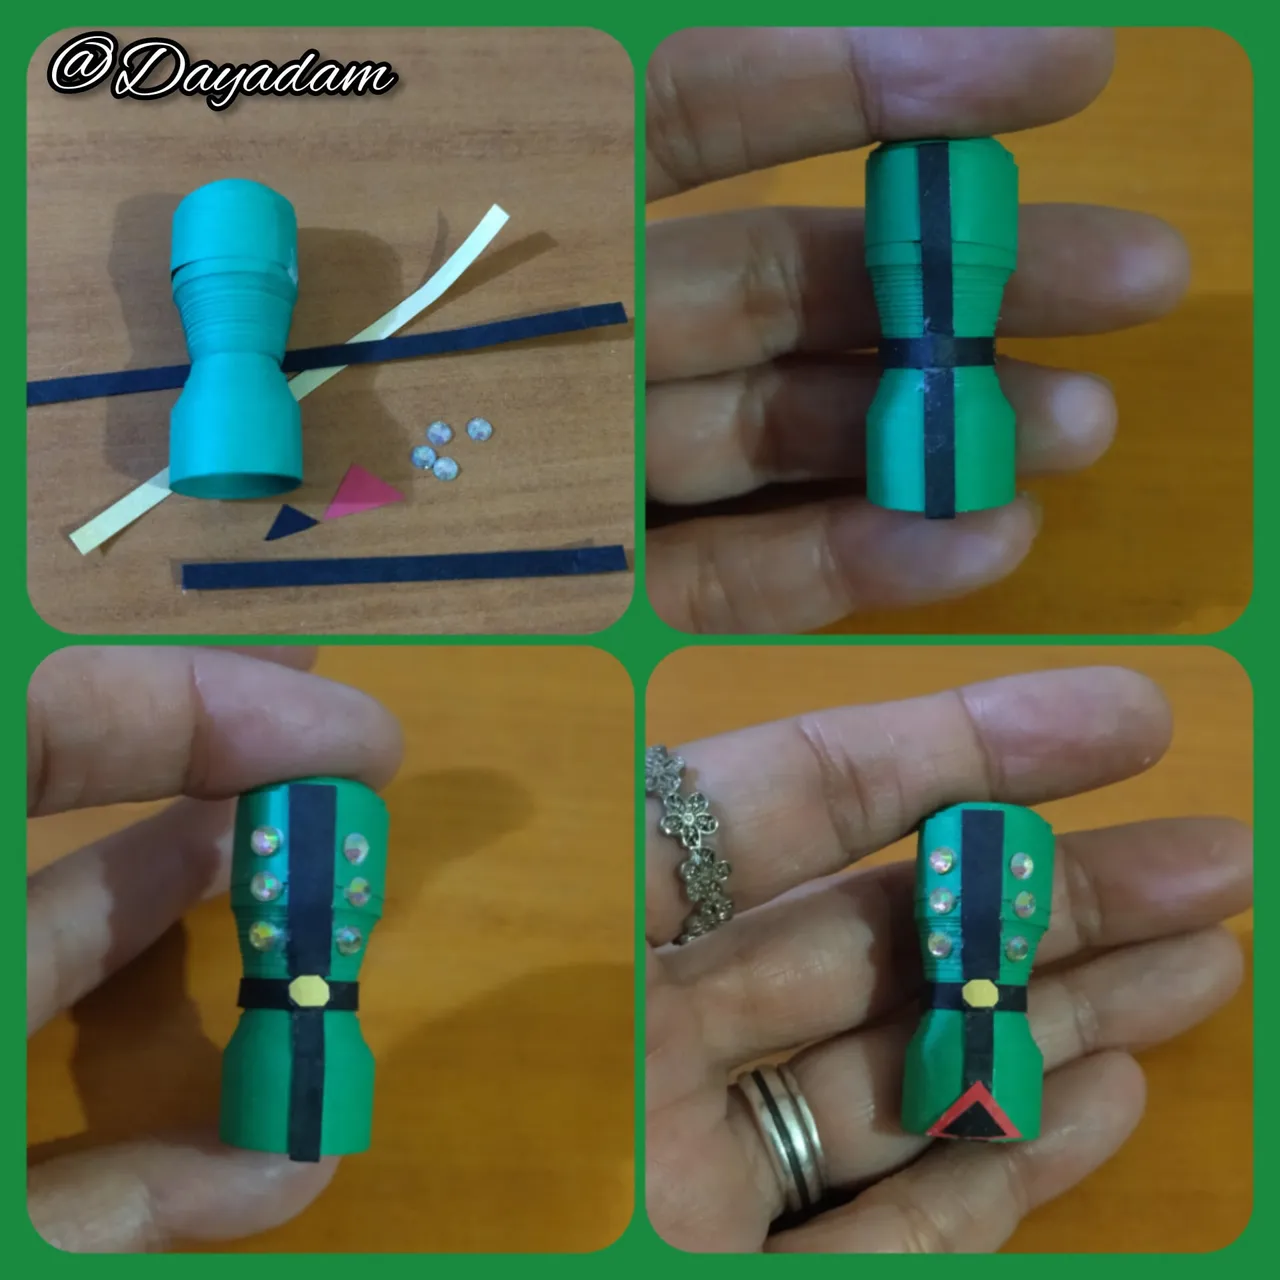
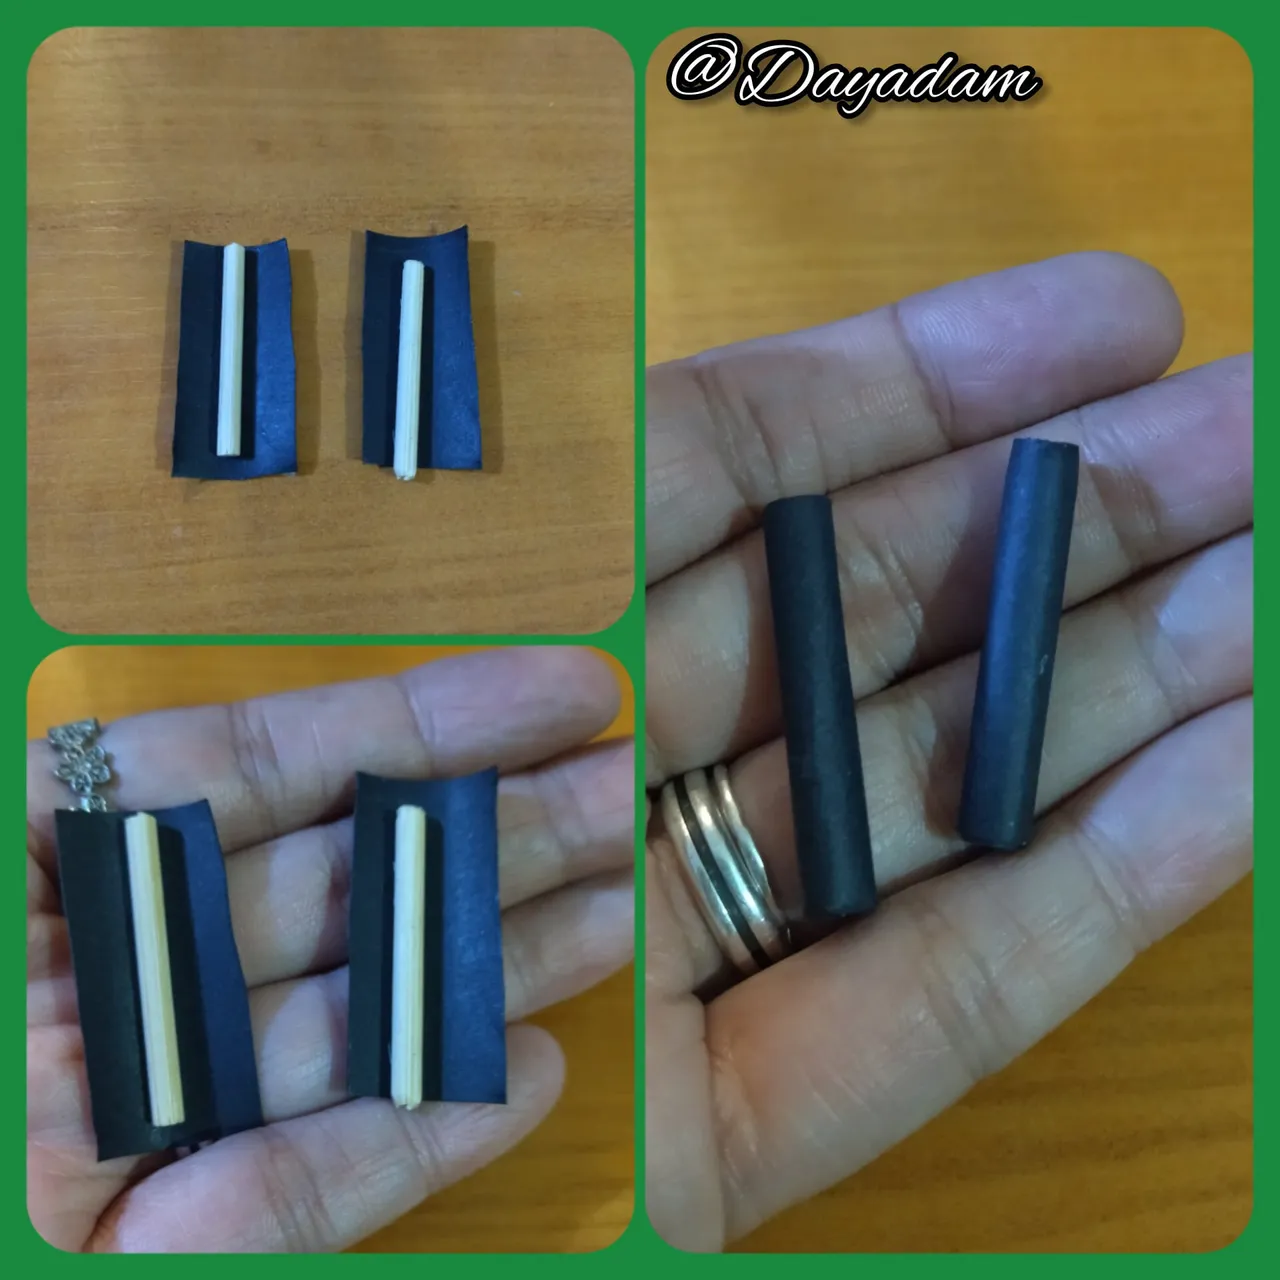
- We will make 3 closed circles, 2 with green ribbon 9mm wide x 100cms long, and another with 3mm ribbon of the same size. We will mold the 2 circles of 9mm in the shape of a cone and the 3mm tape we will only take it out a little bit.
- We will join one of the cone-shaped pieces with the 3mm piece, then we will join the other cone in reverse.
- Take pieces of colored ribbons and small costume jewelry crystals, to decorate the nutcracker's costume, we can do it to our liking.
• Ahora realizaremos 3 círculos cerrados 2 con cinta verde de 9mm de ancho x 100cms de largo, y otro con cinta de 3mm de la misma medida. Moldearemos los 2 círculos de 9mm en forma de cono y la de 3mm solo la sacaremos un poco hacia afuera.
• Uniremos una de las piezas en forma de cono con la pieza de 3mm, luego uniremos al otro cono de forma inversa.
• Tome trozos de cintas de colores y cristales pequeños de bisutería, para decorar el traje del cascanueces, podemos hacerlo a nuestro gusto.

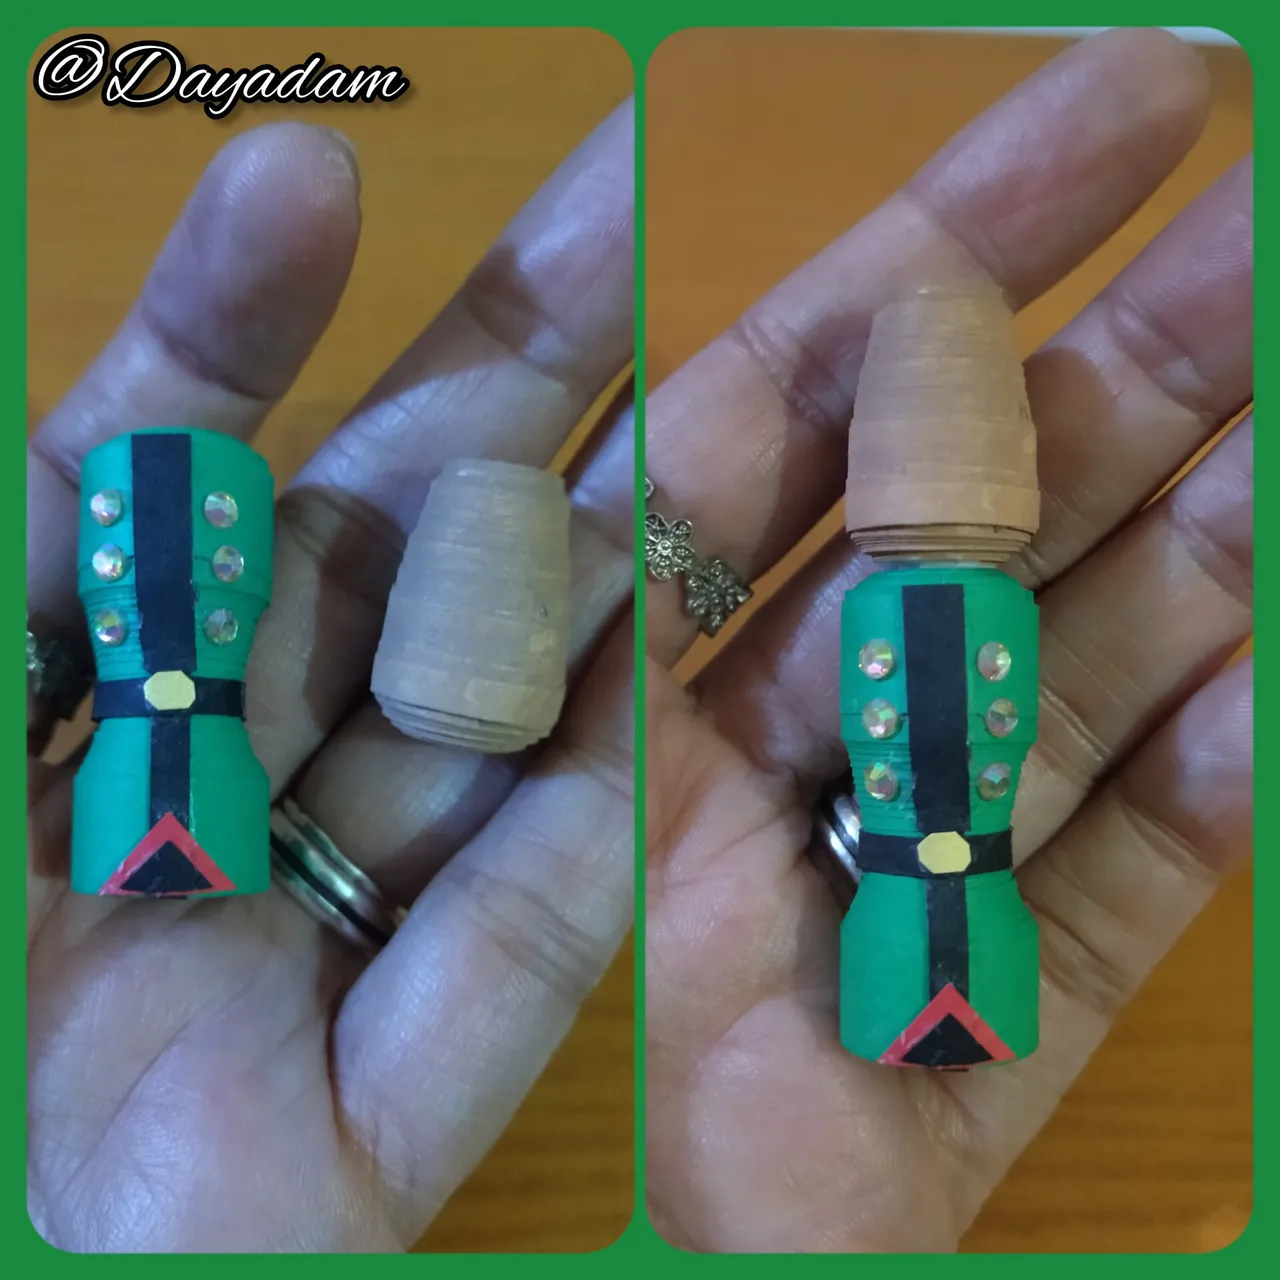
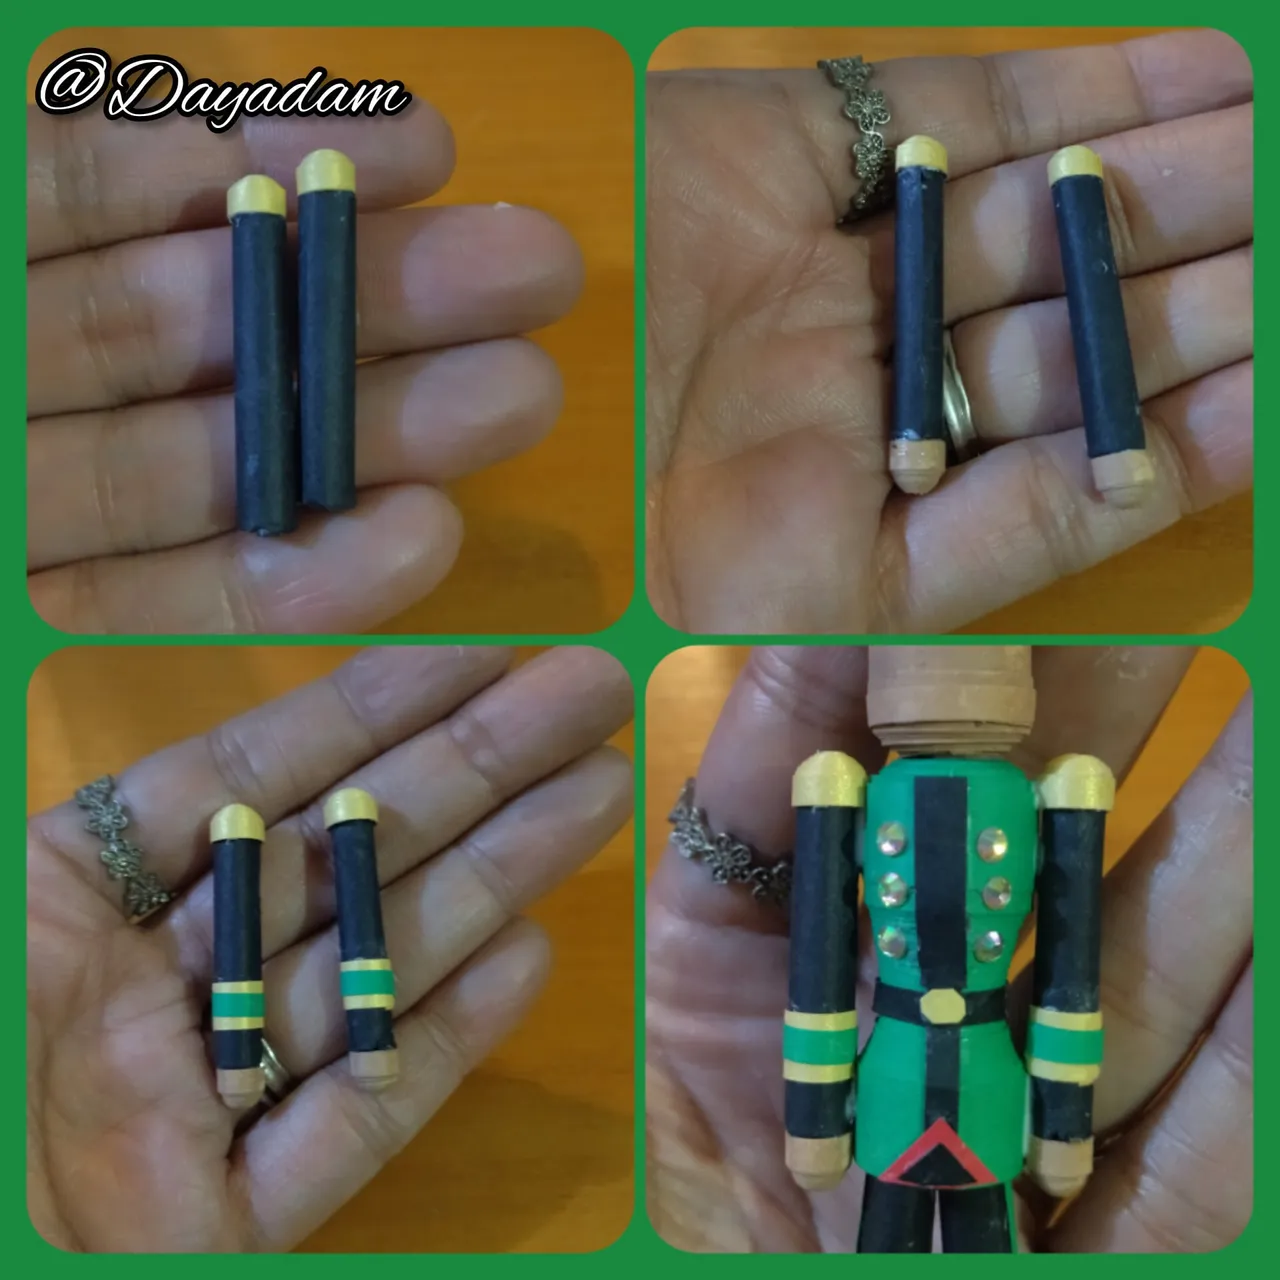
- At this point I decided to attach the head to the suit so that it dries very well.
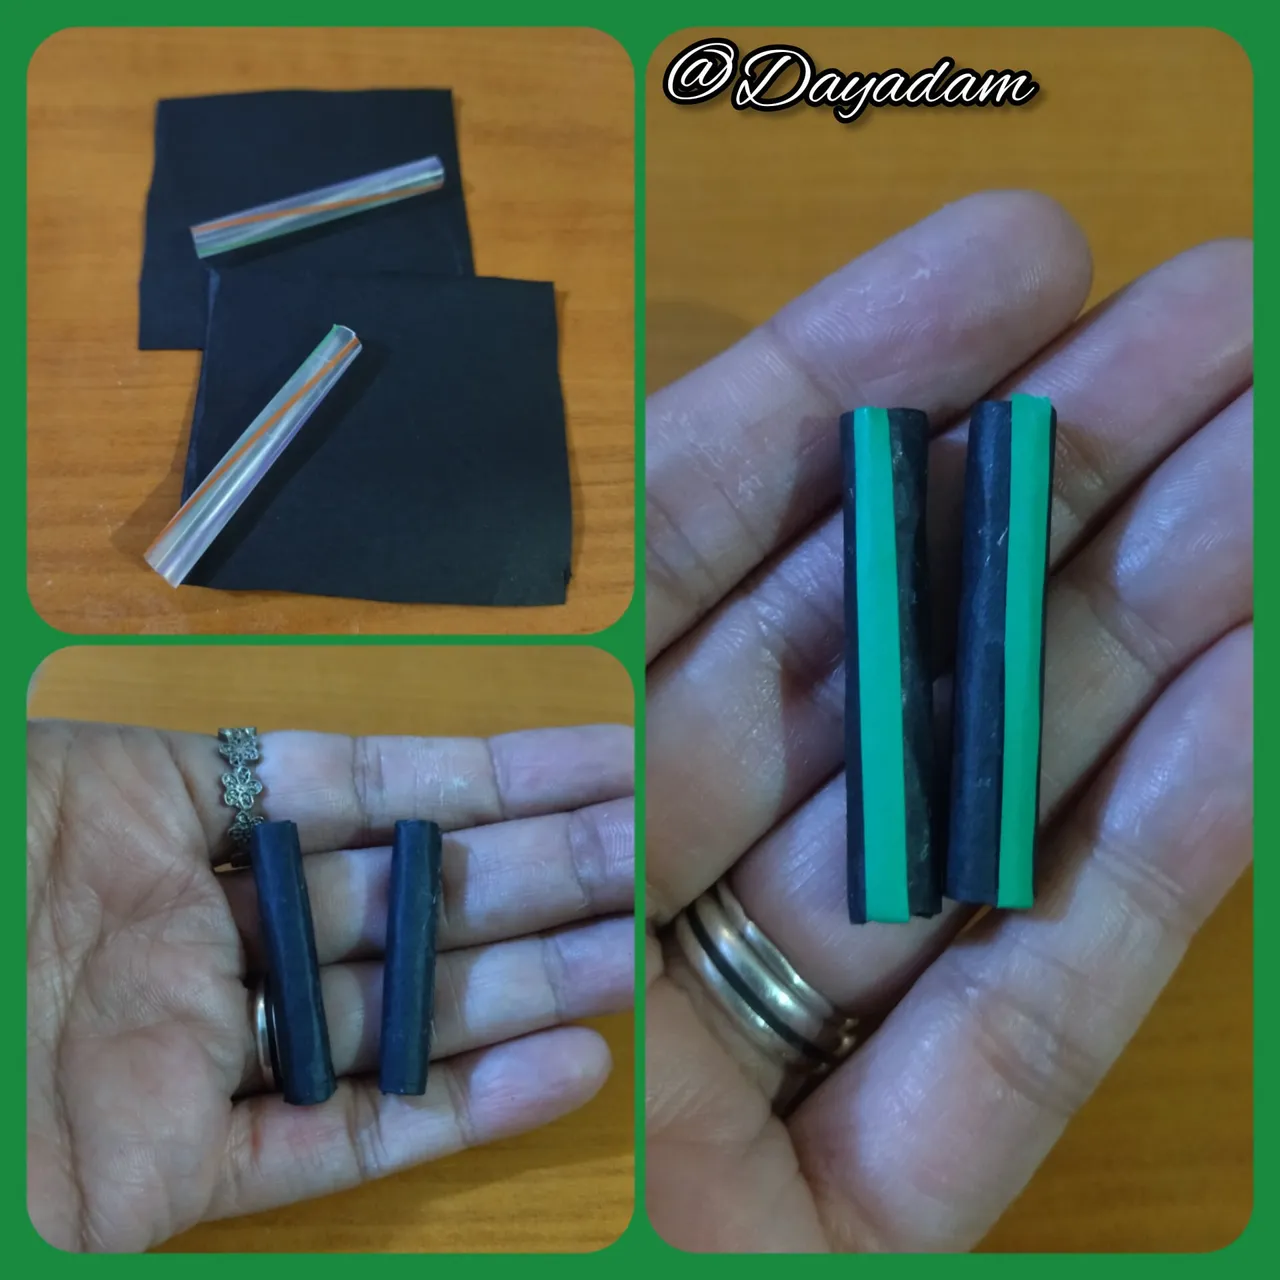
- For the legs take two small pieces of soda straw 4 cm long, roll them up with black quilling strip, on the sides place a strip of green quilling 3 mm wide as an ornament.
- For the feet I made two closed circles which I molded in the shape of a drop, I glued them to the legs of the nutcracker, then I incorporated both to the suit of the nutcracker.
- Let's go with the arms, for them I took two pieces of sticks of 4cms long, to which I rolled black ribbon, then I added a closed circle of gold color on the top, decorate with some ribbons, and I put on the bottom another small closed circle of flesh color to resemble the hands. Once ready, I glued them on both sides of the nutcracker costume.
•En este punto decidí pegar la cabeza al traje para que vaya secando muy bien.
• Para las piernas tome dos trocitos de pajilla para refresco de 4cms de largo, les enrolle tira para quilling de color negro, a los lados coloque como adorno una tira de quilling verde de 3mm de ancho.
• Para los pies realice dos círculos cerrados los cuales moldee en forma de gota, los pegue a las piernas del cascanueces, luego incorpore ambas al traje del mismo.
• Vamos con los brazos, para ellos tome dos trozos de palitos de altura de 4cms de largo, al cual enrolle cinta color negro, luego añadí un circulo cerrado color dorado en la parte de arriba, decore con algunas cintas, y le coloque en la parte de abajo otro pequeño circulo cerrado color carne para asemejar las manos. Una vez listos, los pegue de lado y lado del traje del cascanueces.

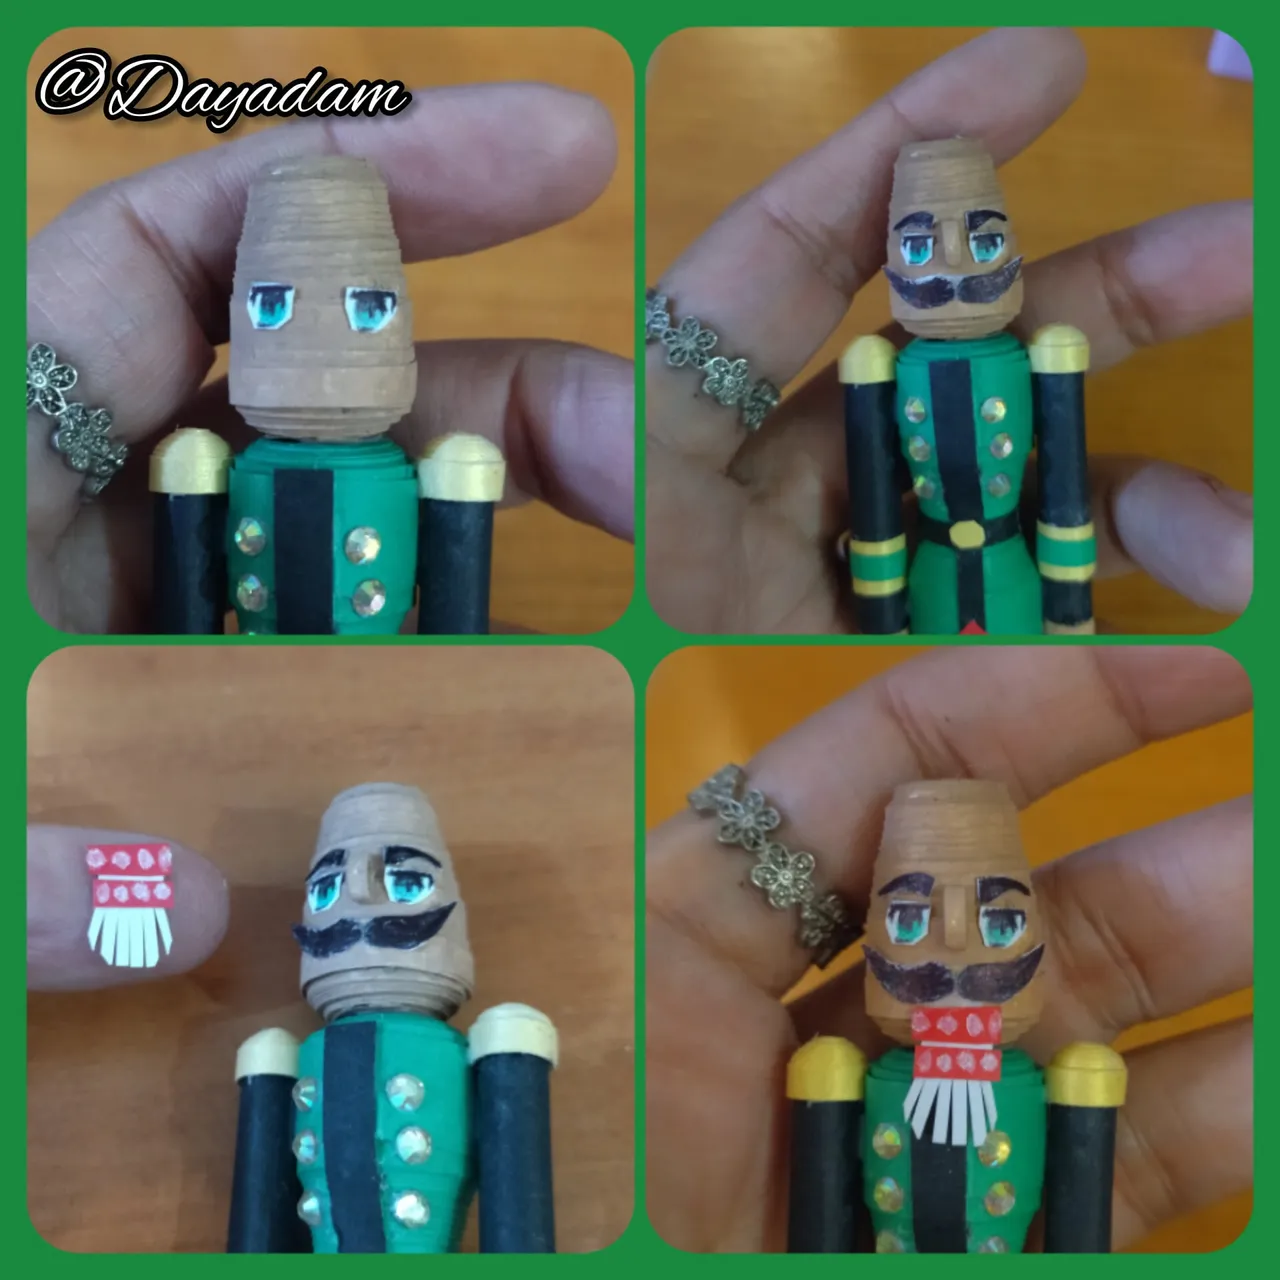
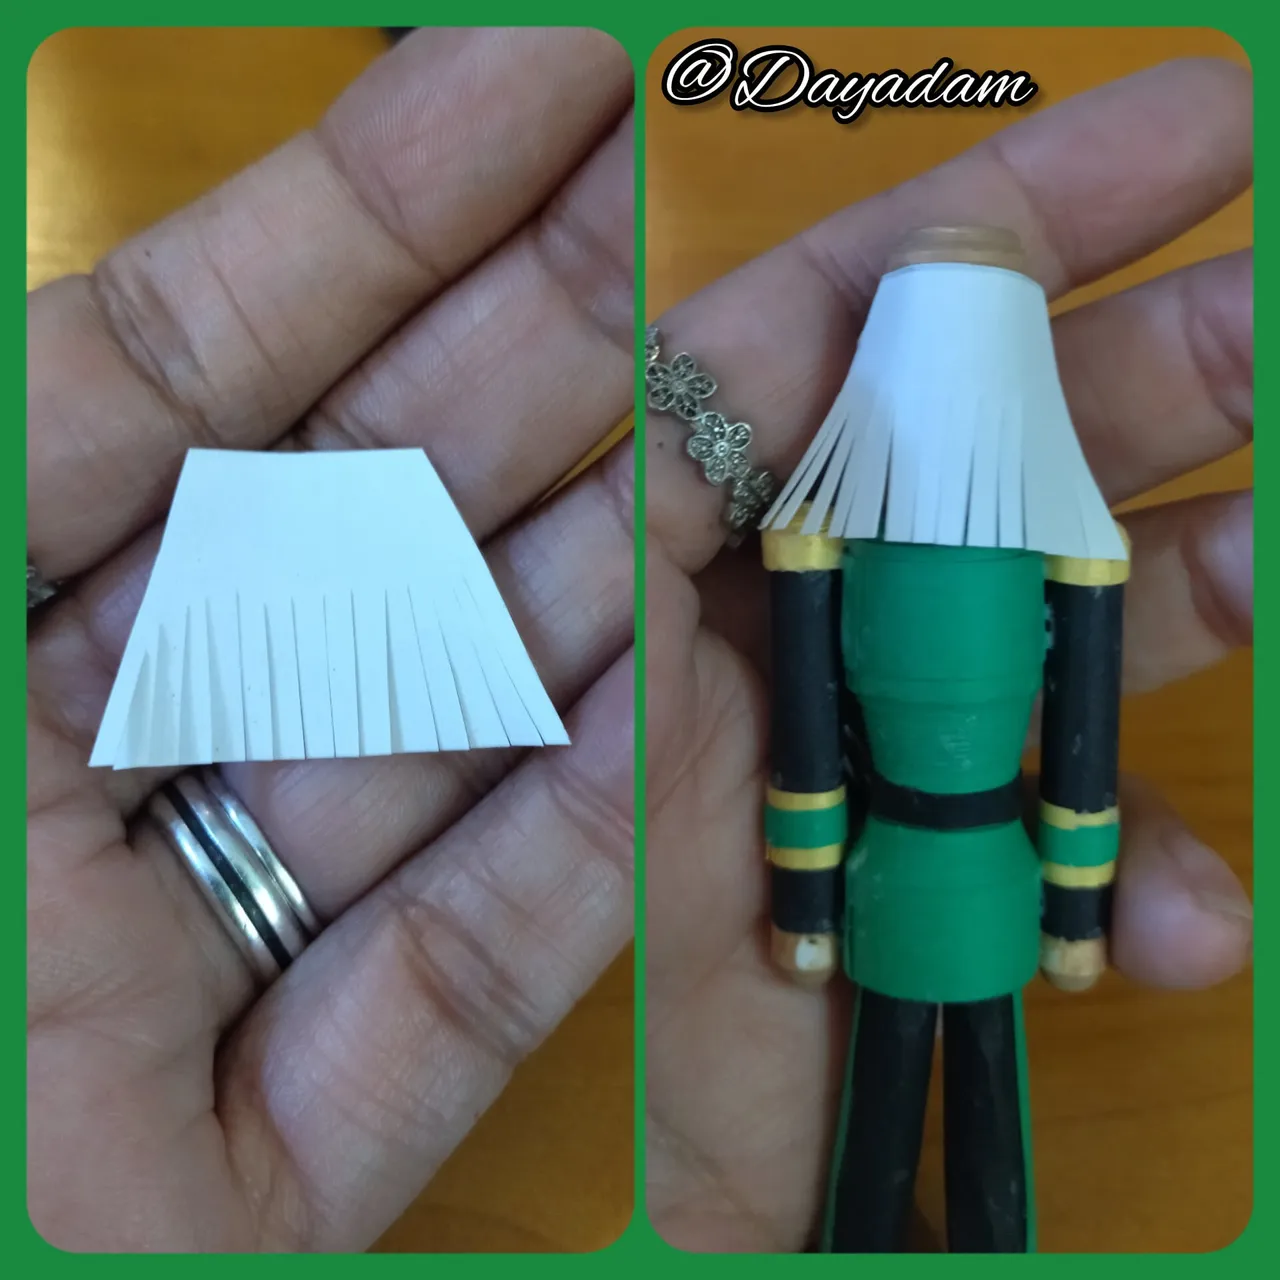
- At this point I decided to glue the eyes, eyebrows, nose that I made from a small quilling skin colored circle, whiskers, plus the mouth and beard to the nutcracker that I also made with a small piece of red ribbon plus a white one that I cut vertically with a scissors, this to be able to calculate more or less how to make the hat. (Everything that goes on the face can be made in any way you like).
- To make the hair, take a piece of white cardboard from which I cut a cone and cut it into peaks vertically, glue it on the back of the nutcracker's head.
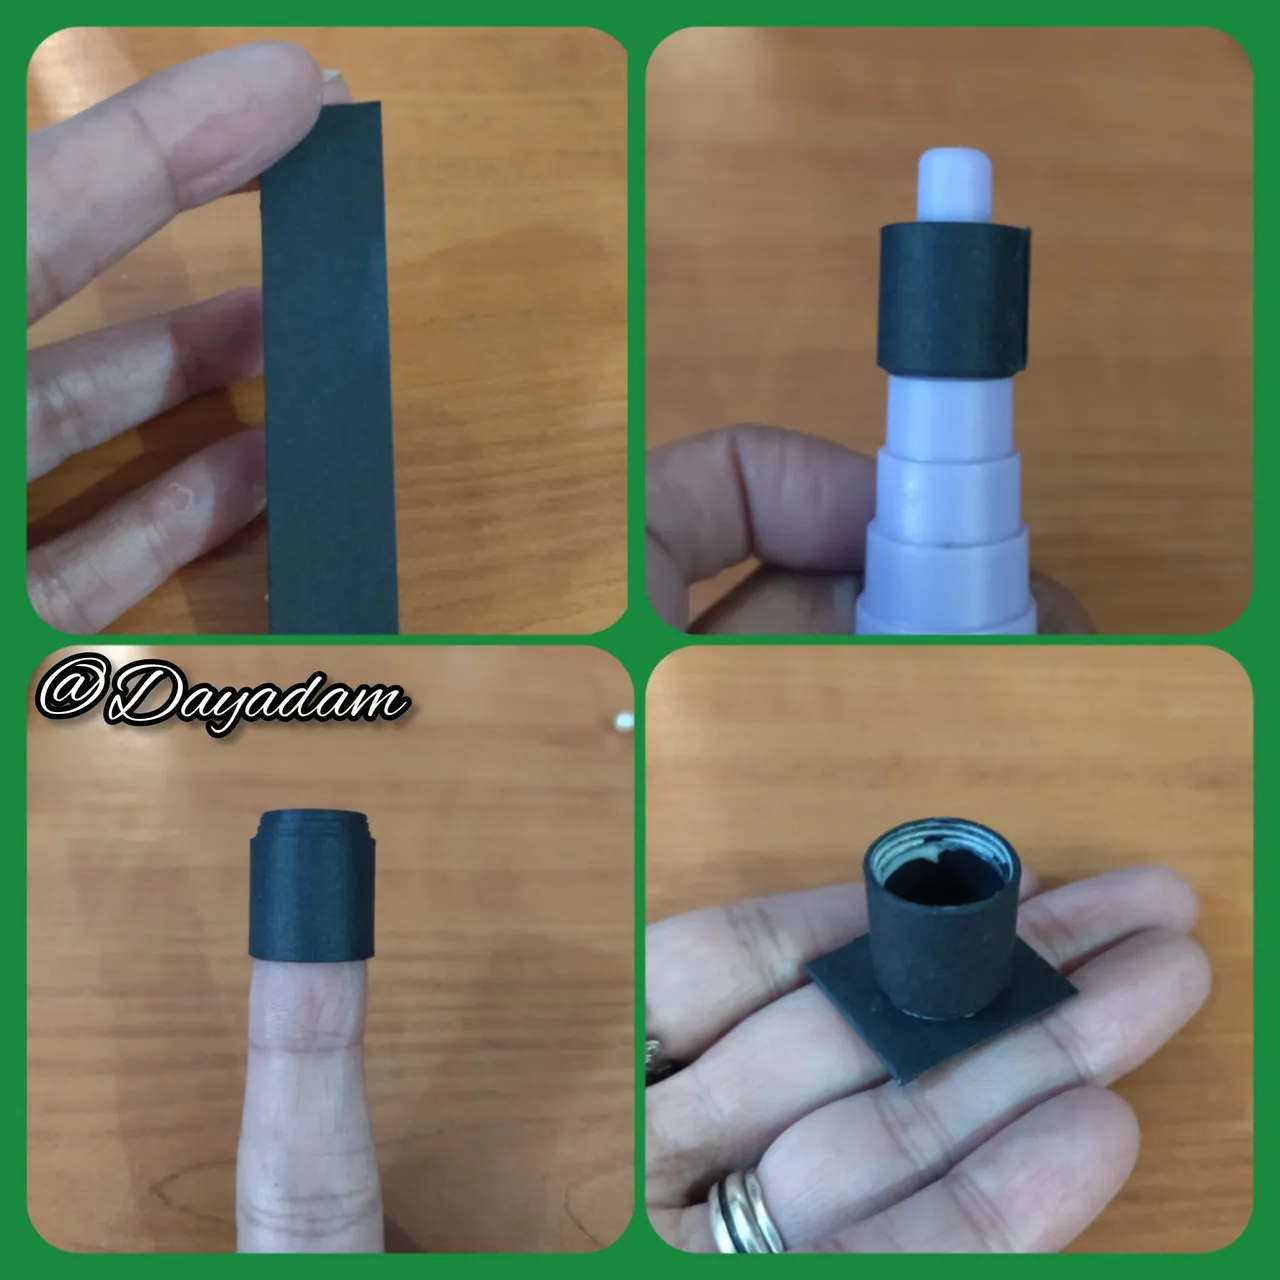
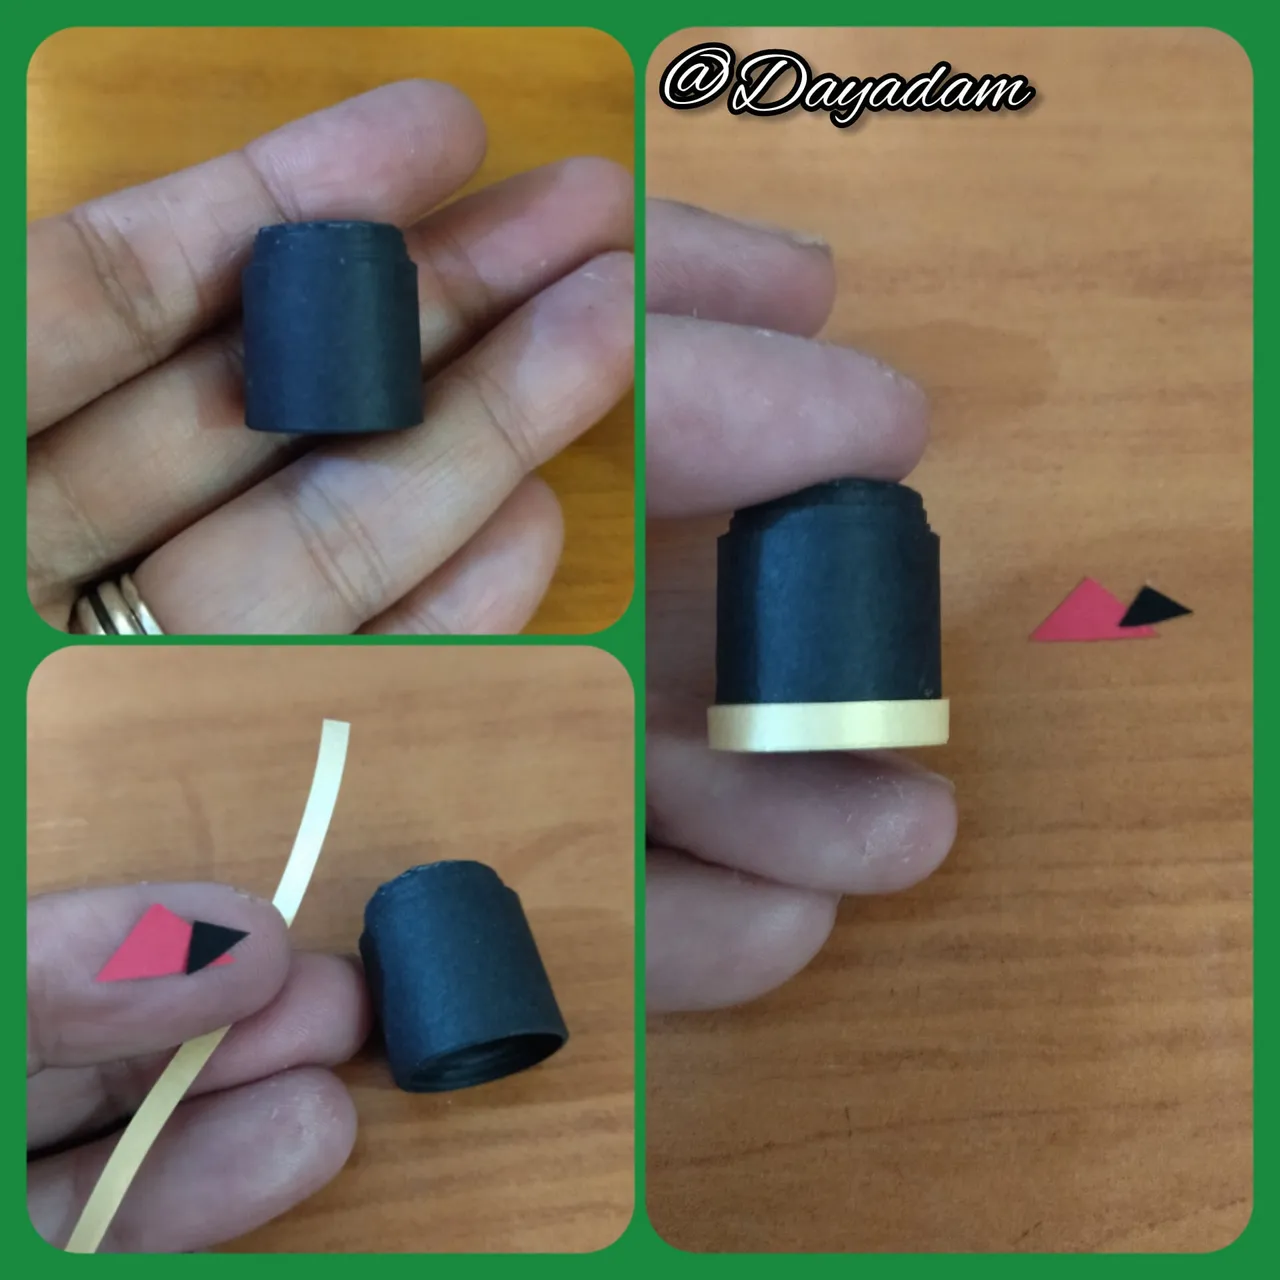
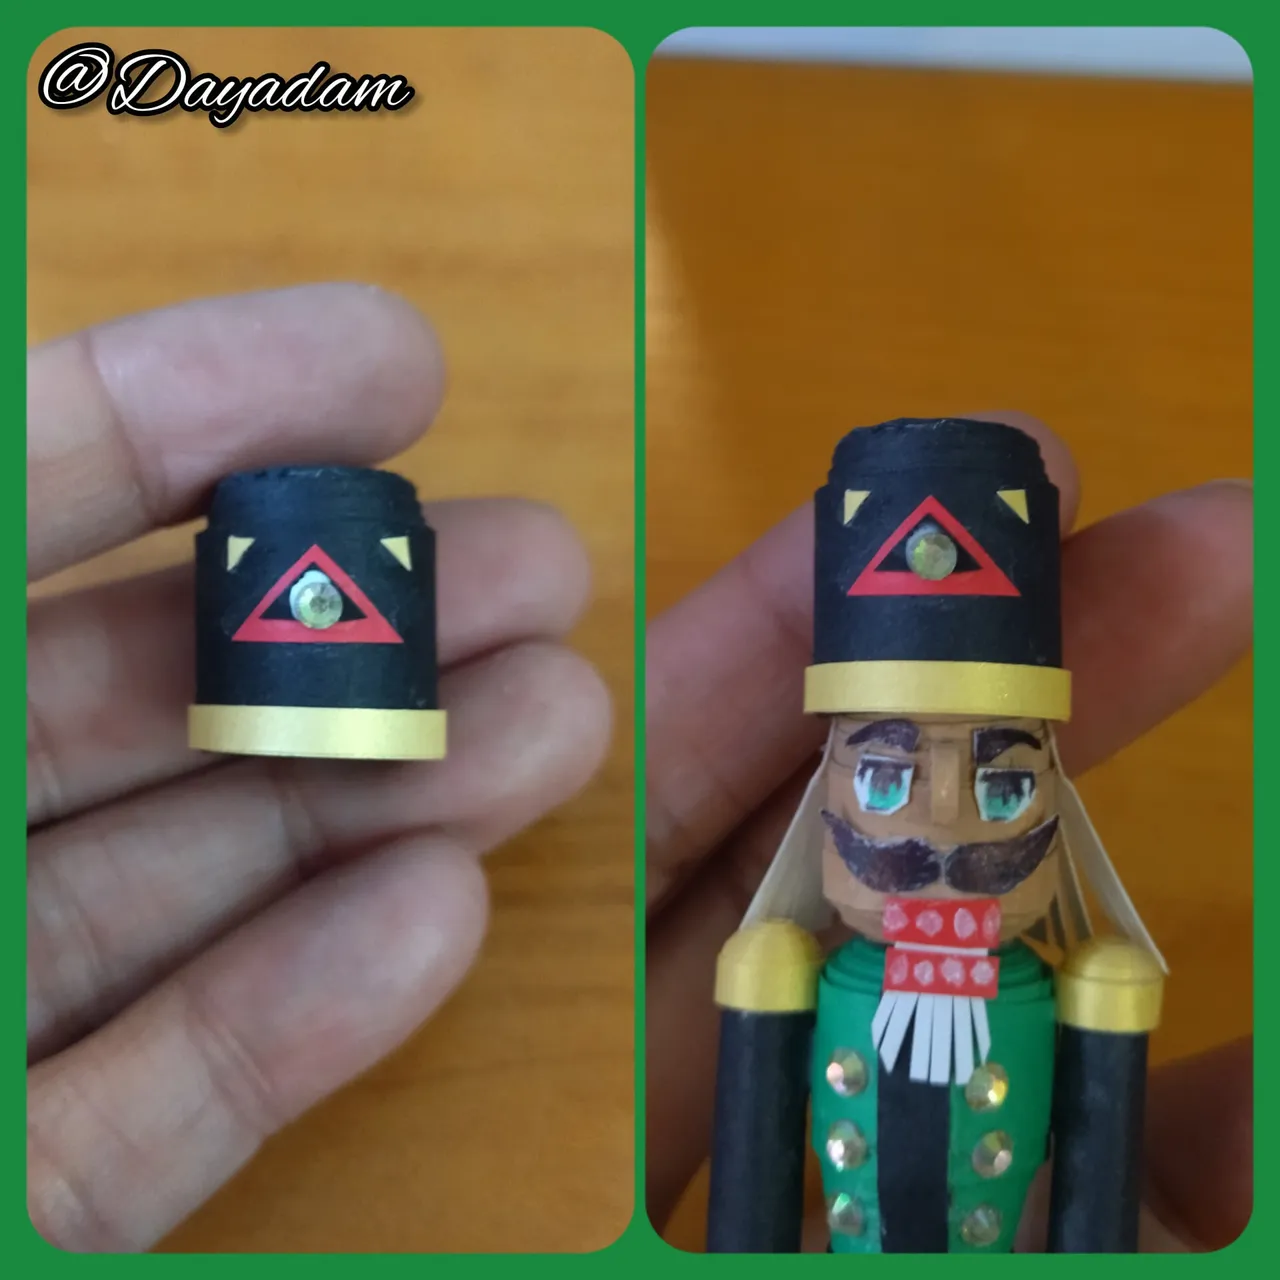
- I made the hat by cutting a strip of black quilling 1.5cms wide which I rolled in a circle mold, when the piece was ready I went up a little with my finger to give it a cone type effect on the top, then I glued a piece of black quilling and cut it out.
- With pieces of ribbons and appliqués I decorated the hat, and glued it to the head of the nutcracker.
• En este punto decidí pegar los ojos, cejas, nariz que hice a partir de un pequeño circulo color piel de quilling, bigotes, mas la boca y barba al cascanueces que también elabore con un pequeño trozo de cinta roja mas una blanca que recorte en vertical con una tijera, esto para poder calcular mas o menos como hacer el sombrero.(Todo lo que va en la cara lo pueden elaborar de la forma en que mas gusten).
• Para hacer el cabello tome un trozo de cartulina blanca del cual recorte un cono el cual corte en picos de manera vertical, pegue en la parte de atrás de la cabeza del cascanueces.
• Realice el sombrero cortando una tira de quilling negro de 1.5cms de ancho el cual enrolle en un molde para círculos, al esta lista la pieza subí un poco con el dedo para darle un efecto tipo cono en la parte de arriba, luego pegue de un trozo de quilling negro y recorte.
• Con trozos de cintas y apliques decore el sombrero, y pegue a la cabeza del cascanueces.
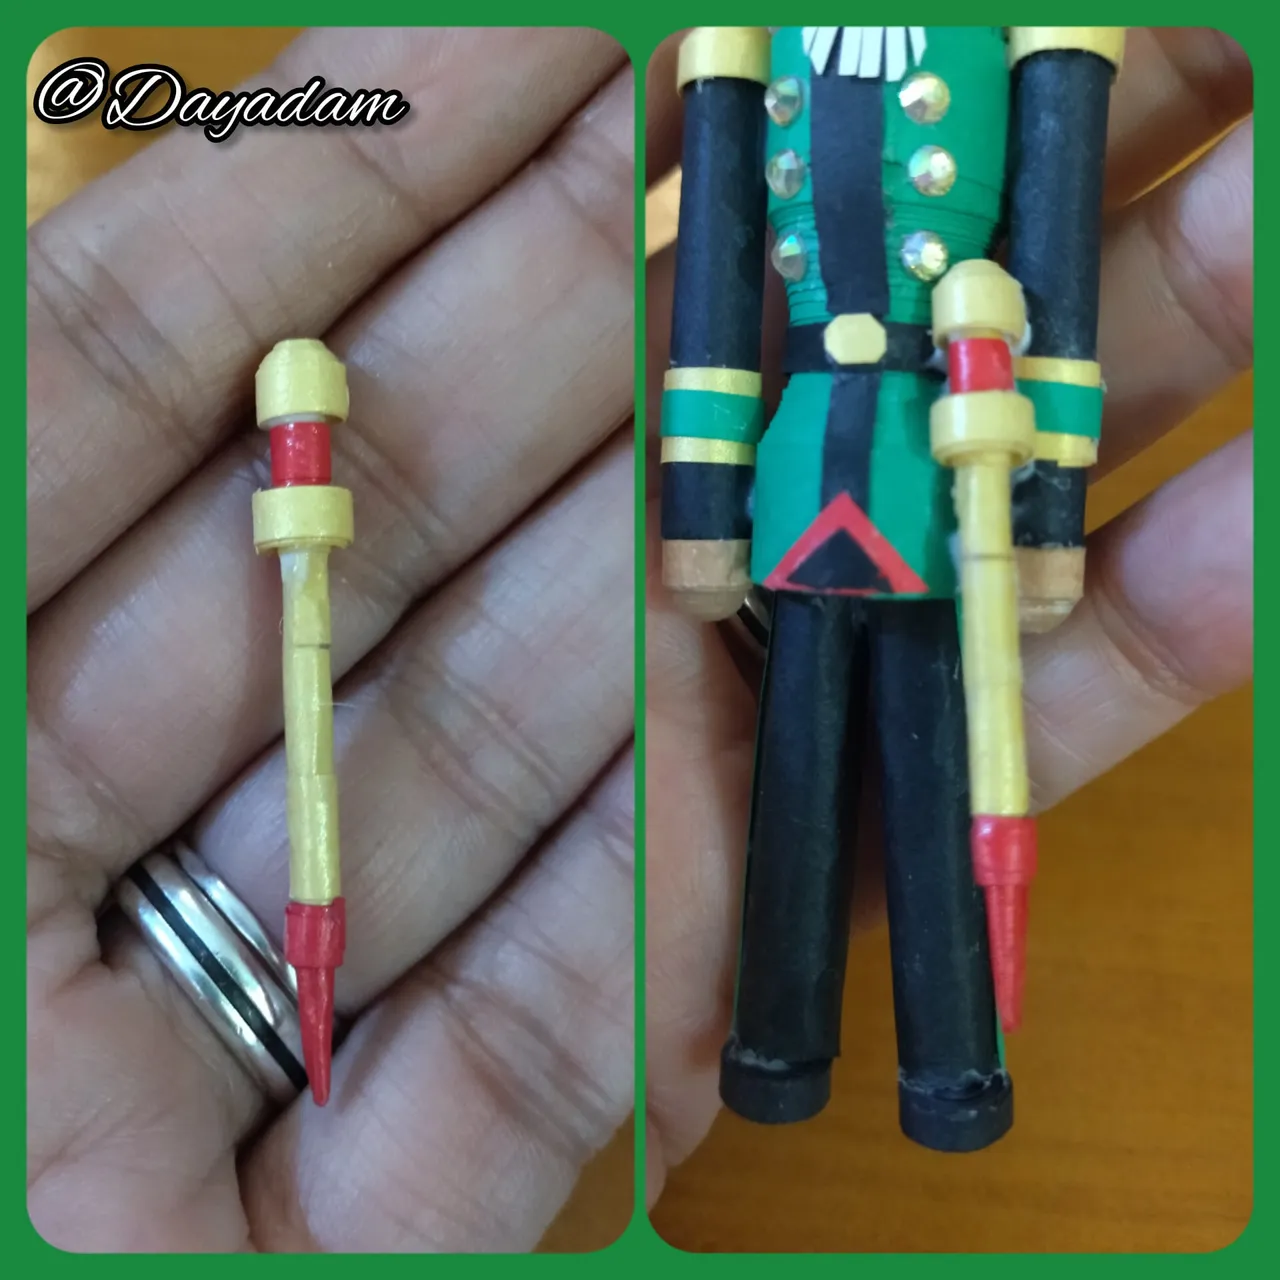
- I decided to make a kind of sword with a tall stick which I decorated with colored ribbons to my liking.
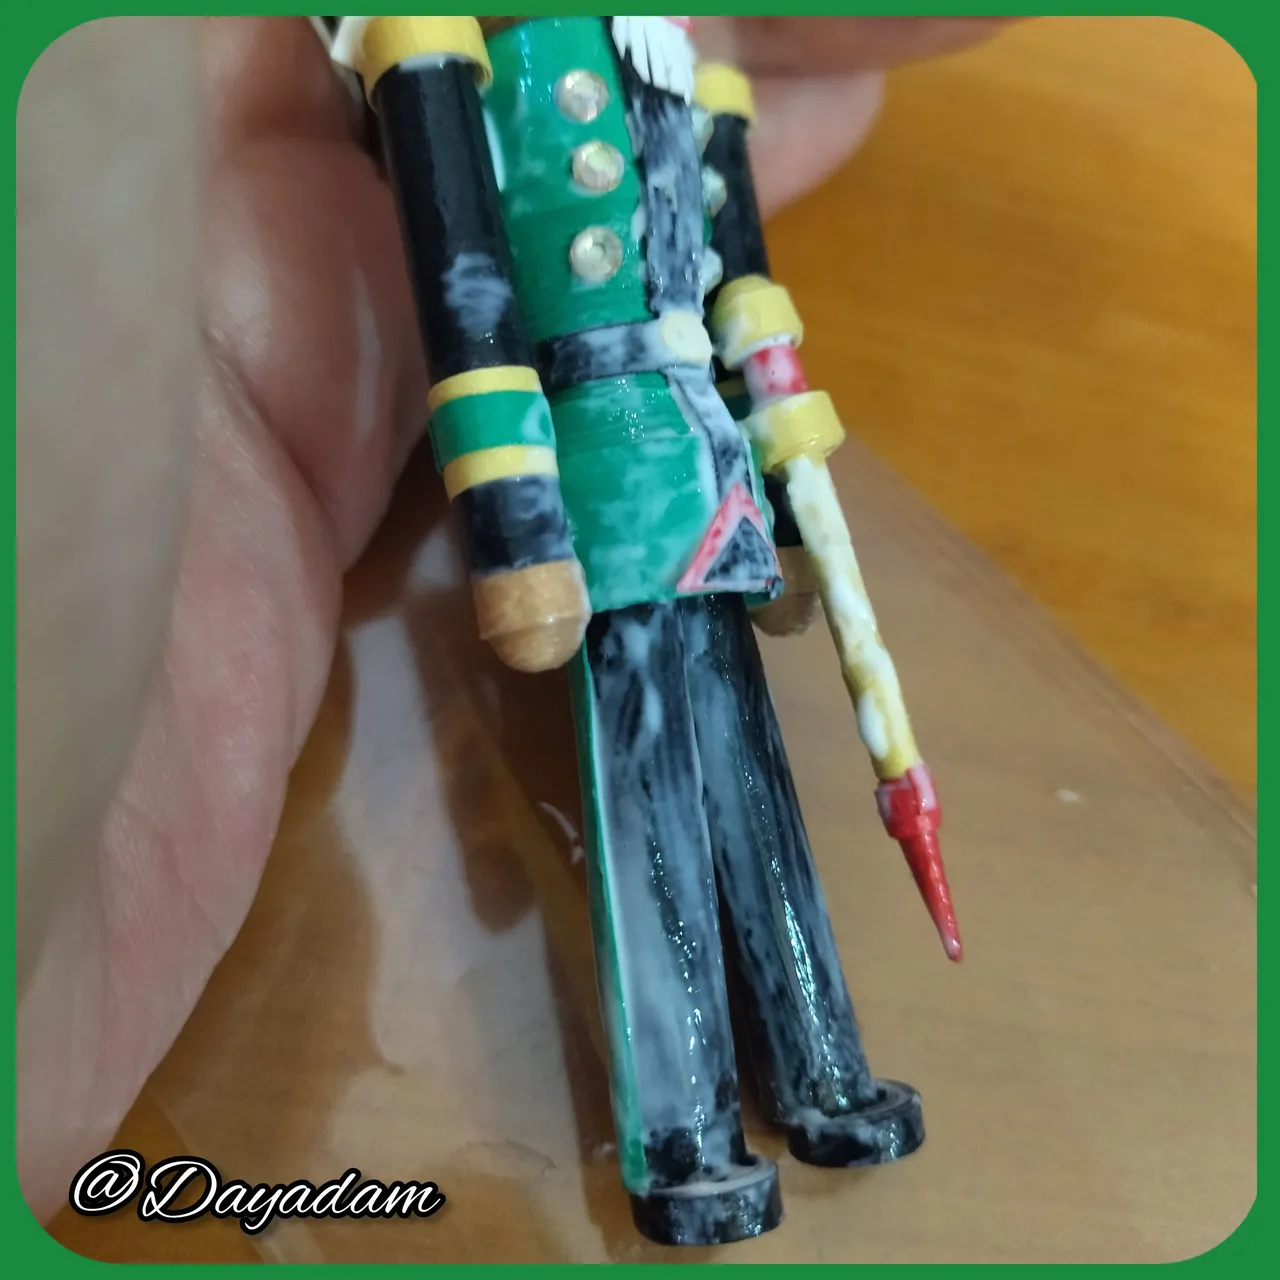
- Finally I applied a layer of white glue to the doll to give it shine and protection.
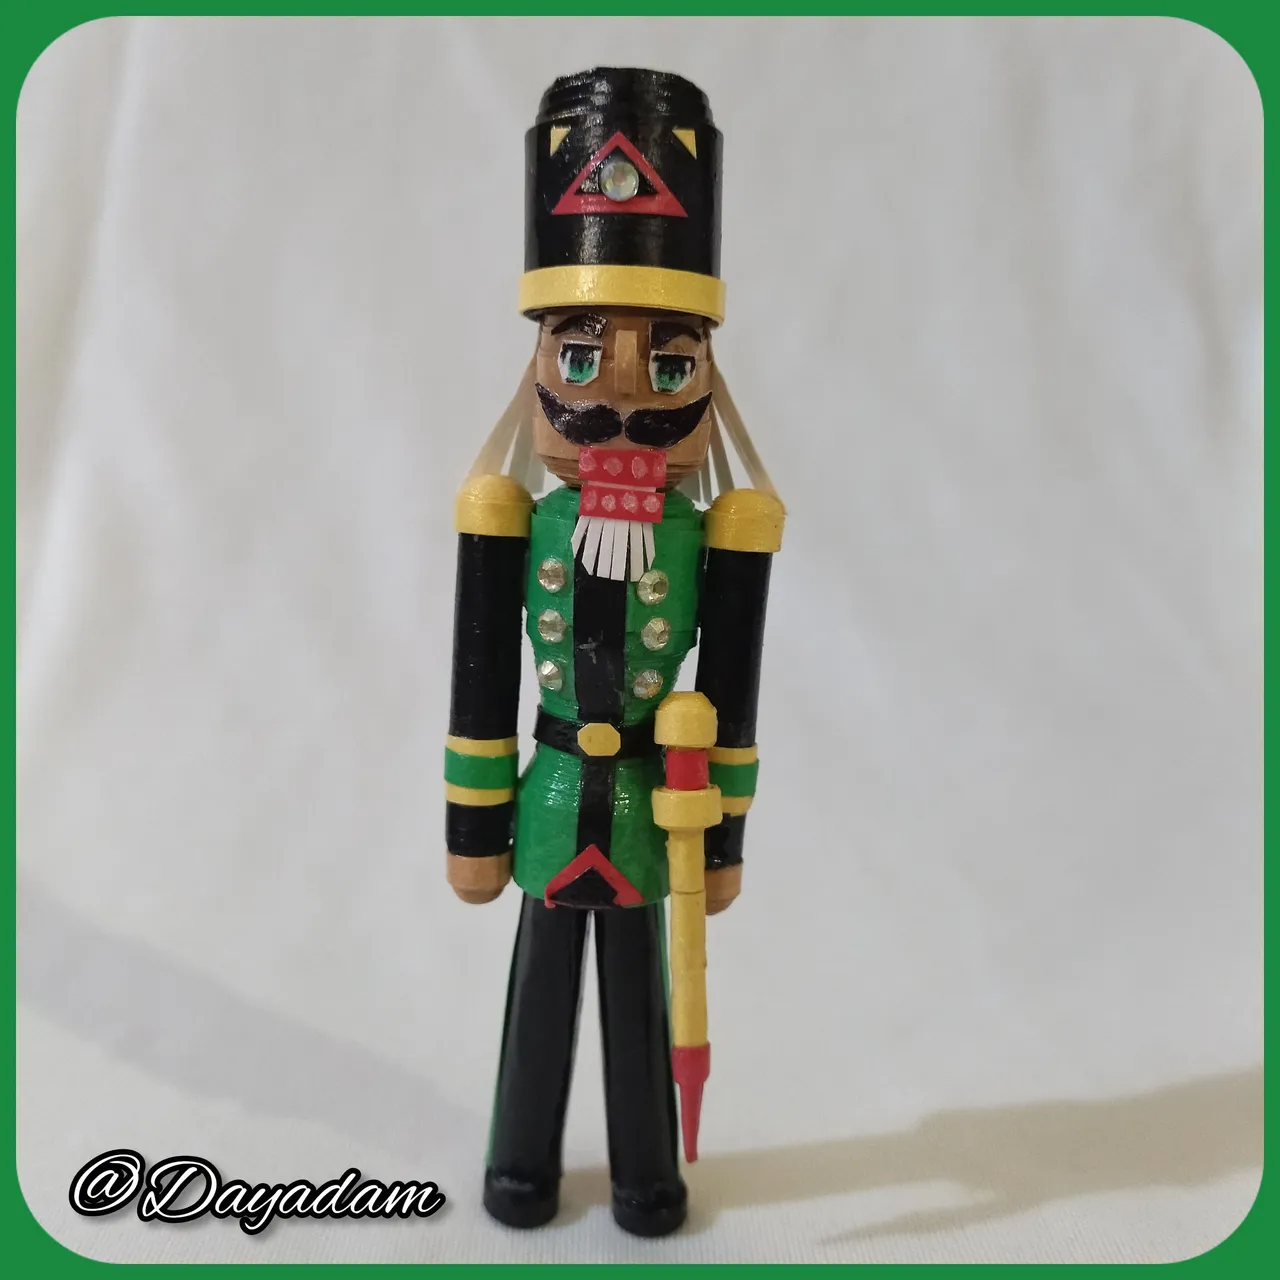
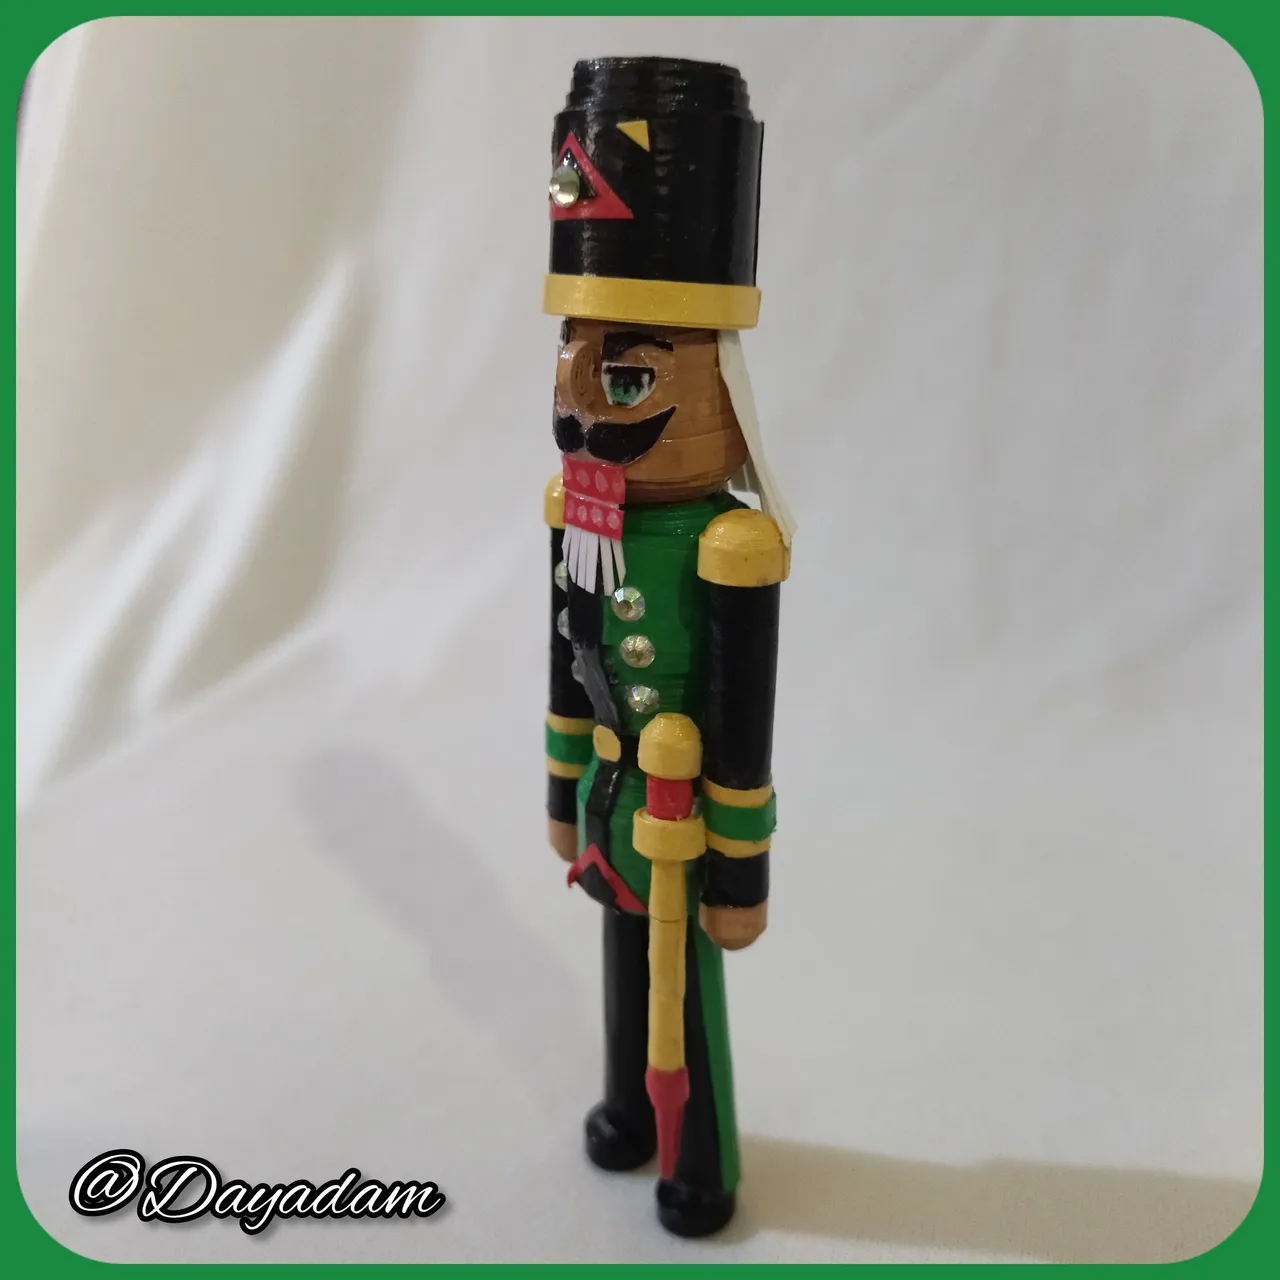
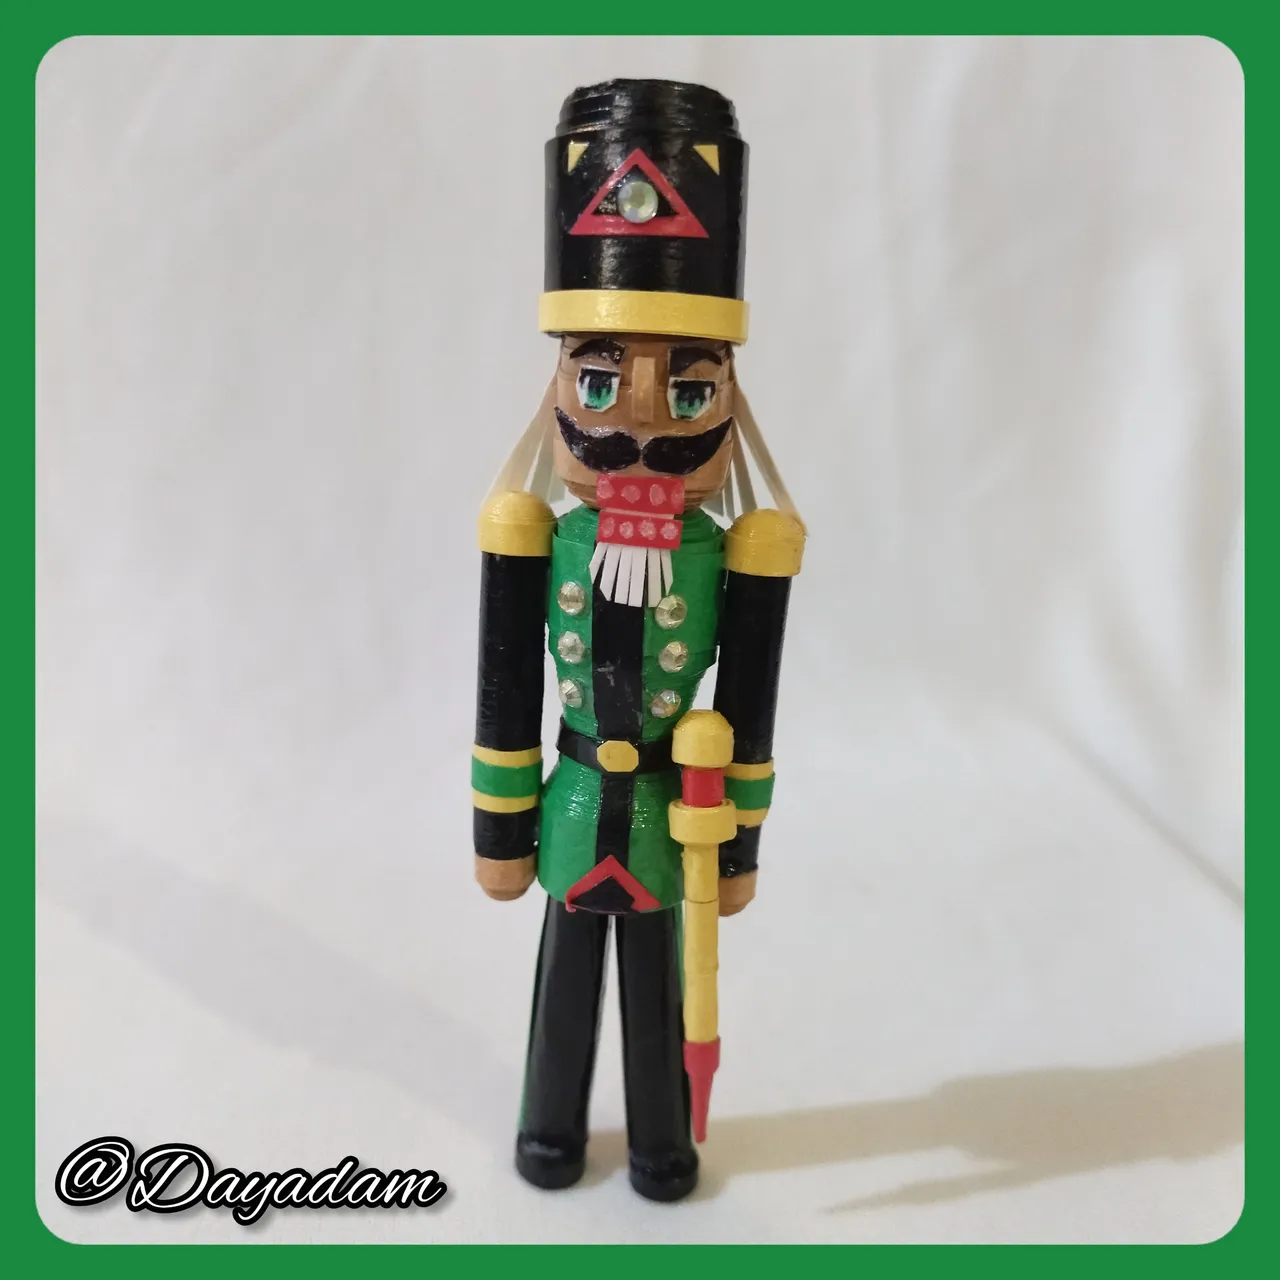
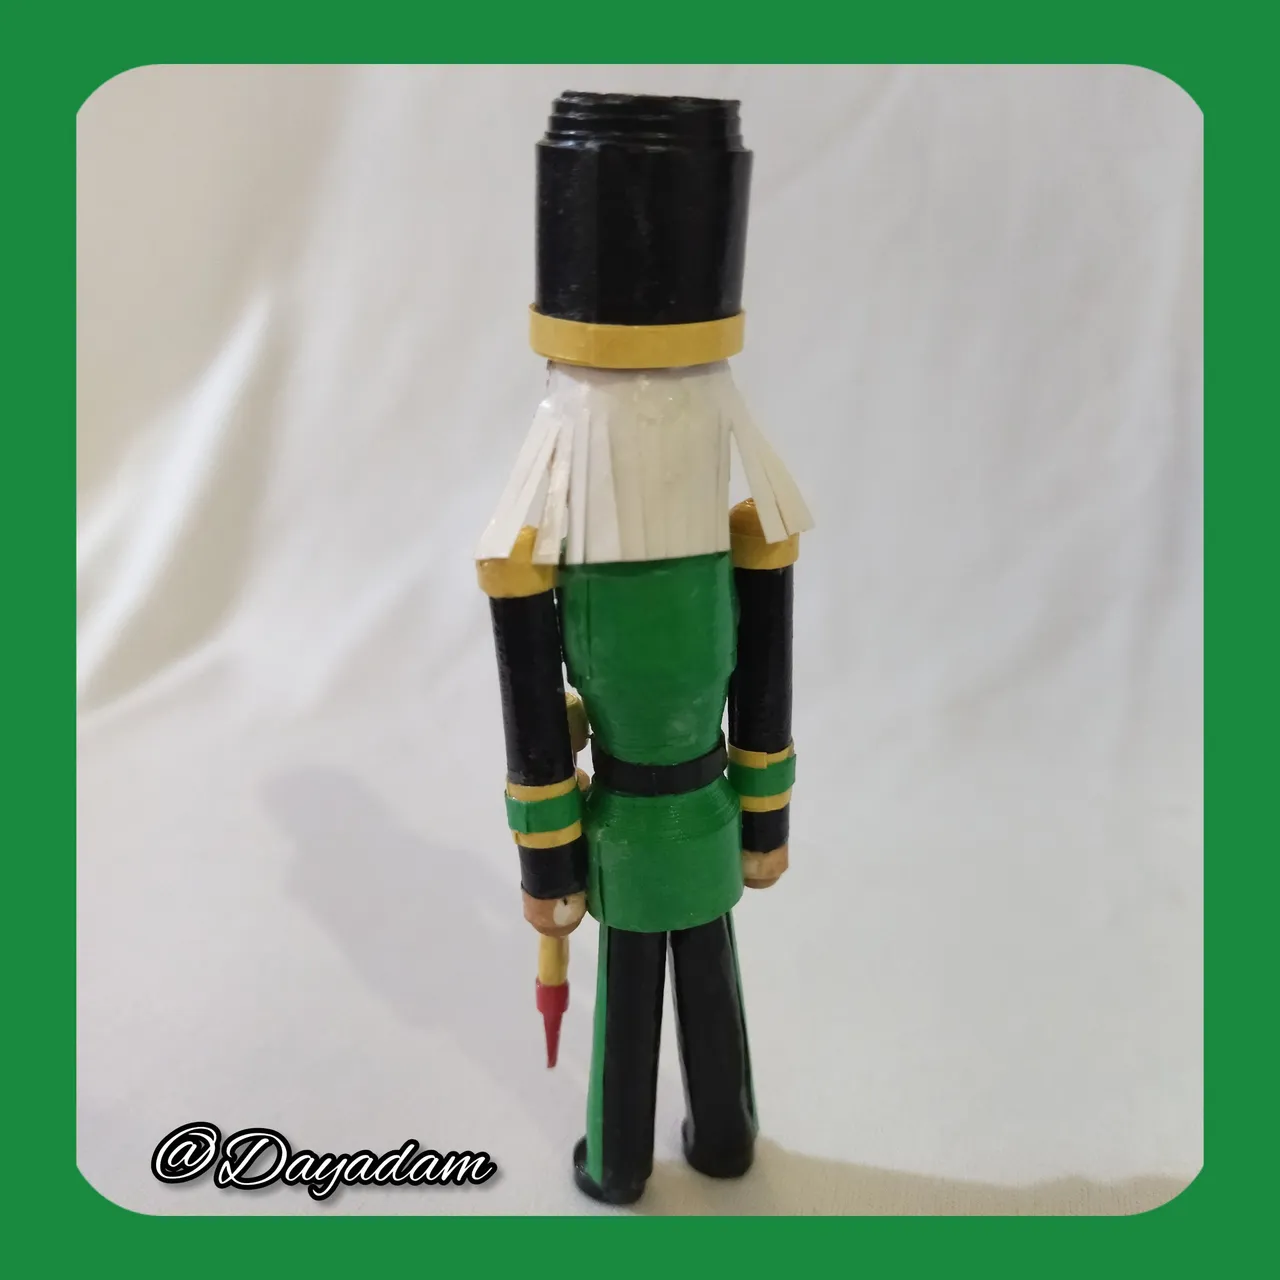
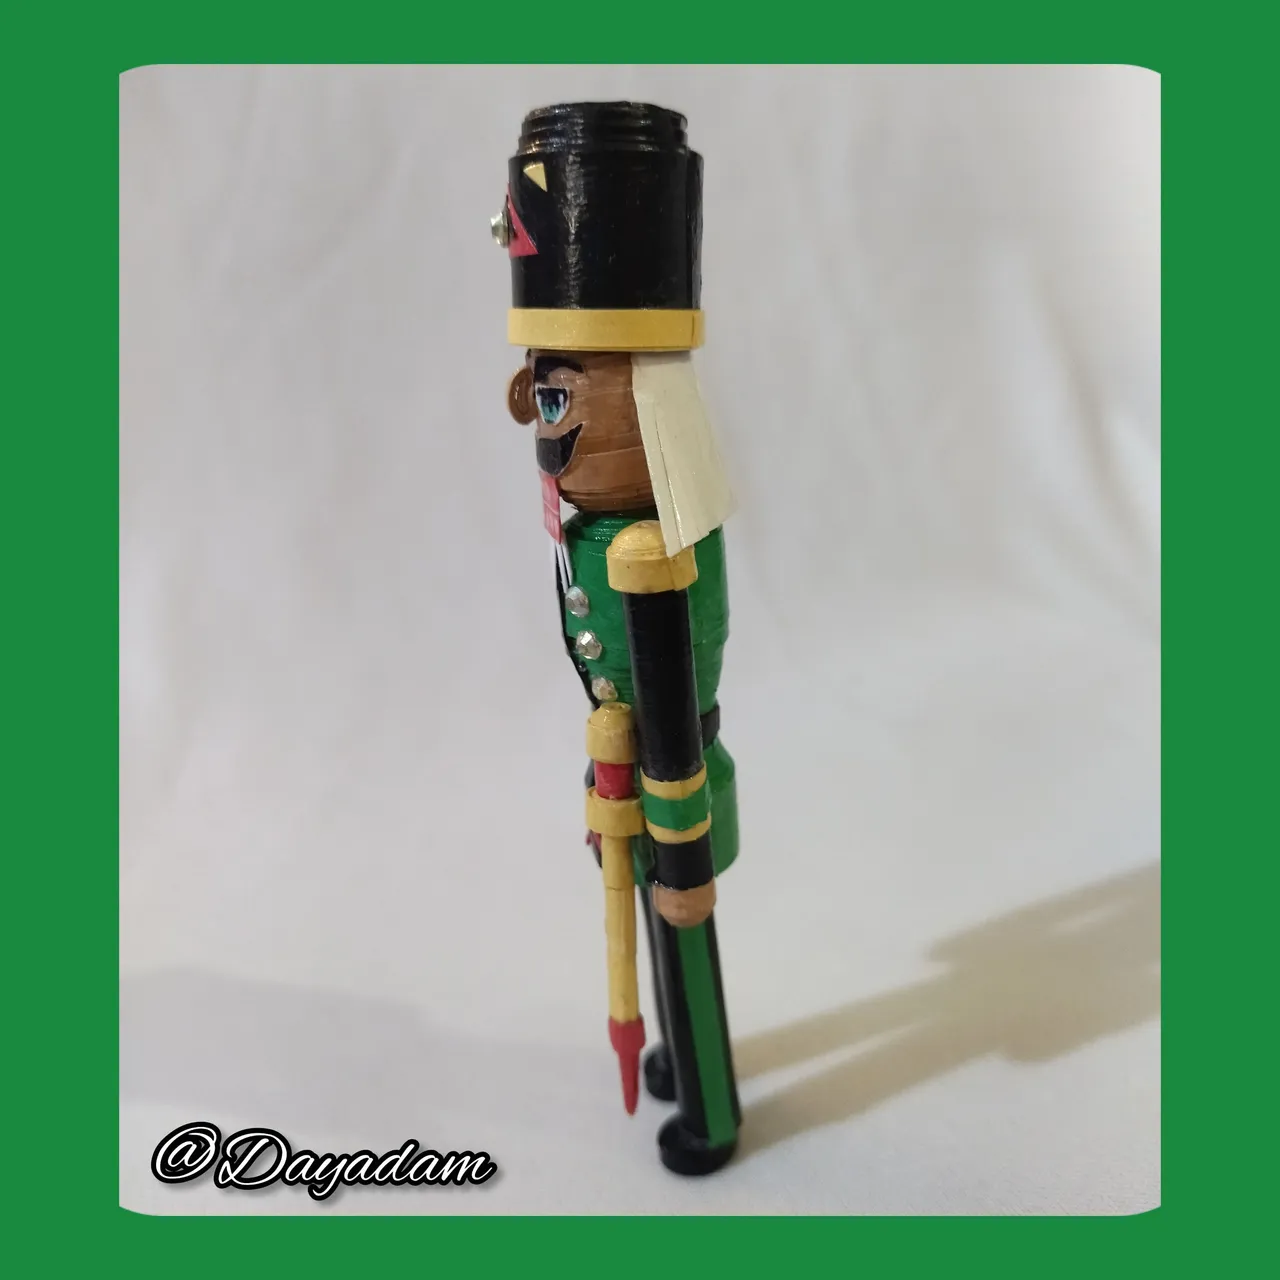
This is how this small 3D decorative nutcracker in the quilling technique is ready.
• Decidí realizar una especie de espada con un palillo de altura el cual decore con cintas de colores a mi gusto.
• Para finalizar aplique una capa de pega blanca al muñeco para darle brillo, y protección.
De esta manera esta listo este pequeño cascanueces decorativo en 3D en la técnica quilling.


What did you think, did you like it?
I hope you did, I hope you liked my explanation, procedure and photos, I made them with love for you.
"Let out that muse that inspires you, and let your imagination fly".
Thank you all, see you next time 🎄🎅✨.
¿Que les pareció, les gustó?
Espero que sí, que les haya gustado mi explicación, procedimiento y fotos, los hice con mucho cariño por y para ustedes.
"Deja salir esa musa que te inspira, y deja volar tu imaginación".
Gracias a todos, nos vemos en la próxima.🎄🎅✨
Todas las fotos usadas en este post son de mi autoría y han sido sacadas en mi celular personal un Redmi 9T, editadas en InShot y Canva Banner y separador hecho por mí en Canva Traducido con la ayuda de DeepL
