❤️❣️❤️♥️💓💗❤️❣️❤️💓💗
 ❤️❣️❤️♥️💓💗❤️❣️❤️💓💗
Hello beautiful people, what a pleasure to be able to share this creative space with you again, I wish you had a nice Christmas and hope for a happy new year full of joy and good health.
Hola qué tal gente bonita que gusto poder compartir nuevamente este espacio creativo junto a ustedes deseo de mi parte hayan tenido una bonita Navidad esperando un próximo año nuevo venturoso lleno de alegría y mucha salud.
❤️❣️❤️♥️💓💗❤️❣️❤️💓💗
 ❤️❣️❤️♥️💓💗❤️❣️❤️💓💗
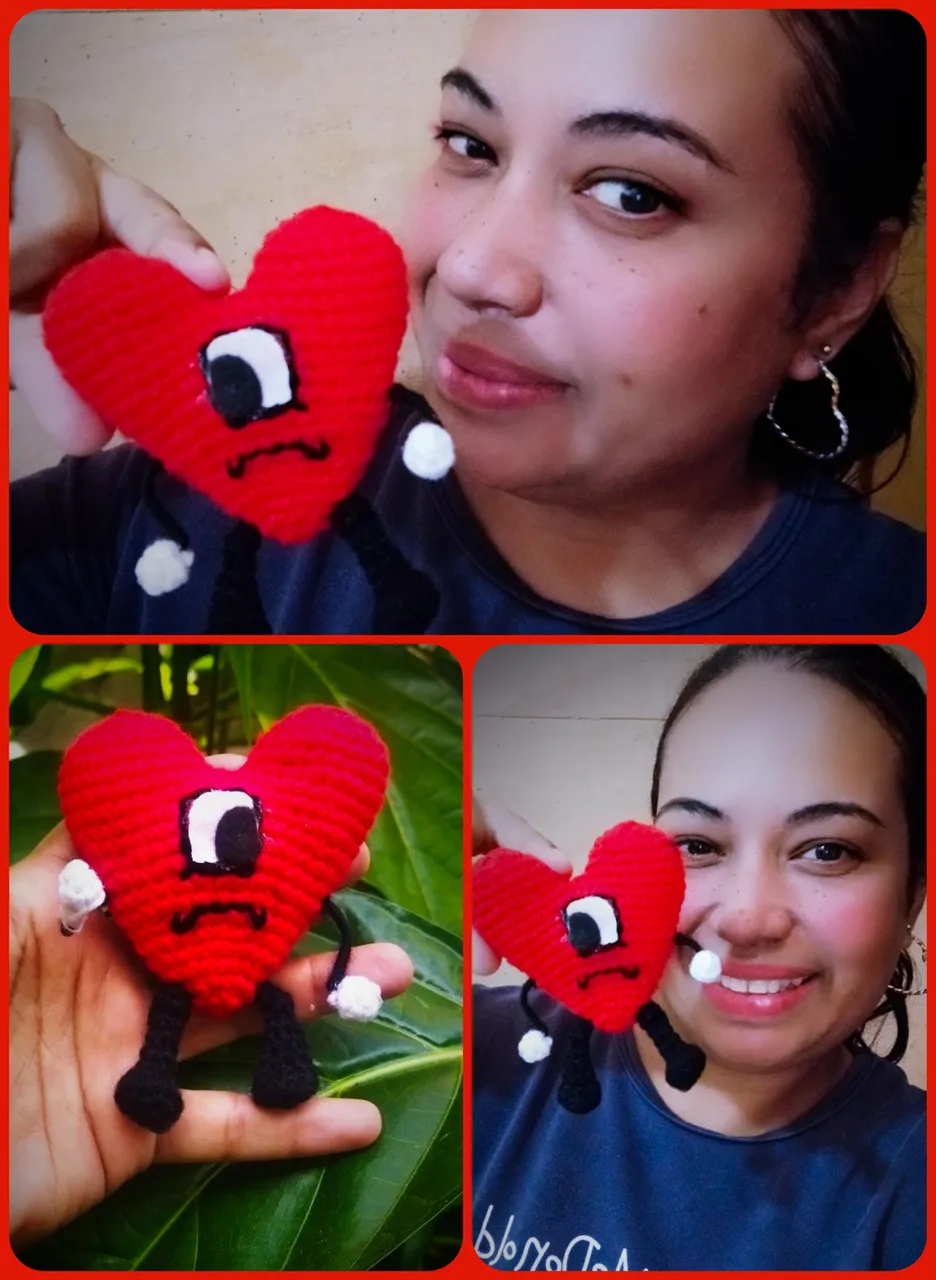
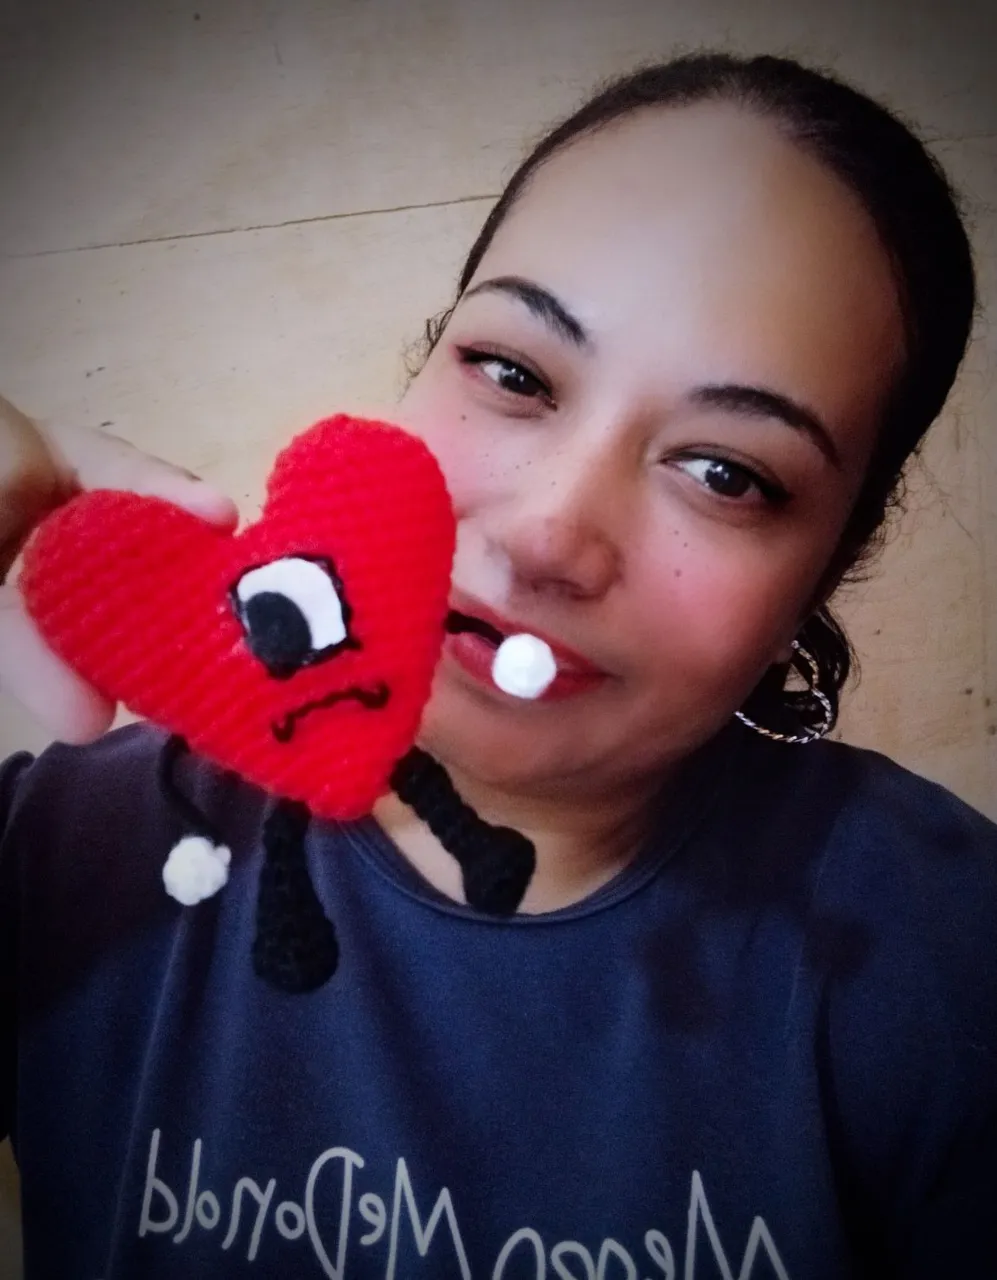
Today I share with you the cover of the album summer without you of the singer bad Bunny crocheted in the amigurumi technique. It is ideal to give as a gift or as a small souvenir to a very special person in the Christmas season we are living.
Hoy día les comparto la portada del álbum verano sin ti del cantante bad Bunny tejido a crochet en la técnica amigurumi. Es ideal para darlo como regalo o un pequeño recuerdo a un ser muy especial propicio en la época de navidad que estamos viviendo.
❤️❣️❤️♥️💓💗❤️❣️❤️💓💗
 ❤️❣️❤️♥️💓💗❤️❣️❤️💓💗
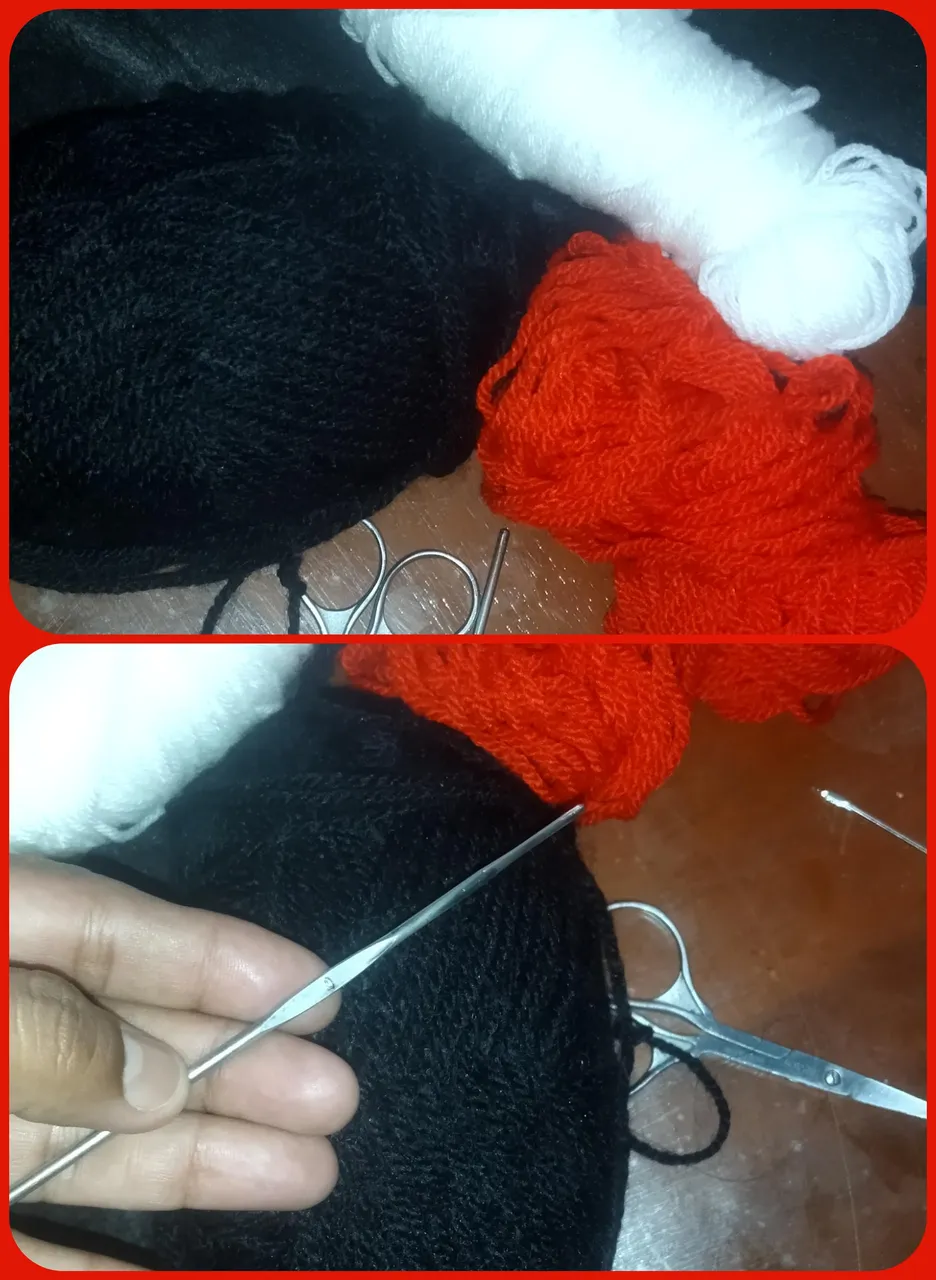
Its elaboration is very simple and fast here I show you the step by step but first I show you the materials that we are going to use.
Su elaboración es muy sencilla y rápida aquí les muestro el paso a paso pero primero les enseñó los materiales que vamos a utilizar.
We are going to use red, black and white wool, hypoallergenic stuffing, a piece of moldable wire, a little bit of black and white foami, black embroidery thread, a number 0 crochet needle and a wool needle.
Vamos a utilizar lana en colores rojo, negro y blanco, relleno hipoalergénico, un pedacito de alambre moldeable, un poquito de foami blanco y negro, hilo para bordar en tono negro, una aguja crochet número 0 y una aguja lanera.
❤️❣️❤️♥️💓💗❤️❣️❤️💓💗
 ❤️❣️❤️♥️💓💗❤️❣️❤️💓💗
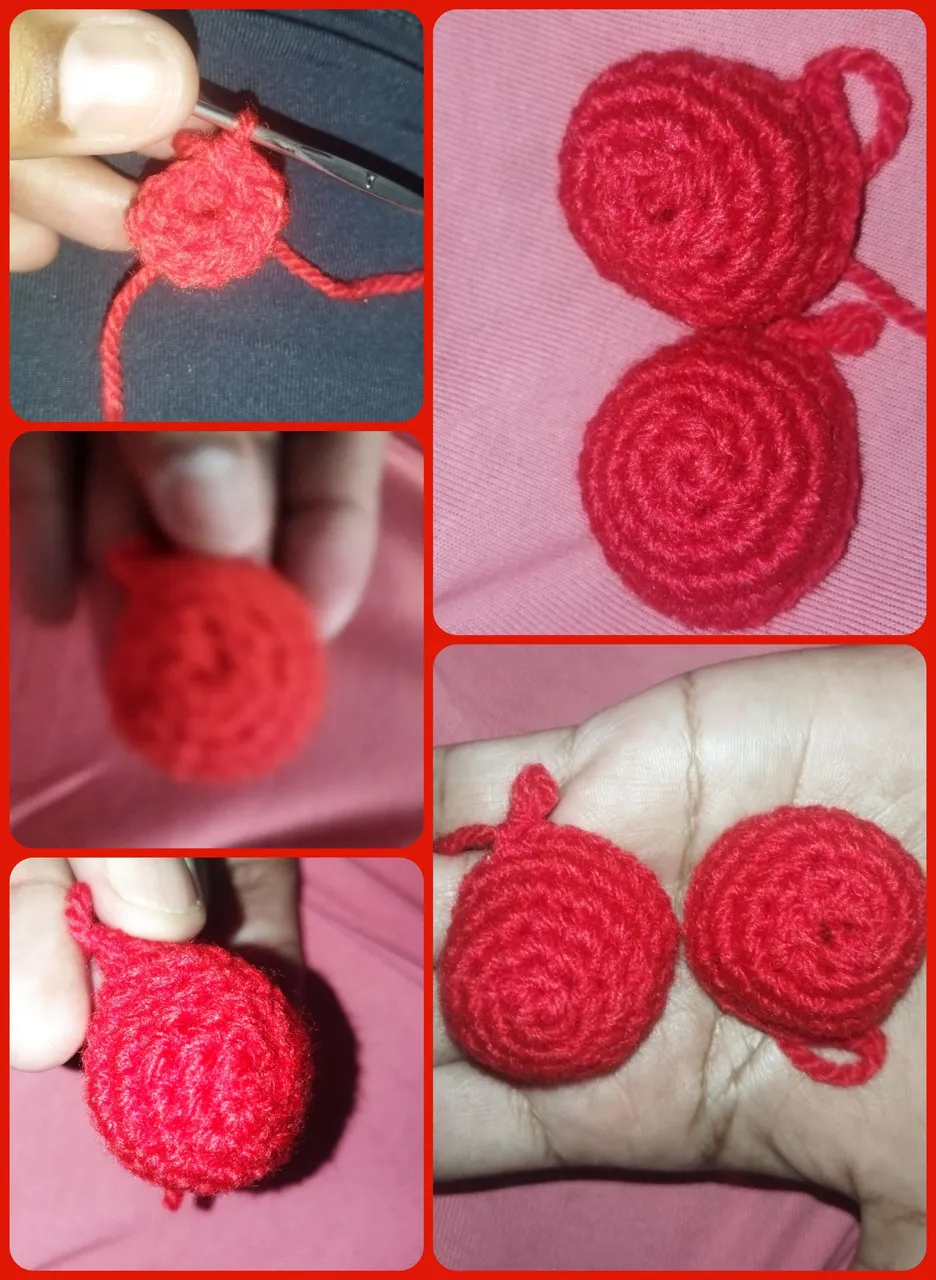
We are going to start with the red yarn to create the heart shape first we are going to make a magic ring of 6 stitches in the first row for the second row we are going to make an increase of stitches for a total of 12 single crochet stitches the third row we are going to make the sequence of one single crochet stitch one increase for the whole row for a total of 18 stitches we are going to have from the fourth to the sixth row the same with 18 stitches. Making two identical pieces with the same amount of stitches.
Vamos a iniciar con la lana roja para que creando la forma del corazón en primer lugar vamos a hacer un anillo mágico de 6 puntos en la primera vuelta para la segunda vamos a hacer un aumento de puntos para un total de 12 puntos bajos la tercera vuelta hacemos la secuencia de un punto bajo Un aumento por toda la vuelta para un total de 18 puntos vamos a tener de la cuarta a la sexta vuelta igual con 18 puntos. Realizando dos piezas idénticas con la misma cantidad de puntos.
❤️❣️❤️♥️💓💗❤️❣️❤️💓💗
 ❤️❣️❤️♥️💓💗❤️❣️❤️💓💗
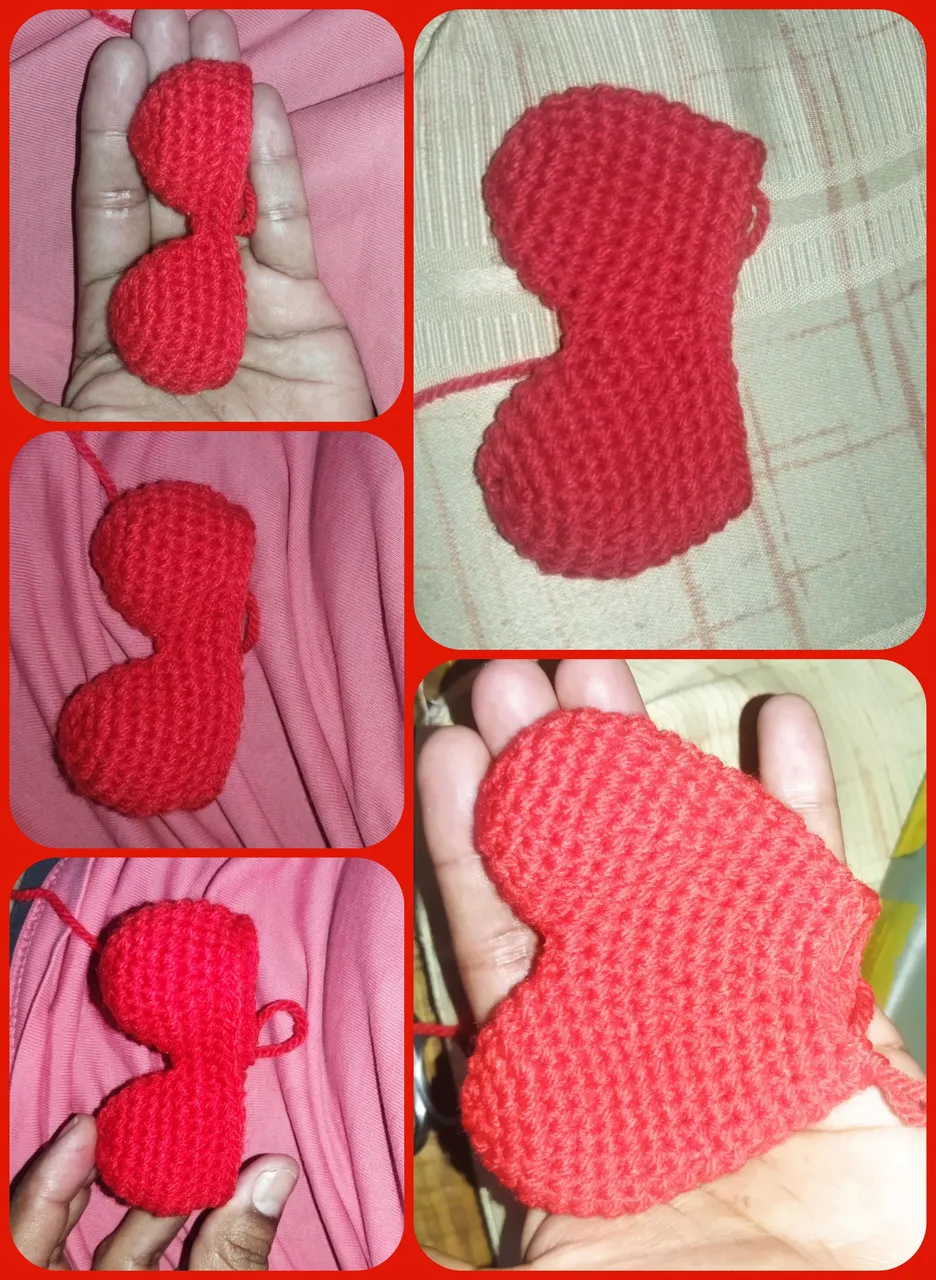
Once we have the two pieces ready we will proceed to join with a slipped stitch we make the 18 stitches of each one and we will go repeating as we go along the sequence of one low stitch, One increase, Then we make the next of the same 24 stitches the next two low stitches One increase the next we will make equal the same amount of 30 low stitches, the next three low stitches one increase for a total of 36 and another round of the same 36 stitches.
Una vez que tenemos lista las dos piezas vamos a proceder a unir con un punto deslizado hacemos los 18 puntos de cada uno y vamos a ir repitiendo a medida que vamos avanzando la secuencia de un punto bajo, Un aumento, Luego hacemos la próxima de los mismos 24 puntos la siguiente dos puntos bajos Un aumento la siguiente vamos a hacer igual la misma cantidad de 30 puntos bajos, la próxima tres puntos bajos un aumento para un total de 36 y otra vuelta de los mismos 36 puntos.
❤️❣️❤️♥️💓💗❤️❣️❤️💓💗
 ❤️❣️❤️♥️💓💗❤️❣️❤️💓💗
When we reach this point we just need to perform the same operation but in reverse, that is to say with the decreases until we reach the 6 stitches, we will fill and close with the help of the knitting needle creating the shape of the heart.
Al llegar a este punto solo nos resta realizar la misma operación pero de madera al revés decir con las disminuciones hasta llegar a los 6 puntos, vamos a rellenar y a cerrar con la ayuda de la aguja lanera creando así la forma del corazón.
❤️❣️❤️♥️💓💗❤️❣️❤️💓💗
 ❤️❣️❤️♥️💓💗❤️❣️❤️💓💗
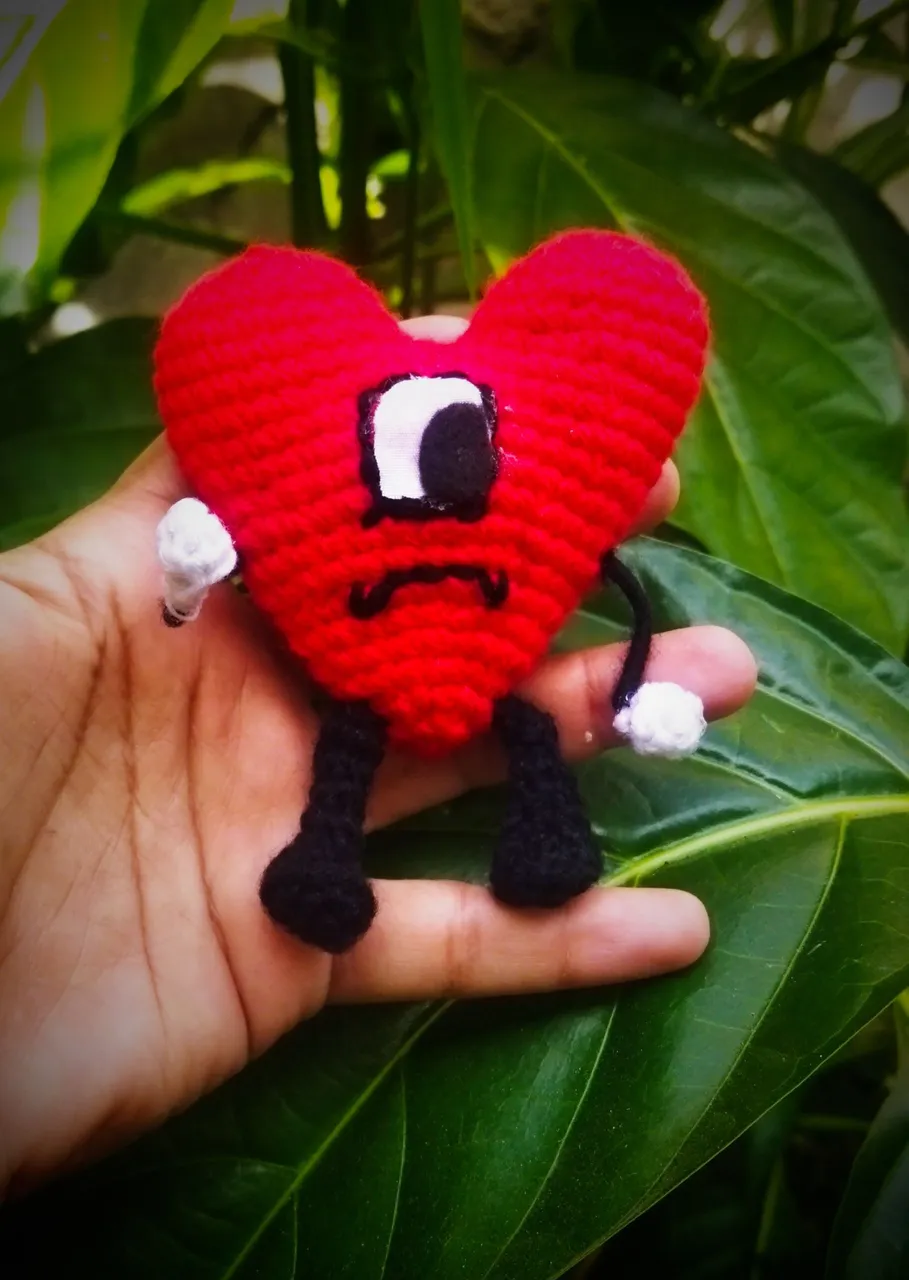
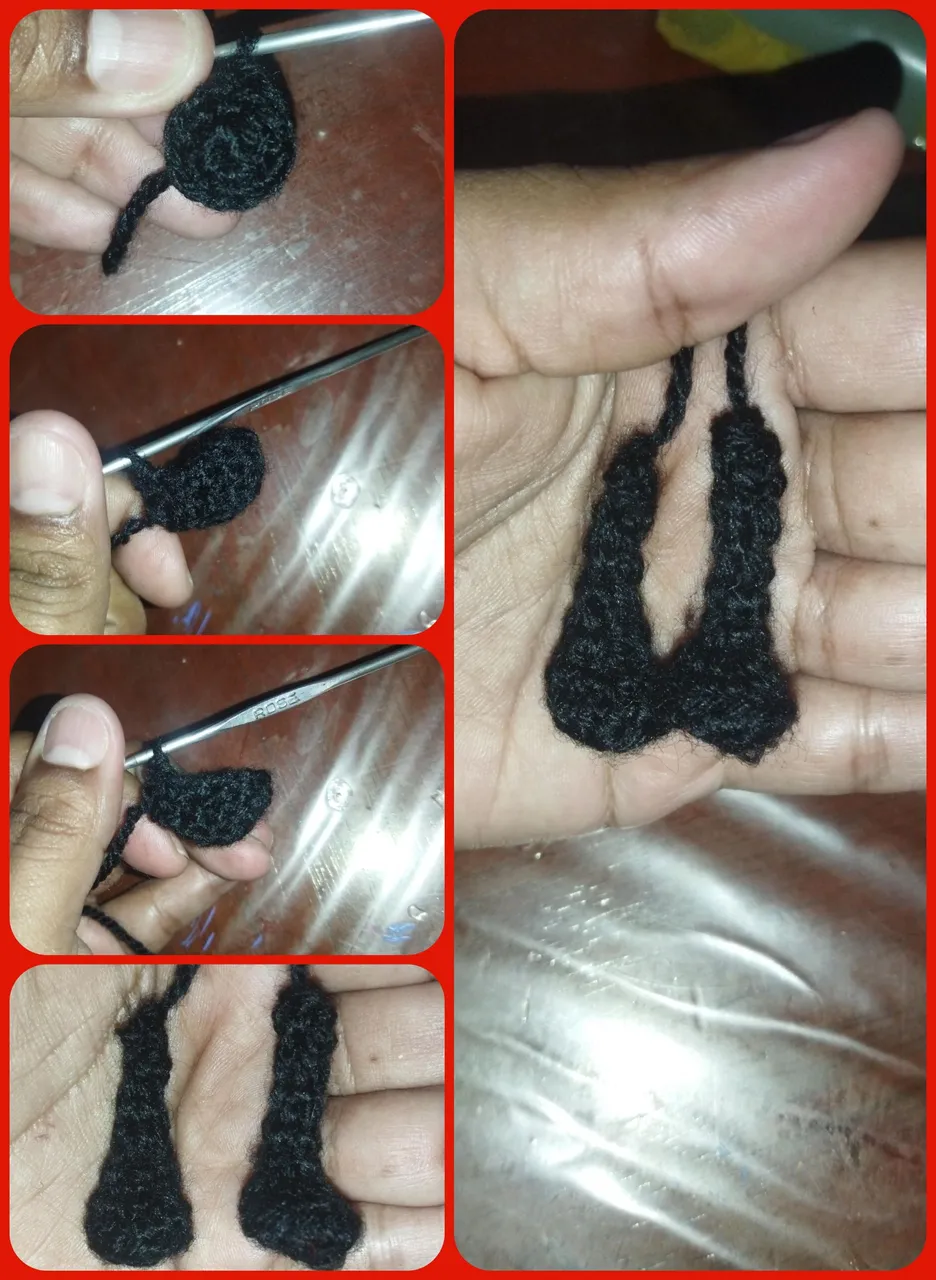
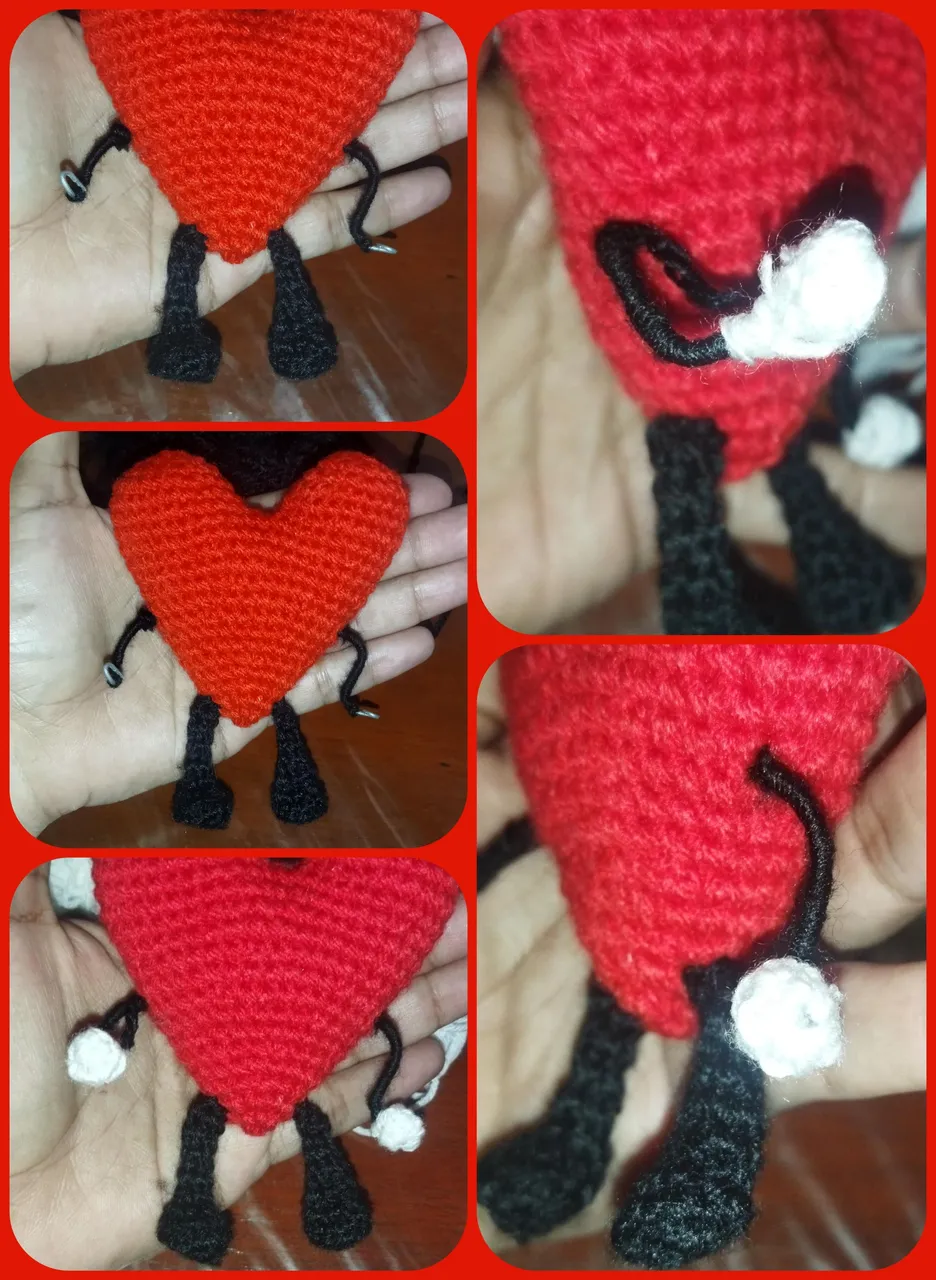
We start with the part of the legs with black wool we will make a magic ring of 6 stitches for two equal doors in the third round we make an increase for each stitch to get a total of 12 the fourth round we will make 6 decreases in a row and four rounds of 6 low stitches, we fill the lower part of the leg and close with a slipped stitch.
Comenzamos con la parte de las piernas con lana negra vamos a hacer un anillo mágico de 6 puntos por dos puertas iguales a la tercera vuelta hacemos un aumento por cada punto para obtener un total de 12 la cuarta vuelta vamos a hacer 6 disminuciones seguidas y cuatro vueltas de 6 puntos bajos, re llenamos la parte inferior de la pierna y cerramos con un punto deslizado.
❤️❣️❤️♥️💓💗❤️❣️❤️💓💗
 ❤️❣️❤️♥️💓💗❤️❣️❤️💓💗
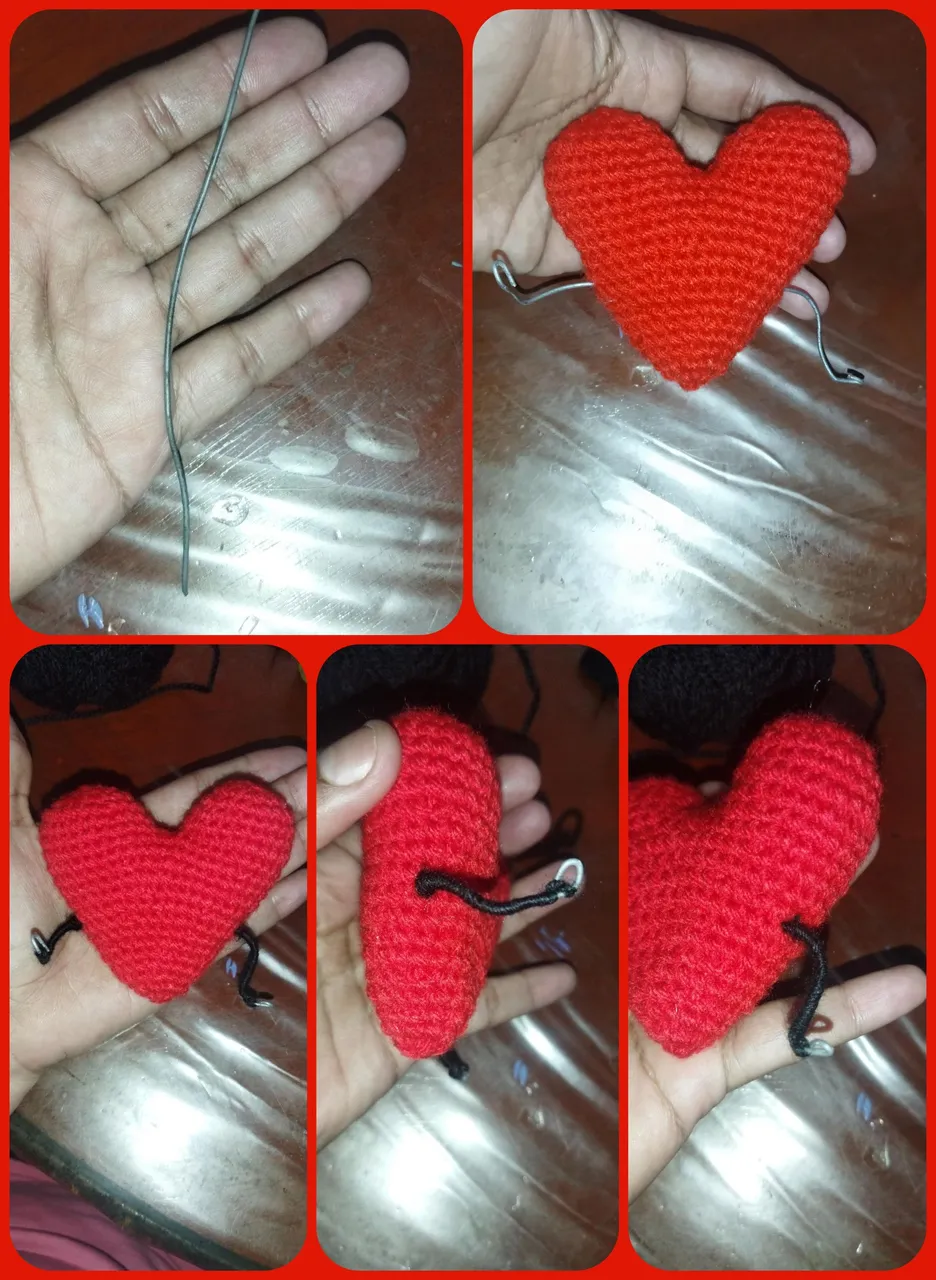
For the part of the arms we are going to take the moldable wire, we are going to introduce it from end to end at the height of the waist of the little heart and with black wool and a little silicone we are going to cover all the wire by the two ends, for the gloves and we simply make in white color a magic ring of 6 stitches for three turns followed we close and glue with cold silicone.
Para la parte de los brazos vamos a tomar el alambre moldeable, lo vamos a introducir de extremo a extremo al altura de la cinturita del corazoncito y con lana negra y un poco de silicón vamos a ír forrado todo el alambre por los dos extremos, para los guantes y simplemente hacemos en color blanco un anillo mágico de 6 punto por tres vueltas seguida cerramos y pegamos con silicón frío.
❤️❣️❤️♥️💓💗❤️❣️❤️💓💗
 ❤️❣️❤️♥️💓💗❤️❣️❤️💓💗
 ❤️❣️❤️♥️💓💗❤️❣️❤️💓💗
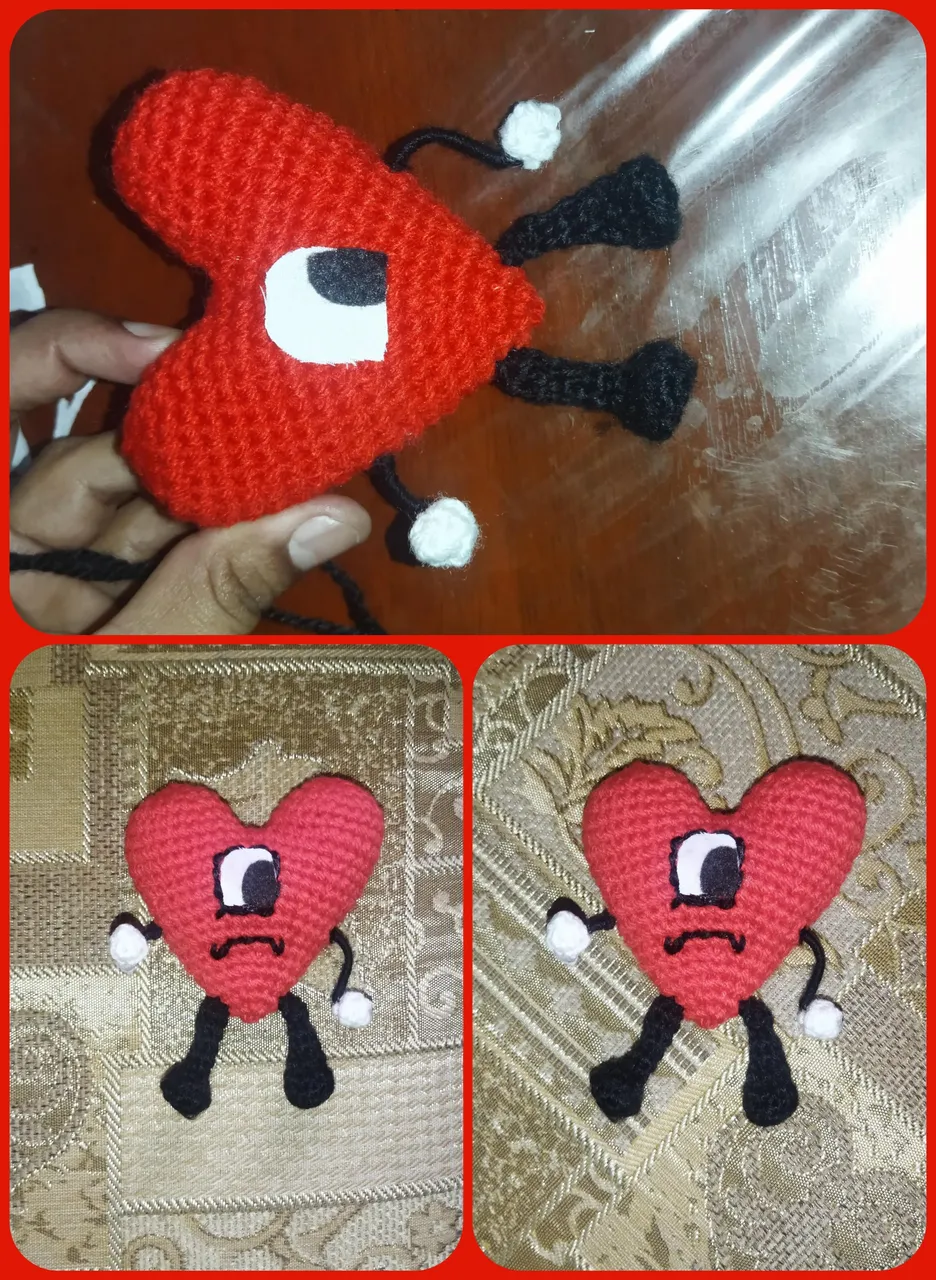
Basically we have already completed the character, we only need to place his eye, which is the distinctive point of it, we will make it with black and white foami, we place it in the center of the heart and embroider it with black thread giving the shape of the eye and the smile.
Básicamente ya tenemos culminado el personaje, sólo nos faltaría colocarle su ojo, que es el punto distintivo de éste, vamos a realizarlo con foami blanco y negro lo colocamos en el centro del corazón y lo bordamos con hilo negro dándole la forma al ojo y a la sonrisa.
❤️❣️❤️♥️💓💗❤️❣️❤️💓💗
 ❤️❣️❤️♥️💓💗❤️❣️❤️💓💗
And in this way we have completed this crocheted cover of a summer without you of bad Bunny I hope you liked it and encourage you to make it because it is very nice and friendly, and it was the perfect gift for my husband who put it as a pendant in his car, we will see each other God willing in a next opportunity.
Y de esta forma tenemos culminado a esta portada tejida a crochet de un verano sin ti de bad Bunny Espero que le haya gustado y se animen a realizarlo ya que es muy bonito y simpático,y fue el regalo perfecto para mí esposo quien lo coloco de colgante en su carro, nos veremos Dios mediante en una próxima oportunidad.
❤️❣️❤️♥️💓💗❤️❣️❤️💓💗
 ❤️❣️❤️♥️💓💗❤️❣️❤️💓💗
All images are my property taken with redmi 9t and edited with the Photoshop Express application for Android.
Todas las imágenes son de mi propiedad tomadas con redmi 9t y editadas con la aplicación Photoshop Express para Android.
❤️❣️❤️♥️💓💗❤️❣️❤️💓💗
❤️❣️❤️♥️💓💗❤️❣️❤️💓💗