HI THERE! #HIVEDIY DIY friends, everyone welcome to this creative space. I must confess that I have a lot of respect for this material "eva rubber" better known in my country Venezuela as foami, since it has always been for me a pebble in my shoe to be able to work with it and give my creations the beauty and subtlety that merits. However, I have filled myself with a lot of value and I have decided to break with my traditional scheme and make beautiful eva or foami rubber flowers. I am very pleased and satisfied with the result, and I have planned to use these beautiful flowers later to decorate a gift box that I plan to make for a beautiful girl who is celebrating her birthday soon. I hope you like my creative craft today and I invite you to watch the following tutorial.
¡HOLA! Amigos bricolajeros de #HIVEDIY, sean todos bienvenidos a este espacio creativo. Les debo confesar que le tengo mucho respeto a este material “goma eva” mejor conocido en mi país Venezuela como foami, puesto que siempre ha sido para mí una piedrita en mi zapato poder trabajar con él y darle a mis creaciones la belleza y sutileza que amerita. Sin embargo, me he llenado de mucho valor y he decido romper con mi esquema tradicional y elaborar una preciosas flores de goma eva o foami. Me siento muy agradada y satisfecha con el resultado, y estas hermosas florecillas he pensado utilizarlas más adelante para decorar un cajita de regalo que pienso hacer para una niña hermosa que festeja su cumpleaños próximamente. Espero que les guste mi manualidad creativa del día de hoy y los invitos a que acompañen a observar el siguiente tutorial.
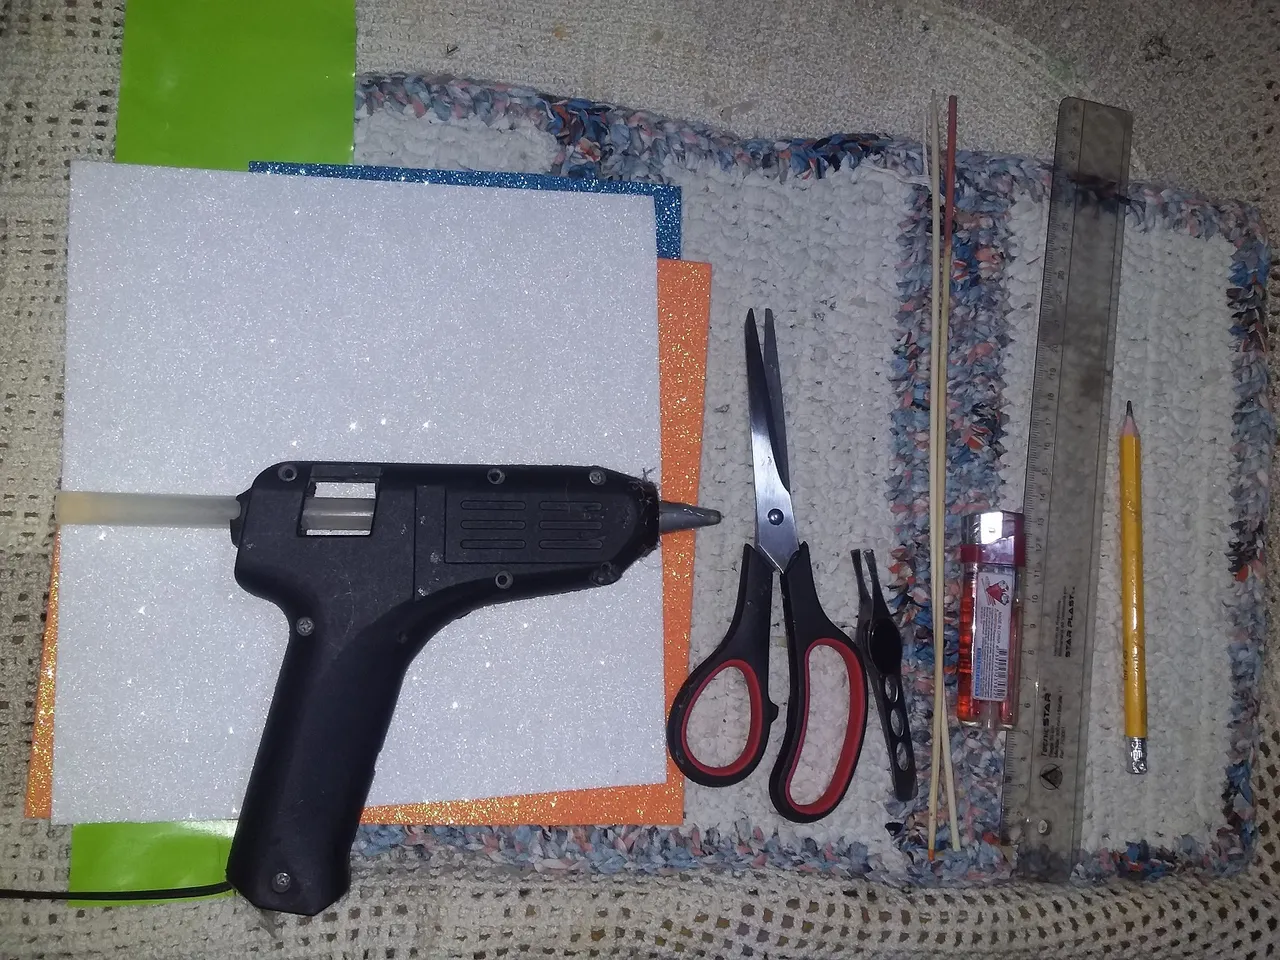
Used materials:
• White, orange and frosty blue eva or foam rubber.
• Green cardboard.
• Stick silicone with your gun.
• Height chopsticks.
• Rule.
• Pencil.
• Pair of scissors.
• Eyebrow tweezers.
• Cigarette lighter.
Materiales utilizados:
• Goma eva o foami colores blanco, naranja y azul escarchado.
• Cartulina verde.
• Silicón en barra con su pistola.
• Palillos de altura.
• Regla.
• Lápiz.
• Tijeras.
• Pinza de cejas.
• Encendedor.
Start of my creative craft:
With the ruler and pencil, he begins to mark on the eva erasers and on the green cardboard at least 8 squares of 4cmx4cm and then I proceed to cut them out with the scissors.
Inicio de mi manualidad creativa:
Con la regla y el lápiz comienza a marcar en las goma eva y en la cartulina verde al menos 8 cuadrados de 4cmx4cm y luego procedo a recortarlos con las tijeras.
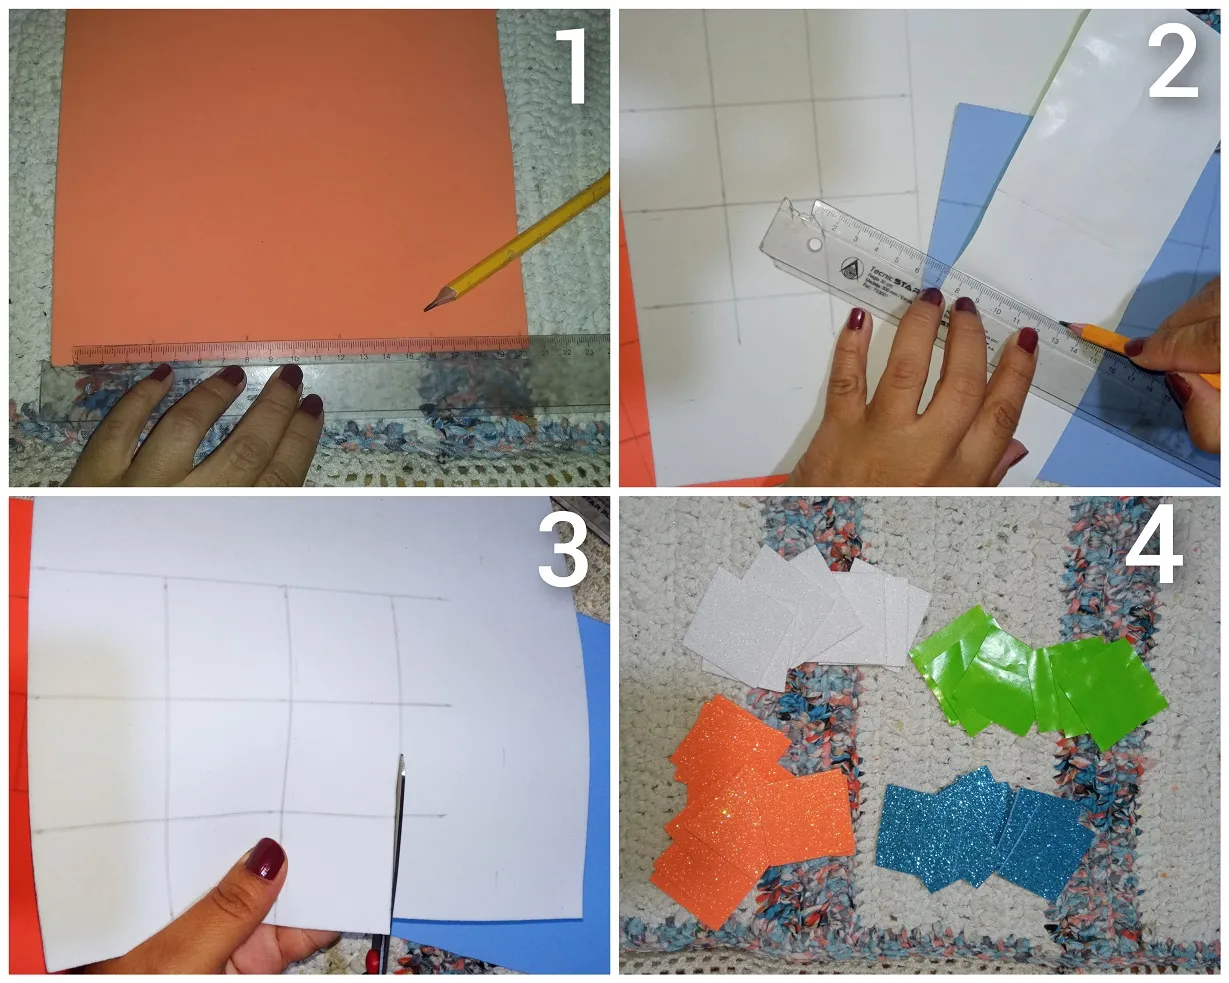
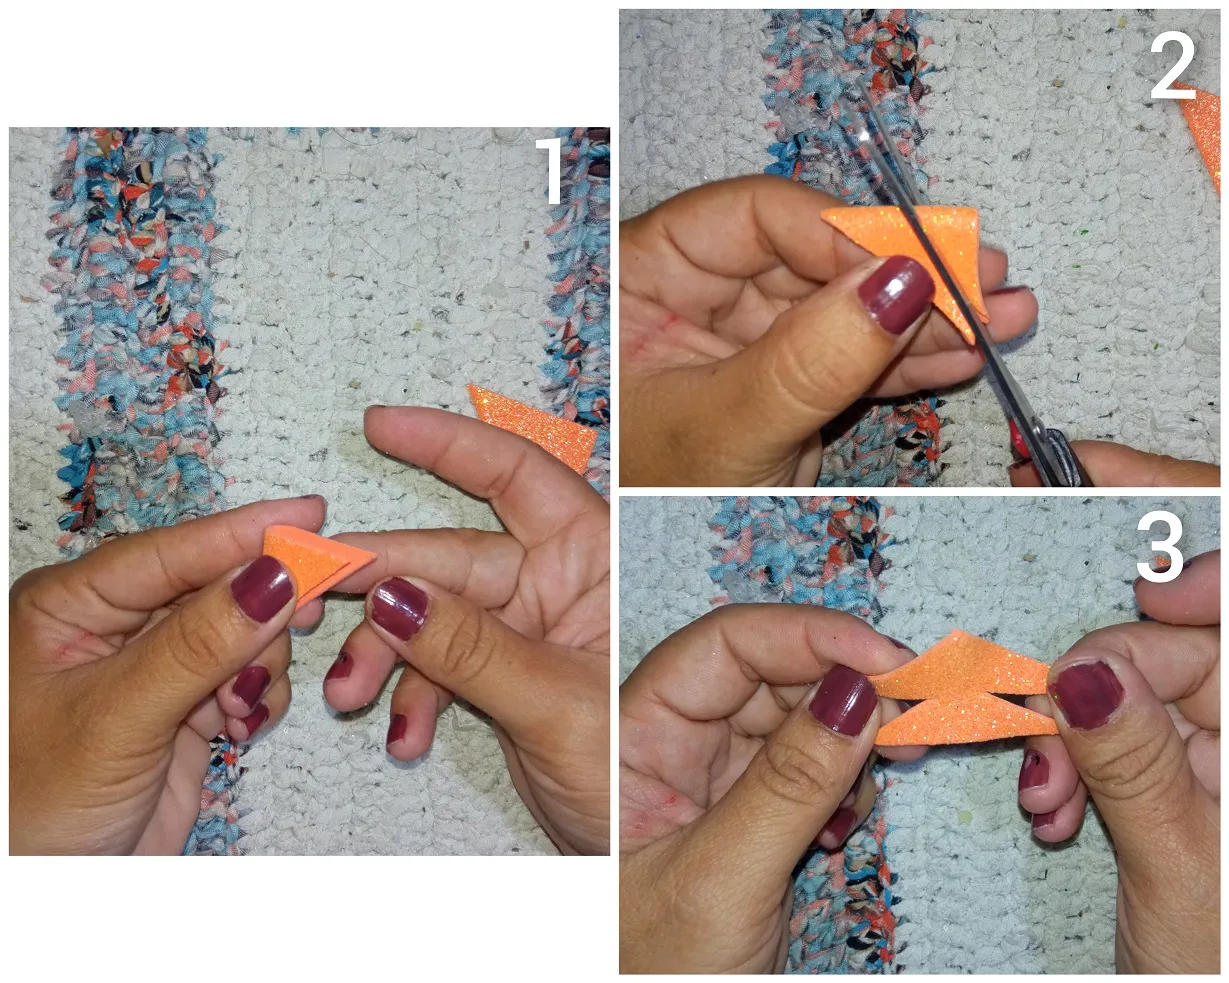
Now I cut all the squares formed in the following way: Take a 4cmx4cm square and fold it in half forming a triangle, with your scissors cut in half and you will get two triangles that will later become two petals.
Ahora corto todos los cuadrados formados de la siguiente forma: Toma un cuadro de 4cmx4cm y dóblalo a la mitad formando un triángulo, con tus tijeras corta a la mitad y obtendrás dos triángulos que se convertirán más adelante en dos pétalos.
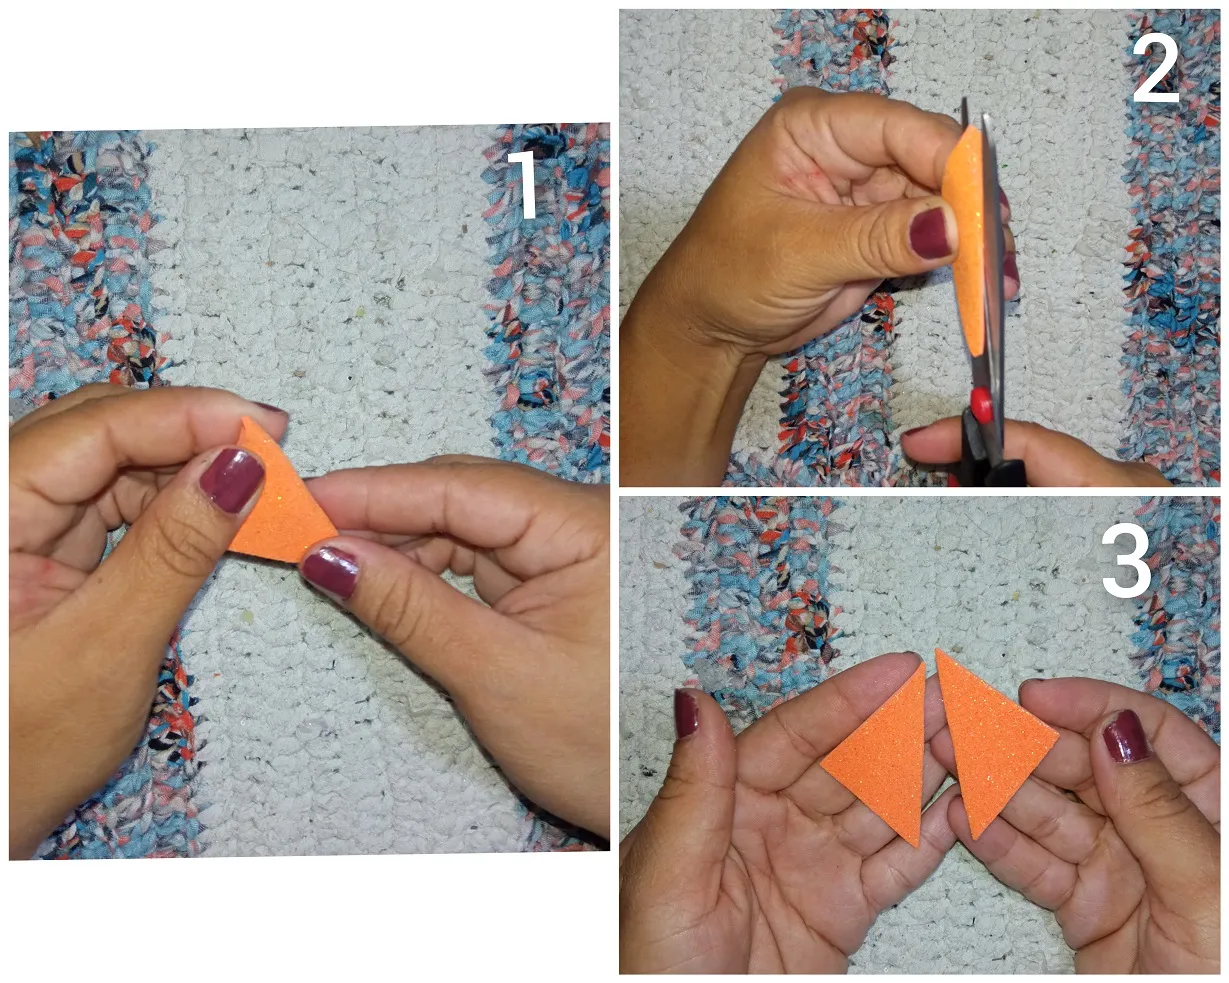
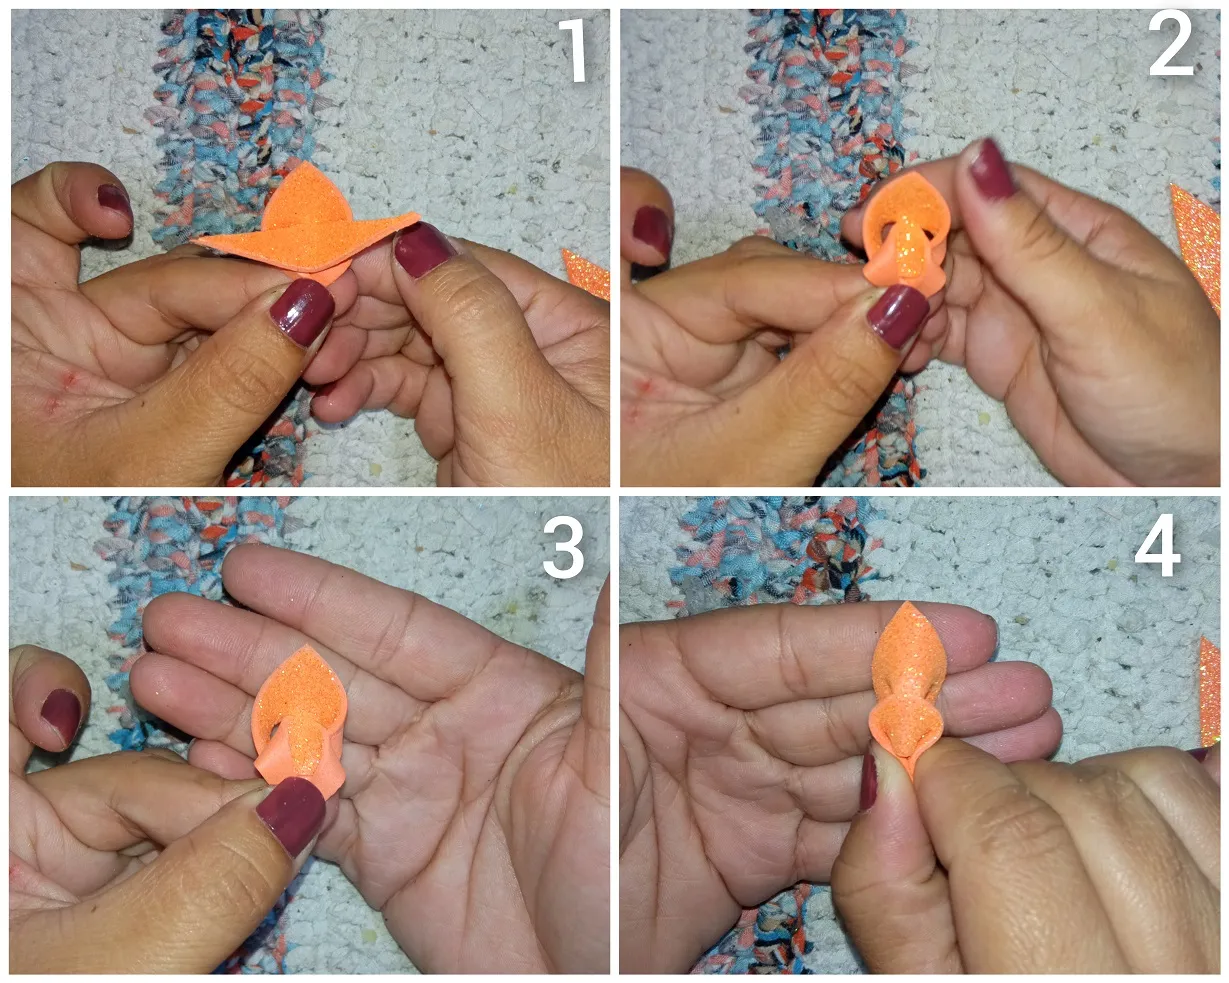
Before forming the flower petals, I carry out the following step in all the triangles formed, not including the green triangles that are for the leaves: in one of the triangles formed I fold in half to form two more triangles, this time short with my scissors from the base of the triangle where the lower tips meet to the middle of the height of the triangle without cutting completely.
Antes de formar los pétalos de la flor realizo el siguiente paso en todos los triángulos formados, sin incluir los triángulos verdes que son para las hojas: en uno de los triángulos formados doblo a la mitad para formar dos triángulos más, esta vez corto con mis tijeras desde la base del triángulo donde se unen las puntas inferiores hasta la mitad de la atura del triángulo sin cortar por completo.
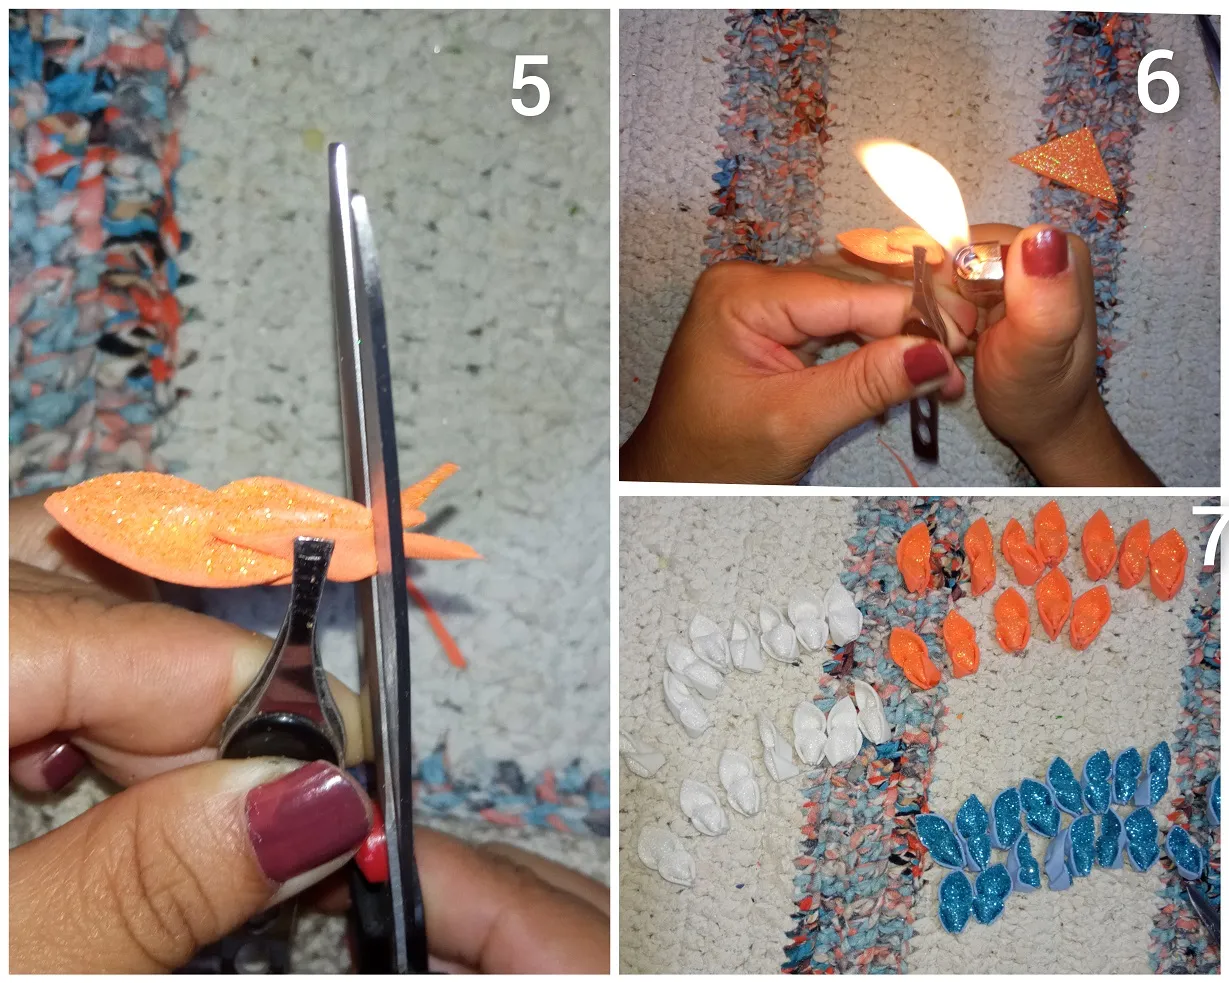
It is time to form the petals of the flower, I give a little twist and fold the two upper points of my triangle inwards. Now, I give the bottom tips another little twist and fold out. Then, I will have the four points in the lower part of the petal, I take the eyebrow tweezers and squeeze the four points that must be well glued, I cut them with the scissors where the base of the triangle is left and then with a lighter or yesquero I burn these four points to join (you can also glue them with the hot silicone and cut them with the scissors). I do this step with all the other triangles of eva rubber formed.
Es momento de formar los pétalos de la flor, doy un pequeño giro y doblo hacia adentro las dos puntas superiores de mi triangulo. Ahora, doy otro pequeño giro a las puntas inferiores y doblo hacia afuera. Luego, me quedaran las cuatro puntas en la parte inferior del pétalo, tomo la pinza de cejas y aprieto con fuerza las cuatro puntas que debes quedar bien pegaditas, las corto con las tijeras por donde me quedo la base del triángulo y luego con un encendedor o yesquero quemo esta cuatro punta para unir (también las puedes pegar con el silicón caliente y córtalas con las tijeras). Realizo este paso con todos los demás triángulos de goma eva formados.
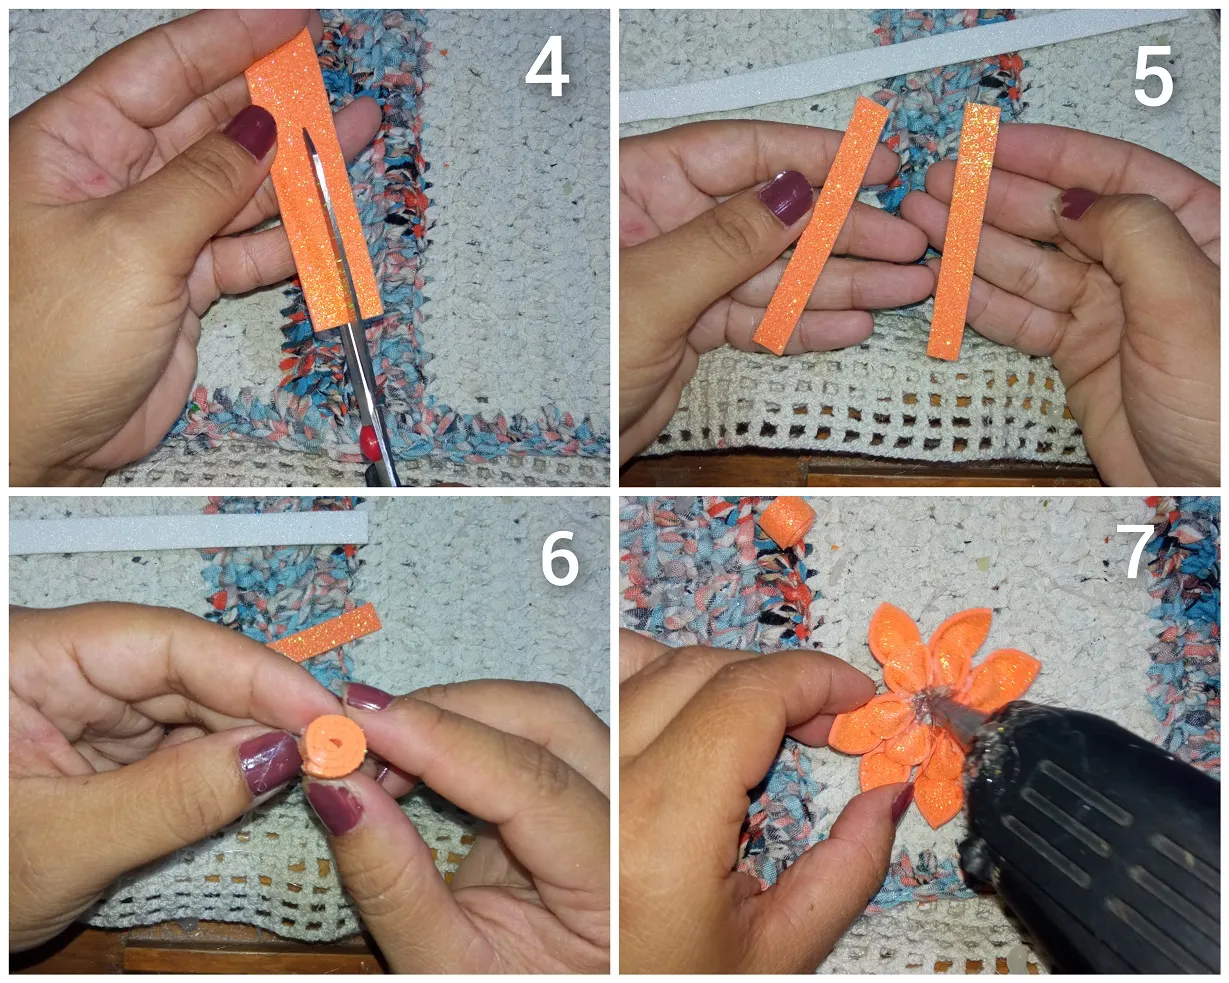
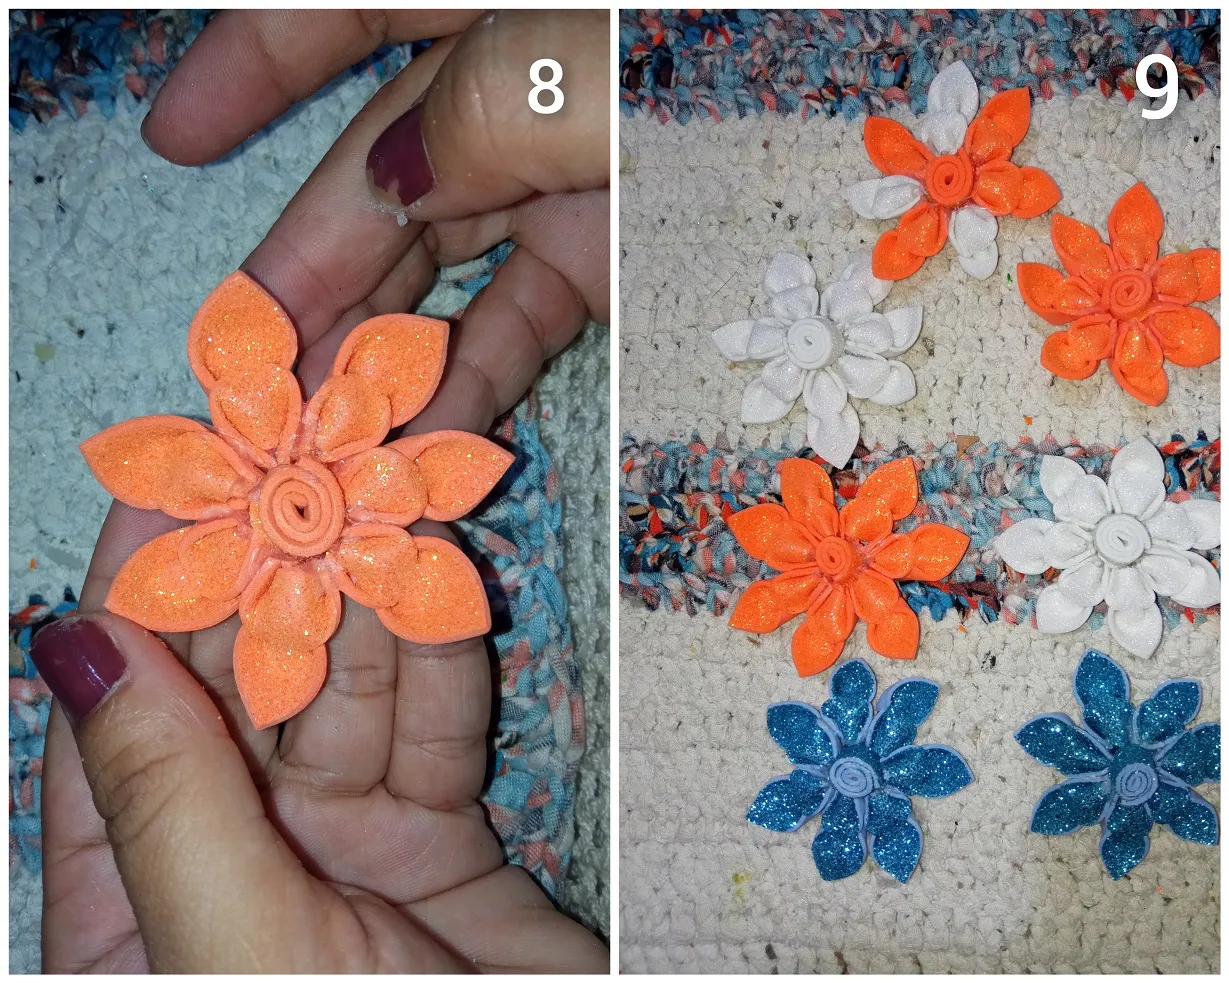
To form the flowers, I glue 7 petals in the center with hot silicone (I had several petals of different colors of foami left and I made two additional flowers) there should be a hollow space, to fill that short space a 1cm wide strip of Eva rubber or foami of the same color of the flower and with the help of the height stick I roll until forming a cylinder of equal size of the hollow space of the flower, I cut the ideal size and I glue the cylinder with the hot silicone. I apply hot silicone in the hollow space formed from the flower and glue my cylinder.
Para formar las flores, pego con el silicón caliente 7 pétalos en el centro (me habían quedado varios pétalos de diferentes colores de foami y realice dos flores adicionales) debe quedar un espacio hueco, para rellenar ese espacio corto una tira de 1cm de ancho de goma eva o foami del mismo color de la flor y con la ayuda del palillo de altura enrollo hasta formar un cilindro de igual tamaño del espacio hueco de la flor, corto el tamaño ideal y pego el cilindro con el silicón caliente. Aplico silicón caliente en el espacio hueco formado de la flor y pego mi cilindro.

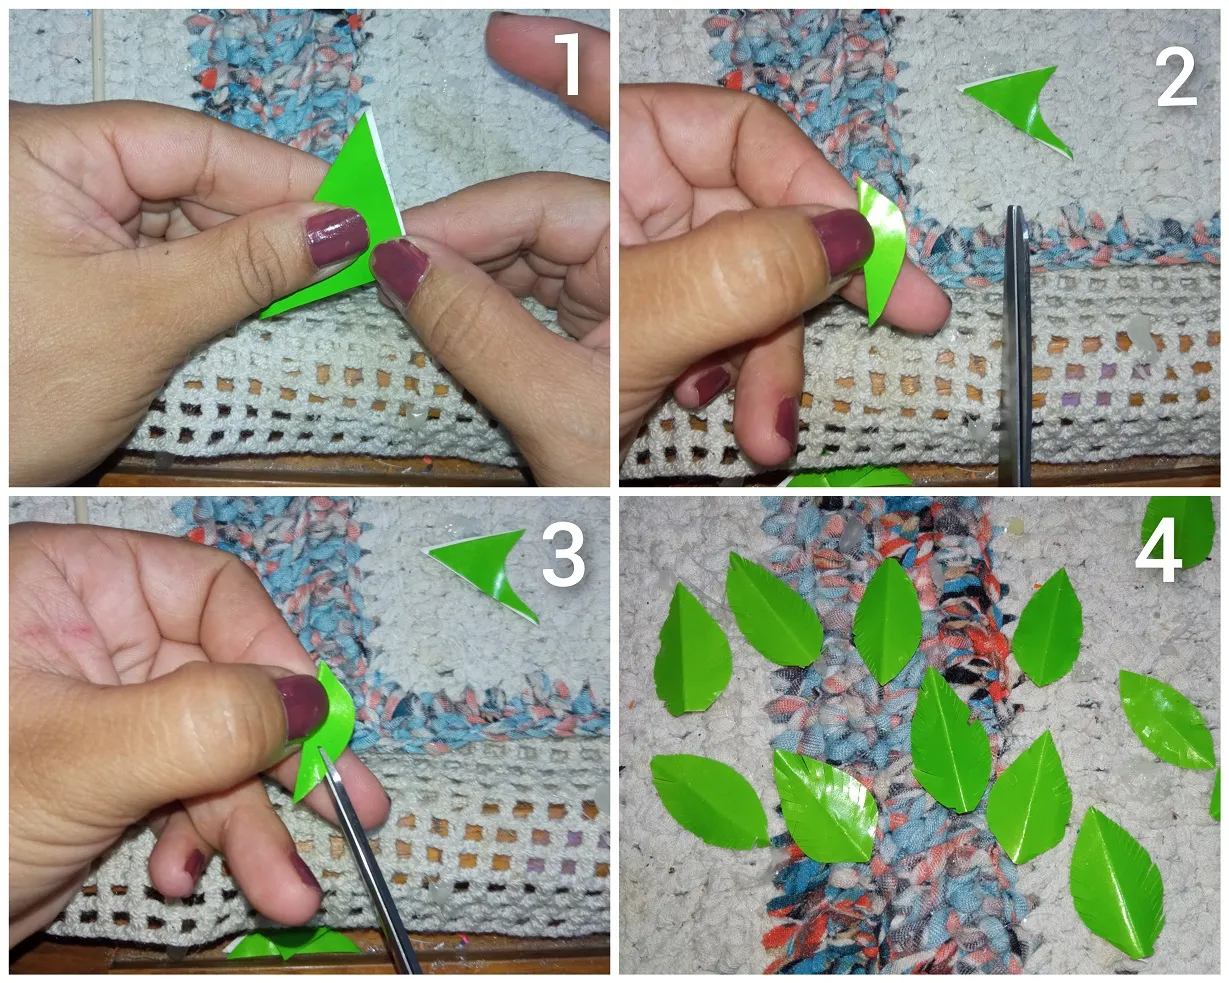
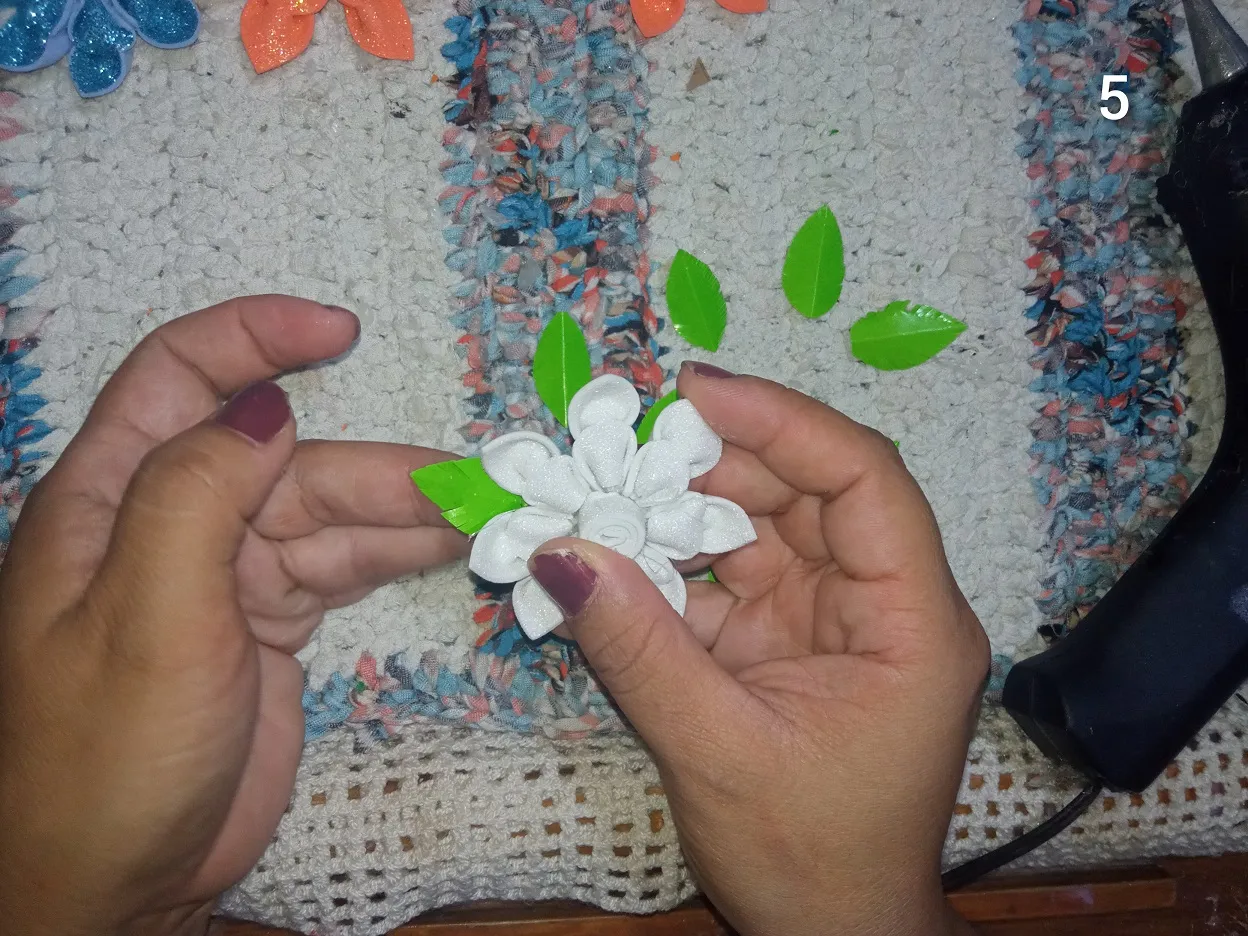
With the green triangles I make the leaves, I take my triangles and fold in half, cut with the scissors in the form of leaves and then I make consecutive cuts on the edge of the leaf diagonally, I open my leaves and glue the flowers.
Con los triángulos verdes realizo las hojas, tomo mis triángulos y doblo a la mitad, recorto con las tijeras en forma de hojas y luego realizo en el borde de la hoja consecutivos cortes en forma diagonal, abro mis hojas y pego de las flores.
To finish, I glue the flowers from my tall stick to form a delicate bouquet.
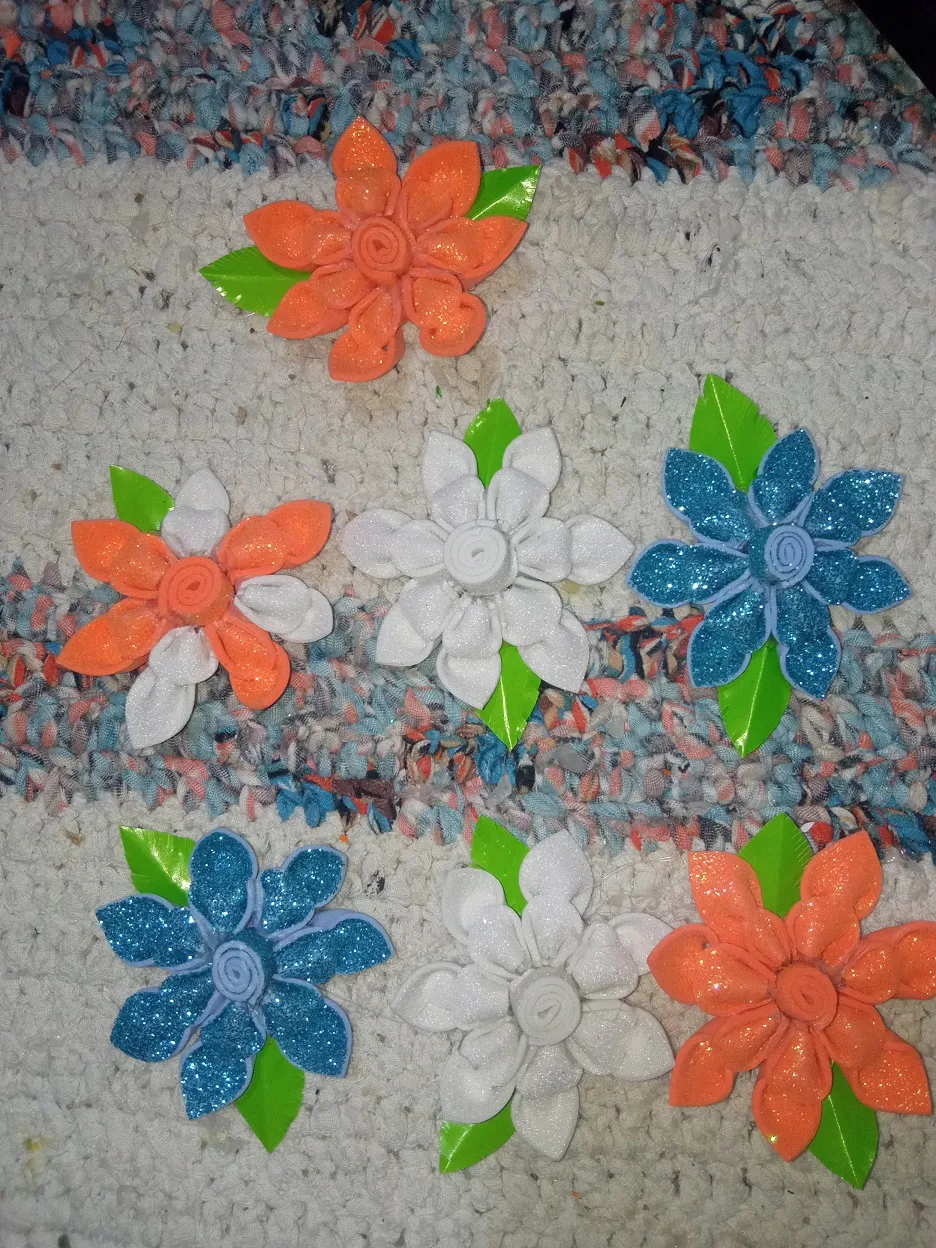
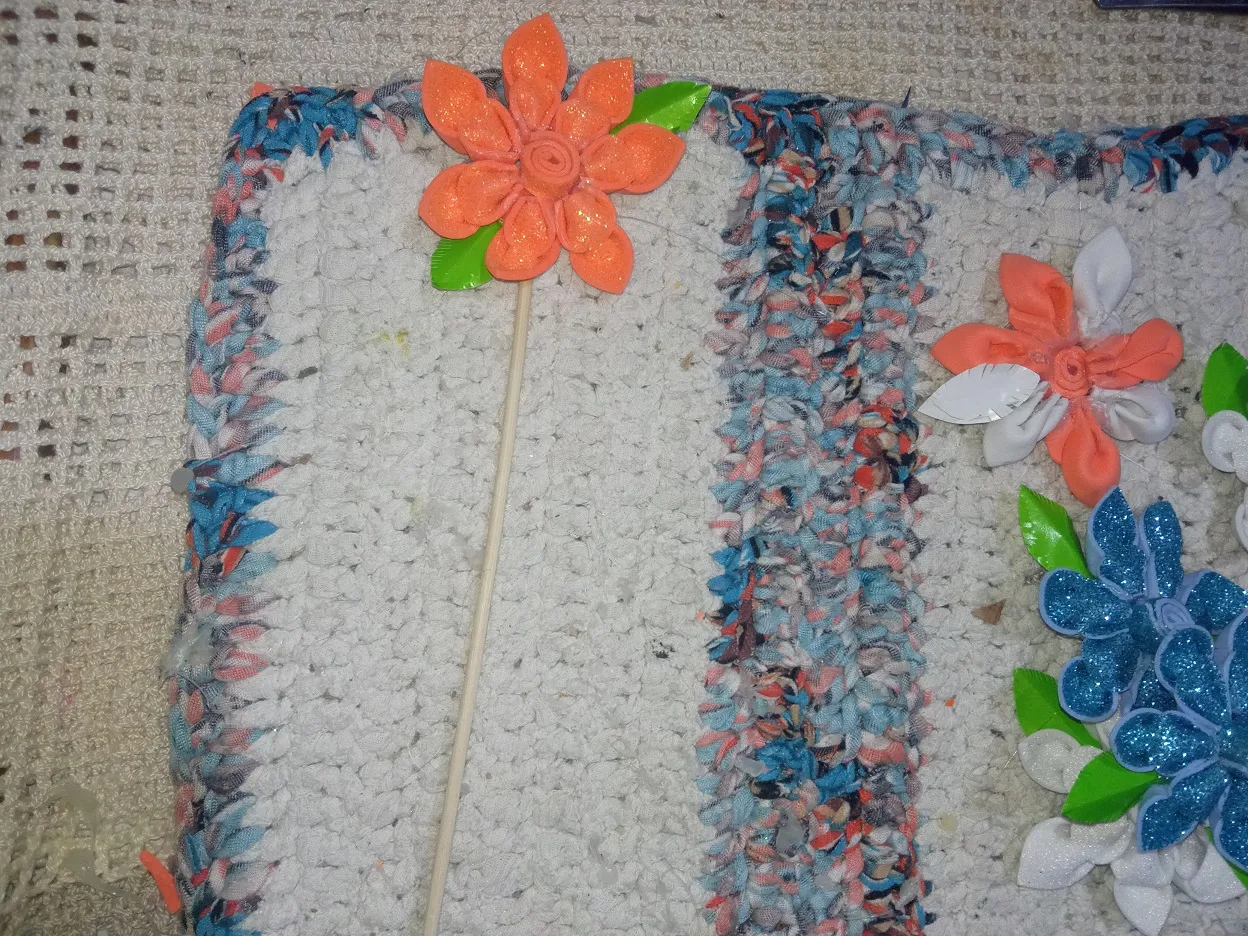
Para finalizar, pego las flores de mi palillo de altura para formar un delicado ramo.
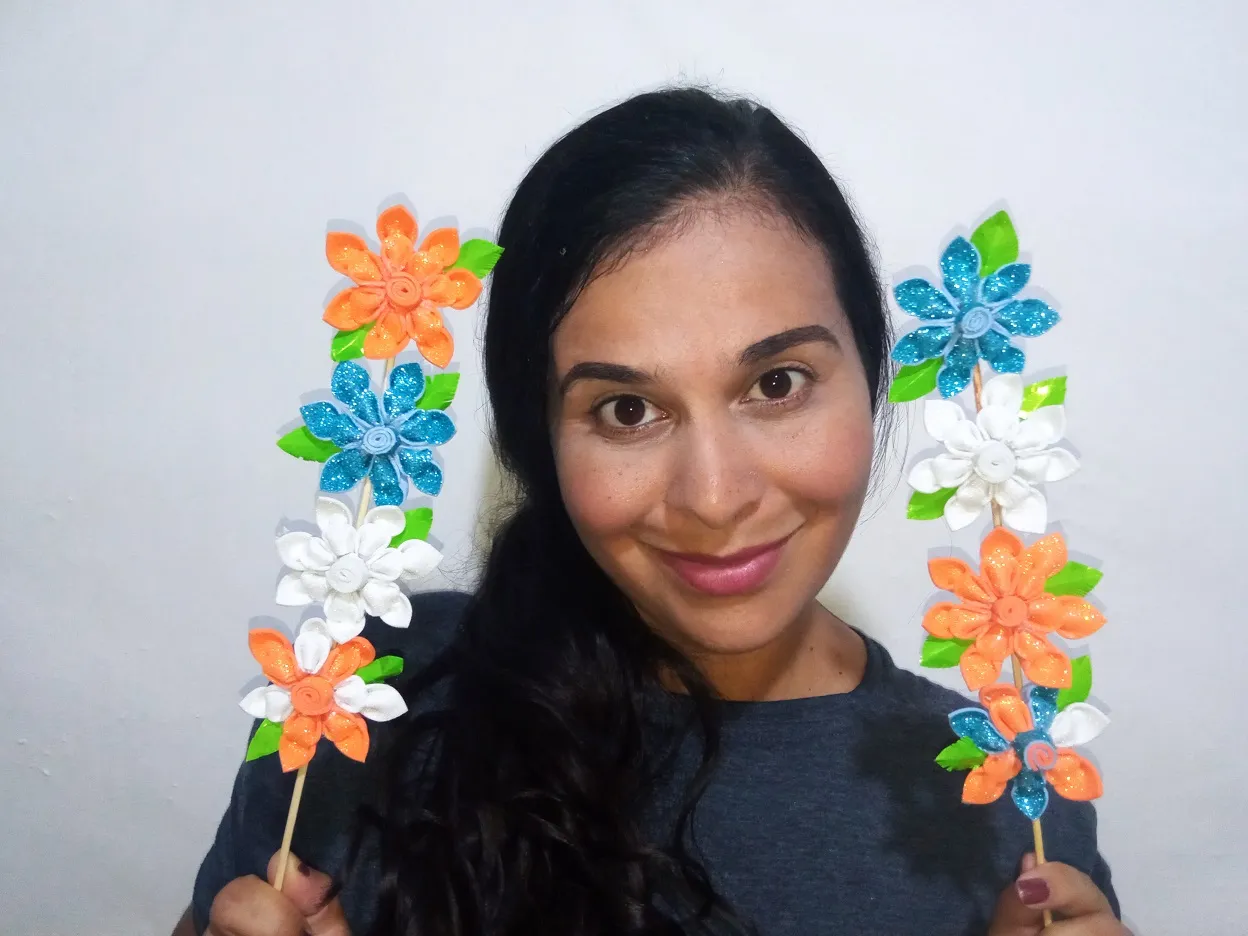
Final score:
Resultado final:

Thanks for dressing me up and reading me, until next time @aksurevm89.
Gracias por vístame y leerme, hasta una próxima ocasión @aksurevm89.
THANKS FOR READING ME // GRACIAS POR LEERME
Translated by: google translator // Traducido por: google traductor
All photos are my property // Todas las fotos son de mi propiedad.
The collage were made with the collage maker android app // Los collage fueron realizado con la app para android collage maker.