Basket making is one of mankind's most ancient skills. Due to the somewhat transient nature of most basket making materials, it's hard to say exactly how long people have been weaving baskets, though I believe actual basket remains were found at Nahal Hemar that dated around 6000BC. You can read more about my brief history with this primitive skill here.
Knowing the history isn't necessary to be able to make a basket yourself, so I won't bore you with any more of that made up history science stuff. All you really need to know, to make a basic basket, is what material will work, and how to put them together. In this part, I'll talk a bit about picking materials, and try to provide detailed photos and explanations about how to construct a very simple basket base.
Choosing the right materials
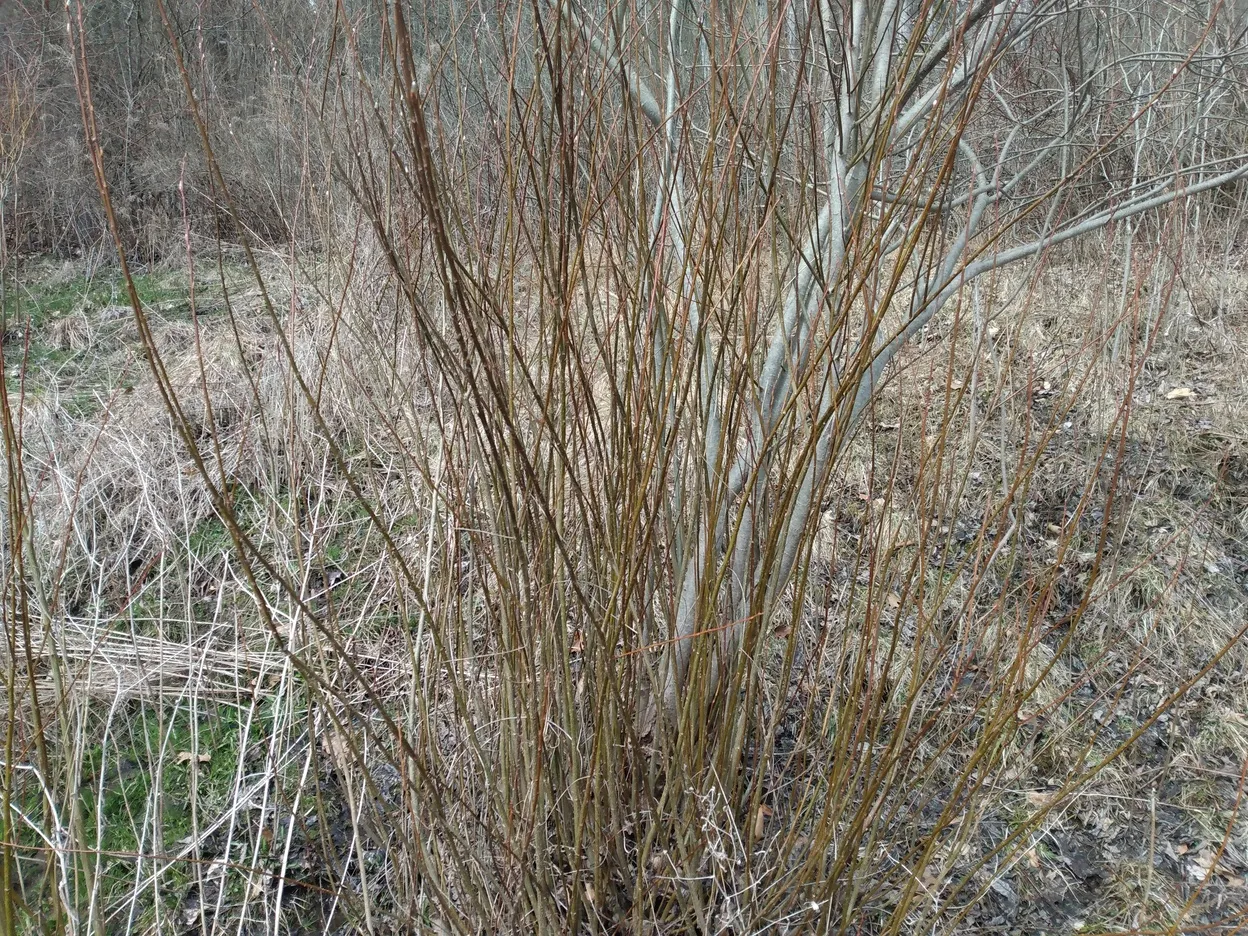
For this basket, I'll be using willow branches. As far as I know, any kind of willow will work for making baskets, though the long hanging branches of the weeping willow are the easiest, in my experience. I believe that the willow trees I've been cutting back here on the homestead are white willow. The tree in the picture above was just a sapling when I first started clearing the woods up here, so small that for the first few years it just got cut down with the weeds. I don't want this tree (or its neighbors) to grow large here, because they will draw too much water away from the ponds.
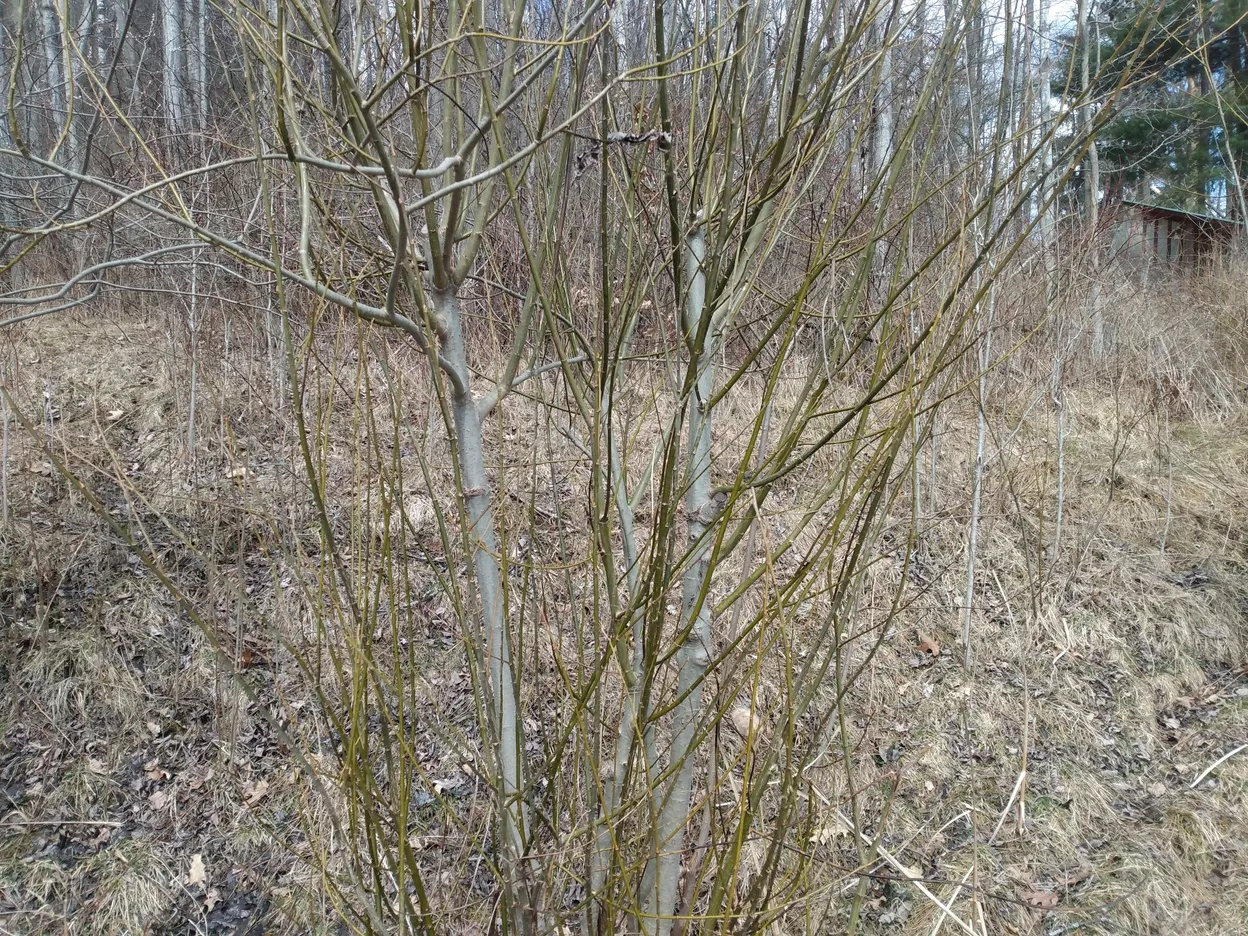
Every year I cut these trees back, and every year they just grow back a little bigger and faster. Most of the time it just goes to the compost, or the wood chipper, but this year they grew in extra long and slender, so I decided it would be a good time to do a basket tutorial with natural materials.
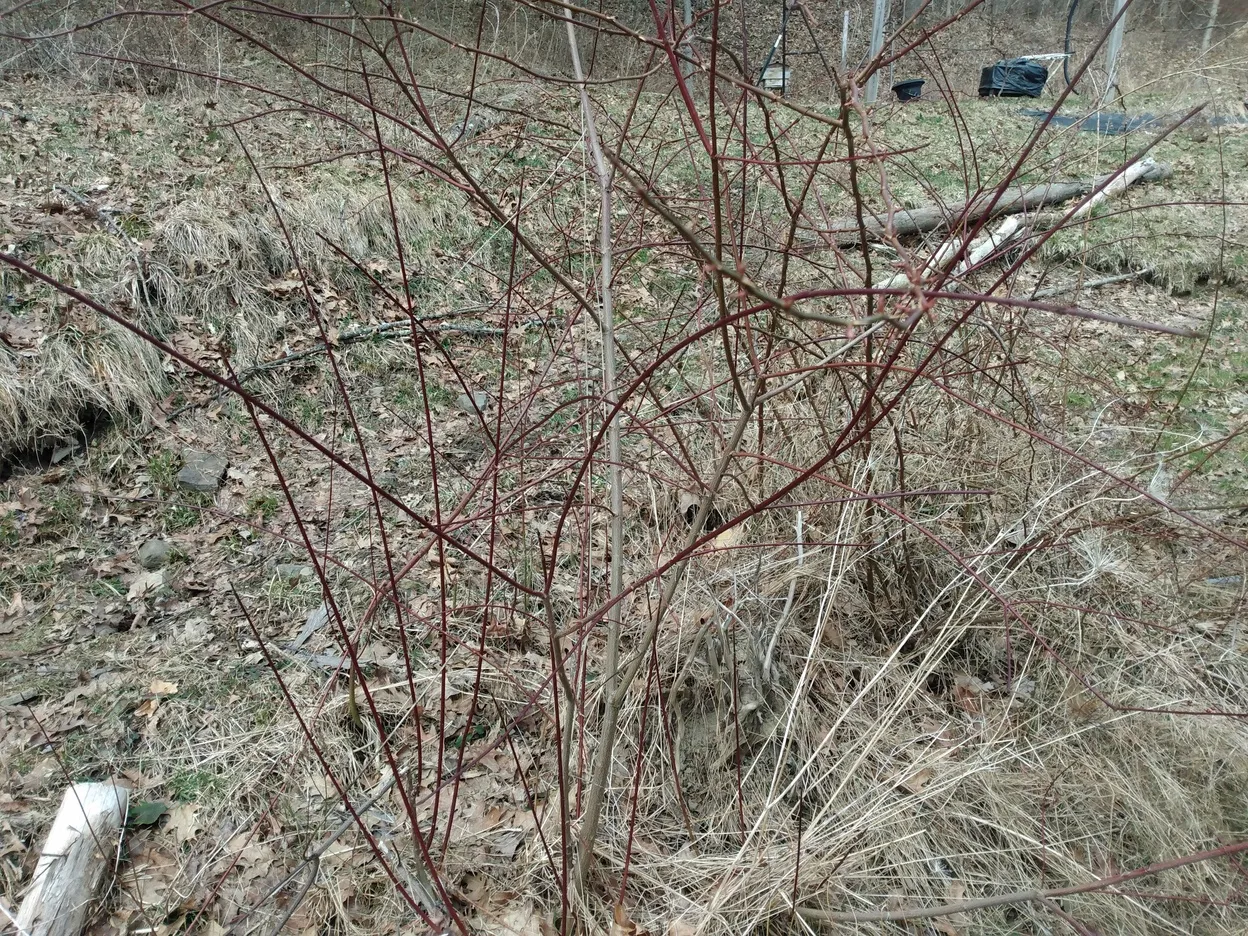
There are many types of trees besides willow that work well for basketry, like the red osier dogwood in the photo above. I didn't cut any of these on this particular day, but I will probably go back and harvest a few of these branches to add color to the basket later on. Any kind of material that you can put a 180° bend in without it snapping should work fine. Anything that won't bend at least 90° without snapping should be avoided. It's not necessarily impossible to make a basket with less flexible material, but it is definitely a lot more difficult.
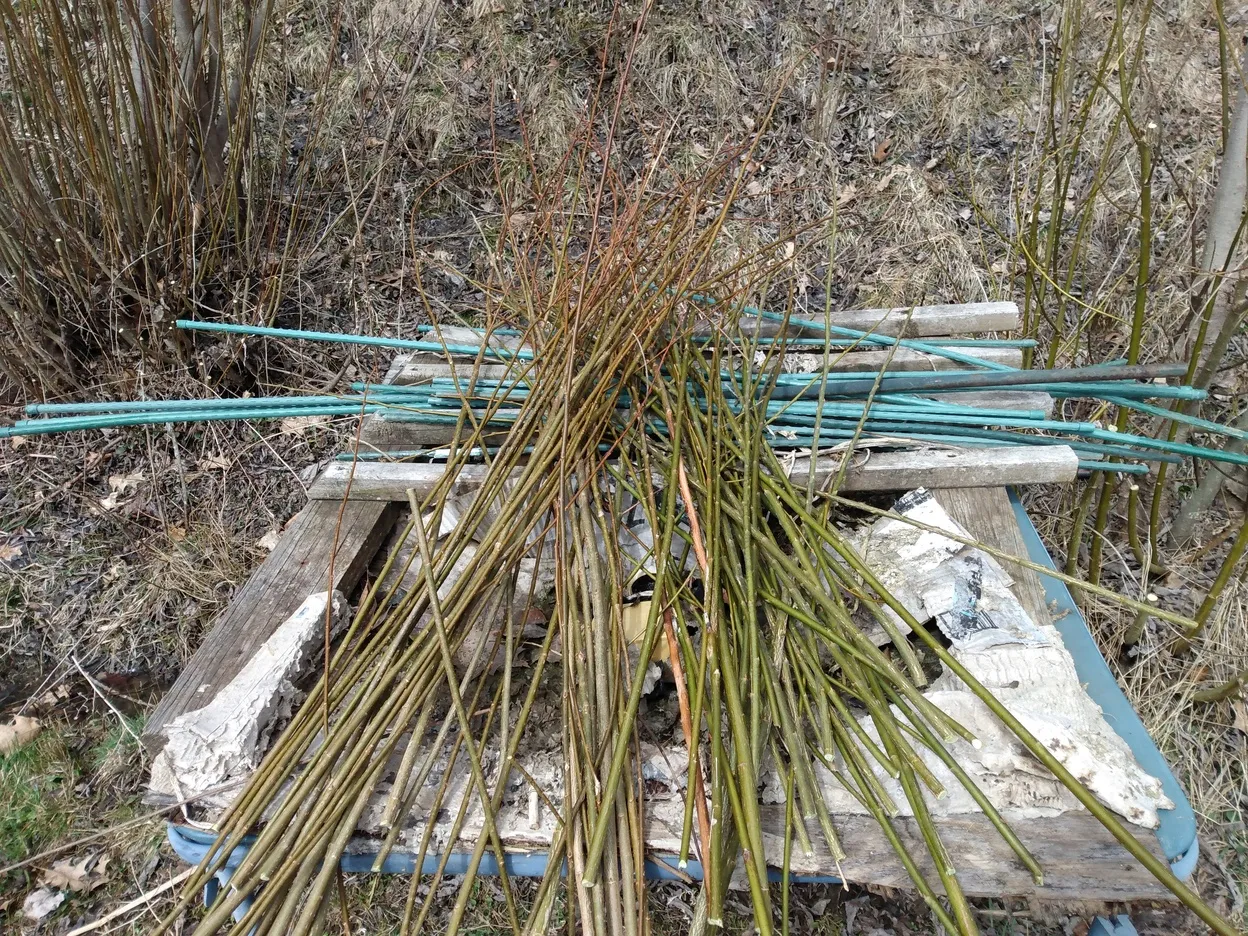
Because I'm cutting these trees back deliberately, I cut each branch as close to the bottom as I can. If you don't mind your tree turning into a big hairy shrub, you can just cut the more flexible parts of the branches that you will be using. Most of the material in the picture above will have 3"-12" cut from the thicker ends when they're used.
Early spring is the best time to harvest wood for basket making here in Western NY, but this can vary greatly depending on your climate, and on the materials you use. Large grass stalks (like pampas grass) works better for me in mid to late fall, while vines seem to be at their best during the middle of summer. Ideally, you want to harvest your material whenever it's the most flexible. Most materials are easier to work with if you soak them in water for a few hours before using them, but that won't be necessary for these branches.
Choosing the stakes
The stakes are what make up the frame, or the 'skeleton' of your basket. You will want them to be sturdy enough that your basket will hold its shape, but still flexible enough to bend at a 90° angle without snapping. Stakes that are less flexible can still be used to make a frame for woven bowls, or other shapes with round bottoms that do not require drastic bends.
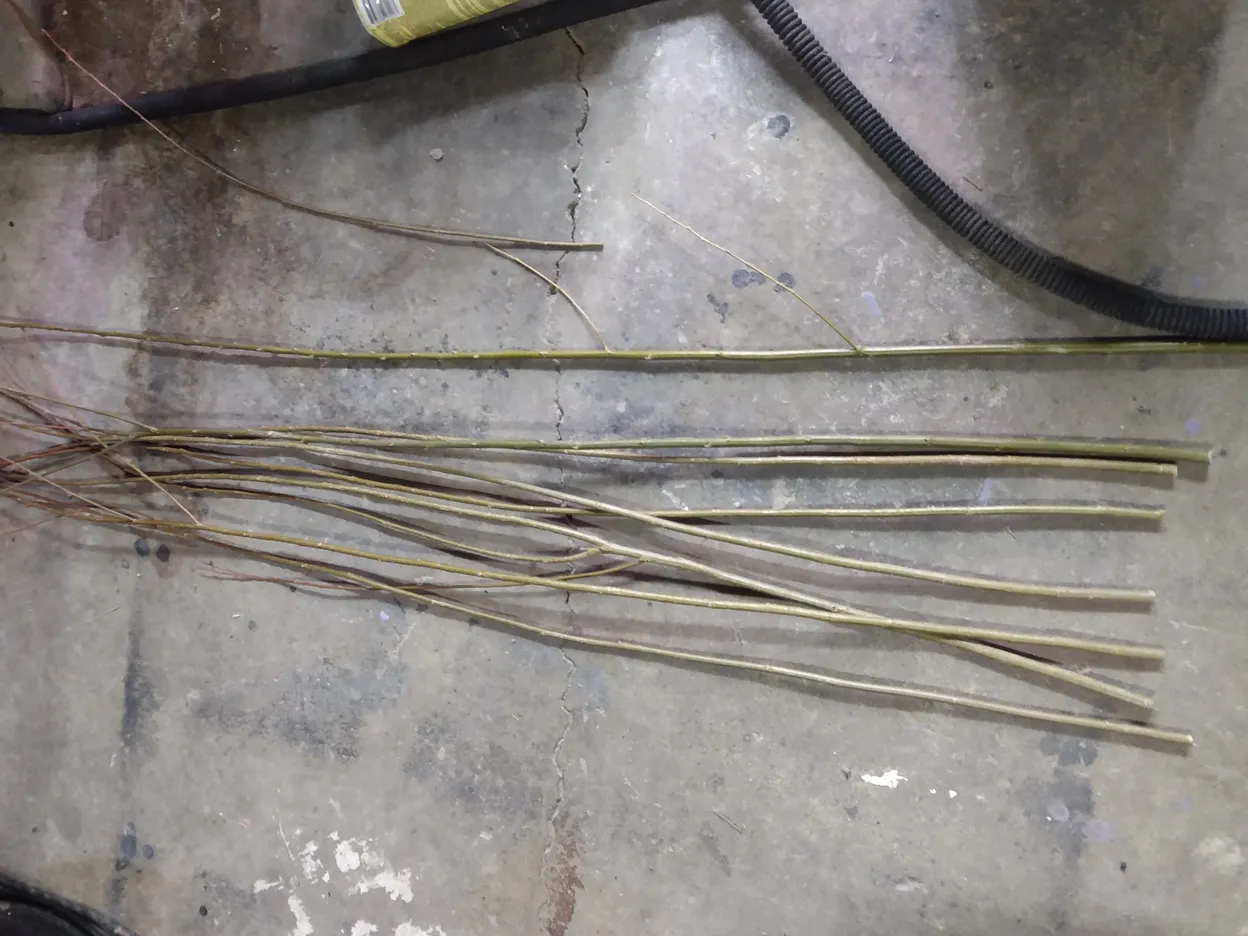
Ideally, your stakes would have the same diameter from end to end, but that will not be possible with this particular willow harvest. It would be a good time to get some wild rose or bramble berry cane to use as my stakes, but all the ones available right now are aggressively thorny, and I don't feel like poking any extra holes in my skin by handling them today. The ones in the photo above will work well enough for this project, they'll just need a little extra help later on.

I cut each stake down to the roughly the same length, and split them into four pairs. For this base style, any multiple of four will do: the more stakes you use, the larger your basket will be. Eight stakes will make a decent sized basket with these materials. With thinner materials like grass stalks, I may use as many as sixteen stakes for a large basket, but I would use a different base style than this if I wanted to start with more than sixteen.
Most importantly when choosing your stakes, it is ideal for them to all have roughly the same flexibility. If some of your stakes are significantly stiffer than others, it will make it more difficult to control the shape of your basket.
Building the base
The base is the starting point for any basket, and in this style of basket it is usually the most difficult part to build. It takes patience, perseverance, and more than a little finger strength to work natural materials into a tight, sturdy, symmetrical basket base. This was the third basket I've started making with branches from these exact same trees, but the first one that I was pleased with. As you'll see, this basket will be pretty, but far from perfect.
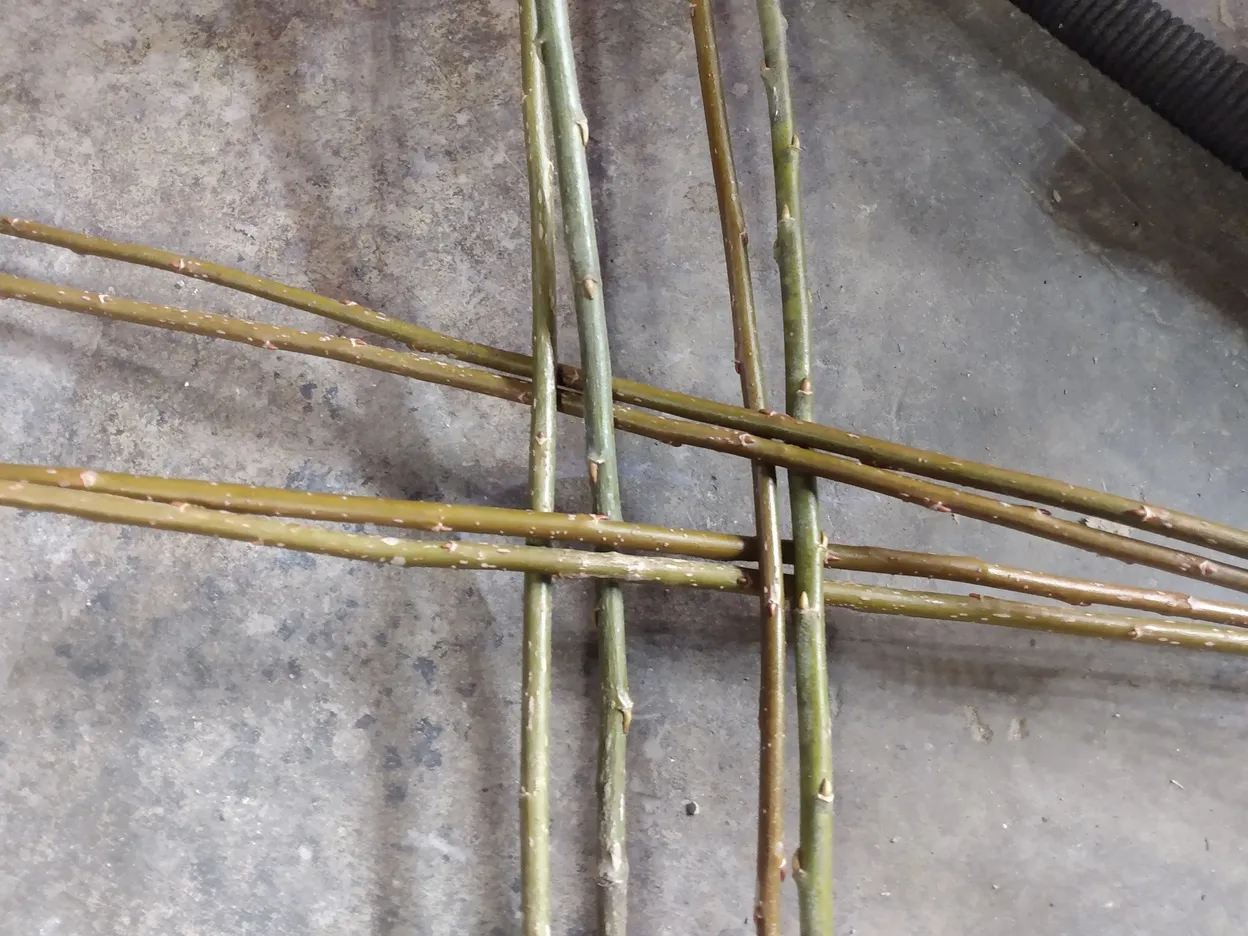
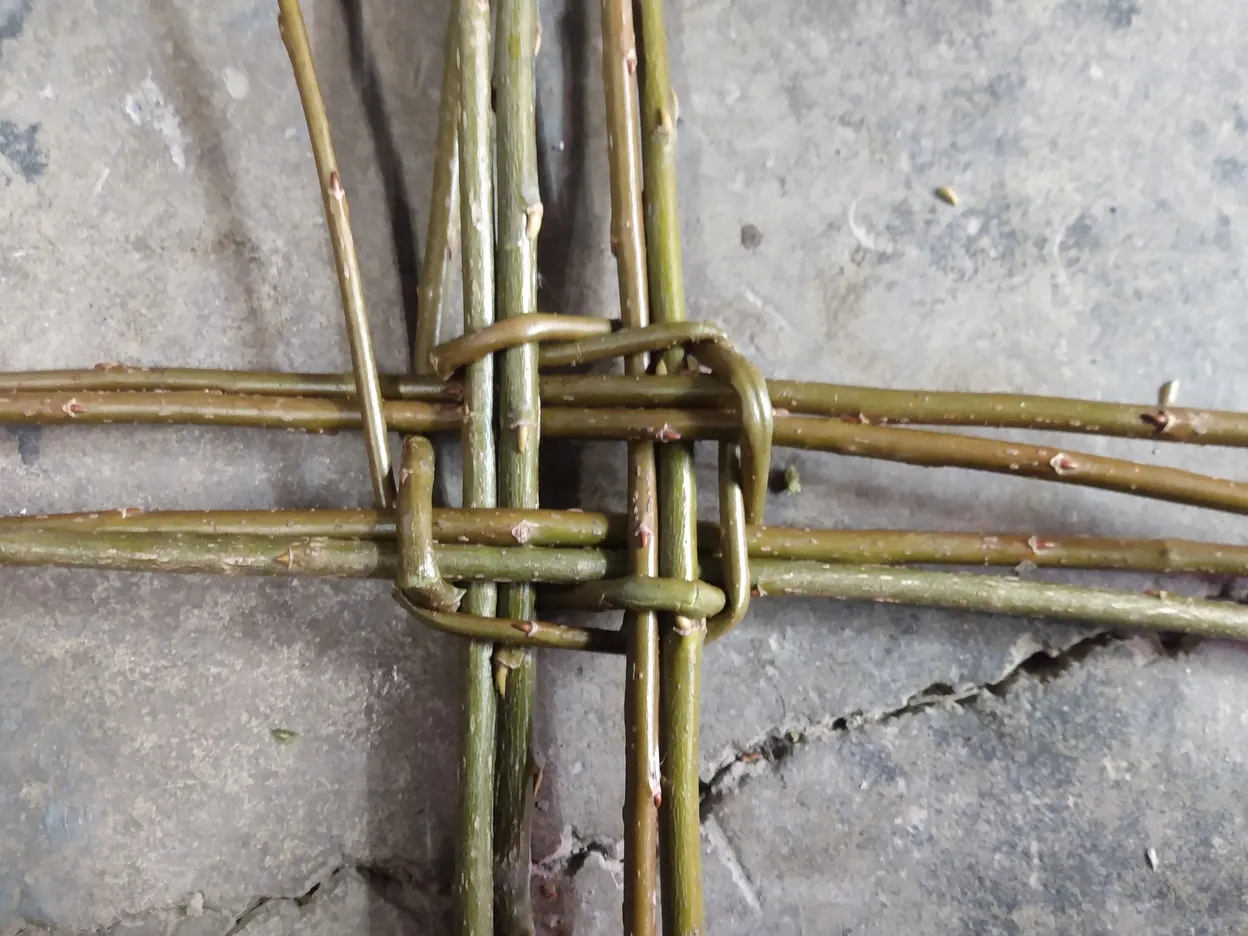
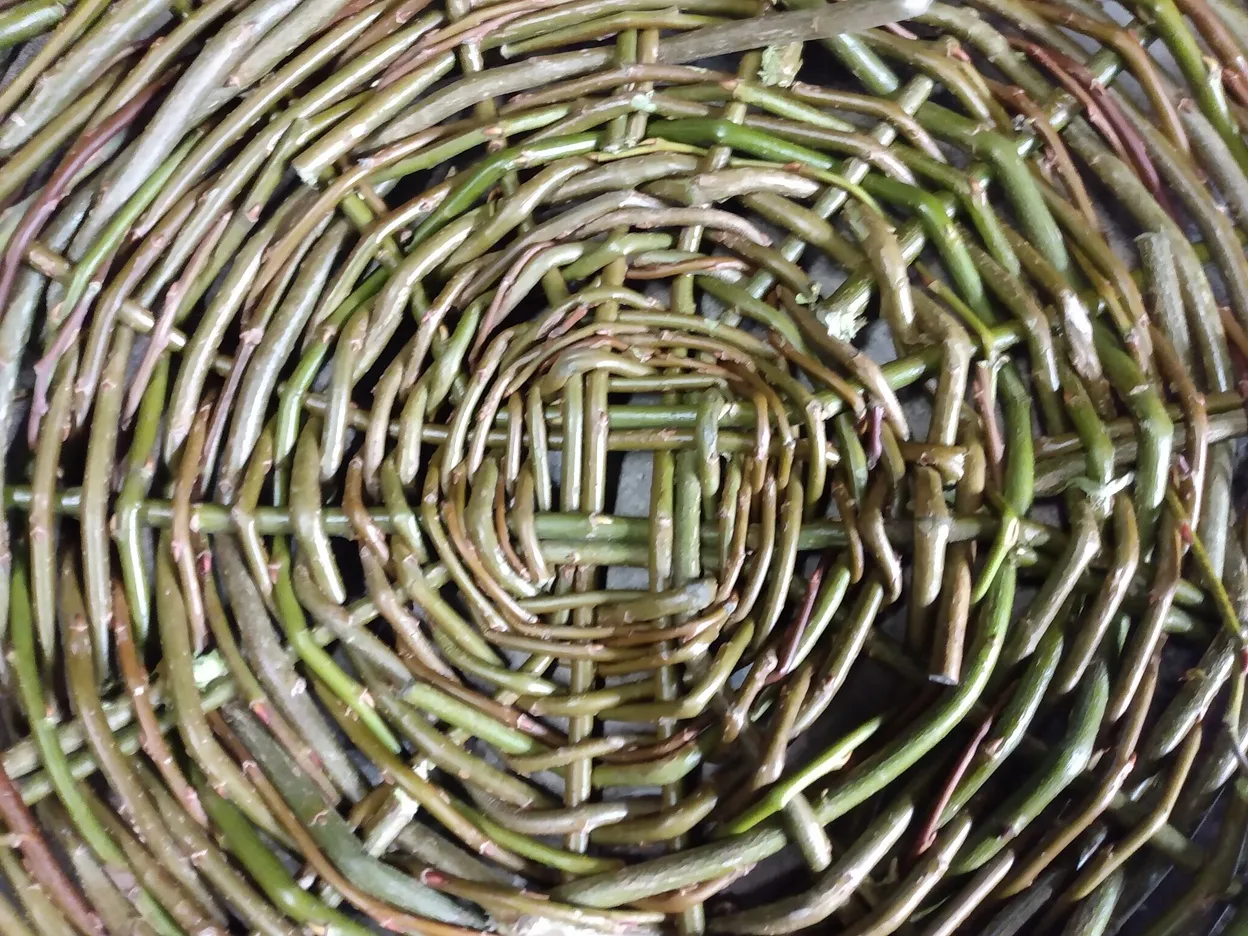
Start the base by interlocking your stakes, as seen in the photo above. At this point, I'll be treating each pair of stakes as though it were a single stake. The procedure is the same if you are using more (or less) stakes to begin with, as long as you are using a multiple of four. The stake should intersect as close to the middle points as you can manage. They'll be difficult to keep together at this point, but that's okay.
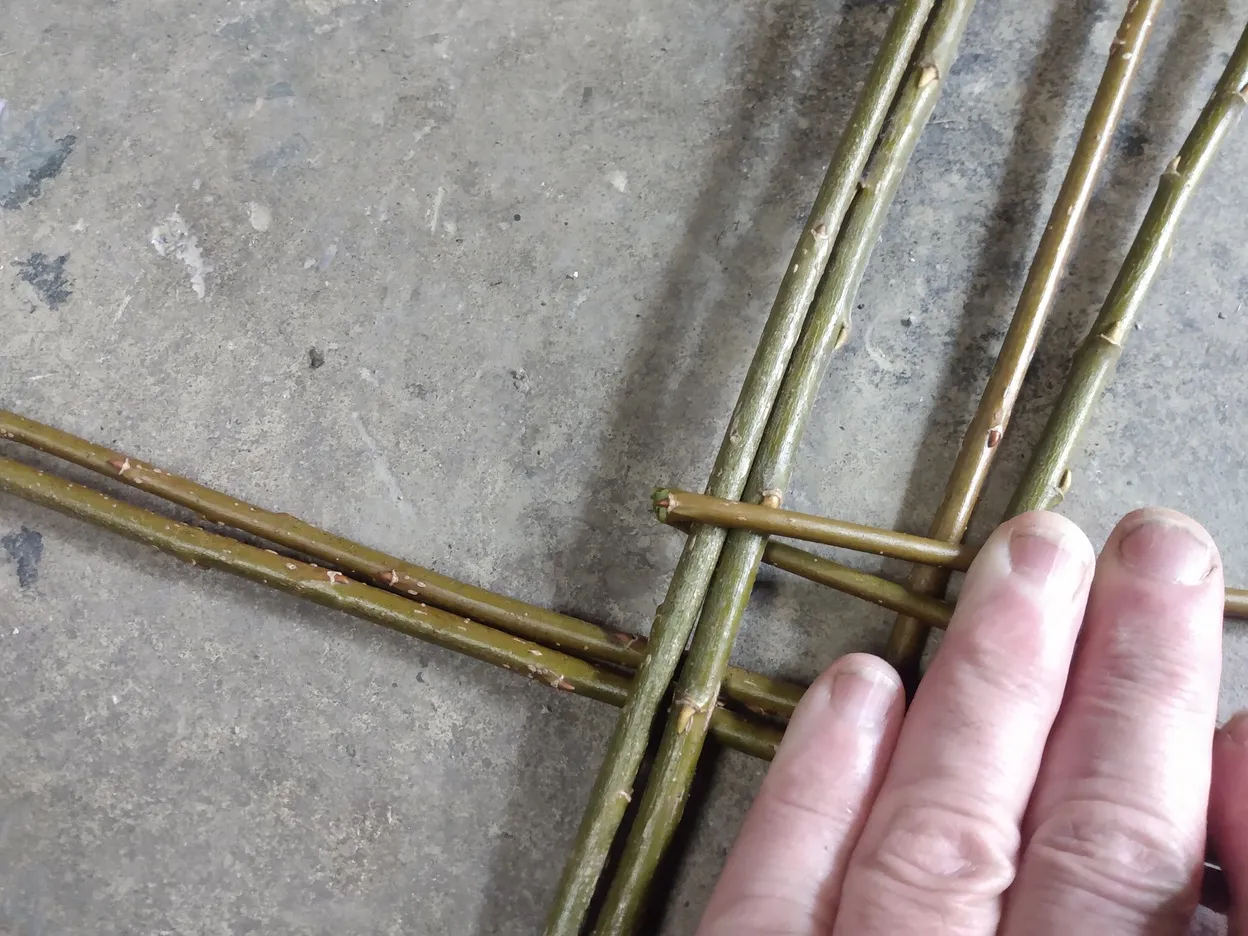
Every piece of material that isn't a stake is a weaver. For your first weaver, you will want to use the strongest piece you have that will take a 180° bend. Bend this weaver around the first pair of stakes (it doesn't matter which pair is first) as shown in the picture above. The bend should be a few inches off from center in your first weaver, so that the ends will be offset as you continue weaving. I prefer to offset so that the wide end of the weaver will be the shorter end.
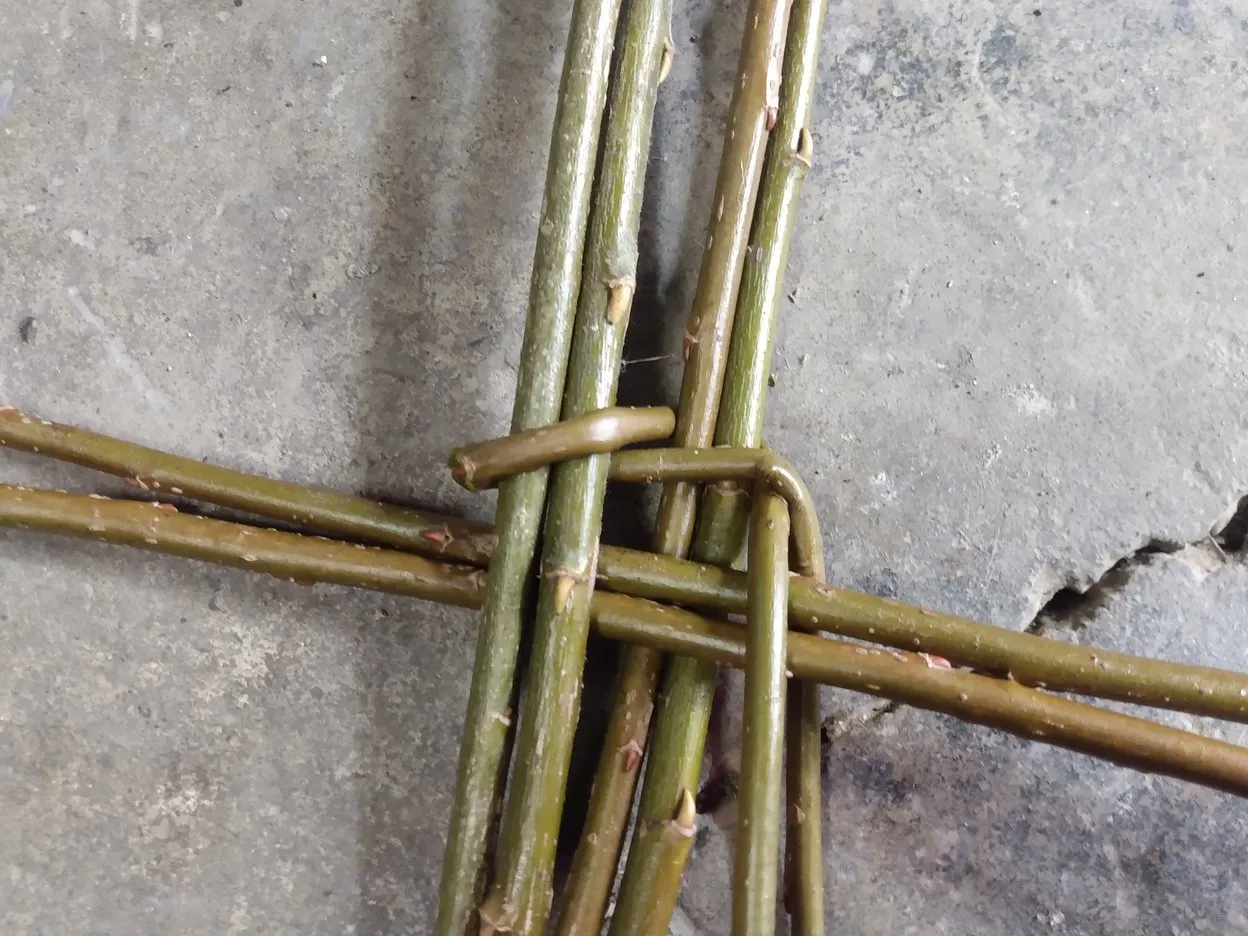
Continue to twist the weaver around each pair of stakes as seen in the photo above, forcing each intersection together as tightly as you can. This locks the stakes into place, so it is very important that your weaver holds everything securely without snapping. If your weaver does break at this point, save it for later use and try again with a different one.
Once you've successfully twisted the weaver all the way around each of your four pairs of stakes, your basket should begin to hold its shape quite well. I actually made a small mistake on this one, and didn't get the proper twist between the stakes on the very bottom, but these willow branches are stiff enough that it won't make a difference in the final outcome. Sometimes, when using smaller materials, I will use rope or twine as my first weaver, and I need to pay a bit more attention with that.
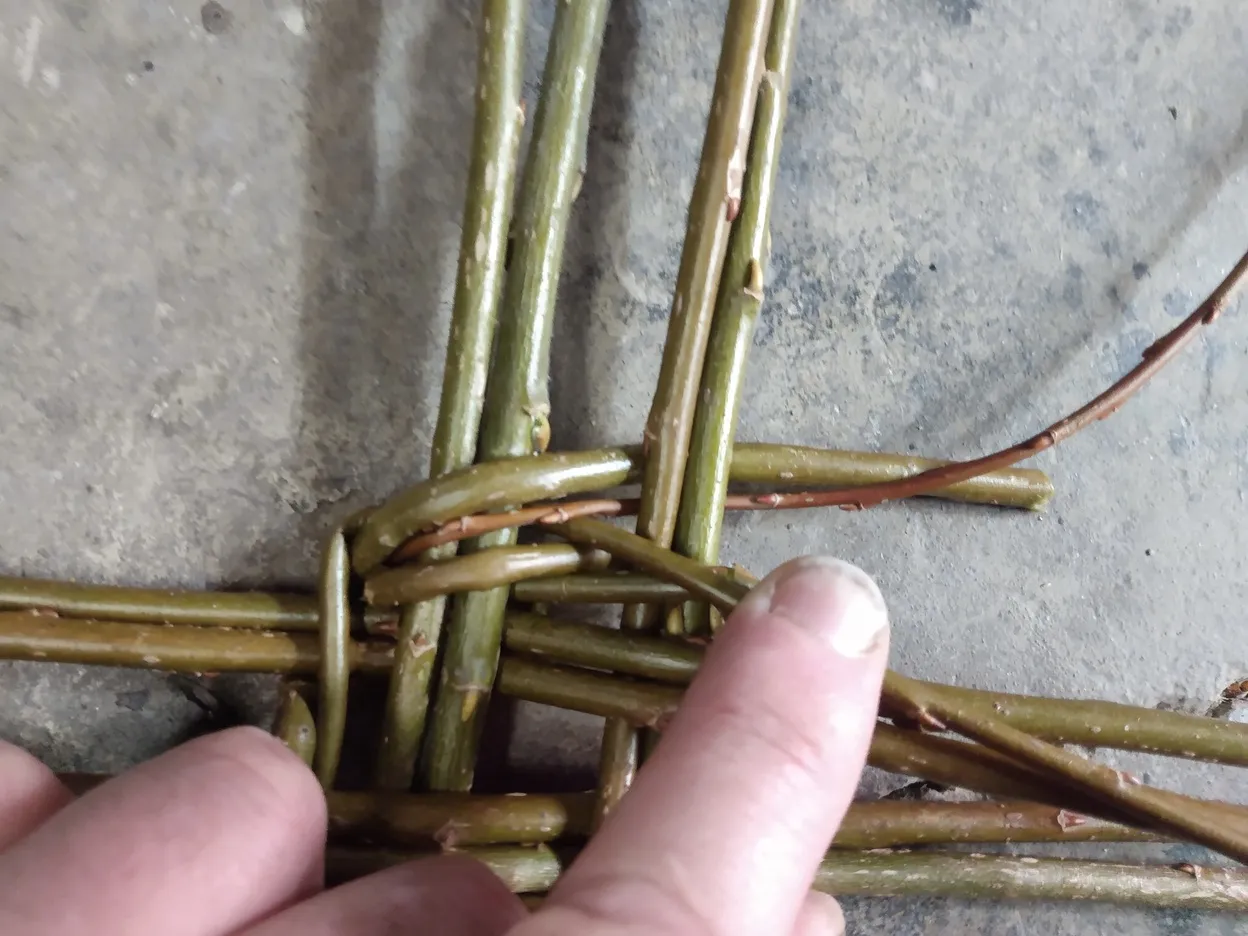
As you near the end of one end of your weaver, you will need to replace it with another. Because of the tight bends that must be made around the stakes here at the beginning, I will insert each new weaver narrow end first. When doing this, you should have the new weaver wrap around at least three stakes together with the old weaver end. This will help hold the new weaver in place.
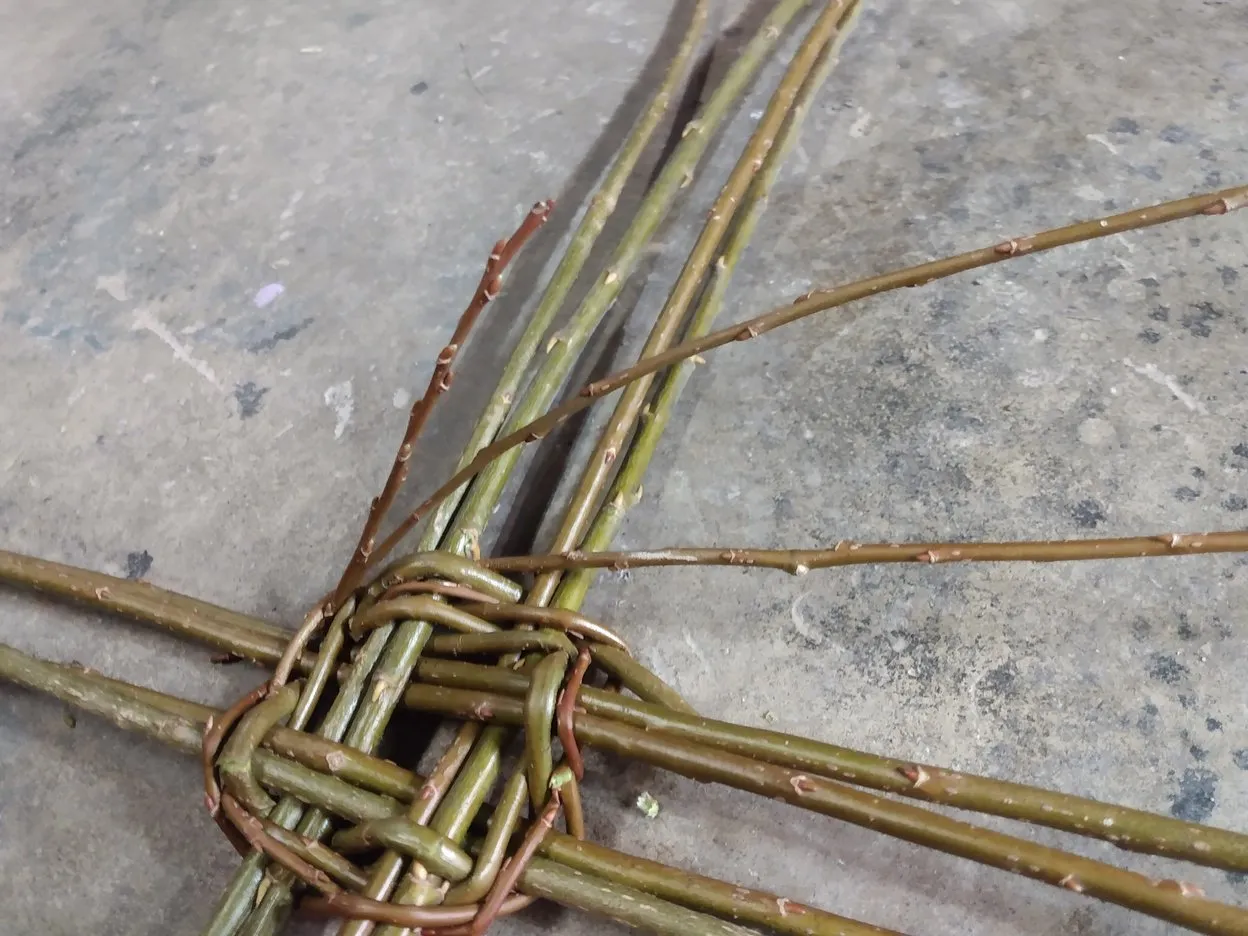
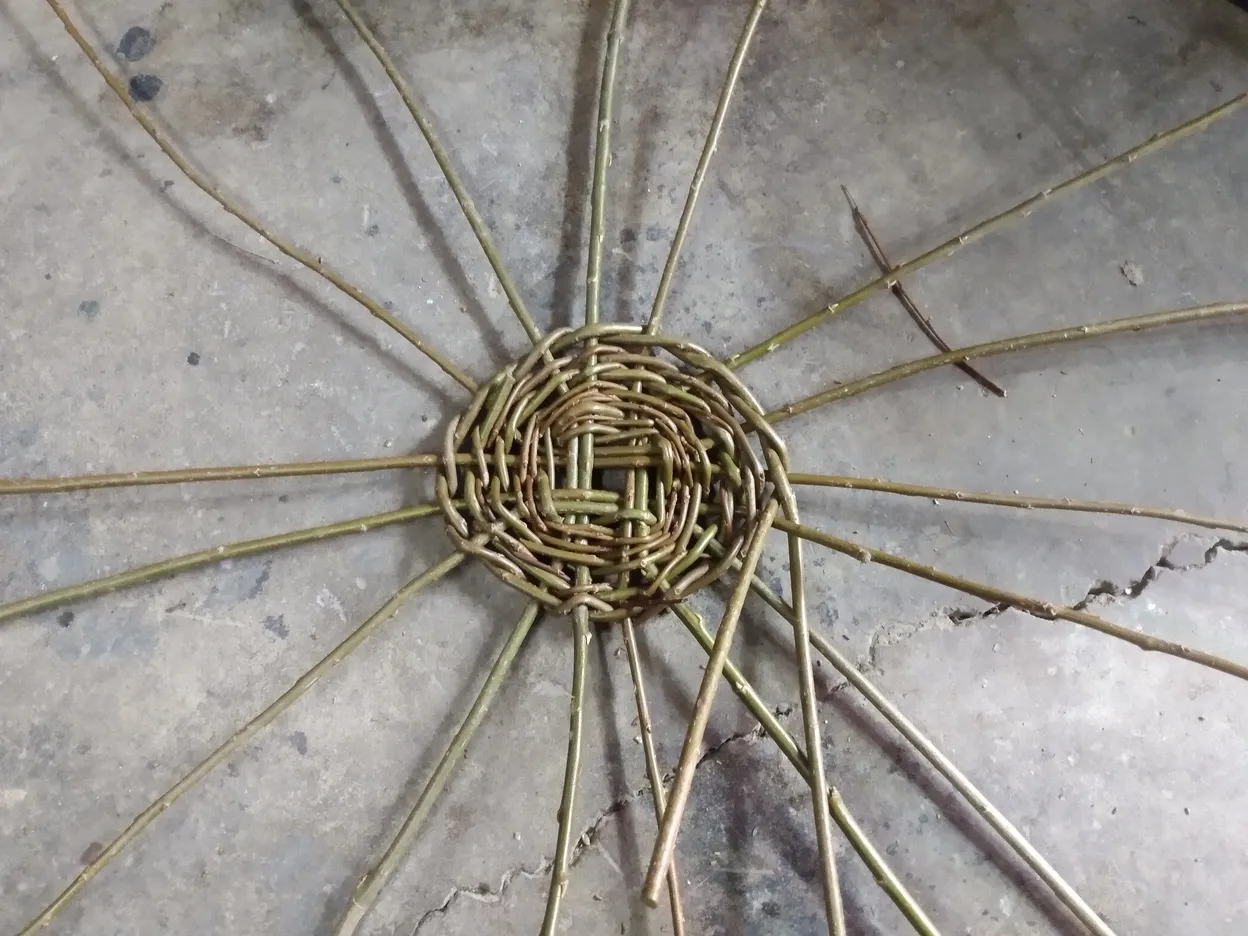
Continue with this 'locking' weave, adding in new weavers as necessary. Always do your best to keep everything tight, flat, and symmetrical. It will be nearly impossible to make it perfect with these materials, but the more attention you pay to the details now, the better looking your basket will be later!
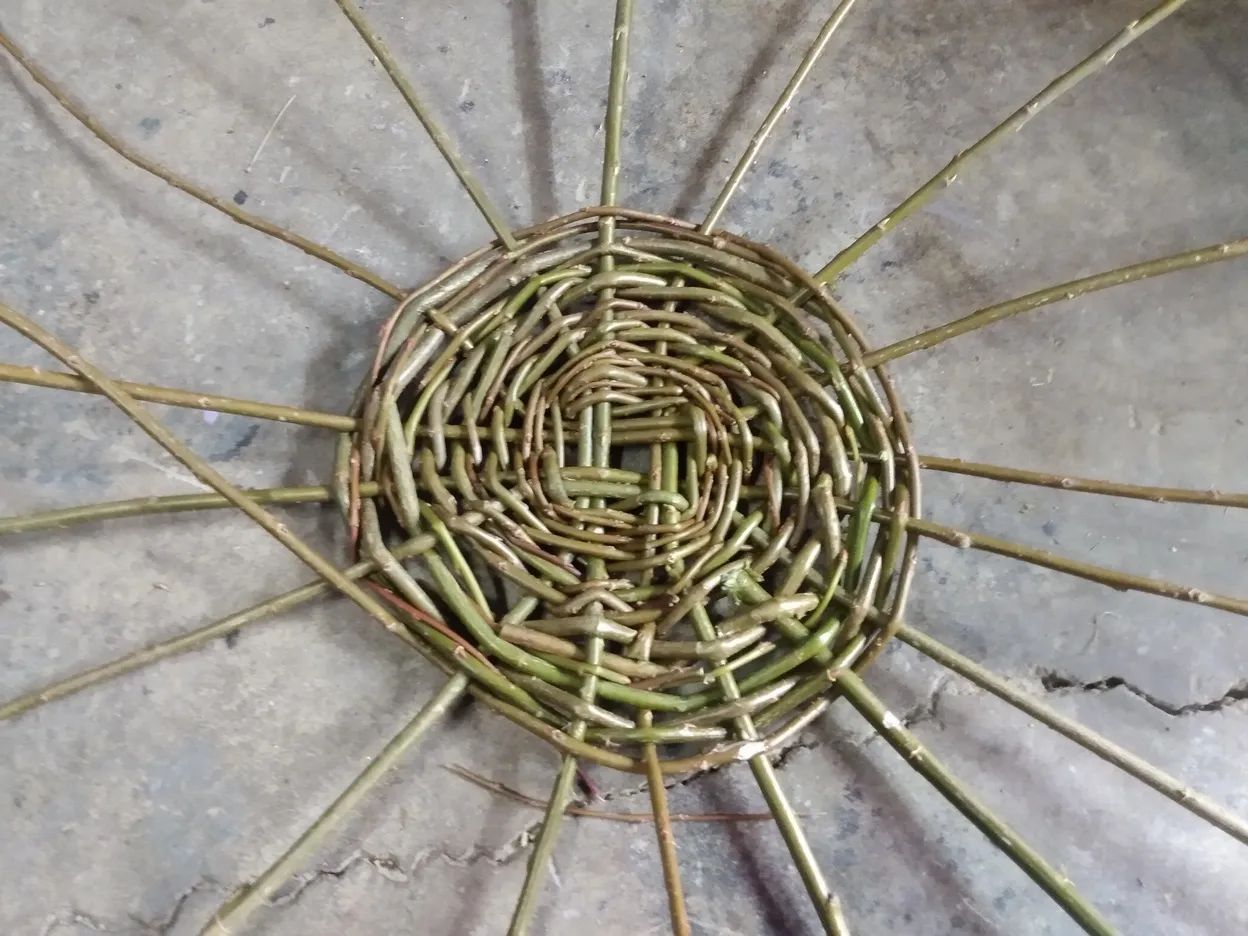
Once you've gone around all the stakes two or three times, you'll notice that the gap in the corners has grown larger, and things aren't locking together as tightly. At this point, you can begin separating and weaving between the stakes in each pair. Do your best to keep the spaces between each of the stakes even.
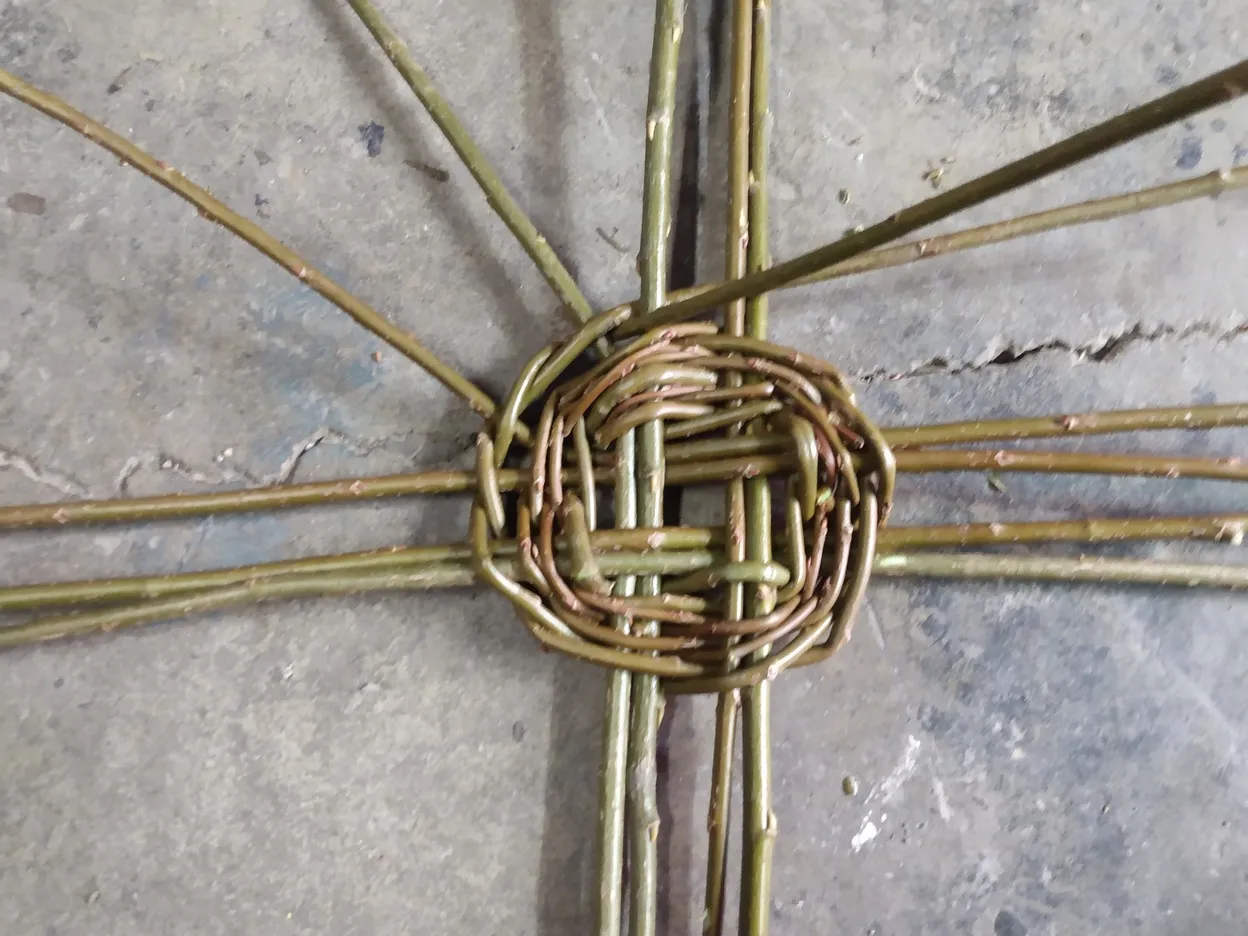
You can use this locking weave on the entire basket, if you wish, but I like to switch to a single strand, 'in and out' weave as soon as possible. To do this we will need an odd number of stakes, so it will be necessary to either add or remove one. Because my diameter is still growing at this time, I will choose to add a stake. If the diameter were decreasing (like in the neck of a vase shape) I would remove one instead.
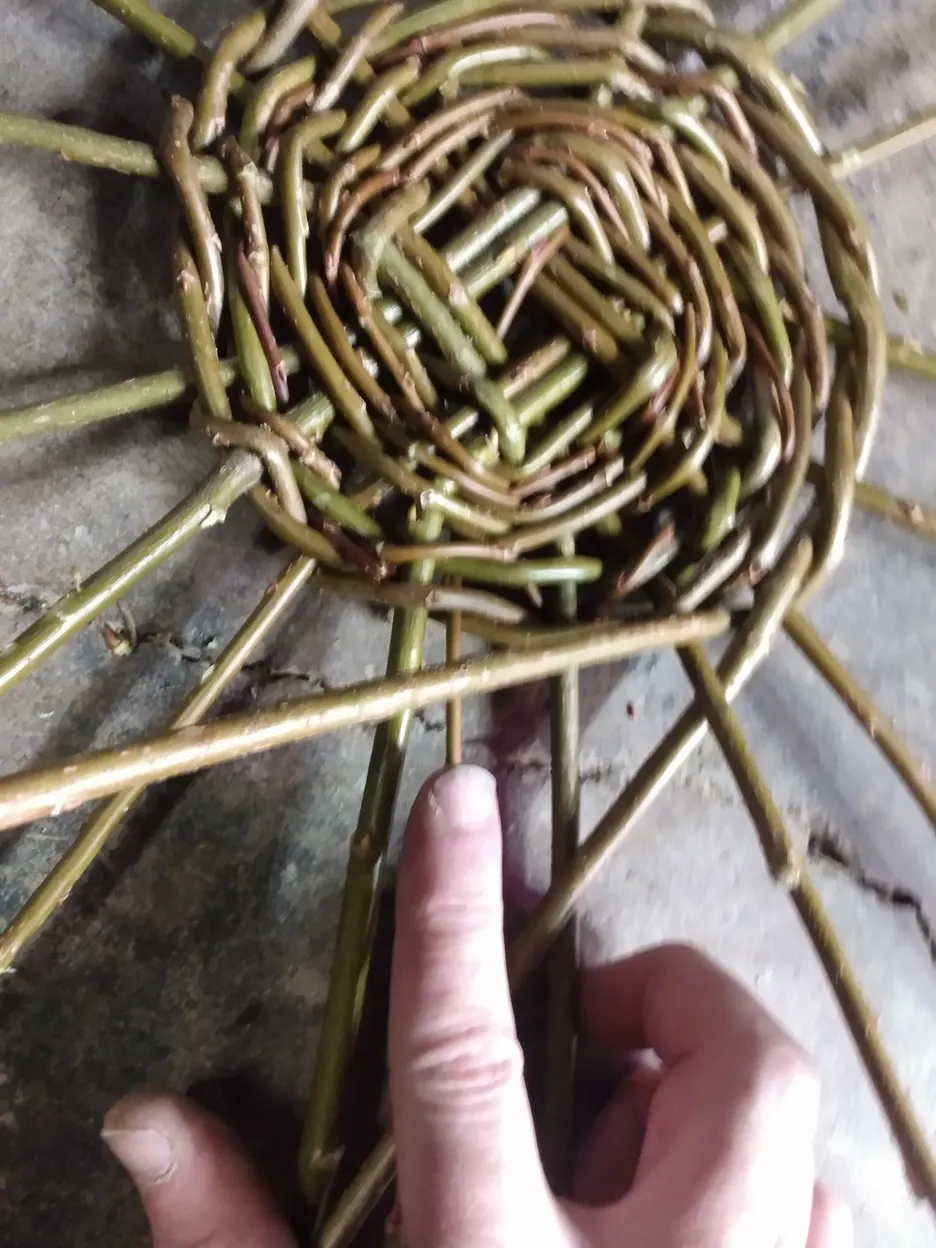
To add a stake, simply insert a new stake into gap alongside an existing one, as seen in the picture above. I like to make at least two passes around the new stake with it still alongside the existing, to help lock it in place, then weave between them just like I did when I first separated the pairs.
Once I'm comfortable with the spacing of all my stakes, I can let the ends of my locking weavers run out and switch over to a single strand weave. To do this, I simply poke the thin end of a new weaver anywhere near the edge, and begin weaving it between the stakes.
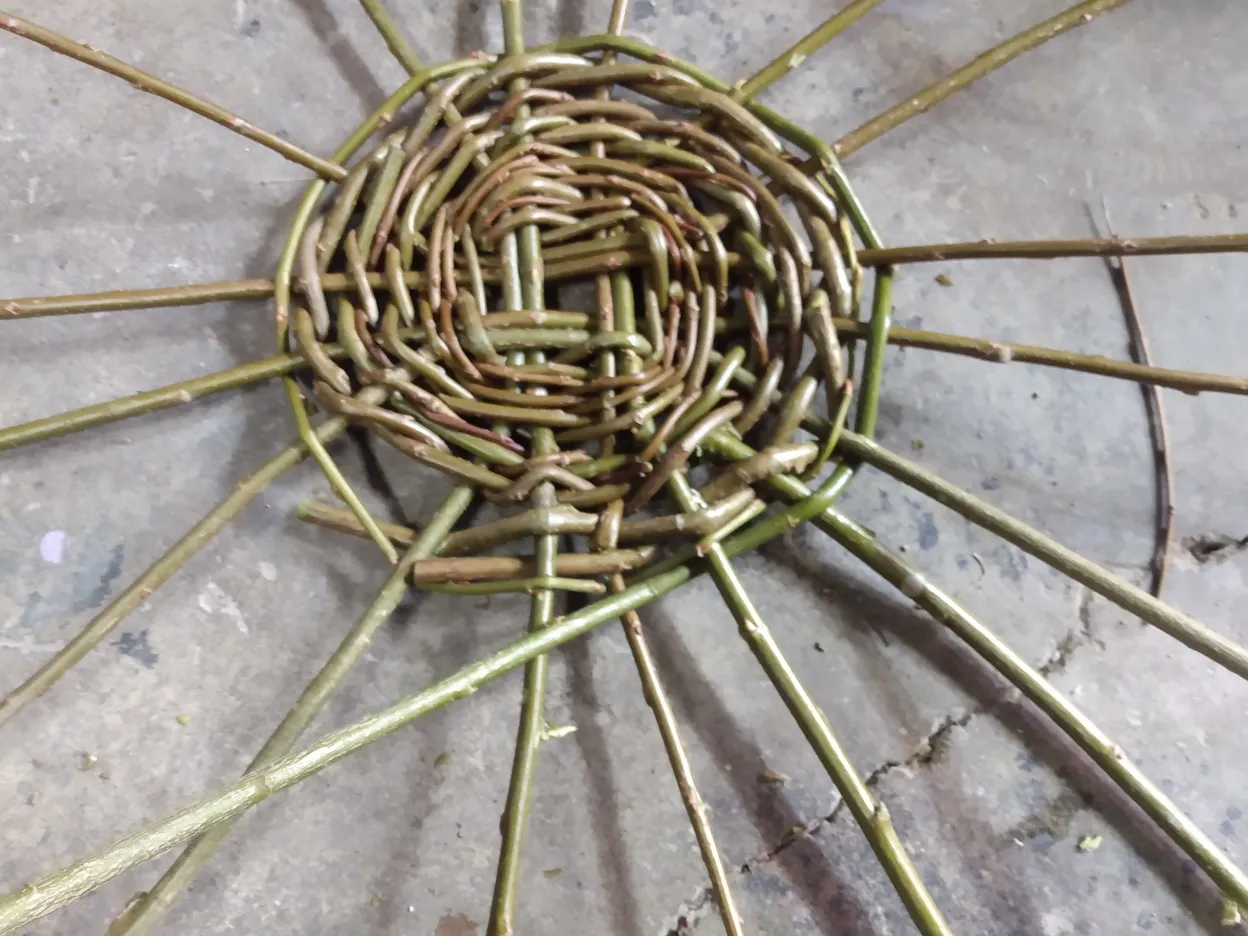
Willow sticks can be stubborn, and will try to unwind themselves from the stakes if given a chance. I try to poke the ends of the weavers into spaces where they will be held in place, but sometimes things get a little unruly, like in the picture above. This is fine, just keep pushing things into place as best you can with each pass you make around the basket with your weavers.
As long as you keep diligently tightening things up and checking the spacing between your stakes, things should even out eventually. If necessary, you can go back to the locking weave to help hold things in place and manage the shape a little better.
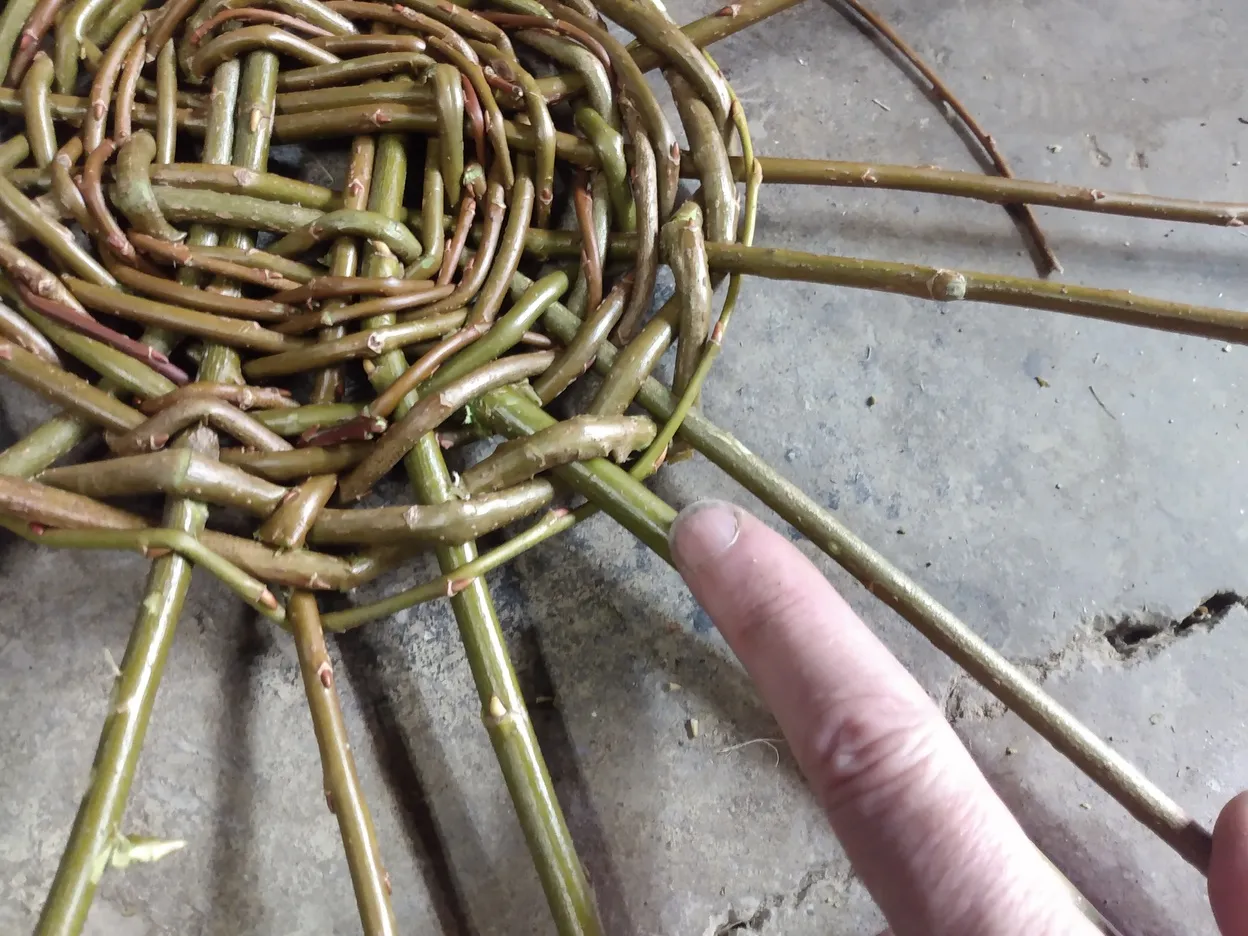
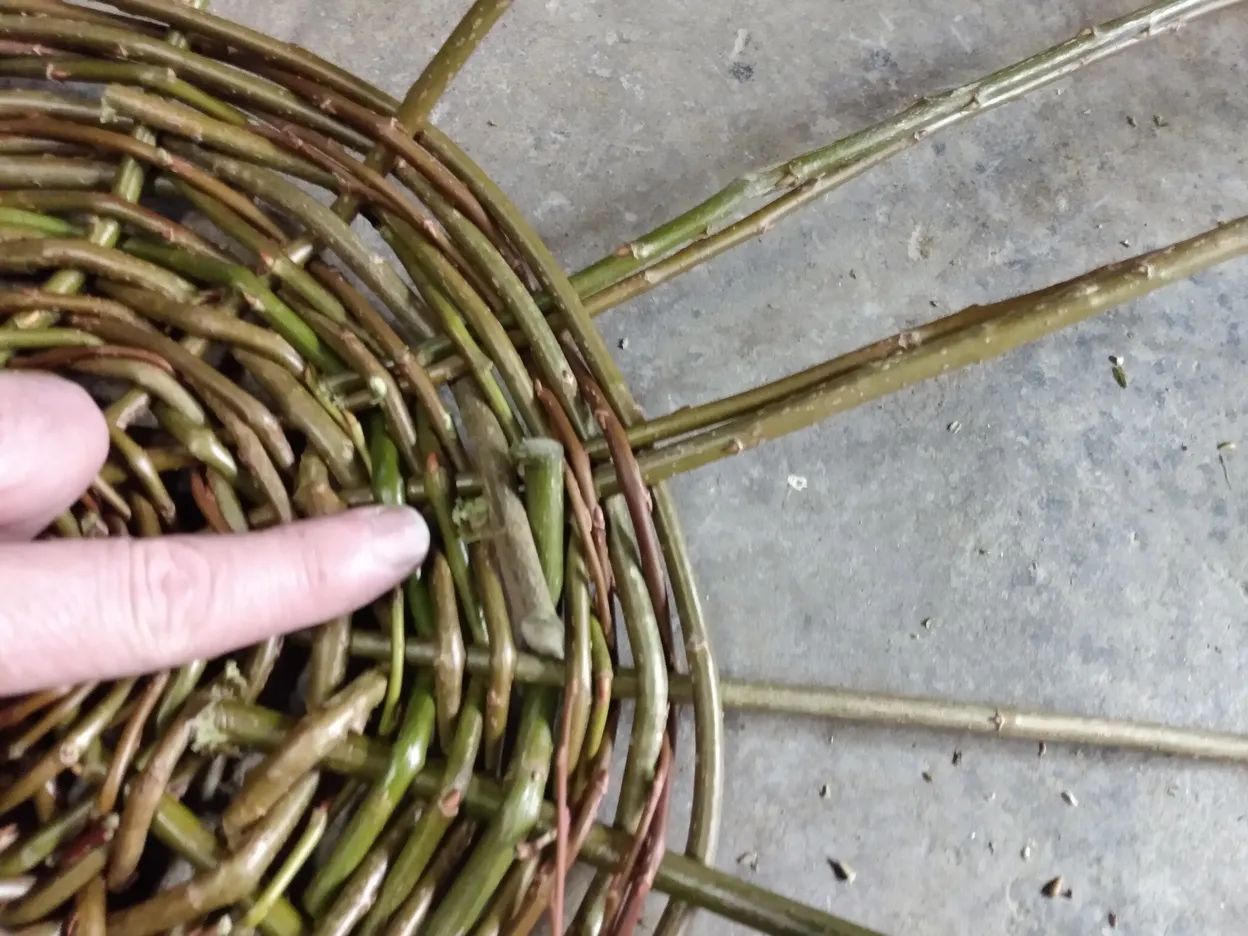
If, like my basket here, some of your stakes get too thin to hold the weavers properly as your basket grows, simply insert new stakes alongside them, as you can see I've done to several in the photo above. Each of these will be treated as a single stake for the rest of this build, but you can add stakes and split them like before to make different shapes, add handles, or for a variety of other reasons.
As your basket grows, it will become easier to add new weavers by inserting the thick end first. When adding a new thick end to a terminating thick end, it will usually suffice to start the new one on the same spoke the old one ends on, rather than running the new weaver alongside the old weaver for three or more spokes. You may need to hold the new end in place at first, but once you've made a few passes beyond it, it should be held securely in place, as seen in the picture above.

When joining thin ends on new and old weavers, it can help to twist the new weaver around the end of the old one, as shown in the photo above.

Basket making can be a full body craft... I use both hands, and often both feet, and occasionally some knees and elbows to keep things from unraveling as I work. Clothes pins (or any other kind of small clamp) can also be a huge benefit, especially when doing fancier weaves that use several weavers at a time.
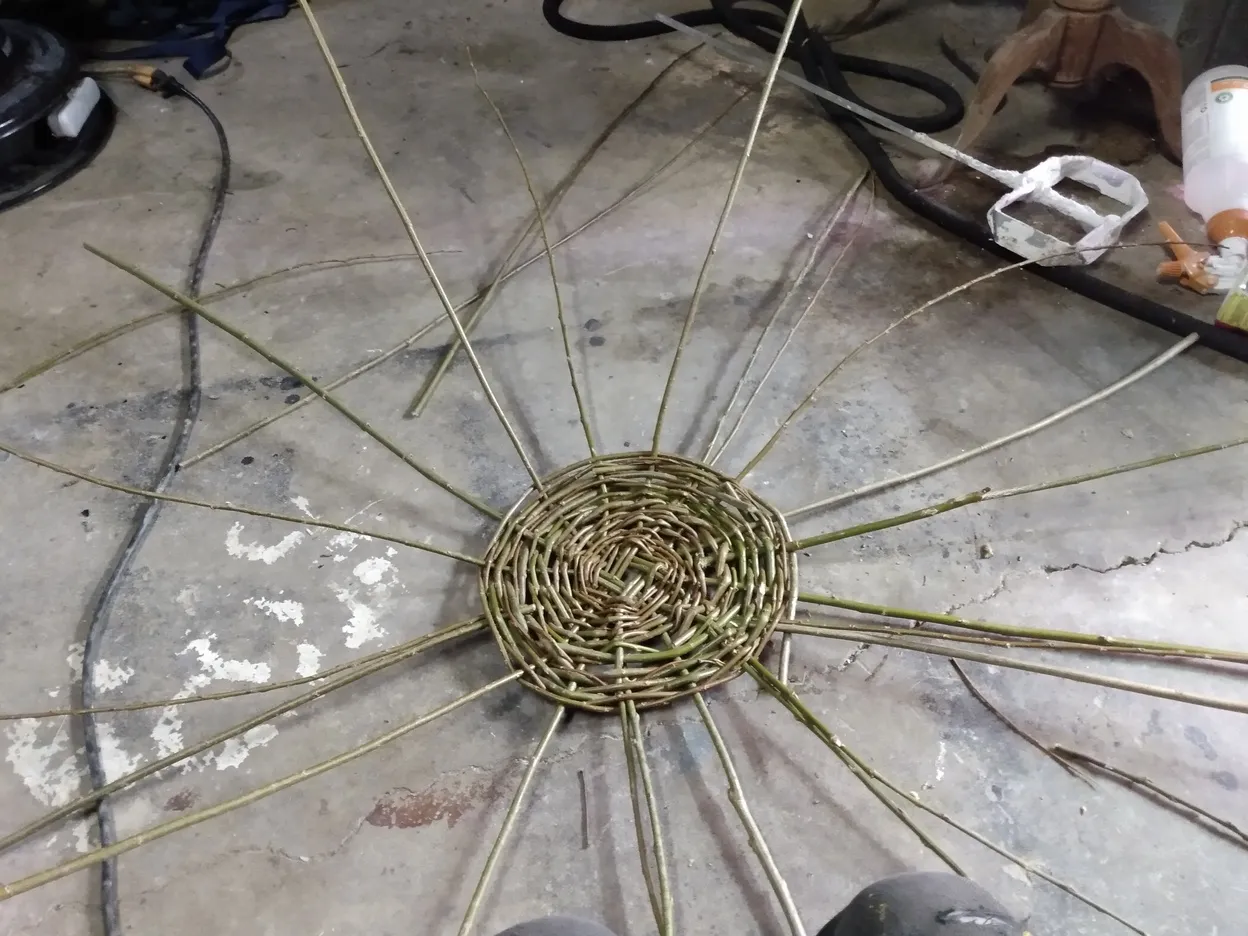
Continue like this until your basket base is whatever size you want it to be. You will want to leave enough stakes to bend up and form the sides of the basket, but we'll get to that in the next part. For now, this will bring a close to our basket making lesson. Give your sore hands a break, and take a well deserved rest!
I hope you all enjoyed this beginning to my basket making tutorial. Hopefully, I won't keep you waiting too long for the next part (or parts, not really sure how that will work out). I will warn you all, though, that I haven't actually finished this basket yet, and my work season began in earnest this morning, so I have a lot less free time these days. As it is, I'm up well past midnight finishing this post, so I think I'm going to skip any further editing and launch this one before I fall asleep. If you enjoyed this, keep checking back, I'm sure I'll finish this project... eventually...