Hello friends, today I bring you an idea so that you yourself can make a wooden box to clean shoes. I tell them that two days ago they needed to clean my shoes and I did not remember where I had left the polishing cream, to avoid this, I decided to make a small wooden box to store all the implements that are required to clean the shoes, such as: wool cloth , brushes and creams.
Hola amigos, hoy les traigo una idea para que ustedes mismos puedan hacer una caja de madera para limpiar zapatos. Les cuento que hace dos días necesitaba limpiar mis zapatos y no recordaba donde habia dejado la crema de pulir, para evitar esto, decidí hacer una pequeña caja de madera para guardar todos los implementos que se requieren para la limpiza y pulimento de los zapatos, como lo son: La tela de lana, los cepillos y las cremas.
How to build a wooden box to clean shoes
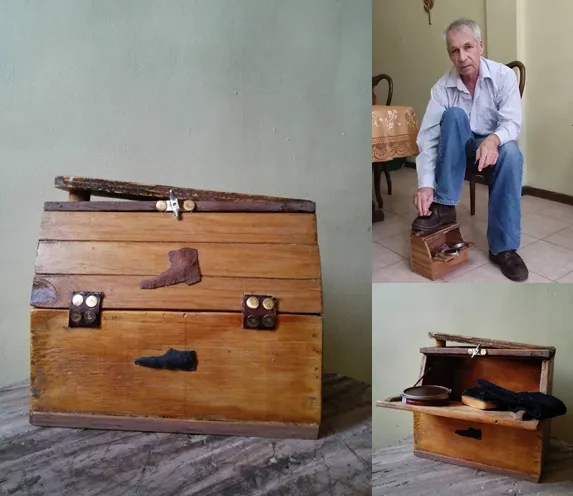
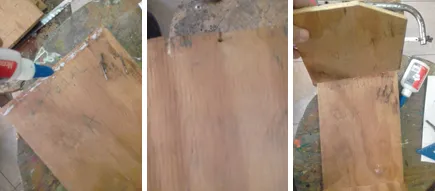
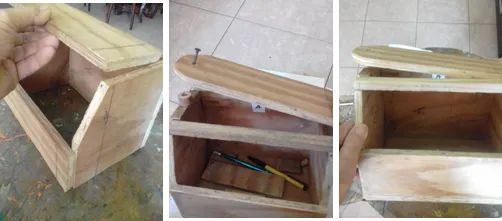
Generally these boxes are known as "box to clean shoes". This box is used to store all the articles and implements that are required for shoe cleaning, such as polishes or creams, wool cloth, brushes, etc. to shine and improve the appearance of footwear. I made this box with plywood 10 millimeters thick, for this it was necessary to make several cuts, to make the 7 pieces that compose it.
Cómo construir una caja de madera para limpiar los zapatos
Generalmente a estas cajas se les conoce como, "Caja para limpiar zapatos". Esta caja se usa para guardar todos los articulos e implementos que se requieren para limpiar los zapatos, tales como, el betun o cremas, tela de lana, cepillos, etc. para dar lustre y mejorar la apariencia de los calzados. Esta caja la hice con madera contraemchapada de 10 milimetros de espesor, para ello fue necesario realizar varios cortes para hacer las 7 piezas que la componen .
| Materials and tools: | Materiales y herramientas: |
|---|
| - A piece of plywood 1.50 m long x 0.20 wide, 10 mm thick to cut the 7 pieces that will make up the box. | - Una tabla de madera contraenchapado de: 1.50 m de largo x 0.20 de ancho, espesor: 10 mm para cortar los 7 piezas que formarán la caja. |
| - White glue for carpentry. | - Pega blanca para carpinteria. |
| - One sheet of 320 grit sandpaper. | - Un pliego de lija grano 320. |
| - 3/4 and 1 inch nails. | - Clavos sin cabeza de 3/4 y de 1 pulgada. |
| - Natural varnish | - Barniz natural. |
| - Hammer | - Martillo. |
| - Manual bow saw. | - Sierra manual de arco. |
Model and measurements of the parts that make up the shoe cleaning box://Modelo y medidas de las piezas que forman la caja para limpiar zapatos:
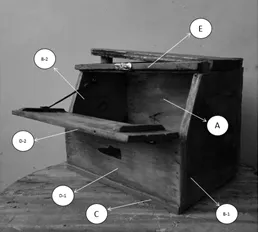
Below you can see the model of the box that I have built, there I indicate with a LETTER each of the pieces that compose it and their measurements.
A continuación podrán ver el modelo de la caja que he construido, allí les indico con una LETRA cada una de las piezas que la componen y las medidas de cada una de ellas.
| Measurements of the wooden pieces, depending on the mode: | Medidas de las piezas de madera según el modelo: |
|---|
| 1 piece of wood for the rear, A. | 1 Pieza de madera para el lado posterior, A. |
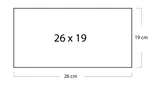
| 2 pieces of wood for sides, B | 2 Piezas de madera para laterales, B. |
|---|
| 1 piece of wood for the bottom, C. | 1 pieza de madera para la parte inferior, C. |
|---|
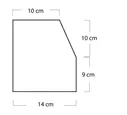
| 1 Fixed pieces of wood for the front, D-1. | 1 Piezas fija de madera para el frente, D-1. |
|---|

| 1 Piece of Wood for Hinged Front, D-2. | 1 Pieza de madera para el frente con bizagras, D-2. |
|---|
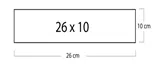
| 1 Upper piece of wood E, which will support the footwear. | 1 Pieza superior de madera E, que servirá de apoyo al calzado. |
|---|
Process for the construction of the shoe shine box:|Proceso para la construcción de la caja para limpiar zapatos:
| Once we have made the different cuts indicated in the previous item, we proceed to assemble the pieces as follows: | Una vez que hemos realizado los diferentes cortes señalados en el item anterior, procedemos a ensamblar las piezas de la siguiente manera: |
|---|
| Step 1: We will start by joining the back piece A with the two side pieces B, the procedure consists of first smearing the glue and then fixing them with the 1-inch nails. This procedure applies to the other parts. | Paso-1: Comenzaremos uniendo la pieza posterior A con las dos piezas laterales B, el procediemiento consiste en untar primero el pegamento y luego las fijamos con los clavos de 1 pulg. Este procedimiento aplica para las demás piezas. |
| Step-2: In this step we are going to place the piece D-1, which will be fixed on the front of the box. | Paso-2: En este paso vamos a colocar la pieza D-1, la cual quedará fija en el frente de la caja. |
|---|
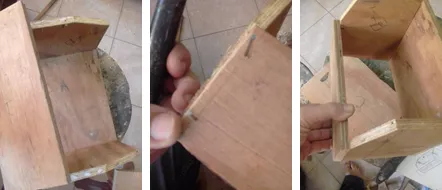
| Step-3: Now I am going to place the bottom piece or floor of the box C, we will do this the same as step 1. | Paso-3: Ahora voy a colocar la pieza inferior o piso de la caja C, esto lo haremos igual que el paso 1. |
|---|
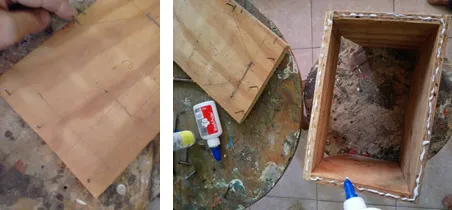
| Step-4: The next thing will be to place the upper piece E, this piece will have a slight inclination to facilitate the position of the foot and the shoe on the box. Another detail that you can see in the image is a small 1 cm thick board, which I placed on the edge of the piece. | Paso-4: Lo siguiente será colocar la pieza superior E, esta pieza tendrá una pequeña inclinación para facilitar la posición del pie y el calzado sobre la caja, para ello coloqué un trozo de madera redonda de 1 pulgada para darle dicha inclinación. Otro detalle que pueden observar en la imágen, es una pequeña tabla de 1 cm que coloqué en el borde de esta pieza. |
|---|
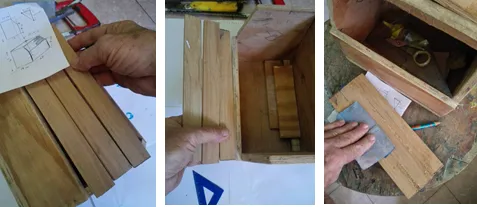
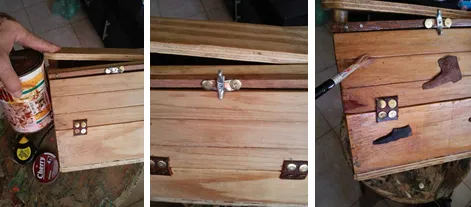
Friends, so far we have placed 6 pieces of the 7 that make up the box, it only remains to place the piece D-2 with the hinges, sanding and varnishing, but to continue with the process, I want to tell you that I decided make this piece D-2, with 3 wooden boards 5mm thick and 3.3 cm wide, because I think it would look better that way than plywood. For this I joined the small boards with the glue held on one side with two screwed boards.
Amigos, hasta ahora hemos colocado 6 piezas de las 7 que forman la caja, solo faltaría por colocar la pieza D-2 con las bizagras, el lijado y el barniz, pero para continuar con el proceso, quiero decirles que esta pieza D-2, la decidí hacer con 3 tablas de madera de 5 mm de espesor y de 3.3 cms de ancho, porque así creo que se veia mejor que el contraenchapado. Para ello uní las pequeñas tablas con el pegamento sujetadas por un lado con dos tablas atornilladas.
| Step-5: After having built the door with the 3 small wooden boards, (piece: D-2), we are going to fix it from piece D, for this the hinges are necessary Thank God, I put my imagination to work and it occurred to me to make them with the leather of an old damaged strap. I attached these hinges with pushpins or decorative office tacks, without the plastic covering them, to show off the gold metal. | Paso-5: Después de haber construido la puerta con las 3 pequeñas tablas, (pieza: D-2), vamos a fijarla de la pieza D, para ello son necesarias las bisagras, gracias a Dios, puse a funcionar la imaginación y se me ocurrió hacerlas del cuero de una correa vieja dañada. Estas bizagras las coloqué utilizando chinches o tachuelas decorativas de oficina, sin el plástico que las cubre para que se viera el metal dorado. |
|---|
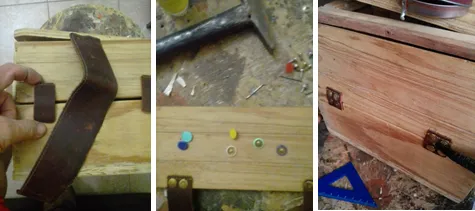
| Step 6: When I thought that I only needed the varnish to finish, another detail came up, which I learned in this work, was to use the butterfly type opener of a container of shoe cream, to serve as a retainer for the door of the box, this idea came to me to mind after looking at this opener and said, this is what was missing so I did it and it really looks great. | Paso-6: Cuando pensé que solo me faltaba el barniz para terminar, surgió otro detalle, del cual aprendí en esta obra, fue la de utilizar el abridor tipo mariposa de un envase de crema para zapatos, para que sirviera de reten de la puerta de la caja, esta idea llegó a mi mente después de mirar este abridor y dije, esto es lo que faltaba, así lo hice y de verdad se ve muy bien. |
|---|
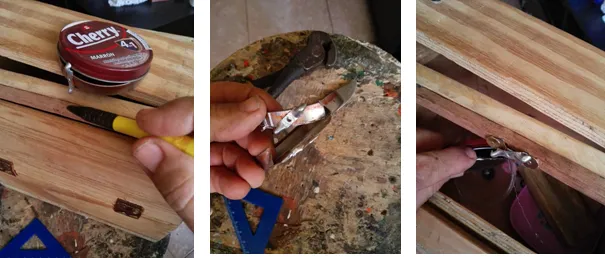
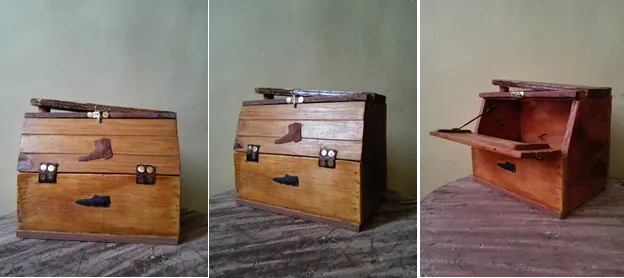
| Step-7: Varnishing the wood of the box. | Paso-7: Barnizado de la madera de la caja. |
|---|
Pictures of the finish of the wooden shoe cleaning box://Imágenes del acabado de la caja de madera para limpiar zapatos:
I say goodbye to you, hoping that you liked this box to clean shoes, that you can make it yourself at home, greetings and God bless you.
Me despido de ustedes esperando que les haya gustado esta caja para limpiar zapatos, que ustedes mismos la pueden hacer en casa, saludos y que Dios me los bendiga.