
Español
Hola linda comunidad de Build-it, en esta oportunidad les mostraré como realizar un arreglo en Globos utilizando distintas técnicas, muchos se preguntan ¿Como puedo inflar un Globo Burbuja? pues aquí les indicaré las técnicas.
Para los amantes de las manualidades este post les será muy beneficioso, tengo un año y medio envuelta en este mundo del arte en globos, es unos de mis trabajos favoritos, para los que quieran conocer mas sobre decoración en globos, les invito a ver mis trabajos por instagram en @decocuchi2020.
English
Hello, Build-it community, in this opportunity I will show you how to make a balloon arrangement using different techniques, many people wonder how can I inflate a Bubble Balloon? well here I will show you the techniques.
For lovers of crafts this post will be very beneficial, I have a year and a half involved in this world of balloon art, is one of my favorite jobs, for those who want to know more about balloon decoration, I invite you to see my work on instagram @decocuchi2020.

Materiales a utilizar | Materials to be used
- Inflador de Globos
- Globo de corazón abierto plateado de 16"
- Globo de estrella de 18"
- 3 palitos para globos burbujas
- Globo burbuja de 18"
- Globos de látex plateado y rosado
- Cinta de regalo plateada
- Papel de seda morado
- Papel de regalo tornasol
- Golosinas
- Pistola de silicón
- Cinta adhesiva
- Cajita o huacal
- Anime
- Confeti
- Embudo
- Etiqueta de Happy Birthday
- Palitos de altura
- Cartulina Fucsia
- Balloons Inflator
- 16" silver open heart balloon
- 18" star balloon
- 3 bubble balloon sticks
- 18" Bubble balloon
- Silver and pink latex balloons
- Silver gift ribbon
- Purple tissue paper
- Iridescent wrapping paper
- Candy
- Silicone gun
- Adhesive tape
- Small box or crate
- Anime
- Confetti
- Funnel
- Happy Birthday label
- Tall sticks
- Fuchsia Cardboard

Tutorial paso a paso | Step by step tutorial
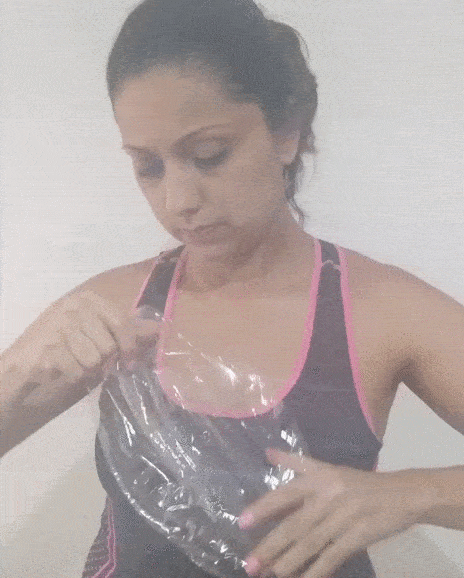
Empezaremos por realizar estiramientos de nuestro globo burbuja horizontal como vertical, lo hacemos sin miedo, inflamos y desinflamos varias veces. Esta técnica es para que el globo quede lo mas redondo posible.
We start by stretching our balloon bubble horizontally and vertically, we do it without fear, we inflate and deflate several times. This technique is to make the balloon as round as possible.
Ahora con un embudo, lo introducimos en la boca del globo burbuja e incorporamos el confeti, sacamos el embudo para introducir los globos de látex por supuesto sin inflar, al estar dentro del globo burbuja procedemos a inflarlos, amarramos bien fuerte y soltamos los globitos.
Now with a funnel, we introduce it into the mouth of the bubble balloon and incorporate the confetti, we take out the funnel to introduce the latex balloons of course without inflating, when they are inside the bubble balloon we proceed to inflate them, we tie them tightly and release the balloons.
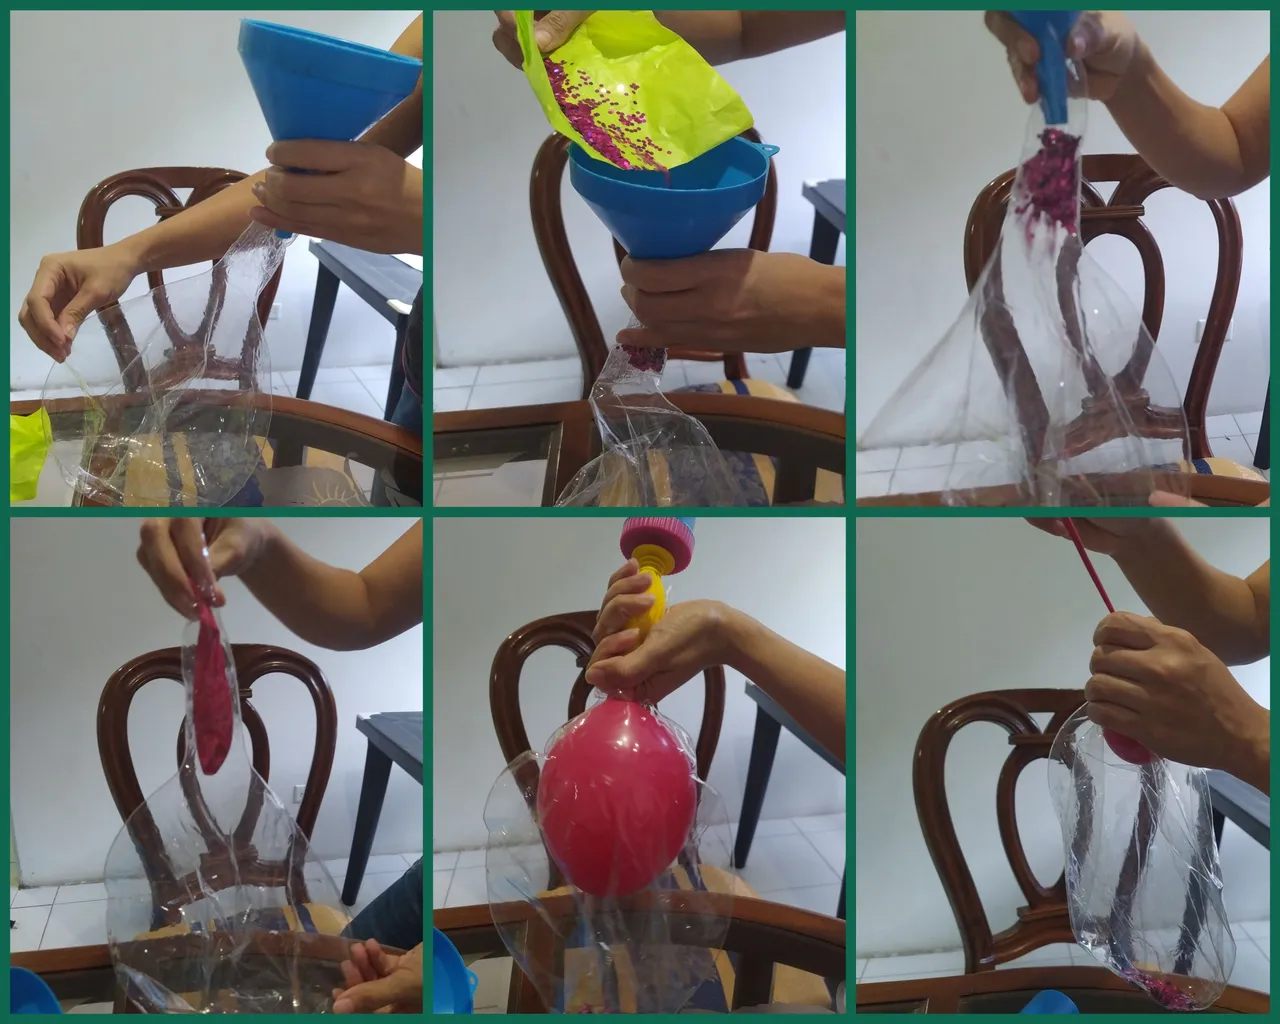
Llenamos el globo burbuja en su totalidad, lo amarramos fuertemente, preparamos nuestra base colocando el anime dentro de la cajita, llenamos los dos globos que nos faltan y los sujetamos en cada palo, ajustando el amarre en la copa para luego introducirlos en la base y organizarlos.
Aprovechamos este paso para pegar la etiqueta en el globo burbuja.
We fill the bubble balloon in its entirety, tie it tightly, prepare our base by placing the anime inside the box, fill the two balloons we are missing and attach them to each stick, adjusting the tie on the cup to then insert them into the base and organize them.
We take advantage of this step to stick the label on the bubble balloon.
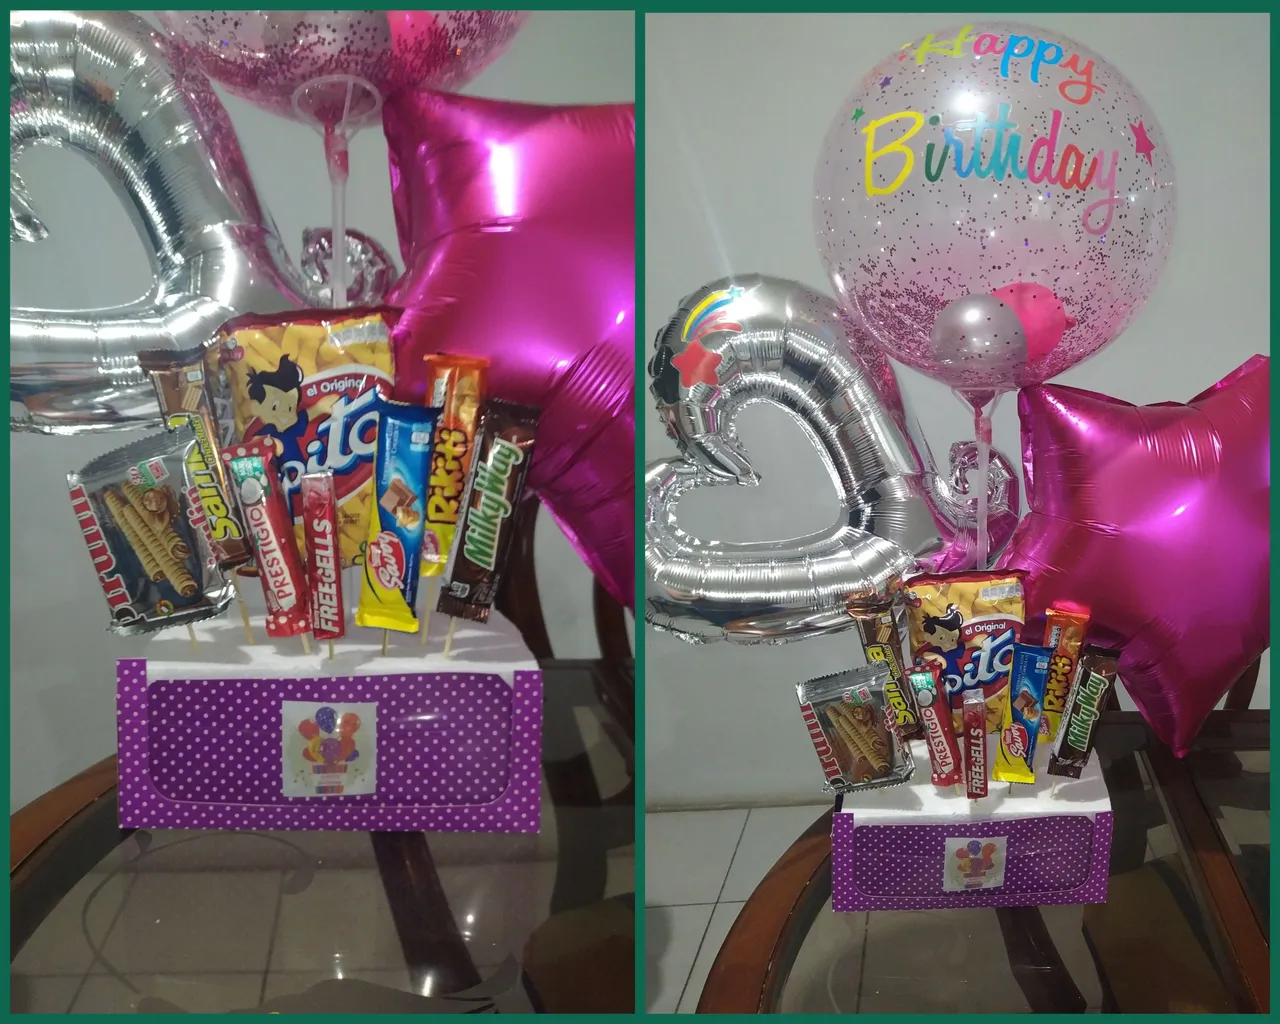
Preparamos las golosinas, le colocamos silicón caliente en la parte de atrás, colocamos el palito de altura, dejamos que seque y aseguramos este proceso con cinta adhesiva.
We prepare the candies, put hot silicone on the back, place the height stick, let it dry and secure this process with adhesive tape.

Introducimos las golosinas, empezando por las mas pequeñas, las cuales colocaremos adelante y las grandes mas atrás.
We introduce the candies, starting with the smallest ones, which we will place at the front and the big ones at the back.
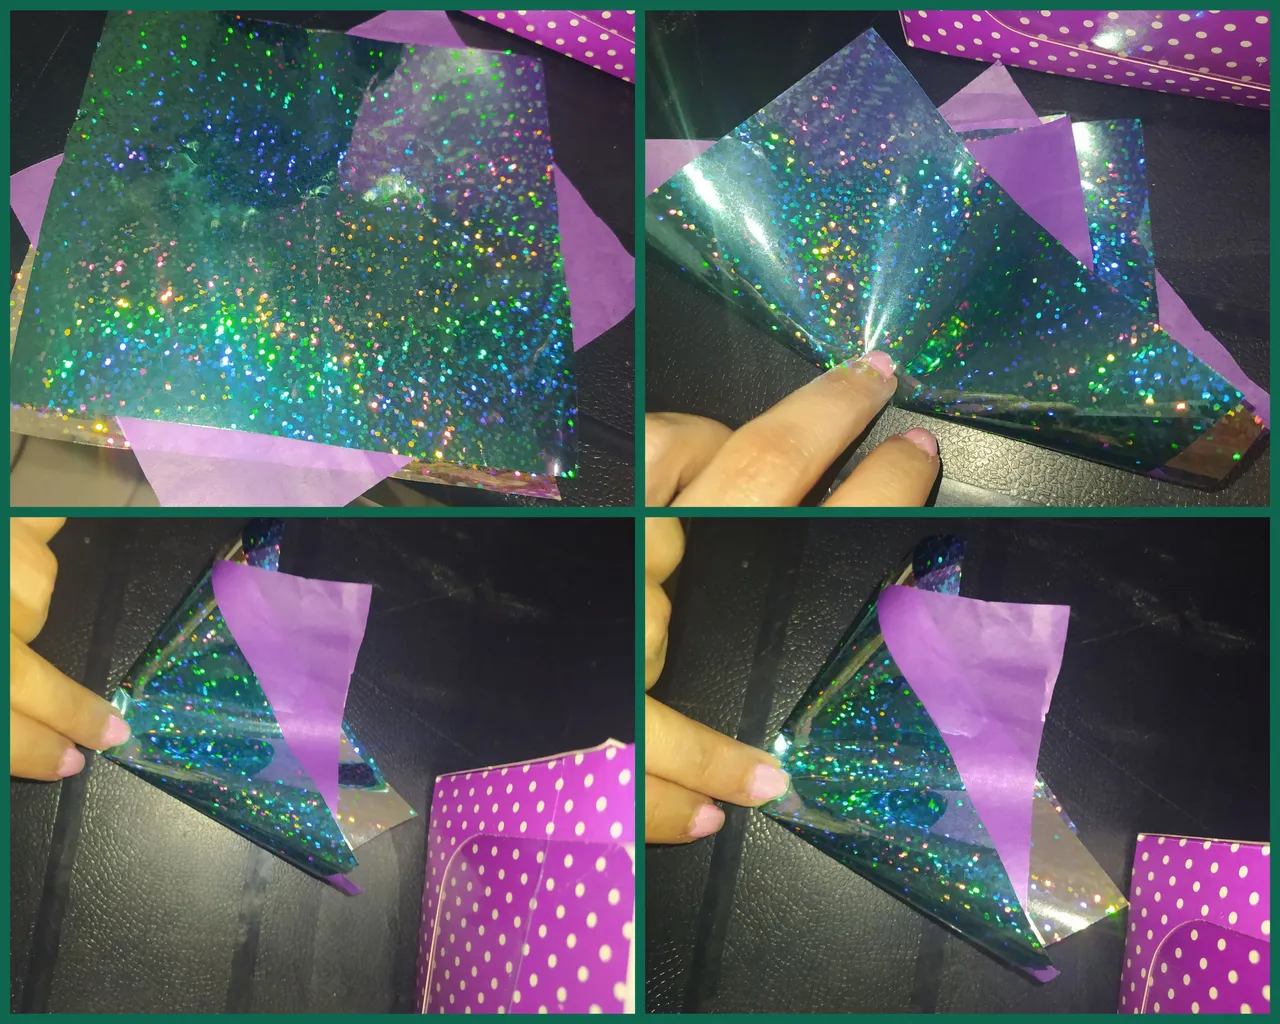
Procedemos a cortar el papel de seda y papel de regalo en cuadrados, las colocamos alternadas, es decir una hoja de papel de seda, una de papel de regalo y otra de papel de seda, doblamos tres veces hasta conseguir un triangulo.
We proceed to cut the tissue paper and wrapping paper in squares, we place them alternately, that is to say, one sheet of tissue paper, one of wrapping paper and one of tissue paper, we fold three times until we get a triangle.
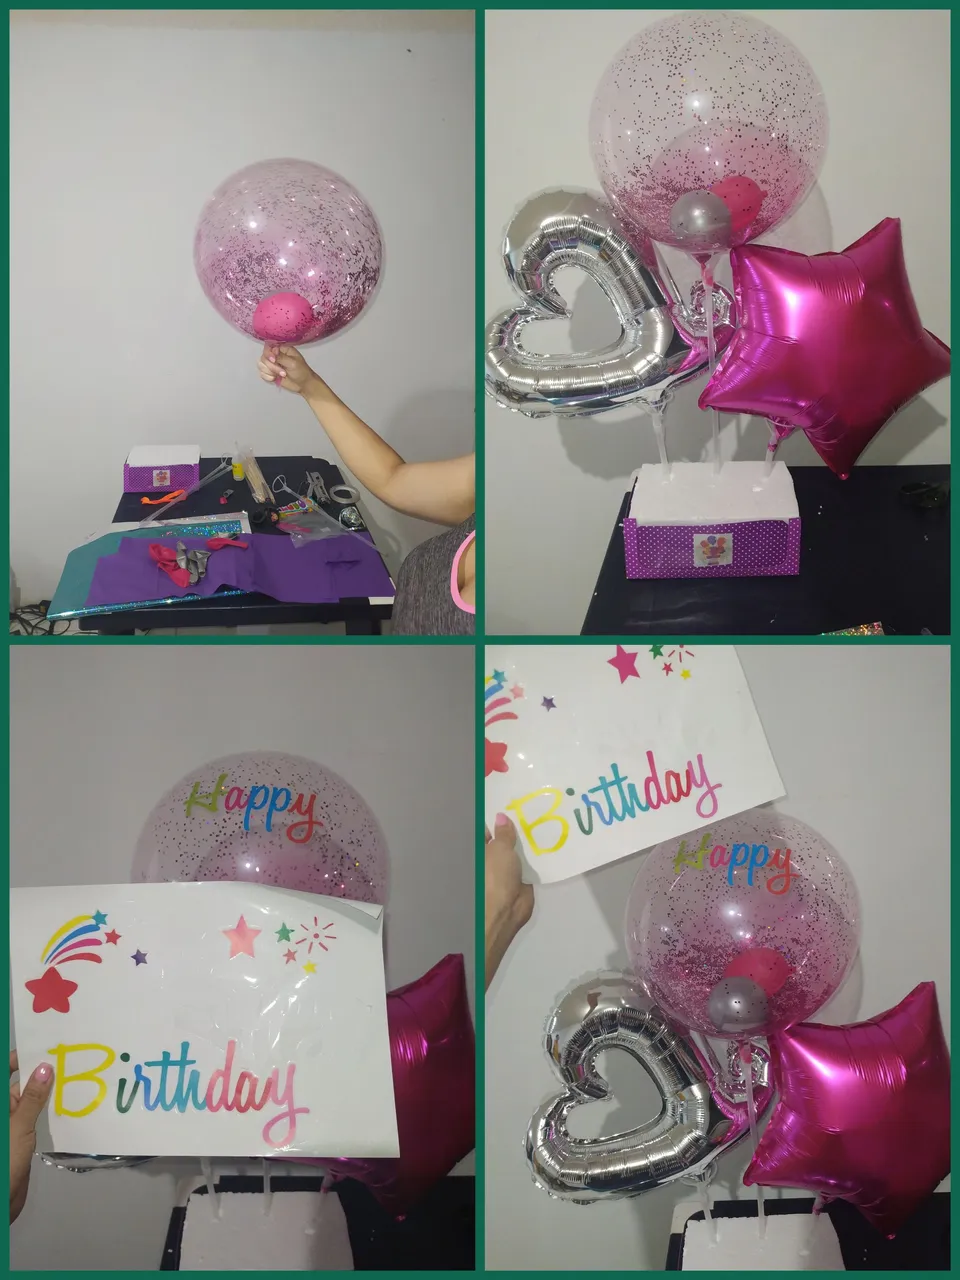
Ahora le vamos dando forma a nuestro arreglo, tapando los espacios y adornando lo mas hermoso posible.
Now we are shaping our arrangement, covering the spaces and decorating it as beautifully as possible.
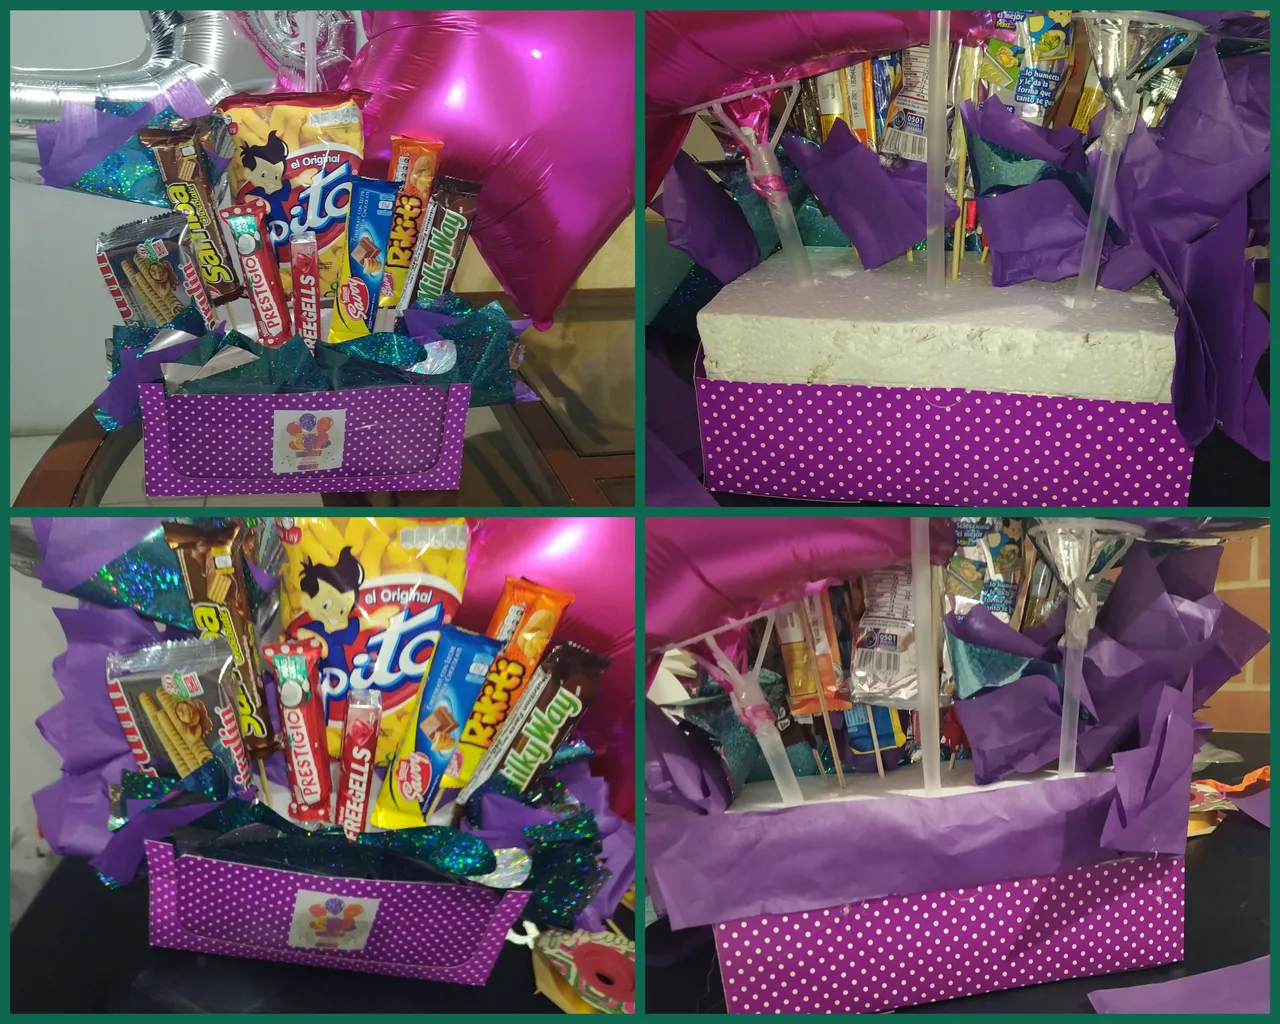
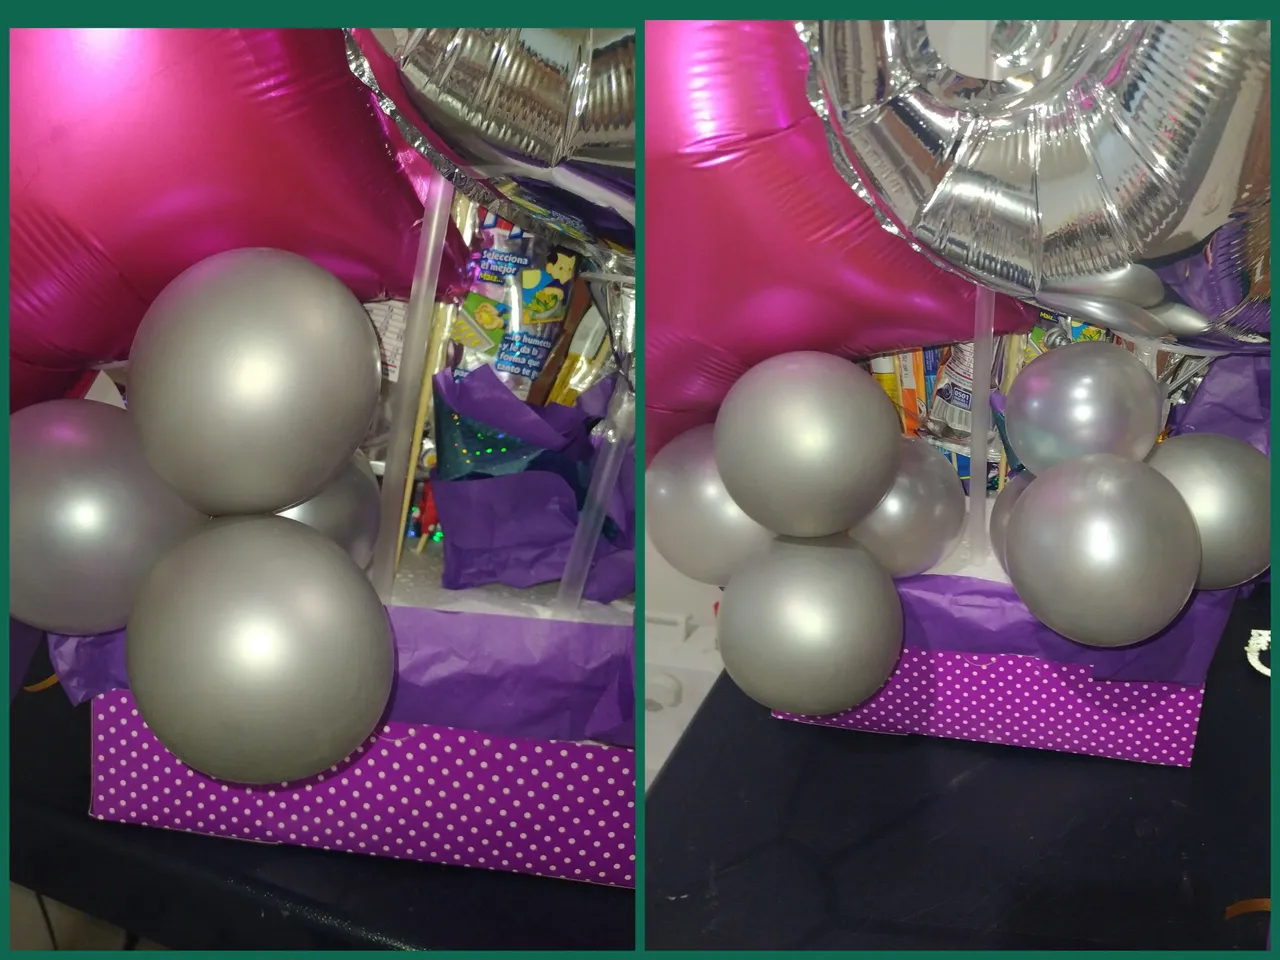
En la parte de atrás de la cajita podemos unir los globos plateados para tapar los espacios vacíos y así continuar con la decoración.
On the back of the box we can attach the silver balloons to cover the empty spaces and continue with the decoration.
Para darle un toque especial, realicé unas flores en cartulina y en el centro de la flor coloqué un corte del papel de regalo, este proceso se realiza en una cartulina, se corta por las líneas del dibujo, luego se enrolla con un palito de altura, se moldea con la ayuda de los dedos y listo.
To give it a special touch, I made some flowers in cardboard and in the center of the flower I placed a cut of the wrapping paper, this process is done in a cardboard, cut along the lines of the drawing, then roll it with a high stick, mold it with the help of your fingers and that's it.

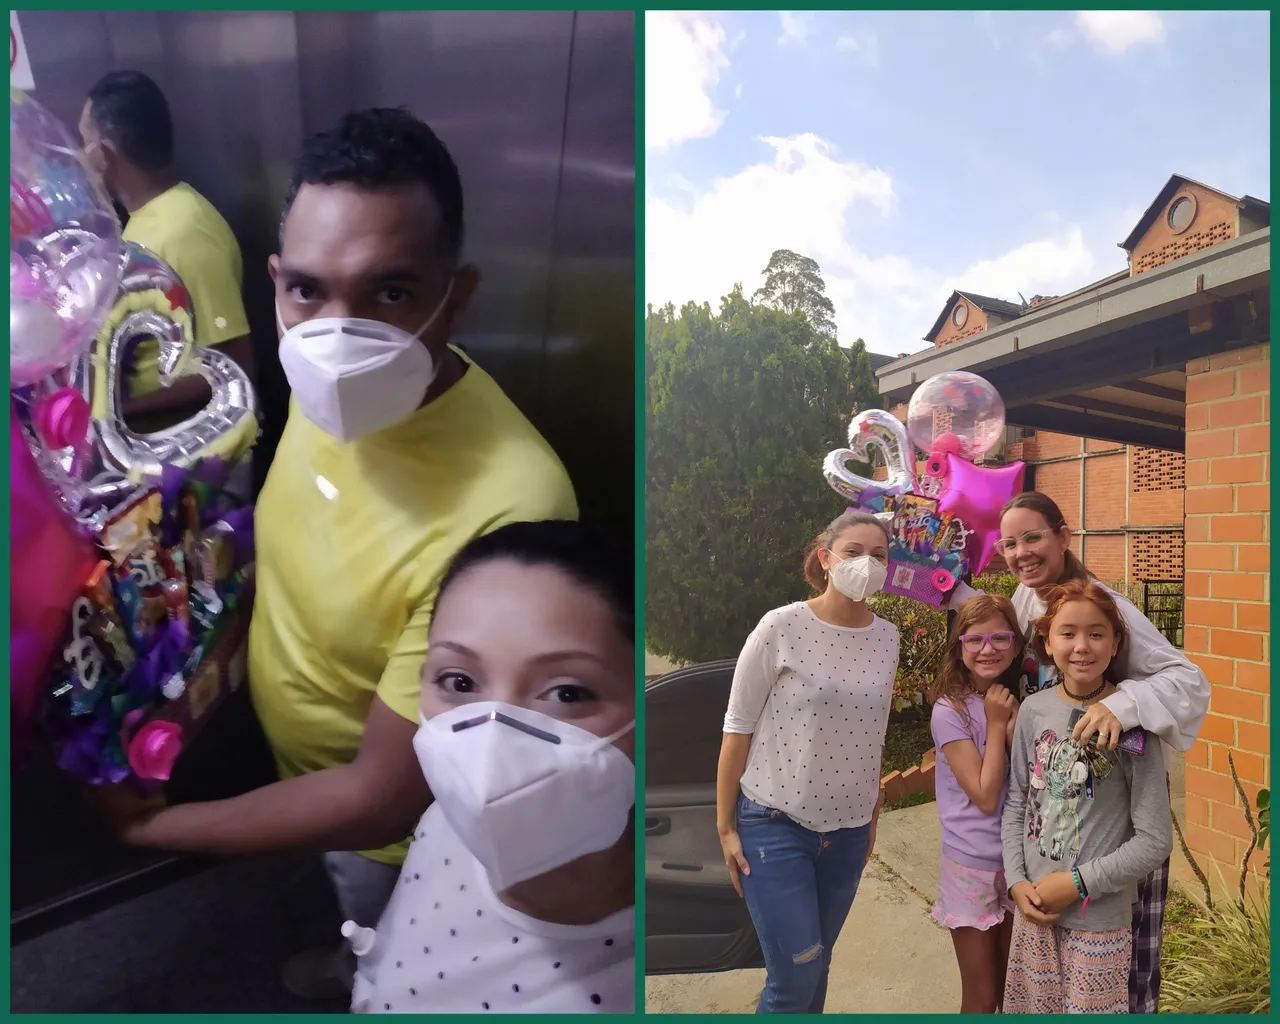
𝐿𝑖𝑠𝑡𝑜 𝑒𝑙 𝑎𝑟𝑟𝑒𝑔𝑙𝑜 𝑝𝑎𝑟𝑎 𝑢𝑛𝑎 𝑙𝑖𝑛𝑑𝑎 𝑐𝑢𝑚𝑝𝑙𝑒𝑎ñ𝑒𝑟𝑎
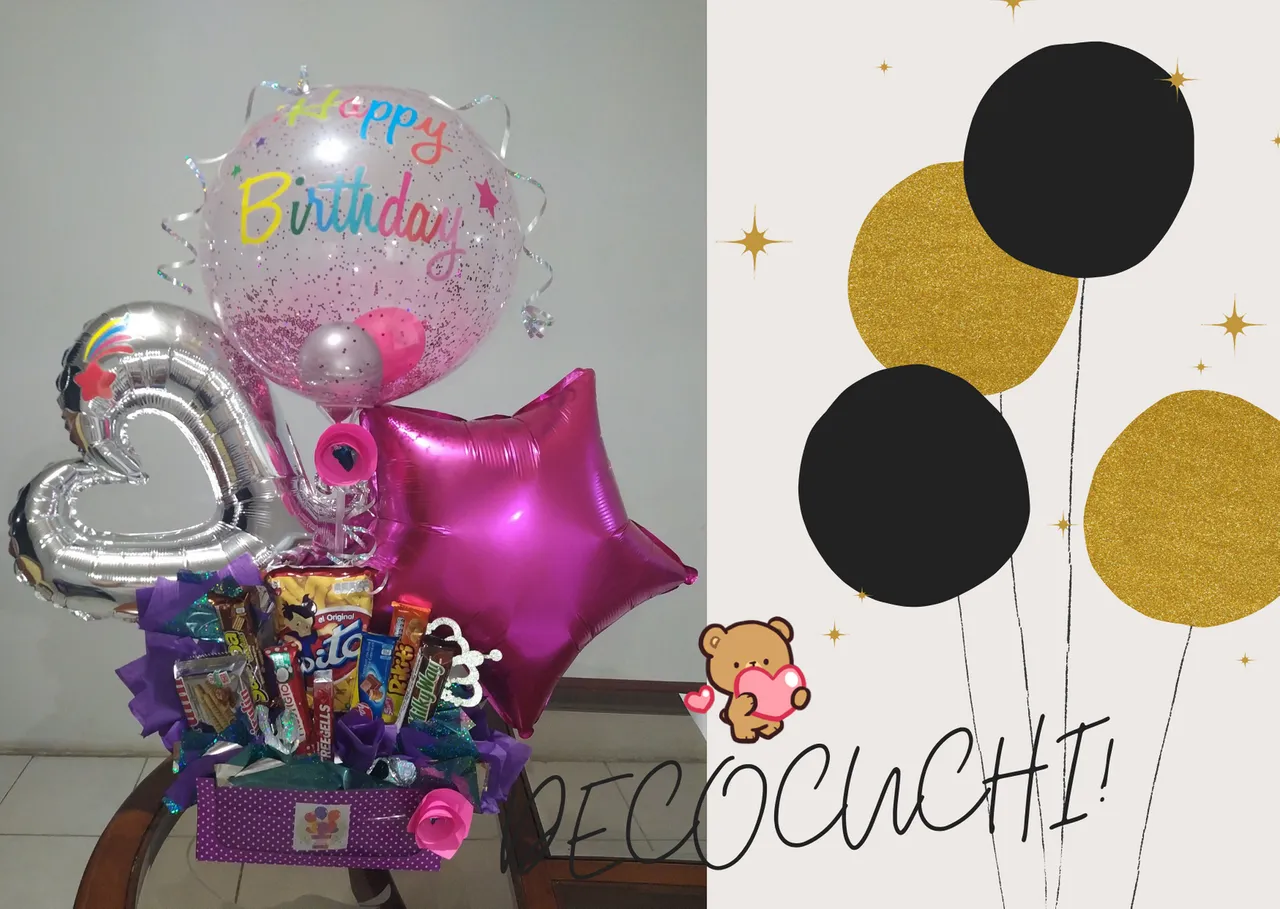
Les cuento que la persona que me contactó fue el esposo de la cumpleañera, me llamó indicando que quería sorprender a su esposa, así que trabajé con mucha dedicación porque sé lo grato que es recibir un detalle tan especial. Son momentos inolvidables y que llegan al corazón.
The person who contacted me was the husband of the birthday girl, he called me indicating that he wanted to surprise his wife, so I worked with great dedication because I know how nice it is to receive such a special detail. They are unforgettable moments that touch the heart.
Espero les haya gustado mi experiencia en el arte del globo... | I hope you liked my experience in the art of ballooning...
𝘚𝘦𝘱𝘢𝘳𝘢𝘥𝘰𝘳 𝘺 𝘣𝘢𝘯𝘯𝘦𝘳: 𝘥𝘪𝘴𝘦ñ𝘢𝘥𝘰 𝘱𝘰𝘳 @𝘢𝘺𝘭𝘦𝘦𝘯𝘳 𝘦𝘯 𝘊𝘢𝘯𝘷𝘢 | 𝘊𝘰𝘭𝘭𝘢𝘨𝘦 𝘳𝘦𝘢𝘭𝘪𝘻𝘢𝘥𝘰 𝘦𝘯 𝘊𝘢𝘯𝘷𝘢 | 𝘐𝘮á𝘨𝘦𝘯𝘦𝘴: 𝘗𝘳𝘰𝘱𝘪𝘢𝘴 𝘵𝘰𝘮𝘢𝘥𝘢𝘴 𝘱𝘰𝘳 𝘈𝘣𝘦𝘭 𝘙𝘰𝘫𝘢𝘴 | 𝘛𝘳𝘢𝘥𝘶𝘤𝘵𝘰𝘳:𝘋𝘦𝘦𝘱𝘓
❤️Gracias ❤️ / ❤️Thanks❤️