Hola linda comunidad de Build-it
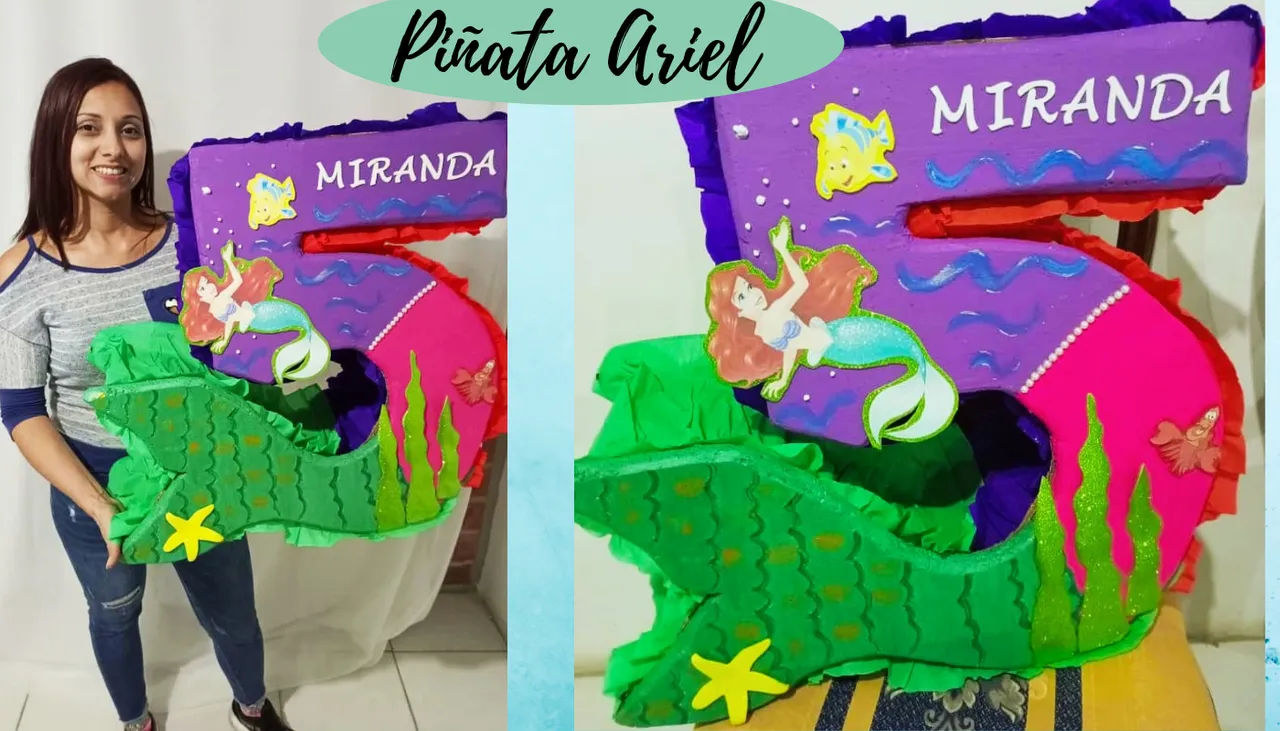
Es un gusto saludarlo, luego de muchos días ausente retomé mis actividades en HIVE, tuve unos días largos de planificación del cumpleaños número 5 de mi hija, gracias a los cursos que he realizado fortalecieron mis ganas de realizar muchas cosas para su día, una de ella fue una linda piñata con el número 5 de la sirenita Ariel. Así que puse todo mi corazón y así comencé...
Antes quiero hablarles de la sirena Ariel como sabemos es una película de Disney donde la sirenita de 16 años busca el amor de un príncipe y para lograrlo desobedece las ordenes de su padre el Rey Tritón, la bruja Úrsula aprovecha la oportunidad para engañar a Ariel haciéndole firmar un contrato con el objetivo de convertirla en humana pero lo que no se percató es que en realidad era una mala idea ya que dentro del contrato dice que la nueva mandante seria la bruja, al final la descubren y el padre el Rey Tritón logra recuperar su poder, a su vez se da cuenta de lo enamorada que esta su hija y decide convertirla en humana para que sea feliz con su príncipe.
Hello beautiful Build-it community.
It is a pleasure to greet you, after many days absent I resumed my activities in HIVE, I had a few long days of planning the 5th birthday of my daughter, thanks to the courses I have done strengthened my desire to make many things for her day, one of them was a nice piñata with the number 5 of the little mermaid Ariel. So I put all my heart and that's how I started....
Before I want to talk about the mermaid Ariel as we know is a Disney movie where the 16 year old mermaid seeks the love of a prince and to achieve it disobeys the orders of his father King Triton, The witch Ursula takes the opportunity to deceive Ariel making her sign a contract with the aim of turning her into a human but what she did not realize is that it was actually a bad idea because within the contract says that the new principal would be the witch, in the end she is discovered and the father King Triton manages to regain his power, in turn realizes how in love his daughter is and decides to turn her into a human to be happy with her prince.

Aquí les dejo las lista de Materiales que utilicé/ Here is the list of materials I used:
- Cajas de Cartón liso
- Anime
- Foami escarchado amarillo, verde, blanco y rojo
- Pinturas al frio morado, fucsia, verde, azul y dorado
- Barra de silicón
- Pistola de silicón
- Silicón frio
- Papel crepé morado, rojo y verde
- Impresiones de la sirenita Ariel, Flounder (Pez) y Sebastián (cangrejo)
- Perlas blancas
- Exacto
- Lámina de anime
- Tijera
- Regla
- Pabilo
- Lápiz
- Engrapadora
- Grapa
- Lija
- Una mota de algodón
- Purple, fuchsia, green, blue and gold cold paints
- Silicone stick
- Silicone gun
- Cold silicone
- Purple, red and green crepe paper
- Prints of the little mermaid Ariel, Flounder (Fish) and Sebastian (crab)
- White beads
- Exactly
- Anime print
- Scissors
- Ruler
- Wick
- Pencil
- Stapler
- Staple
- Sandpaper
- A cotton ball
Ⓣⓤⓣⓞⓡⓘⓐⓛ ♡
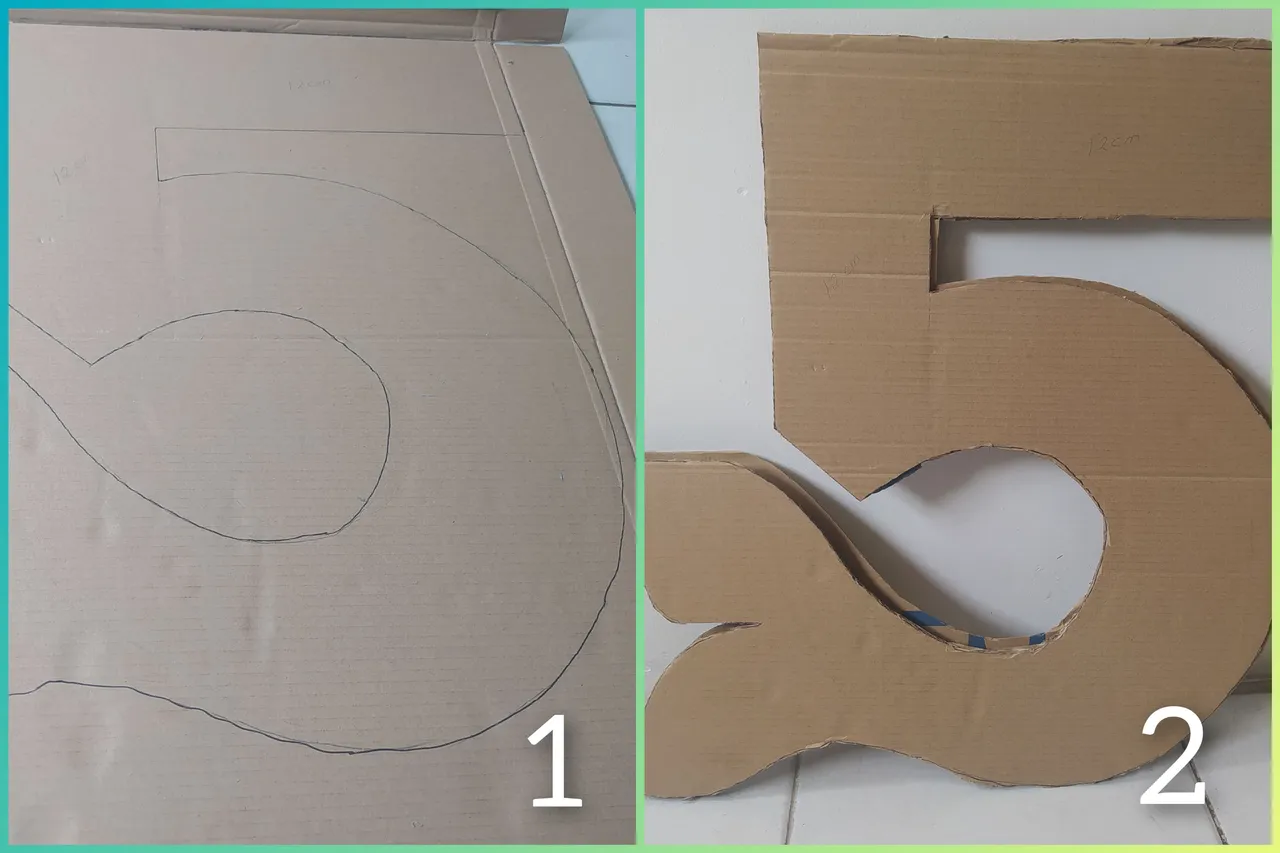
Primero dibujé el numero 5 formando una cola de pez al final, la medida que utilicé para el ancho es de 12 centímetros hasta llegar al final, serian dos juegos.
First I drew the number 5 forming a fish tail at the end, the measure I used for the width is 12 centimeters until reaching the end, it would be two sets.
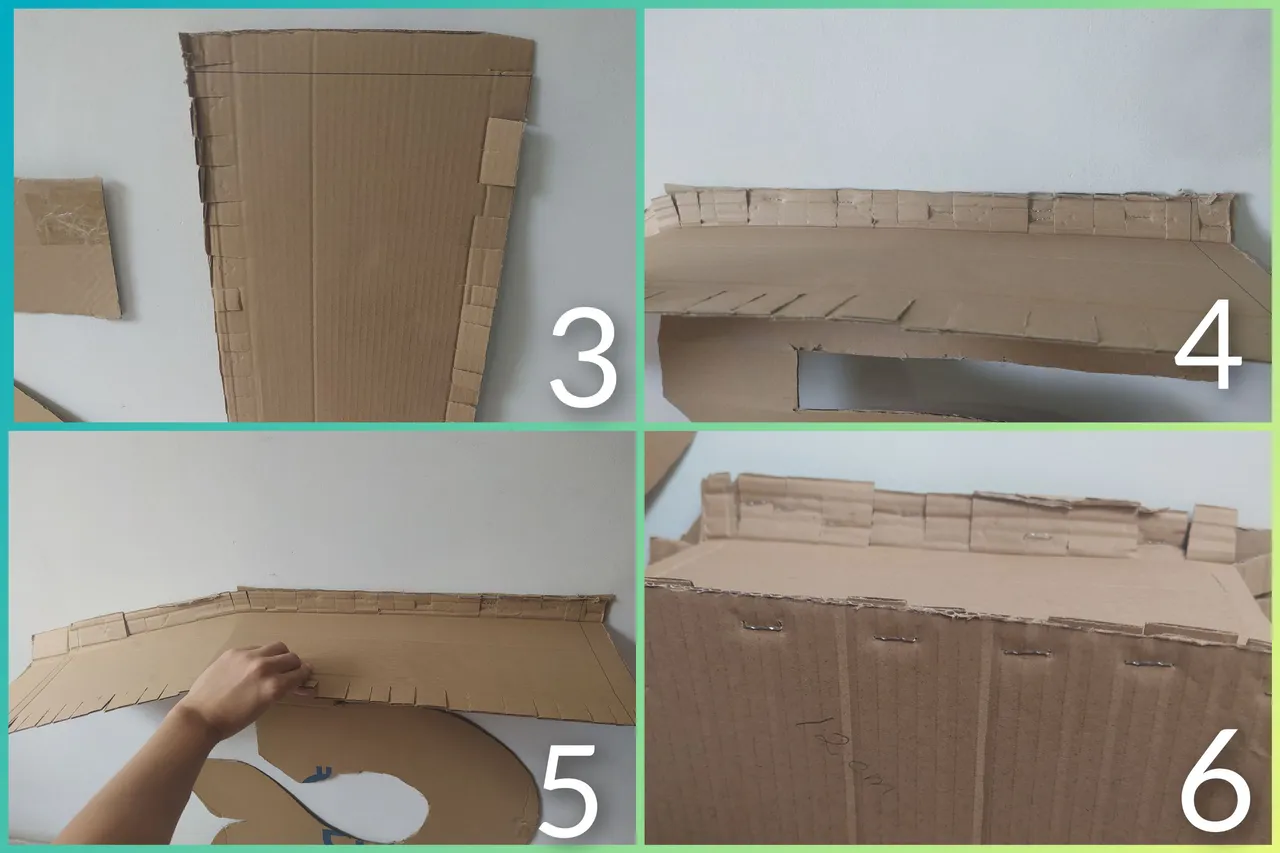
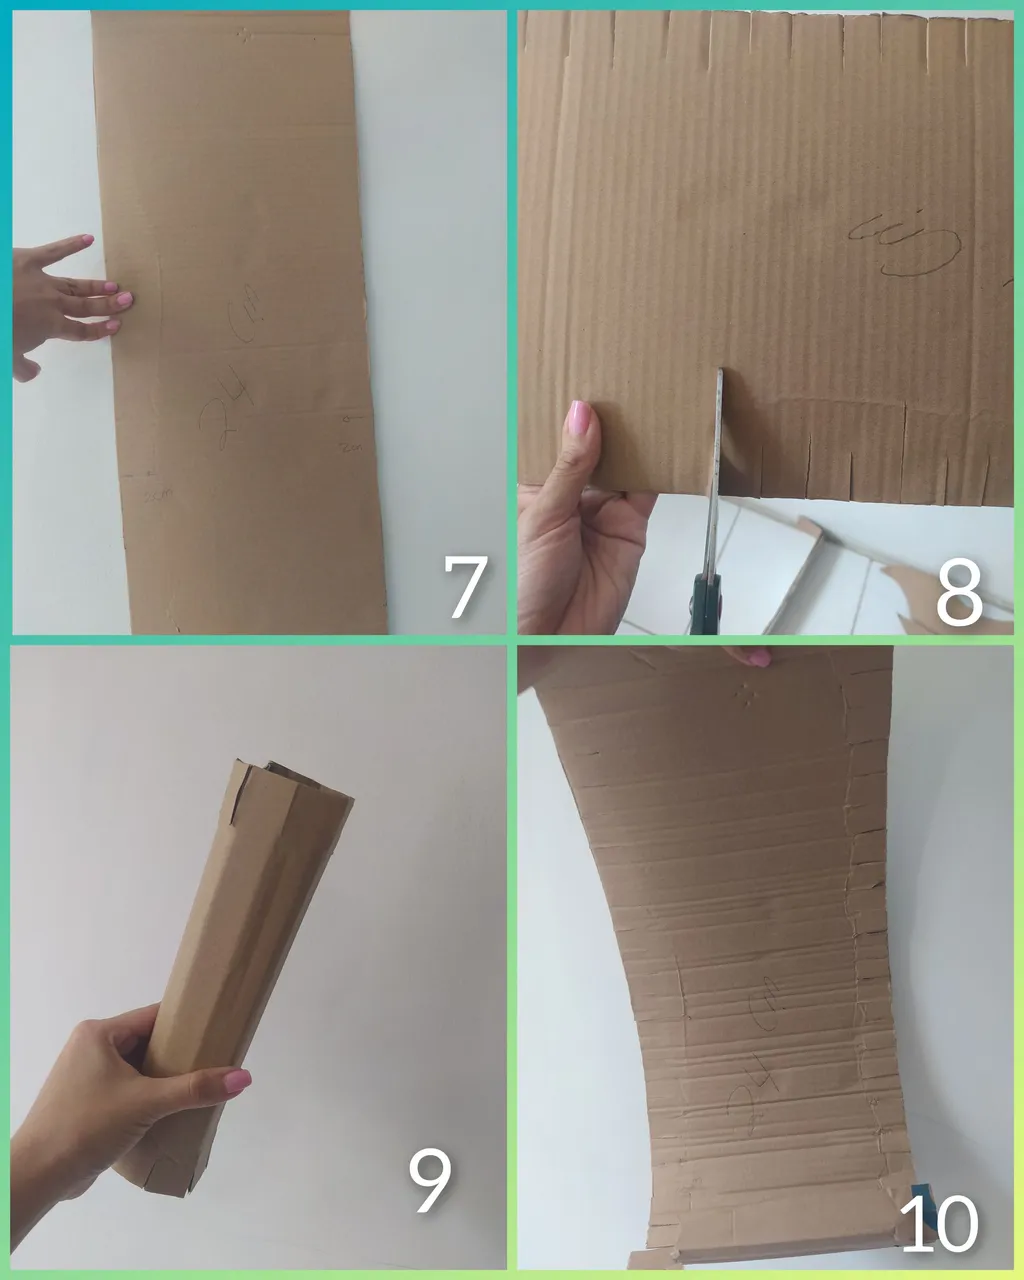
Corté varias franjas de 24 centímetros y con la ayuda de una tijera realicé varios cortes para formar unas pestañas, cada corte es de 2 centímetros de profundidad aproximadamente.
I cut several 24-centimeter strips and with the help of a scissors I made several cuts to form eyelashes, each cut is approximately 2 centimeters deep.
En el caso de la curva que posee el numero 5 realicé cortes con el largo del cartón y ancho solo de 24 centímetros, igualmente realicé las pestañas y enrollé para hacerlo flexible y coloqué en las curvas que posee la piñata.
In the case of the curve that has the number 5 I made cuts with the length of the cardboard and width of only 24 centimeters, also made the tabs and rolled to make it flexible and placed in the curves that has the piñata.

Utilicé la engrapadora para asegurar que quede en el sitio correcto y fui colocando grapas hasta terminar con la curva o hasta donde llegó el largo del cartón.
I used the stapler to make sure it was in the right place and stapled until I finished the curve or as far as the length of the cardboard would go.

Coloqué un trozo de cartón por dentro justo donde va el pabilo para colgar la piñata, esto es con el fin de darle fuerza al levantarla, seguí engrapando hasta culminar el número 5.
I placed a piece of cardboard inside just where the wick goes to hang the piñata, this is in order to give it strength when lifting it, I continued stapling until I finished the number 5.
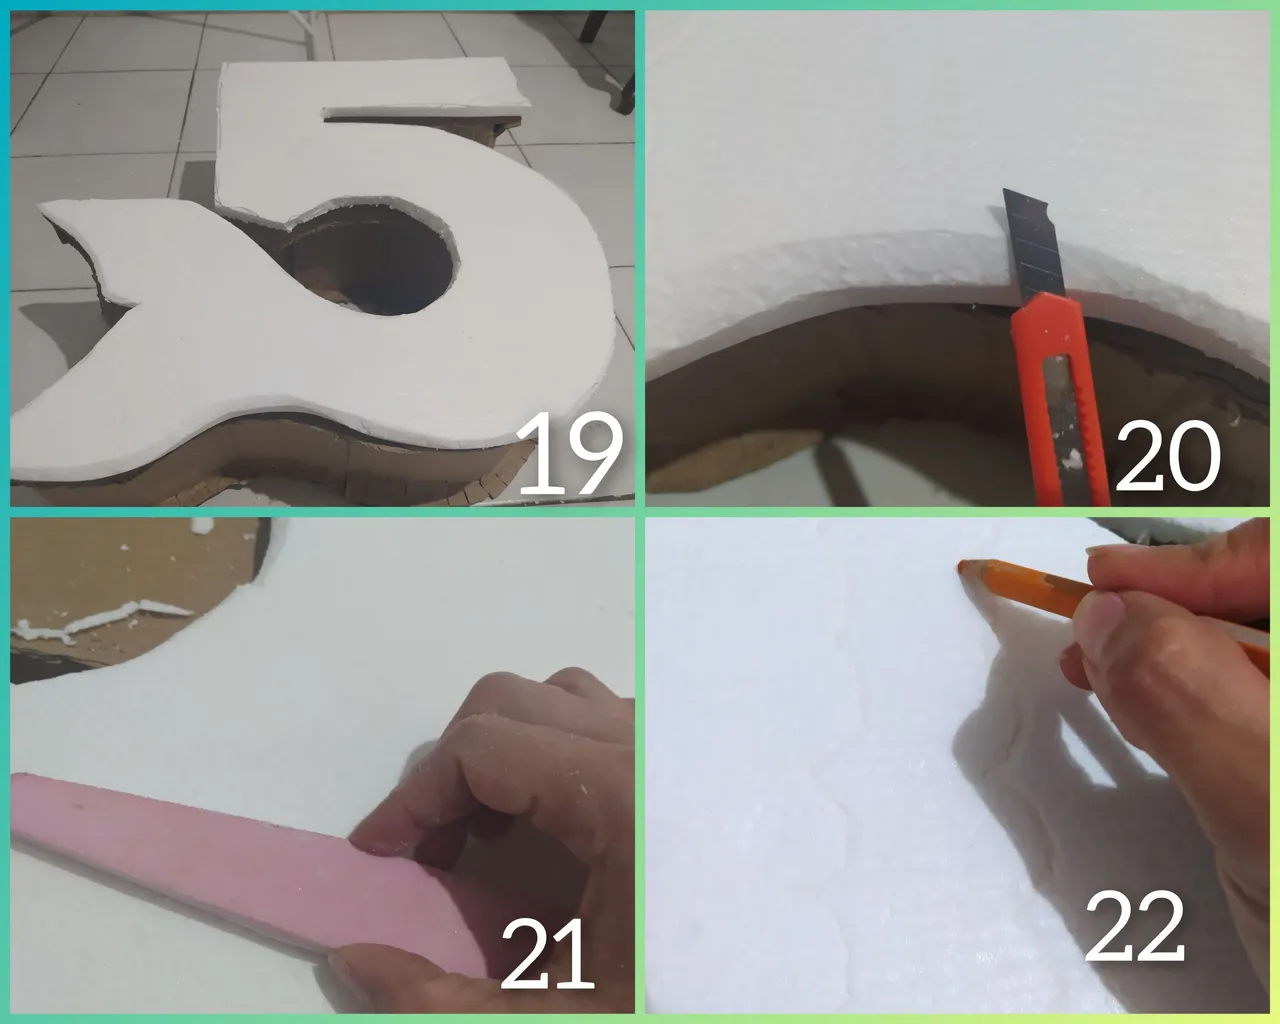
Con la lámina de anime realicé la forma del 5 con la cola, corté con el exacto, moldeé la figura cortando suavemente los bordes bordeando la figura, lijé con una lima porque no tenía lija y con un lápiz dibujé escamas profundas haciendo un efecto 3D.
With the anime sheet I made the shape of the 5 with the glue, I cut with the exact one, I molded the figure cutting softly the edges bordering the figure, I sanded with a file because I didn't have sandpaper and with a pencil I drew deep scales making a 3D effect.
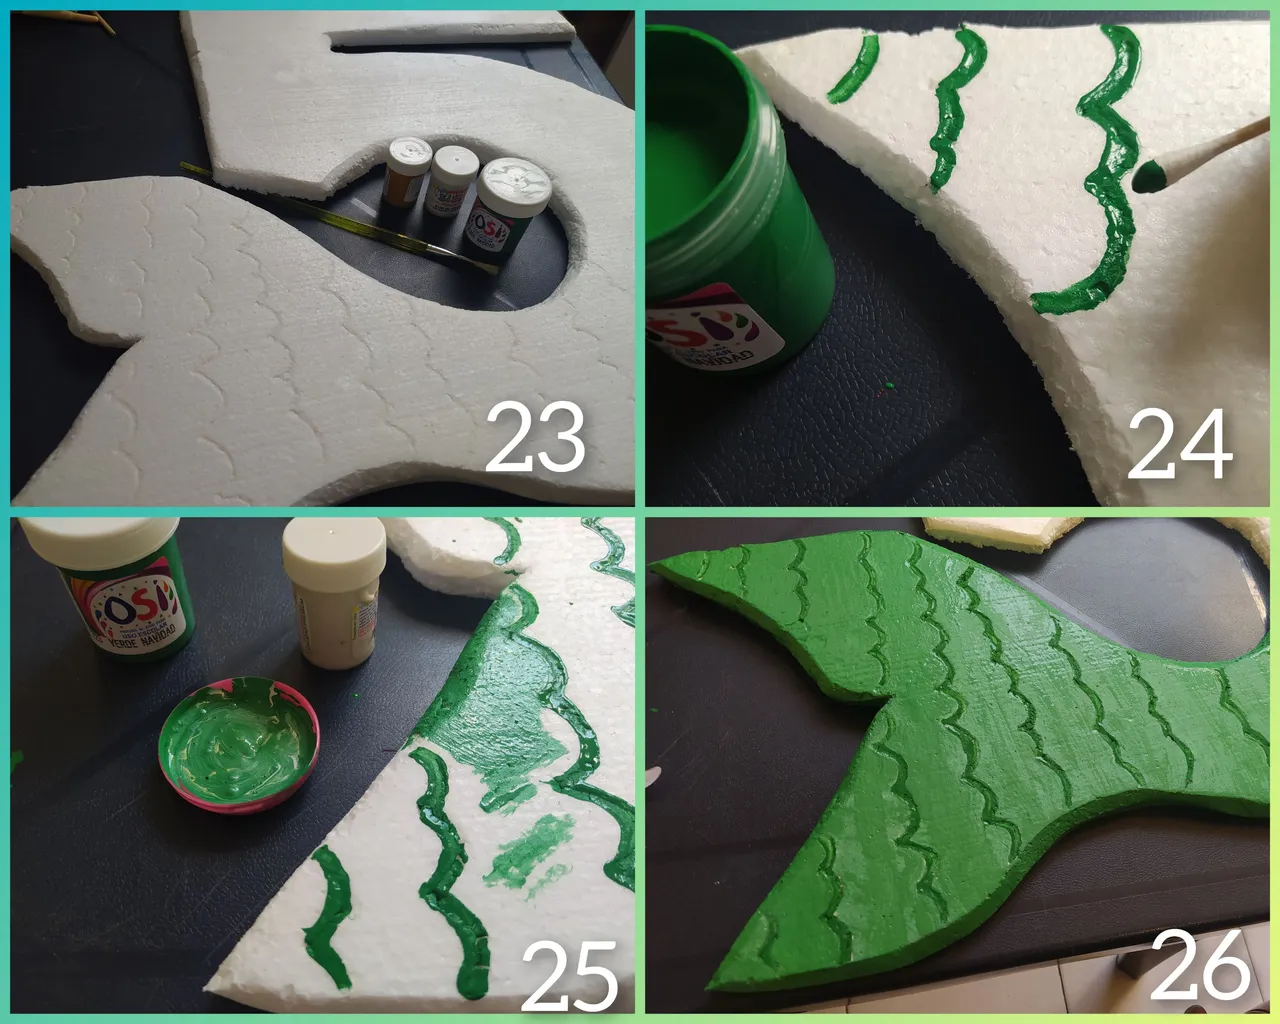
Procedí a pintar las escamas, luego ligue el color blanco con verde para hacerlo más claro que los bordes de las escamas.
I proceeded to paint the scales, and then I mixed the white color with green to make it lighter than the edges of the scales.
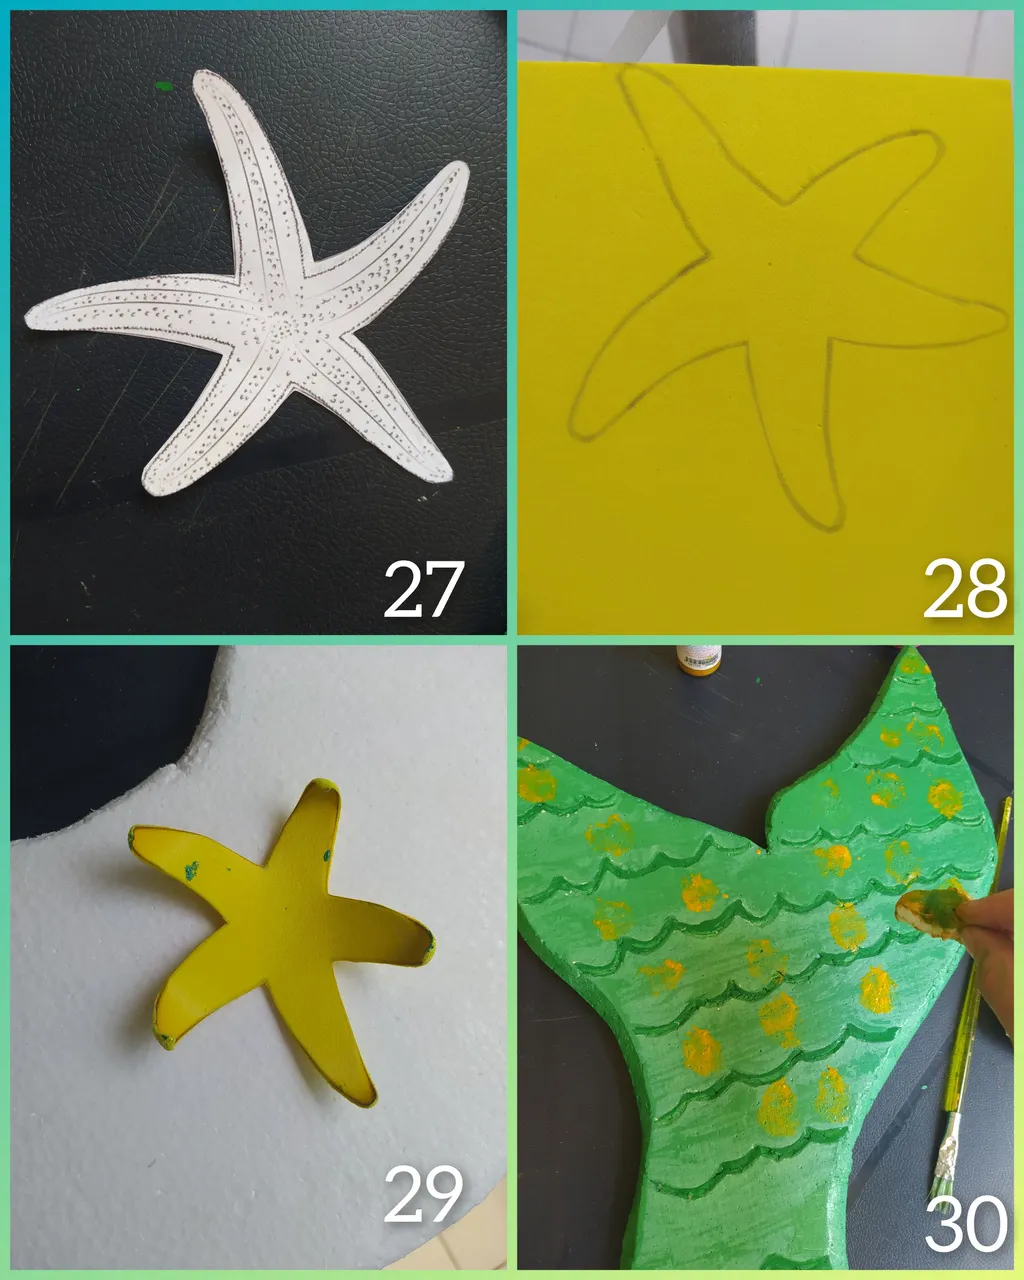
Imprimí una estrella del mar, recorté y repasé en foami amarillo, nuevamente recorté; con la ayuda de un yesquero, quemé solo los bordes para darle forma.
I printed out a starfish, cut out and reworked it in yellow foami, cut it out again, and with the help of a tinderbox, I burned only the edges to give it shape.
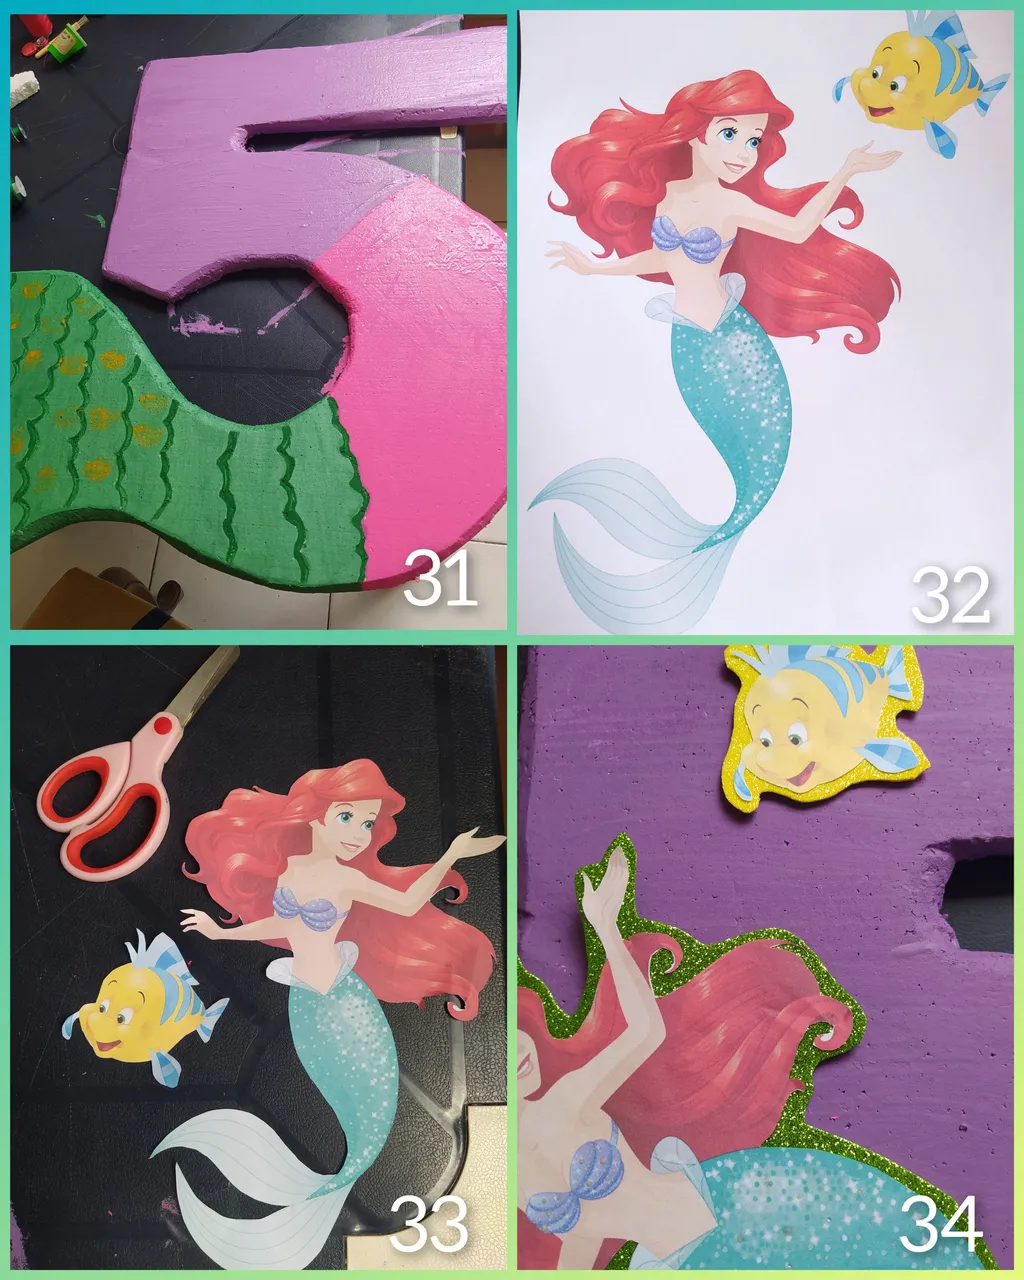
Continué coloreando el numero 5 realizado en anime, coloree de morado y rosado, imprimí la Sirenita Ariel con su amigo el pez Flounder, incorporé en foami verde escarchado y amarillo para tener firmeza y pegué en el anime.
I continued coloring the number 5 made in anime, colored in purple and pink, printed the Little Mermaid Ariel with her friend the fish Flounder, incorporated in frosted green and yellow foami to have firmness and glued on the anime.
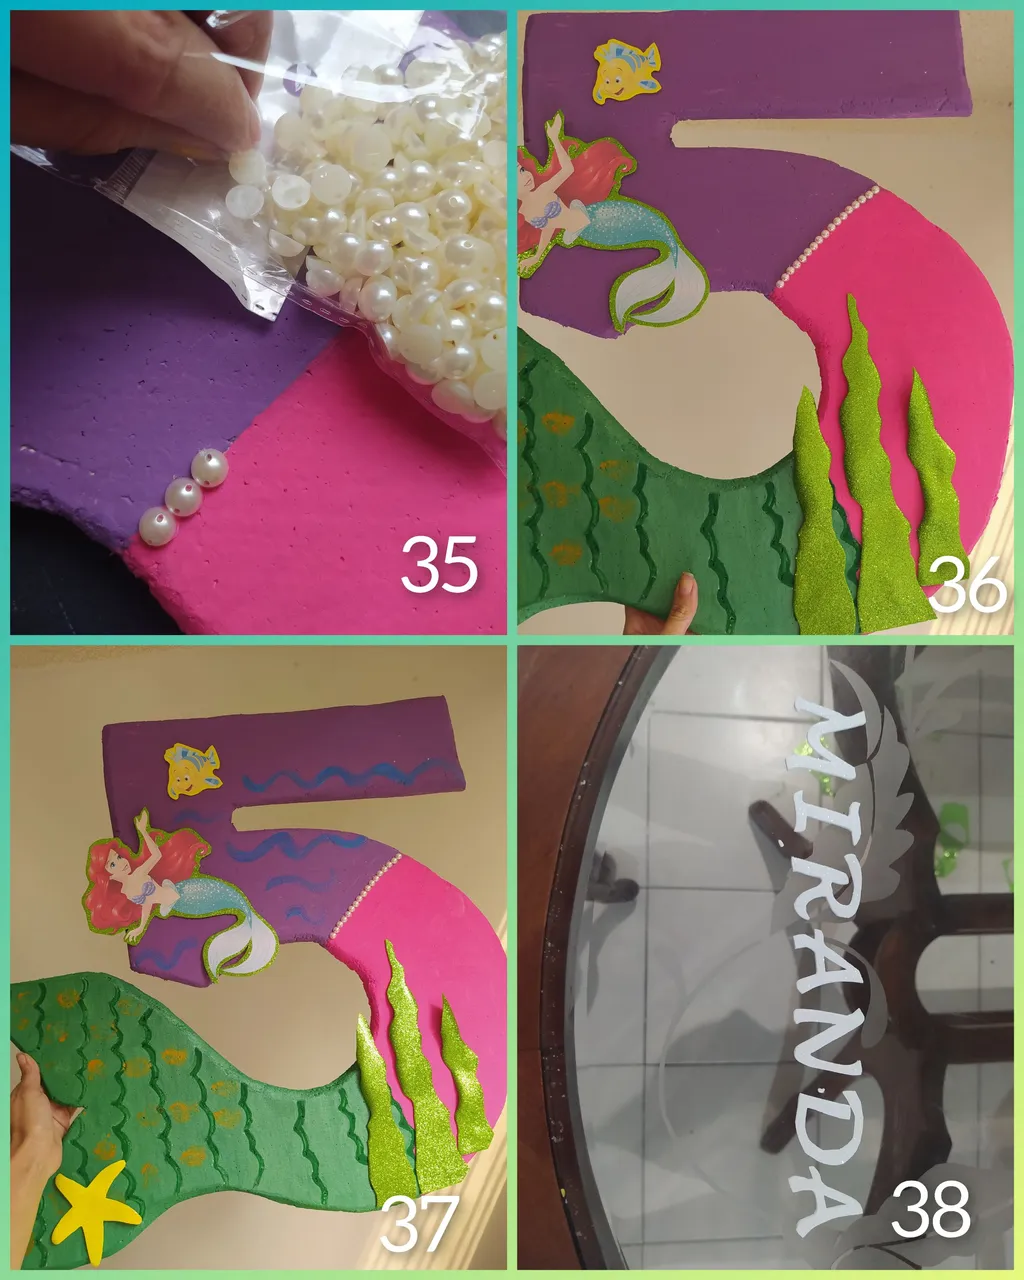
Procedí a colocar perlas justo donde se divide el color morado y rosado, además agregué unas algas realizadas con foami verde escarchado, repetí el procedimiento de quemar los bordes para hacer un efecto 3D, realicé el nombre de mi hija en foami blanco y procedí a pegarlo en la parte superior del número 5. Además realicé una especie de olas con pintura azul.
I proceeded to place pearls right where the purple and pink color divides, I also added some seaweed made with frosted green foami, I repeated the procedure of burning the edges to make a 3D effect, I made my daughter's name in white foami and proceeded to paste it on top of the number 5. I also made a kind of waves with blue paint.
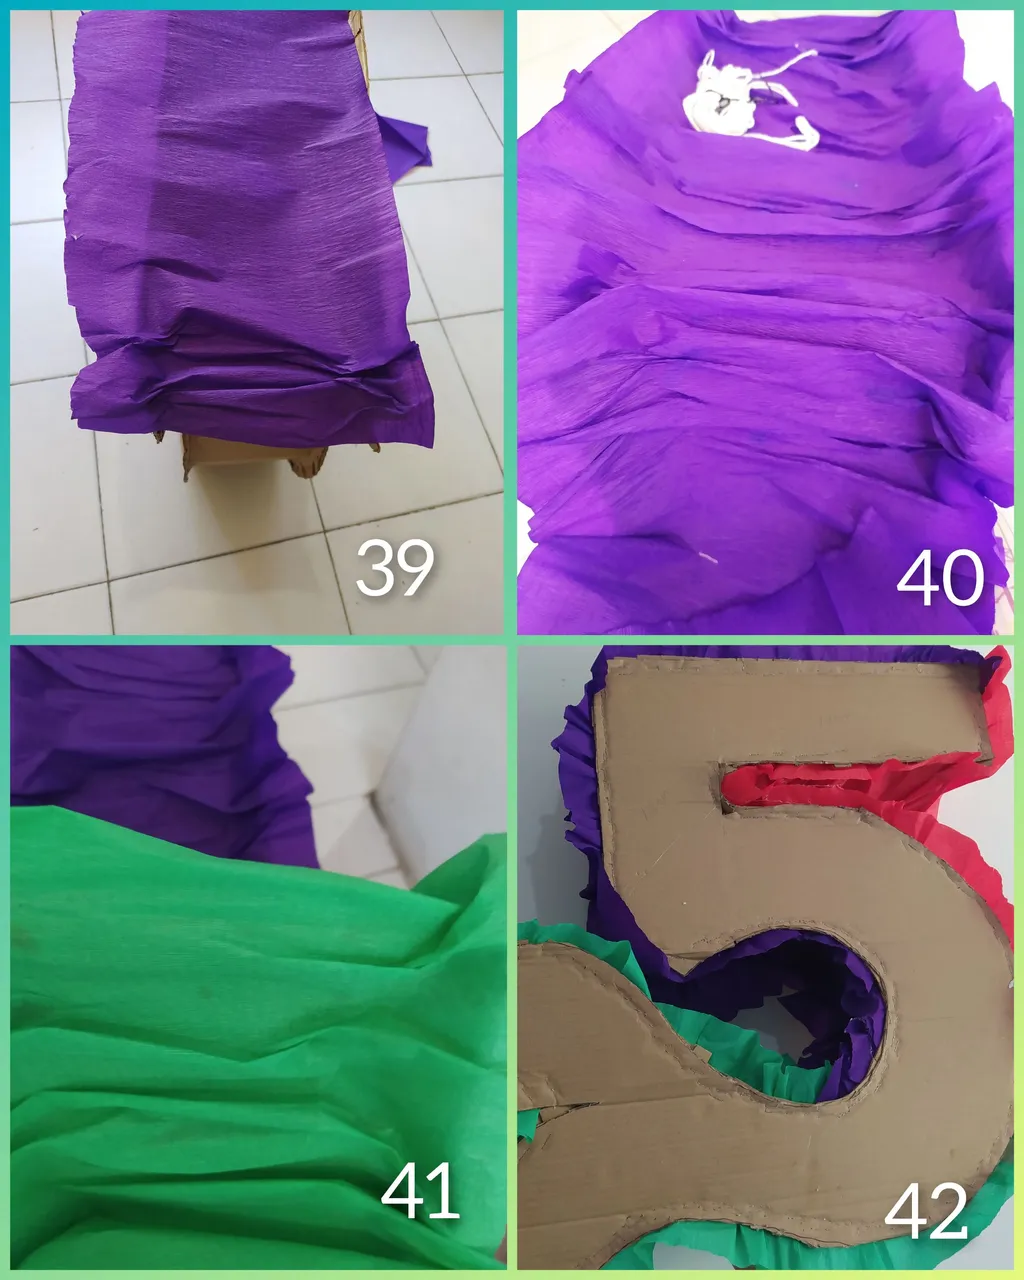
Arruché el foami morado al borde de la piñata, fui pegando los colores rojo y verde, este procedimiento lo realicé solo a los lados de la piñata.
glued the red and green colors, I did this procedure only on the sides of the piñata.
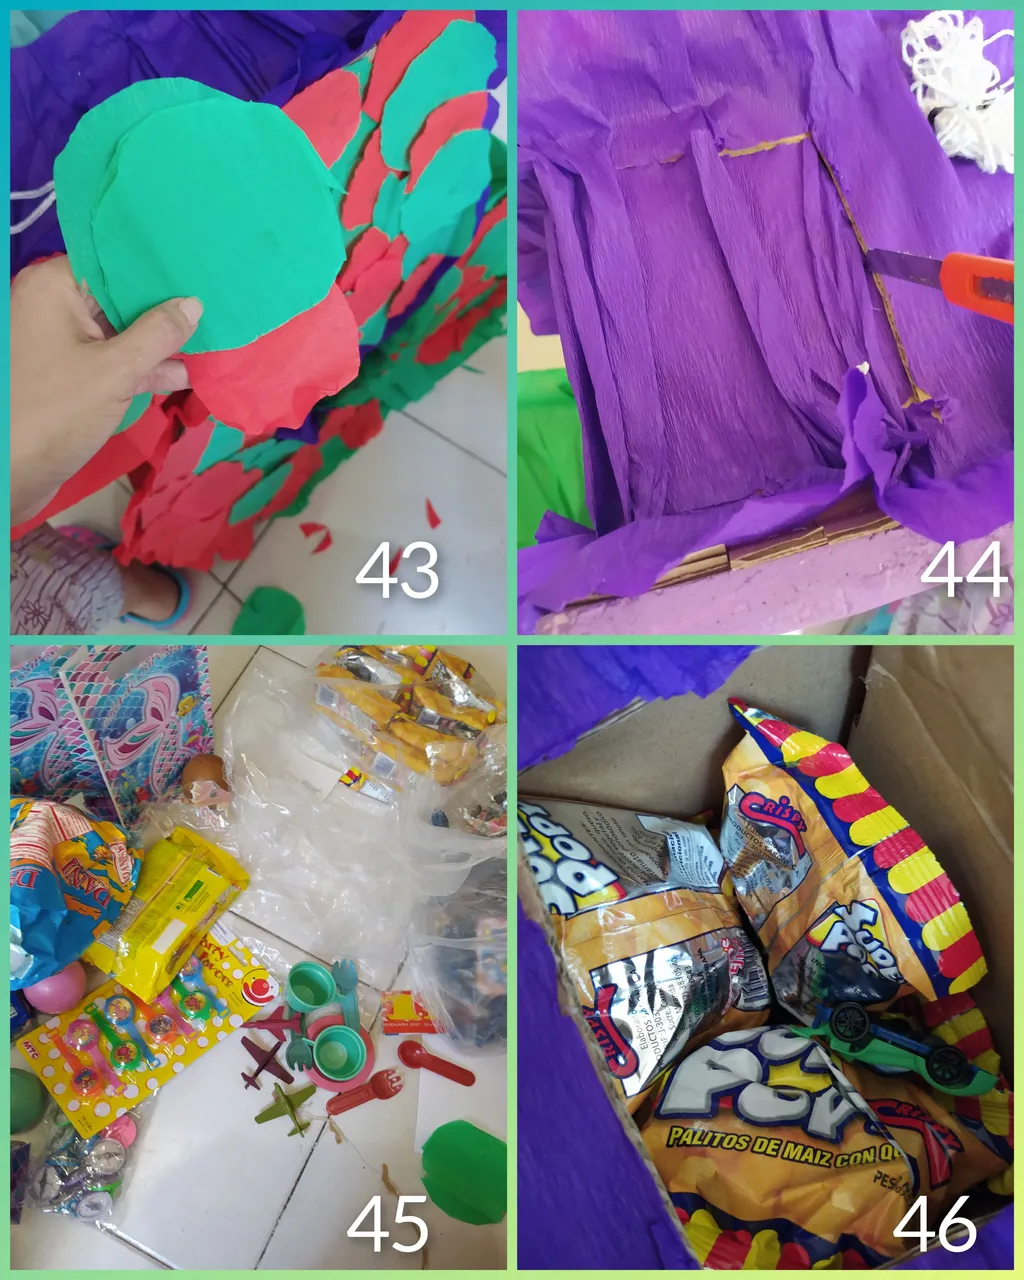
En la parte de atrás realicé varios círculos con el mismo papel crepé rojo y verde, los fui uniendo hasta taparlo por completo, con un exacto procedí a realizar una abertura en la parte superior agregué juguetes y dulces hasta el final de la cola. Este paso fue genial porque sentía que la piñata iba a explotar.
In the back I made several circles with the same red and green crepe paper, I joined them together until I covered it completely, with an exact one I proceeded to make an opening at the top and added toys and candy until the end of the tail. This step was great because I felt that the piñata was going to explode.
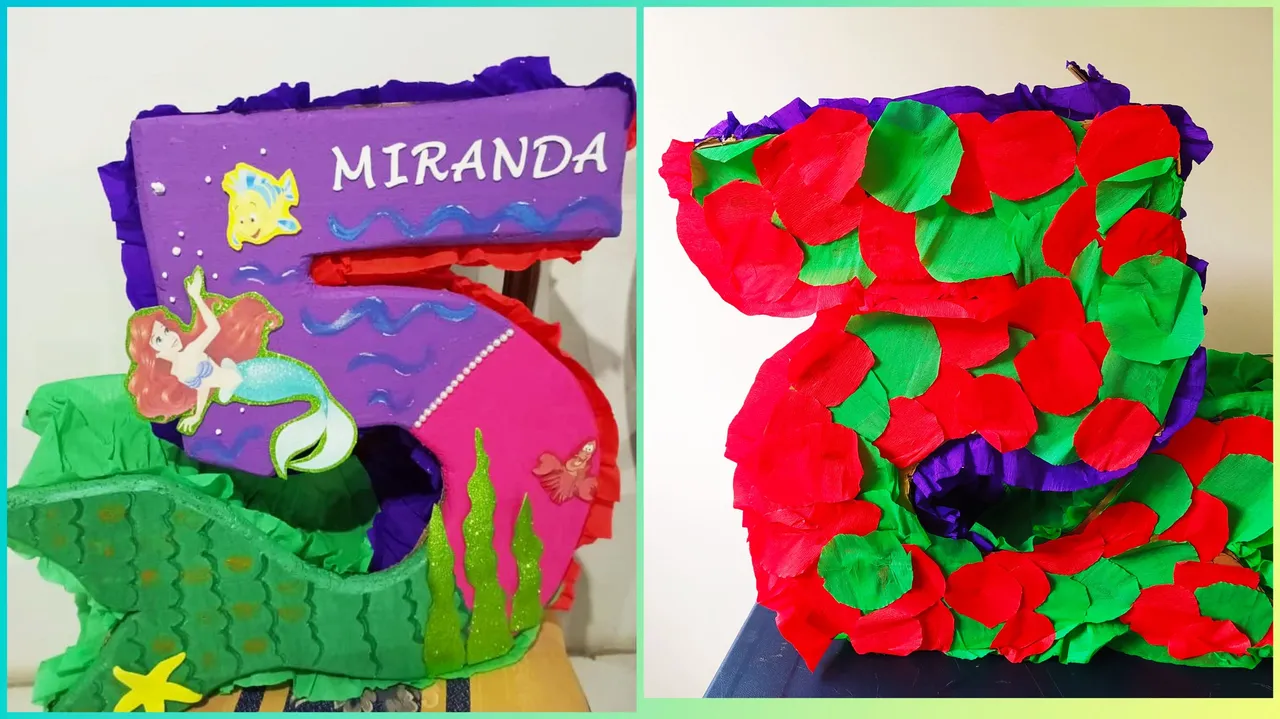
Aquí el resultado final de la piñata número 5, la parte delantera como la de atrás. Mi hija se sintió muy feliz al ver esta piñata para su cumpleaños número 5, debo confesarles que es la primera piñata que le realizo a mi hija. Espero mi tutorial les sirva para los cumpleaños que deseen celebra de ahora en adelante.
Here is the final result of the piñata number 5, the front and the back. My daughter was very happy to see this piñata for her 5th birthday, I must confess that this is the first piñata I made for my daughter. I hope my tutorial will be useful for the birthdays you want to celebrate from now on.
Espero vernos pronto en un próximo post...Hope to see you soon in a future post...
𝘚𝘦𝘱𝘢𝘳𝘢𝘥𝘰𝘳 𝘺 𝘣𝘢𝘯𝘯𝘦𝘳: 𝘥𝘪𝘴𝘦ñ𝘢𝘥𝘰 𝘱𝘰𝘳 @𝘢𝘺𝘭𝘦𝘦𝘯𝘳 𝘦𝘯 𝘊𝘢𝘯𝘷𝘢 || 𝘾𝙤𝙡𝙡𝙖𝙜𝙚: 𝙧𝙚𝙖𝙡𝙞𝙯𝙖𝙙𝙤 𝙚𝙣 𝘾𝙤𝙡𝙡𝙖𝙜𝙚 𝙈𝙖𝙧𝙠𝙚𝙧 || 𝘐𝘮á𝘨𝘦𝘯𝘦𝘴: 𝘗𝘳𝘰𝘱𝘪𝘢𝘴 𝘦𝘥𝘪𝘵𝘢𝘥𝘢𝘴 𝘦𝘯 𝘊𝘢𝘯𝘷𝘢 || 𝘛𝘳𝘢𝘥𝘶𝘤𝘵𝘰𝘳: 𝘋𝘦𝘦𝘱𝘓.