« Creativity does not run out. The more you use, the more you have »


🇪🇸 ~ Hey! Esta semana ha sido un poco lenta entre el trabajo, y que empecé a ver ´Word of Honor´ o “Faraway Wanderers (esta en Netflix, no pude resistirme, los chinos de pelo largo ancestrales son mi nueva debilidad); me ha costado trabajo concentrarme y enfocarme en una sola actividad 🥱 💫
Esta mañana una nueva clienta vino a recoger una pequeña comisión que me encargo la semana pasada (me contacto por teléfono y me paso las referencias de lo que quería, todo fue muy rápido).
« Quiero compartir este proceso a pesar de lo simple que es porque me encontré con 2 pequeñas dificultades de confección que resolver a último momento. Sé que más de una persona podrá sacarle provecho »
También para mi sorpresa, resulta que estos juegos de almohadas para bebes siguen siendo populares (yo las encuentro algo genéricas, pero qué se yo sobre lo que está de moda o no, si solo encuentro bonito el flat desing estilo Sanrio) 🐸 💕
🇺🇸 ~ Hey! This week has been a bit slow between work, and that I started watching 'Word of Honor' or "Faraway Wanderers (this one on Netflix, I couldn't resist, ancestral long haired Chinese are my new weakness); I've had a hard time concentrating and focusing on one activity 🥱 💫
This morning a new client came to pick up a small commission she ordered from me last week (she contacted me by phone and passed me the references of what she wanted, everything went very fast).
« I want to share this process as simple as it is because I found myself with 2 small difficulties to solve at the last minute. I know that more than one person may find this useful »
Also to my surprise, it turns out that these baby pillow sets are still popular (I find them somewhat generic, but what do I know about what's trendy or not, if I just find the flat desing style Sanrio cute 🐸 💕
« T O O L S • & • M A T E R I A L S »


| • Hilo color lila. | • Lilac yarn. |
| • Aguja regular. | • Regular needle. |
| • Hilo color rosa. | • Pink thread. |
| • Tijeras para tela. | • Fabric scissors. |
| • Lápiz & Borrador. | • Pencil & Eraser. |
| • Máquina de coser. | • Sewing machine. |
| • Tijeras para papel. | • Paper scissors. |
| • Silicón líquido frÍo. | • Cold liquid silicone. |
| • Hilo color oscuro. | • Black thread. |
| • Hilo color blanco. | • White thread. |
| • Plancha para ropa. | • Clothes iron. |
| • Pliego de papel grande. | • Large sheet of paper. |
| • Tela de sabana color lila. | • Lilac colored sheet fabric. |
| • Relleno de almohada o felpa. | • Pillow or plush stuffing. |
| • Tela de cobija color turquesa. | • Turquoise blanket fabric. |
| • Fieltro Almidonado color rosa. | • Pink starched felt. |
| • Fieltro almidonado color oscuro. | • Dark colored starched felt. |
« STEP N° 1 »
• Patrones / Patterns •


El primer paso es elaborar los patrones, y como siempre, si el patrón está bien hecho, el resultado será bueno. Un patrón bien hecho asegura un resultado exitoso.
Para este trío de almohadas, en el caso de la nube, hice un patrón a mano alzada, pero si no eres bueno dibujando, te recomiendo utilizar "FlatIcon" para obtener referencias hermosas y perfectas.
The first step is to make the patterns, and as always, if the pattern is well made, the result will be good. **A well-made pattern ensures a successful result.
For this trio of pillows, in the case of the cloud, I made a freehand pattern, but if you are not good at drawing, I recommend using "FlatIcon " to get beautiful and perfect references.
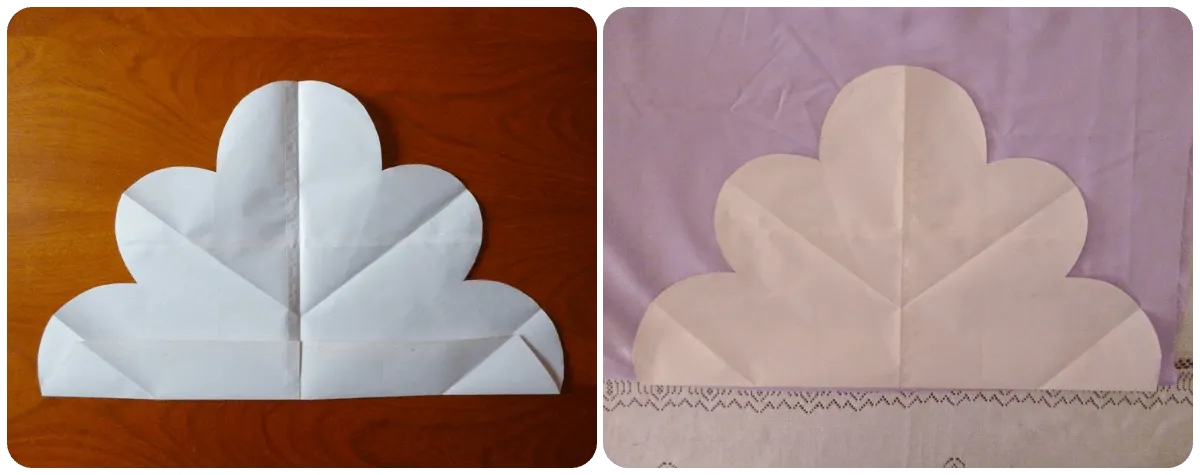
Listo los patrones, los transferí a la tela delineando todo su contorno con lápiz. Puedes sujetar a la tela el molde de papel utilizando alfileres o un poco de cinta adhesiva si tienes problemas en mantener el papel en su lugar.
Ready the patterns, I transferred them to the fabric outlining all the outline with pencil. You can attach the paper pattern to the fabric using pins or a bit of tape if you have trouble keeping the paper in place.

En el caso de la estrella (y la luna), ya tenía un patrón guardado de comisiones anteriores, y como la silueta es perfectamente simétrica, solo hice la mitad, y la replique sobre la tela.
Después, debes fijar el interior de cada silueta de tela con suficientes alfileres para que no se mueva.
In the case of the star (and the moon), I already had a pattern saved from previous commissions, and since the silhouette is perfectly symmetrical, I only did half of it, and replicated it on the fabric.
Then, you must fix the inside of each fabric silhouette with enough pins to keep it from moving.
« STEP N° 2 »
• Coser / Sewing •

Una vez fijada la tela con suficientes alfileres, hay que recortar todo el contorno exterior a la línea guía dejando suficiente espacio (unos 3 cm de margen).
[Nota: En este paso no se ve la luna porque creía que no alcanzaría el relleno para las 3 almohadas, así que no la hice. Sorry por eso, pero más abajo verán que sí se pudo hacer la luna].
Once the fabric is pinned with enough pins, you have to cut out all the outside contour to the guide line leaving enough space (about 3 cm of margin).
[Note: In this step you can't see the moon because I didn't think there wouldn't be enough stuffing for the 3 pillows, so I didn't make it. Sorry about that, but below you will see that the moon could be made].

La costura debe ser pequeña y ajustada porque cada pieza va a ser rellenada y debe contener bien la fibra interna. También, porque serán utilizadas y soportaran peso, así que es necesario una costura resistente (entre N° 2 y 3 según tus gustos).
The seam must be small and tight because each piece will be stuffed and must contain the internal fiber well. Also, because they will be used and will bear weight, so a strong seam is necessary (between N° 2 and 3 according to your taste).

Antes de llegar a la costura donde empezamos a coser, debes detenerla no menos de 6 cm. Esta será la abertura para introducir el relleno de almohada.
Before you get to the seam where we start sewing, you must stop it not less than 6 cm. This will be the opening to insert the pillow filling.

Después de repasar toda la línea guía con costura a máquina, retiras los alfileres, y recortas el exceso de tela de todo el rededor de cada figura. Luego harás pequeños cortes en todo el margen exterior que sobra, como se ve en las imágenes.
After going over the entire guide line with machine stitching, remove the pins, and trim the excess fabric all the way around each figure. Then you will make small cuts all around the outside seam allowance, as shown in the pictures.

Y es necesario planchar muy bien cada figura, porque una vez rellenas y cerradas, será muy difícil disimular las líneas de doblez original de la tela.
And it is necessary to iron each figure very well, because once filled and closed, it will be very difficult to hide the original fold lines of the fabric.

Cada figura debe ser volteada, y es recomendable revisar muy bien las costuras de todo el borde, tirando un poco de cada una en direcciones opuestas para confirmar que no se abran y sean regulares.
Each figure should be turned over, and it is advisable to check the seams of the entire edge very well, pulling a little of each one in opposite directions to confirm that they do not open and are regular.

Podemos planchar de nuevo, hasta que estemos satisfechos con la apariencia de ambas caras de cada almohada.
We can iron again, until we are satisfied with the appearance of both sides of each pillow.
« STEP N° 3 »
• Rellenar y Cerrar / Fill & Close •

Usualmente para este tipo de almohada utilizo relleno de felpa (que es suave y más esponjoso), pero la clienta me envió este relleno para almohada que resulta un poco más fibroso y de textura sintética, y aparentemente de mejor calidad.
Usually for this type of pillow I use plush stuffing (which is soft and fluffier), but the customer sent me this pillow stuffing which is a bit more fibrous and synthetic in texture, and apparently of better quality.

El relleno de almohada debe introducirse poco a poco, en pequeñas cantidades y siempre rellenando primero las esquinas y partes más agudas de cada figura. Después, la abertura se sostiene con alfileres, y se cierra con costura invisible a mano.
The pillow stuffing should be introduced little by little, in small quantities and always filling the corners and sharpest parts of each figure first. Then, the opening is held with pins, and closed with invisible stitching by hand.
« STEP N° 4 »
• SÚPER HACK para el rostro / SUPER HACK for the face ;3c •

Recortar siluetas en fieltro color negro es muy difícil, la tiza para tela y los marcadores y lápices son inútiles en este tipo de textura tan fibrosa que no sostiene ninguna clase de pigmento.
Cutting out silhouettes in black felt is very difficult, fabric chalk and markers and pencils are useless on this kind of fibrous texture that does not hold any kind of pigment.
Por esa razón, se me ocurrió un método para transferir de forma económica y provisoria una silueta guía en el fieltro para poder generar las piezas del rostro de cada almohada (ojos y boca).
Las referencias para la forma de los ojos la encontré en internet, googleando por vectores de buena calidad lo más similares a lo que quería la clienta.
For that reason, I came up with a method to transfer in an economical and provisional way a guide silhouette on the felt to generate the pieces of the face of each pillow (eyes and mouth).
I found the references for the shape of the eyes on the internet, googling for good quality vectors as similar as possible to what the client wanted.

Encontrado los vectores, los replique en una hoja de papel simple de cuaderno, y recorte con mucho cuidado.
Once the vectors are found, replicate them on a sheet of plain notebook paper, and cut them out very carefully.
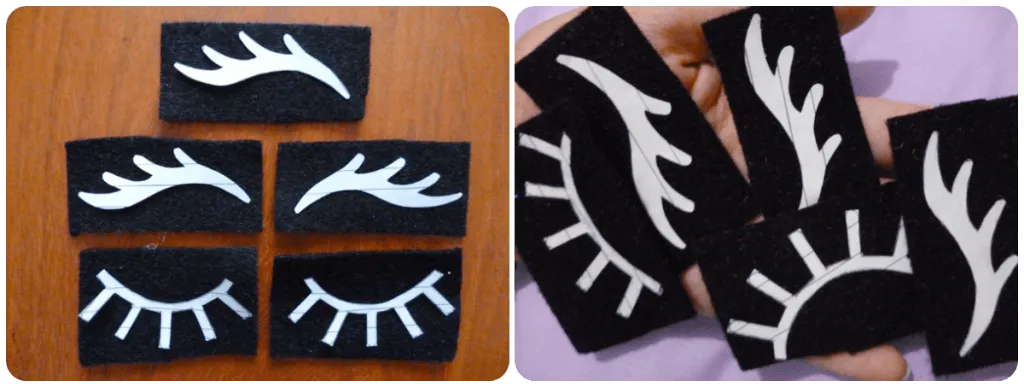
Luego, los pegue en el fieltro almidonado con un poquito de pegamento escolar corriente, y los deje secar. Eso para mantener los moldecitos de papel en su lugar sin dañar el fieltro.
Then, glue them to the starched felt with a little bit of regular school glue, and let them dry. This is to keep the paper molds in place without damaging the felt.

El resultado al recortar cada pieza guiándote por el molde en su fondo es bastante bueno y limpio. Recomiendo mucho esta simple técnica si se va a necesitar producir piezas muy pequeñas que no dan oportunidad a errores.
The result when trimming each piece by guiding you by the mold on its bottom is quite good and clean. I highly recommend this simple technique if you are going to need to produce very small parts that give no chance for mistakes.

El papel al reverso puedes retirarlo jalando un poco, o humedeciendo un poco la pieza. Dado el caso, si está bien pegado puedes dejarlo, no afectara el resultado cuando se transfieran a las almohadas, aunque personalmente prefiero retirarlo.
The paper on the back can be removed by pulling it a little, or by wetting the piece a little. In this case, if it is well glued you can leave it, it will not affect the result when transferred to the pillows, although I personally prefer to remove it.

Para las piezas más grandes como el rubor de las mejillas, no hace falta utilizar el molde de papel para sacarlas, pero sí es importante utilizar un lápiz suave para dibujar los círculos, nada de bolígrafos o marcadores, porque manchara el material.
For the larger pieces such as the cheek blush, it is not necessary to use the paper mold to draw them, but it is important to use a soft pencil to draw the circles, no pens or markers, because it will stain the material.
« STEP N° 5 »
• Fijación de todas las piezas / Fixing of all parts •

Finalmente, ubicaremos todas las piezas en sus posiciones tentativas, y cuando estemos seguros de donde serán fijadas, colocamos alfileres como guías para devolverlas a su lugar exacto con suficiente silicón frio.
Usualmente utilizo pegamento UHU en estos casos pero se me acabo. El silicón frio hace un buen trabajo pero debe utilizarse suficiente y hacer presión para que entre en las fibras, y al mismo tiempo tener cuidado de no manchar el contorno debajo de cada figurita.
Finally, we will place all the pieces in their tentative positions, and when we are sure of where they will be fixed, we place pins as guides to return them to their exact place with enough cold silicone.
I usually use UHU glue in these cases but I ran out of it. The cold silicone does a good job but you must use enough of it and apply pressure to get it into the fibers, and at the same time be careful not to stain the outline under each figurine.
« R E S U L T »

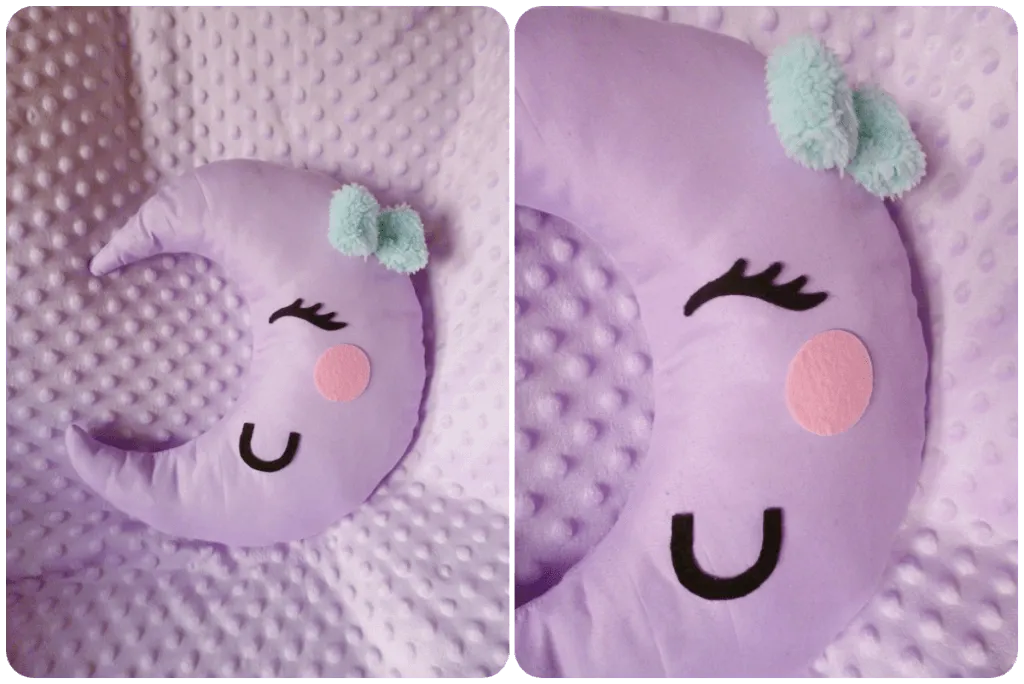


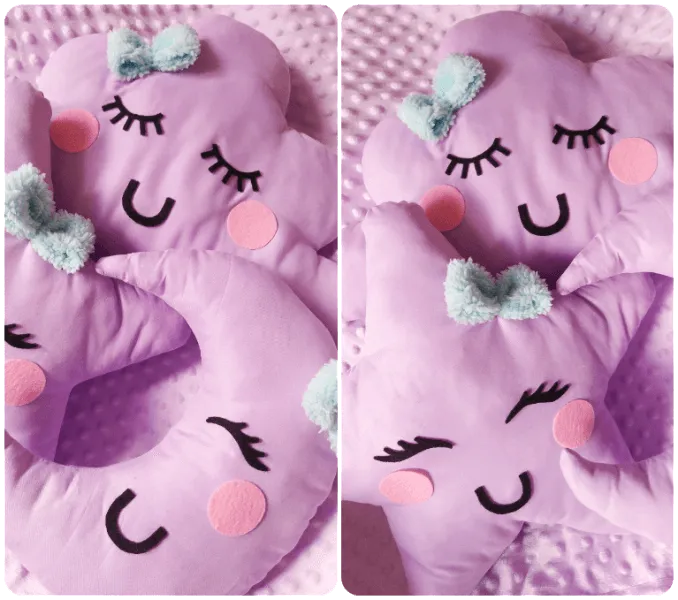

Al principio no tenía mucha fe en este proyecto pero al finalizarlo, entendí el encanto que tienen todas las piezas una vez juntas, y por supuesto, con una cobija a juego texturizada (¡es súper suavecita!) 💜
At first I didn't have much faith in this project but upon completion, I understood the charm that all the pieces have once together, and of course, with a matching textured blanket (it's super soft!) 💜
👉 WE HAVE A PROBLEM... 👈

Lamentablemente la noche de ayer me di cuenta de una cosa, una cosa grave: El pegamento que utilice (aparentemente) estaba vencido, o no tan liquido como debería, no hizo contacto y las piezas estaban medio fijas.
Unfortunately last night I realized one thing, a serious thing: The glue I used (apparently) was out of date, or not as liquid as it should be, it didn't make contact and the pieces were half fixed.

En algunas partes estaban completamente adheridas y en otras no, no era posible retirarlas para buscar segundas opciones. Así que decidí a último minuto coserlas mano con la costura más ninja posible.
Para eso, necesite una aguja extra fina (aguja de velo de novia N° 9), e introduje la aguja desde el fondo de cada pieza hacia afuera por sus bordes, para lograr puntadas 1 en 1 por todo su borde.
In some parts they were fully adhered and in others not, it was not possible to remove them to look for second options. So I decided at the last minute to sew them by hand with the most ninja stitch possible.
For this, I needed an extra fine needle (bridal veil needle N° 9), and introduced the needle from the bottom of each piece outwards along its edges, to achieve 1 in 1 stitches all along its edge.


Hay 2 maneras de hacer esto, la primera (img 1) es atravesar por debajo la figura completa y agregar una puntada en cada extremo por encima (en zigzag). La segunda (img 2), es introducir la aguja desde el borde exterior, y sacarla hasta casi el centro de la figura, para introducirla otra vez debajo del borde de la pieza.
There are 2 ways to do this, the first (img 1) is to go underneath the whole figure and add a stitch at each end on top (zigzag). The second (img 2), is to insert the needle from the outside edge, and pull it out to almost the center of the figure, to introduce it again under the edge of the piece.
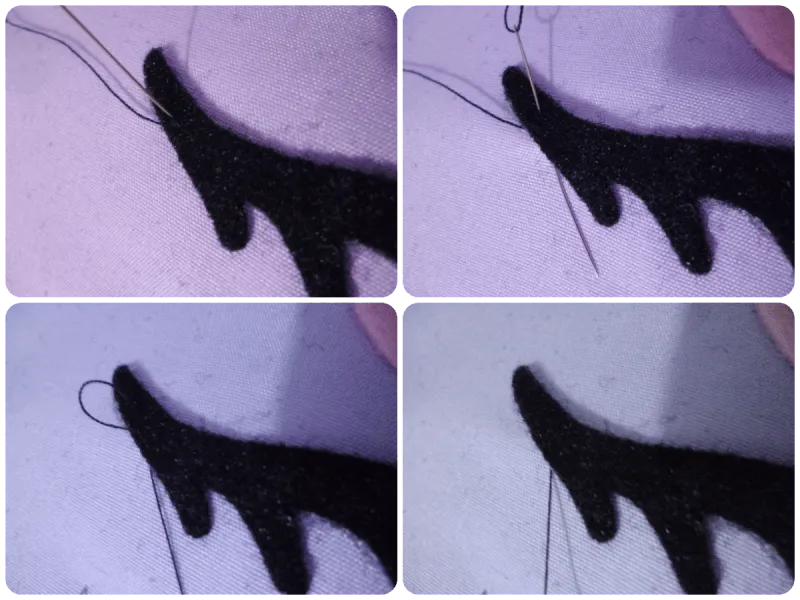
La manera en que yo lo hice fue con puntadas exteriores en su mayoría, primero, sacando la aguja por debajo de la tela morada, introduciéndola en el borde de las pestañas, y sacándola justo en el borde entre el siguiente punto de la pestaña y la tela del fondo. Necesita hacerse con cuidado pero de este modo el hilo negro nunca se notara.
The way I did it was with mostly outside stitches, first, pulling the needle out from under the purple fabric, inserting it into the edge of the tabs, and pulling it out right at the edge between the next stitch in the tab and the bottom fabric. It needs to be done carefully but this way the black thread will never show.

Aquí puede notarse mejor la manera en que debe introducirse la aguja, y el borde justo donde debe sacarse para que no se note en la siguiente puntada.
Here you can better see how the needle should be inserted, and the edge just where it should be pulled out so that it will not be noticeable in the next stitch.
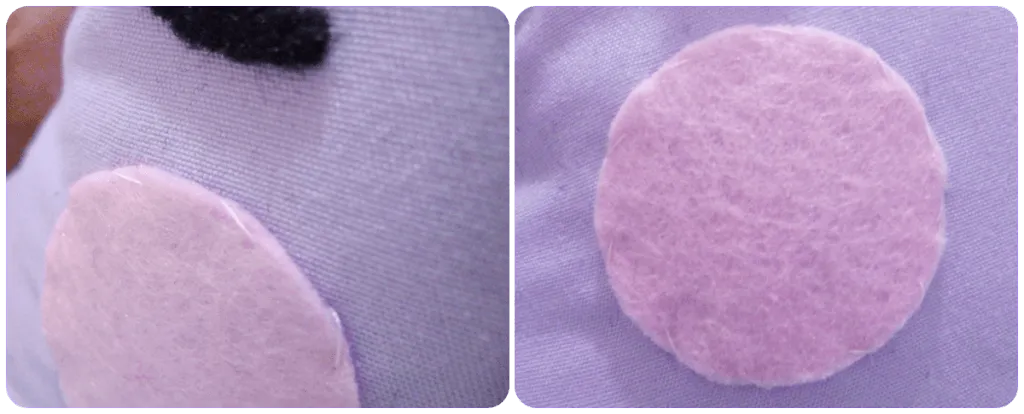
Para las mejillas el caso fue diferente, por su color, el brillo del hilo se notaba mucho, así que le hice puntadas en sentido de la aguja del reloj que pudieran verse, pero que quedaran lo más similares posibles.
For the cheeks the case was different, because of their color, the brightness of the thread was very noticeable, so I made stitches in a clockwise direction that could be seen, but that were as similar as possible.

La moraleja de esta historia es que nunca confíen al 100% en los adhesivos (T▽T) siempre es mejor apostar por la vieja confiable.
The moral of this story is to never rely 100% on adhesives (T▽T) it is always better to go with the old reliable one.
¡Muchas gracias por leer!
📷 Herramientas: Postimages/TinyPNG/Lumix Panasonic DMC-FH2 📷
🚨 ¡Por favor no tomes, edites ni re-publiques mi material sin mi permiso! 🚨
💌 ¿Deseas ponerte en contacto conmigo? Tesmoforia@Outlook.com 💌
✨ Translation done with Deepl - Separadores: @Vanuzza ✨