"The bond that unites you to your true family is not one of blood, but one of respect and joy that you feel for their lives and they for yours."


¡𝑭𝒆𝒍𝒊𝒛 𝑵𝒆𝒆𝒅𝒍𝒆𝒘𝒐𝒓𝒌𝑴𝒐𝒏𝒅𝒂𝒚 𝒂 𝒕𝒐𝒅𝒐𝒔!
(Happy NeedleWorkMonday to all friends!)
🇪🇸 ~ Éste es un registro que guardo hace mucho tiempo esperando una ocasión especial; hoy logre tenerlo listo para coincidir con el lunes, y estoy muy emocionada por compartir de nuevo un longpost después de muchos tutoriales y registros más breves.
Éste es el proceso de elaboración de una comisión que me hizo la familia de mi BBF @Vanuzza, un pequeño vestido tradicional Italiano para su sobrina más joven (baby Fiore).
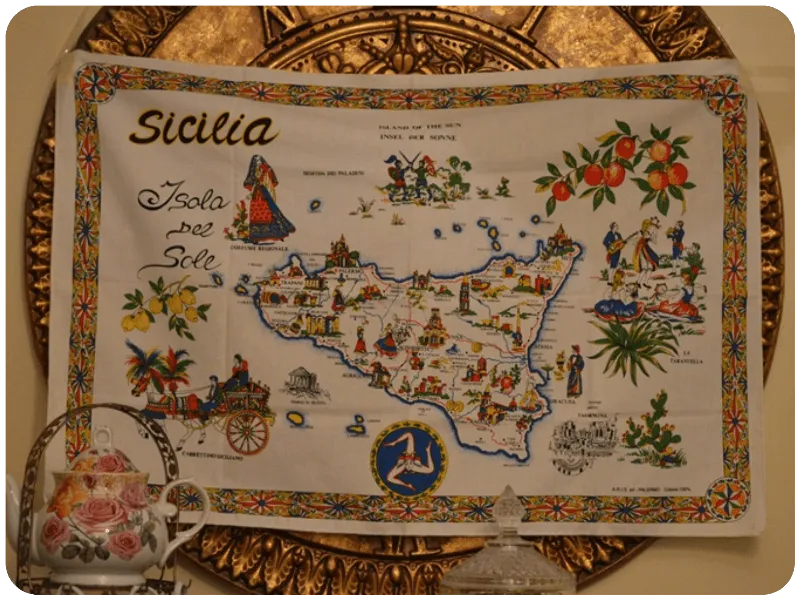
Su familia me dio esta referencia como guía para el diseño del vestido; también me mostraron otros ejemplos pero insistieron en que éste es el diseño que utilizan originalmente en Sicilia, así que trate de respetarlo lo más posible.
🇺🇸 ~ This is a log I've been saving for a long time waiting for a special occasion; today I managed to get it ready to coincide with Monday, and I'm so excited to share a longpost again after many tutorials and shorter logs.
This is the process of making a commission made for me by my BBF @Vanuzza's family, a little traditional Italian dress for her youngest niece (baby Fiore).
Her family gave me this reference as a guide for the design of the dress; they also showed me other examples but insisted that this is the design they originally use in Sicily, so try to respect it as much as possible.

Necesito confesar que aunque hice este regalo con todo mi cariño y afecto, estaba muy nerviosa porque no quería que pareciera un disfraz, o que el resultado ofendiera a la familia (después de todo las fotos de la bebé utilizando este atuendo se las enviarían a la familia en el extranjero, con la que mantienen una muy buena comunicación y lazos estrechos).
La idea era que la pequeña Fiore utilizara algo especial y representativo de su familia paterna (abuelo que emigro de Italia/Venezuela hace 50 años).
I need to confess that although I made this gift with all my love and affection, I was very nervous because I didn't want it to look like a costume, or that the result would offend the family (after all the photos of the baby wearing this outfit would be sent to the family abroad, with whom they have a very good communication and close ties).
The idea was that little Fiore would wear something special and representative of her paternal family (grandfather who emigrated from Italy/Venezuela 50 years ago).
« Faced with such a scenario my pride as a crafter was at stake, and I was not going to forgive myself for looking less than perfect »
« Ante semejante escenario mi orgullo de crafter estaba en juego, y no me iba a perdonar que quedara menos que perfecto »
Btw! Notaran que el escenario y la máquina de coser es diferente, porque los días previos al cumple años número 2 de Fiorella, @Vanuzza me invito a quedarme en su casa para trabajar en el vestido (su máquina de coser es más eficiente que la mía).
Btw! You'll notice that the setting and the sewing machine is different, because the days before Fiorella's 2nd birthday, @Vanuzza invited me to stay at her house to work on the dress (her sewing machine is more efficient than mine).
• S T E P • B Y • S T E P •
« Pequeño Vestido Tradicional Italiano / Small Traditional Italian Dress »
Ésta fue la primera vez que acepte hacer algo para un niño pequeño, no había elaborado prendas infantiles antes; tampoco sé mucho sobre los trajes típicos y festividades en Sicilia, así que si hay algún Italiano o persona con parentesco en la audiencia, eres súper bienvenido a dejarme tus comentarios al final del post (¡acepto críticas y correcciones!).
This was the first time I agreed to make something for a young child, I hadn't made children's garments before; I also don't know much about the typical costumes and festivities in Sicily, so if there are any Italians or related people in the audience, you are super welcome to leave me your comments at the end of the post (I welcome criticism and corrections!).
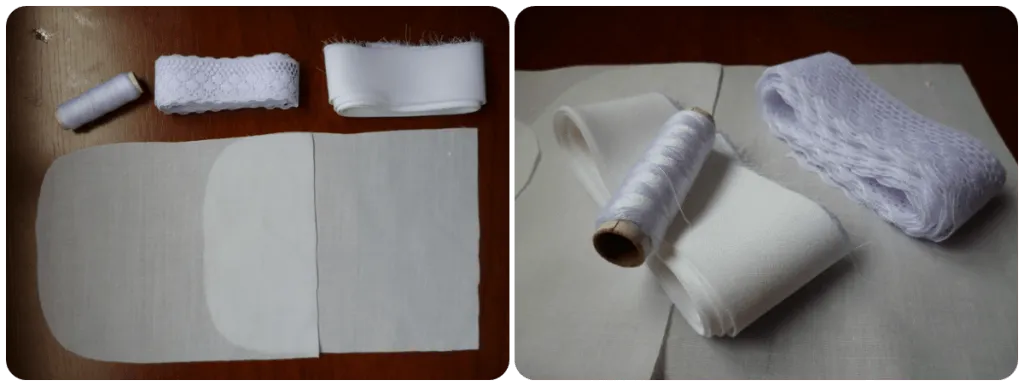
« T O O L S • & • M A T E R I A L S »


| • Cinta métrica. | • Tape measure. |
| • Regla grande. | • Large ruler. |
| • Tijera regular. | • Regular scissors. |
| • Tijera para tela. | • Cloth scissors. |
| • Regla de costura. | • Sewing ruler. |
| • Lápiz & Bolígrafo. | • Pencil & Pen. |
| • Hilo color blanco. | • White thread. |
| • Hilo color negro. | • Black thread. |
| • Hilo color rojo. | • Red thread. |
| • Hilo color dorado. | • Gold colored thread. |
| • Tul color blanco (1 metro). | • White tulle (1 meter). |
| • Máquina de coser. | • Sewing machine. |
| • Plancha para ropa. | • Iron for clothes. |
| • Broche de metal. | • Metal brooch. |
| • Papel bond (1 pliego). | • Bond paper (1 sheet). |
| • Encaje de 4 cm de ancho. | • 4 cm wide lace. |
| • Encaje de 1 cm de ancho. | • 1 cm wide lace. |
| • Cinta de seda color rojo. | • Silk red ribbon. |
| • Tela color negro (raso). | • Black fabric (satin). |
| • Tela color rojo (chifón). | • Red fabric (chiffon). |
| • Tiza para tela color claro. | • Light colored fabric chalk. |
| • Tela color verde (raso tafeta). | • Green color fabric (satin taffeta). |
| • Alfileres grandes y pequeños. | • Large and small pins. |
| • Tela color blanco (charmuse). | • White fabric (charmuse). |
| • Tela de camisería color blanco. | • White shirting fabric. |
| • Cinta elástica de 2cm de ancho. | • 2cm wide elastic ribbon. |
| • Aplique dorado de 0,5 cm de ancho. | • Golden applique 0.5 cm wide. |
| • Aplique dorado de 2 cm de ancho (*). | • 2 cm wide golden appliqué (*). |
| • Cierre invisible color marrón de 30 cm. | • Invisible brown clasp of 30 cm. |
| • Cinta/aplique dorado de 1 cm de ancho. | • Gold ribbon/applique 1 cm wide. |
« STEP N° 1 »
• Elaboración de Patrones / Pattern Making •


Al principio pensaba utilizar una tabla de medidas con referencias sacada de internet (tallas infantiles), pero @Vanessa es muy buena patronando y me ayudo con este paso, así que solo tuve que tomar las medidas de Fiorella.
At first I was thinking of using a measurement chart with references taken from the internet (children's sizes), but @Vanessa is very good at pattern making and helped me with this step, so I just had to take Fiorella's measurements.


Sobre los patrones básicos, dibujamos ligeras modificaciones para que se adaptaran al diseño de la referencia del vestido que querían los abuelos.
On the basic patterns, we drew slight modifications to fit the design of the dress reference the grandparents wanted.

Por cuestiones de seguridad incluimos los centímetros de costura (tenemos antecedentes de olvidar los centímetros de costura si no los marcados de una vez).
For safety reasons we include the seam allowances (we have a history of forgetting the seam allowances if they are not marked at once).

Recortamos ambas piezas y luego las duplicamos en el mismo papel, así tenemos 2 piezas de cada una (estas segundas piezas las guardamos para siempre tener una referencia del molde original, porque los que se usan a partir de ahora siempre sufren modificaciones).
We cut out both pieces and then duplicate them on the same paper, so we have 2 pieces of each one (we keep these second pieces to always have a reference of the original mold, because the ones used from now on always suffer modifications).

Duplicamos en el mismo papel (una tercera vez) el negativo de cada pieza, y las unimos con cinta adhesiva o pega escolar; debe quedar como en la imagen.
Duplicate on the same paper (a third time) the negative of each piece, and join them with adhesive tape or school glue; it should look like the image.
« STEP N° 2 »
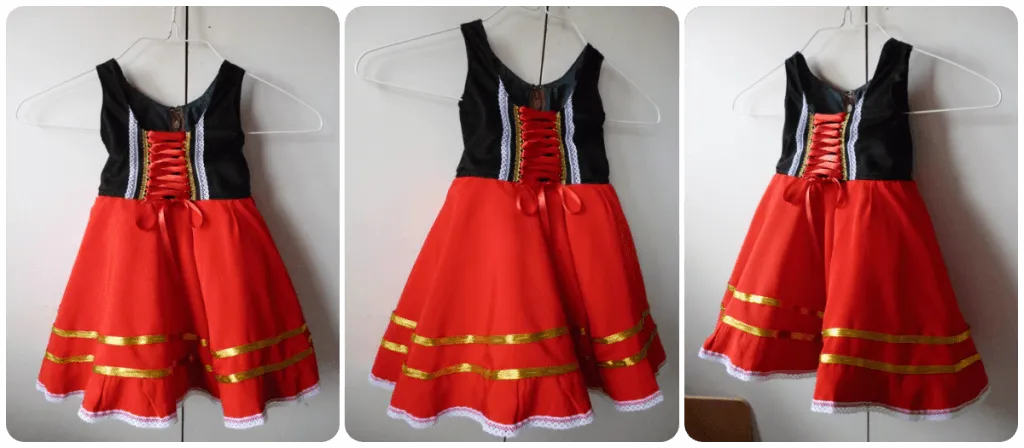
• Parte superior del vestido + detalles / Top of dress + details •

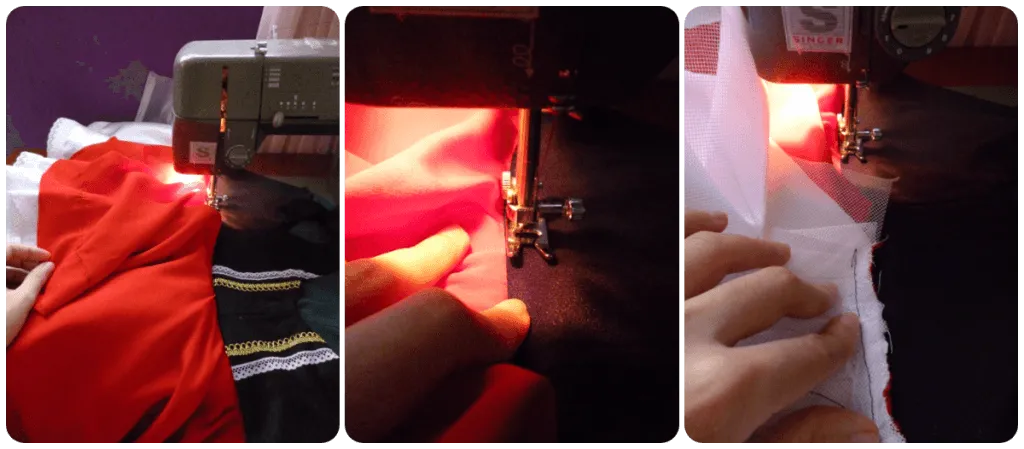
Con ayuda de la tiza para tela y cada patrón, trasladamos la silueta del frente y reverso del vestido en la tela de raso color oscuro.
With the help of the fabric chalk and each pattern, we transfer the silhouette of the front and back of the dress on the dark satin fabric.

Planchamos a temperatura alta/media, y llevamos a la máquina de coser para unirlas en sus laterales y hombros, dejando la parte de detrás abierta.
We iron at high/medium temperature, and take them to the sewing machine to join them at the sides and shoulders, leaving the back part open.

Coseremos a mano el encaje de 0,5 cm con hilo blanco, y con una puntada discreta que no se note (no lo lleve a la máquina de coser porque tendría que haber cambiado el número de aguja para no dañar el encaje tan finito).
We will hand sew the 0.5 cm lace with white thread, and with a discreet stitch that is not noticeable (do not take it to the sewing machine because I would have had to change the needle number so as not to damage the very fine lace).

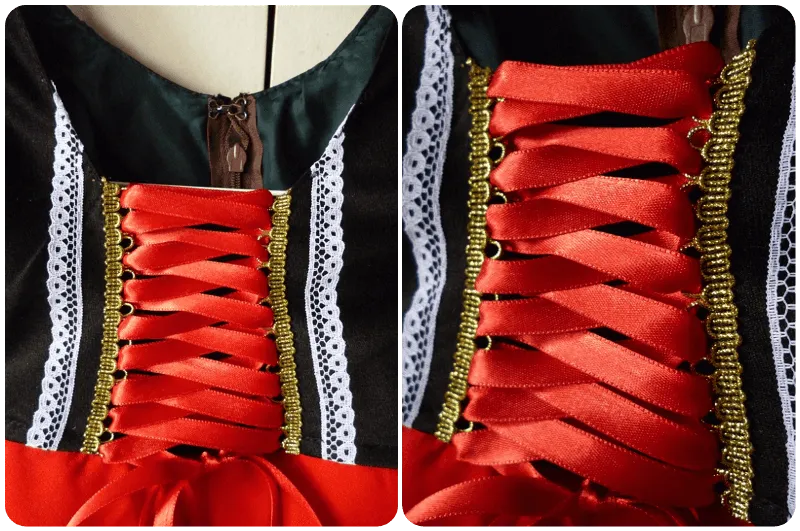
Esta parte es muy importante: Para lograr la ilusión de zigzag es vital encontrar un torchón fino con esta clase de "ojales", y una cinta de seda que quepa entre esos ojales, que no quede holgado pero tampoco se arrugue.
This part is very important: To achieve the zigzag illusion it is vital to find a thin torchon with this kind of "eyelets", and a silk ribbon that fits between those eyelets, that is not baggy but does not wrinkle either.
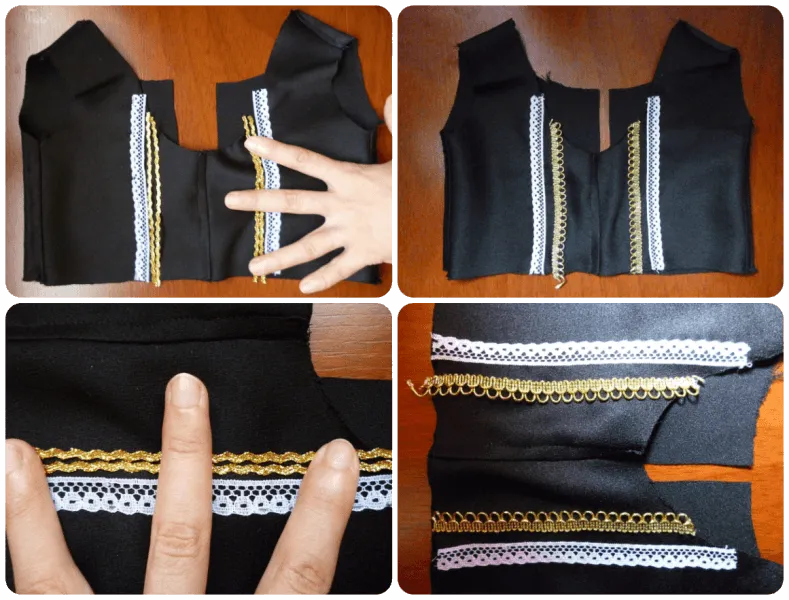
Coseremos a mano el torchón del mismo modo que cosimos el encaje color blanco; cambiamos a hilo dorado y pasamos unas 3 costuras mínimo en cada tira de dorada.
We will sew the torchon by hand in the same way we sewed the white lace; we change to golden thread and sew at least 3 seams on each strip of golden thread.
« STEP N° 3 »
• Forro interior para la parte superior / Inner lining for the top •

De nuevo con la tiza para tela, pasamos la silueta de los patrones superiores del vestido a la tela para forro color verde, siempre en el sentido en que la tela estira (o como dicen, "para cortar al bies").
Again with the fabric chalk, we pass the silhouette of the upper patterns of the dress to the green lining fabric, always in the direction in which the fabric stretches (or as they say, "to cut on the bias").

Ubicamos las partes con los alfileres finos (con cuidado de no dañar la tela, porque la tafeta es ligera y sus hilos se corren fácilmente) cosemos un zigzag cerrado, y luego cosemos del mismo modo que la parte exterior del vestido (sus laterales y los hombros).
We place the parts with the fine pins (being careful not to damage the fabric, because taffeta is light and its threads run easily), sew a closed zigzag, and then sew in the same way as the outside of the dress (its sides and shoulders).

Esta parte debe coincidir con exactitud con el frente del vestido; podemos ubicarla dentro de la pieza a la que le cosimos el torchón y el encaje, y sostenerlas con alfileres para corregir si sobra un poco, pero no debemos coserlas aún.
This part must coincide exactly with the front of the dress; we can place it inside the piece to which we sewed the torchon and the lace, and hold them with pins to correct if there is a little left over, but we should not sew them yet.
« STEP N° 4 »
• Parte exterior de la falda + detalles / Outer part of skirt + details •

Para la falda, tome la medida de la cintura de la mini-modelo hasta sus tobillos para obtener el largo, y el contorno de su cintura para obtener el diámetro del borde interno de la falda.
For the skirt, take the measurement from the mini-model's waist to her ankles to get the length, and her waist circumference to get the diameter of the skirt's inner edge.

Luego, le hice un ruedo ancho a la falda (lo cosí todo a mano con costura invisible), y después lo uní a la parte superior exterior del vestido (de nuevo, primero a mano, antes de llevar a la máquina de coser).
Next, I made a wide hem on the skirt (I sewed it all by hand with invisible stitching), and then attached it to the outer top of the dress (again, first by hand, before taking it to the sewing machine).

Para conseguir un resultado súper limpio, cosí a mano todos los apliques de la falda, y sólo cuando comprobé que estaban alineados correctamente, los cosí con hilo blanco y dorado respectivamente en la máquina, con una puntada N° 3,5 o 4.
To get a super neat result, I hand sewed all the appliqués on the skirt, and only when I checked that they were aligned correctly, I sewed them with white and gold thread respectively on the machine, with a N° 3.5 or 4 stitch.

La parte dorada fue especialmente difícil de colocar correctamente, porque este aplique es totalmente sintético y no cede para nada en las curvas. Para la zona donde coincide el principio y el final de cada extremo, los sujete con pequeños alfileres para que pareciera que su unión cae bajo la costura del cierre de la falda.
The gold part was especially difficult to attach correctly, because this applique is totally synthetic and does not give at all in the curves. For the area where the beginning and end of each end coincide, I pinned them together with small pins to make it look like their union falls under the seam of the skirt closure.
« STEP N° 5 »
• Fondo blanco + detalles / White background + details •
Para el fondo color blanco del vestido, repetí los mismos pasos que con la primera capa de color rojo, con la diferencia de que el ruedo de esta falda es mucho más angosto.
For the white background of the dress, I repeated the same steps as with the first red layer, except that the hem of this skirt is much narrower.

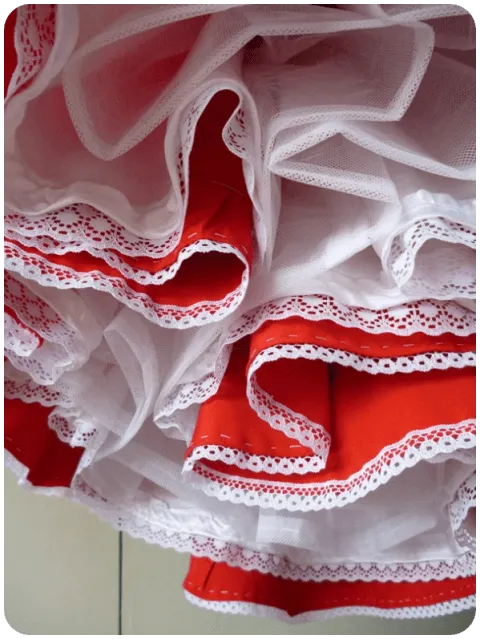
Sobre el ruedo, al que le pase 2 costuras en su centro y lo hice más "rellenito", cosí a mano en todo el exterior el encaje grueso de 4 cm. La gracia de coser a mano este tipo de apliques es que se adaptan mejor a las curvas de la prenda, porque el encaje de este tipo no es elástico ni flexible en sus fibras, y a mano puede forzarse un poco para que no arrugue la tela.
On the hem, to which I sewed 2 seams in the center and made it more "plump", I hand sewed the 4 cm thick lace all around the outside. The advantage of hand sewing this type of applique is that it adapts better to the curves of the garment, because this type of lace is not elastic or flexible in its fibers, and by hand it can be forced a little so that it does not wrinkle the fabric.
« STEP N° 6 »
• Armador de la falda / Skirt Tutu •
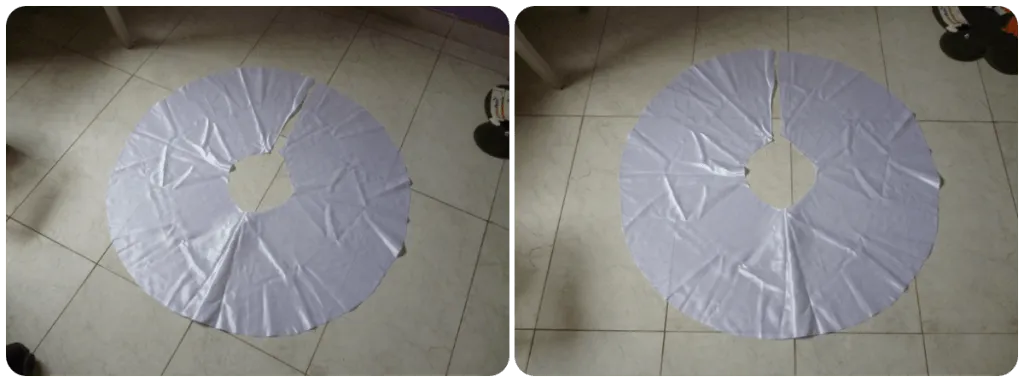
Para el armador de la falda, tomaremos 1 metro de tul grueso, y lo cortaremos para obtener 2 tiras largas que ajustaremos al ancho de la medida que tenemos en las faldas rojo y blanco (mas unos 5 cm para elaborar el ruedo).
To make the skirt's hem, we will take 1 meter of thick tulle, and we will cut it to obtain 2 long strips that we will adjust to the width of the measure we have in the red and white skirts (plus about 5 cm to make the hem).

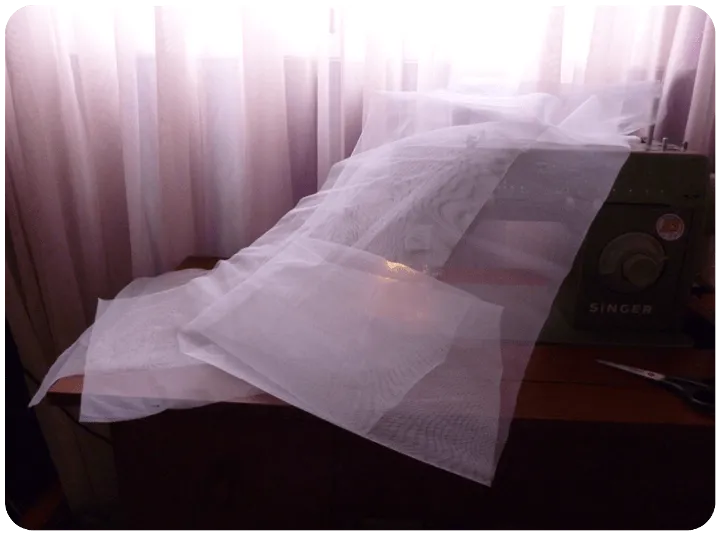
Uniremos ambas piezas con doble costura, cuidando de guardar la unión en un segundo pliegue para que no incomode con el roce. Recordemos que el "Tul TM" y el "Tul para tutus" le causa mucha incomodidad al tacto a los niños pequeños.
We will join both pieces with double stitching, taking care to keep the union in a second fold so that it does not cause discomfort with friction. Remember that the "Tulle TM" and the "Tulle for tutus" cause a lot of discomfort to the touch to small children.

Después de unir las piezas, elaboramos un ruego que será la parte inferior de nuestro tutu interno. Es bueno utilizar una puntada abierta N° 5.
After joining the pieces together, we make a pleat that will be the lower part of our inner tutu. It is good to use an open stitch N° 5.

Terminado el ruedo, obtendremos un resultado resistente al tacto (este ruedo no es solo estético, hace que las ondas del armador sean más resistentes y no se pierdan tan rápido con el uso).
After finishing the roll, we obtain a result that is resistant to the touch (this roll is not only aesthetic, it makes the waves of the weaver more resistant and does not get lost so quickly with use).

Cada metro de encaje al ser fruncido, nos da unos 25 cm de ruche, es decir que esta tira de tul fruncida es suficiente para igualar la circunferencia interna/cintura de cada falda.
Each meter of lace, when gathered, gives us about 25 cm of ruche, i.e. this strip of gathered tulle is enough to equalize the inner circumference/waist of each skirt.
« STEP N° 7 »
• Unión de todas las piezas / Joining all parts together •

Para unir todas las piezas primero coseremos la falda blanca al armador (a mano y después a máquina). Luego, alineamos con ayuda de los alfileres el cuerpo del vestido (la parte roja) al armador y el fondo blanco lo mejor que podamos, es vital que las 3 capas coincidan. Después cosemos con una puntada pequeña N° 3, hasta dos veces si es necesario, porque estas piezas pesan mucho.
To join all the pieces together we will first sew the white skirt to the bodice (by hand and then by machine). Then, we align with the help of the pins the body of the dress (the red part) to the armor and the white bottom as best as we can, it is vital that the 3 layers match. Then we sew with a small stitch N° 3, up to twice if necessary, because these pieces are very heavy.
Finalmente le damos la vuelta a todo, y estiramos la parte baja del vestido y la pieza superior para coser con hilo oscuro por toda la cintura del vestido. Esto le dará pulcritud al acabado y hará que el borde interno sobrante de tul y telas mire hacia arriba, y nunca contra la pancita de la niña (para que no le pique).
Finally we turn the whole thing inside out, and stretch the bottom of the dress and the top piece to sew with dark thread all around the waist of the dress. This will give a neatness to the finish and will make sure that the excess inner edge of tulle and fabrics faces upwards, and never against the girl's tummy (so it doesn't itch).
« STEP N° 8 »
• Instalación y cierre del forro / Installation and closing of the inner lining •

Para instalar el forro, le daremos vuelta a todo el vestido y lo ubicaremos como en la imagen; esta parte debe ser forzosamente a mano para un resultado delicado y preciso. La parte más importante aquí es que la parte "filosa" del tul, quedara guardada entre el raso exterior y la tafeta del forro, así que no se verá, y tampoco tendrá contacto con la piel de la niña, asegurando 0% de molestias y máxima comodidad.
Para terminar, instale el cierre invisible color marrón entre el forro y el raso oscuro, todo a mano nuevamente, hasta cerrar por fin la pieza y finalizar con los brochecitos de metal al final del cierre.
To install the lining, we will turn the whole dress inside out and place it as shown in the picture; this part must be done by hand for a delicate and precise result. The most important part here is that the "sharp" part of the tulle will be kept between the outer satin and the taffeta of the lining, so it will not be seen, nor will it have contact with the girl's skin, ensuring 0% discomfort and maximum comfort.
To finish, install the invisible brown zipper between the lining and the dark satin, all by hand again, until the piece is finally closed and finished with the little metal clasps at the end of the zipper.
« STEP N° 9 »
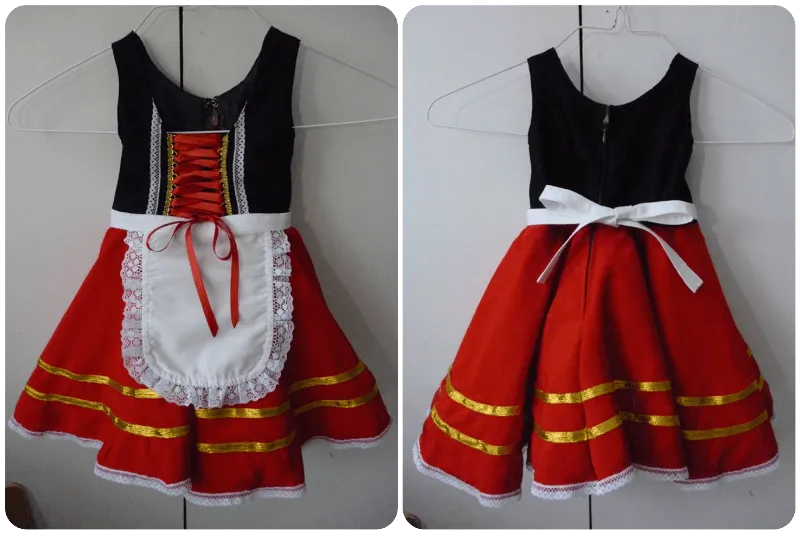
• Elaboración del delantal / Apron making •
💕 ESTA ES MI PARTE FAVORITA DE TODO EL PROCESO 💕
Para el pequeño delantal, prepare una cinta de charmuse blanco de 1 metro de largo y 7 centímetros de ancho, y dos rectángulos que ovale en su parte baja, de 12 cm x 20 cm aproximadamente (no recuerdo las medidas exactas porque no las anote, lo siento, esta parte fue muy free style).
💕 THIS IS MY FAVORITE PART OF THE WHOLE PROCESS 💕
For the little apron, I prepared a white charmuse ribbon 1 meter long and 7 centimeters wide, and two rectangles that ovale at the bottom, 12 cm x 20 cm approximately (I don't remember the exact measurements because I didn't write them down, sorry, this part was very free style).
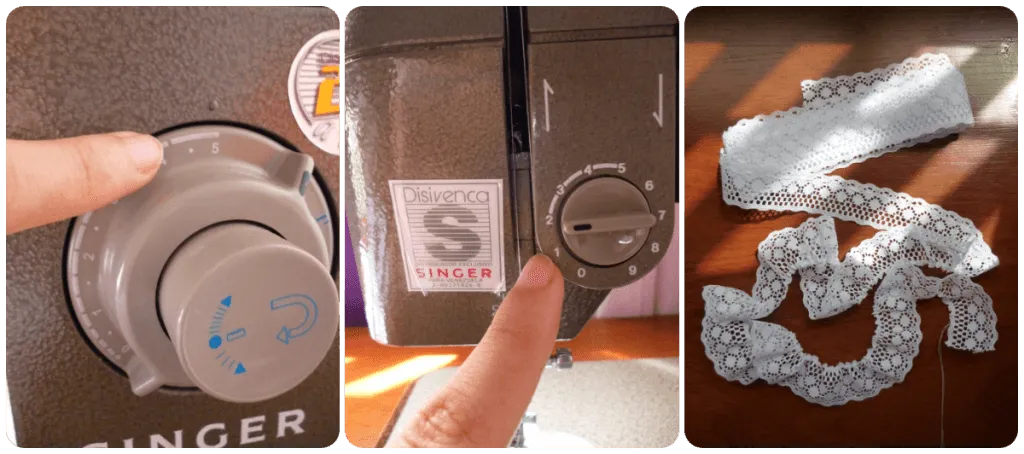
El siguiente paso fue elaborar el borde ondulado/ruche bonito de todo el rededor del delantal. Para eso ubique la máquina de coser en tensión N° 2 con puntada N° 5, esto para que automáticamente al pasar el encaje, la maquina sola en puntada recta te dará ese resultado.
The next step was to elaborate the wavy edge/pretty ruching all around the apron. For this I set the sewing machine to tension N° 2 with stitch N° 5, this so that automatically when you pass the lace, the machine alone in straight stitch will give you that result.

En caso que no te quede como en la imagen de muestra, siempre puedes hacer una puntada recta normal, sin modificar la tensión de tu máquina de coser, y luego jalar el hilo desde el extremo final del encaje, y así hacer estas ondas manualmente (como un acordeón).
In case it does not look like the sample image, you can always make a normal straight stitch, without modifying the tension of your sewing machine, and then pull the thread from the end of the lace, and thus make these waves manually (like an accordion).

Tomaremos una de las caras del delantal (que está hecha con tela de camisería común, aunque también sirve tela para mantelería) y le coseremos el ruche de encaje en todo su borde, respetando la línea superior, esa no debe llevar encaje. El encaje debe mirar hacia dentro.
We will take one of the sides of the apron (which is made with common shirting fabric, although it can also be used for table linen) and we will sew the lace ruching all around its edge, respecting the upper line, which should not have lace. The lace must face inwards.

El resultado debe ser justo como en la imagen, y así mismo, colocaremos la otra cara del delantal sobre esta pieza, a modo de sanguchito, y sostendremos con alfileres en su lugar.
The result should be just as in the picture, and likewise, we will place the other side of the apron over this piece, as a sanguchito, and hold with pins in place.
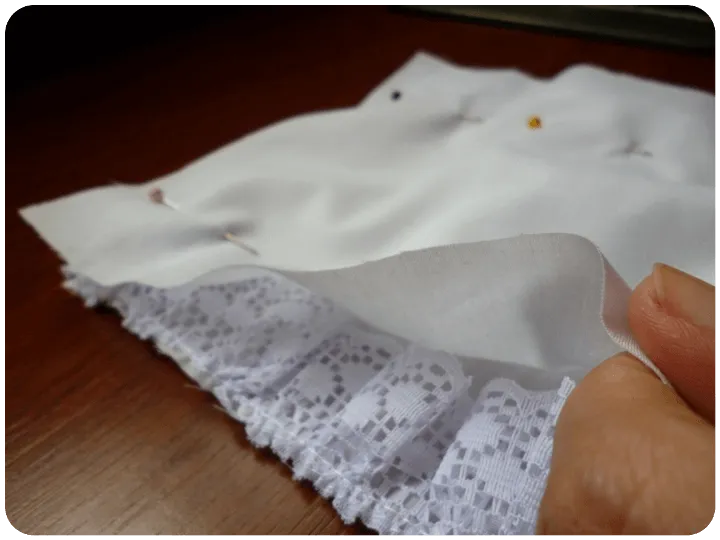
Es muy importante tener cuidado de NO dañar las ondas ni separaciones bonitas del encaje interno en esta etapa.
It is very important to be careful NOT to damage the waves or nice internal lace separations at this stage.

Llevamos a la máquina de coser y cosemos todo el rededor la línea del encaje, esta costura no debe superar 1 cm a partir del borde exterior. Retiramos los alfileres y volteamos la pieza.
We take to the sewing machine and sew all around the lace line, this seam should not exceed 1 cm from the outer edge. Remove the pins and turn the piece over.

Estiramos muy bien la tela y sobamos el encaje para confirmar que esta derecho y que conservo sus ondas rectas (a veces mientras pasa el pie de la máquina, es normal que se abran demasiado o se superpongan, dado el caso siempre podemos descoser y repetir el proceso). Planchamos a temperatura baja.
Stretch the fabric very well and rub the lace to confirm that it is straight and that it has kept its straight waves (sometimes while passing the foot of the machine, it is normal that they open too much or overlap, in this case we can always unpick and repeat the process). Iron at low temperature.

Para un bonito acabado final, cosemos una línea recta limpia en todo el marco exterior del delantal. Esta costura puede ser doble, pero yo escogí dejarla simple.
For a nice final finish, we sew a neat straight line all the way around the outside frame of the apron. This seam can be double stitched, but I chose to leave it simple.

Con ayuda de la plancha para ropa a alta temperatura, le di forma a la cinta del delantal antes de ubicarla en el cuerpo de la pieza. En esta etapa solo queda cerrar con una puntada recta.
With the help of a high temperature iron, I shaped the apron ribbon before placing it on the body of the piece. At this stage, the only thing left to do is to close with a straight stitch.

Me mencionaron que estos delantales no siempre son lisos, que era una opción pintarle a mano algunas flores con pintura para telas, pero por cuestión de tiempo no quise hacerlo, no me quería arriesgar a dañar una pieza tan bonita después de tanto esfuerzo.
It was mentioned to me that these aprons are not always smooth, that it was an option to hand paint some flowers with fabric paint, but due to time constraints I didn't want to do it, I didn't want to risk damaging such a beautiful piece after so much effort.
« STEP N° 10 »
• Pañoleta / Bandanna •

A último minuto, recordé que el atuendo llevaba una pañoleta en la cabeza, pero al tratarse de una niña pequeña una pañoleta regular seria rápidamente desecha o se caería, por eso rebusque entre los retazos de material que quedaron y elabore fugazmente esta pieza.
Hice un diamante de tela roja, lo cosí y lo voltee por una de sus esquinas que deje sin coser, resultando en un triángulo. Elabore un tubito de tela al que inserte un pedazo de cinta elástica, que cosí velozmente a las puntas del triángulo, and TA-DAAA ~
At the last minute, I remembered that the outfit had a head scarf, but since this was a little girl a regular scarf would be quickly discarded or fall off, so I rummaged through the scraps of material that were left and fleetingly made this piece.
I made a diamond out of red fabric, sewed it together and flipped it over at one of its corners that I left unstitched, resulting in a triangle. I made a small tube of fabric to which I inserted a piece of elastic ribbon, which I quickly sewed to the ends of the triangle, and TA-DAAA ~
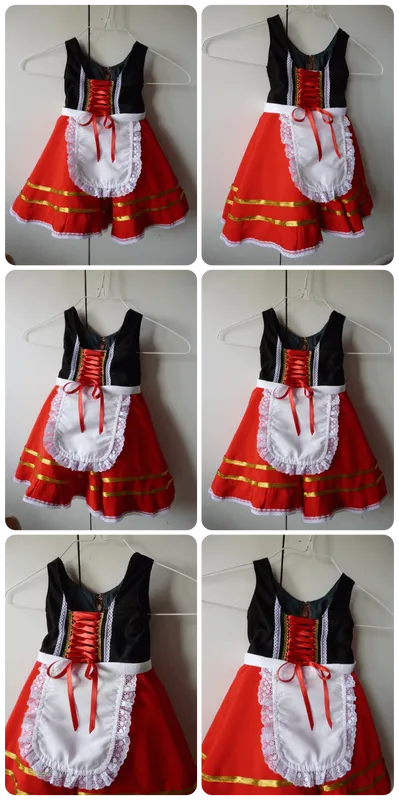
« C O M P L E T E D ~ D R E S S »
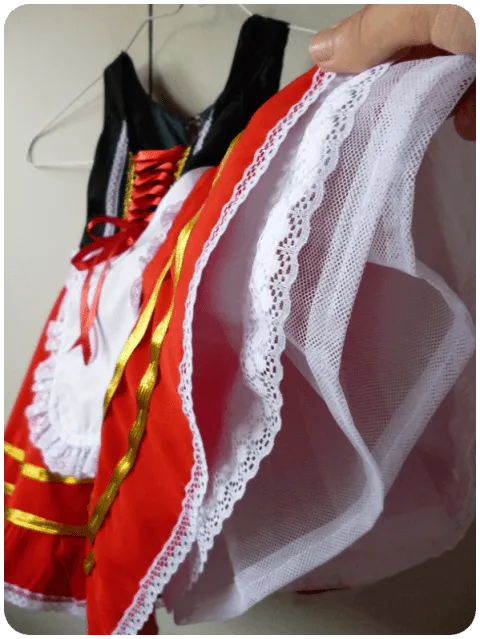

En primer lugar, estas telas tenían muchos años guardados en una maleta, me cuenta la abuela de la pequeña, que me dijo que las compraron en un viaje a Italia hace muchos años. Así que estas telas vinieron desde otro continente y esperaron largo tiempo para convertirse en esto que ven.
Y en segundo lugar, mis humildes manitos y mi afecto por esta familia, cuya amistad aprecio muchísimo al igual que todo el cariño que me han brindado desde que los conocí en 2010.
First of all, these fabrics had many years stored in a suitcase, the little girl's grandmother tells me, who told me they bought them on a trip to Italy many years ago. So these fabrics came from another continent and waited a long time to become what you see.
And secondly, my humble little hands and my affection for this family, whose friendship I appreciate very much as well as all the love they have given me since I met them in 2010.
« 𝘚𝘛𝘙𝘐𝘒𝘌 𝘈 𝘗𝘖𝘚𝘌 »
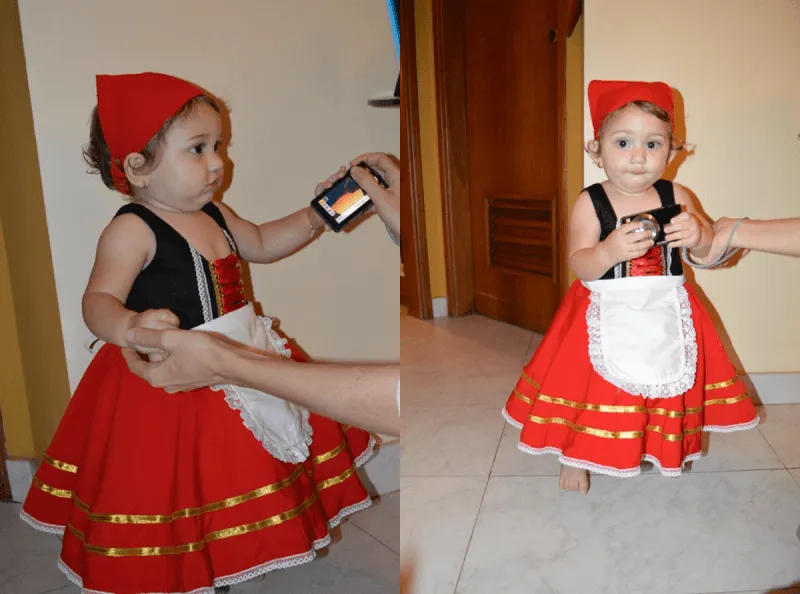
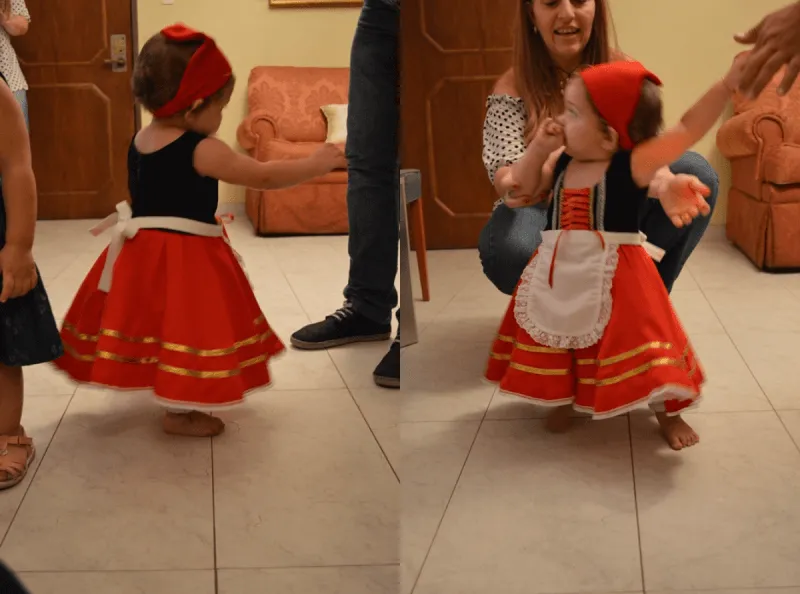


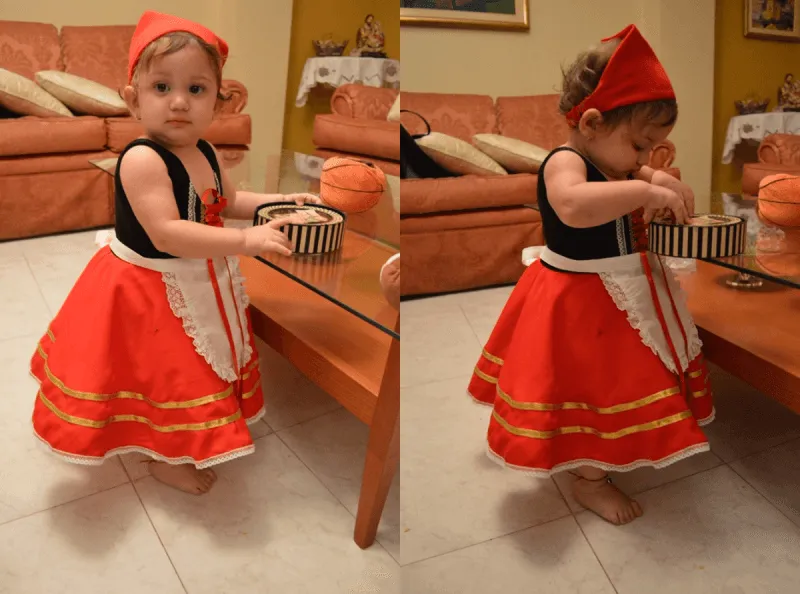


Les presento a la pequeña Fiorella. Ese día que estreno el vestido les comparto con mucha alegría que le quedo como un guante, y a diferencia de lo que todos pensaban, no se arrancó la pañoleta de la cabeza (su mama me dijo que ella usualmente no se deja lazos ni cintillos). La bebé se veía muy cómoda y toda su familia estaba encantada con lo adorable que lucía en su trajecito siciliano.
Algunas cosas que aprendí ese día fueron que la comodidad en un atuendo infantil es la prioridad, también la resistencia de la ropa, y que preferiblemente todos los accesorios deben estar cosidos (el delantal con el tiempo ella misma se lo soltaba, así que mejor opción hubiera sido coserlo con puntada invisible en el frente de la cintura).
Después de esa agradable experiencia, me animé a incursionar en elaborar cosas para niños (he hecho vestidos para eventos escolares y disfraces desde entonces).
Meet little Fiorella. That day she was wearing her dress for the first time, I am very happy to share with you that it fit her like a glove, and contrary to what everyone thought, she didn't rip off her head scarf (her mom told me that she usually doesn't wear ribbons or headbands). The baby looked very comfortable and her whole family was thrilled with how adorable she looked in her little Sicilian outfit.
Some things I learned that day were that comfort in a child's outfit is the priority, also the resistance of the clothes, and that preferably all the accessories should be sewn on (the apron would eventually come loose herself, so a better option would have been to sew it with invisible stitch on the front of the waist).
After that pleasant experience, I was encouraged to dabble in making things for children (I've made dresses for school events and costumes since then).
𝘕𝘰𝘵𝘢 𝘌𝘴𝘱𝘦𝘤𝘪𝘢𝘭: 𝘛𝘰𝘥𝘢𝘴 𝘭𝘢𝘴 𝘧𝘰𝘵𝘰𝘨𝘳𝘢𝘧í𝘢𝘴 𝘥𝘦 𝘉𝘢𝘣𝘺 𝘍𝘪𝘰𝘳𝘦 𝘧𝘶𝘦𝘳𝘰𝘯 𝘵𝘰𝘮𝘢𝘥𝘢𝘴 𝘺 𝘱𝘶𝘣𝘭𝘪𝘤𝘢𝘥𝘢𝘴 𝘢𝘲𝘶í 𝘣𝘢𝘫𝘰 𝘦𝘹𝘱𝘳𝘦𝘴𝘰 𝘤𝘰𝘯𝘴𝘦𝘯𝘵𝘪𝘮𝘪𝘦𝘯𝘵𝘰 𝘺 𝘱𝘦𝘳𝘮𝘪𝘴𝘰 𝘥𝘦 𝘴𝘶𝘴 𝘱𝘢𝘥𝘳𝘦𝘴, 𝘱𝘰𝘳 𝘦𝘴𝘰 𝘯𝘰 𝘦𝘥𝘪𝘵𝘦 𝘭𝘢𝘴 𝘧𝘰𝘵𝘰𝘴 𝘤𝘰𝘮𝘰 𝘶𝘴𝘶𝘢𝘭𝘮𝘦𝘯𝘵𝘦 𝘩𝘢𝘨𝘰 𝘤𝘶𝘢𝘯𝘥𝘰 𝘵𝘦𝘳𝘤𝘦𝘳𝘢𝘴 𝘱𝘦𝘳𝘴𝘰𝘯𝘢𝘴 𝘩𝘢𝘤𝘦𝘯 𝘤𝘢𝘮𝘦𝘰𝘴 𝘦𝘯 𝘮𝘪𝘴 𝘱𝘶𝘣𝘭𝘪𝘤𝘢𝘤𝘪𝘰𝘯𝘦𝘴.
𝘚𝘱𝘦𝘤𝘪𝘢𝘭 𝘕𝘰𝘵𝘦: 𝘈𝘭𝘭 𝘱𝘩𝘰𝘵𝘰𝘴 𝘰𝘧 𝘉𝘢𝘣𝘺 𝘍𝘪𝘰𝘳𝘦 𝘸𝘦𝘳𝘦 𝘵𝘢𝘬𝘦𝘯 𝘢𝘯𝘥 𝘱𝘶𝘣𝘭𝘪𝘴𝘩𝘦𝘥 𝘩𝘦𝘳𝘦 𝘶𝘯𝘥𝘦𝘳 𝘦𝘹𝘱𝘳𝘦𝘴𝘴 𝘤𝘰𝘯𝘴𝘦𝘯𝘵 𝘢𝘯𝘥 𝘱𝘦𝘳𝘮𝘪𝘴𝘴𝘪𝘰𝘯 𝘰𝘧 𝘩𝘦𝘳 𝘱𝘢𝘳𝘦𝘯𝘵𝘴, 𝘴𝘰 𝘐 𝘥𝘪𝘥 𝘯𝘰𝘵 𝘦𝘥𝘪𝘵 𝘵𝘩𝘦 𝘱𝘩𝘰𝘵𝘰𝘴 𝘢𝘴 𝘐 𝘶𝘴𝘶𝘢𝘭𝘭𝘺 𝘥𝘰 𝘸𝘩𝘦𝘯 𝘵𝘩𝘪𝘳𝘥 𝘱𝘢𝘳𝘵𝘪𝘦𝘴 𝘮𝘢𝘬𝘦 𝘤𝘢𝘮𝘦𝘰𝘴 𝘪𝘯 𝘮𝘺 𝘱𝘶𝘣𝘭𝘪𝘤𝘢𝘵𝘪𝘰𝘯𝘴.
¡Muchas gracias por leer!
📷 Herramientas: Postimages/TinyPNG/Lumix Panasonic DMC-FH2 📷
🚨 ¡Por favor no tomes, edites ni re-publiques mi material sin mi permiso! 🚨
💌 ¿Deseas ponerte en contacto conmigo? Tesmoforia@Outlook.com 💌
✨ Translation done with Deepl - Separadores: @Vanuzza - Italy ✨