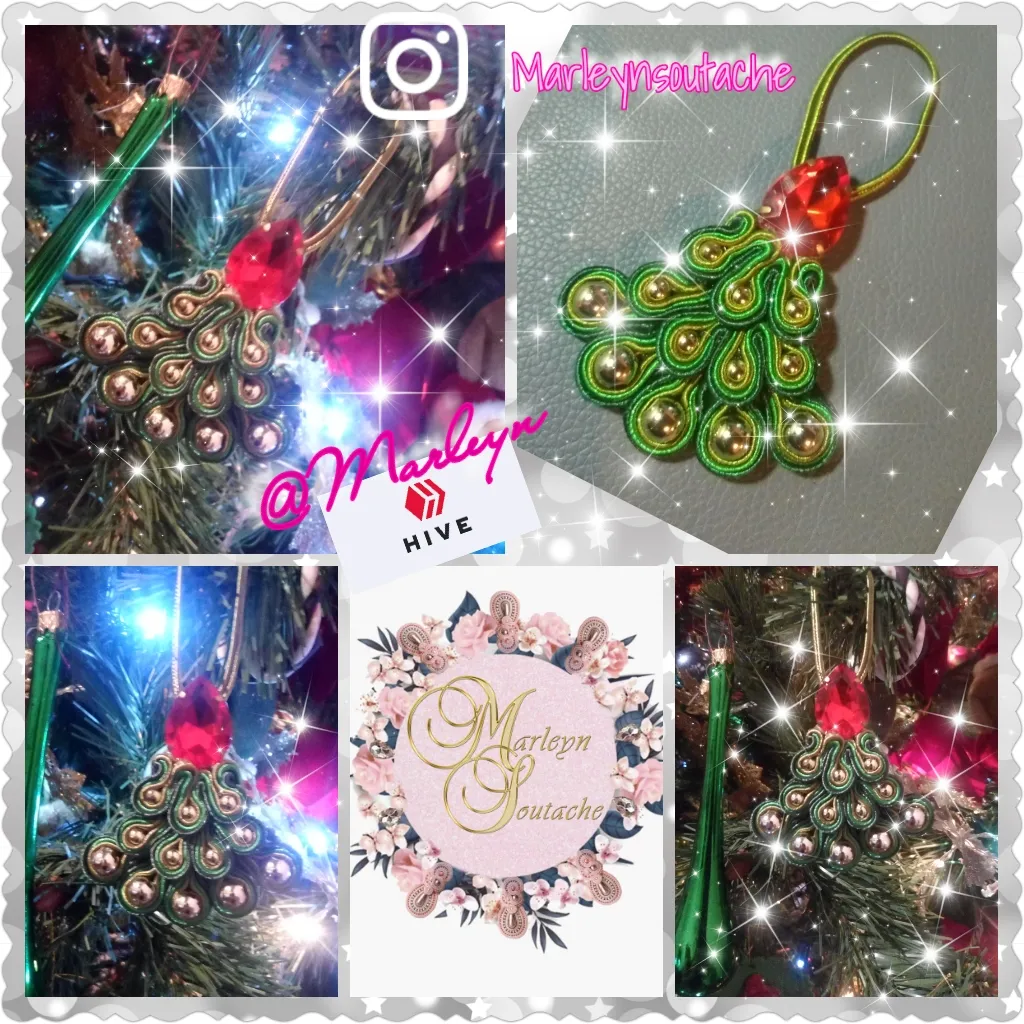
Feliz y bendecido nuevo día el día de hoy es realizado con mucho amor 1 adorno para nuestro árbol de Navidad, es elegante es delicado y creo que es muy original, y es un árbol de navidad miniatura. Espero que les guste tanto como a mí y se propongan hacerlo Yo solamente te doy las bases, la creatividad está en ti así que manos a la aguja 😜🤗
Happy and blessed new day, today an ornament for our Christmas tree is made with much love, it is elegant, it is delicate and I think it is very original, and it is a miniature Christmas tree . I hope you like it as much as I do and intend to do it. I only give you the basics, the creativity is in you, so get on the needle 😜🤗

Materiales:
Hilo soutache, abalorio dorados en dos tamaños diferentes 8 milímetros y 6 milímetros, silicón líquido, tijera, encendedor, aguja e hilo, cuero o tela gruesa para la base, gota de cristal engastado de 2.5 cm de alto por 2 cm de ancho
Materials: Soutache thread, golden beads in two different sizes 8 millimeters and 6 millimeters, liquid silicone, scissors, lighter, needle and thread, leather or thick fabric for the base, crystal drop set 2.5 cm high by 2 cm wide

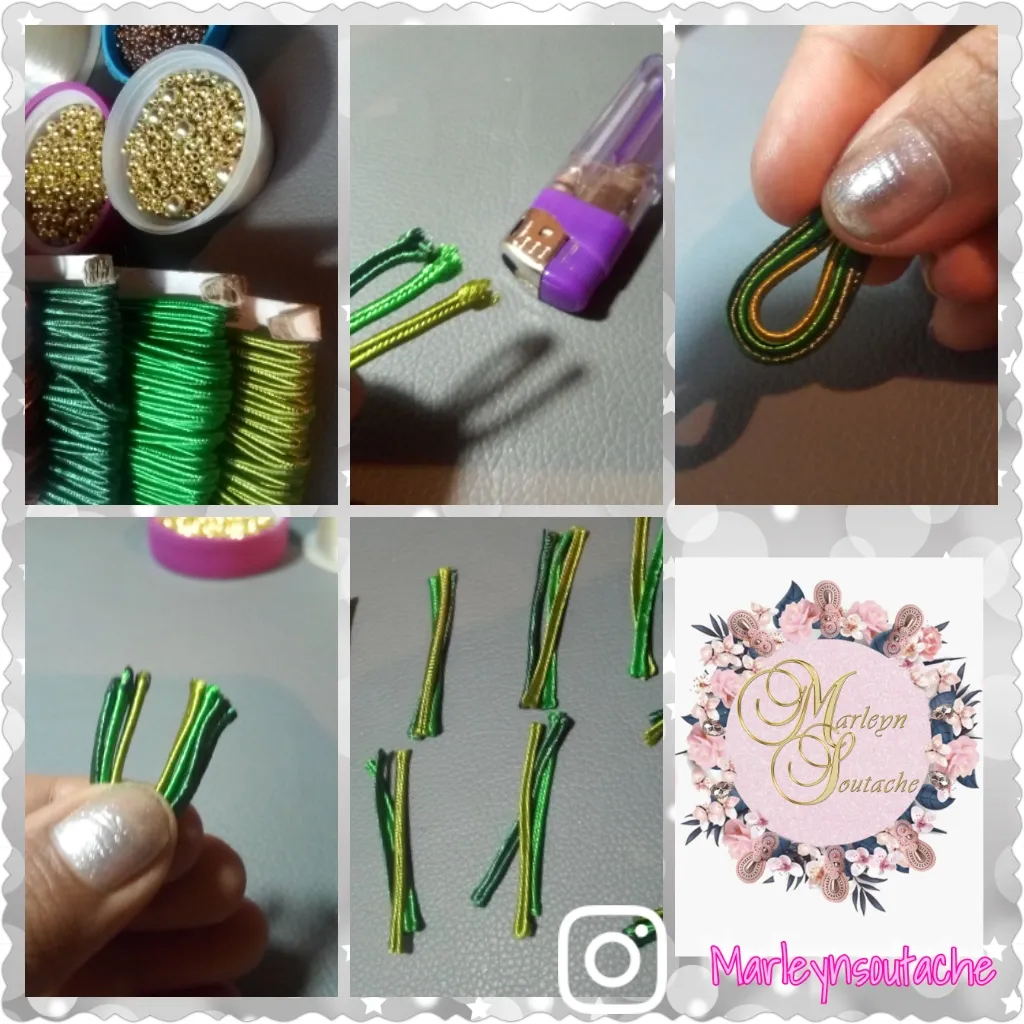
Pasó 1: cuando tenemos todos los materiales listos quemamos la punta de los 3 hilos de diferentes tonos de color verde, ahora corta esos de esos tres y los cuatro o cinco centímetros de largo vas a realizar este mismo proceso 5 veces.
Step 1: when we have all the materials ready we burn the tips of the 3 threads of different shades of green, now cut those of those three and the four or five centimeters long you are going to make this same process 5 times.
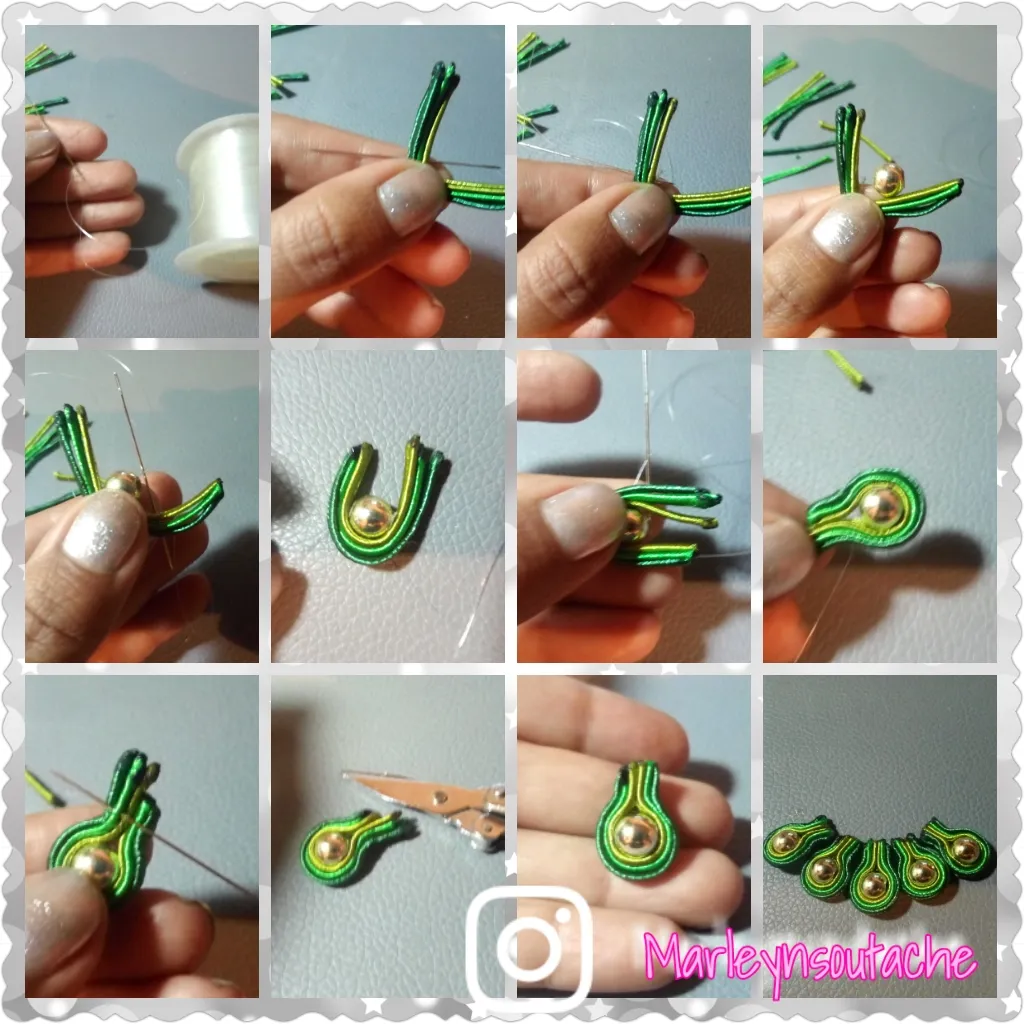
Pasó 2: Ensarta la aguja con el nylon preferiblemente porque este hilo es transparente y no se va a notar en nuestras costuras colocan los hilos uno sobre otro que no poco las puntas y comienza a cocer baja en traducir la aguja por el lado de adentro y luego te regresas de afuera hacia adentro introduciendo uno de los abalorios de 8 milímetros puedes guiarte con las imágenes sigue corriendo hasta que quede como una gota realiza este mismo proceso 5 veces de esta manera estamos realizando la parte de abajo de nuestro árbol de navidad.
Step 2: Thread the needle with the nylon preferably because this thread is transparent and it will not be noticeable in our seams, they place the threads one on top of the other, not only the ends and it begins to cook low In translating the needle from the inside side and then you turn from the outside to the inside by inserting one of the 8-millimeter beads, you can guide yourself with the images, keep running until it looks like a drop, carry out this same process 5 times in this way we are doing the bottom of our Christmas tree.

Pasó 3: En esta etapa vamos a realizar la parte central del árbol, cómo estoy aprendiendo a medida que explicaba a ustedes realice esta parte diferente, Corta 3 tiras de hilo de 15 o 20 cm de largo, ensarta nuevamente la aguja, primero quema las tres puntas juntas para que se peguen los hilos deja 12 centímetros de distancia entre la punta hacia abajo y coloca la aguja de adentro hacia afuera luego regresa la aguja hacia dentro y coloca un abalorio de 6 mm sube el hilo y coser como lo hicimos en el paso anterior, ahora dobla el hilo hacia abajo y vuelve a realizar el mismo proceso tres veces más, puedes ver las fotos para guiarte mejor, El hilo restante doblarlo hacia abajo y cocerlo corta el hilo restante y quema las punta para que no se deshilache con cuidado de no quemar el hilo y romperlo!
Step 3: At this stage we are going to make the central part of the tree, how I am learning as I explained to you, make this different part, Cut 3 strips of thread of 15 or 20 cm of long, thread the needle again, first burn the three tips together so that the threads stick, leave 12 centimeters of distance between the point down and put the needle inside out then return the needle in and put a 6 mm bead raise the thread and sew as we did in the previous step, now fold the thread down and repeat the same process three more times, you can see the photos to guide you better, the remaining thread fold it down and cook it cuts the remaining thread and burn the tips so that it does not fray, being careful not to burn the thread and break it!
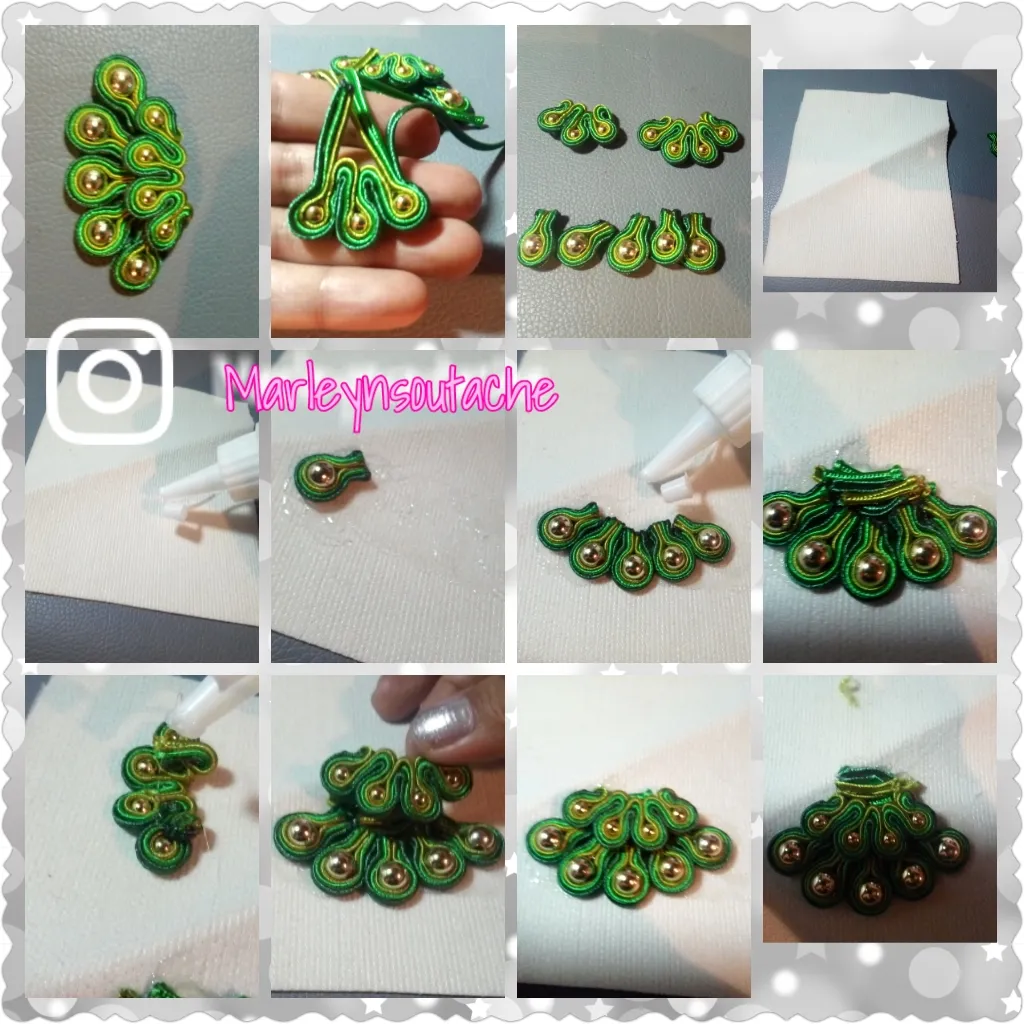
Pasó 4: Vamos a realizar el mismo proceso del paso anterior esta vez solamente tres abalorios cuando esté listo y hayas cortado el hilo restante vamos a agarrar un cuero o tela gruesa y en la parte de abajo colocarle suficiente silicón líquido, y comenzaremos a pegar las piezas que realizamos en el primer paso, luego de pegar las piezas en la parte superior como puedes ver en las imágenes vamos a colocar un poco más de silicón líquido, pegar trozos de hilo restante. Ahora en la pieza central colocarle silicón Liquido por atrás a la pieza y pegarlo sobre la pieza de abajo y los hilos, arriba de este coloca mas silicon liquido y pegaremos otro poquito de hilos, puedes ver las imágenes para guiarte.
Step 4: We are going to carry out the same process as in the previous step, this time only three beads when it is ready and you have cut the remaining thread we are going to take a leather or thick fabric and at the bottom Place enough liquid silicone on it, and we will begin to glue the pieces that we made in the first step, after gluing the pieces on the top as you can see in the images we are going to place a little more liquid silicone, glue pieces of the remaining thread. Now in the central piece, place Liquid silicone on the back of the piece and stick it on the bottom piece and the threads, on top of this place more liquid silicone and we will glue another little thread, you can see the images to guide you.

Pasó 5: Vamos a pegar la última pieza del árbol ahora con mucho cuidado con lo que amas silicón líquido en la parte superior y pega la gota de cristal engastada, corta un trozo de hilo pequeño del tamaño de su preferencia que mal en las puntas juntas para que se peguen y lo vas a colocar por abajo del cristal, hemos terminado nuestro árbol de navidad 😍🤗 espero que te guste y te atrevas a realizarlo con tu toque personal.
Step 5: We are going to glue the last piece of the tree now very carefully with what you love liquid silicone on top and glue the crystal drop set, cut a piece of small thread from the size of your preference that badly on the tips together so that they stick and you are going to place it below the glass, we have finished our Christmas tree 😍🤗 I hope you like it and you dare to make it with your personal touch.


Autoría del texto y todas las imágenes: @Marleyn , La edición de las imágenes las realicé yo misma, Por favor no Utilices mis fotos sin mi autorización, edites ni re-publiques mi material ¿Deseas ponerte en contacto conmigo? Escríbeme:
Correo electronico: Marleynl123@gmail.con
Discord Marleyn#7821
Twitter: @marleynleal1
Imstagran: @MarleynSoutache
Authorship of the text and all the images: @Marleyn, Editing of the images was done by myself, >Please do not use my photos without my authorization, edit or re-publish my material Do you want to >contact me? Write me:
Email: Marleynl123@gmail.con
Discord Marleyn #7821
Twitter: @marleynleal1
Imstagran: @MarleynSoutache