Saludos gente bonita de esta comunidad , lo hice de nuevo (testaruda como siempre) , me perdí por un tiempo realizando un proyecto que me llevó mucho días de cansancio, dolor y en algunos casos equivocaciones que me retrasaron bastante, pero al fin lo terminé, estoy satisfecha, al principio tenía claro exactamente en mi mente como iba a proceder en la mayoría de sus partes del amigurumi mientras que en las otras estaba decidida a trabajar conforme fuera avanzando, es decir lo dejaría a la improvisación, pero todo resultó al revés, las cosas que tenía planeada hacer con facilidad en mi mente fueron las que no resultaron bien y terminé creando un plan B que si resultó, esto es lo bonito de tejer amigurumis desde cero, es decir sin tener un patrón de otra persona, creo que este proyecto me hizo caer en cuenta de todo lo que debo aprender, es decir ya me estaba acostumbrándome a que todo me saliera bien a la primera todo el tiempo y con esta experiencia he obtenido muchos conocimientos y fue como que alguien me dijera “No sabes nada” y eso me hizo caer en la realidad.
Greetings beautiful people of this community, I did it again (stubborn as always), I lost myself for a while doing a project that took me many days of fatigue, pain and in some cases mistakes that delayed me a lot, but finally I finished it, I am satisfied, at first it was clear in my mind exactly how I was going to proceed in most of its parts of the amigurumi while in the others I was determined to work as I progressed, that is, I would leave it to improvisation, but everything turned out the other way around, The things that I had planned to do with ease in my mind were the ones that did not turn out well and I ended up creating a plan B that did work, this is the beauty of knitting amigurumis from scratch, that is, without having a pattern from another person, I think this The project made me realize everything I have to learn, that is, I was getting used to everything going well the first time all the time and with this experience I have obtained a lot of knowledge and It was like someone telling me "You don't know anything" and that made me fall into reality.
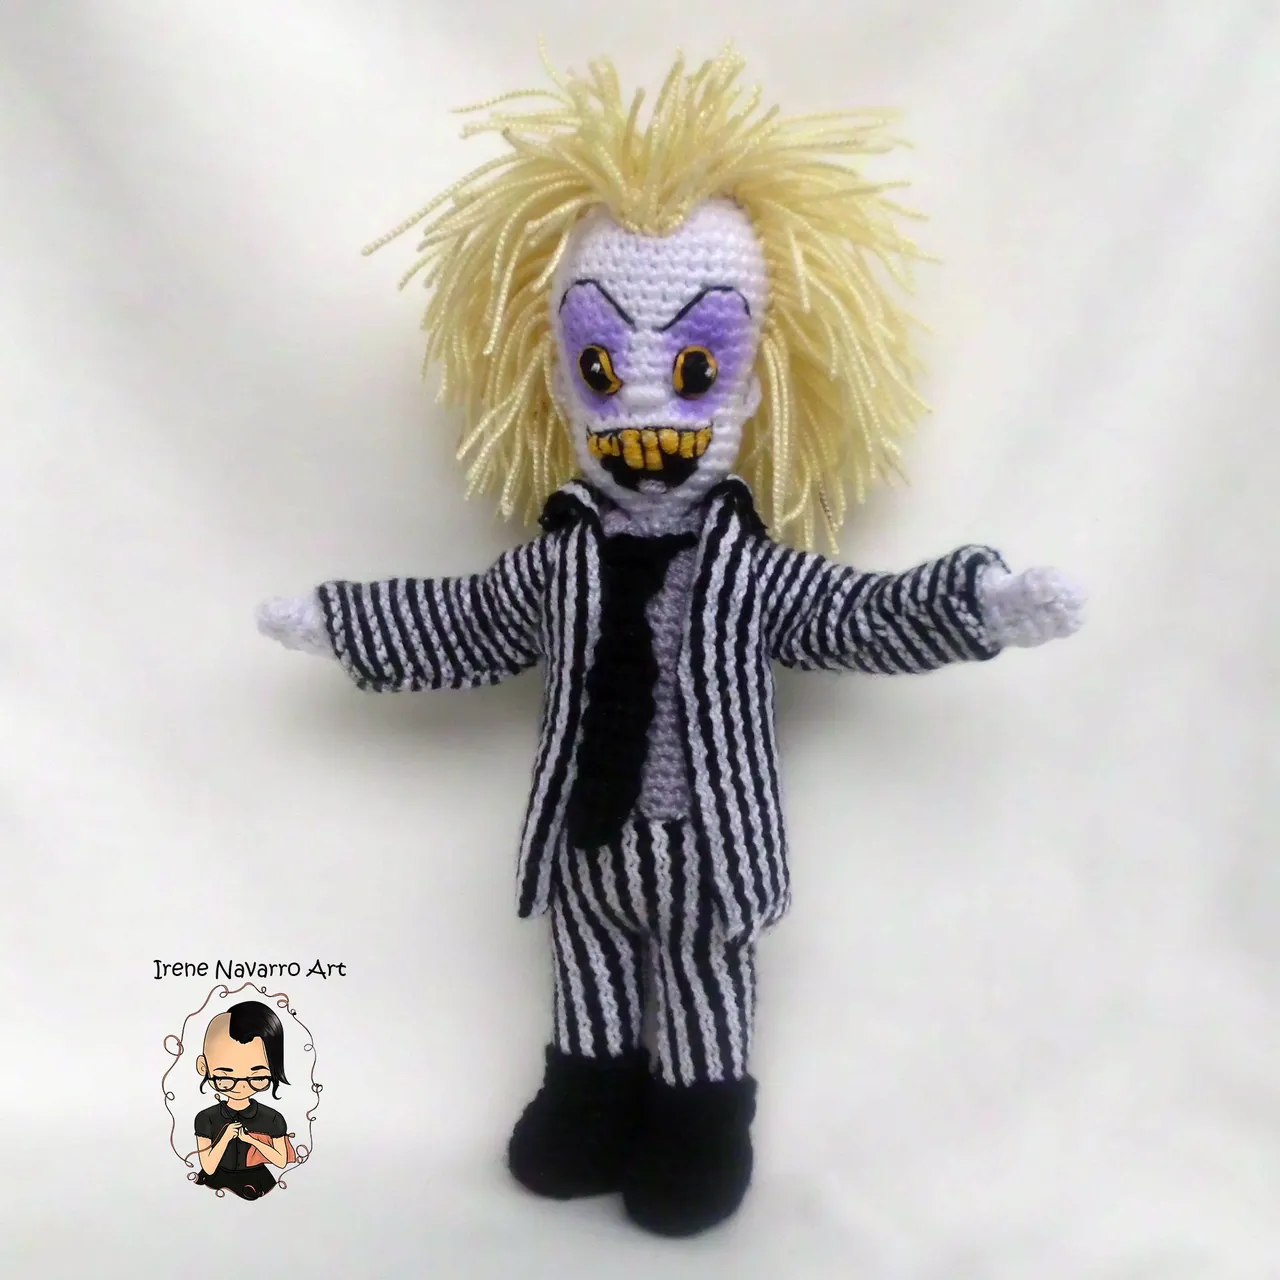
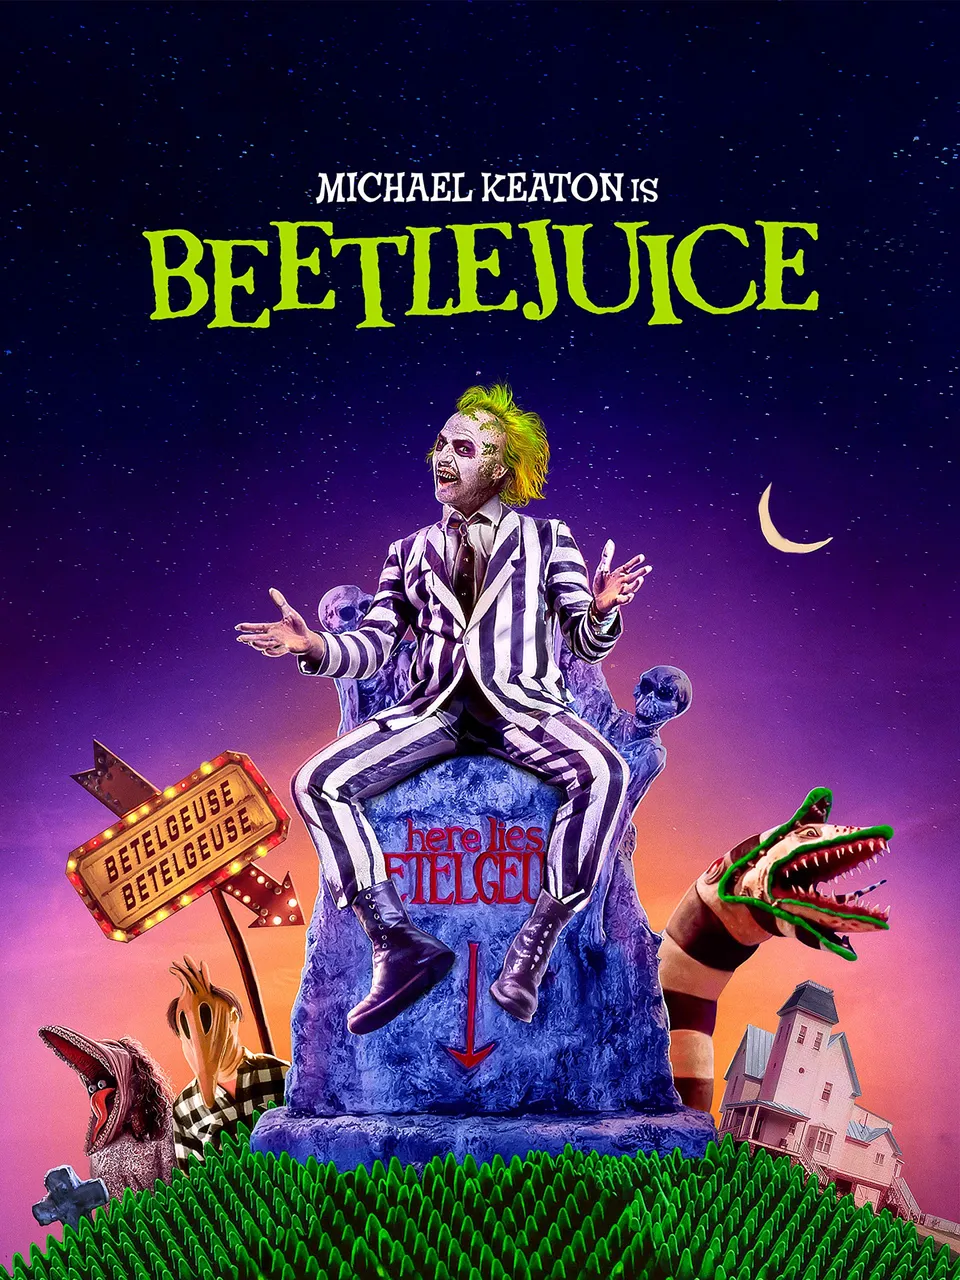
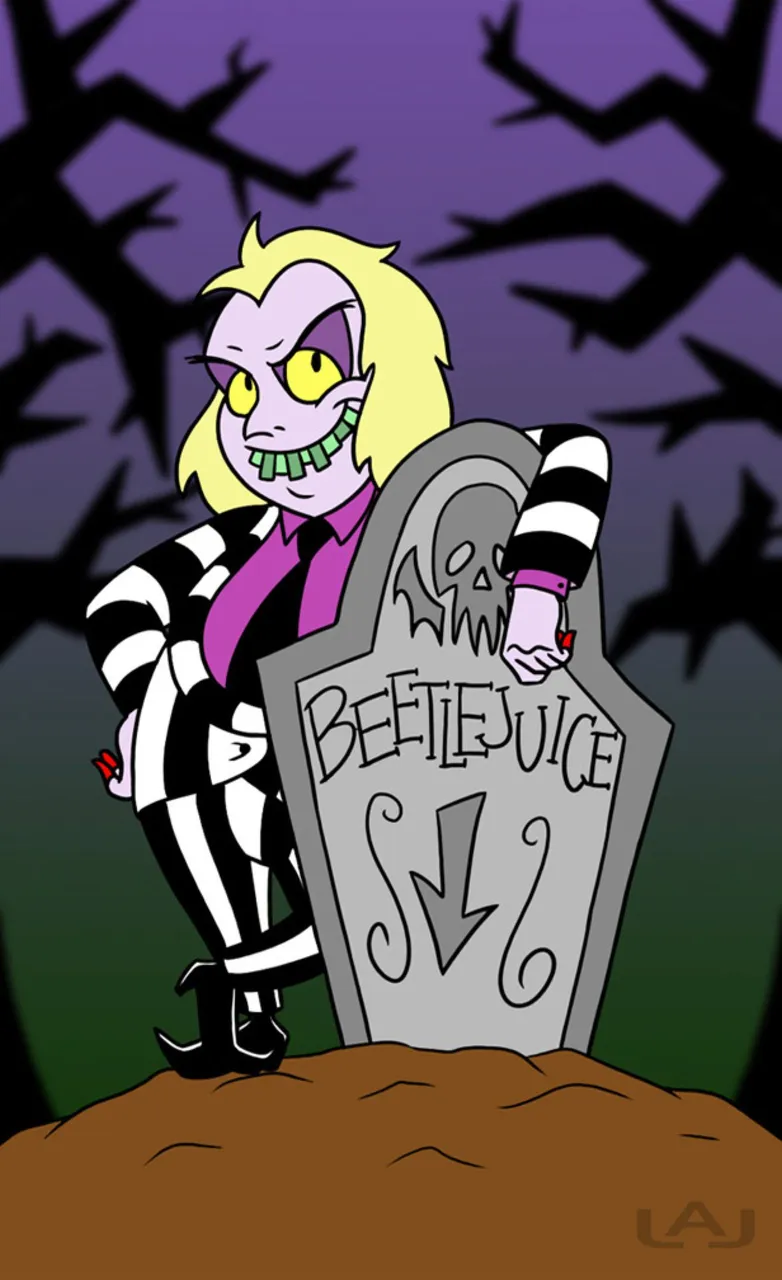
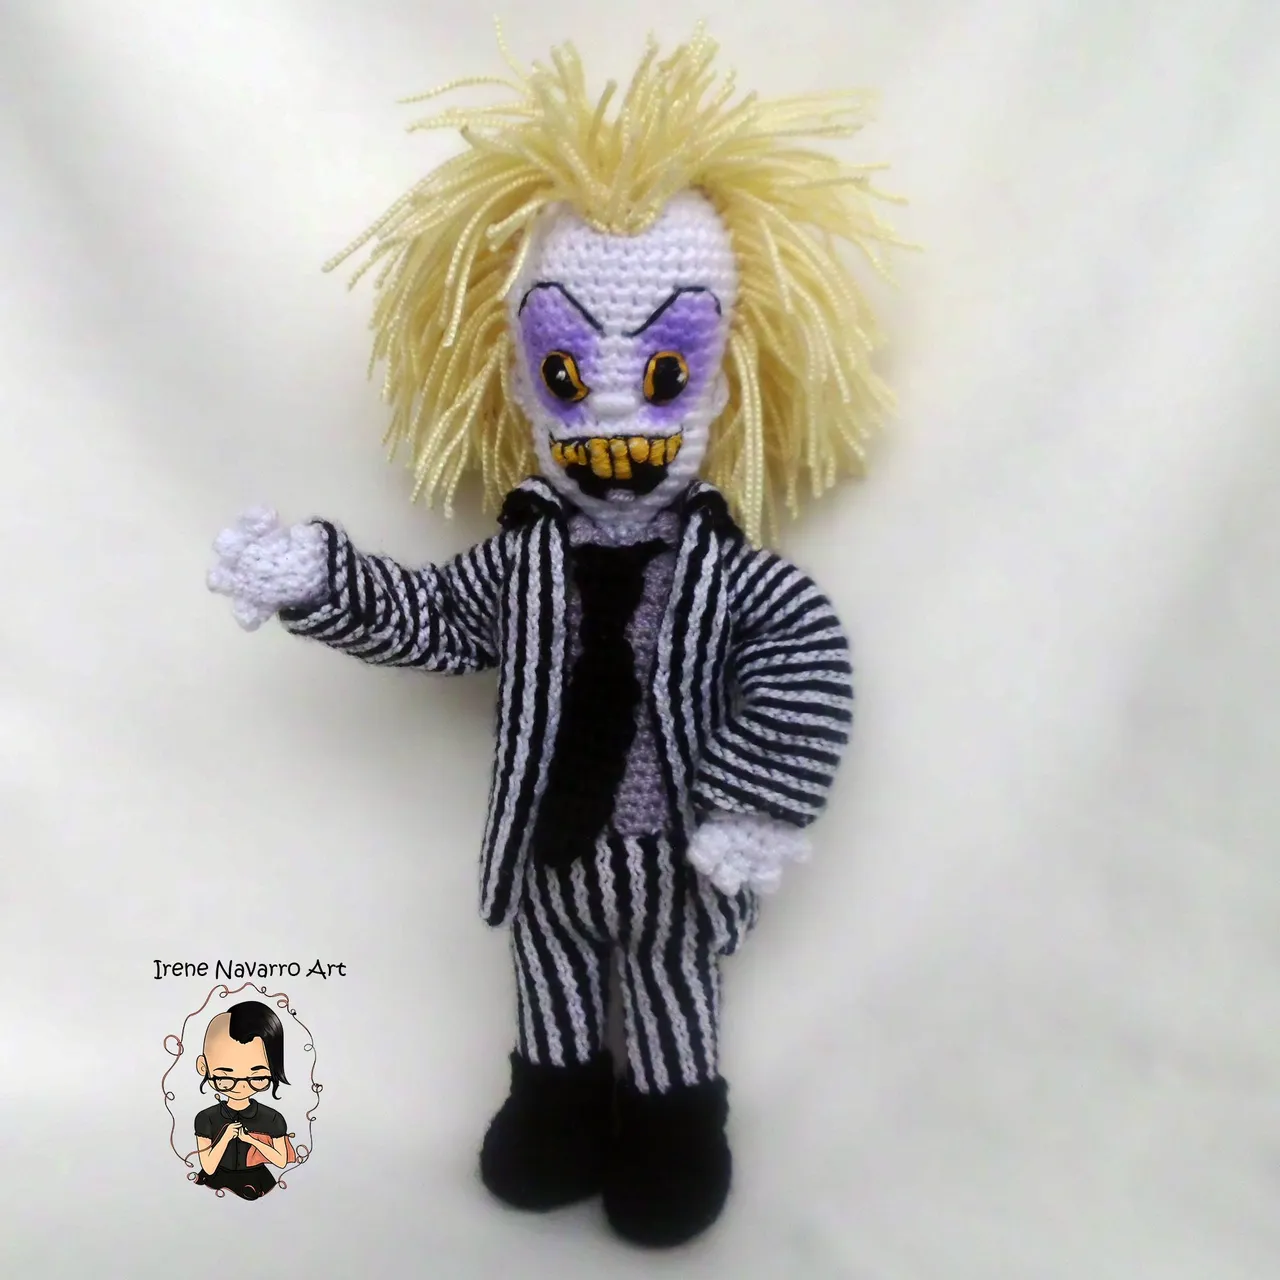
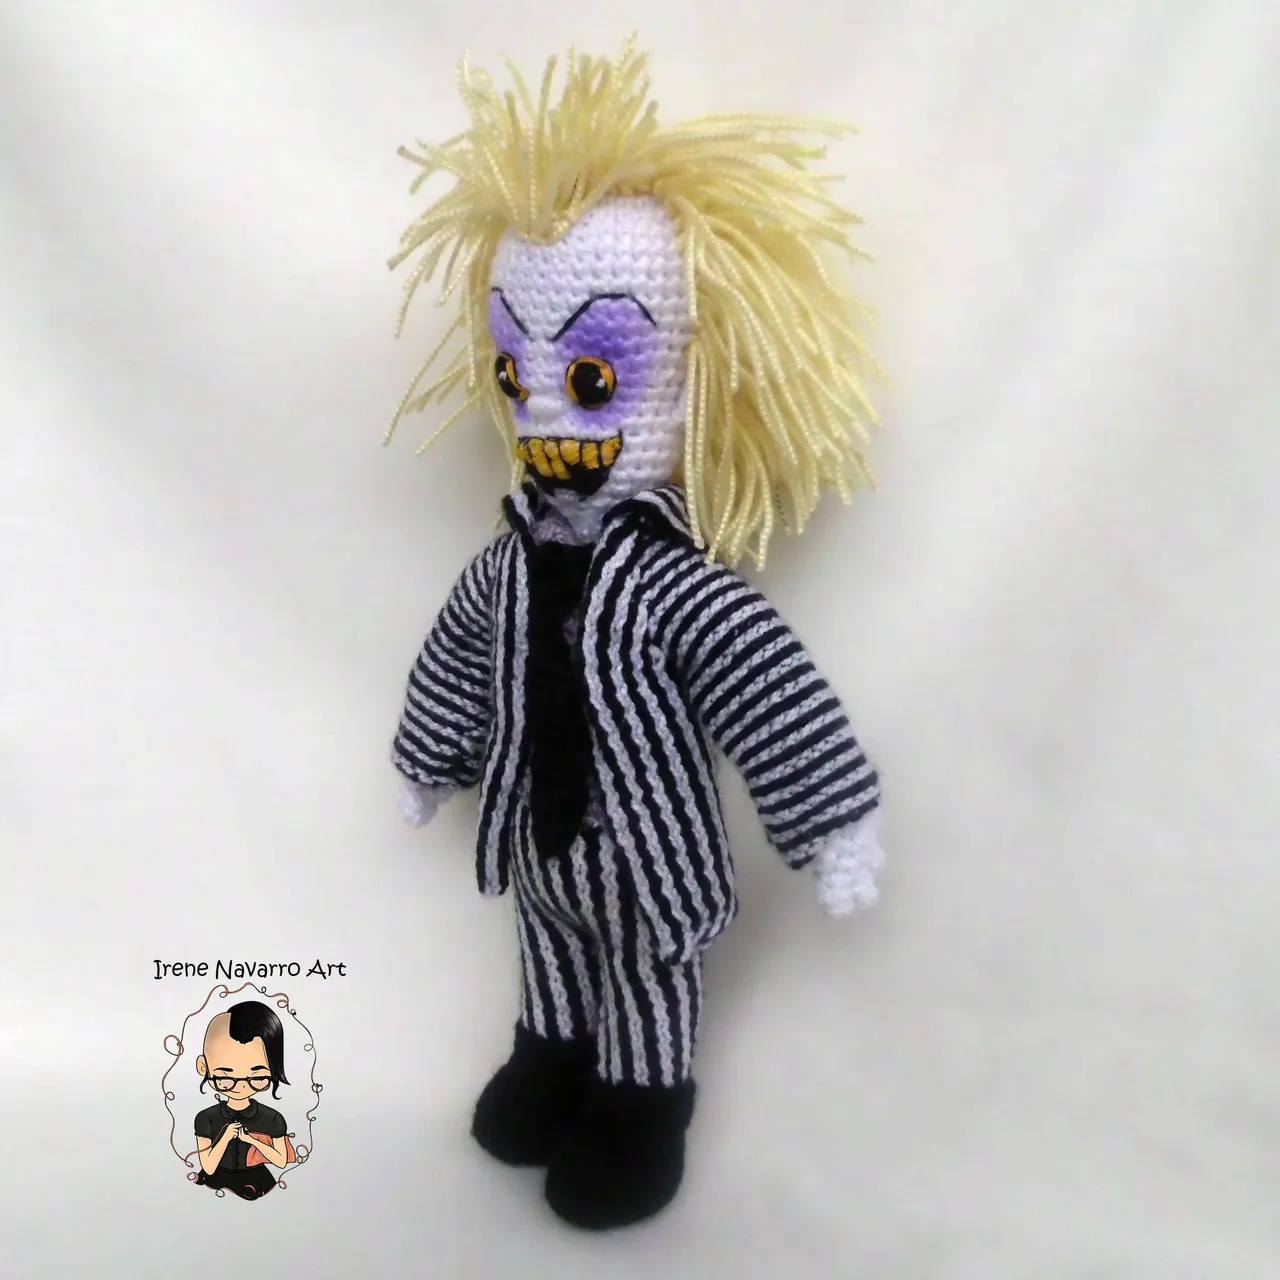
Sin más preámbulo les muestro este amigurumi del personaje Beetlejuice de la película de Tim Burton, esta fue una comisión de un cliente y amigo, yo me tomé la libertad de hacer mi propia versión, porque aunque la película fue primero, me parecía que los colores que usa el persona de la versión animada se verían mucho mejor en el amigurmi, la diferencia radica en que en la película la ropa es solo blanco y negro, mientras que en las serie animada la camisa es morada, así mimo quise que la expresión del rostro recordara un poco más a la serie animada que al personaje de la película, cree digamos que un hibrido de ambas versiones. Les comparto imágenes referenciales de las dos para que se den cuenta.
Without further ado I show you this amigurumi of the Beetlejuice character from Tim Burton's movie, this was a commission from a client and friend, I took the liberty of making my own version, because although the film was first, it seemed to me that the colors that the person in the animated version wears would look much better in the amigurmi, the difference is that in the movie the clothes are only black and white, while in the animated series the shirt is purple, so I wanted the expression of the face will remind a little more of the animated series than the character in the film, let's say a hybrid of both versions. I share referential images of the two for you to realize.
Imágenes de referencia
Proceso / Process
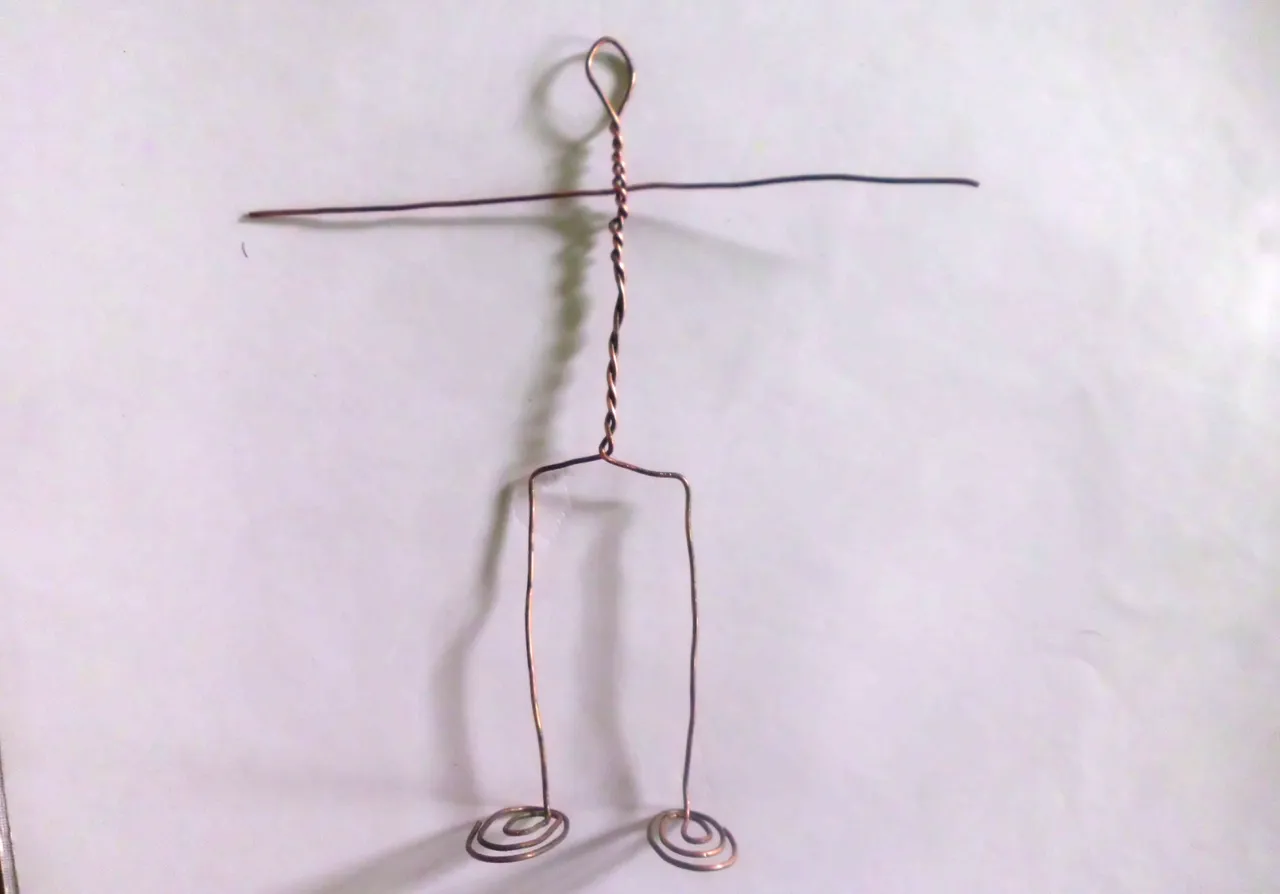
Lo primero que hice fue hacer una estructura de alambre de cobre de reciclaje para que la figura se mantenga en pie y pueda articular sus extremidades.
The first thing I did was make a structure out of recycled copper wire so that the figure stands upright and can articulate its limbs.
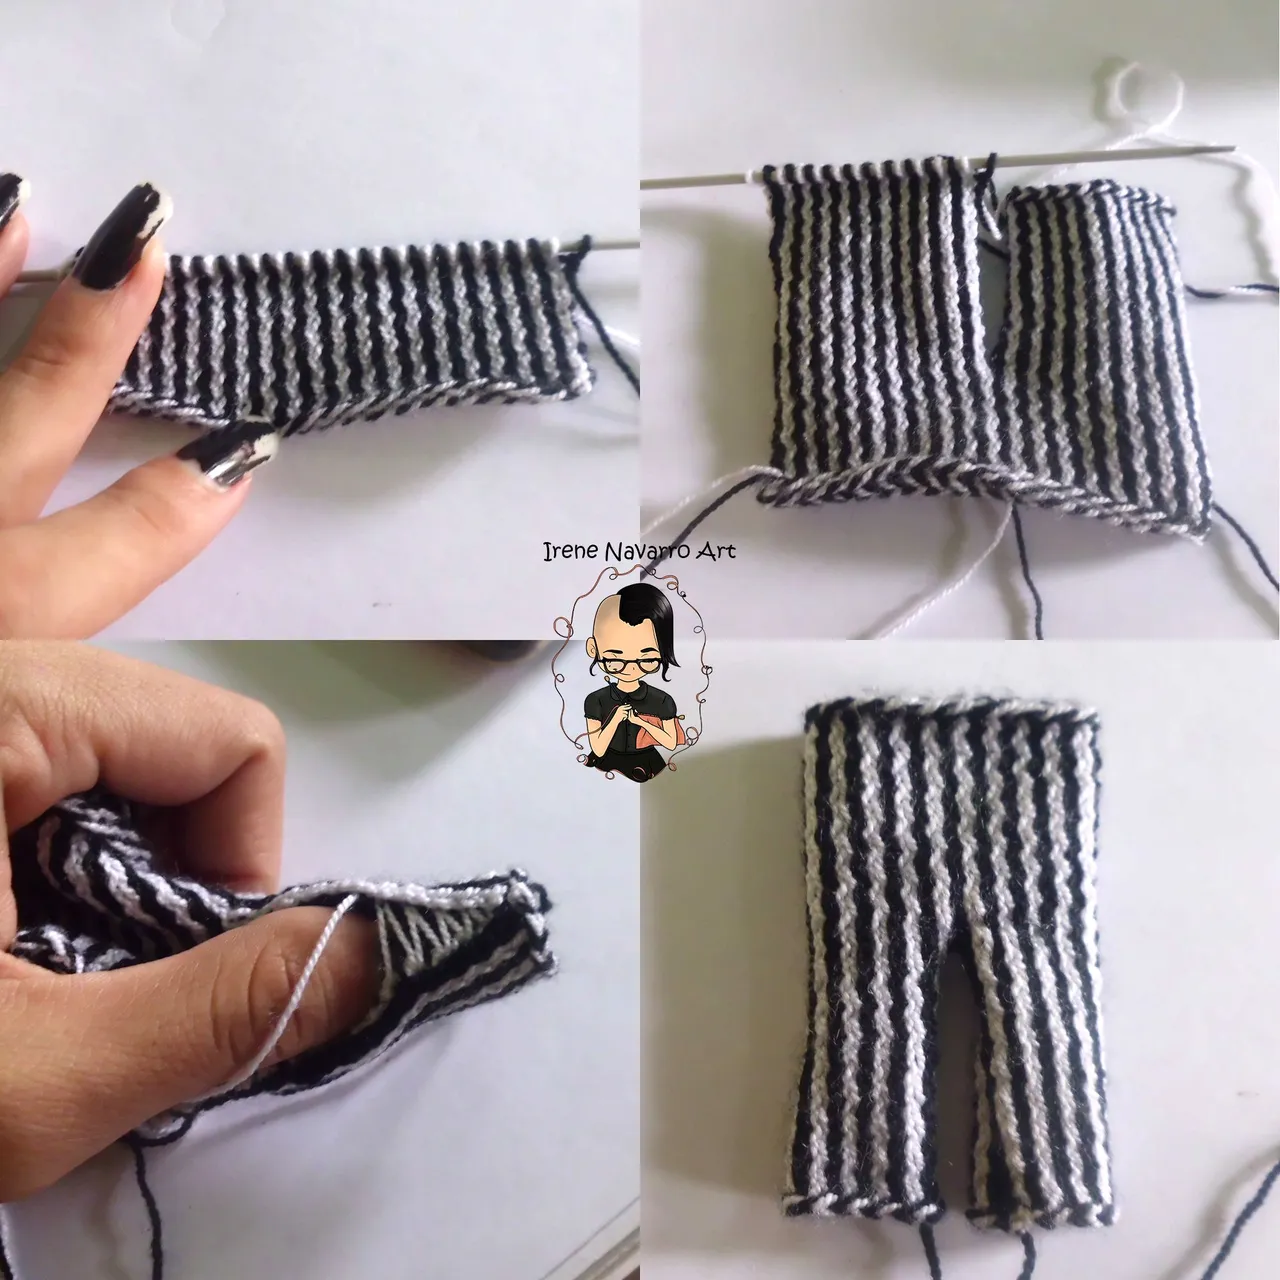
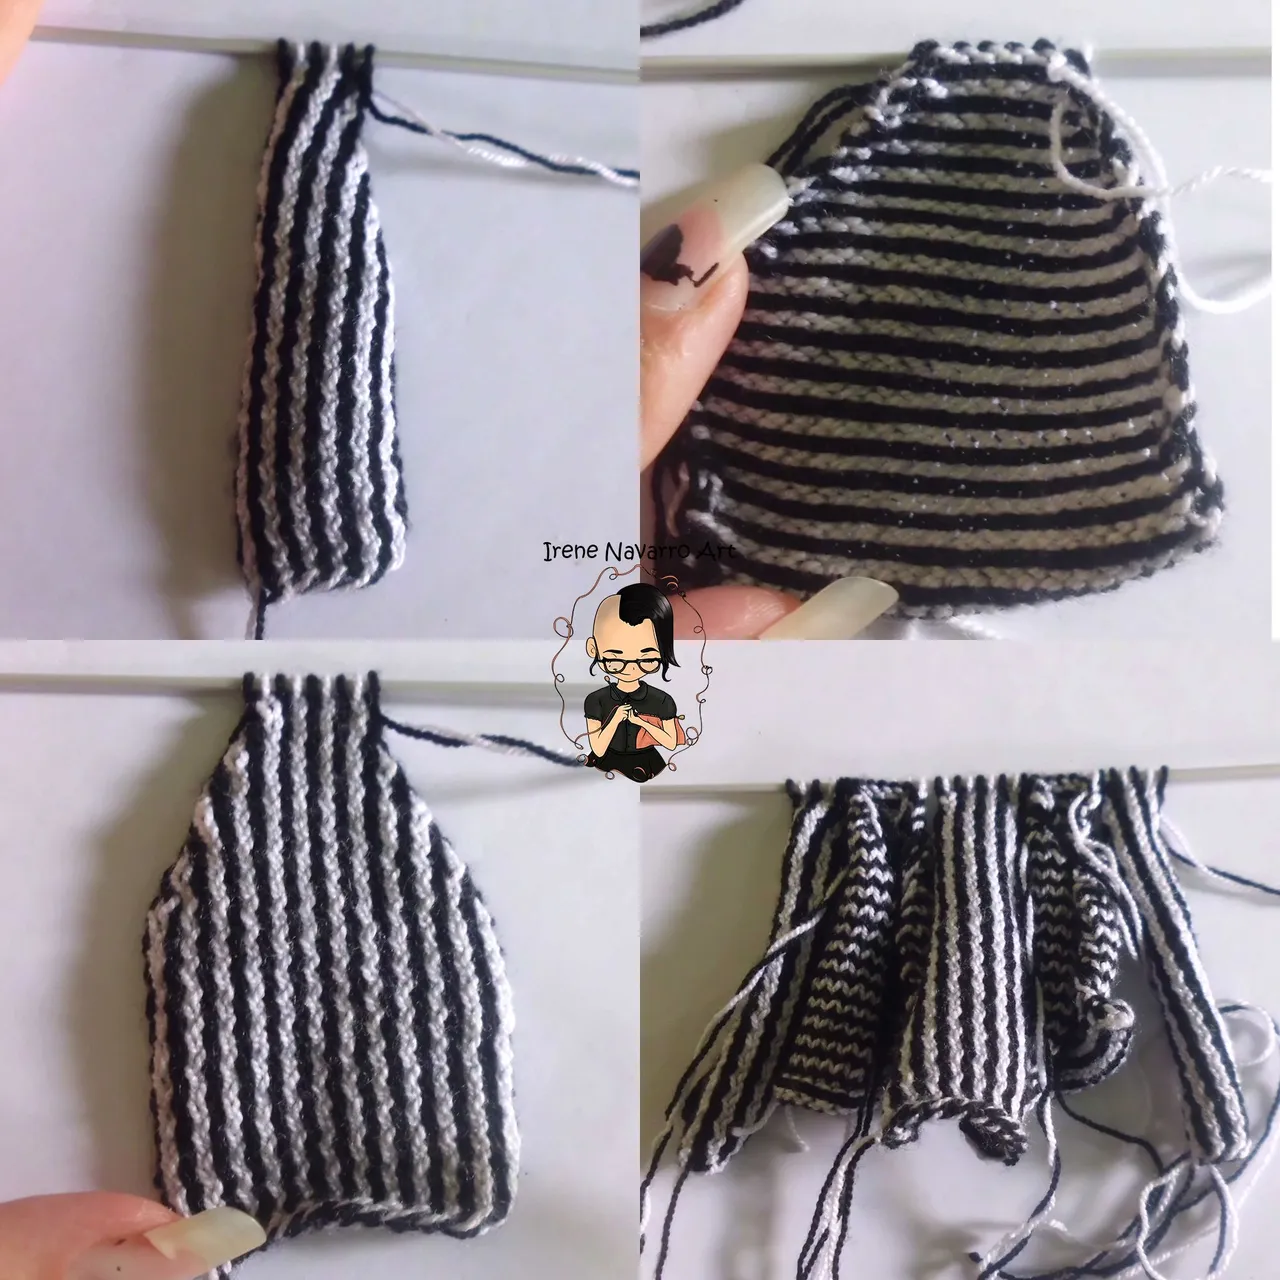
El amigurui está tejido usando combinaciones de técnicas de crochet y de dos agujas, usando hilo acrílico para crochet del delgado comencé por tejer los pantalones en do agujas de 2mm, los pantalones son e rayas verticales, para ellos comencé de arriba hacia abajo, montando en la aguja la cantidad necesaria de puntadas para abarcar el ancho de la cintura, tejiendo una puntada en blanco y un puntada en negro sucesivamente(además de los puntos de orillo) en punto jersey derecho, es decir una vuelta con puntos al derecho y una vuelta con puntos de revés, sucesivamente, dejando los puntos derecho se muestren por el lado del frente mientras que los puntadas de revés se muestren por la cara posterior, mientras que los colores se siguen como corresponden en todas la rondas. Al llegar a la altura de la entrepierna dividí en tejido en dos partes y continué tejiendo por separado hasta obtener la altura de las piernas. Posteriormente tomando las puntadas de orillo hice una costura que uniera las partes resultando el pantalón.
The amigurui is knitted using combinations of crochet and two-needle techniques, using acrylic yarn to crochet the thin I started by knitting the pants on two 2mm needles, the pants are vertical stripes, for them I started from top to bottom, riding on the needle the necessary amount of stitches to cover the width of the waist, knitting a white stitch and a black stitch successively (in addition to the edge stitches) in right stockinette stitch, that is to say a round with right stitches and a round with purl stitches, successively, letting the right stitches show on the front side while the purl stitches show on the back side, while the colors are followed as they correspond in all rounds. When I reached the crotch, I divided the fabric into two parts and continued knitting separately until I got the height of the legs. Later, taking the selvage stitches, I made a seam that joined the parts, resulting in the pants.
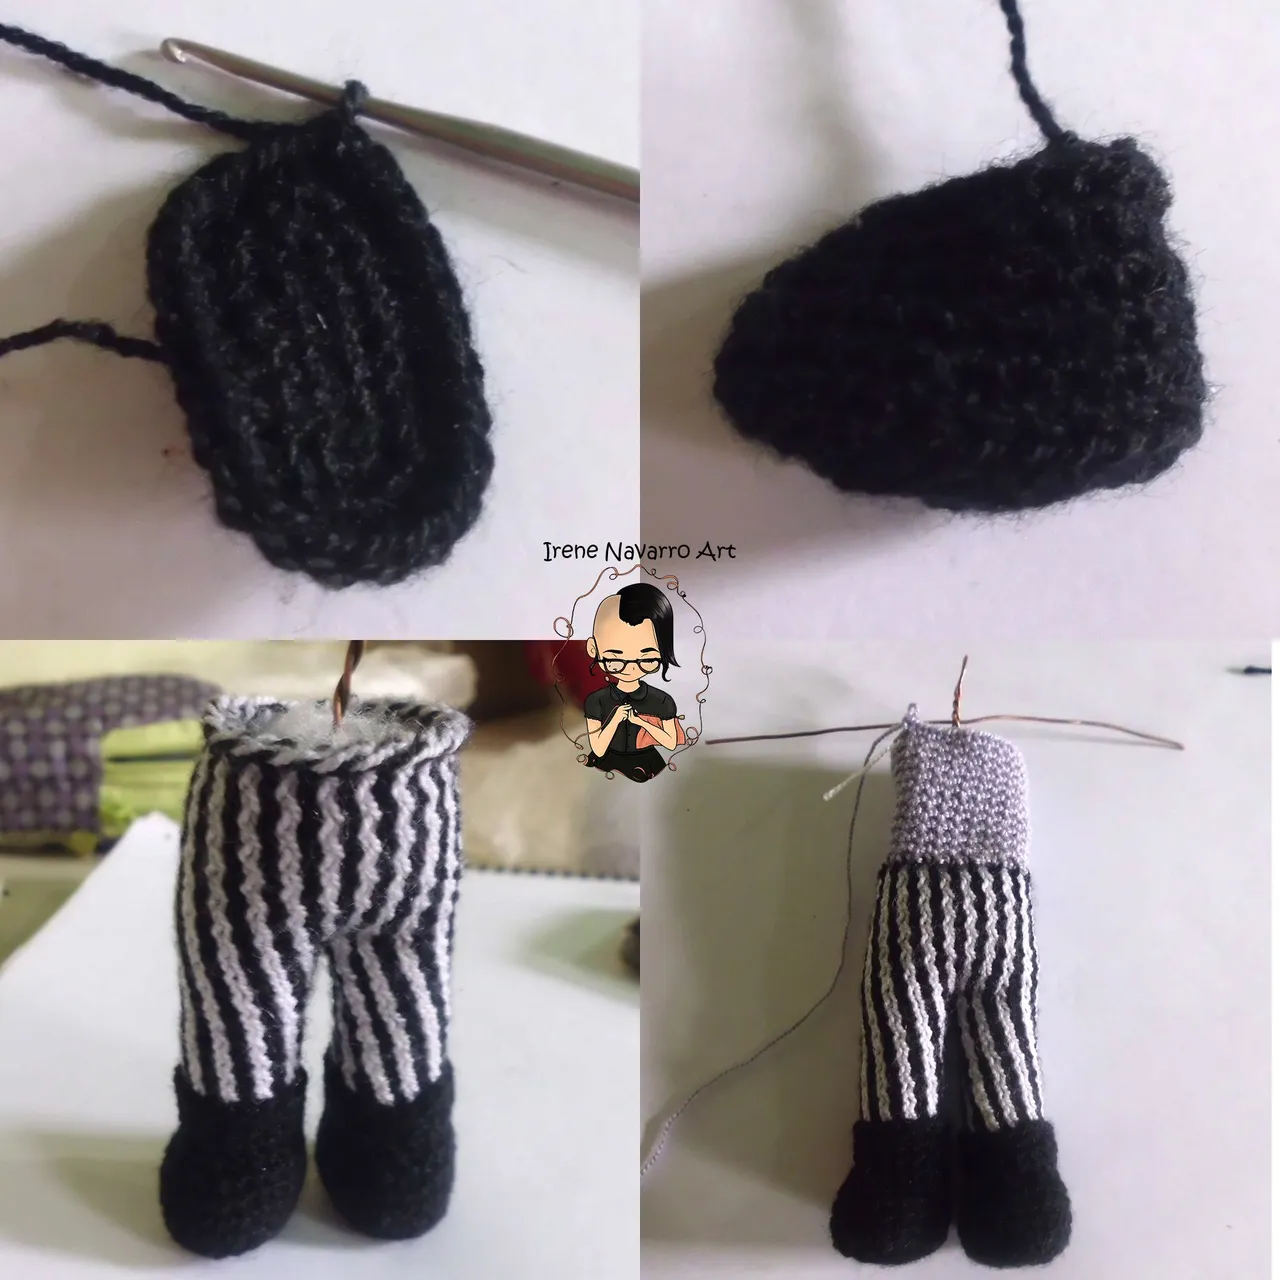
Para los zapatos, con ganchillo # 4 de 1, 25mm e hilo negro , tejí cadenas y sobre estas comencé a tejer puntadas simples y aumentos para crear un óvalo para la planta del pie, posteriormente tomando el lado de atrás de los puntadas tejí una ronda sin aumentos, luego tejí recto, hice disminuciones hasta llegar al tobillo, hice dos iguales y los cosí a los pantalones tomando el lado de atrás de la puntadas, luego retomé el lado del frente y tejí tres rondas de puntos bajos para formar las botas, porque el personaje usa los pantalones por dentro de las botas. De este modo se queda unido el tejido al la estructura de alambre por dentro, rellenando con fibra. Con hilo morado claro levanté puntadas al rededor de la cintura y tejí recto hasta la altura del pecho, dejé el tejido en suspenso para tejer los brazos.
For the shoes, with crochet # 4 of 1, 25mm and black thread, I knitted chains and on these I began to knit simple stitches and increases to create an oval for the sole of the foot, then taking the back side of the stitches I knitted a round without increases, then I knit straight, I made decreases until I reached the ankle, I made two equal ones and sewed them to the pants taking the back side of the stitches, then I returned to the front side and I knitted three rounds of single crochets to form the boots, because the character wears the pants inside the boots. In this way the fabric remains attached to the wire structure inside, filling with fiber. With light purple thread I raised stitches around the waist and knitted straight up to the chest, I left the fabric in suspense to knit the arms.
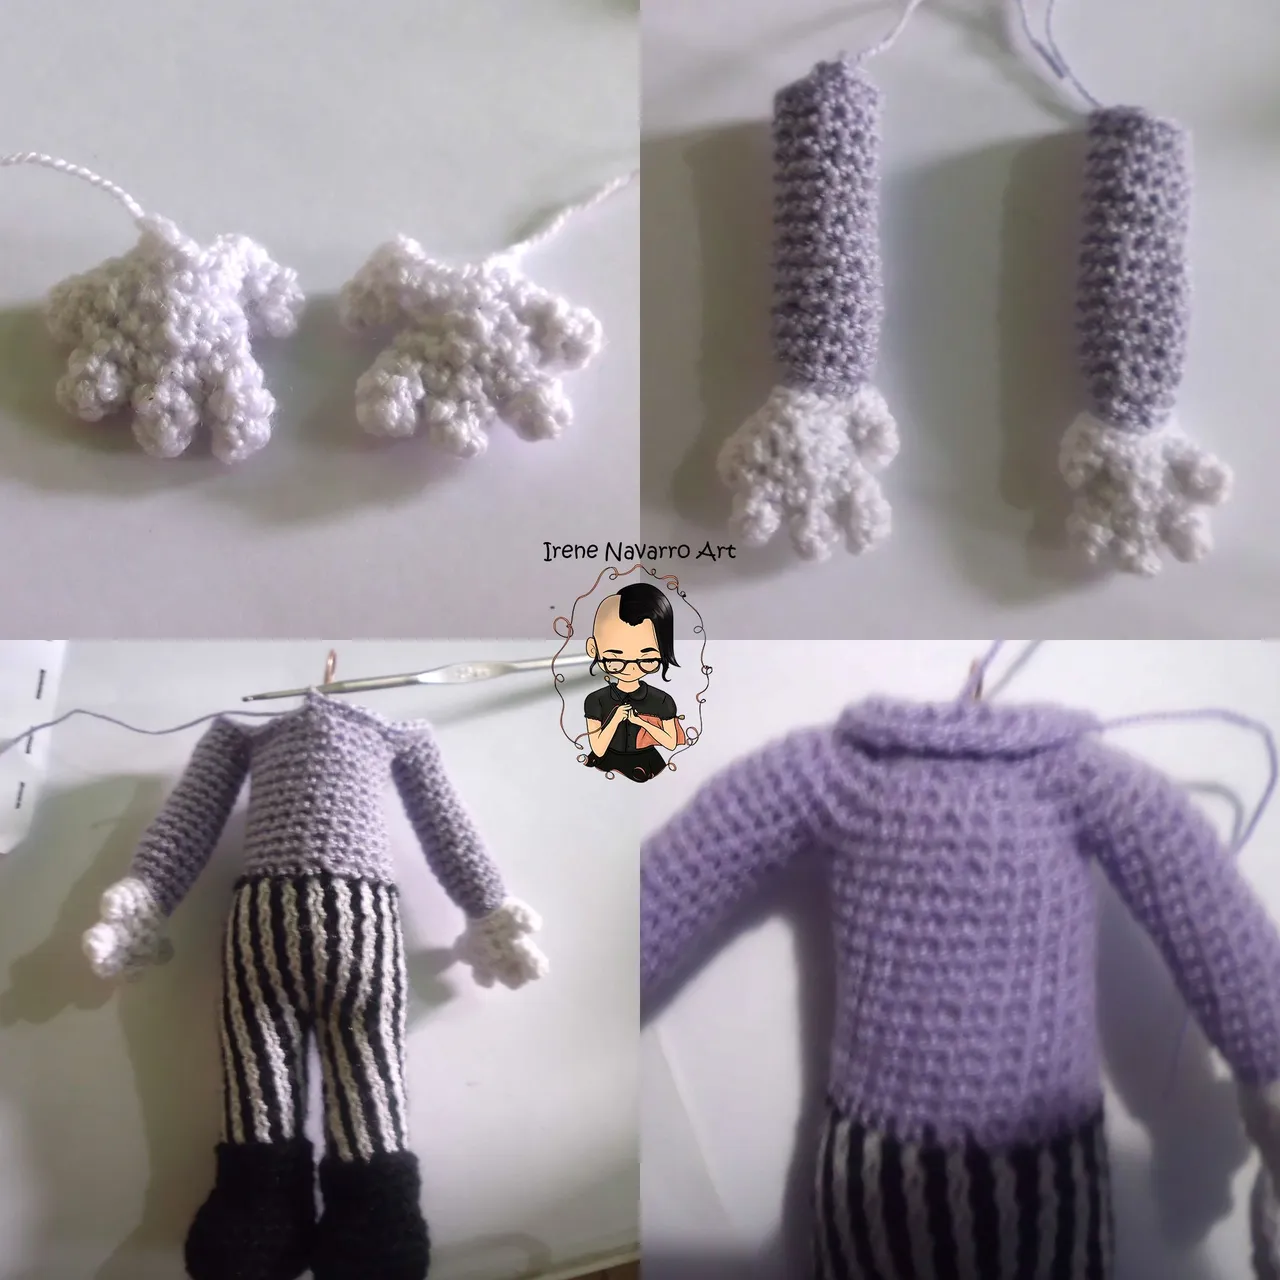
Comencé a tejer con hilo blanco cado uno de los dedos de la mano , luego los uní tejiendo y haciendo disminuciones para crear la muñeca del brazo, luego cambié a hilo morado claro y continué tejiendo sin aumento hasta alcanzar la altura del brazo. Hice dos brazos iguales, los coloqué a ambos lados de cuerpo y los tejí junto, luego hice disminuciones para formar los hombros y el cuello. Luego tejí el cuello de la camisa con el mismo hilo morado
I started knitting with white yarn on one of the fingers of the hand, then I joined them by knitting and making decreases to create the wrist of the arm, then I changed to light purple yarn and continued knitting without increasing until reaching the height of the arm. I made two equal arms, placed them on both sides of the body and knit them together, then made decreases to form the shoulders and neck. Then I knit the collar of the shirt with the same purple thread
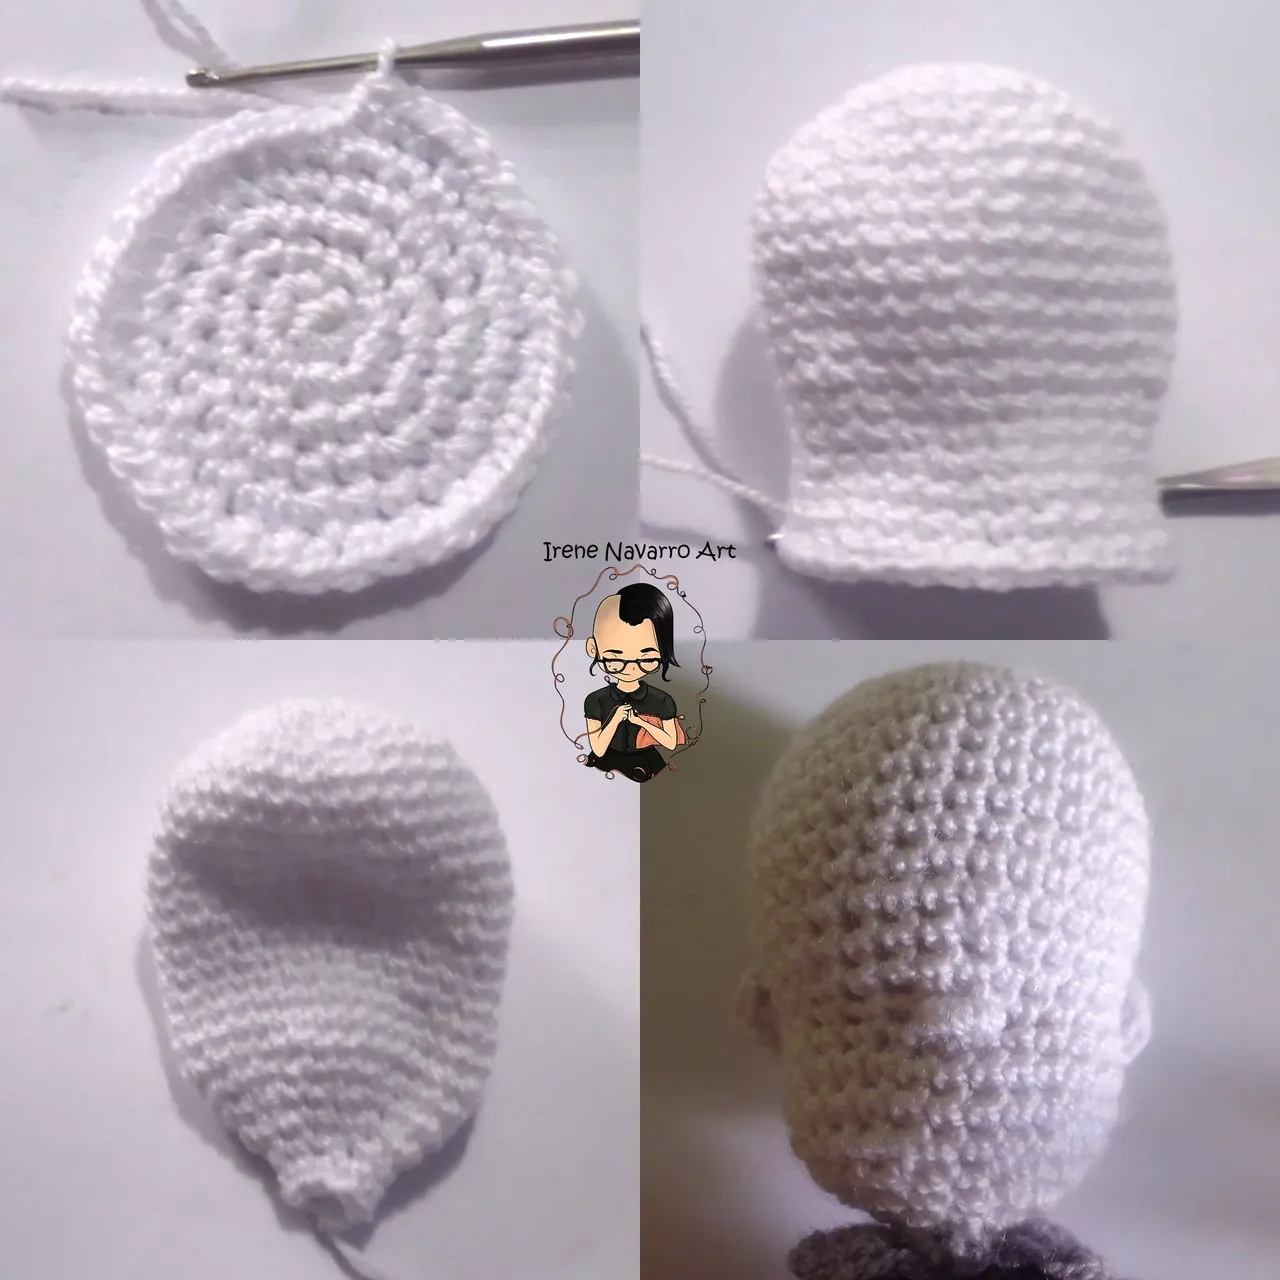
Para tejer la cabeza comencé tejiendo 6 puntos bajos en un anillo, haciendo seis aumentos por ronda hasta obtener 36 puntadas, tejí recto, luego hice disminuciones, luego aumentos para formar esa pequeña forma de pera y luego tejí recto n poco mas y terminé haciendo disminuciones para formar el cuello, rellené con fibra y la cosí la cabeza al cuello. Tejí las orejas a los lados.
To knit the head I started by knitting 6 single crochets in a ring, making six increases per round until I got 36 stitches, I knit straight, then I made decreases, then increases to form that little pear shape and then I knit a little more straight and ended up making decreases To form the neck, I stuffed it with fiber and sewed the head to the neck. I knit the ears to the sides.
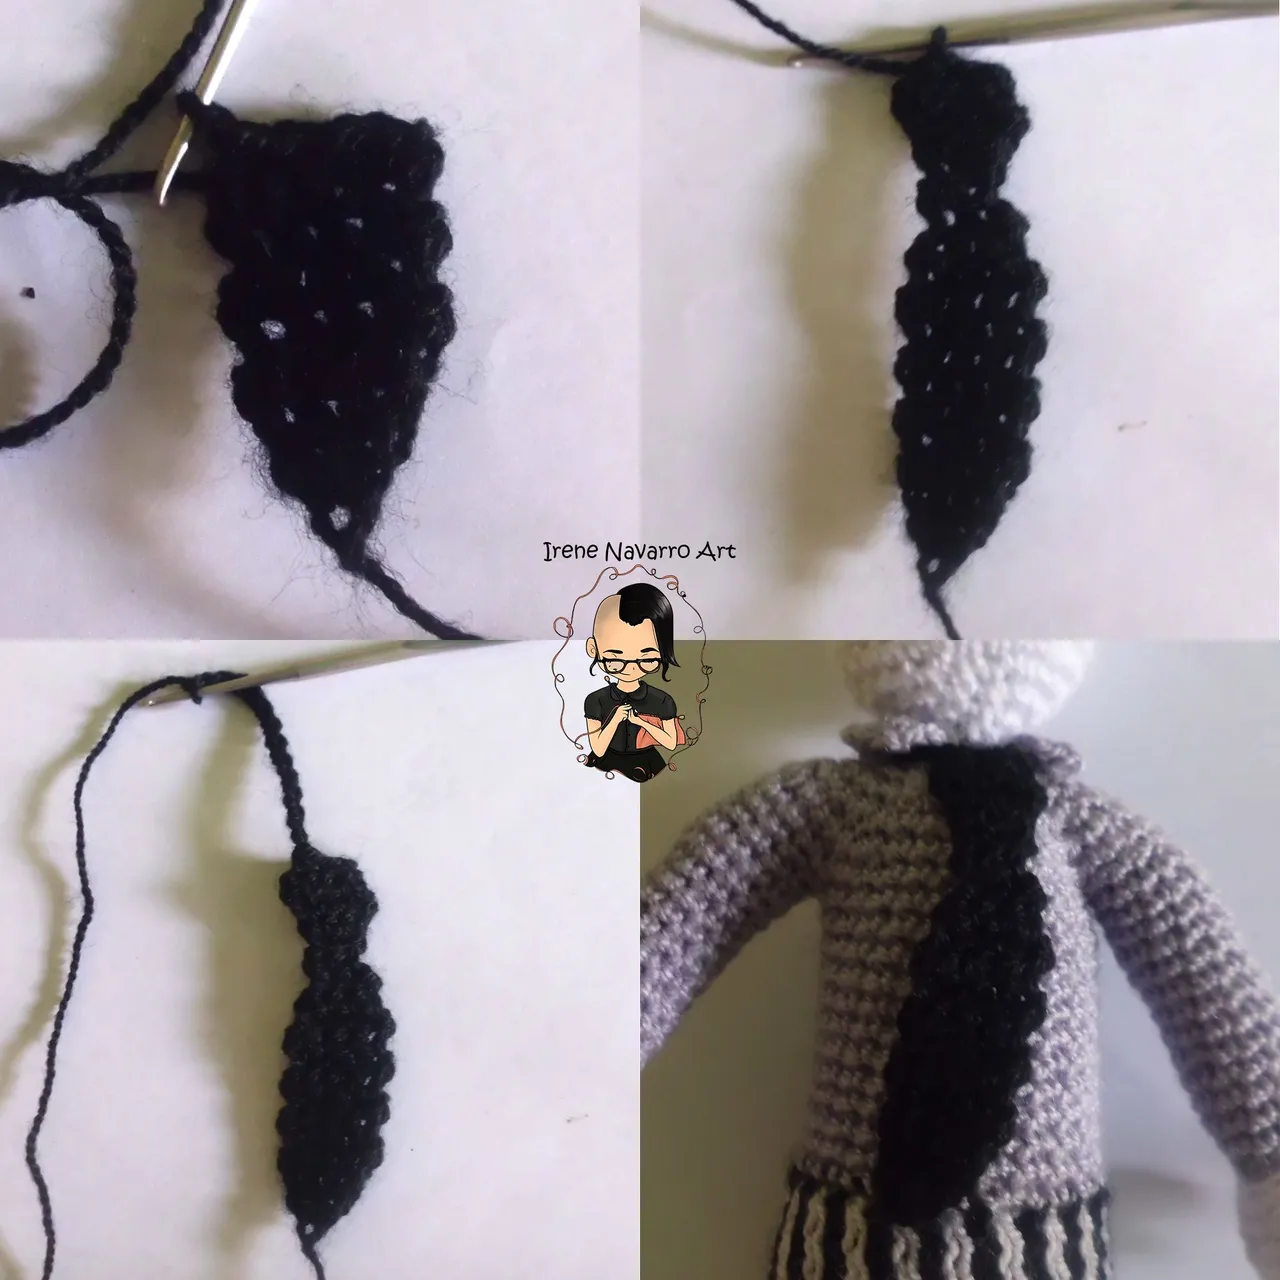
Para la corbata tejí con hilo negro y ganchillo, comenzando con una cadena haciendo un aumento por ronda hasta tener 4 puntadas, tejí recto y luego hice disminuciones hasta llegar al nudo de la corbata y luego aumentos, tejí cadenas para rodear al cuello y terminé uniendo la corbata tejiendo un punto deslizado.
For the tie I knit with black yarn and crochet, starting with a chain making an increase per round until I have 4 stitches, I knit straight and then I made decreases until I reached the knot of the tie and then increases, I knit chains to go around the neck and I finished joining the tie by weaving a slip stitch.
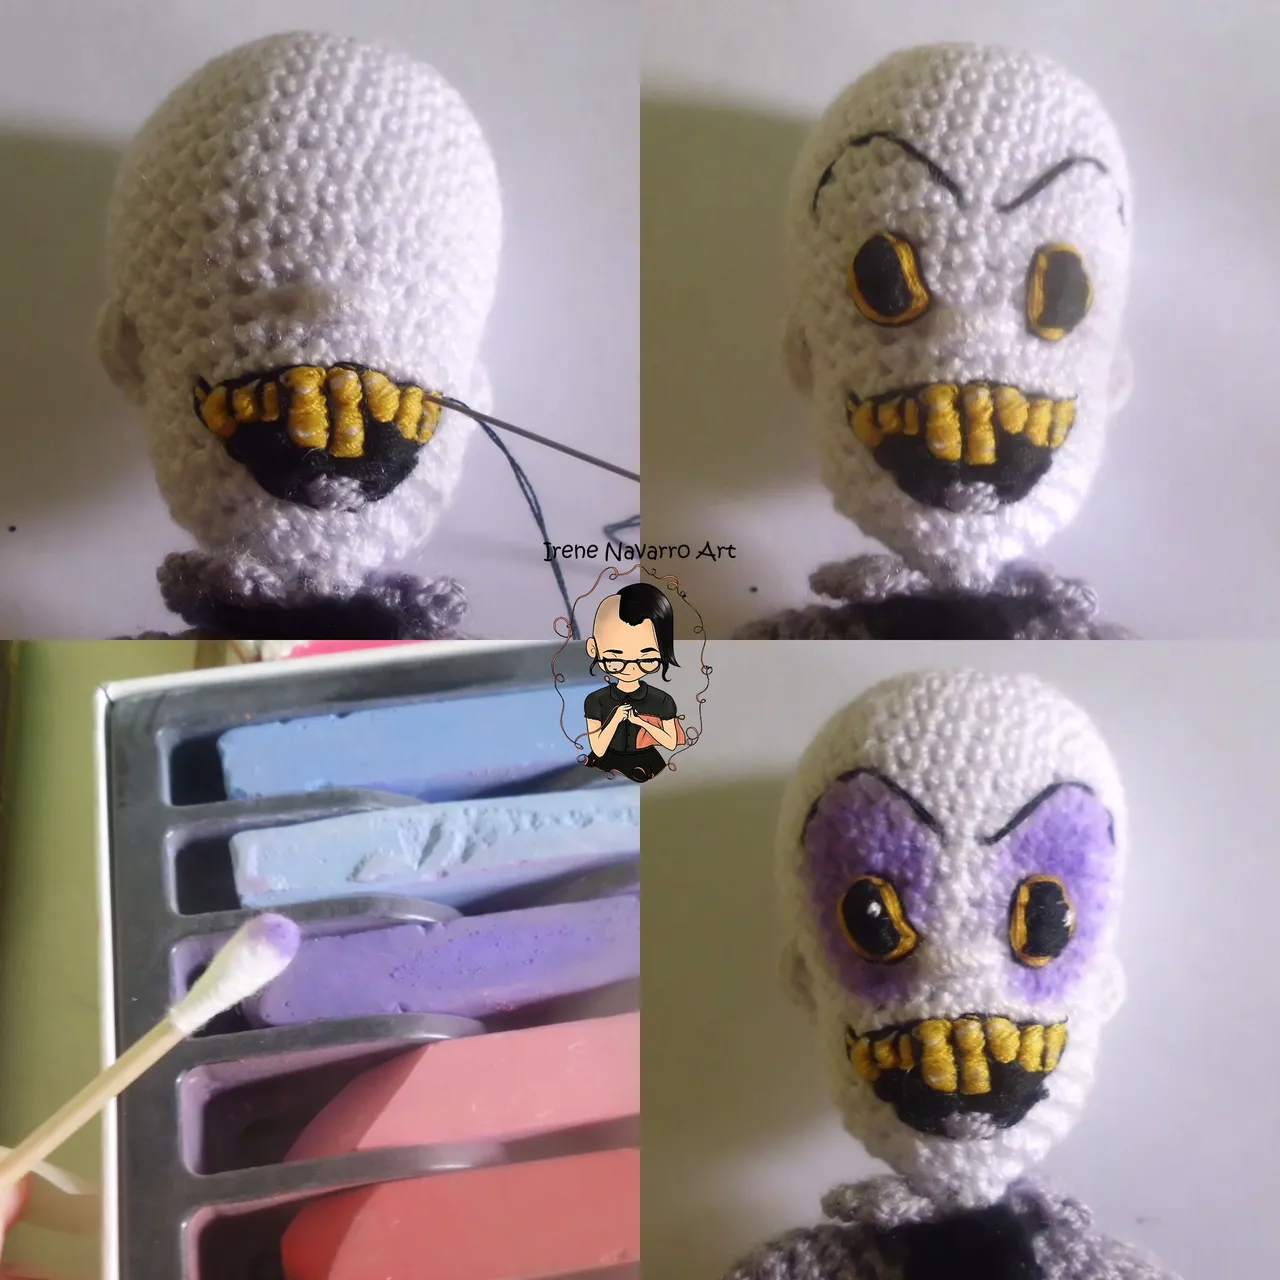
Para el rostro bordé los detalles con hilo y aguja de coser, comenzando con la boca, con hilo negro e hilo amarillo para los dientes, la lengua la hice con hilo morado claro para crochet, Luego bordé los ojos con hilo negro y amarillo. Apliqué tiza pastel para las ojeras.
For the face I embroidered the details with thread and sewing needle, starting with the mouth, with black thread and yellow thread for the teeth, the tongue was made with light purple thread for crochet, then I embroidered the eyes with black and yellow thread. I applied pastel chalk for the dark circles.
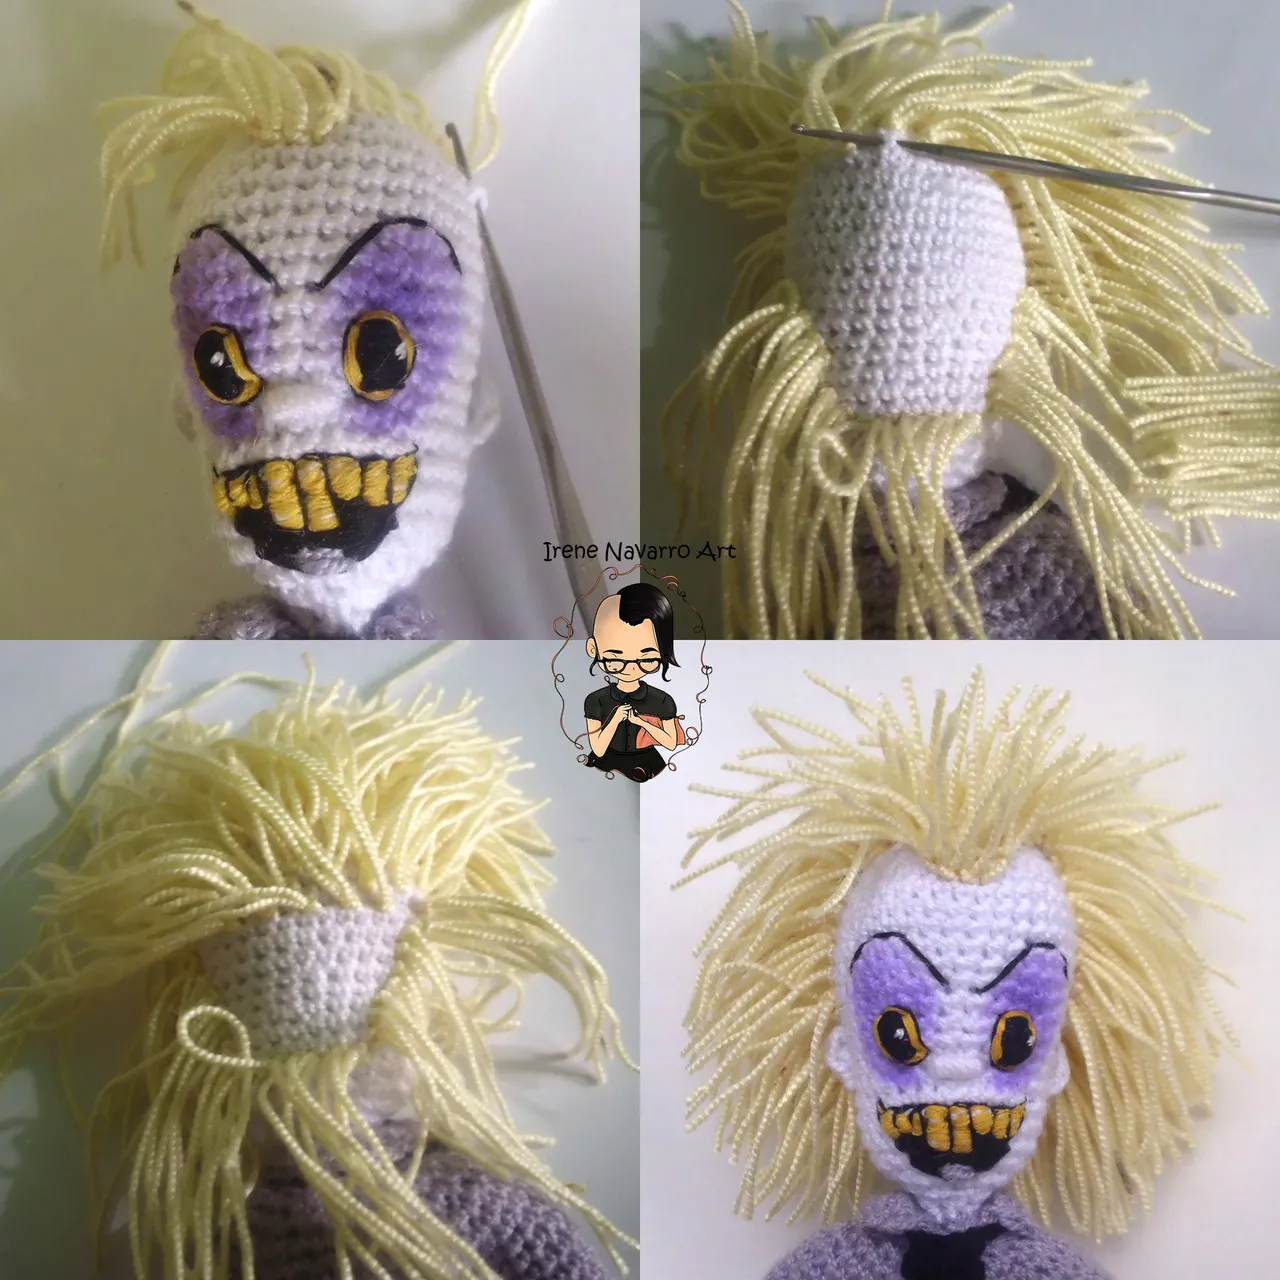
Para el cabello, corté hebras de hilo amarillo claro y fue colocándolas por toda la línea del cabello, para formar las entradas de la cabeza, luego de haber colocado suficiente cabello procedí a cortarlo en las partes necesarias para asemejar el peinado alocado y un poco calvo del personaje.
For the hair, I cut light yellow strands and thread and was placing them throughout the hairline, to form the entrances of the head, after having placed enough hair I proceeded to cut it in the necessary parts to resemble the crazy and a little bald hairstyle of the character.
Mi sufrimiento vino al tejer el saco, resulta que pensé que será más sencillo hacerlo como lo he hecho en ocasiones anteriores, es decir comenzar el tejido en dos agujas desde el cuello hacia abajo, haciendo aumentos ubicados en las sisas (axilas) por así decirlo, entonces los aumentos forman las mangas y luego se separa el tejido de la mangas, se teje juntos las dos partes del delantero y la espalda dejando obviamente la abertura del centro, pero no resultó como imaginé, puesto que el problema era que el traje del personaje no tiene todas las rayas de forma vertical, sino que las mangas son rayas horizontales, para ellos supuse que tejiendo las mangas con una ronda de hilo blanco y una ronda de hilo negro no haría problema, ello implico tener dos hebras blancas y dos hebras negras de hilo adicionales por cada lado de la mangas además de las dos hebras normales de cada una de los lados, es decir dos para cada lado delantero y dos más por la espalda, esto fue bastante complicado sin embargo todo iba según el plan, pero resulta que cuando el tejido iba más avanzado me di cuenta que la puntada jersey para las mangas del lado del frete resultaba no muy bonita, es decir, se ve claramente que una ronda es blanca y la otra ronda es negra, pero como las puntadas en dos agujas son como la forma de una letra “V” el resultado no era líneas parejas sino como especie de zigzag que mi mente detallista (Obsesiva) no podía dejar pasar, así que deshice todo el tejido y comencé a hacerlo de otra forma.
My suffering came when knitting the jacket, it turns out that I thought it would be easier to do it as I have done on previous occasions, that is, to start the knitting on two needles from the neck down, making increases located in the armholes (armpits) so to speak , then the increases form the sleeves and then the fabric of the sleeves is separated, the two parts of the front and the back are knit together, obviously leaving the opening in the center, but it did not turn out as I imagined, since the problem was that the suit of the The character does not have all the stripes vertically, but the sleeves are horizontal stripes, for them I assumed that knitting the sleeves with a round of white thread and a round of black thread would not be a problem, this implied having two white threads and two threads Additional black yarn on each side of the sleeves in addition to the two normal strands on each side, that is, two for each front side and two more on the back, this was quite complicated without e However, everything was going according to plan, but it turns out that when the fabric was more advanced I realized that the stockinette stitch for the sleeves on the front side was not very pretty, that is, it is clear that one round is white and the other round It is black, but since the stitches on two needles are like the shape of a letter "V", the result was not even lines but rather a kind of zigzag that my detailed mind (Obsessive) could not miss, so I undid all the fabric and I started doing it differently.
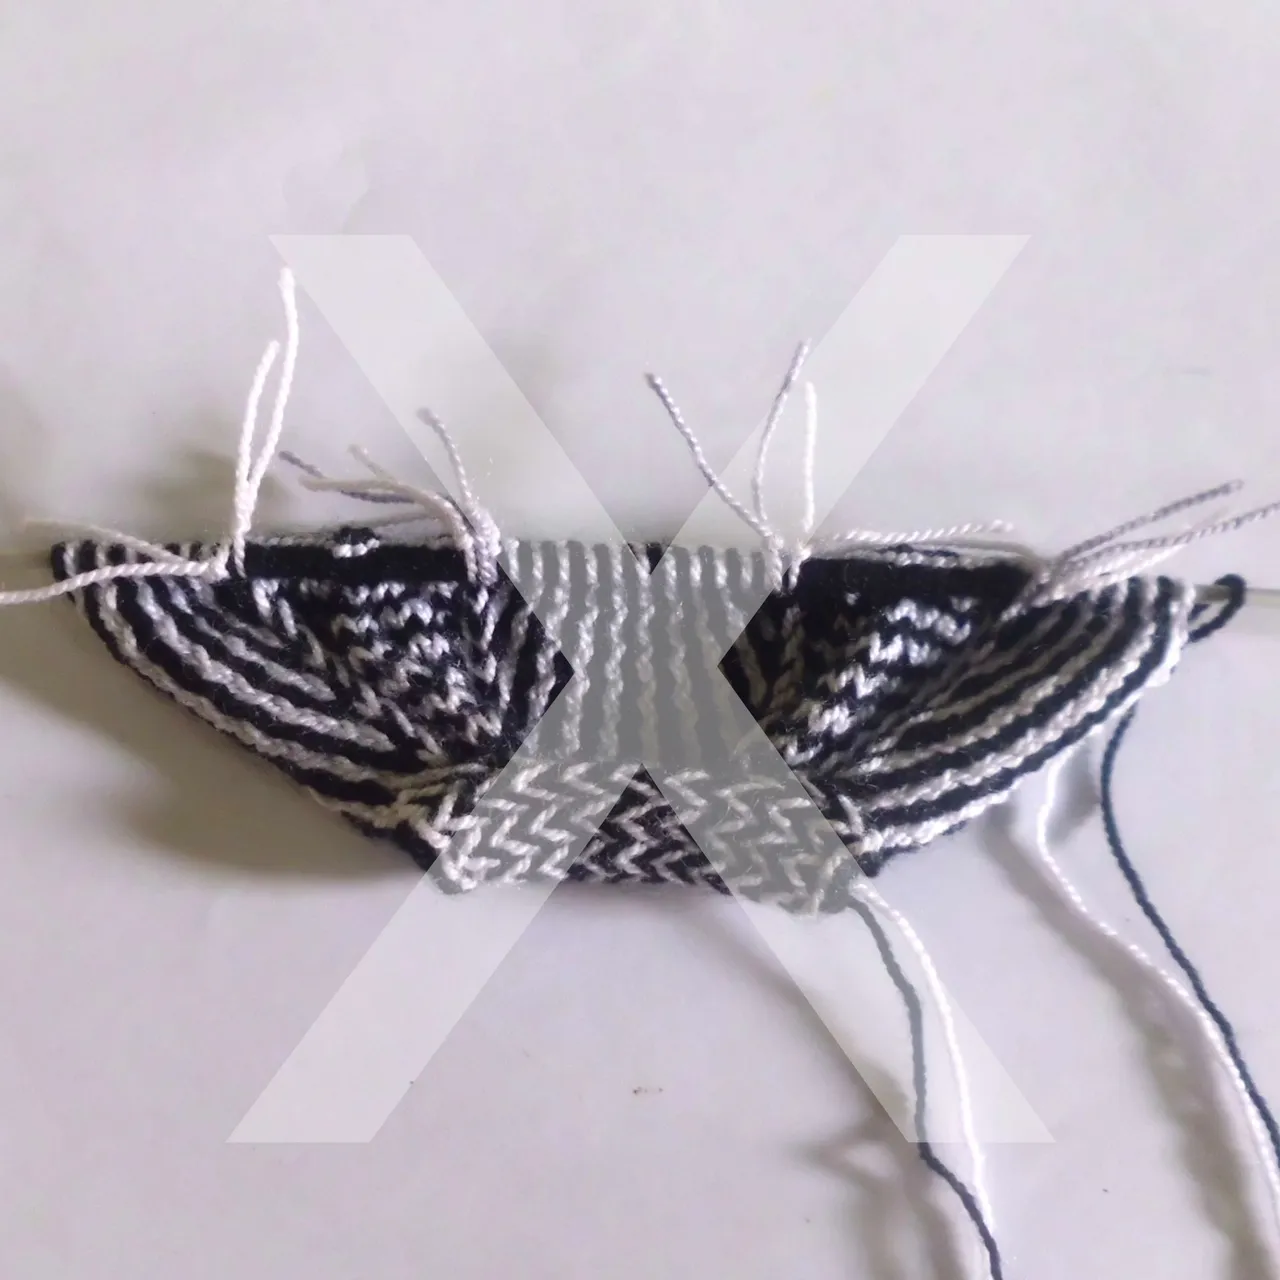
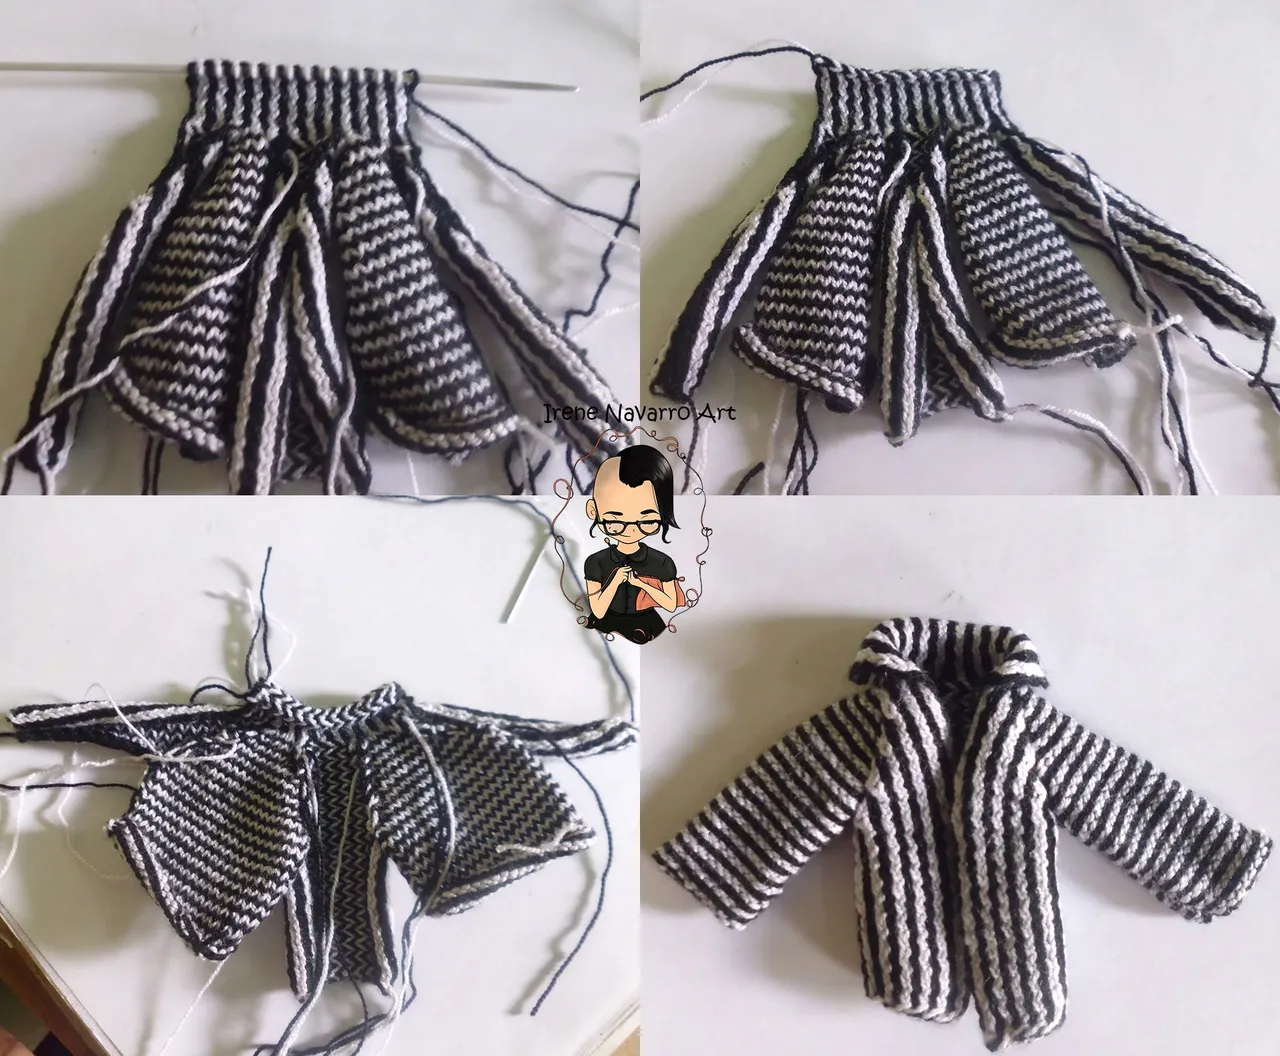
El plan B y el que mejor resultado dio, fue seguir tejiendo con dos agujas (no quise hacerlo a crochet porque las líneas no quedan tampoco parejas visualmente), pero en esta ocasión tejí cada parte del saco por separado, es decir dos partes delanteras, la espalda y dos mangas, las partes delanteras y de la espalda las tejí del mismo modo que el pantalón, es decir, un puntada blanca y una puntada negra en el mismo punto jersey, pero las mangas las hice es punto jersey pero al revés, es decir el lado del revés es el que se mostrara para el frente, haciendo una ronda en blanco y una ronda en negro, visualmente las líneas se ven parejas y no se ve de forma de zigzag, (mi cerebro ansioso se sintió en paz). Luego de tener todas las partes listas, las organice en una aguja y tejí el cuello con rayas verticales, luego hice las costuras necesarias usando las puntadas de orillo y listo. Luego planché el saco y la corbata con una plancha para cabello.
Plan B and the one that gave the best result, was to continue knitting with two needles (I didn't want to crochet because the lines are not visually straight either), but this time I knitted each part of the jacket separately, that is, two front parts, I knitted the back and two sleeves, the front and back parts in the same way as the pants, that is, a white stitch and a black stitch in the same stockinette stitch, but I made the sleeves in stockinette stitch but reversed, that is, the reverse side is the one that will be shown for the front, making a round in white and a round in black, visually the lines look even and it does not look like a zigzag, (my anxious brain felt at peace) . After having all the parts ready, I organized them on a needle and knit the neck with vertical stripes, then I made the necessary seams using the selvage stitches and that's it. Then I ironed the jacket and tie with a hair straightener.
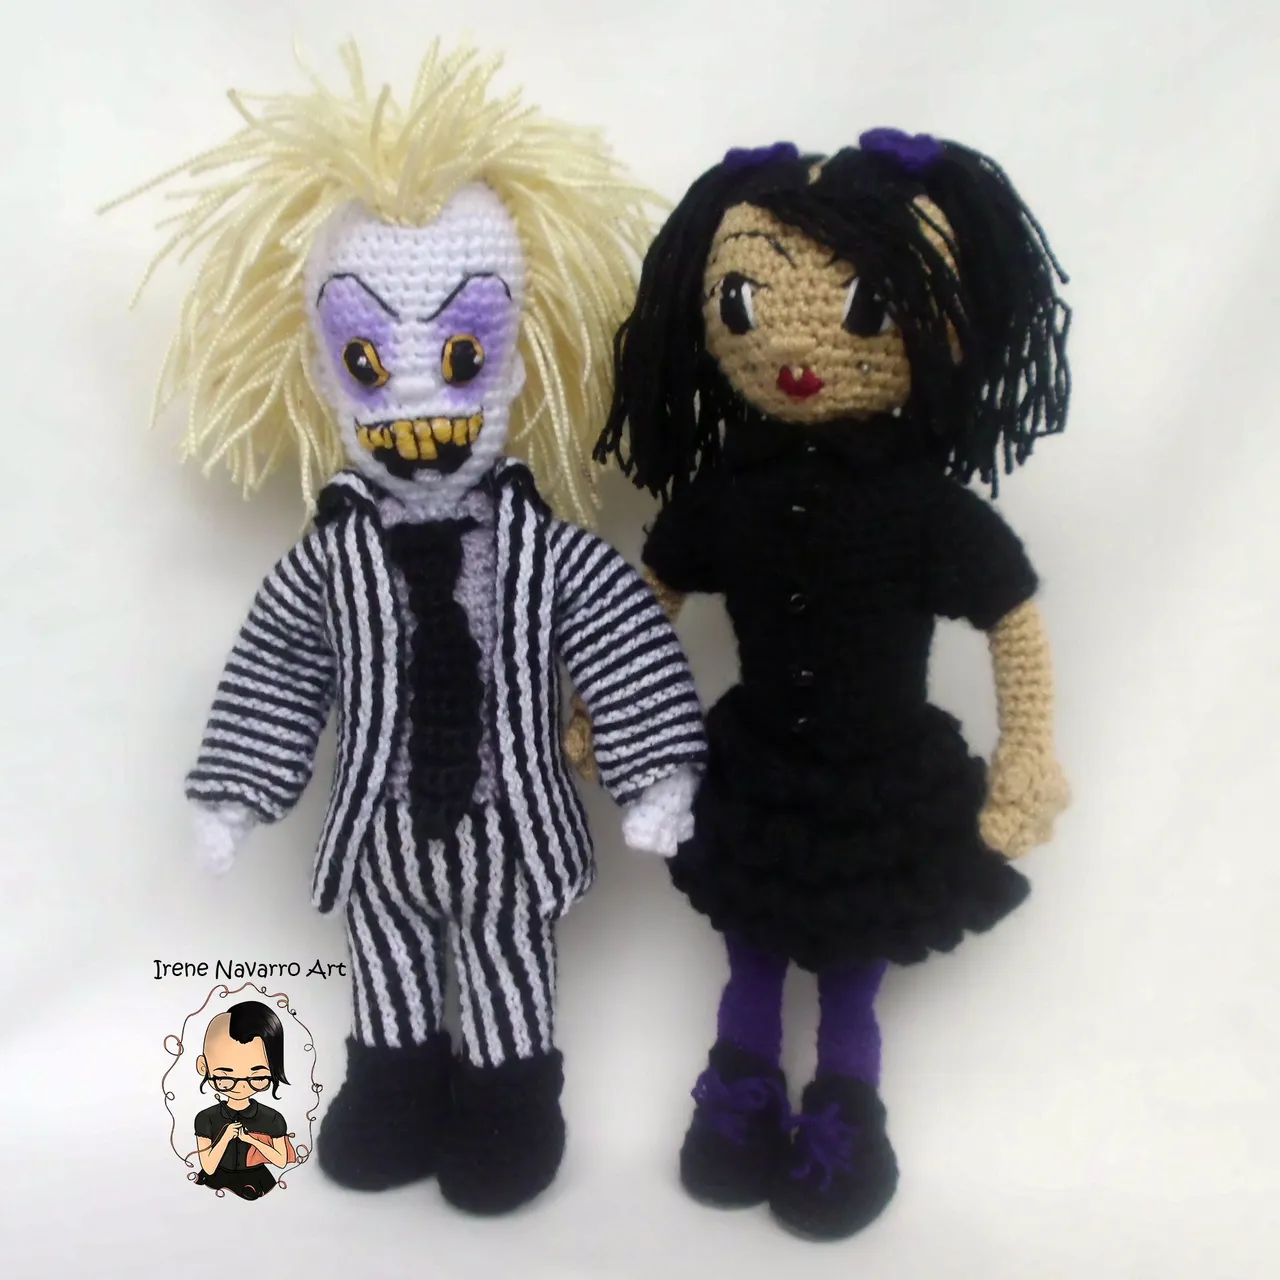
Resultado / Result
Fue un camino largo pero ahora estoy feliz estoy muy agradecida de haber aprendido cosas nuevas con este proyecto aunque me haya tomado mucho tiempo, creo que solo puedo compartir mi felicidad y también mis errores por si acaso a alguien le pueda servir de ejemplo en algo que este tejiendo. Un abrazo a todos, estoy muy feliz que hoy solo irradio felicidad. Por cierto si Lydia no aceptó yo si me caso con el Beetlejuice!!!
It was a long road but now I am happy I am very grateful to have learned new things with this project even though it took me a long time, I think I can only share my happiness and also my mistakes just in case someone can serve as an example in something that is weaving. A hug to all, I am very happy that today I only radiate happiness. By the way, if Lydia didn't accept, I'll marry Beetlejuice !!!


Imágenes tomadas con cámara Casio QV-R100 y editadas en Adobe Photoshop Cs6
Images taken with Casio QV-R100 camera and edited in Adobe Photoshop Cs6
Invítenme un Café/Support Me on Ko-Fi
Si te gusta mi contenido y quieres apoyarme a seguir dibujando, pintando, escribiendo y tejiendo puedes invitarme un Ko-fi en el enlace que les dejo aquí abajo, les recuerdo que es fácil, se usa Paypal y Tarjeta. ¡Muchas gracias a todos!
If you want to support my art you can also make donations for the value of a coffee (Ko-Fi) this uses Paypal, it is simple and with it I will be able to continue knitting and buying materials to create and share my publications

https://ko-fi.com/irenenavarroart
Espero les haya gustado. Les invito a leer mis próximas publicaciones y siempre estaré dispuesta a responder sus preguntas y comentarios, también pueden seguirme y contactarme en cualquiera de mis redes sociales. ¡Muchas gracias!
I hope you liked it. I invite you to read my next publications and I will always be willing to answer your questions and comments, you can also follow me and contact me on any of my social networks. Thank you!