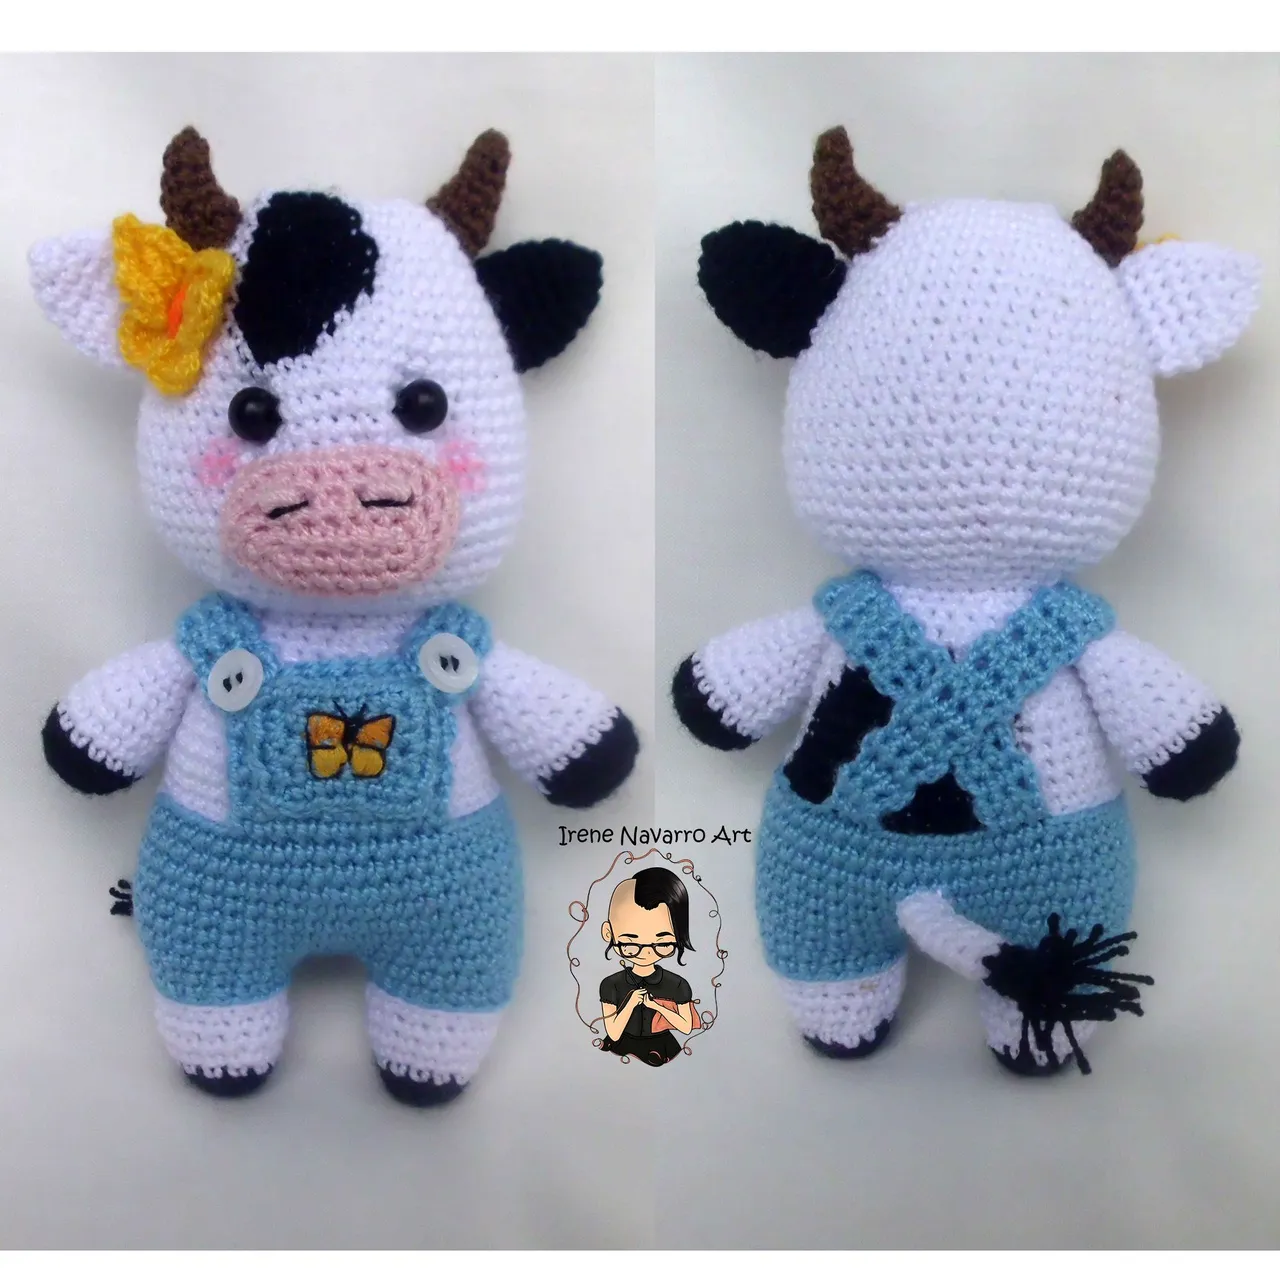
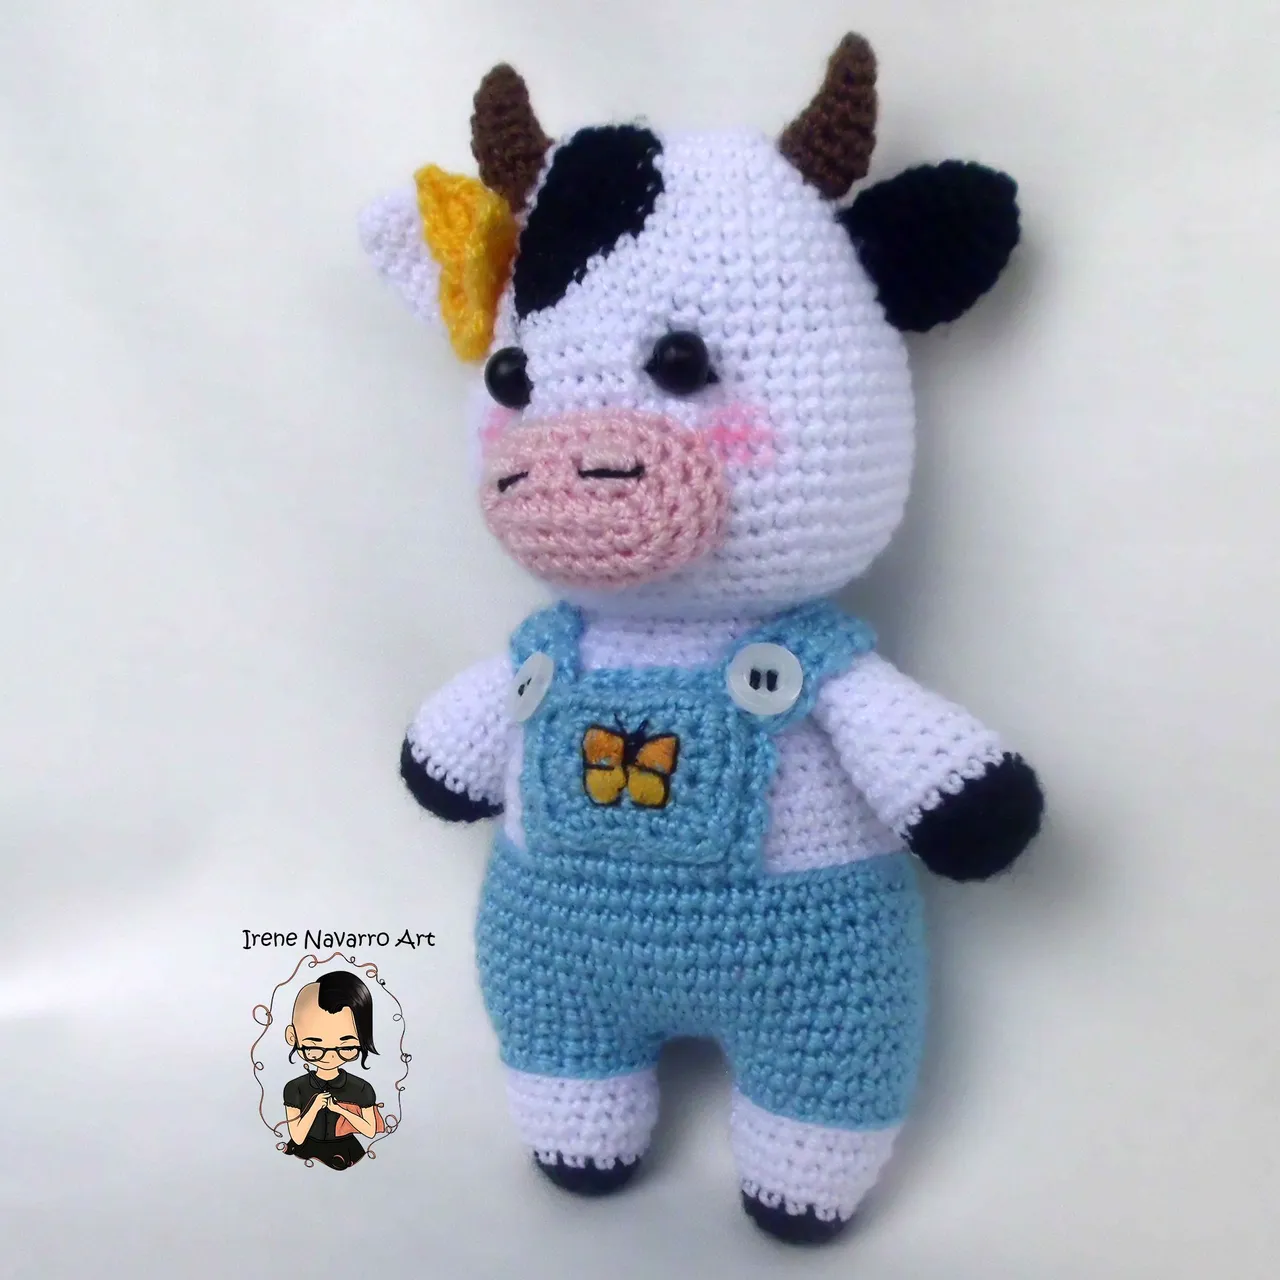
Saludos en esta ocasión les quiero compartir un amigurumi al que llame Vaca Mariposa, porque es una vaca con una pequeña mariposa en su cabeza, pero la razón principal es un juego de palabras relacionado con un tema musical tradicional venezolano que tiene nombre la Vaca Mariposa, el cantautor Simón Díaz narra en su canción la conmovedora historia de una vaca de nombre Mariposa quien tuvo un bebé ternero, pero ella sabe que los terneros son separados de sus madres y son sacrificados, por eso ella cuando observa que los animales y los niños van a conocer al bebé ella lo esconde. Este tema me impactó desde niña y por eso cada vez que veo una vaca me imagino el amor que sienten por sus bebés es tan grande como el amor de Mariposa la vaca.
Greetings on this occasion I want to share with you an amigurumi that I call Butterfly the cow, because it is a cow with a small butterfly on her head, but the main reason is a play on words related to a traditional Venezuelan musical theme that has the name the Butterfly the cow, the singer-songwriter Simón Díaz narrates in his song the touching story of a cow named Butterfly who had a baby calf, but she knows that calves are separated from their mothers and are sacrificed, so when she sees that the animals and children are going to meet the baby she hides it. This theme impacted me as a child and that is why every time I see a cow I imagine the love they have for their babies is as great as the love of Butterfly the cow.
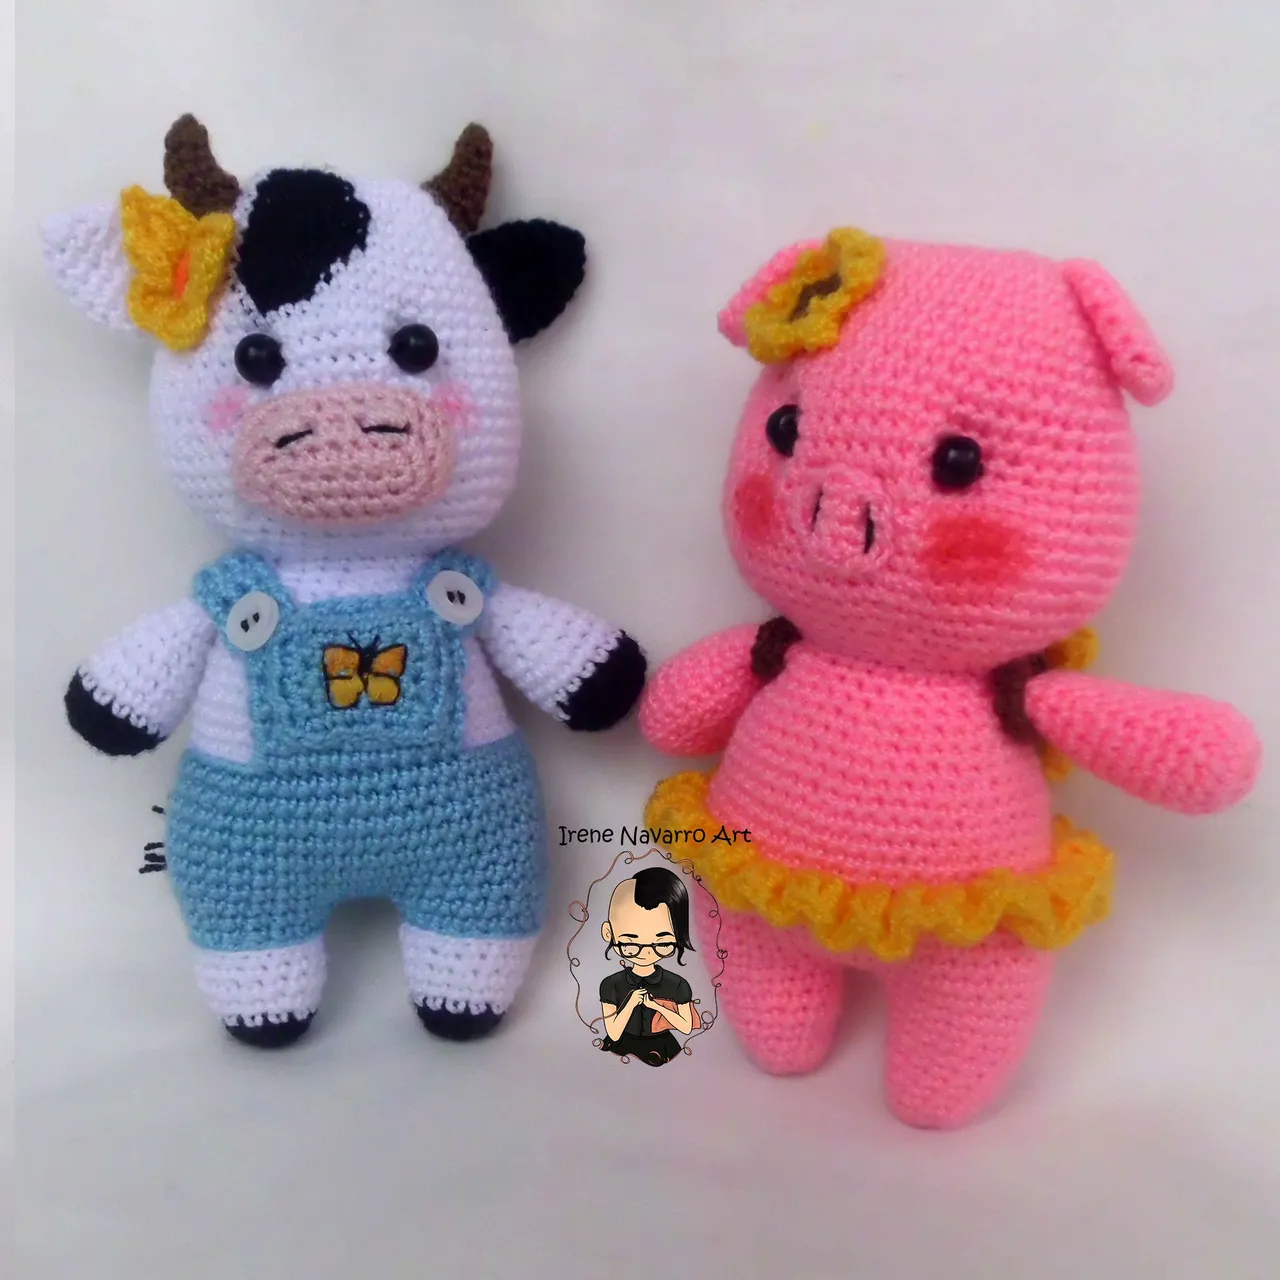
Para este amigurumi modifiqué un poco el patrón que hice la vez pasada para el cerdito con morral de girasol, solo hice algunos pequeños cambios para hacer a la vaca Mariposa, pero en términos generales las patas , el cuerpo y la cabeza tienen casi las mismas puntadas, solo varían en el uso del color, aquí les explico el proceso y si quieren visitar el tutorial detallado del cerdito para guiarse exactamente en cada ronda les comparto el enlace al final de la publicación.
For this amigurumi I modified a little the pattern I made last time for the piggy with sunflower backpack, I only made some small changes to make the butterfly cow, but in general terms the legs, body and head have almost the same stitches, only vary in the use of color, here I explain the process and if you want to visit the detailed tutorial of the piggy to guide you exactly in each round I share the link at the end of the publication.

Piernas / Legs
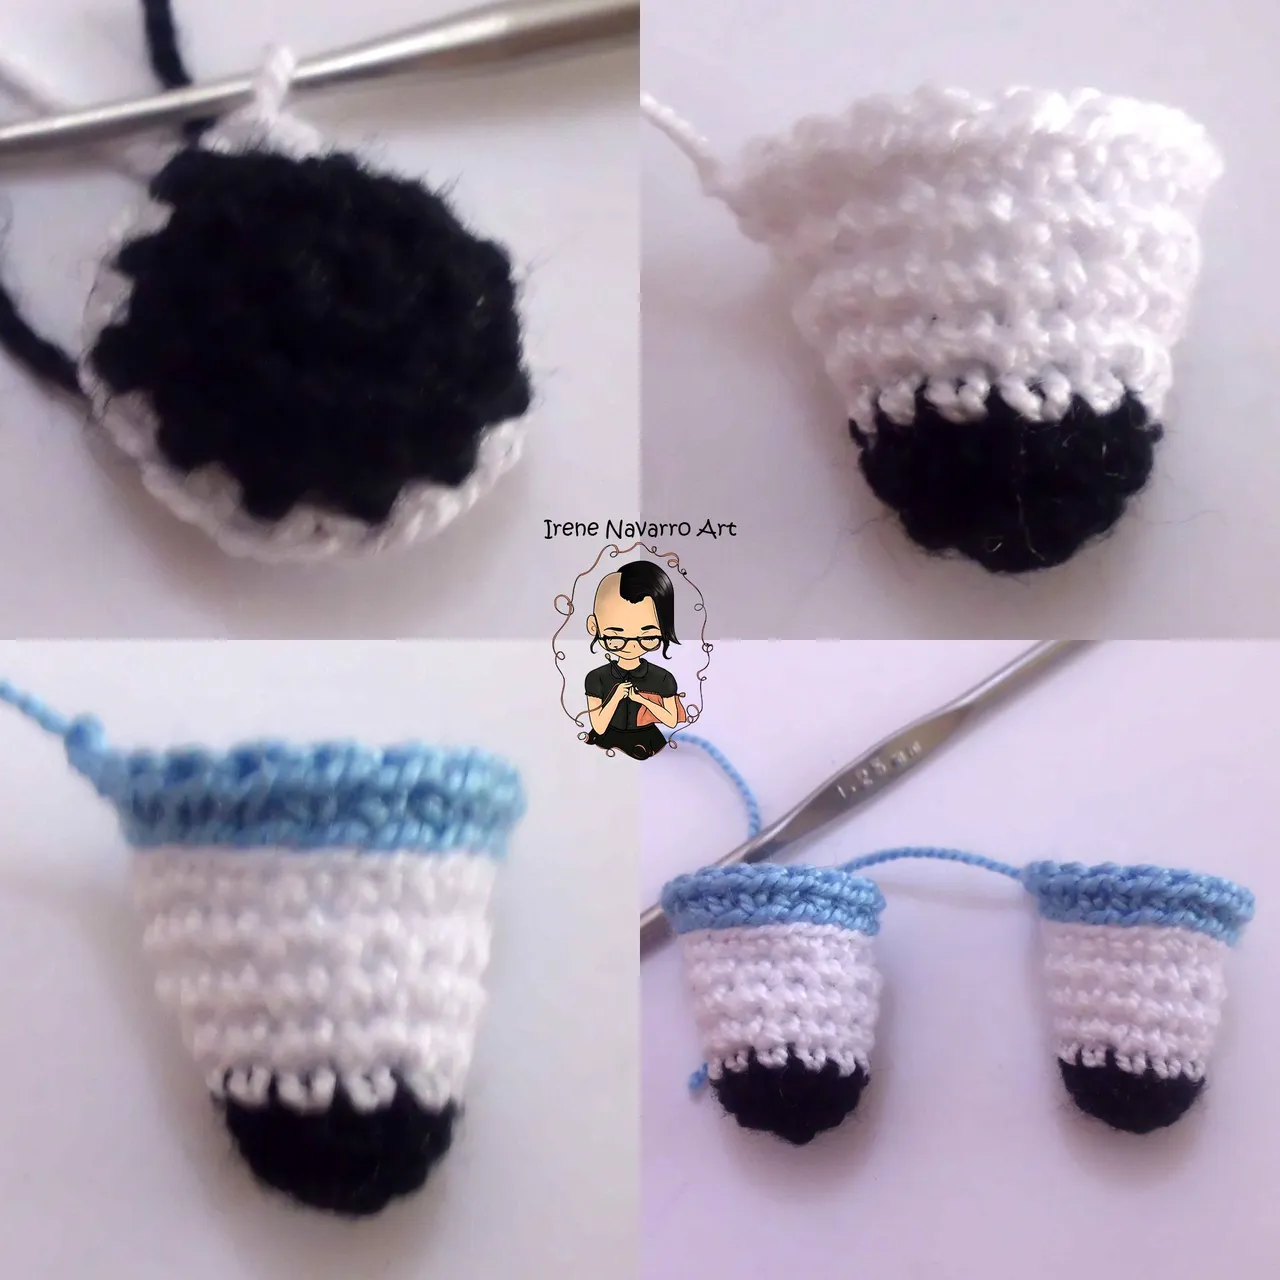
Por ser una vaca antropomórfica esta sobre dos piernas como una persona, comencé con el hilo negro tejiendo 6 puntos bajos en un anillo, en la primera ronda tejií 6 aumentos, la segunda ronda 12 puntos bajos, cambié a hilo blanco y tejí 2 aumentos en la siguiente ronda, hice dos rondas sin aumentos y luego 2 aumentos en la siguiente ronda, cambié a hilo azul celeste , tomando solo el lado de atrás de los puntos tejí una ronda de puntos deslizados, tomando nuevamente la parte de atrás de los puntos tejí una ronda de puntos bajos, de esa forma el cambio de color se ve mejor. Hice dos piernas de la misma forma.
Being an anthropomorphic cow is on two legs like a person, I started with the black thread knitting 6 single crochets in a ring, in the first round I crocheted 6 increases, the second round 12 single crochets , I changed to white yarn and knitted 2 increases in the next round, I did two rounds without increases and then 2 increases in the next round, I changed to sky blue yarn, taking only the back side of the stitches I knitted a round of slip stitches, taking the back of the stitches again I knit a round of single crochets, that way the color change looks better. I made two legs the same way.
Cuerpo / Body
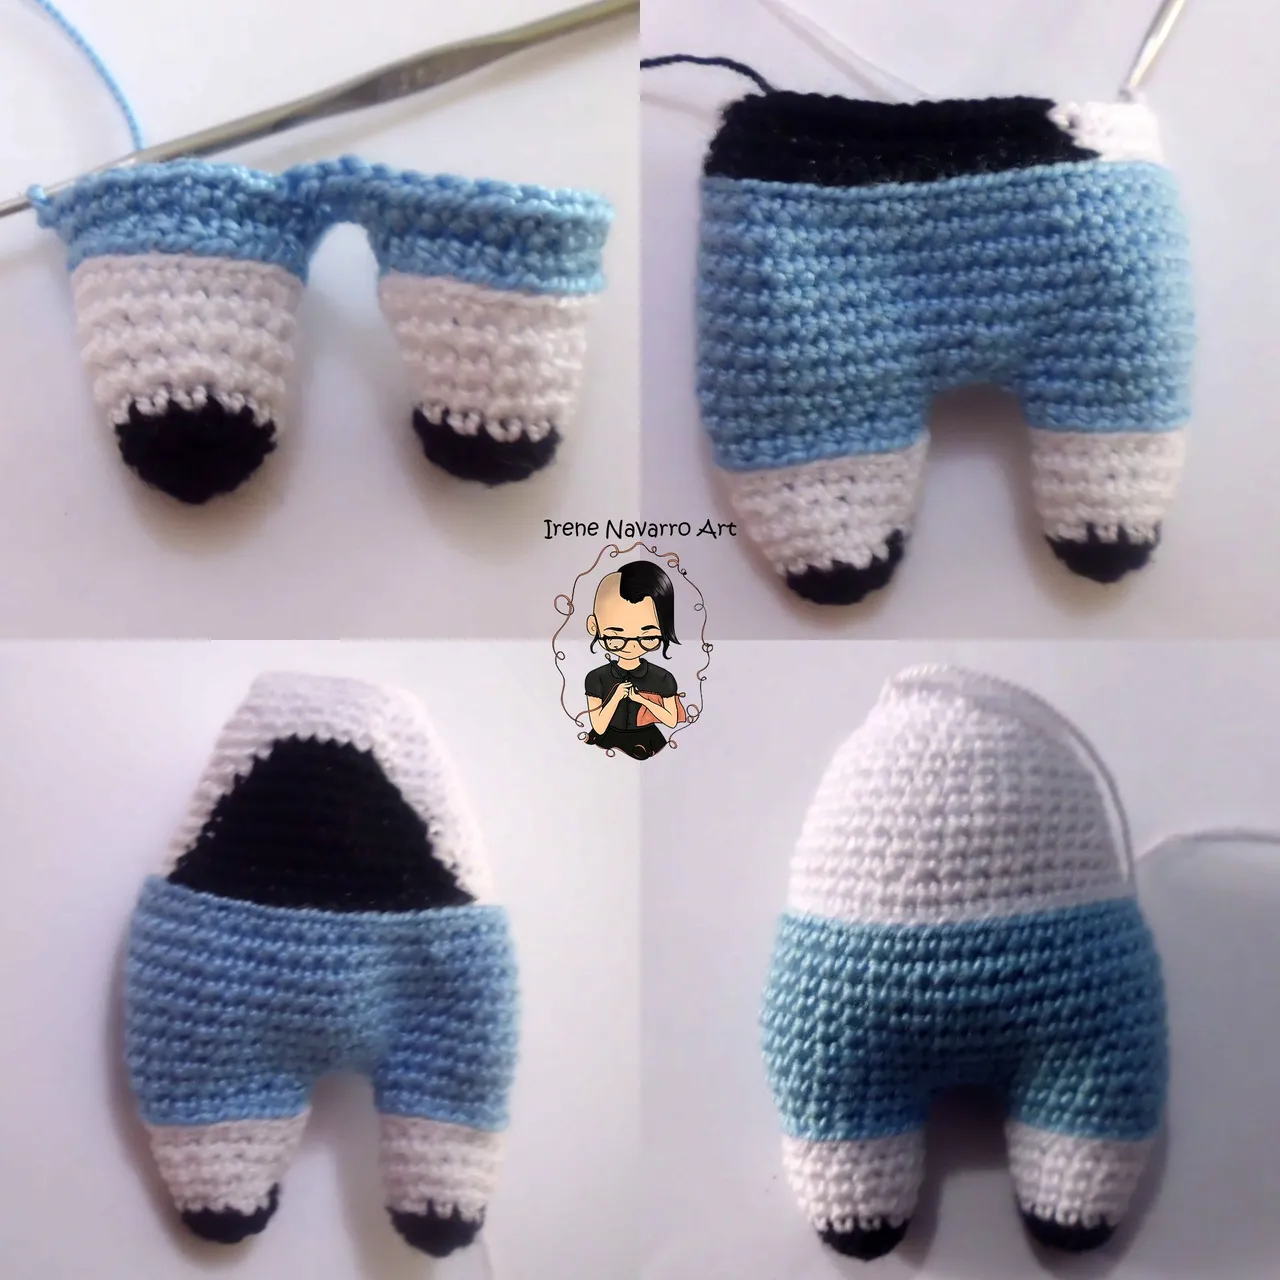
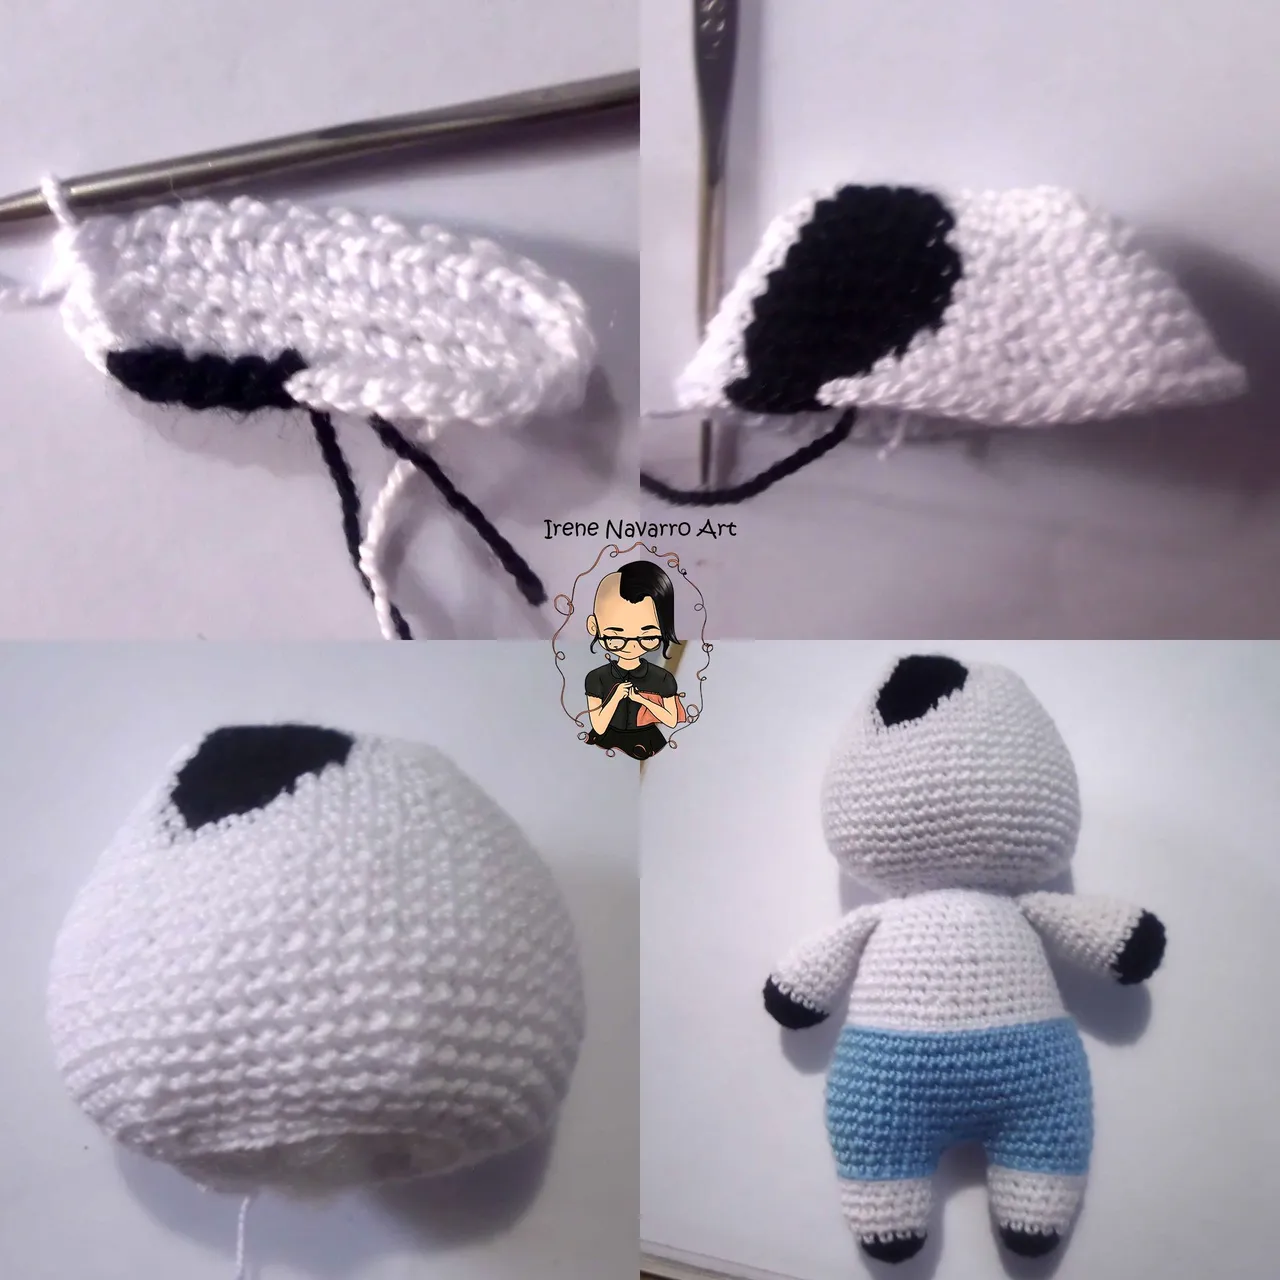
Al igual que con el cerdito el cuerpo se forma uniendo las dos piernas de la siguiente forma: en la primer ronda se tejen 9 puntos bajos de la primera pierna, se tejen 3 cadenas y se tejen los 18 puntos bajos de la segunda pierna, se tejen tres puntos bajos en las cadenas hechas anteriormente y luego se tejen los 9 puntos bajos de la primera pierna. Para obtener 42 puntos. En la siguiente ronda se tejen 6 aumentos para obtener 48 puntos, se tejen siete rondas sin aumentos ni disminuciones. Hasta allí se teje con el azul.
En la siguiente ronda tomando solo el lado de atrás de los puntos, se tejen puntos deslizados con color blanco y con color negro para hacer la mancha de la espalda, esto puede variar al gusto de la persona pero yo comencé la macha con 16 puntadas en negro, en la siguiente ronda tomando solo el lado de atrás de los puntos se tejen los 18 puntos bajos del color que se presenten. A partir de allí se intercala una ronda con 3 disminuciones y una ronda sin disminuciones hasta obtener 36 puntos, en la siguiente ronda se hacen tres disminuciones y se termina la macha negra, en las siguientes rondas solo con hilo blanco se hacen tres disminuciones hasta obtener 24 puntos. Cerré con un punto deslizado y deje la hebra larga para coser, lo rellené con fibra.
As with the pig, the body is formed by joining the two legs as follows: in the first round, 9 single crochets are knitted from the first leg, 3 chains are knitted and knit the 18 single crochets of the second leg, three single crochets are worked in the chains made previously and then the 9 single crochets of the first leg are worked. To obtain 42 stitches. In the next round 6 increases are knitted to obtain 48 stitches, seven rounds are knitted without increases or decreases. Until there it is woven with blue.
In the next round, taking only the back side of the stitches, slip stitches are knitted with white and black to make the stain on the back, this can vary to suit your taste. person but I started the stain with 16 stitches in black, in the next round, taking only the back side of the stitches, the 18 single crochets of the color that are presented are knitted. From there, a round with 3 decreases is inserted and a round without decreases until obtaining 36 stitches, in the next round three decreases are made and the black stain is finished, in the following rounds only with white thread three decreases are made until obtaining 24 stitches. I closed with a slip stitch and left the thread long to sew, I filled it with fiber.
Brazos / Arms
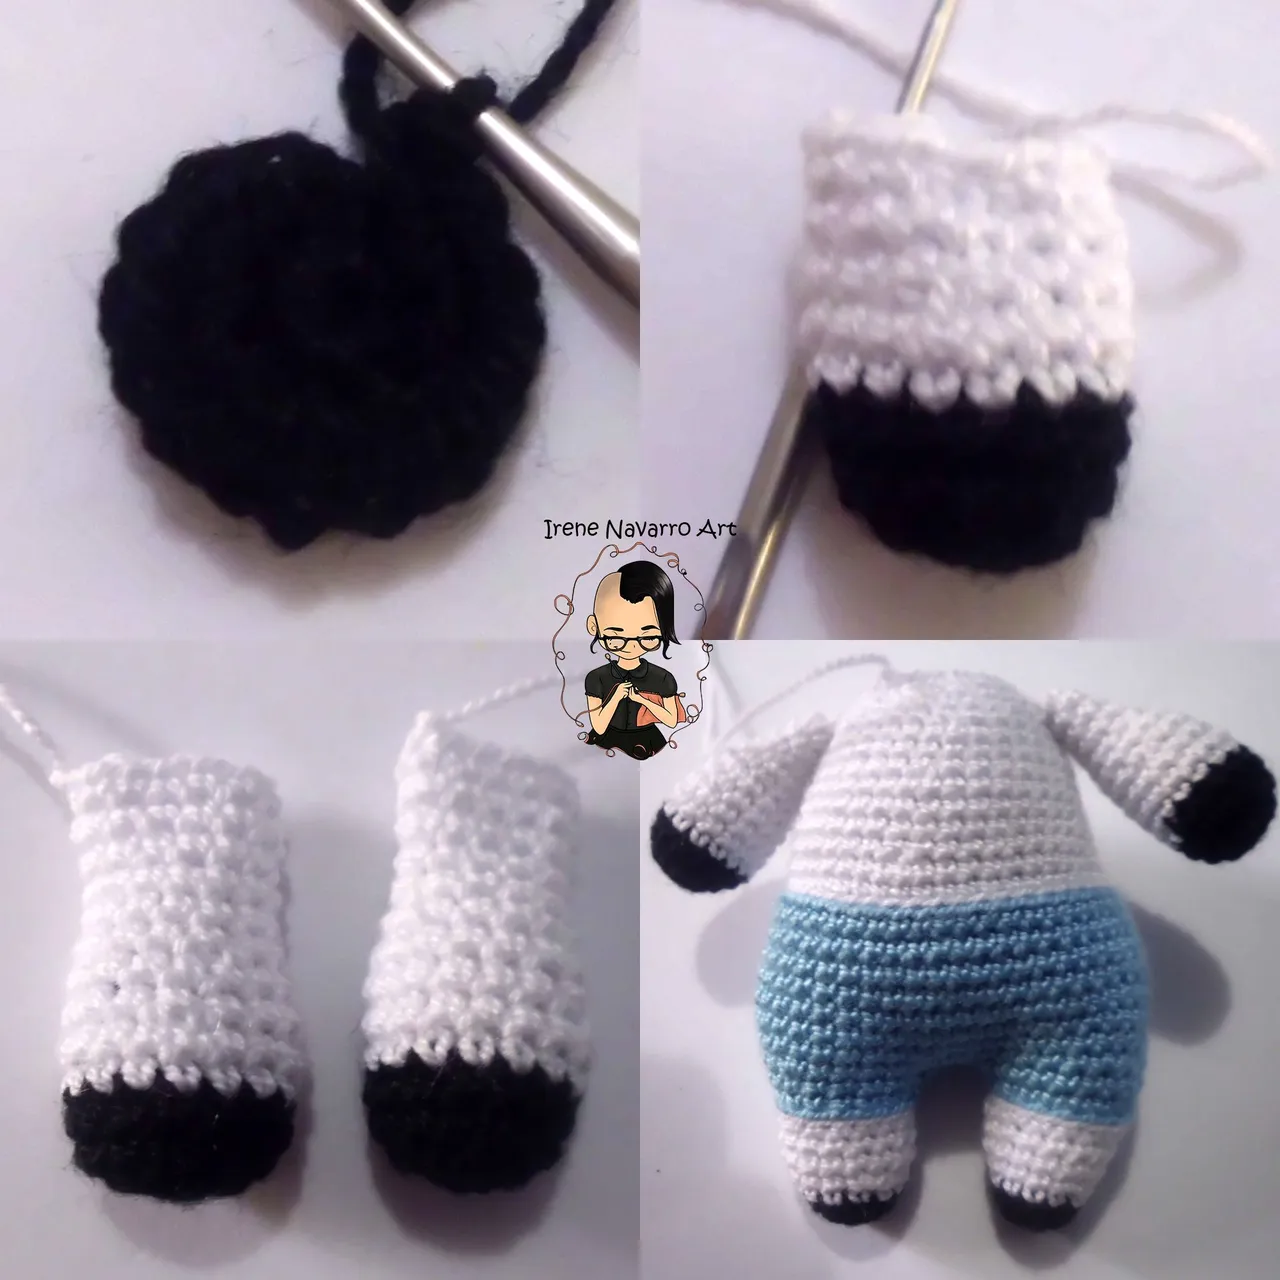
Con el hilo negro tejí 8 puntos bajos en un anillo, tejí 8 aumentos para obtener 16 puntos, hice dos rondas de puntos bajos, cambié a hilo blanco y tejí dos rondas mas, lego tejí una disminución por 4 rondas hasta obtener 12 puntos, tejí cuatro rondas de puntos bajos, cerré con un punto deslizado y deje la hebra larga para coser. Hice dos iguales, los rellené con fibra y los cosí a los lados del cuerpo con la aguja de ojal grande.
With the black yarn I worked 8 single crochets in a ring, I did 8 increases to get 16 stitches, I did two rounds of single crochets, I changed to white yarn and I knitted two more rounds, here I knitted one decrease for 4 rounds until obtaining 12 stitches, I worked four rounds of single crochets, closed with a slip stitch and left the long strand to sew. I made two of the same, filled them with fiber and sewed them on the sides of the body with the large buttonhole needle.
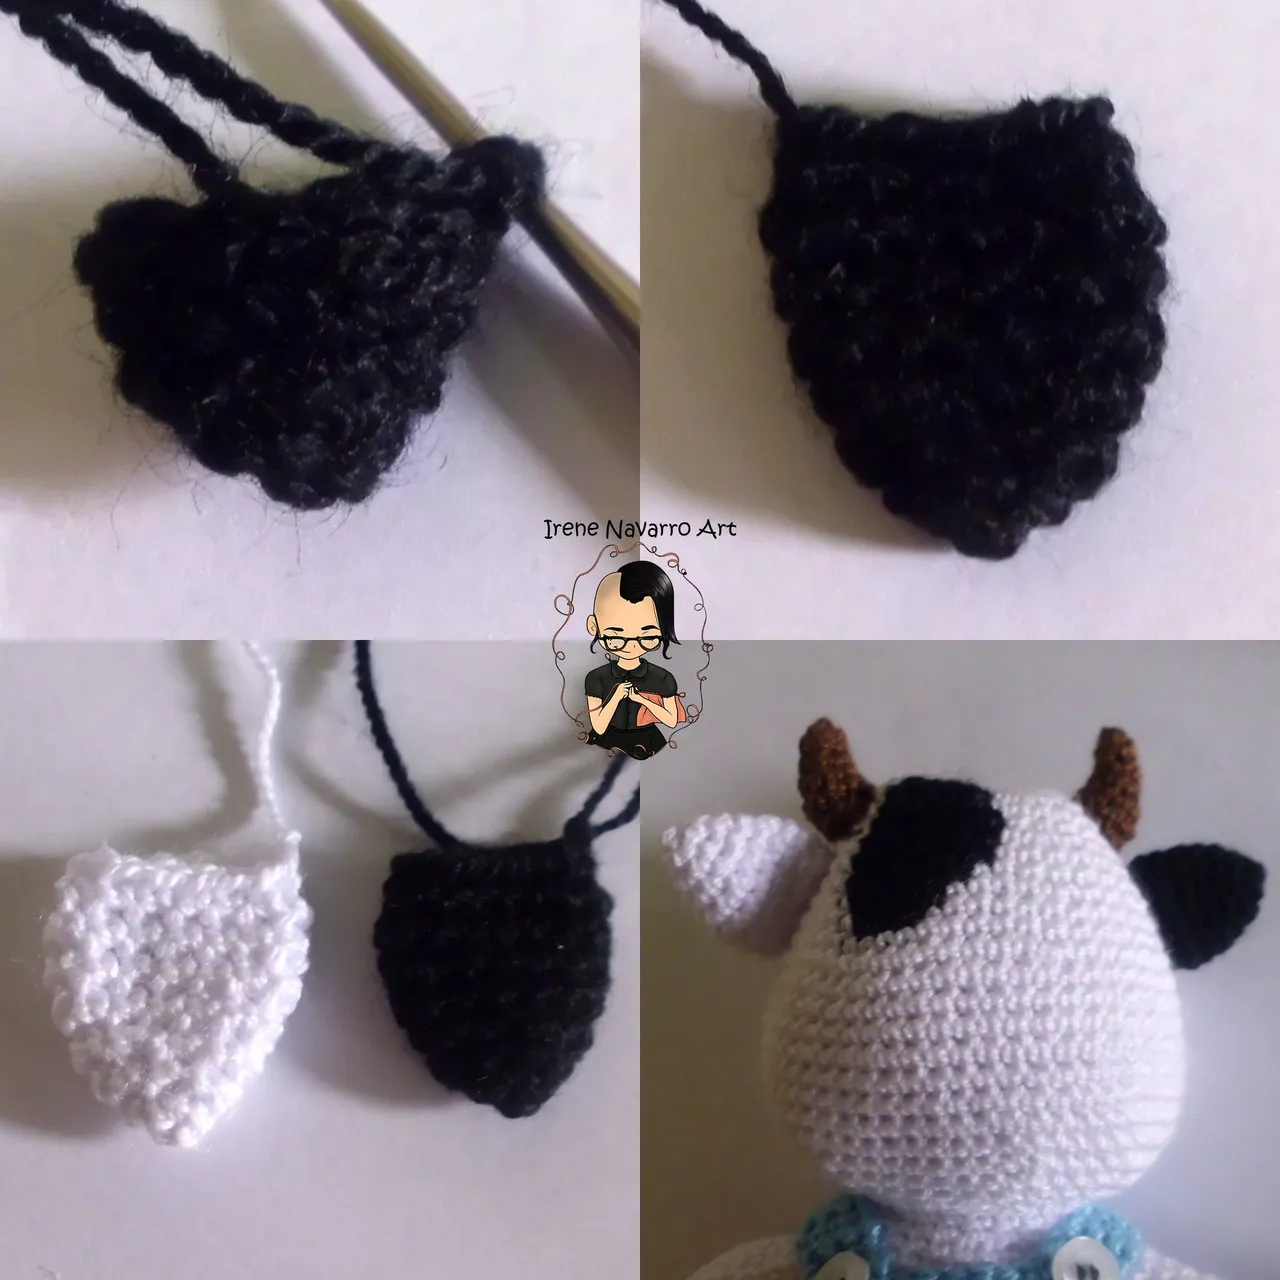
Cabeza / Head
Para tejí la cabeza procedí de la misma forma que la cabeza de la cerdita, pero la diferencia está en que desde la ronda 2 a la 10 ubiqué la mancha negra cuyo tamaño y forma puede variar, porque una vaca no siempre tiene las machas iguales a otra.
Comencé con 10 cadenas, en la primera ronda tejí sobre estas 1 aumentos, 8 puntos bajos, 2 aumentos, 8 puntos bajos y 1 aumento, para obtener 24 puntos, tejí una ronda sin aumentos, a partir de allí intercalé una ronda con 8 aumentos y dos rondas sin aumentos, hasta obtener 56 puntos en la ronda 12.
Tejí 8 rondas de 56 puntos bajos, luego tejí 8 disminuciones por 4 rondas hasta obtener 24 puntos. Cerré con un punto deslizado y deje la hebra larga para coser, rellené la cabeza con fibra y la cosí al cuerpo con la aguja de ojal grande.
To knit the head I proceeded in the same way as the head of the pig, but the difference is that from round 2 to 10 I located the black spot whose size and shape can vary, because a cow does not always have the same stains as another.
I started with 10 chains, in the first round I knitted over these 1 increases, 8 single crochets, 2 increases, 8 single crochets and 1 increase, to get 24 stitches, I worked a round without increases, from there I interspersed a round with 8 increases and two rounds without increases, until I got 56 stitches in round 12.
I worked 8 rounds of 56 single crochets, then I worked 8 decreases for 4 rounds until I got 24 stitches. I closed with a slip stitch and left the long strand to sew, I stuffed the head with fiber and sewed it to the body with the large buttonhole needle.
Ropa / Clothes
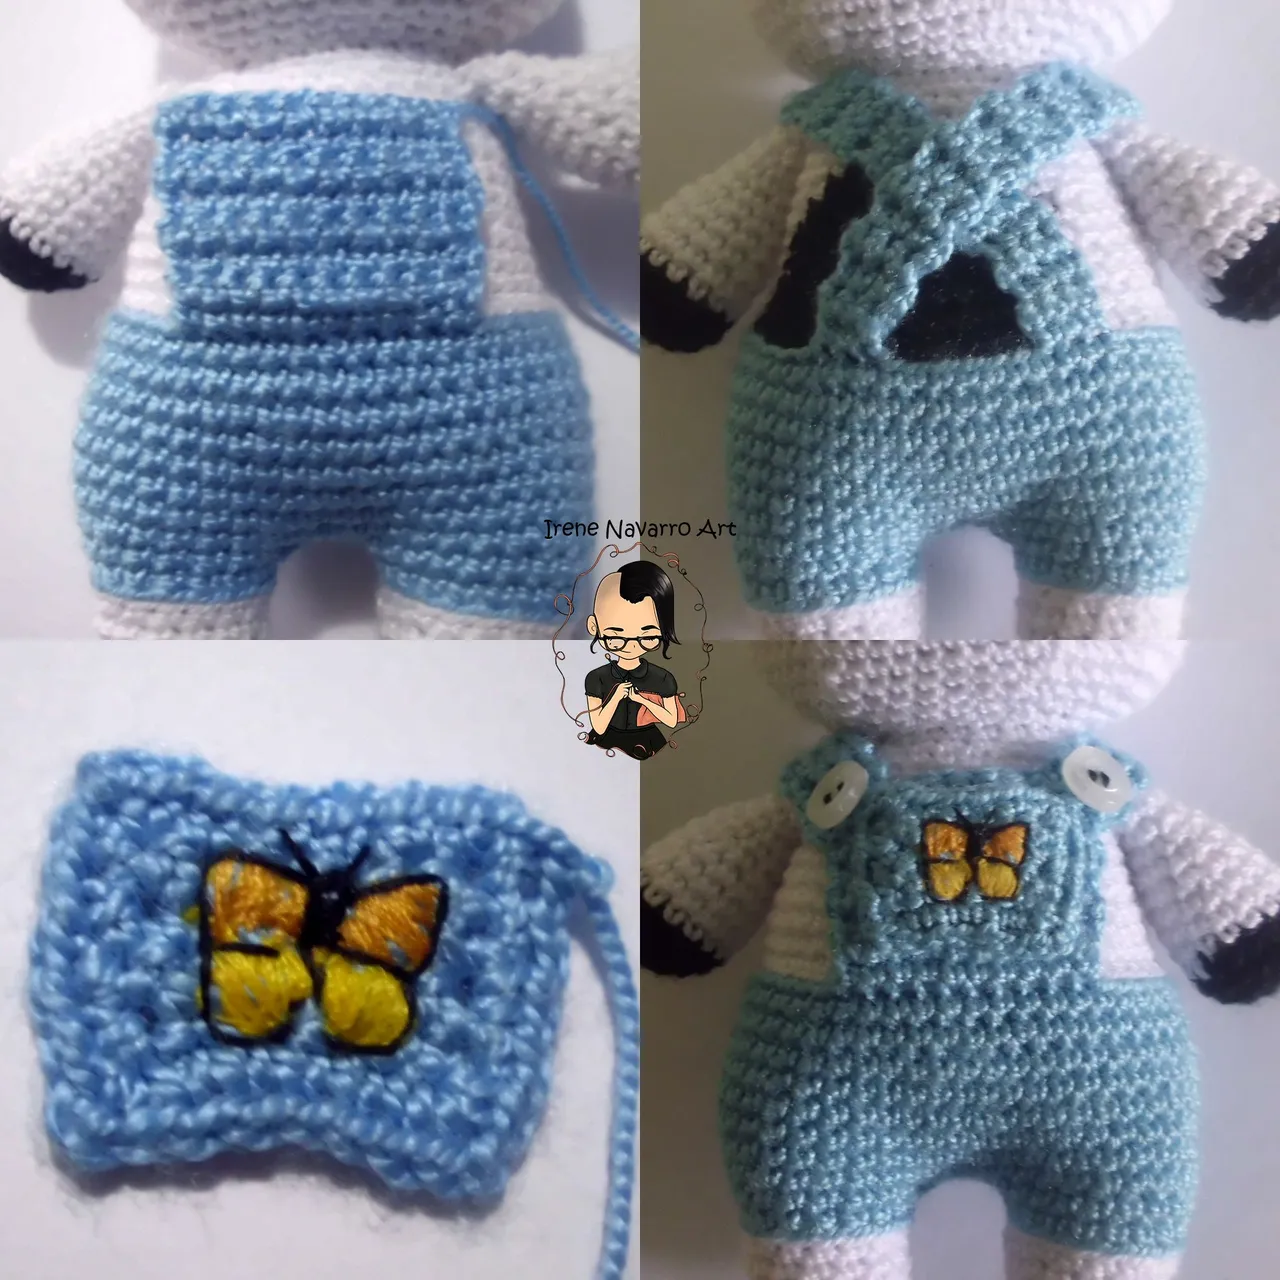
Para la pechera levanté 10 puntos en el centro de la última hilera celeste del cuerpo, tejí 8 rondas de puntos bajos.
Para el bolsillo tejí 6 cadenas y sobre estas tejí cinco rondas de puntos bajos, luego hice una ronda de puntos bajos por todo el rededor del rectángulo formado. Bordé con hilo de coser la mariposa y con hilo celeste cosí el bolsillo.
Para los tirantes levante 3 puntos y tejí 21 rondas de puntos bajos, hice el asa para el botón con 3 cadenas en la ronda 22, hice dos tirantes iguales, cosí los botones del lado del frente y abotoné los tirantes.
For the front I picked up 10 stitches in the center of the last light blue row of the body, I knitted 8 rounds of single crochets.
For the pocket I wove 6 chains and on these I wove five rounds of single crochets, then I made one round of single crochets around the rectangle formed. I embroidered the butterfly with sewing thread and with light blue thread I sewed the pocket.
For the straps I picked up 3 stitches and knitted 21 rounds of single crochets, I made the handle for the button with 3 chains in round 22, I made two equal straps, I sewed the buttons on the front side and buttoned the suspenders.
Cuernos / horns
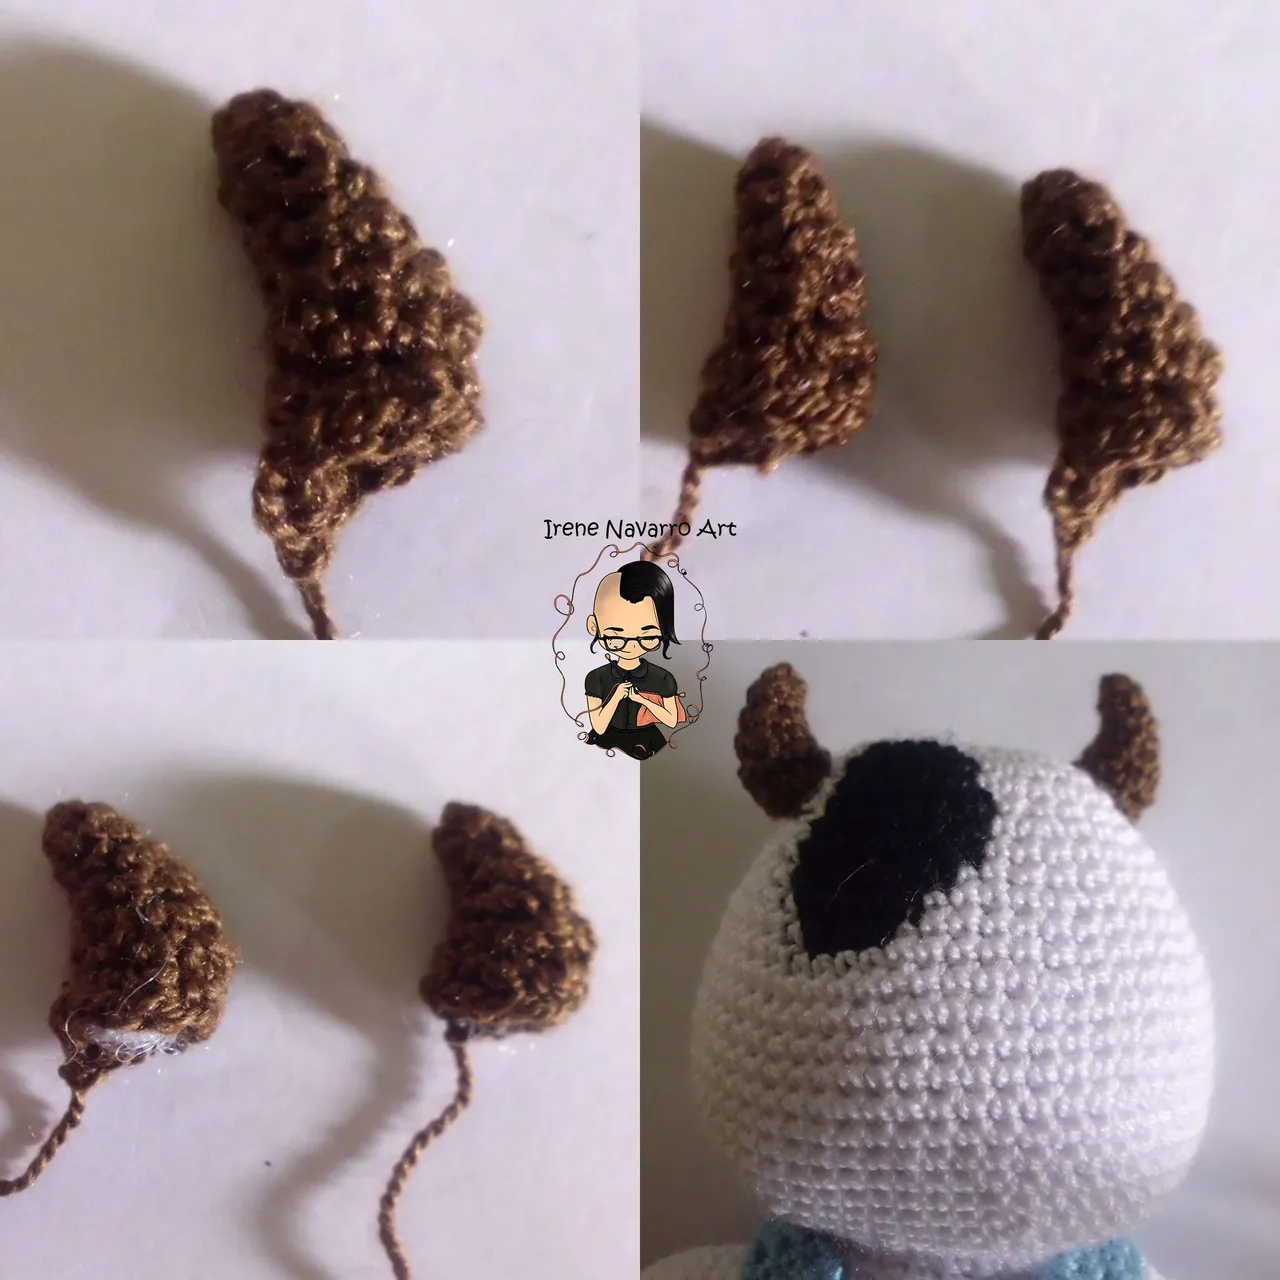
Para los cuernos con hilo marrón tejí 4 puntos bajos en una anillo, tejí una aumento por 4 rondas hasta obtener 8 punto, para crear la curvatura tejí (1 punto bajo, 1 aumento) X2 y (1 punto bajo, 1 disminución) X2. Cerré con un punto deslizado y deje la hebra larga para coser, hice dos iguales rellené con fibra y los cosí a los lados de la cabeza con la aguja de ojal grande.
Para los cuernos con hilo marrón tejí 4 puntos bajos en una anillo, tejí una aumento por 4 rondas hasta obtener 8 punto, para crear la curvatura tejí (1 punto bajo, 1 aumento) X2 y (1 punto bajo, 1 disminución) X2. Cerré con un punto deslizado y deje la hebra larga para coser, hice dos iguales rellené con fibra y los cosí a los lados de la cabeza con la aguja de ojal grande.
Cola / Tail
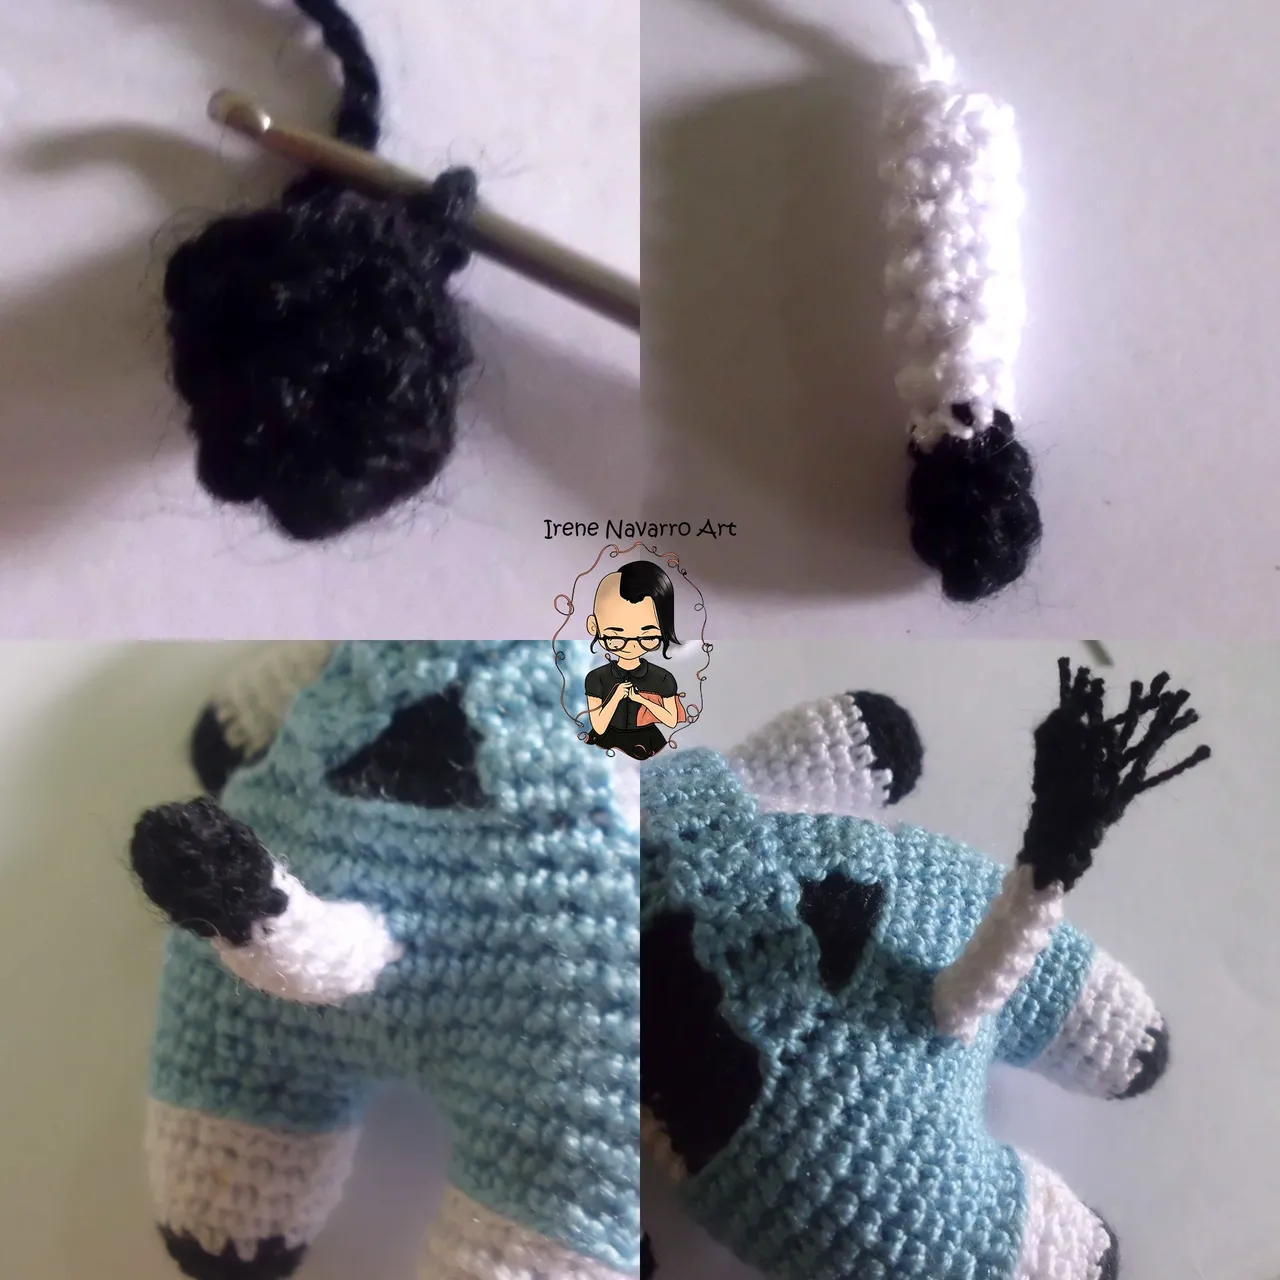
Con hilo negro tejí 6 puntos bajos en un anillo, tejí dos rondas de puntos bajos, cambié a hilo blanco y tejí 6 rondas, cerré con 1 punto deslizado y dejé una hebra larga para coser a la parte de atrás del cuerpo, con hebras de hilo negro hice flecos en la punta de a cola.
With black yarn I worked 6 single crochets in a ring, I worked two rounds of single crochets, changed to white yarn and worked 6 rounds, closed with 1 slip stitch and left a long strand to sew at the back of the body, with strands of black thread, I made fringes at the tip of the tail.
Orejas / Ears
Para las orejas comencé con 4 puntos bajos en un anillo, tejí 4 aumentos hasta obtener 8 puntos, tejí 2 aumentos por tres rondas hasta obtener 14 puntos, tejí dos rondas de puntos bajos, en la última ronda hice dos disminuciones. Cerré con 1 punto deslizado y dejé una hebra larga para coser. Hice dos iguales (una blanca y otra negra) y las cosí a los lados de la cabeza con la aguja de ojal grande.
Para las orejas comencé con 4 puntos bajos en un anillo, tejí 4 aumentos hasta obtener 8 puntos, tejí 2 aumentos por tres rondas hasta obtener 14 puntos, tejí dos rondas de puntos bajos, en la última ronda hice dos disminuciones. Cerré con 1 punto deslizado y dejé una hebra larga para coser. Hice dos iguales (una blanca y otra negra) y las cosí a los lados de la cabeza con la aguja de ojal grande.
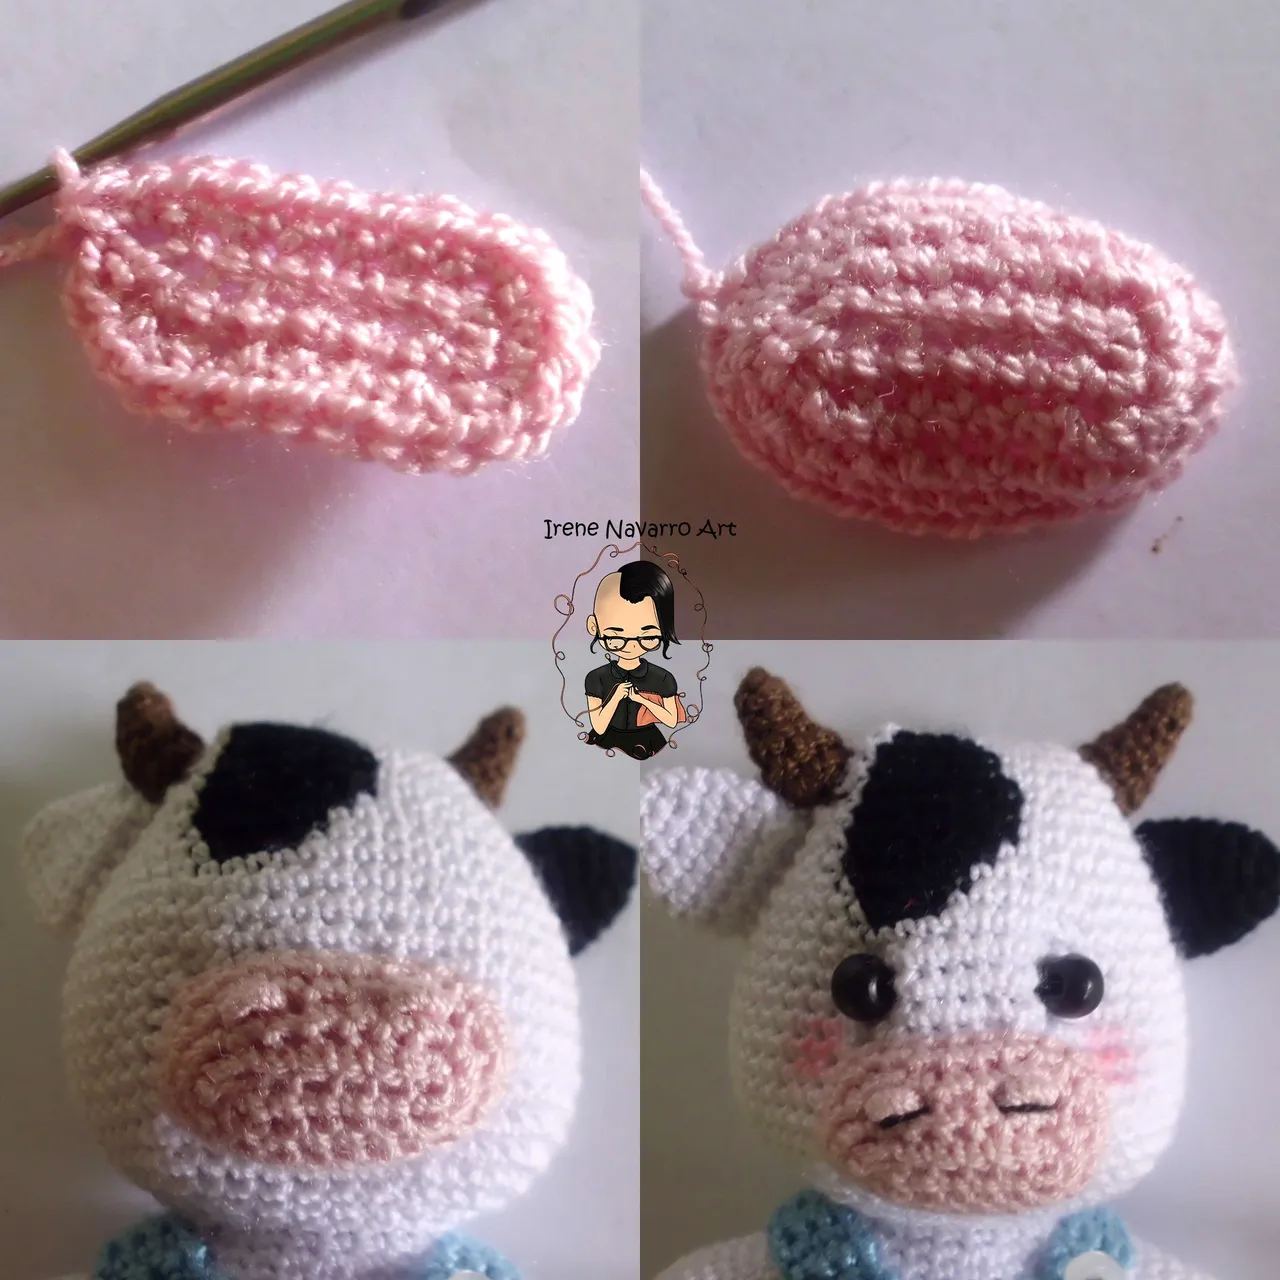
Hocico / Snout
Para el hocico con hilo rosa vieja, tejí 6 cadenas, sobre estas tejí:
1 Ronda: 1 aumento, 4 puntos bajos, 2 aumentos, 4 puntos bajos, 1 aumentos. Total de puntos (16)
2 Ronda: 2 aumentos, 4 puntos, 4 aumentos, 4 puntos bajos, 2 aumentos. Total de puntos (24)
3-4 Rondas: 24 puntos bajos. Cerré con 1 punto deslizado y dejé una hebra larga para coser. Rellene con fibra y cosí el hocico a la cabeza con la aguja de ojal grande. Bordé las fosas nasales con el mismo hilo.
For the muzzle with pink thread, I wove 6 chains, on these I wove:1 Round: 1 increase, 4 double crochet, 2 increase, 4 double crochet, 1 increase. Total points (16)2 Round: 2 increases, 4 stitches, 4 increases, 4 single crochets, 2 increases. Total points (24)3-4 Rounds: 24 single crochets. I closed with 1 slip stitch and left a long strand to sew. Fill with fiber and sew the muzzle to the head with the large buttonhole needle. I embroidered the nostrils with the same thread.
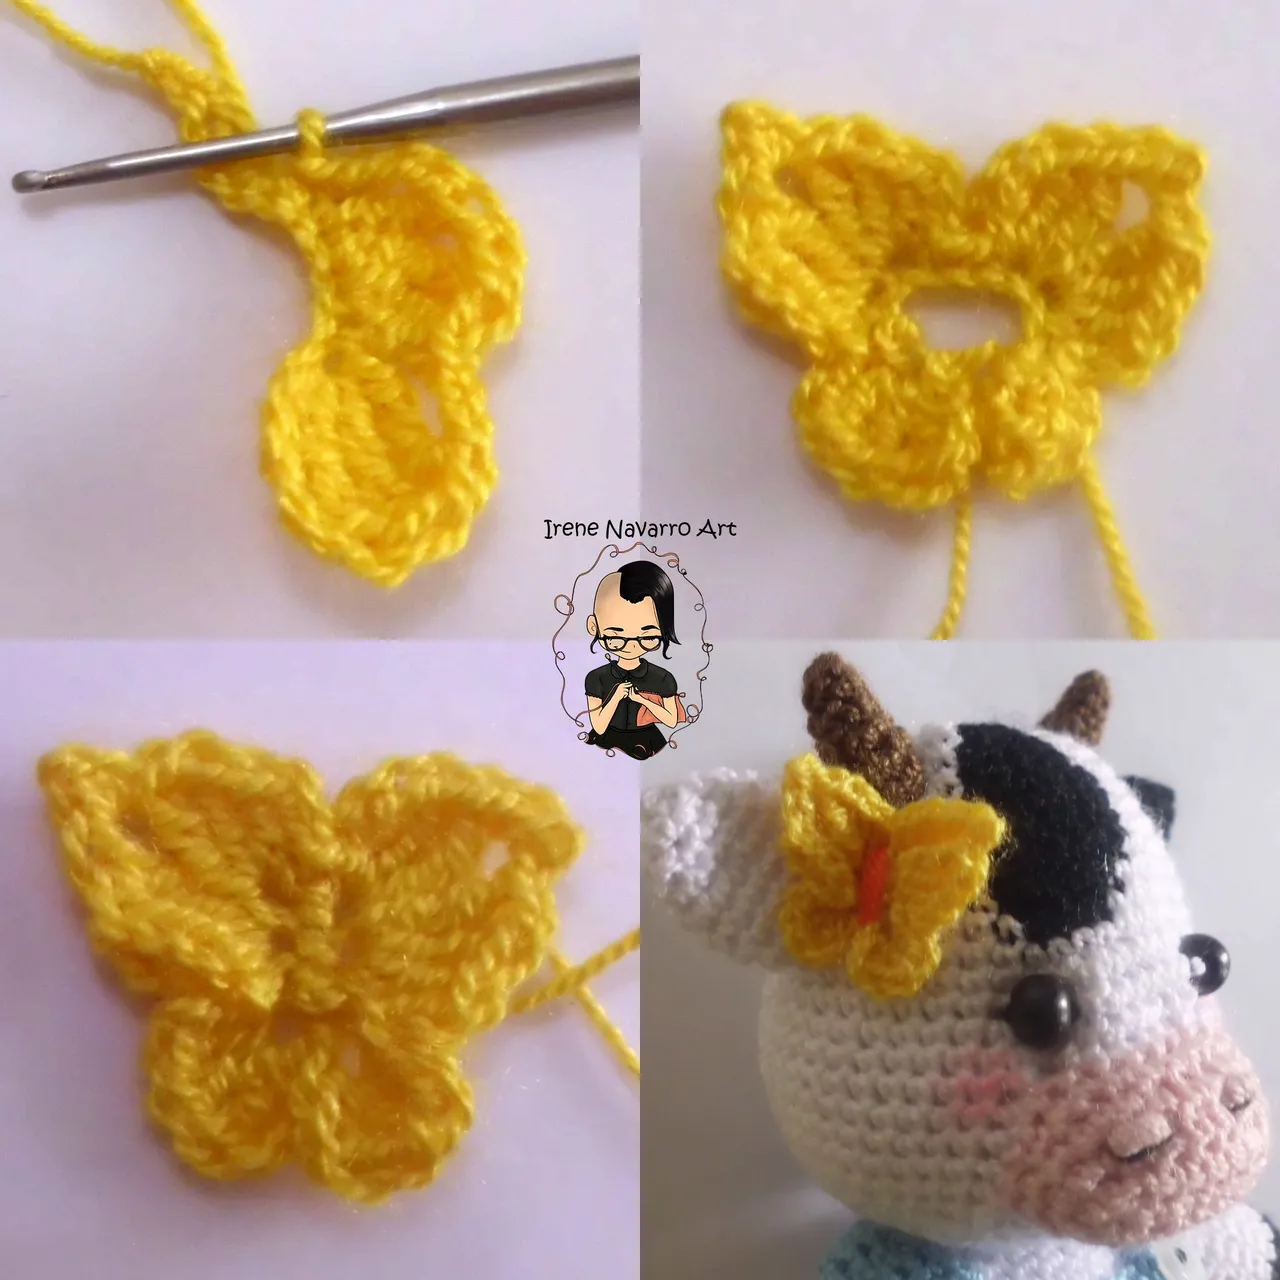
Mariposa / Butterfly
Para tejé la mariposa de la cabeza con hilo amarillo tejí 10 cadenas y sobre estas tejí la siguiente secuencia de puntadas:
Primera ala (tomando el lado del frente de las cadenas)
3 cadenas (para hacer 1 punto alto), 3 puntos altos juntos, 2 cadenas, 1 punto deslizado
2 cadenas, 1 punto alto y 2 puntos altos dobles juntos
2 cadenas y 1 punto bajo en la primera cadena hecha anteriormente
2 puntos altos dobles y 1 punto alto juntos, 2 cadenas, 1 punto deslizado.
Segunda ala (tomando el lado del atrás de las cadenas)
1 punto deslizado, 2 cadenas, 1 punto alto y 2 puntos altos dobles juntos.
2 cadenas y 1 punto bajo en la primera cadena hecha anteriormente.
2 puntos altos dobles y 1 punto alto juntos, 2 cadenas, 1 punto deslizado.
2 cadenas, 3 puntos altos juntos, 3 cadenas y 1 punto deslizado en la cadena de inicio.
Coser la mariposa la cabeza y bordar le centro con hilo naranja.
Coser las perlas e madera para los ojos, pintar las mejillas con tiza pastel.
To knit the butterfly on the head with yellow yarn I knitted 10 chains and on these I knitted the following sequence of stitches:
First wing (taking the front side of the strings)3 chains (to make 1 double crochet), 3 double crochets together, 2 chains, 1 slip stitch2 chains, 1 double crochet and 2 treble crochets together2 chains and 1 single crochet in the first chain made previously2 treble crochets and 1 double crochet together, 2 chains, 1 slip stitch.
Second wing (taking the back side of the strings)1 slip stitch, 2 chains, 1 double crochet and 2 treble crochets together.2 chain and 1 single crochet in the first chain made previously.2 treble crochet and 1 double crochet together, 2 chains, 1 slip stitch.2 chains, 3 double crochet together, 3 chains and 1 slip stitch in the starting chain.
Sew the butterfly on the head and embroider the center with orange thread.Sew the beads and wood for the eyes, paint the cheeks with pastel chalk.
Resultado / Result

Piggy Tutorial
Imágenes tomadas con cámara Casio QV-R100 y editadas en Adobe Photoshop Cs6
Images taken with Casio QV-R100 camera and edited in Adobe Photoshop Cs6
Invítenme un Café/Support Me on Ko-Fi
Si te gusta mi contenido y quieres apoyarme a seguir dibujando, pintando, escribiendo y tejiendo puedes invitarme un Ko-fi en el enlace que les dejo aquí abajo, les recuerdo que es fácil, se usa Paypal y Tarjeta. ¡Muchas gracias a todos!
If you want to support my art you can also make donations for the value of a coffee (Ko-Fi) this uses Paypal, it is simple and with it I will be able to continue knitting and buying materials to create and share my publications

https://ko-fi.com/irenenavarroart
Espero les haya gustado. Les invito a leer mis próximas publicaciones y siempre estaré dispuesta a responder sus preguntas y comentarios, también pueden seguirme y contactarme en cualquiera de mis redes sociales. ¡Muchas gracias!
I hope you liked it. I invite you to read my next publications and I will always be willing to answer your questions and comments, you can also follow me and contact me on any of my social networks. Thank you!