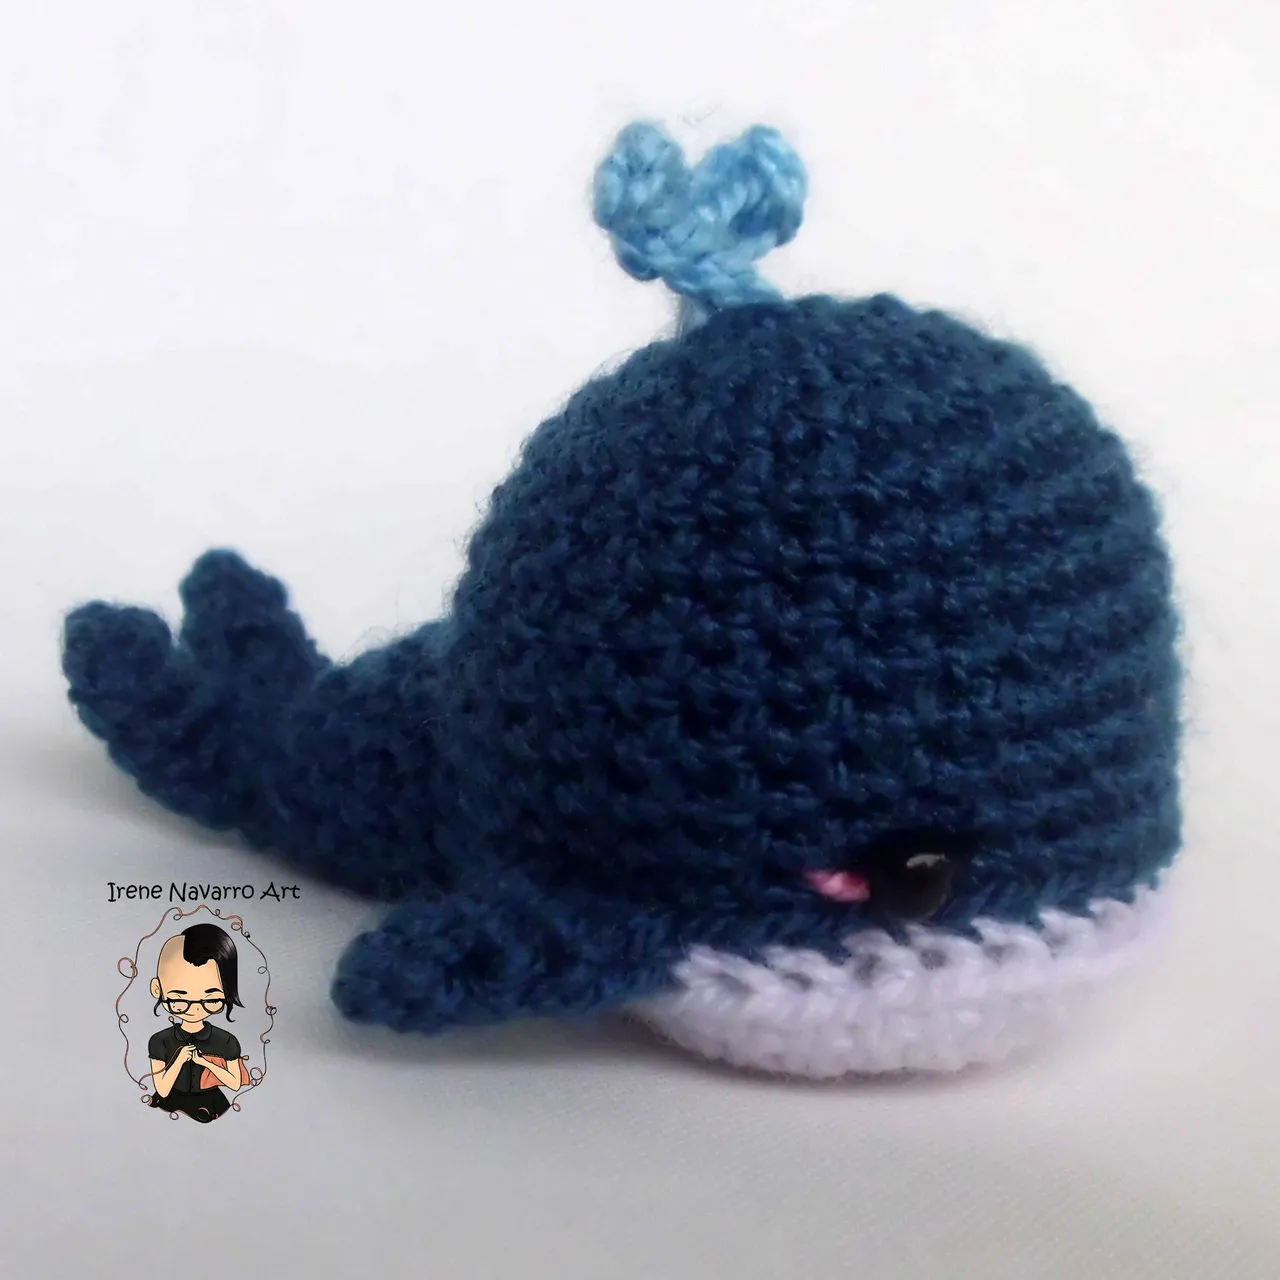
Saludos comunidad, hace unos días hice esta pequeña amigurumi para darle mi toque personal a una publicación sobre la ballenas de Hive, pero no podía dejar pasar la ocasión para compartirles el tutorial, puesto que todos amantes de crochet en Hive merecen tener su propia ballena tejida para motivarles a creer cada día más en la plataforma.
Es un tutorial muy sencillo ideal para las personas que saben lo básico del tejido como lo es tejer puntadas dentro de anillos para iniciar, punto bajo, punto deslizado, aumento y disminución, si saben eso ya están listos para hacer su ballena sin ninguna complicación porque es explico paso a paso el procedimiento ronda por roda, así que animo a todas esas personas que me comentan que saben o sabían tejer pero que nunca han hecho un amigurumi o nunca han practicado lo suficiente, esta es una oportunidad para prender con un tutorial simple, también les recuerdo que si tienen otro tamaño de ganchillo, pueden seguir las mismas instrucciones con un hilo o estambre acorde para el tamaño que tengan. Espero les guste y su alguna persona lo hace, amaría ver el resultado si está dispuesto a compartirlo.
Greetings community, a few days ago I made this little amigurumi to give my personal touch to a post about the Hive whales, but I could not miss the opportunity to share with you the tutorial, since all Hive crochet lovers deserve to have their own knitted whale to motivate them to believe more and more in the platform.
It is a very simple tutorial ideal for people who know the basics of knitting such as knitting stitches inside rings to start, single crochet, slip stitch, increase and decrease, if you know that you are ready to make your whale without any complication because it is explained step by step procedure round by round, so I encourage all those people who tell me that they know or knew how to knit but have never made an amigurumi or have never practiced enough, this is an opportunity to learn with a simple tutorial, I also remind you that if you have another size of crochet, you can follow the same instructions with a yarn according to the size you have. I hope you like it and if someone makes it, I would love to see the result if you are willing to share it.

Materiales / Materials
- Hilo acrílico de color azul oscuro, azul claro, blanco.
- Fibra sintética o cualquier otro material para rellenar.
- Aguja de ojal grande
- Ganchillo # 4 (1,25mm)
- 2 perlas de plástico
- Acrylic yarn in dark blue, Claire blue, white.
- Synthetic fiber or any other material for stuffing.
- Large buttonhole needle
- Crochet hook # 4 (1,25mm)
- 2 plastic beads
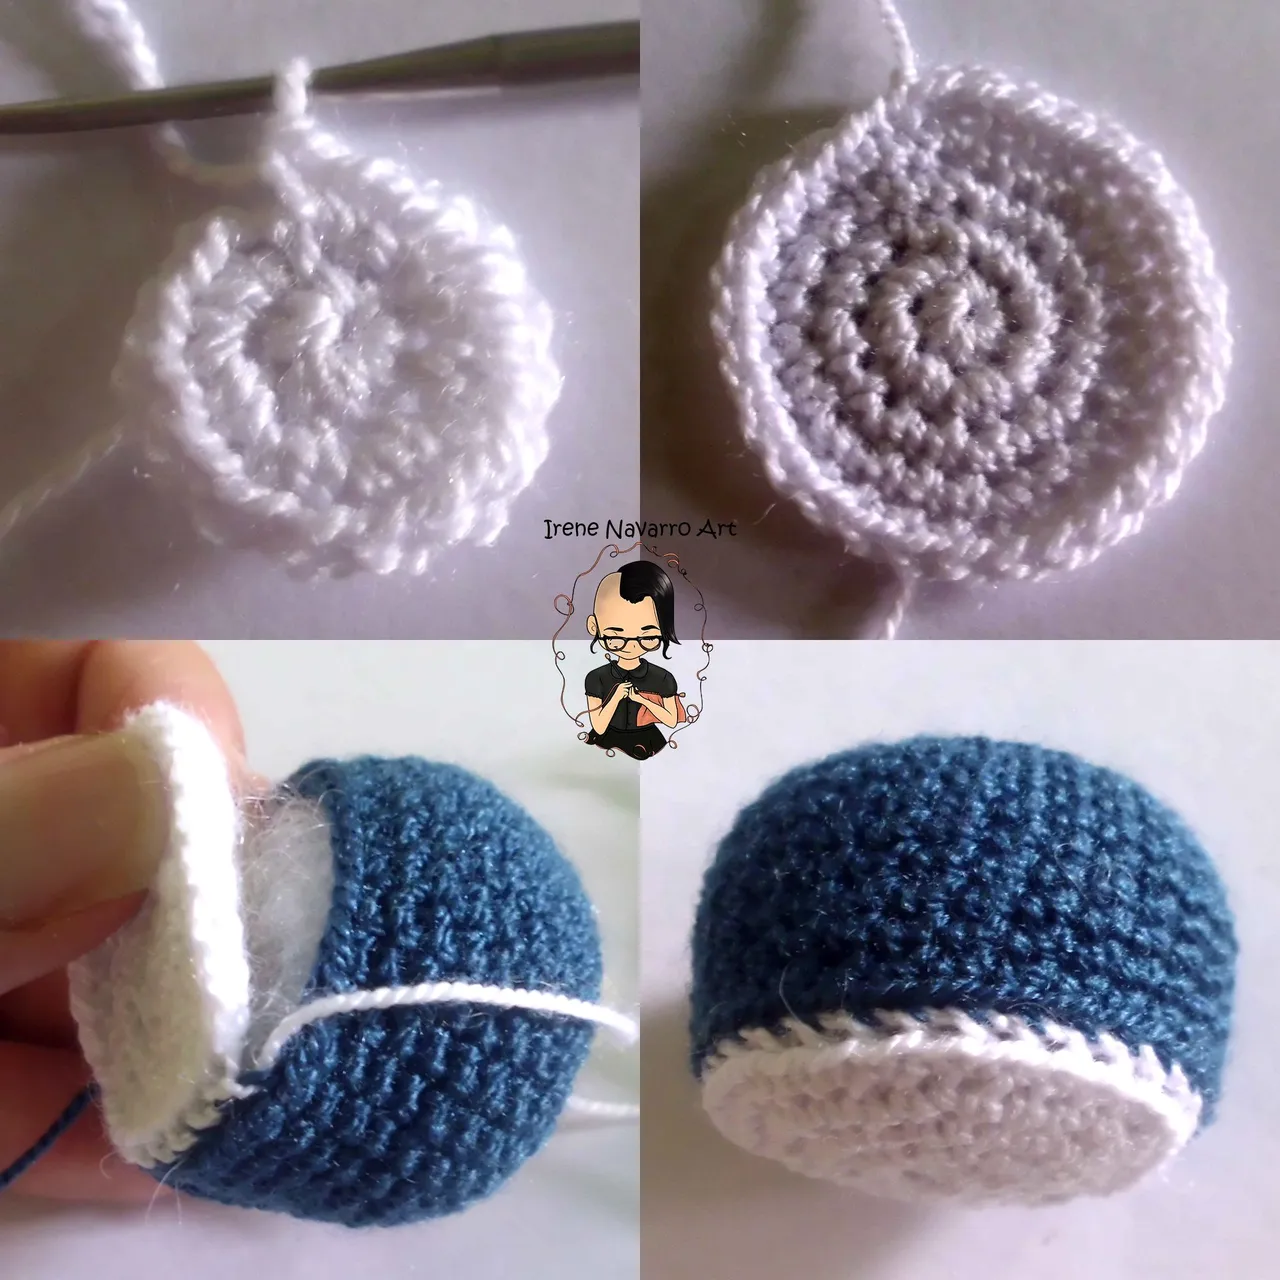
Cabeza / Head
Primera parte
Con hilo azul tejer 6 puntos bajos en un anillo
1 Ronda: Tejer 6 aumentos. Total de puntadas (12)
2 Ronda: Tejer 1 punto bajo, 1 aumento, repetir. Total de puntadas (18)
3 Ronda: Tejer 2 puntos bajos, 1 aumento, repetir. Total de puntadas (24)
4 Ronda: Tejer 3 puntos bajos, 1 aumento, repetir. Total de puntadas (30)
5-12 Ronda: Tejer 30 puntos bajos.
Cerrar con 1 punto deslizado y dejar una hebra larga para coser.
First part
With blue yarn knit 6 single crochets in a ring1 Round: Knit 6 increases. Total stitches (12)2 Round: Knit 1 single crochet, 1 increase, repeat. Total stitches (18)3 Round: Knit 2 single crochets, 1 increase, repeat. Total stitches (24)4 Round: Knit 3 single crochets, 1 increase, repeat. Total stitches (30)5-12 Round: Knit 30 single crochets.Close with 1 slip stitch and leave a long strand to sew.

Segunda parte
Con hilo blanco tejer 8 puntos bajos en un anillo.
1 Ronda: Tejer 8 aumentos. Total de puntadas (16)
2 Ronda: Tejer 1 punto bajo, 1 aumento, repetir. Total de puntadas (24)
3 Ronda: Tejer 3 puntos bajos, 1 aumento, repetir. Total de puntadas (30)
4 Ronda: Tejer 30 puntos bajos. Cerrar con 1 punto deslizado y dejar una hebra larga para coser.
Rellenar con fibra y con la aguja de ojal grande coser la primera parte a la segunda tomando el lado de atrás de las puntadas.
Second part
With white yarn work 8 single crochets in a ring.1 Round: Increase 8. Total stitches (16)2 Round: Knit 1 single crochet, 1 increase, repeat. Total stitches (24)3 Round: Knit 3 single crochets, 1 increase, repeat. Total stitches (30)4 Round: Knit 30 single crochets. Close with 1 slip stitch and leave a long strand to sew.Fill with fiber and with the large buttonhole needle sew the first part to the second, taking the back side of the stitches.
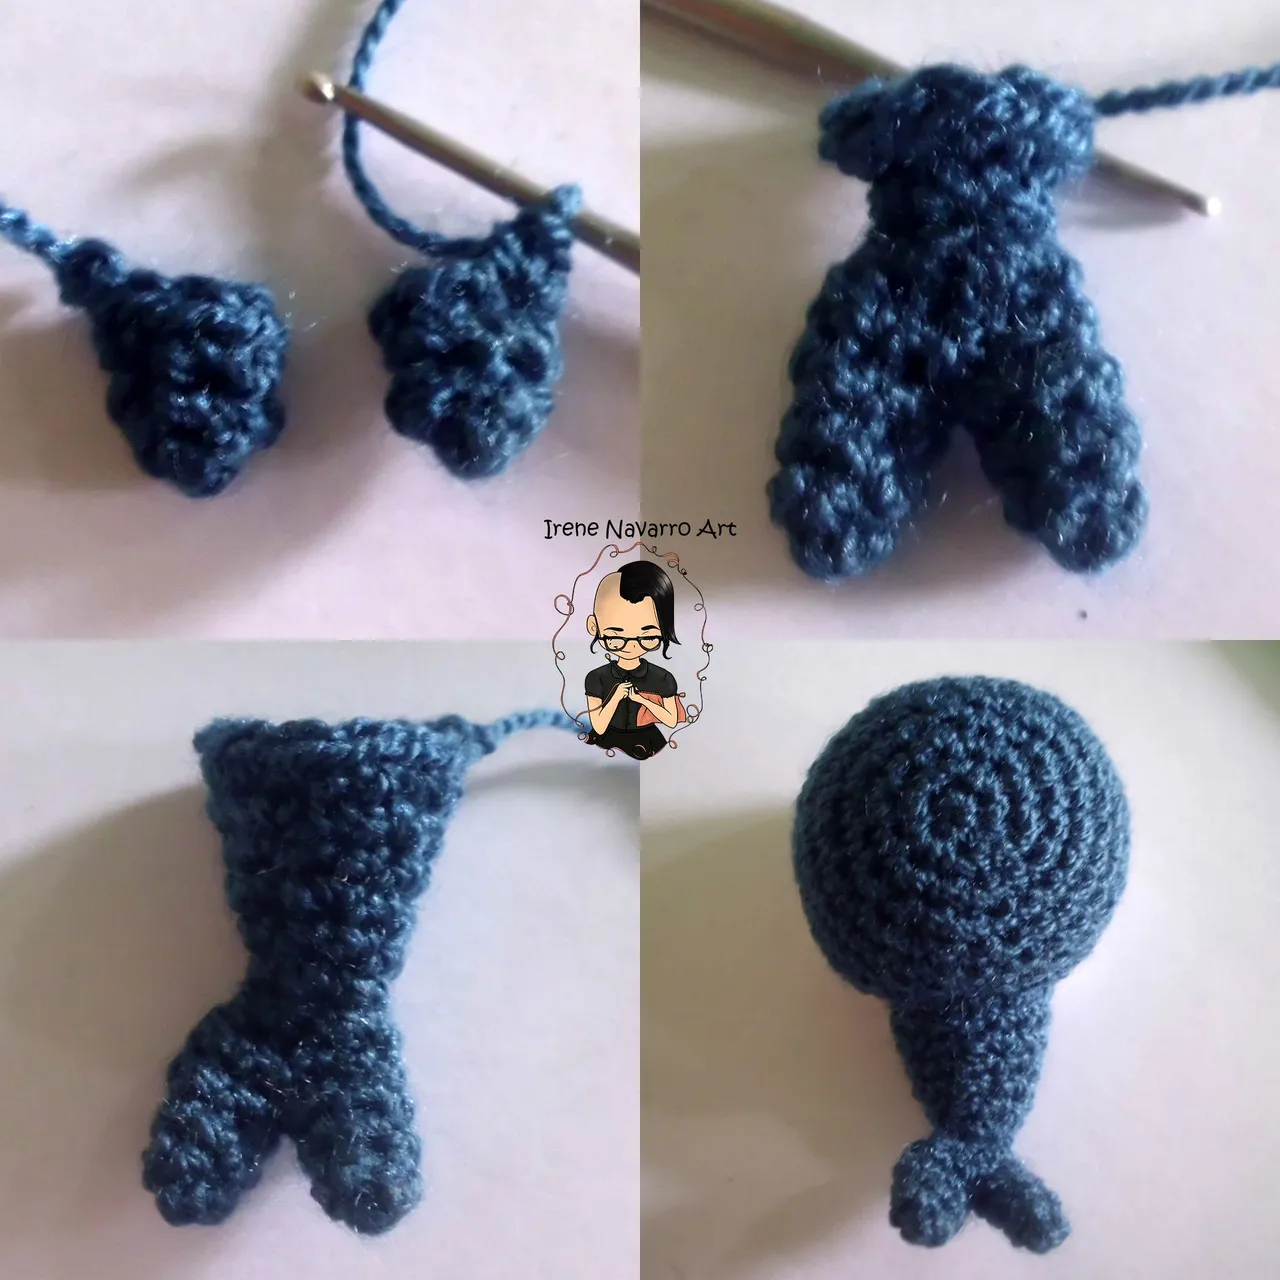
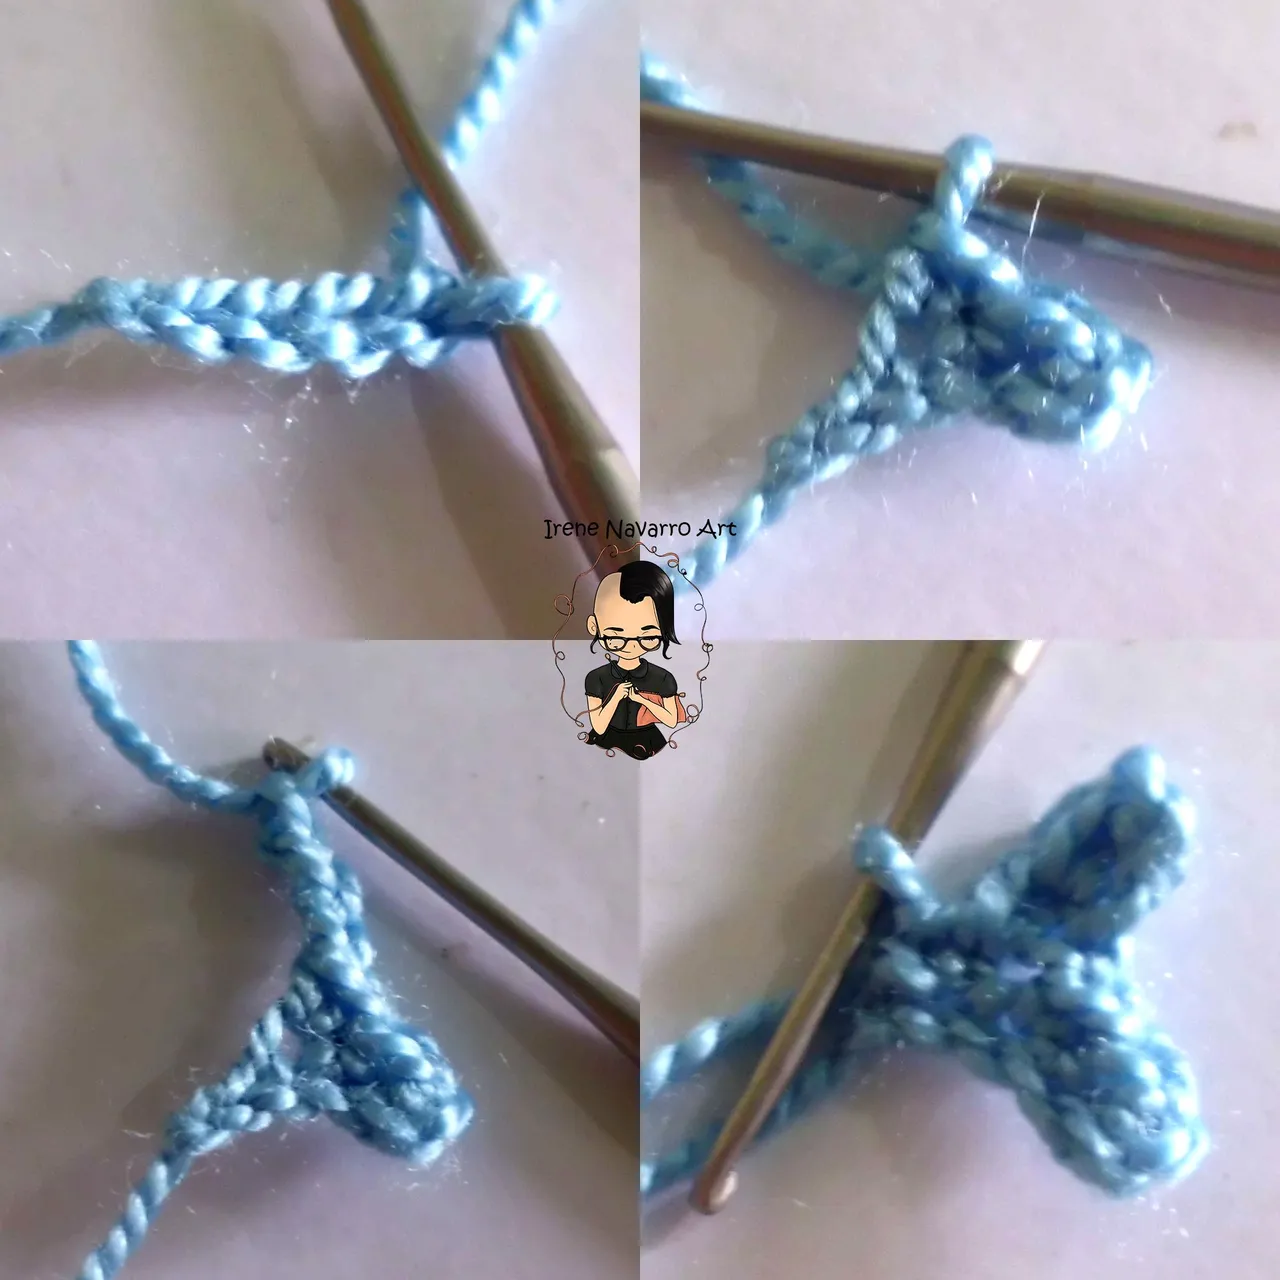
Cola / Tail
Con hilo azul tejer 4 puntos bajos en un anillo.
1 Ronda: Tejer 3 puntos bajos, 1 aumento. Total de puntadas (5)
2 Ronda: Tejer 2 puntos bajos, 1 aumento, 2 puntos bajos. Total de puntadas (6)
Hacer dos parte iguales y unirlas en la siguiente ronda
3 Ronda: Tejer 12 puntos bajos
4 Ronda: Tejer 1 punto bajo, (2 puntos bajos, 1 disminución) X2, 1 punto bajo. Total de puntadas (9)
5 Ronda: Tejer 1 puntos bajo, 1 disminución, repetir. Total de puntadas (6)
6 Ronda: Tejer 3 aumentos, 3 puntos bajos. Total de puntadas (9)
7 Ronda: Tejer 9 puntos bajos.
8 Ronda: Tejer 1 punto bajo, 1 aumento, 2 puntos bajos, 1 aumento, 4 puntos bajos. Total de puntadas (11)
9 Ronda: Tejer 11 puntos bajos.
10 Ronda: Tejer (1 punto bajo, 1 aumento) X3, 5 puntos bajos. Total de puntadas (14)
11 Ronda: Tejer 14 puntos bajos. Cerrar con 1 punto deslizado y dejar una hebra larga para coser.
Rellenar con fibra y con la aguja de ojal grande coser la cola a la cabeza de la ballena.
With blue yarn work 4 single crochets in a ring.1 Round: Knit 3 single crochets, 1 increase. Total stitches (5)2 Round: Knit 2 single crochets, 1 increase, 2 single crochets. Total stitches (6)Make two equal parts and join them in the next round3 Round: Knit 12 single crochets4 Round: Knit 1 single crochet, (2 single crochets, 1 decrease) X2, 1 single crochet. Total stitches (9)5 Round: Knit 1 single crochet, 1 decrease, repeat. Total stitches (6)6 Round: Knit 3 increases, 3 single crochets. Total stitches (9)7 Round: Knit 9 single crochets.8 Round: Knit 1 single crochet, 1 increase, 2 single crochet, 1 increase, 4 single crochet. Total stitches (11)9 Round: Knit 11 single crochets.10 Round: Knit (1 single crochet, 1 increase) X3, 5 single crochets. Total stitches (14)11 Round: Knit 14 single crochets. Close with 1 slip stitch and leave a long strand to sew.Fill with fiber and with the large buttonhole needle sew the tail to the head of the whale.
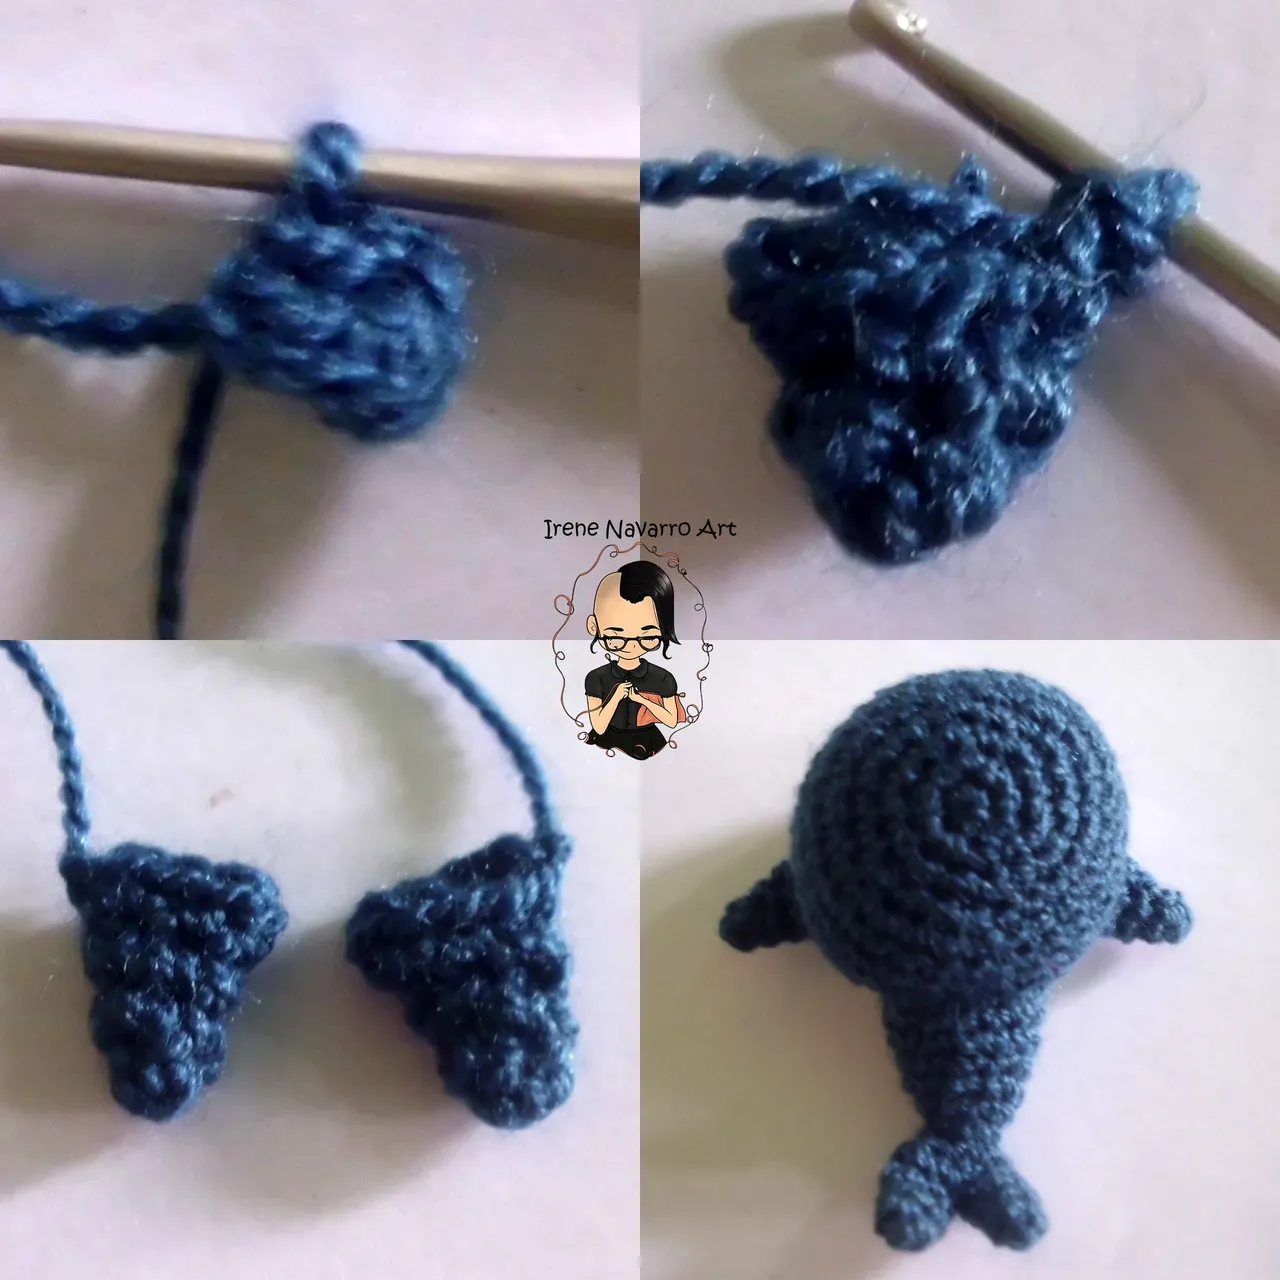
Aletas / Flipper
Con hilo azul tejer 4 puntos bajos en un anillo
1 Ronda: Tejer 3 puntos bajos, 1 aumento. Total de puntadas (5)
2 Ronda: Tejer 4 puntos bajos, 1 aumento. Total de puntadas (6)
3 Ronda: Tejer 2 puntos bajos, 1 aumento, repetir. Total de puntadas (8)
Cerrar con 1 punto deslizado y dejar una hebra larga para coser.
Hacer dos iguales y coserlas a los lados de la ballena.
With blue yarn knit 4 single crochets in a ring1 Round: Knit 3 single crochets, 1 increase. Total stitches (5)2 Round: Knit 4 single crochets, 1 increase. Total stitches (6)3 Round: Knit 2 single crochets, 1 increase, repeat. Total stitches (8)Close with 1 slip stitch and leave a long strand to sew.Make two the same and sew them to the sides of the whale.
Detalles / Details
Con hilo azul claro hacer el agua que expulsa la ballena por el espiráculo u orificio nasal ubicado en la cabeza, el mismo se realiza de la siguiente forma:
Tejer 5 cadenas
Saltar 2 cadenas y tejer 2 puntos bajos en las siguientes dos cadenas.
Tejer 4 cadenas
Saltar 2 cadenas y tejer 2 puntos bajos en las siguientes dos cadenas.
Tejer 1 punto bajo en la cadena inicial. Dejar una hebra para coser.
Con la aguja de ojal grande coser a la parte superior de la cabeza.
Coser as perlas de platico para hacer los ojos de la ballena y es opcional hacer una línea de hilo rosado debajo del ojo para resaltar a mirada.
With light blue thread, make the water that the whale expels through the blowhole or nostril located in the head, it is done as follows:Knit 5 chainsSkip 2 chains and work 2 single crochets in the next two chains.Knit 4 chainsSkip 2 chains and work 2 single crochets in the next two chains.Work 1 single crochet in the starting chain. Leave a thread to sew.With the large buttonhole needle sew to the top of the head.Sew the silver beads to make the whale's eyes and it is optional to make a line of pink thread under the eye to highlight the look.
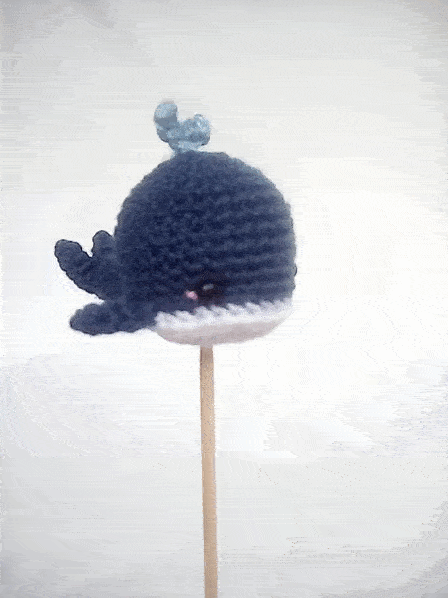
Resultado / Result
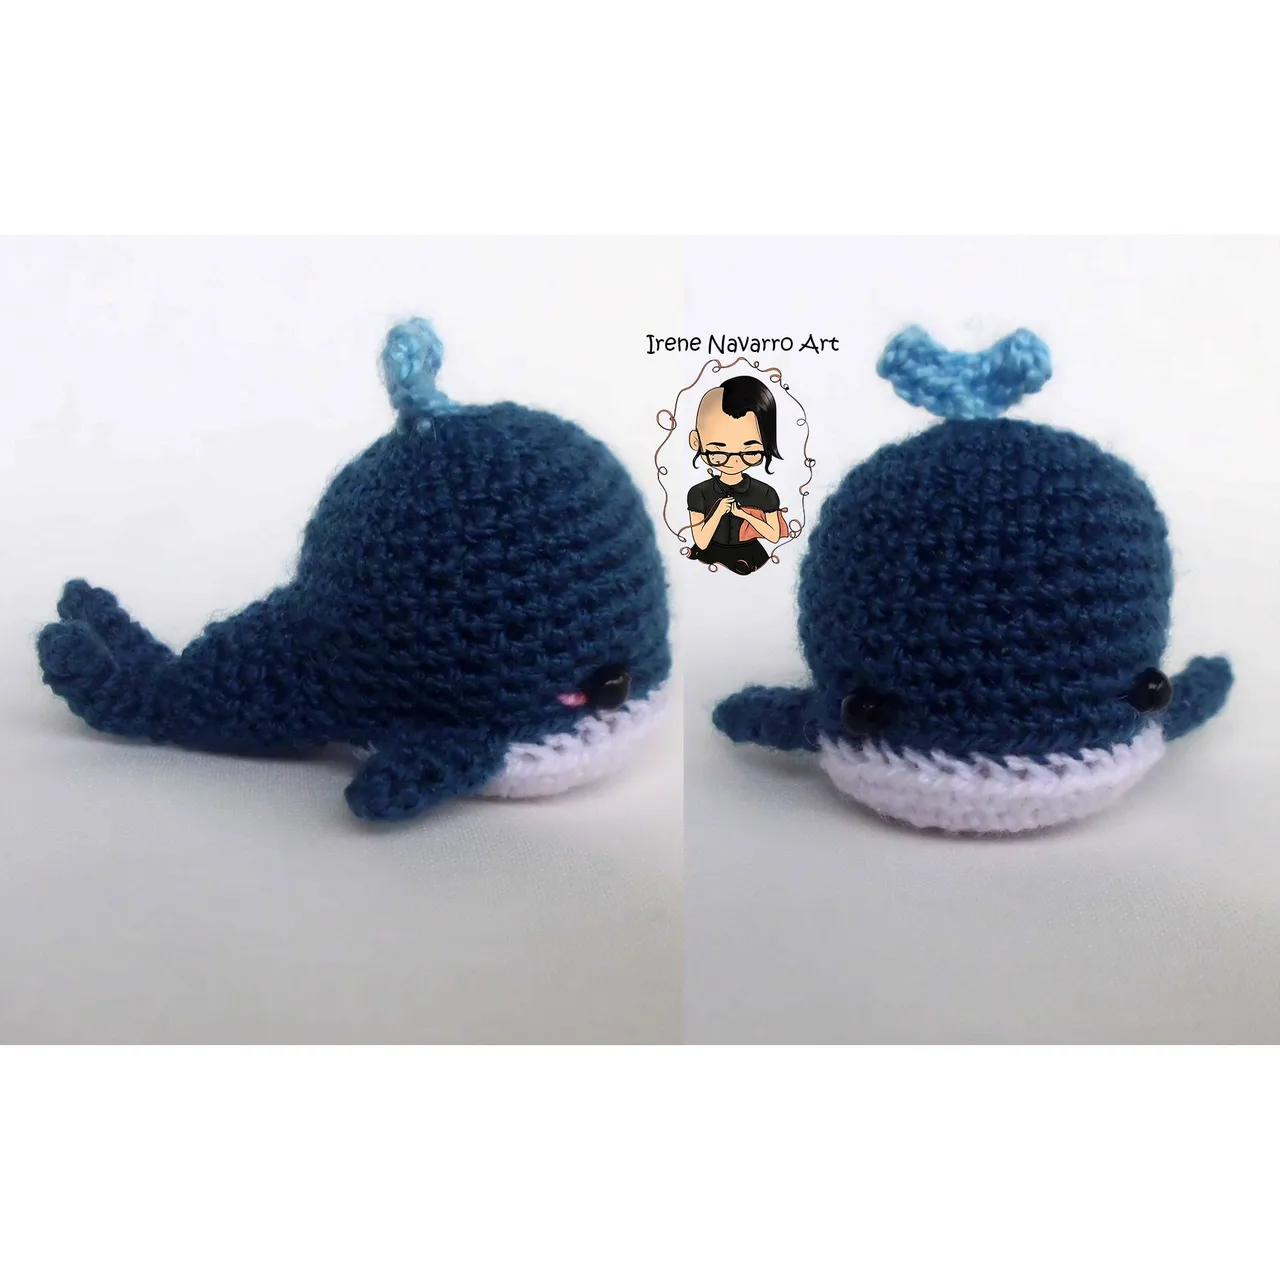
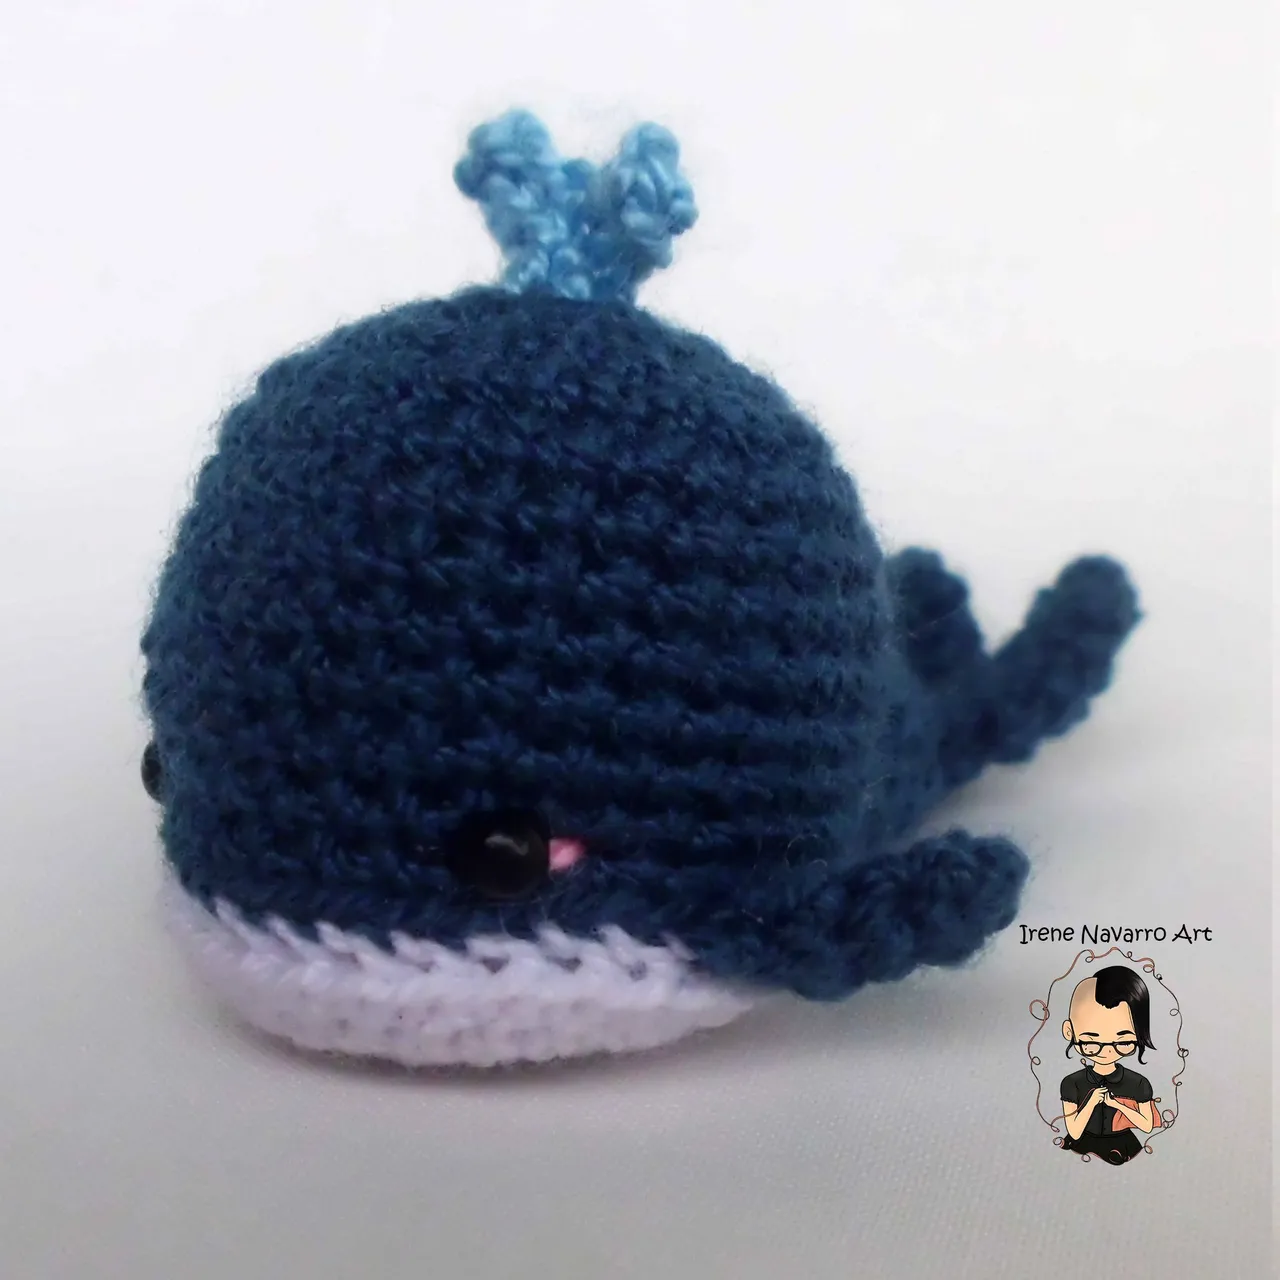
Imágenes tomadas con cámara Casio QV-R100 y editadas en Adobe Photoshop Cs6
Images taken with Casio QV-R100 camera and edited in Adobe Photoshop Cs6
Invítenme un Café/Support Me on Ko-Fi
Si te gusta mi contenido y quieres apoyarme a seguir dibujando, pintando, escribiendo y tejiendo puedes invitarme un Ko-fi en el enlace que les dejo aquí abajo, les recuerdo que es fácil, se usa Paypal y Tarjeta. ¡Muchas gracias a todos!
If you want to support my art you can also make donations for the value of a coffee (Ko-Fi) this uses Paypal, it is simple and with it I will be able to continue knitting and buying materials to create and share my publications

https://ko-fi.com/irenenavarroart
Espero les haya gustado. Les invito a leer mis próximas publicaciones y siempre estaré dispuesta a responder sus preguntas y comentarios, también pueden seguirme y contactarme en cualquiera de mis redes sociales. ¡Muchas gracias!
I hope you liked it. I invite you to read my next publications and I will always be willing to answer your questions and comments, you can also follow me and contact me on any of my social networks. Thank you!