
Buen dia para toda esta bella gente de la comunidad de costura, esperando cada dia sea mejor con mucho entusiasmo y buena salud.
Good morning to all these beautiful people in the sewing community, hoping every day is better with great enthusiasm and good health.
Hoy quiero mostrar como hice mis scrunchies o colitas para el cabello, se que ya se ha publicado muchos de estos, pero cada quien tiene su forma o manera de hacerlo, y de las telas que mejor creemos que se pueda hacer, y como tengo el cabello largo siempre las usos por que son muy comodas de usar y no se me enreda el cabello, como en la colitas de goma o las que son muy finitas.
Today I want to show how I made my hair scrunchies or ponytails, I know that many of these have already been published, but everyone has their way or way of doing it, and the fabrics that we think can best be made, and how I have the I always use them for long hair because they are very comfortable to wear and my hair doesn't get tangled, like in the rubber bands or the ones that are very thin.
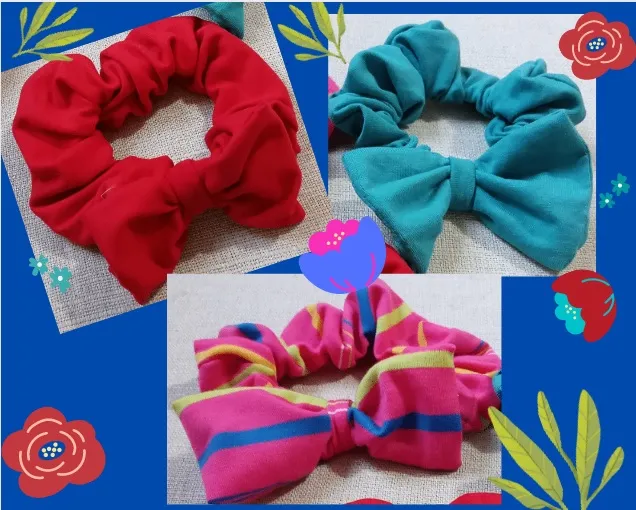
Estas colitas las hice de tela de franela y me gusto mucho los colores que tenia, asì que hice tres de estos colores, cada una con su lazo de la misma tela, todo es cuestión de gusto de cada quien, siempre llevo en mi bolso o cartera una colita adicional, nunca esta de más, para cualquier ocasión.
I made these pigtails out of flannel fabric and I really liked the colors it had, so I made three of these colors, each one with its own bow of the same fabric, everything is a matter of personal taste, I always carry in my bag or wallet an additional tail, never hurts, for any occasion.
Entonces empiezo con mis paso a paso en este diseño.
So I start with my step by step in this design.
Mis materiales son:
Retazos de telas de franelas.
Elastica de 1/2cm de ancho.
Hilos, agujas, maquina de coser, cinta metrica.
My materials are:
Scraps of flannel fabrics.
1/2cm wide elastic.
Threads, needles, sewing machine, tape measure.

Empiezo por cortar unas tiras largas de 50cm de largo, este largo puede variar, tambien podria ser de 48cm o muy bien 52, dependiendo tambien si la tela alcanza a estas medidas, yo tuve que empatar una de estas telas para poder hacer la colita. Y de ancho la hice de 9cm.
I start by cutting some long strips 50cm long, this length can vary, it could also be 48cm or very well 52, also depending on whether the fabric reaches these measurements, I had to tie one of these fabrics to be able to make the tail. And I made it 9cm wide.

Una vez teniendo esta tira ya cortada, coloco las puntas juntas para poder coser a la maquina, enfrentendo las telas y asi pasar la costura, quedara como una correa toda cosida, luego coloco la parte del frente de la tela hacia arriba, y voy acomodando la otra parte que queda en el centro la voy doblando que quede bien doblada para no coserla, y coloco las orillas juntas, voy cosiendo y voy dandole vuelta a esta tira hasta llegar a la costura que empecé y dejo como dos o tres centimetros de abertura, para luego voltear la tira.
Once I have this strip already cut, I place the ends together to be able to sew to the machine, facing the fabrics and thus pass the seam, it will be like a sewn strap, then I place the front part of the fabric upwards, and I am accommodating I fold the other part that remains in the center so that it is well folded so as not to sew it, and I place the edges together, I sew and turn this strip until I reach the seam that I started and leave about two or three centimeters of opening , then flip the strip.


Despues de volteada quedara como en la foto, y por esa abertura voy pasando la elastica con un gancho de pelo o un imperdible, esta elastica la corto a unos 18cm de largo y luego la coso para que no se suelte.
Ya la elastica dentro de la tela procedo a coser la parte de la abertura, con una sobre costura a maquina.
After flipping it will be as in the photo, and through that opening I pass the elastic with a hair clip or a safety pin, I cut this elastic about 18cm long and then I sew it so that it does not come loose.
Already the elastic inside the fabric I proceed to sew the part of the opening, with a machine overseam.


Para el lazo corto un rectangulo de 12cm por 10cm
La doblo y hago una costura pero tambien dejo una abertura, luego coloco y acomodo bien este rectangulo dejando esta costura en el centro, y voy cosiendo de los lados, y por la abertura para despues voltear.
For the short bow a rectangle of 12cm by 10cm
I fold it and make a seam but I also leave an opening, then I place and arrange this rectangle well, leaving this seam in the center, and I sew from the sides, and through the opening and then turn it over.

Una vez teniendo este rectangulo, lo coso a mano a la colita, y coloco tambien otra tira pequeña sobre las dos y asi quedara como una cinta tapando los detalles.
Once I have this rectangle, I sew it by hand to the tail, and I also place another small strip on top of the two so it will look like a ribbon covering the details.


Gracias por su visita y leer mi publicacion, esperando haya sido de su agrado, ya que lo hice con mucho cariño, hasta la proxima, chau!
Thank you for your visit and reading my publication, hoping it has been to your liking, since I did it with great care, until next time, bye!
Las fotos son de mi autoria, con mi celular Tecno Spark go.
Traductor deepl.
Diseño canva.
The photos are my own, with my Tecno Spark go cell phone.
Translator deepl.
Canvas design.