Vidulum Validator Installation and Server Setup Guide
To avoid repeating something that is already well covered, first see the current guide in setting up a Validator Node.
https://vidulum.app/docs/getting-started/mainnet.html
Server Requirements
- 2 CPU
- 4GB RAM
- +300GB SSD or NVME Storage Space(plus ~300GB/yr)
- 15000 VDL
- Ubuntu Server 20.04.3 LTS
- Dedicated (Shared hosting will have performance issues)
Hosting at Home(Not Recommended)
If you are choosing to host your validator at home, I recommend the following:
Not doing it- Inform your stakers you run a home set up as part of your validator description
- Use a UPS
- Add Tethering capability, if your internet goes down, attempt to continue to sign blocks via your mobile
- Think like a data center, you potentially risk others Vidulum staked in you
- Did I already recommend to not do this? ;)
This is of course my personal opinion, not everyone shares this view and I understand that.
Picking a Host(Recommended)
What To look for in a Host?
- Initial Costs
- Block Drive costs looking to the future
- Clones / Backups
- SSD or NVME Drives?
- Shared or Dedicated?
- Hosting features: DNS, Firewall, Loadbalancing
- Ease of Use
- Provider Redundancy and Historical Uptimes
- Comment below with what you think should be here!
At the time of writing this, most VPS shared or dedicated hosting with block storage addition, were all close to costing the same. I would just be on the lookout for any great coupons or discounts.
I have a Linode referral link and if you sign up with your Google or GitHub account, you will get $100 in credit to try their service. This is a no-brainer - Basically a 2 months free Vidulum Validator Trial Period!!!
https://www.linode.com/?r=d9c9099f123b68c9b4fb5ac3bd999c681ca3601e
Linode has NVME block storage available in a few locations. You will want to pick a location that uses NVME for block storage. IE: Atlanta, GA.
Linode also provides a firewall that will exist on top and before your node. This is extremely helpful in DDOS attacks.
See my recent migration blog, I go over why I migrated from OVH to Linode.
Drive Requirements and Performance
Corey has currently stated that the expected growth rate of the blockchain as it currently stands, will grow at a rate of 300GB per year. This is a large responsibility to maintain when you are considering choosing a hosting provider. The end goal is to provide the best performing server for your stakers so they do not ever need to worry about slashing events.
I recommend starting with a 300GB block storage drive. You will want to test the performance of your drive using the following command:
hdparam -tT /dev/DEVICE
Where DEVICE is where you would store the Vidulum blockchain.
My current results are:
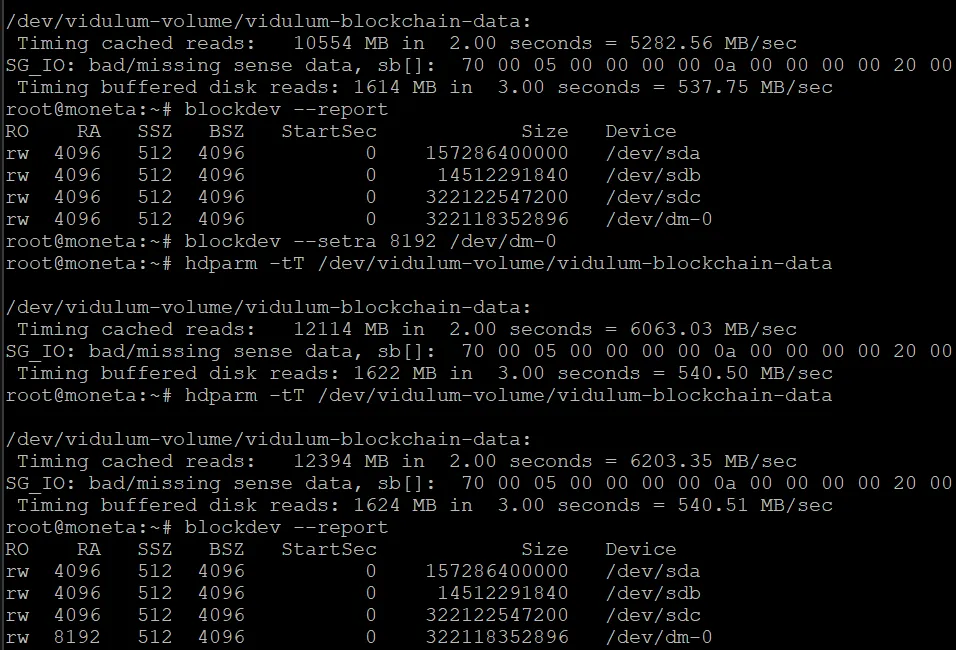
I have also changed my read-ahead value as well.
Planning for the Future
A blogged intention for you running your validator would be a good way for you to outline your plan for the future of your Validator. Whatever that is and may mean to you. This will help staker's when looking to choose a validator they want to stake in.
My current Intentions Blog Post
CPU, RAM, and Network Performance
- 2 CPU
- 4GB RAM
- +300GB SSD or NVME Storage Space(~25GB/mo)
- 1000GB/Mo Transfer (Currently a rough estimate)
- Ubuntu Server 20.04.3 LTS
- Dedicated (Shared hosting will have performance issues)
Basically STABILITY > FEATURE UPDATE
It's recommended to do a full update every month with the recommended OS.
apt-get update && apt-get upgrade
Configuring Your Server
Head over to Linode and get your $100 credit using my referral link. Don't start a server just yet, just get your account created.
We need some tools on the machine we will use to Administrate from.
Download Putty: https://www.chiark.greenend.org.uk/~sgtatham/putty/latest.html
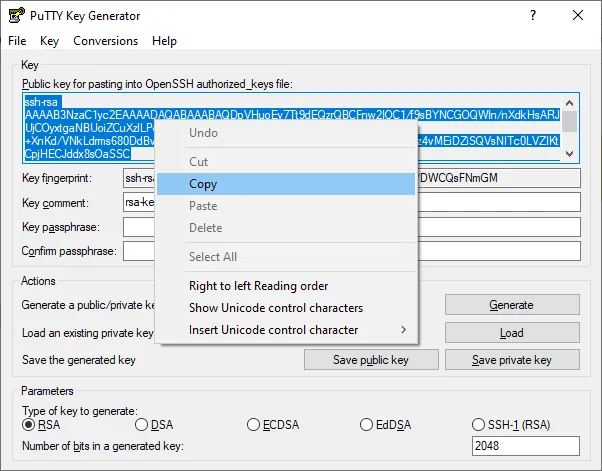
Make your ssh private and public key.
- Click Start and run 'PuttyGen'
- Default RSA & 2048 are fine
- Click Generate
- Save public and private key
- Leave window open
- Right click on 'Key' background, select all, and copy
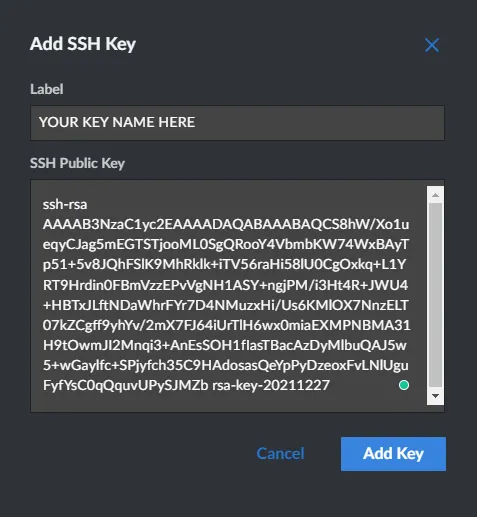
- Go to your SSH Keys on Linode, https://cloud.linode.com/profile/keys
- Cut and Paste the key we copied into the "SSH Public Key" Field
- Name your Key appropriately - Vidulum Mainnet - SERVERNAME
- Back to PuttyGen, Save both your public and private key with the above name you chose for easy identifying
- Backup your keys!
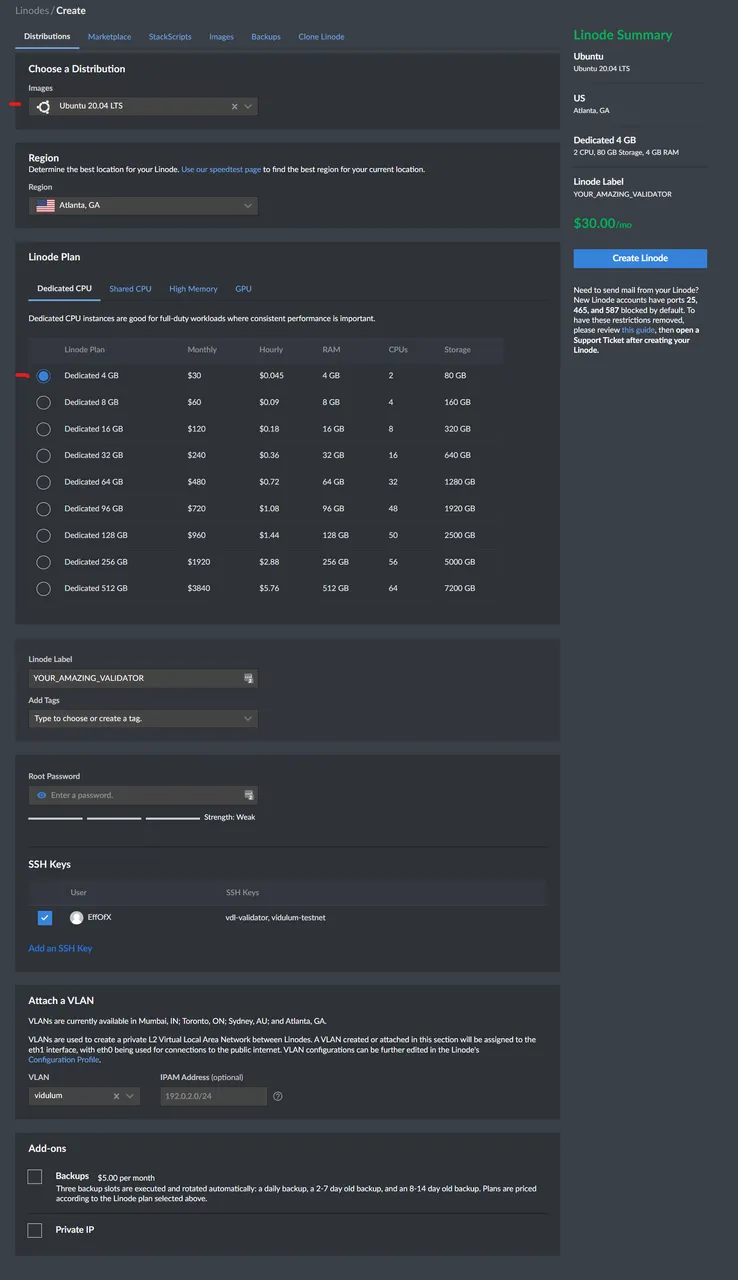
Now that we have our SSH Key saved in Linode SSH Key's, let's add our first server.
Below is just an example.
- Choose a Region (Atlanta, GA and a few other locations have NVME. Use those locations that are best suited you)
- Label your server appropriately
- Create a secure root password. (I use LastPass to manage my passwords)
- Check the box in SSH Keys to use the key you uploaded. (We did it first so when we create the server, it's uploaded and setup automatically to use)
- Click 'Create Linode' and wait for your server to finish provisioning
Secure the server - Initial Setup
SSHD Configuration
Once the server is up, we will try to SSH in with your private key. We need to configure Putty to do so.
- Go to your Linode Page and copy the IP Address.
- Open Putty
- Cut and Paste the IP Address into the 'Host Name' field
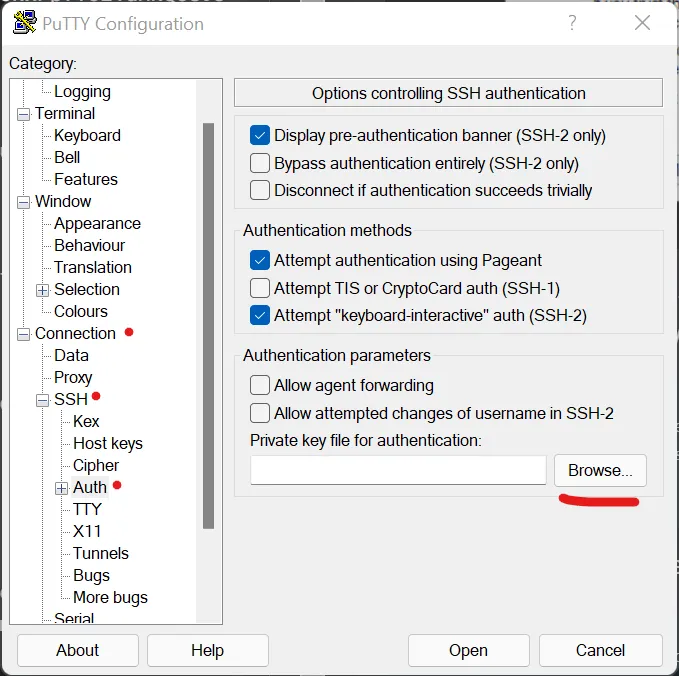
- On the Left: ->Connection -> SSH -> Auth
- Browse for your private key
- On the Left: Click back on Session
- In the 'Saved Sessions' field, name the Session and click 'Save'
- Now click 'Open' to start your session
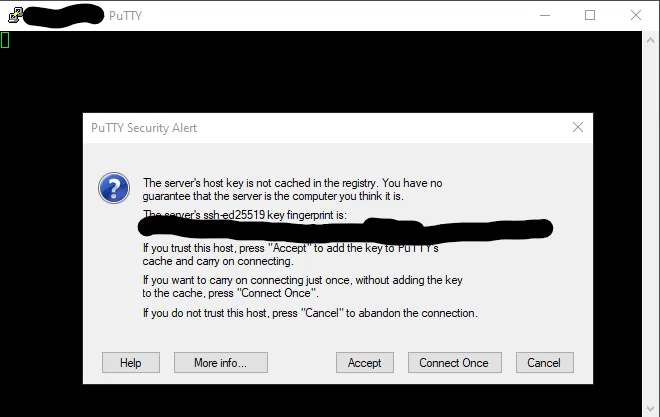
You should get a similar prompt screen asking you to accept your server key.
Let's first login as 'root' and begin the fun! We also need to install the build-essential package so we can build Vidulum from source.
apt-get -y update && apt-get -y upgrade
apt-get install -y build-essential
nano /etc/ssh/sshd_config
Optional install:
apt-get install -y htop jq net-tools
You will want to uncomment/add the following lines:
Port 2222 #Or some other port that is above 1024
PasswordAuthentication no #Default is yes
PermitRootLogin yes
Then issue:
systemctl reload sshd
Now exit from your current terminal and reconfigure your Putty's Saved Sessions Port Value.
- Click on the Session and Click, Load
- Change the Port to the new SSH port you defined in the conf.
- Click Save.
- Click Open
If you are unable to connect, you can always go to your Linode and view the Console from LISH/GISH.
Always confirm your change works before moving on to the next step.
You can also set up Putty to auto-login with a specific username. You could set up 2 saved sessions, one for ROOT and the other for VIDULUM. To add a username to auto-login as:
On the left: Connection -> Data -> Auto-login Username
Alternatively, you can prevent root from logging into the server via SSHD.
Then you would enter the password you set up when configuring the Linode at the very beginning from the Web interface.
The choice is yours, System Administrator! 😉
Firewalls and Fail2Ban
Linode Firewall
Lets first enable Linodes Firewall. It is our best first defense at everything. Read more about it on their website, but it helps remove some of that load off your server.
Head over to: https://cloud.linode.com/firewalls and create a firewall.
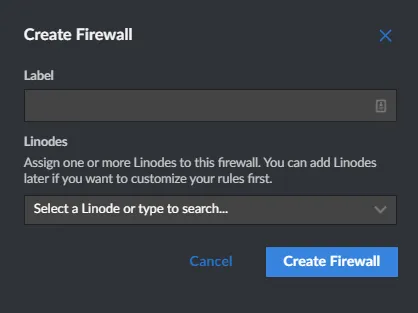
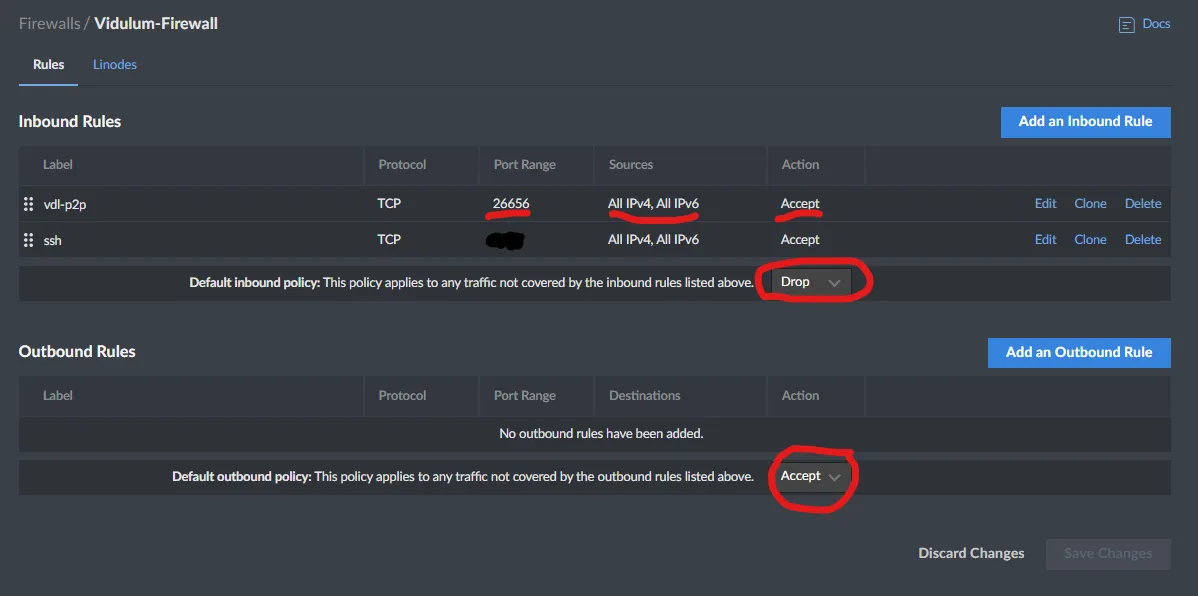

- Label your firewall with an appropriate name that will pair it with your linode server.
- Configure rules first before enabling it
- Set all incoming traffic to DROP
- Set all outgoing traffic to ACCEPT
- Add 2 rules, one for Vidulums P2P traffic and SSHD on the port you specified earlier
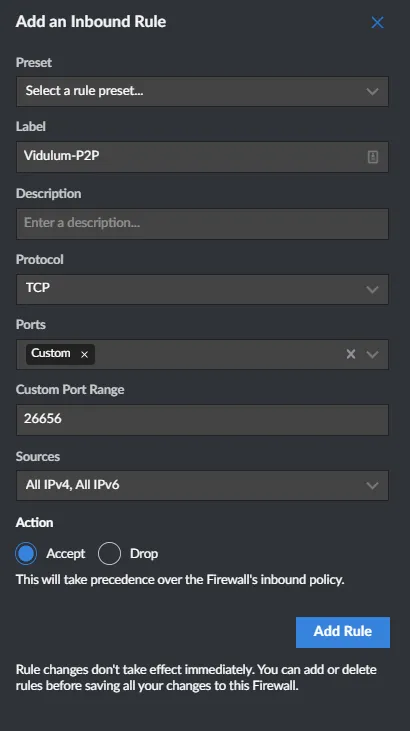
To add an Inbound rules:
- Label your rule appropriate to the source/port/application. In this case, Vidulums P2P acception
- Further describe in the description if needed
- Select TCP for the protocol
- Choose 'Custom' in Ports
- Enter the P2P port, 26656
- Choose 'All Sources'
- Action: Accept
- Click Add Rule
Once you've added all the rules you need to, specifically both the P2P and SSHD ports, you are free to enable the firewall.
Go back to the main Firewall page, and choose to 'Enable' your firewall.
UFW Firewall
Hopefully, UFW never has to intervene because of the Linode firewall. However, let's enable an internal firewall as well. S-E-C-U-R-I-T WHY?? It's probably the most important thing to focus on. #TwoCents
I copied this from the current Vidlum Documentation on configuring a Validator Node and changed the first line. I don't want to rate limit ssh. Replace port 2222 with your SSH port.
ufw allow 2222/tcp comment 'Openssh server'
ufw limit ssh
ufw default deny incoming
ufw default allow outgoing
ufw allow 26656/tcp comment 'Cosmos SDK/Tendermint P2P (Vidulum Validator)'
ufw enable
Check the status of the firewall after:

Ensure it is active. You can also see the status and follow the logs with the following commands:
systemctl status ufw
Fail2Ban
For every service you enable on your validator, I would recommend setting up a Fail2Ban rule to handle bad users and such. In our instance, setting up Fail2Ban is going to be mostly for SSHD.
apt-get update
apt-get install -y fail2ban
systemctl stop fail2ban
cp /etc/fail2ban/jail.conf /etc/fail2ban/jail.local
nano /etc/fail2ban/jail.local
Configure Fail2Ban jail.local - Enable/Uncomment the following lines:
bantime.increment = true
bantime.multipliers = 1 2 4 8 16 32 64
#ignoreip = 127.0.0.1/8 ::1 YOURPUBLIC IP 3.82.120.39 45.79.194.35
bantime = 8m
findtime = 8m
maxretry = 3
#destemail = CHANGE TO YOUR EMAIL AND UNCOMMENT
#sender = CHANGE TO YOUR EMAIL AND UNCOMMENT
Now find the SSH Configuration, enable it and add your custom port after 'ssh' like this:

Enable and start fail2ban.
systemctl enable fail2ban && systemctl restart fail2ban
systemctl status fail2ban
Check for no errors before moving on.
Test and make sure all the network changes have worked up to this point. Disconnect from your SSH session and attempt to reconnect.
Proper Time - Hostname
NTP
When I was going to go through with configuring a Hive witness, I came across issues where witnesses did not have good enough time to sign blocks properly. Read more about why this is an important change to implement: @sicarius/sicarius-witness-update-issues-resolved-quick-bonus-guide-for-currentfuture-witnesses-with-similar-issues
The above link is also a guide. I will summarize the steps needed here:
apt-get update -y
apt-get install -y ntp
nano /etc/ntp.conf
At the bottom of the conf, add this line:
#My custom additions for keeping time very accurate
minpoll 5 maxpoll 7
Now issue:
systemctl enable ntp
systemctl restart ntp
Hostname
I personally choose Star names or Greek mythology-related names for my servers.
To set your hostname
hostnamectl set-hostname aries
Sentry Nodes
I recommend keeping your Validator server IP private. Placing your Validator behind a Sentry Node will help you achieve this.
TODO/LINK TO GUIDE COMING
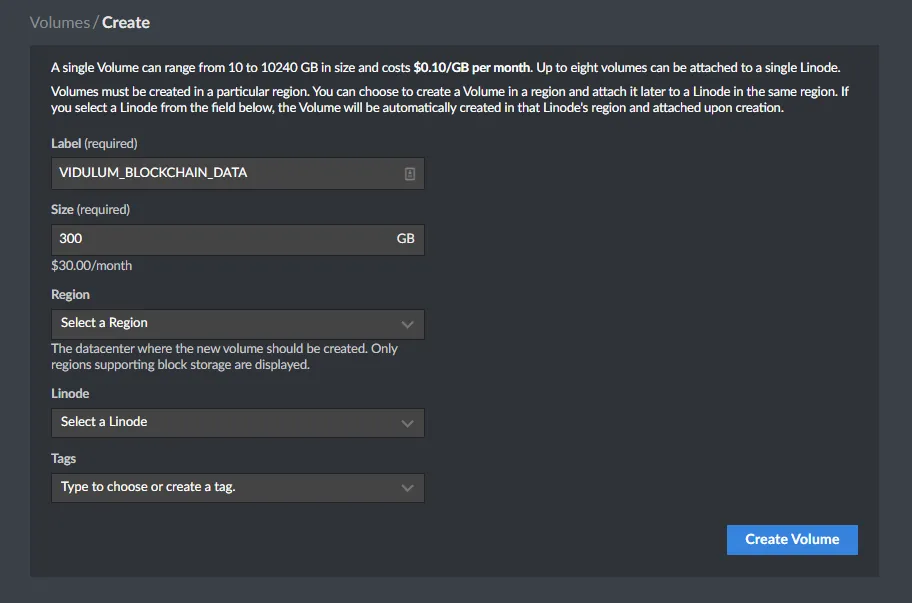
Configure LVM for Block Storage
In Linode, we need to create our block storage device. My current recommendation is to NOT share LVM space between the Linode Node and the Block storage. Even though we are using NVME Block Storage.
- Click this link: https://cloud.linode.com/volumes/create
- Label your block storage device so you know what it contains 'Vidulum Blockchain Storage'
- Size: 300GB
- Choose the same region as your Linode
- Select your Linode to attach it to
- Tag if necessary for your entire configuration
I emailed Linode Support and here is what they said...
This matters because unlike a Linode’s disks, which use SSDs, Block Storage Volumes use HDD for storage (at least until NVMe Block Storage volumes become available in Fremont).LVM striped or linear on HDD + SSD
The reason why it was recommended to separate different storage types into different volume groups is because the slower disks usually limits performance at some point (according to a user in that forum).
Now we need to add your new drive to your boot configuration.
- Go to your Linode and click on the Configurations tab in the middle of the screen
- Scroll down to Block Device Assignment
- Add A Device, Select your new storage device
- Click Save
- Are you ready to reboot?? Click the BOOT link to reboot your Linode with the updated configuration.
DO NOT REBOOT YOUR LINODE USING THE COMMAND LINE INTERFACE
Please see this as to why: https://www.linode.com/community/questions/17244/reboot-my-linode
Use the script above or the web GUI to reboot your server. You will run into an array of issues if you issue the shutdown command to reboot/shutdown.
Quick tangent:
I initially wrote this guide using LVM Thin Snapshots and decided to cut it down to just configuring LVM. I recommend giving Thin Snapshots and Over-provisioning a google to see if it will fit your needs.
It is important you use direct device names instead of symlinks, as they can change between reboots.
root@localhost:~# ls -lha /dev/disk/by-id/
total 0
drwxr-xr-x 2 root root 100 Dec 28 21:08 .
drwxr-xr-x 6 root root 120 Dec 28 21:08 ..
lrwxrwxrwx 1 root root   9 Dec 28 21:08 scsi-0QEMU_QEMU_HARDDISK_drive-scsi-disk-0 -> ../../sda
lrwxrwxrwx 1 root root   9 Dec 28 21:08 scsi-0QEMU_QEMU_HARDDISK_drive-scsi-disk-1 -> ../../sdb
lrwxrwxrwx 1 root root   9 Dec 28 21:08 scsi-0QEMU_QEMU_HARDDISK_drive-scsi-disk-2 -> ../../sdc
Your block storage from Linode will look like similar to this:
(where the 'vdl-validator' is the name you choose for your block storage)
lrwxrwxrwx 1 root root 9 Dec 16 15:57 scsi-0Linode_Volume_vdl-validator -> ../../sdd
Create the LVM
- pvcreate /dev/disk/by-id/scsi-0QEMU_QEMU_HARDDISK_drive-scsi-disk-2
- Repeat the above step for each drive you plan on adding to your LVM
- vgcreate vidulum-volume /dev/disk/by-id/scsi-0QEMU_QEMU_HARDDISK_drive-scsi-disk-2 /dev/disk/by-id/YOUR-OTHER-DRIVES
- lvcreate -l 100%FREE -n vidulum-blockchain-data vidulum-volume
pvcreate /dev/disk/by-id/scsi-0QEMU_QEMU_HARDDISK_drive-scsi-disk-2
vgcreate vidulum-volume /dev/disk/by-id/scsi-0QEMU_QEMU_HARDDISK_drive-scsi-disk-2
lvcreate -l 100%FREE -n vidulum-blockchain-data vidulum-volume
View your VG and LV:
vgs
  VG             #PV #LV #SN Attr   VSize    VFree
  vidulum-volume   1   1   0 wz--n- <300.00g    0
and
lvs
  LV                      VG             Attr       LSize    Pool Origin Data%  Meta%  Move Log Cpy%Sync Convert
  vidulum-blockchain-data vidulum-volume -wi-ao---- <300.00g
Format it with the largefile option(sets inode to blocksize ratio) and 1% reserved blocks:
mkfs.ext4 -T largefile -m 1 /dev/vidulum-volume/vidulum-blockchain-data
Add your LVM to fstab
Edit your fstab
nano /etc/fstab
Include your LVM to mount as your home drive for the vidulum user. I also recommend changing the /dev/sda and /dev/sdb to point to the /dev/disk/by-id/ names. Example:
# /etc/fstab: static file system information.
#
# Use 'blkid' to print the universally unique identifier for a
# device; this may be used with UUID= as a more robust way to name devices
# that works even if disks are added and removed. See fstab(5).
#
#
/dev/disk/by-id/scsi-0QEMU_QEMU_HARDDISK_drive-scsi-disk-0        /             ext4    errors=remount-ro 0     1
/dev/disk/by-id/scsi-0QEMU_QEMU_HARDDISK_drive-scsi-disk-1        none          swap    sw                0     0
#
#Vidulum Home
/dev/disk/by-id/dm-name-vidulum--volume-vidulum--blockchain--data /home ext4 defaults,noatime 0 0
System Tuning
TODO/LINK TO GUIDE COMING
TEMPFS - Using RAM to increase performance -- testing
TODO/LINK TO GUIDE COMING
Installing Vidulum (Link)
No need to repeat what's already been said. Here is the current guide from Vidulum on how to install and set up a Validator.
https://vidulum.app/docs/getting-started/mainnet.html
I run a full node/seed node. Feel free to add it to your seeds list(updated with DNS entry):
eed11fff15b1eca8016c6a0194d86e4a60a65f9b@apollo.erialos.me:26656
Do not make your passwords the same between root and vidulum users. I recommend using a password manager, I personally use Lastpass. You can even store your keys with them. All data is encrypted at the device level before being sent to LastPass, and like your wallet information, if you lose your master password you lose ALL your passwords.
SSH Keys for Vidulum user
You have some options now, reuse the SSH keys we set up for the root user or set up new keys to be used by your Vidulum user. You also have the option of disabling root from being able to SSH into the server. At the end of the day, you always have LISH to recover your server if you fubar yourself from being able to log in.
rsync -avr --info=progress2 --chown=vidulum:vidulum /root/.ssh /home/vidulum/
Test and make sure you can log in as vidulum.
- Start a new Putty Session
- Connect to your server
- Use 'vidulum' as the user to log in
Continue to follow the rest of the Vidulum Validator Guide.
https://vidulum.app/docs/getting-started/mainnet.html
How To Monitor Your Server
TODO/LINK TO GUIDE COMING
Software to send you alerts
TODO/LINK TO GUIDE COMING
Monitoring logs and the Explorer
TODO/LINK TO GUIDE COMING
The CLI
TODO/LINK TO GUIDE COMING
Testnet and your testbed
TODO/LINK TO GUIDE COMING
All Done
I hope you found this guide helpful in some way! Other Validators have contributed to this documentation with suggestions and edits.
Big thanks to:
Centera for proof reading and giving me suggestions.
Credits
Consider staking with the following Validators if you found this guide helpful!
- Moneta By Erialos
- Centera's Validator
- Corey's Validator
- Valorie By Sas
If you'd like to donate, here are a few options!
Vidulum: vdl1mv8zeqes72e7cjd8nzp5gzy5zkqr4rnhgrf57c
Osmosis: osmo1mv8zeqes72e7cjd8nzp5gzy5zkqr4rnh9u2r9v
Cosmos: cosmos1mv8zeqes72e7cjd8nzp5gzy5zkqr4rnhd8enn7
Hive: @erialos
Bitcoin: 1HAsQMvPTEWQHDBNZRgDbH45F2vwprk1cD
BitcoinZ: t1aFsLfqxiz6Z9miV2pCUrdVZbhtG5Shww6