Hola mis queridos amigos de HIVE en este post quiero mostrarles como realizo separadores de manera sencilla para quienes quieran tomar el dato, espero les sea de mucho provecho, que lo disfruten.
Hello my dear friends of HIVE in this post I want to show you how I make separators in a simple way for those who want to take the data, I hope it will be very useful, that you enjoy it.
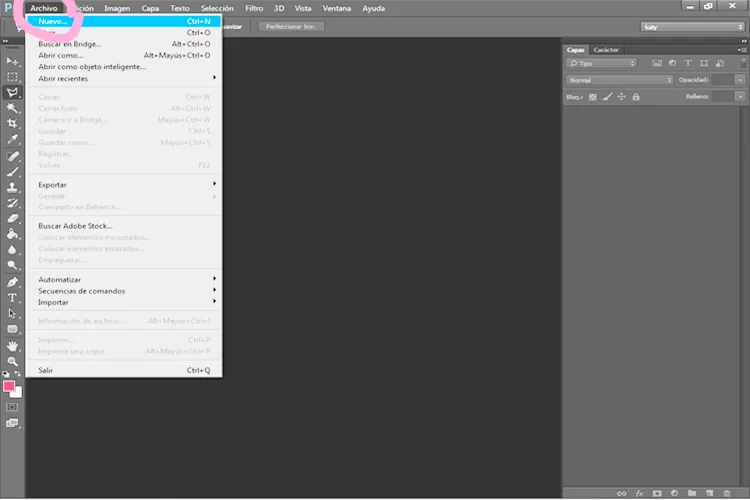
1 step: We open our Photoshop program, In the file we select the option "new".
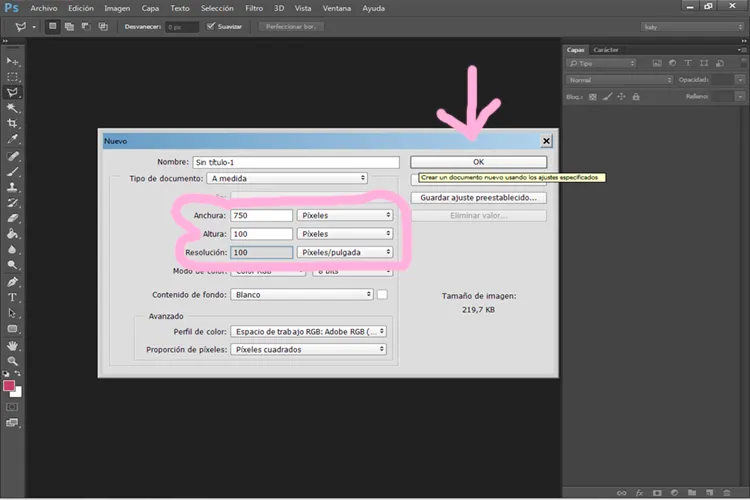
2 First we make sure that we will work with "pixels", then we fill in the following boxes: Width 750, Height 100 and Resolution 100; Once this data is finished we put "ok".
3 Con la herramienta “Marco rectangular” vamos a trazar una ligera línea gruesa, tal como lo muestro en el ejemplo.
3 With the “Rectangular Marquee” tool we are going to draw a light thick line, as shown in the example.

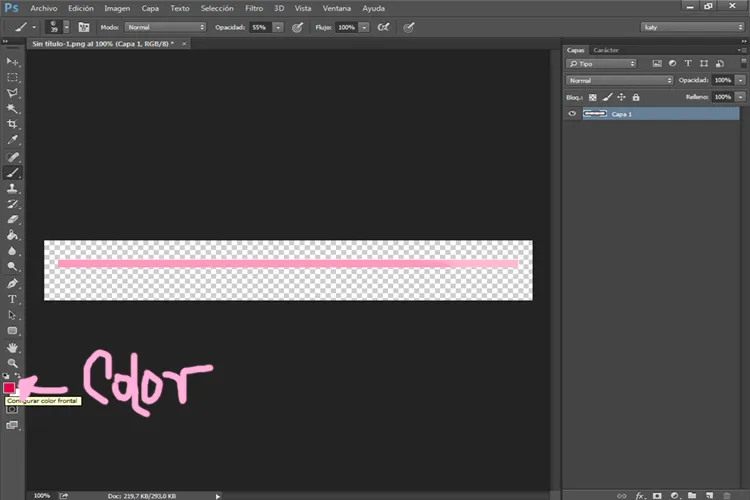
4 Seleccionamos la herramienta pincel, y elegimos el color de preferencia, este caso yo elijo el rosa
4 We select the brush tool, and we choose the color of preference, in this case I choose pink.
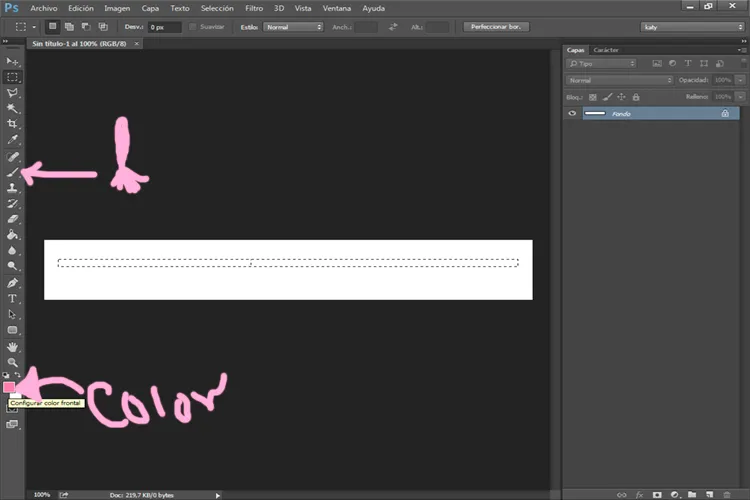
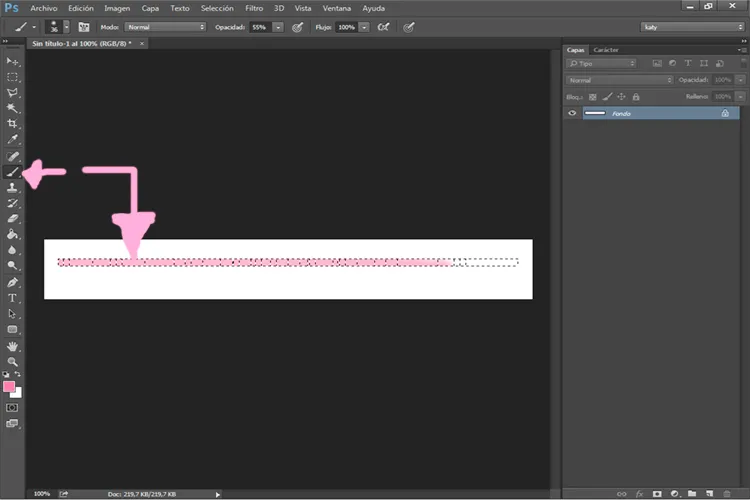
5 Seleccionado el pincel vamos a colorear la línea que hemos trazado.
5 Once the brush is selected, we are going to color the line that we have drawn.
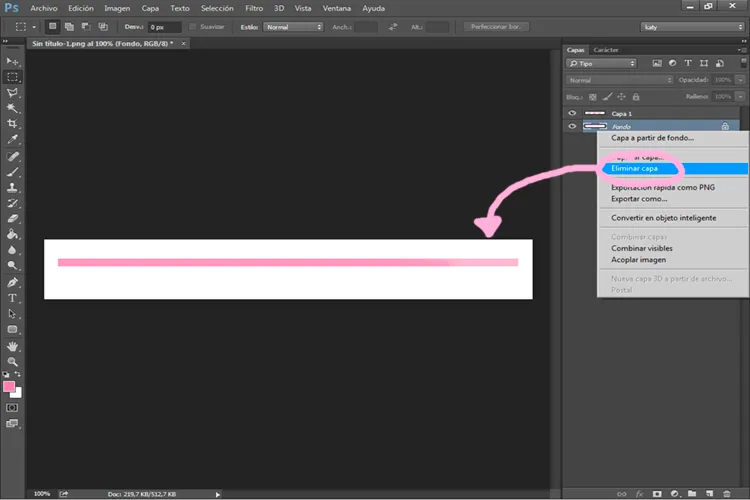
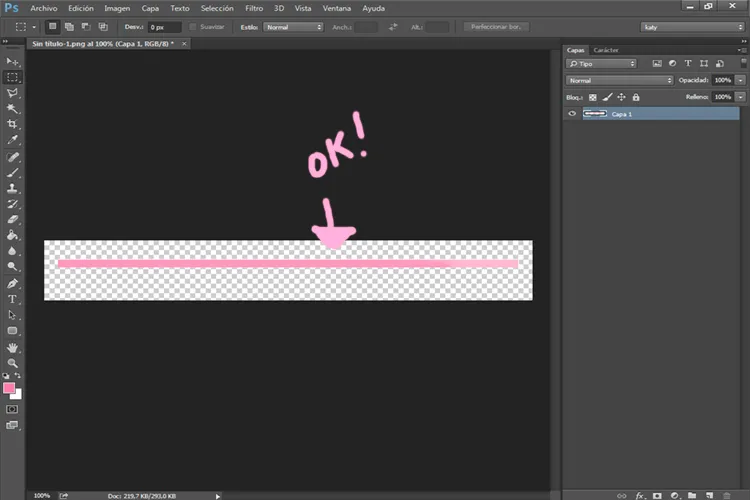
6 Una vez coloreado, presionamos el segundo clic del mouse y tomamos la opción “seleccionar inverso”. con el segundo clic en la capa de fondo blanco ponemos “eliminar capa” ( con esta acción vamos a deshacernos de todo el fondo, de manera que nos quede como un sticker).
6 Once colored, we press the second mouse click and take the option “select inverse”. (With this action we are going to get rid of the entire background, so that it looks like a sticker).

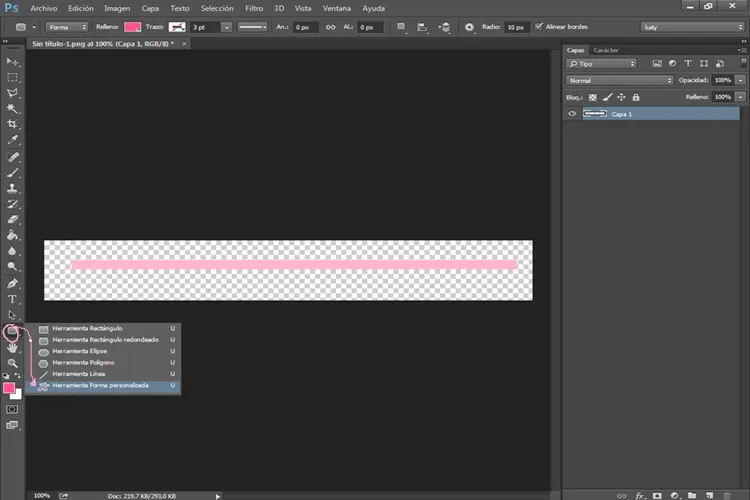
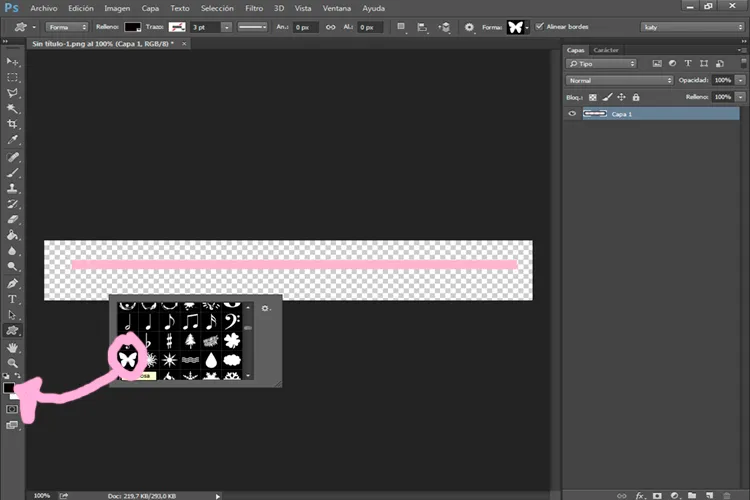
7 Para colocarle una figurilla en nuestro separador, primero debemos elegir el color que queramos.
7 To place a figurine in our divider, we must first choose the color we want.
8 Ahora, nos ubicamos justo arriba del icono de la manita, presionamos segundo clic de nuestro mouse y vamos a seleccionar “herramienta forma personalizada”. Una vez aquí vamos a elegir nuestra figurilla. En este caso yo elegí una linda mariposa.
8 Now, we are located just above the hand icon, we press the second click of our mouse and we are going to select "custom shape tool". Once here we are going to choose our figurine. In this case I chose a cute butterfly.
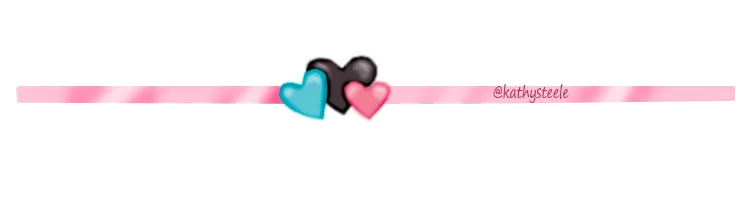
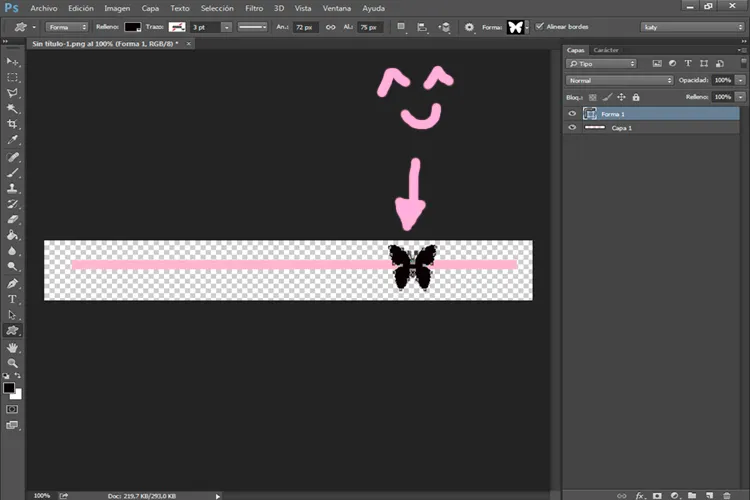
9 Trazamos nuestra figurilla donde más nos parezca y listo, ya le dimos vida a un hermoso separador para nuestros post de nuestra querida comunidad HIVE.
9 We trace our figurine where it seems most and voila, we have already given life to a beautiful separator for our posts from our beloved HIVE community.
10 Podemos seguir dándole más detalles con las mismas técnicas que ya les eh acabado de enseñar. Como ven le agregué otra mariposilla encima de la oscura para darle un toque más sutil.
10 We can continue giving you more details with the same techniques that I have already finished teaching you. As you can see, add another butterfly on top of the dark one to give it a more subtle touch.
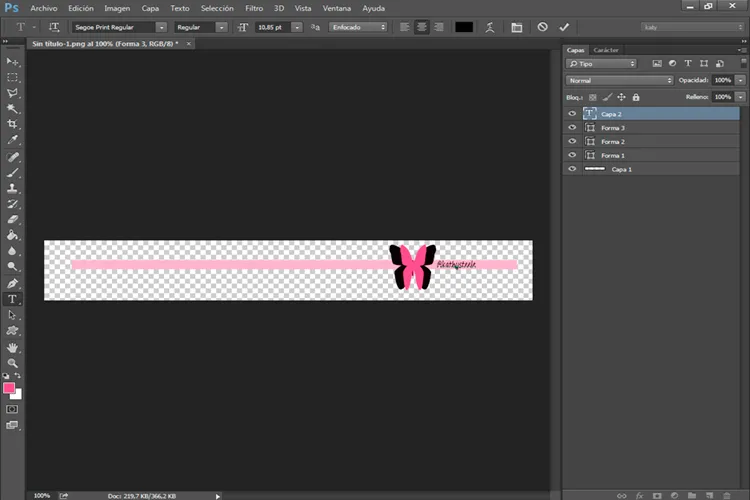
11 Como sé que somos algo celosos con nuestras propias creaciones y respetamos la firma de cada quien, no estaría de más personalizar más aun tu separadores con tu firma, tal como le muestro en este ejemplo.
11 As I know that we are somewhat jealous of our own creations and we respect each other's signature, it would not hurt to further personalize your bookmarks with your signature, as I show you in this example.
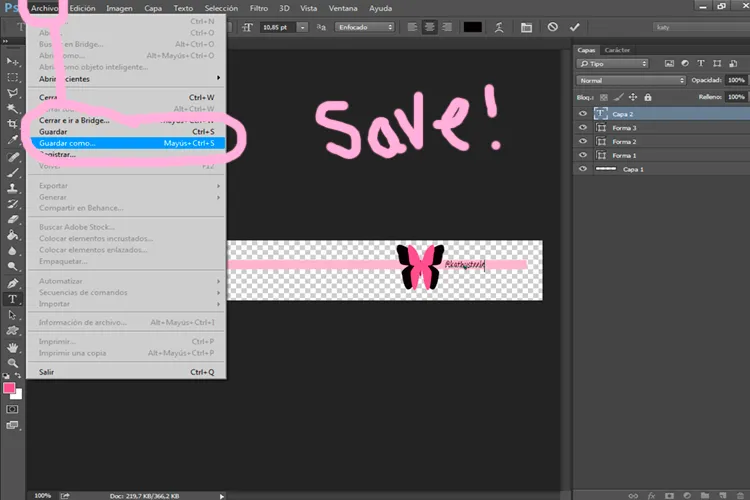
12 Ya falta poco para culminar nuestro trabajo, solo que falta un importante paso, ¿cómo lo vamos a guardar?, nos dirigimos a “archivo” seleccionamos “guardar como”.
12 There is little left to finish our work, only one important step is missing, how are we going to save it? We go to "file" and select "save as".
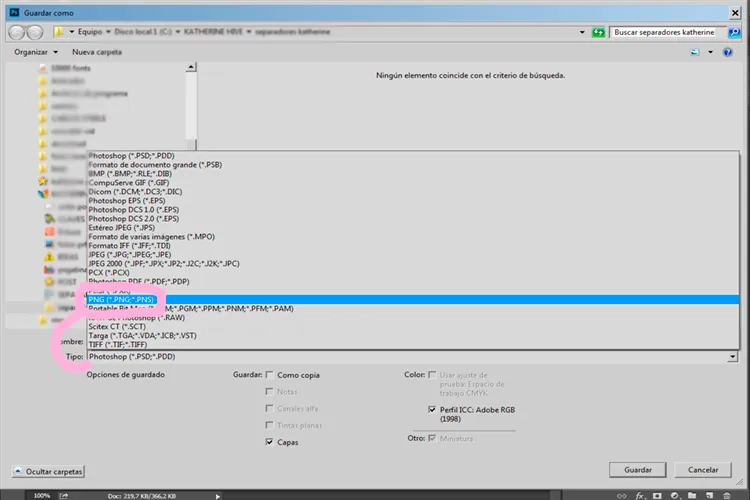
13 Hacemos clic en la ventanilla “tipo” y seleccionamos el formato “png (.png; pns)”.
13 We click on the "type" window and select the "png (* .png *; pns)" format.
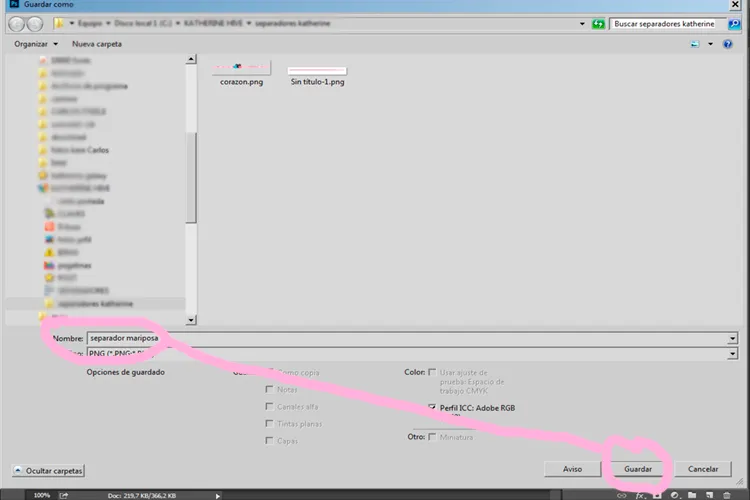
14 Le colocamos un nombre qu identifique nuestro separador y guardamos.
14 We put a name that identifies our separator and we save.
Hemos realizado nuestro lindo separador y a nuestro gusto; ¡nada más original que eso! ; Con esta técnica súper sencilla para manejar photoshop podemos crear un sinfín de separadores, destacando nuestra genialidad y resaltando el contenido de nuestros interesantes post de la comunidad. Esto es todo por hoy amigos de HIVE, gracias por darme la oportunidad de formar parte de ustedes, se les quiere, hasta la próxima.
We have made our nice separator and to our liking; Nothing more original than that! ; With this super simple technique to handle Photoshop we can create endless dividers, highlighting our genius and highlighting the content of our interesting community posts. This is all for today friends of HIVE, thank you for giving me the opportunity to be part of you, you are loved, until next time.