Hello to all of you, today I will give you a legendary homemade baklava recipe. My mom and I tried very hard to make this, but it was worth it. I love the taste. This is my second recipe. In the first one, I gave you the Chocolate Cake recipe, which has been my favorite dessert since my childhood. Homemade Baklava is my recent favorite. As I said, it takes a little effort to make, but it is definitely worth the effort. Let's get started.

I will explain it to you from the beginning and in detail so that you can easily make it at home. First, we separate our walnuts from the shell. Make sure there are no shells in the bowl where you separate the walnuts. Otherwise you may break your teeth or get hurt. I love baklava with lots of walnuts, so we used a lot of walnuts, you can make it with less.

Then you have to crush the walnuts into small pieces. I did this with a tool we call "dibek" in Turkey. I poured the walnuts into the wooden part and crushed the walnuts with the iron part. I say iron, but I don't know exactly what material it is made of, but I am sure it is not harmful to health. If you don't know how to crush your walnuts, let me know in the comments. I can give you advice on this.
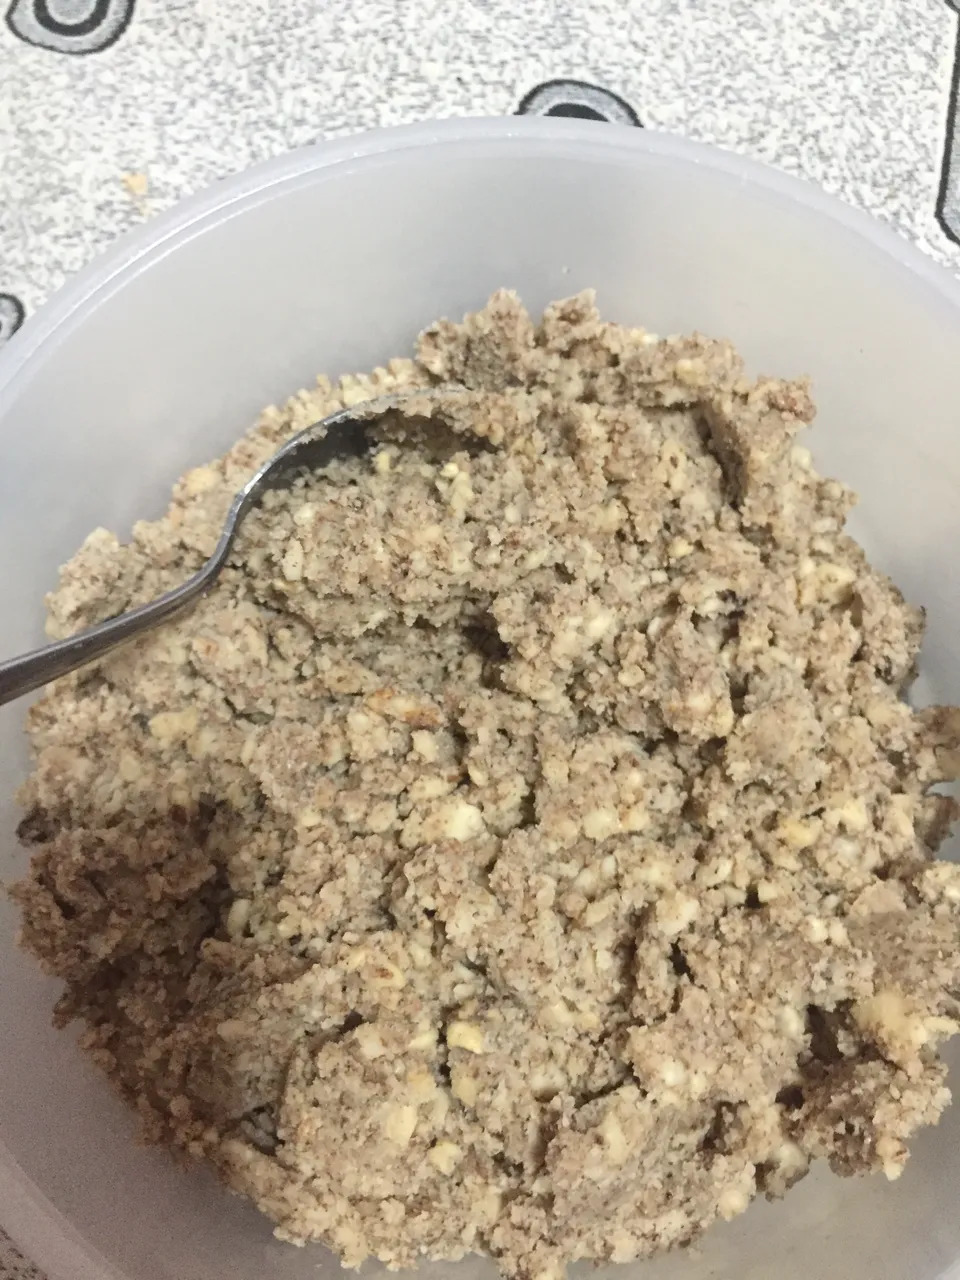
This is what it will look like after crushing your walnuts. Make sure that all the walnuts are well crushed. Unless you want to hurt your teeth while eating baklava lol.
Next is to prepare the dough. Ingredients;
- 1 packet of baking powder
- 1 tea glass of liquid oil
- 4.5 cups flour
- 2 eggs
- 2 spoons of yogurt
- 1 tea glass of milk
- 1 glass of water
- 2 teaspoons of vinegar


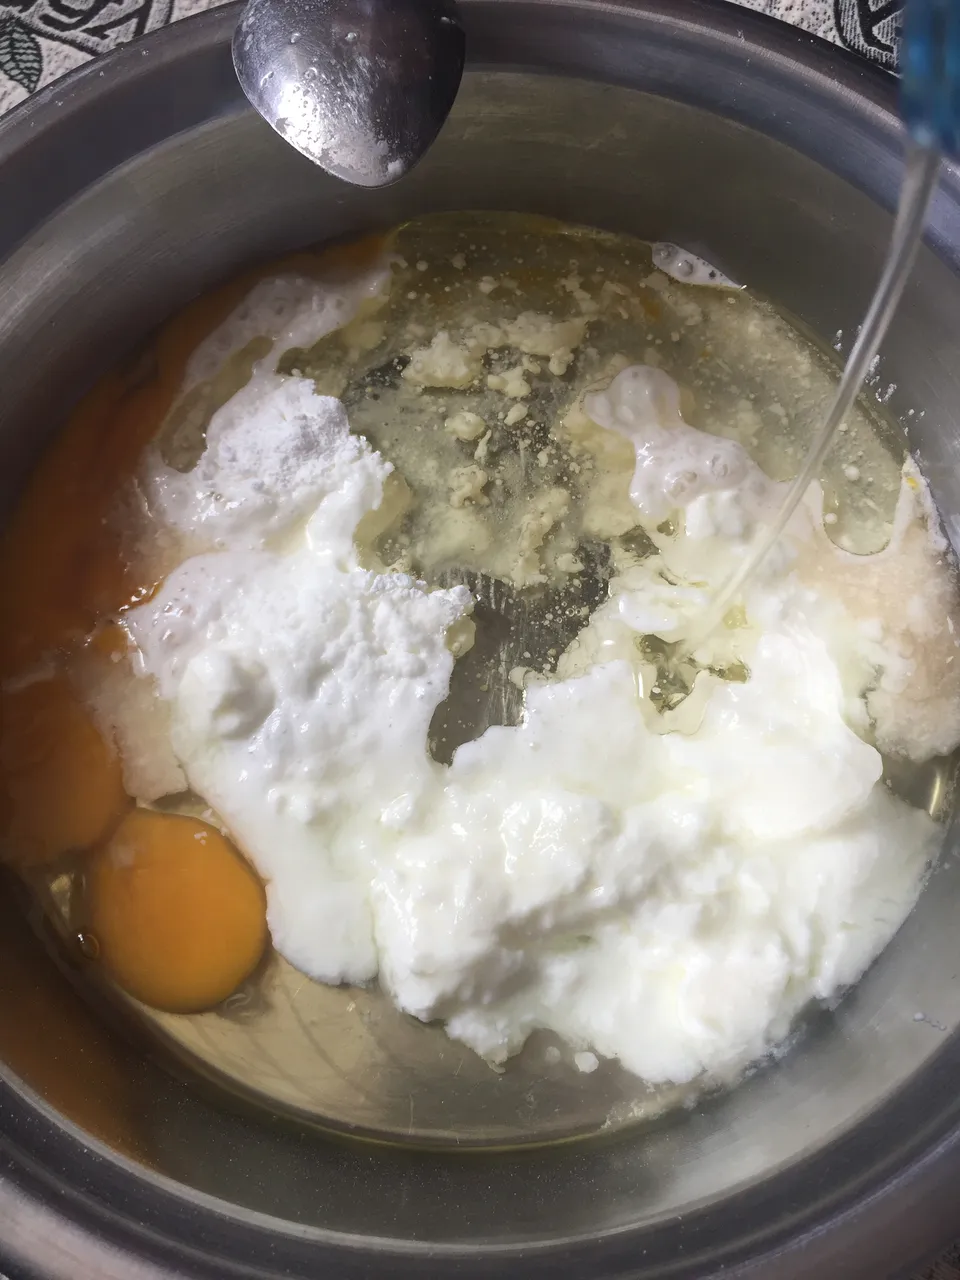

After adding the other ingredients, sift the flour in this way. Because the flour should be grainy, not big pieces.

After sifting the flour, we knead our dough well. My mom does this for me. Because there is something called hand flavor and my mother's cooking is always good. Definitely not because I am lazy 😂.
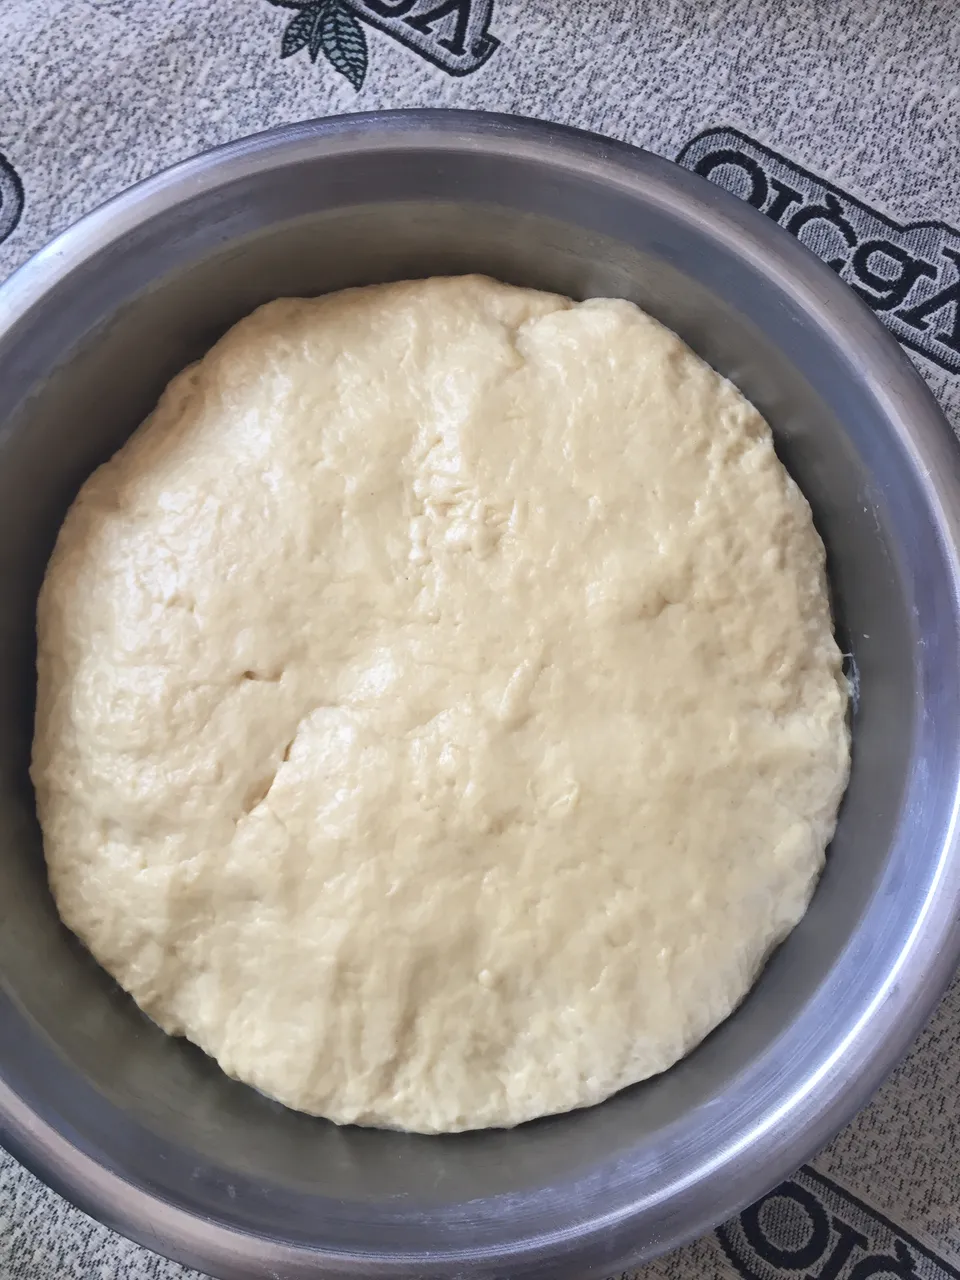
This is how the dough will look like. Its consistency should be soft and easy to shape. Then we leave our dough covered for a couple of hours. When I asked my mom the reason for this, she said it was to make it easier when rolling out the phyllo.

After waiting, we divide the dough into pieces like this. You can already see the size in the photo, but if you want a clear size, it should be the size of an egg.

We roll out these pieces with the help of a rolling pin. It is important that it is thin, otherwise the baklava will not be crispy. While rolling out, we pour starch on the bench and on the dough. The reason for this is that the dough can be rolled out well without sticking. You can see in the photo how thin it should be. Or you can get rid of all this by buying phyllo for baklava 🤣.
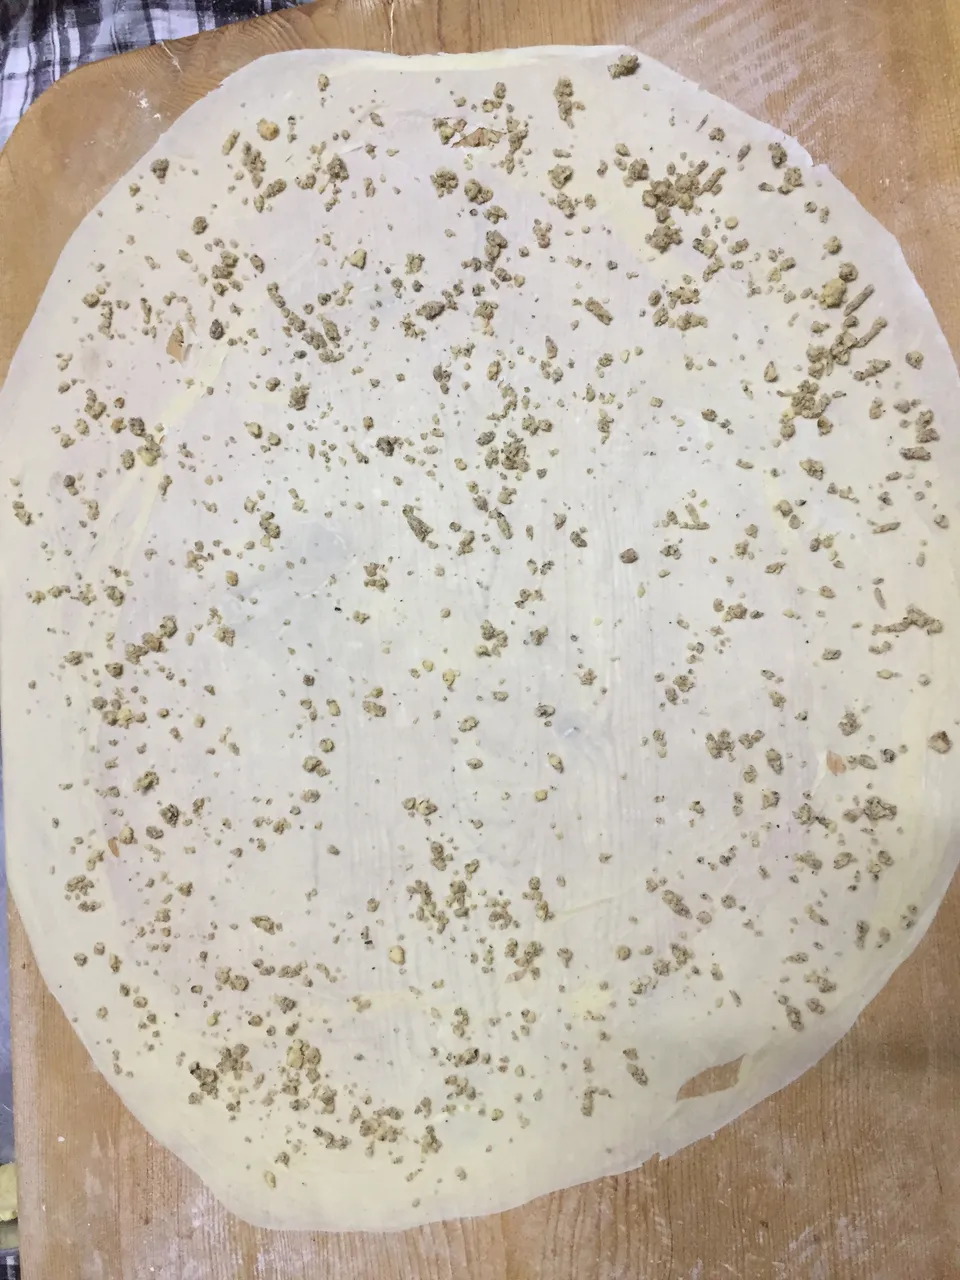
We sprinkle the walnuts on it nicely. It is important that it is all over because this will provide a homogeneous flavor. As I said, we made it with plenty of walnuts. You can make it with less walnuts.

Then we wrap the dough we roll out on the rolling pins in this way. Then we gently pinch it by holding the two ends of the rolling pins. This provides the shape of our baklava.
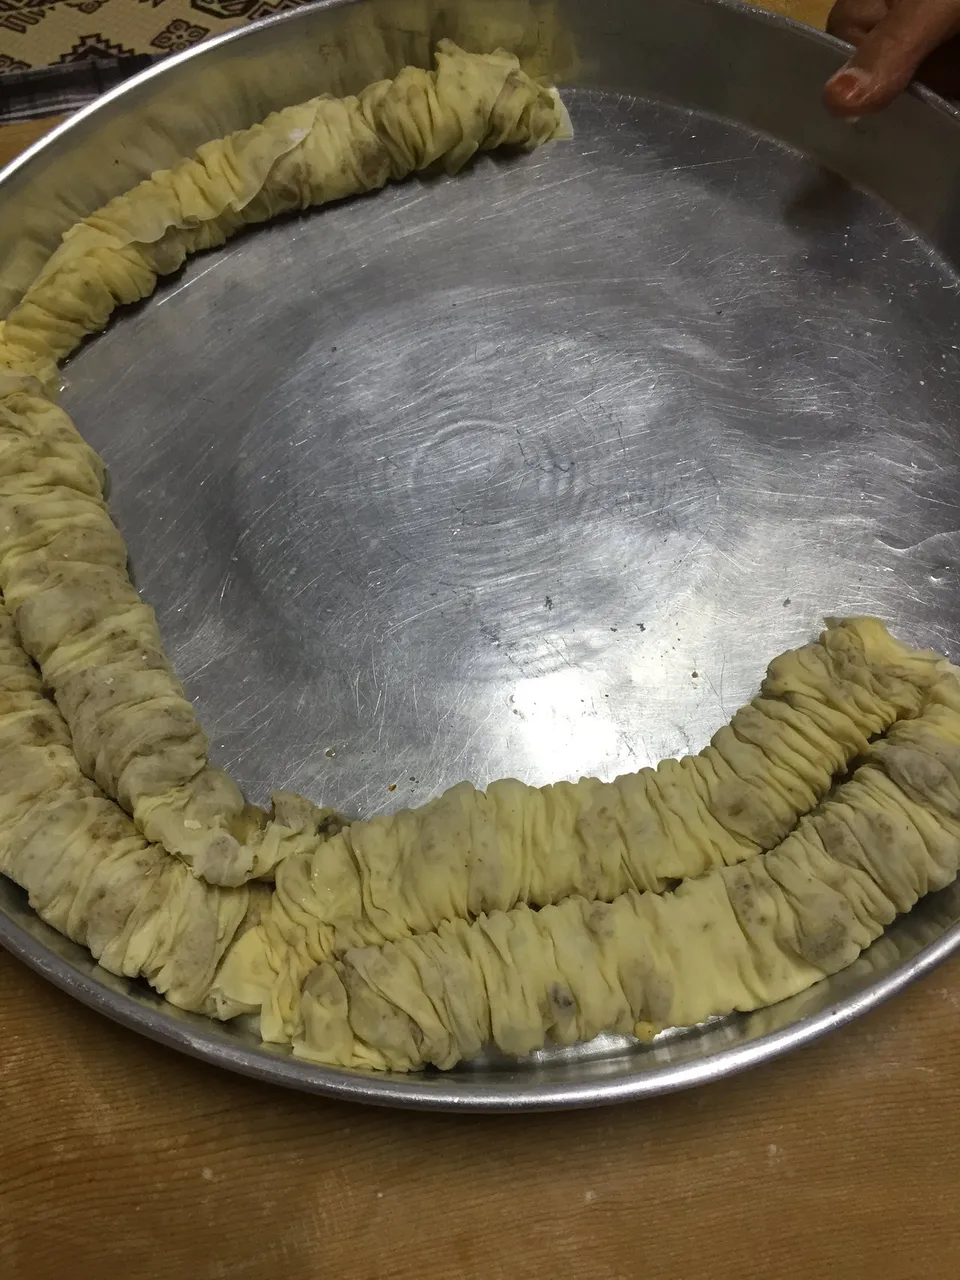
Then we slowly remove the dough from the rolling pins. It is important that you remove it at the same time, otherwise it may lose its shape. You can see how the shape should be on the tray.
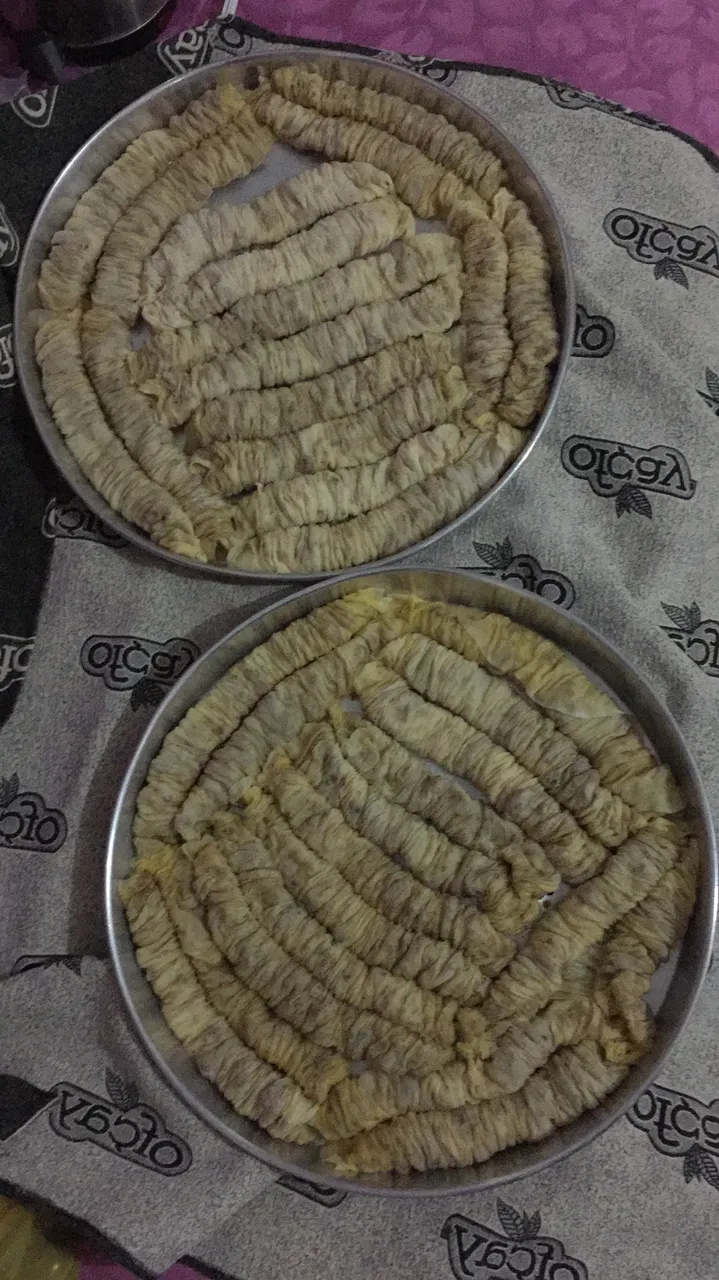
We made 2 trays of baklava with my mom. Obviously this can be a bit tiring. If you are a family of 4-5 people, I recommend making 1 tray.

For 2 trays, we boil 250 gr butter and 2 cups of vegetable oil. This will give a very nice flavor to our baklava.
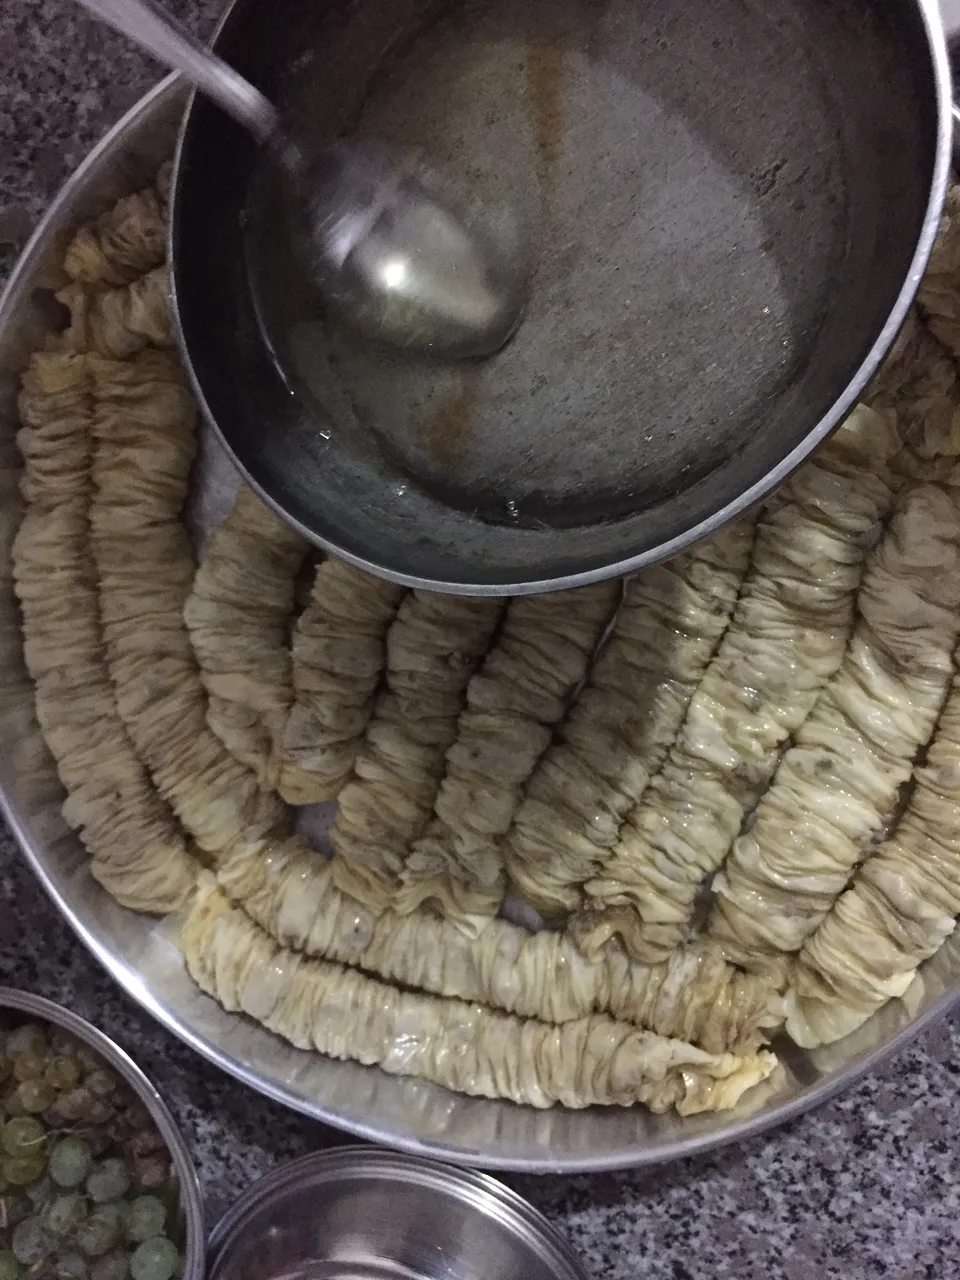
We spread it well on the baklava. Be careful to spread it all over. As I said, we will need a homogeneous flavor.

Then we proceed to the baking process. We bake our baklava at 180 degrees for 40-45 minutes. Actually, there is no specific time for this. When you are sure that your baklava is browned, you can take it out of the oven.

The color of the baklava should be exactly like this. So it shouldn't burn but it should be well browned.
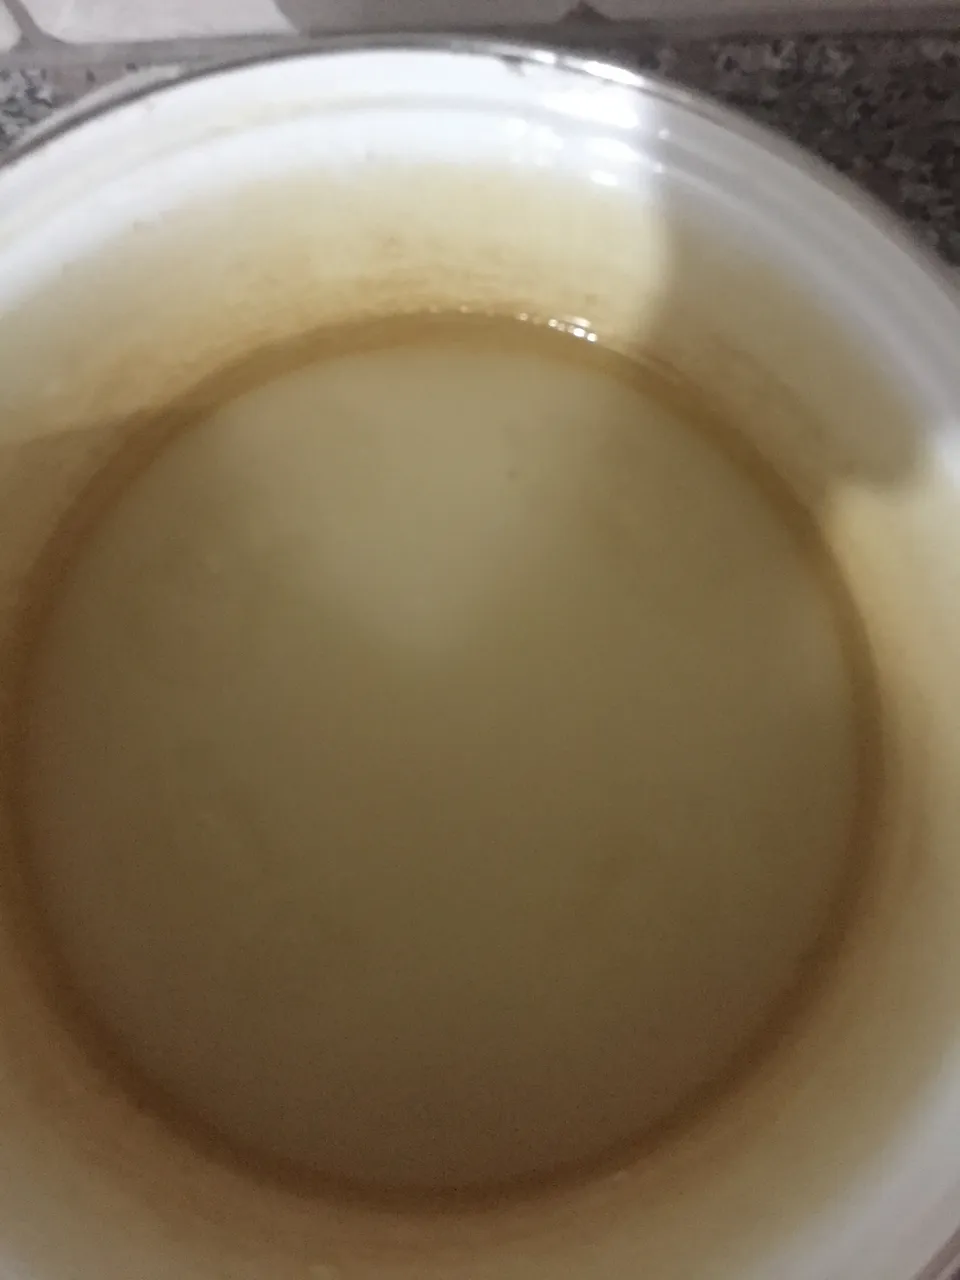
Now we move on to the sherbet part. For 1 tray of baklava, pour 2 cups of sugar and 2 cups of water into a pot and stir until it boils. We continue to boil on low heat for 10 minutes until it gets a syrupy consistency. If you squeeze the juice of 1 slice of lemon into the sherbet, this will prevent the sugar from freezing after pouring it into the baklava. After pouring the lemon, we will boil the sherbet for another 2 minutes. Then we will turn off the heat and let it cool.

The last process is to pour the sherbet into the baklava. Don't forget to cut the baklava with a knife before pouring the syrup. You can cut it to the size you want. What you need to pay attention to is that one of the baklava or the sherbet should be cold and one hot. If they are both hot, your baklava will be like dough. If they are both cold, it will not be crispy. Make sure that the hot one is not too hot. This is what your baklava will look like afterwards.


Wait 30 minutes for the baklava to absorb the syrup and cool down. It's ready to eat! See how delicious it looks. Much better than the baklava we normally buy. Also, if you have ever eaten baklava, you know that when you eat 2-3 slices of baklava, you cannot eat more because of the sugar. But you can eat 10 slices of this baklava! @perceval You need to check this dude 😋.
Thank you very much for reading. I hope you liked it. If you have any questions about the recipe, don't forget to ask in the comments. I enjoy reading and answering comments. Today is the last day of the month. I hope next month will be great for all of us!
TR
Hepinize merhaba, bugün sizlere efsane bir ev yapımı baklava tarifi vereceğim. Annemle birlikte bunu yapmak için çok uğraştık ama değdi. Tadına bayıldım. Bu benim 2. yemek tarifim. İlkinde size çocukluğumdan beri en sevdiğim tatlı olan Çikolatalı Pasta tarifini vermiştim. Ev Yapımı Baklava da benim son zamanlardaki favorim. Dediğim gibi yapımı biraz uğraştırıyor ama verdiğiniz emeğe kesinlikle değiyor. Hadi başlayalım.
Bunu size baştan ve ayrıntılı bir şekilde anlatacağım bu sayede siz de evinizde bunu rahatlıkla yapabileceksiniz. Önce cevizlerimizi kabuğundan ayırıyoruz. Cevizleri ayırdığınız kasenin içinde hiç kabuk olmadığından emin olun. Yoksa dişiniz kırılabilir ya da canınız yanar. Ben baklavayı bol cevizli seviyorum bu yüzden çok ceviz kullandık siz daha azıyla da yapabilirsiniz.
Sonra cevizleri iyice ezip küçük parçalar haline getirmeniz gerekiyor. Ben bunu Türkiye'de "dibek" dediğimiz bir araçla yaptım. Ahşap kısmın içine cevizi döktüm ve demir kısmıyla cevizi ezdim. Demir diyorum ama tam olarak hangi malzemeden yapıldığını bilmiyorum. Ama sağlığa zararlı olmadığından eminim. Siz cevizlerinizi nasıl ezeceğinizi bilmiyorsanız yorumlarda belirtin. Size bununla ilgili tavsiyeler verebilirim.
Cevizlerinizi ezdikten sonra böyle görünecek. Bütün cevizlerin iyice ezildiğinden emin olun. Baklava yerken dişlerinizi acıtmak istemiyorsanız tabi.
Sırada hamuru hazırlamak var. Malzemelerimiz;
- 1 paket hamur kabartma tozu
- 1 çay bardağı sıvı yağ
- 4.5 su bardağı un
- 2 adet yumurta
- 2 kaşık yoğurt
- 1 çay bardağı süt
- 1 su bardağı su
- 2 tatlı kaşığı sirke
Diğer malzemeleri koyduktan sonra unu içine bu şekilde eliyoruz. Çünkü unun tane tane olması lazım. Büyük parçalar halinde değil.
Unu eledikten sonra hamurumuzu güzelce yoğuruyoruz. Bunu benim yerime annem yapıyor. Çünkü el lezzeti denen bir şey var ve annemin yaptığı yemekler her zaman güzel olur. Kesinlikle üşendiğim için değil 😂.
Hamurun görüntüsü bu şekilde olacak. Kıvamı da yumuşak ve kolay şekil verilebilecek şekilde olmalı. Daha sonra hamurumuzu birkaç saat ağzını kapatıp bekletiyoruz. Bunun sebebini anneme sorduğumda yufkayı açarken kolay olması için olduğunu söyledi.
Beklettikten sonra hamuru bu şekilde parçalara ayırıyoruz. Büyüklüğünü zaten fotoğrafta görüyorsunuz ama net bir boyut isterseniz, yumurta büyüklüğünde olmalı.
Bu parçaları oklava yardımıyla güzelce açıyoruz. İnce olması önemli yoksa baklava çıtır çıtır olmaz. Açarken açtığımız tezgahın üzerine ve hamurun üzerine nişasta döküyoruz. Bunun sebebi de hamurun yapışmadan güzelce açılabilmesi. Ne kadar ince olması gerektiğini fotoğrafta görebilirsiniz. Ya da baklava için yufka alarak bütün bunlardan kurtulabilirsiniz 🤣.
Cevizi üzerine güzelce serpiyoruz. Her yerinde olması önemli çünkü bu homojen bir tat sağlayacak. Dediğim gibi biz bol cevizli yaptık. Siz daha az cevizle de yapabilirsiniz.
Daha sonra açtığımız hamuru oklavalara bu şekilde sarıyoruz. Daha sonra oklavaların iki ucundan tutarak yavaşça sıkıştırıyoruz. Bu baklavamızın şeklini sağlıyor.
Daha sonra hamuru oklavalardan yavaşça çıkarıyoruz. Aynı anda çıkarmanız önemli yoksa şekli bozulabilir. Tepside şeklin nasıl olması gerektiğini görebilirsiniz.
Biz annemle 2 tepsi baklava yaptık. Açıkçası bu biraz yorucu olabiliyor. Eğer 4-5 kişilik bir aileyseniz 1 tepsi yapmanızı tavsiye ederim.
2 tepsi için 250 gr tereyağı ve 2 su bardağı sıvı yağı kaynatıyoruz. Bu baklavamıza oldukça hoş bir lezzet verecek.
Baklavanın üzerine iyice sürüyoruz. Her yerine sürmeye dikkat edin. Dediğim gibi homojen bir tada ihtiyacımız olacak.
Daha sonra fırınlama işlemine geçiyoruz. Baklavamızı 180 derecede 40-45 dakika pişiriyoruz. Aslında bunun için belli bir süre yok. Baklavanızın kızardığından emin olduğunuz zaman fırından çıkarabilirsiniz.
Baklavanın rengi tam olarak böyle olmalı. Yani yanmamalı ama iyi kızarmalı.
Şimdi şerbet kısmına geçiyoruz. 1 tepsi baklava için 2 su bardağı şeker ve 2 su bardağı suyu bir tencereye döküp kaynayana kadar karıştırıyoruz. Şurup şeklinde bir kıvam alana kadar kısık ateşte 10 dakika kaynatmaya devam ediyoruz. 1 dilim limonun suyunu şerbetin içine sıkarsanız bu şekerin baklavaya döktükten sonra donmasını engelleyecektir. Limonu döktükten sonra şerbeti 2 dakika daha kaynatacağız. Daha sonra altını kapatıp soğumaya bırakacağız.
Son işlem şerbeti baklavaya dökmek. Şerbeti dökmeden baklavayı bıçak yardımıyla kesmeyi unutmayın. Kendi istediğiniz boyutta kesebilirsiniz. Dikkat etmeniz gereken şey, baklava ya da şerbetten birinin soğuk birinin sıcak olması. Eğer ikisi de sıcak olursa baklavanız hamur gibi olur. Eğer ikisi de soğuk olursa bu sefer de çıtır çıtır olmaz. Sıcak olanın da aşırı sıcak olmadığından emin olun. Sonrasında baklavanız bu şekilde görünecek.
Baklavanın şerbeti içine çekmesi ve soğuması için 30 dakika bekleyin. İşte yemeye hazır! Ne kadar lezzetli göründüğüne bakın. Normalde satın aldığımız baklavalardan çok daha güzel. Ayrıca daha önce baklava yediyseniz bilirsiniz ki, baklavadan 2-3 dilim yediğiniz zaman şekerden dolayı daha fazlasını yiyemezsiniz. Ama bu baklavadan 10 dilim yiyebiliyorsunuz! @perceval Buna bir göz atsan iyi olur dostum 😋.
Okuduğunuz için çok teşekkürler. Umarım beğenmişsinizdir. Tarifle ilgili bir sorunuz olursa yorumlarda sormayı unutmayın. Yorumları okumaktan ve cevaplamaktan keyif alıyorum. Bugün ayın son günü. Umarım gelecek ay hepimiz için harika geçer!