
Hola, linda gente de Hive! Espero se encuentre muy bien. El día de hoy les enseñaré cómo hacer una torta o pastel Red Velvet también conocida como “Devilˈs Cake” por su color rojo intenso. Estoy segura que esta receta va a conquistar corazones y el paladar de toda esta maravillosa comunidad. Además, les daré mi secreto para que el bizcocho quede con un rojo perfecto y brillante.
Antes de empezar con la receta, permítanme contarles brevemente sobre uno de los orígenes de esta peculiar torta que está en tendencia no solo por su belleza y elegancia sino también, por su sabor único e irresistible.
Según cuentan, en la Segunda Guerra Mundial cuando los alimentos estaban fuertemente racionados, la creatividad y el ingenio de los pasteleros estadounidenses los llevó a usar el jugo de remolacha o betarraga hervida para mejorar el color de sus tortas y de esta manera hacerlas más atractivas para los clientes de la época. Adicionalmente, este jugo servía para que el bizcocho quedara sumamente húmedo y sedoso.
Pero, no fue sino años más tarde cuando empezó a usarse el colorante comestible para darle este caractérisco color rojo a la torta Red Velvet que sea dicho de paso, va acompañada de un relleno de crema de queso (frosting de queso crema) que incrementa su sabor y la hace toda una delicia de la que nadie puede resistirse.
Por otro lado, se cree que el Hotel Waldorf Astoria en Nueva York fue donde nació la torta Red Velvet y al parecer, una cliente al probar una ración de este pastel, le gustó tanto que terminó comprando la receta al Hotel. Sin embargo, la mujer estaba tan molesta por el dinero que tuvo que pagar que terminó regalando esta codiciada receta a todo el mundo. Fue en ese momento que el secreto mejor guardado de la pastelería ahora era propiedad pública.
Cabe destacar que, la torta Red Velvet se hizo mucho más famosa cuando apareció en una película llamada “Magnolias de Acero” dejando a toda la audiencia hechizada por su cubierta blanca inmaculada y por su brillante color rojo en su interior.
La torta Red Velvet se ha convertido en uno de los símbolos para representar el amor y la pasión además, que nos deleita con su magnífico sabor.
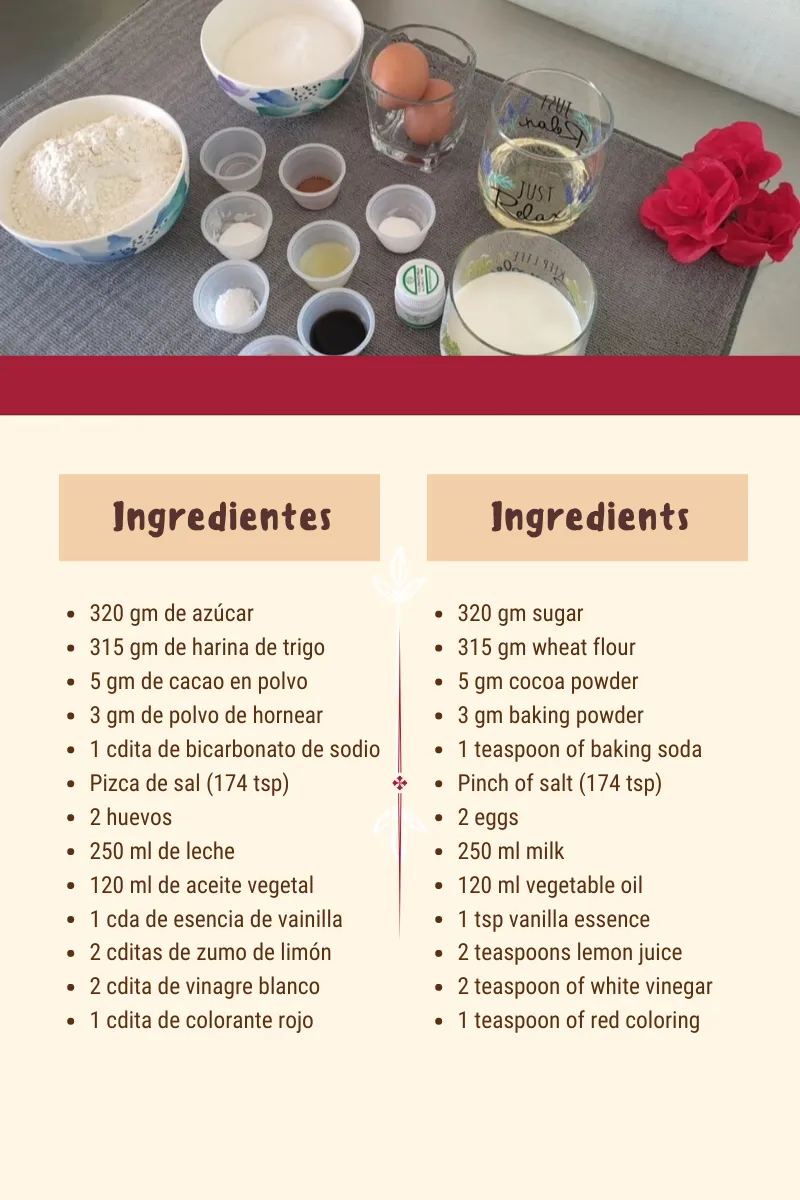
Y ahora sí, procedamos a elaborar el bizcocho Red Velvet y para ello vamos a necesitar los siguientes ingredientes:

Hello, nice people of Hive! I hope you are doing great. Today I will show you how to make a Red Velvet cake also known as "Devilˈs Cake" because of its intense red color. I am sure that this recipe will conquer hearts and the palate of all this wonderful community. In addition, I will give you my secret to make the cake with a perfect and bright red.
Before starting with the recipe, let me tell you briefly about one of the origins of this peculiar cake that is in trend not only for its beauty and elegance but also for its unique and irresistible taste.
According to the story, during World War II when food was heavily rationed, the creativity and ingenuity of American bakers led them to use boiled beet juice to improve the color of their cakes and thus make them more attractive to the customers of the time. Additionally, this juice served to make the cake extremely moist and silky.
But, it was not until years later when edible coloring began to be used to give this characteristic red color to the Red Velvet cake that, by the way, is accompanied by a cream cheese filling (cream cheese frosting) that increases its flavor and makes it a delight that no one can resist.
On the other hand, it is believed that the Waldorf Astoria Hotel in New York was where the Red Velvet cake was born and apparently, a client who tasted a portion of this cake, liked it so much that she ended up buying the recipe from the Hotel. However, the woman was so upset about the money she had to pay that she ended up giving away this coveted recipe to everyone. It was at that moment that the best kept secret of the bakery became public property.
It is worth mentioning that the Red Velvet cake became much more famous when it appeared in a movie called "Steel Magnolias" leaving the whole audience spellbound by its immaculate white cover and its bright red color inside.
Red Velvet cake has become one of the symbols to represent love and passion and it delights us with its magnificent taste.
And now, let's proceed to make the Red Velvet cake and for this we will need the following ingredients:
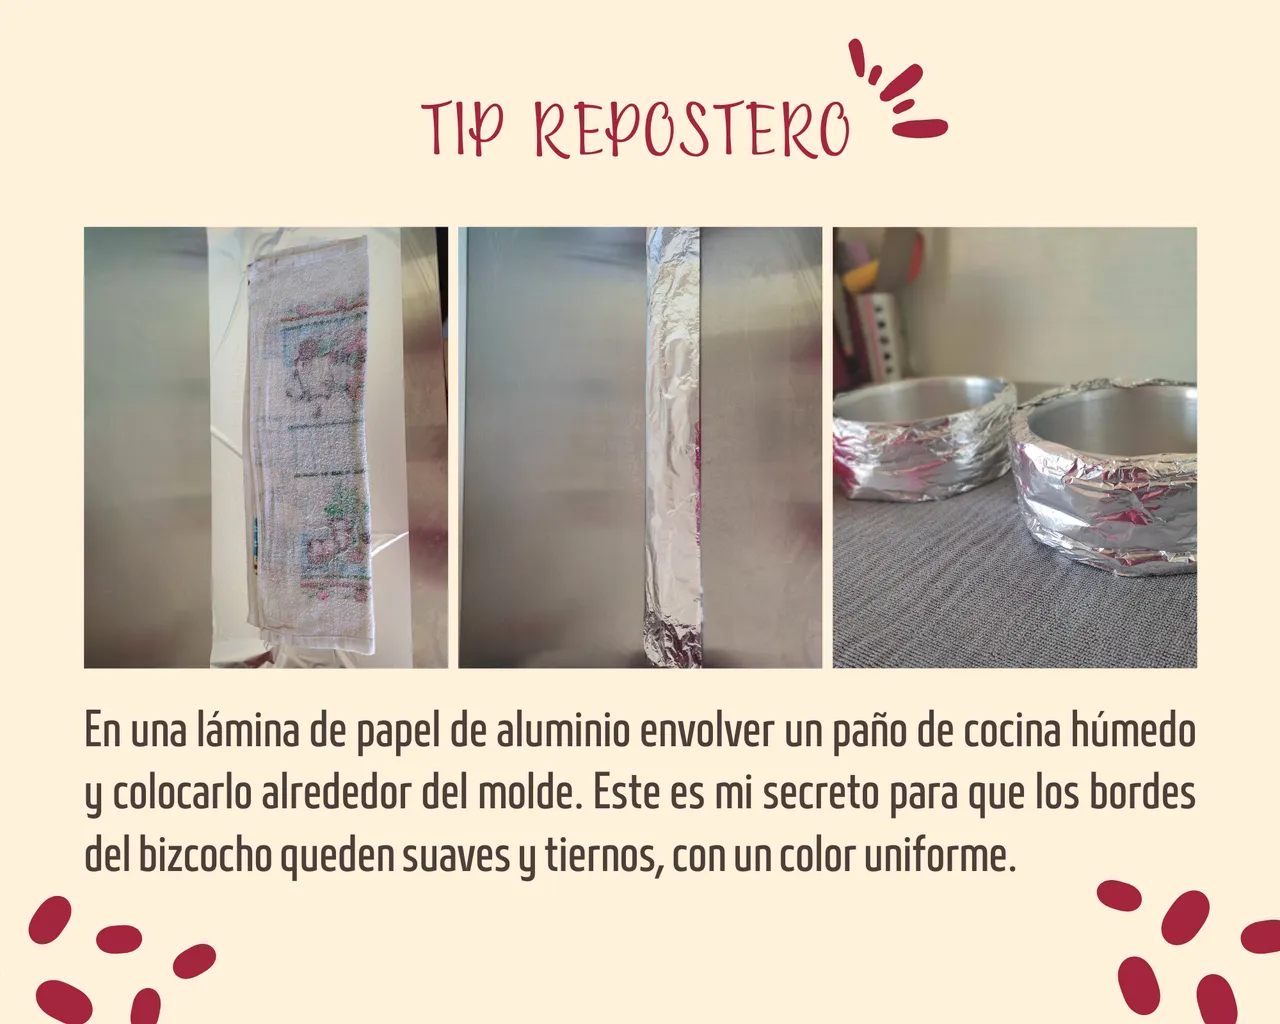
BAKING TIP
On a sheet of aluminum foil wrap a damp kitchen towel and place it around the pan. This is my secret to make the edges of the cake soft and tender with a uniform color.
PREPARACIÓN
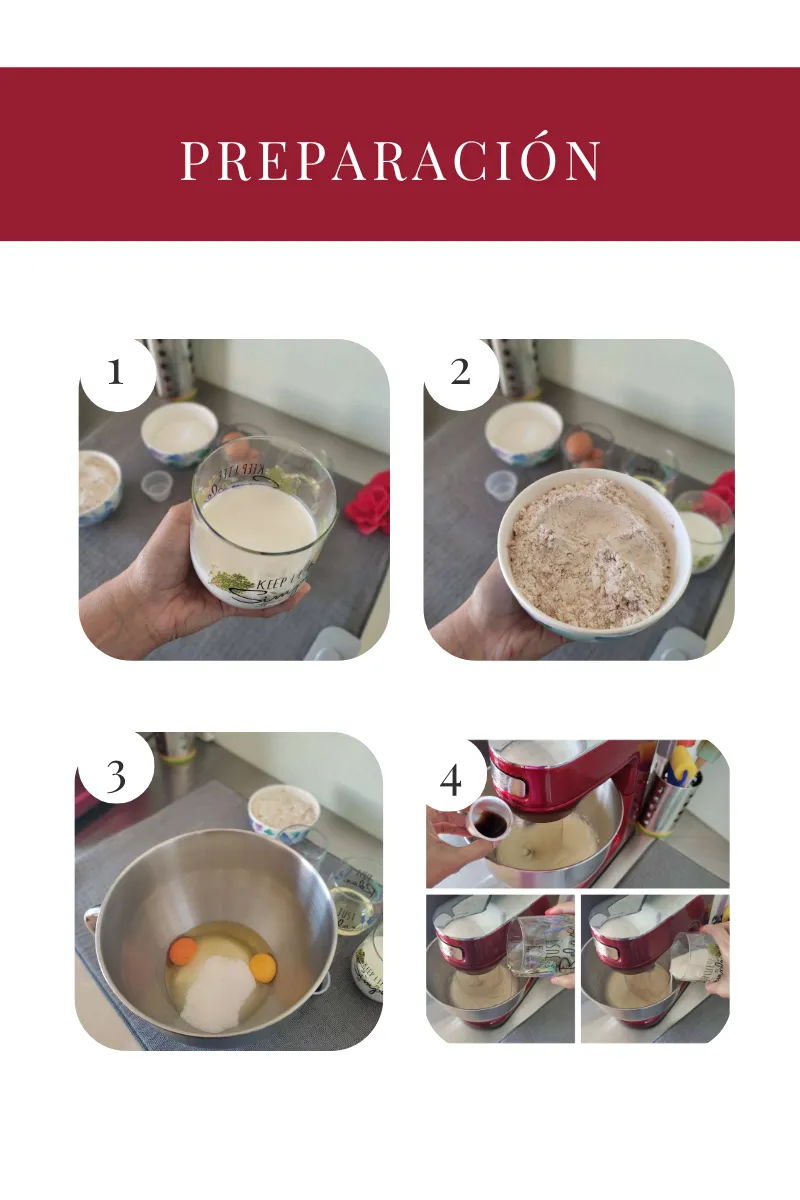
PASO 1: Añadir el zumo de limón a la leche y dejarlo reposar 15 minutos para obtener una buttermilk o suero de mantequilla. Este ingrediente aporta sabor y esponjosidad al bizcocho.
PASO 2: Agregar todos los ingredientes secos y reservar para usarlos luego.
PASO 3: En el bowl añadir el azúcar y los 2 huevos para luego batir durante 5 minutos aproximadamente.
PASO 4: Pasado los 5 minutos, incorporamos la esencia de vainilla, el aceite vegetal y la buttermilk y batimos por un minutos entre cada uno de ellos.
PREPARATION
STEP 1: Add the lemon juice to the milk and let it stand for 15 minutes to obtain a buttermilk. This ingredient adds flavor and fluffiness to the cake.
STEP 2: Add all the dry ingredients and set aside for later use.
STEP 3: In the bowl add the sugar and the 2 eggs and then beat for about 5 minutes.
STEP 4: After 5 minutes, add the vanilla essence, the vegetable oil and the buttermilk and beat for one minute between each one of them.
PASO 5: Tamizar los ingredientes secos sobre la mezcla. Batir hasta que todo quede bien integrado.
PASO 6: Una vez hayan integrado todo muy bien, incorporar el colorante rojo y batir hasta que todo esté bien distribuido en toda la mezcla.
PASO 7: Por último, agregamos el bicarbonato al vinagre blanco y se lo incorporamos a la preparación.
PASO 8: Volcamos la mezcla en un molde de 20 cm de diámetro o 2 moldes de 18 cm de diámetro c/u, previamente engrasado y con papel mantequilla o papel vegetal en el fondo.
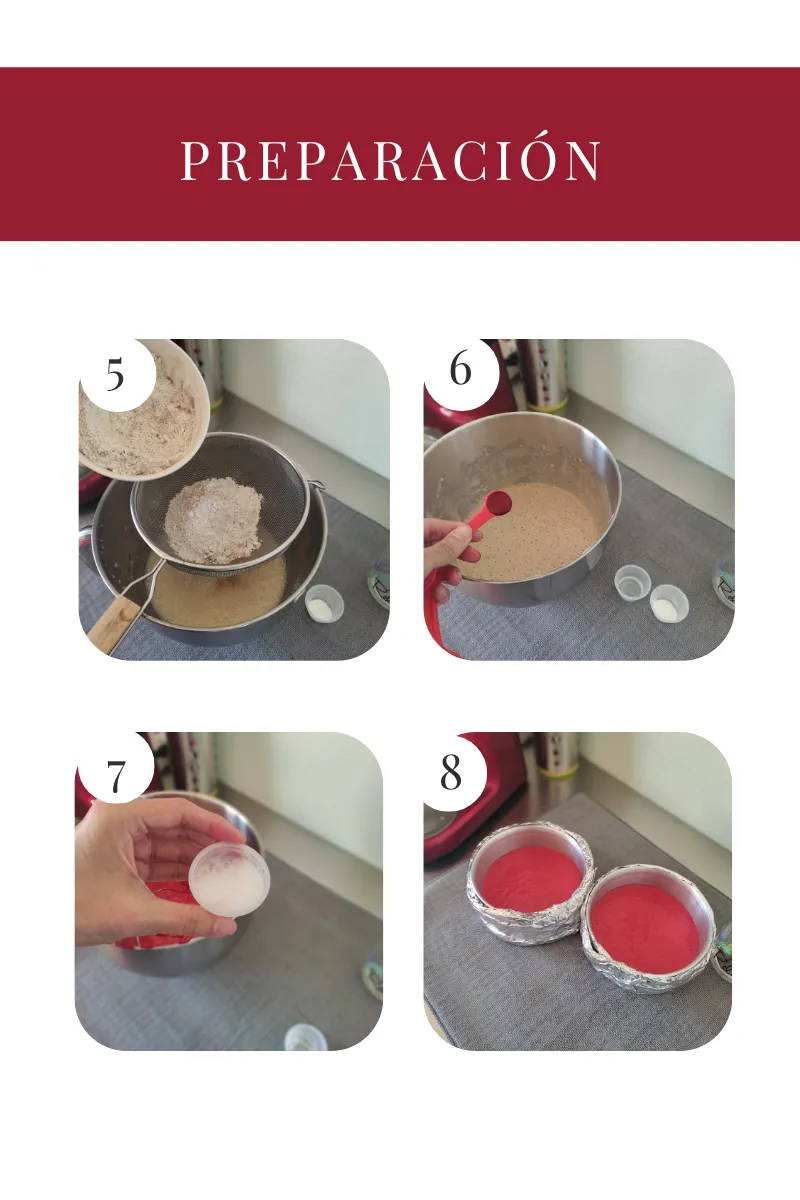
STEP 5: Sift the dry ingredients over the mixture. Beat until everything blends in.
STEP 6: Once everything is well integrated, add the red coloring and beat until everything is well distributed throughout the mixture.
STEP 7: Finally, we add the baking soda to the white vinegar and we incorporate it to the preparation.
STEP 8: Pour the mixture into a 20 cm diameter mold or 2 molds of 18 cm diameter each, previously greased and with butter paper or parchment paper on the bottom.
PASO 9: Llevamos a un horno precalentado a 180 grados centígrados por una hora aproximadamente. Recuerda que cada horno es diferente, por eso debes estar chequeando tu bizcocho para asegurarte que se está cocinando correctamente.
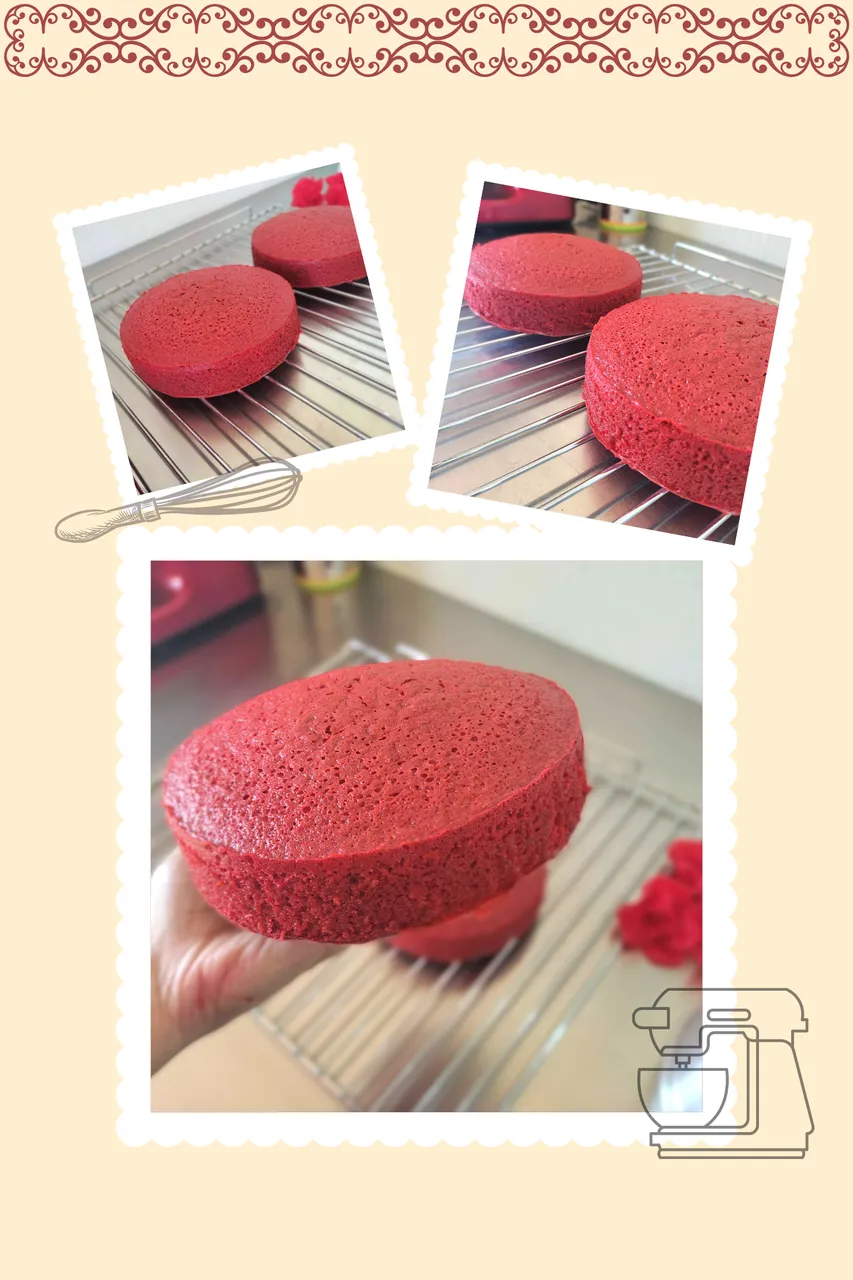
PASO 10: Retirar el bizcocho del horno cuando esté cocido y retirar con cuidado las cintas de aluminio y dejar reposar por 5 minutos.
PASO 11: Pinchar con una brocheta para asegurarnos que el bizcocho está bien cocido antes de desmoldarlo.
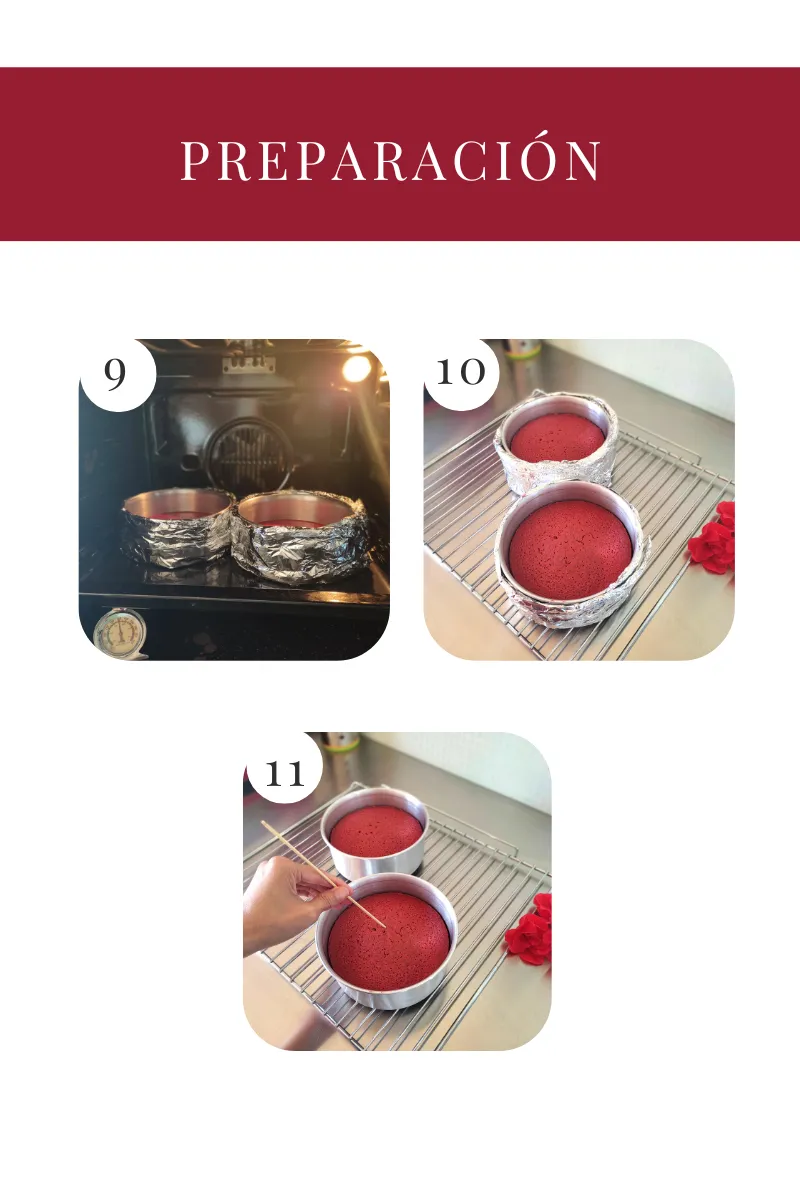
STEP 9: Bake in a preheated oven at 180 degrees Celsius for approximately one hour. Remember that every oven is different, so you should be checking your cake to make sure it is cooking correctly.
STEP 10: Remove the cake from the oven when it is cooked and carefully remove the aluminum foil strips and let it rest for 5 minutes.
STEP 11: Pierce with a skewer to make sure the cake is well cooked before unmolding it.
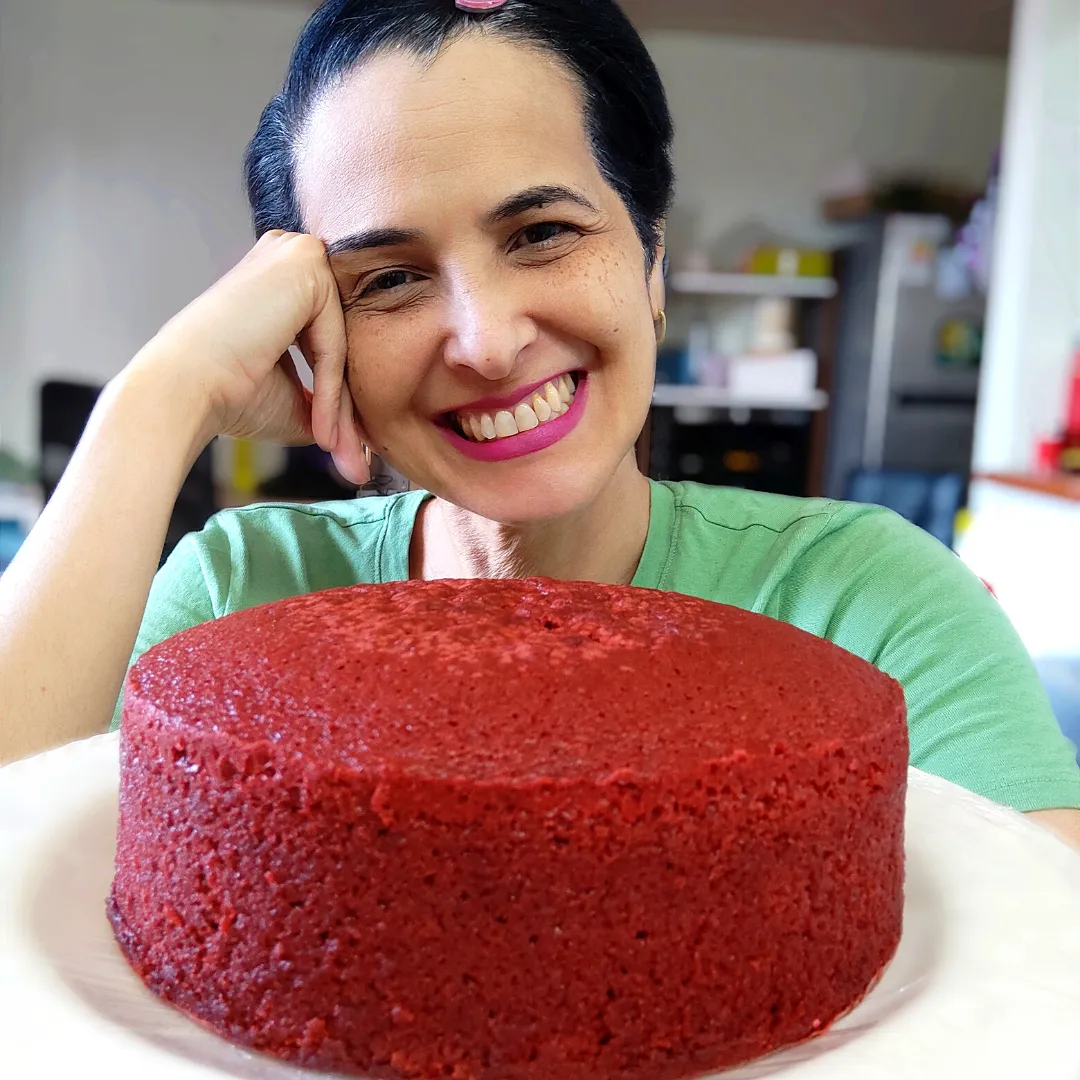
Y así ha quedado este hermoso y rico bizcocho Red Velvet que con mucho amor comparto con ustedes.
And this is how this beautiful and rich Red Velvet cake turned out, which I am sharing with you with much love.
Espero te animes a prepararlo para que sorprendas a familiares y amigos y lo acompañen con una tasa de café o té.
I hope you are encouraged to prepare it to surprise family and friends and accompany it with a cup of coffee or tea.

▶️ 3Speak