HOLA COMUNIDAD!👩🍳
HELLO COMMUNITY!👩🍳
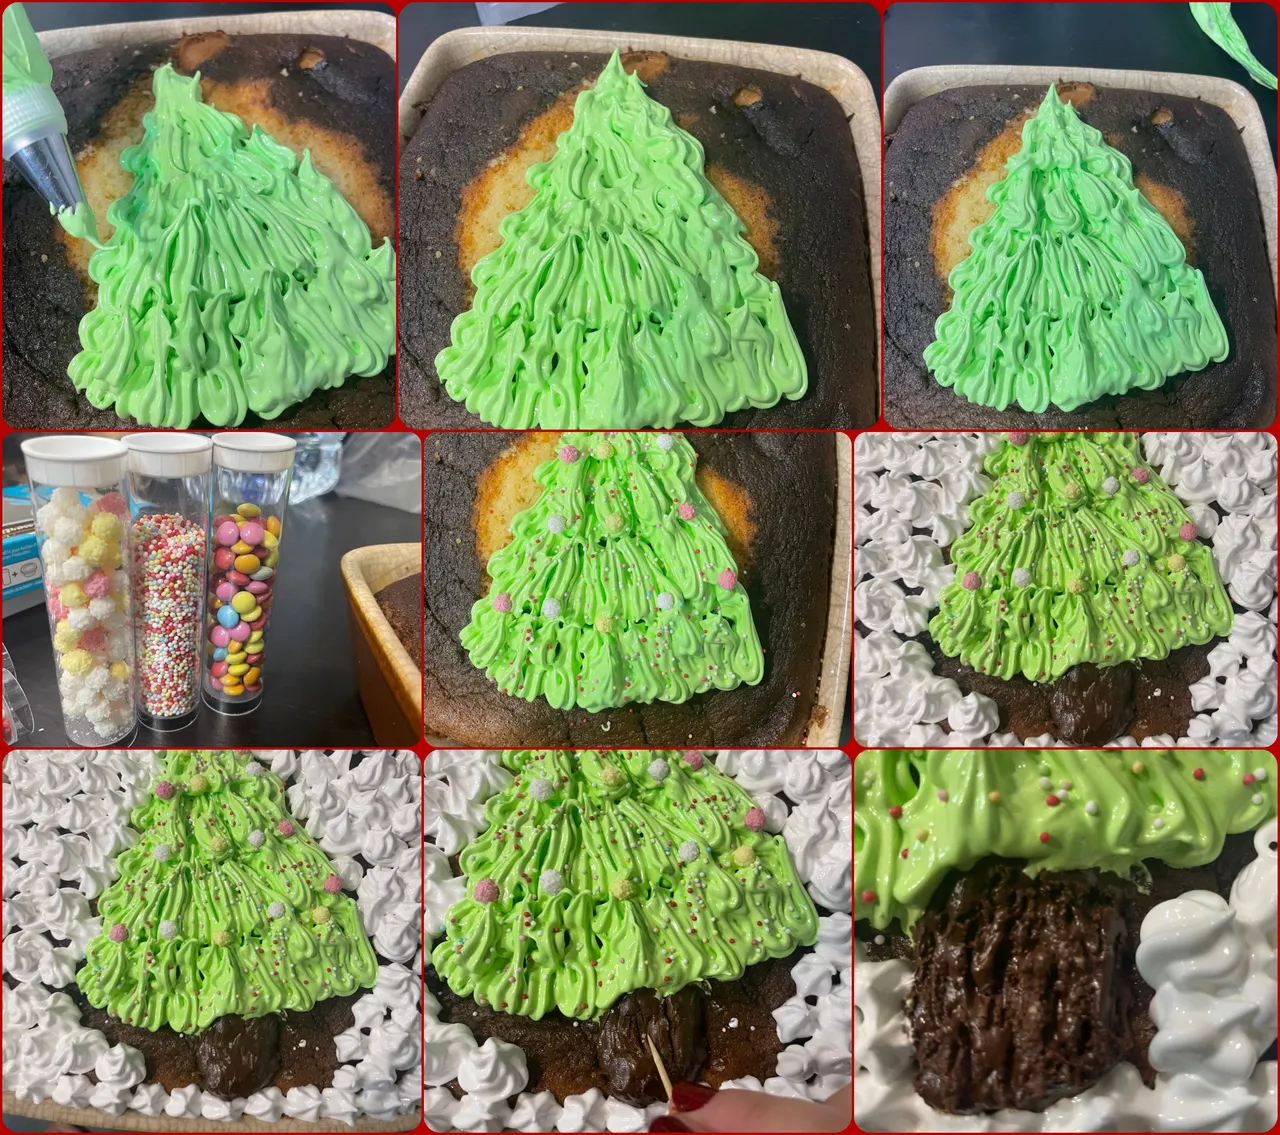
This Christmas I had to bring a cake for my family for this Christmas dinner that we have every year to share in this beautiful Christmas, so I decided to bake a delicious tres leches cake with Christmas decoration. As you can see in the photo, I made a Christmas tree with Swiss meringue. If you want to learn how to bake this delicious cake, I invite you to read my post.
ESP
Esta Navidad tenía que llevar un pastel para mi familia en esta cena navideña que realizamos cada año para compartir en esta hermosa Navidad, así que decidí hornear un delicioso pastel de tres leches con decoración de navidad. Como se puede observar en la foto, realicé un árbol de navidad con merengue suizo. Si quieres aprender a hornear este delicioso pastel, te invito a leer mi post.

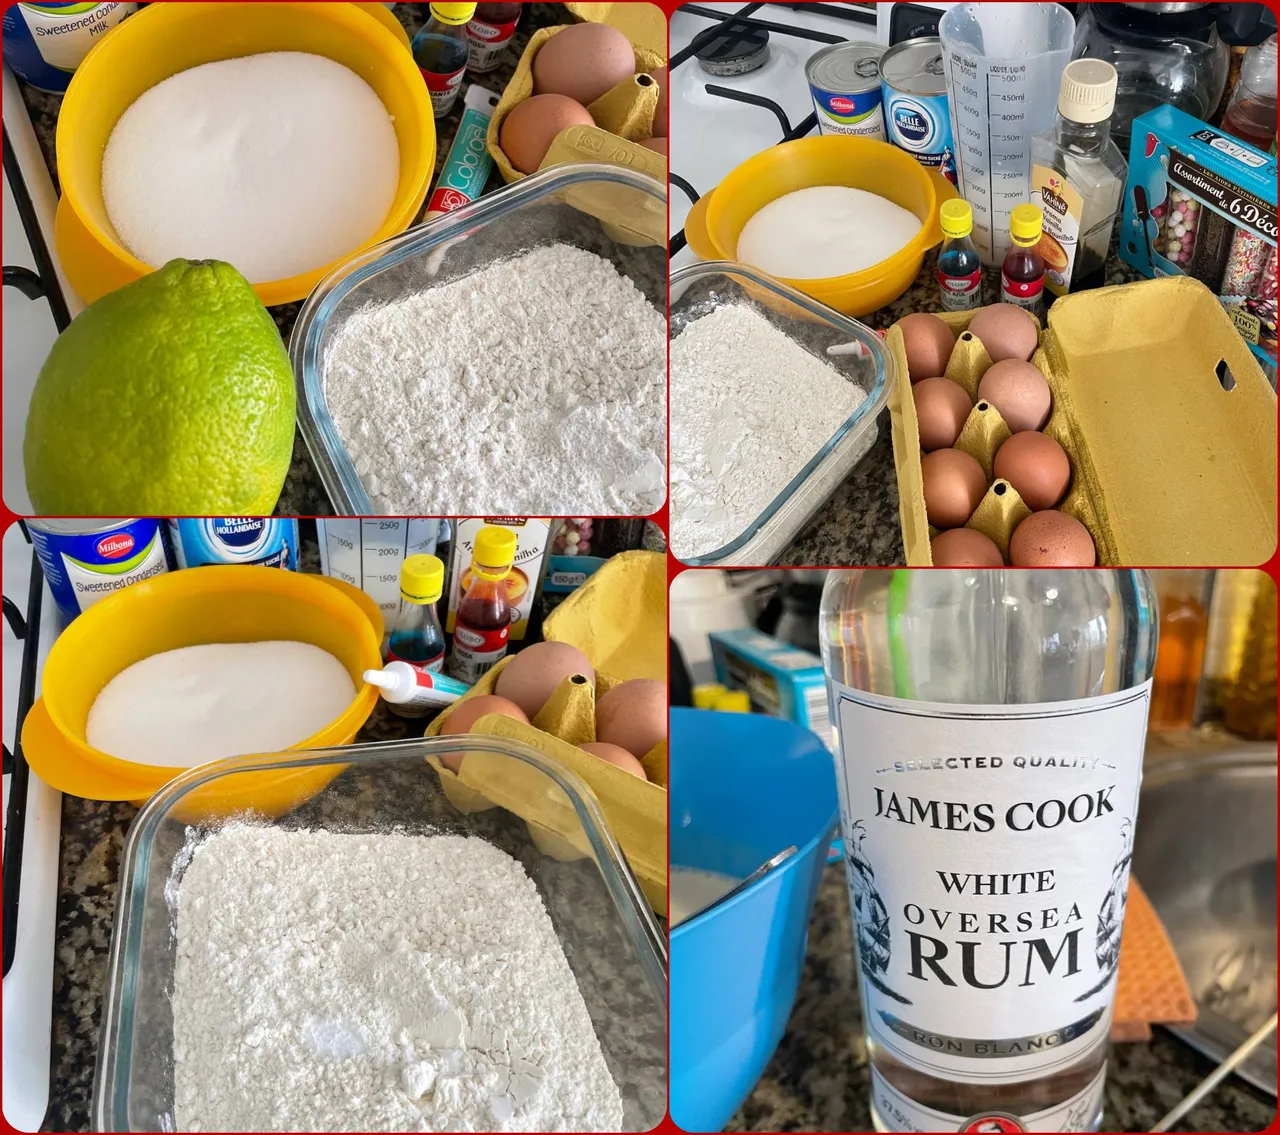
- Cake:
| 6 Eggs | 300G Pastry Flour |
|---|---|
| 300G Sugar | Lemon zest |
| 1 tsp Vanilla | 1 pinch of Salt |
| 60ml oil | 1 tsp Rum |
| 395g Condensed and evaporated milk. | 100ml of milk. |
- Swiss meringue and decoration:
| 113g Egg whites | 25g Sugar |
|---|---|
| 200G Sugar | 3 drops of lemon |
| 175 ml Water | Chocolate (optional) |
ESP
- Bizcocho:
| 6 Huevos | 300G Harina Repostera |
|---|---|
| 300G Azúcar | Ralladura de limón |
| 1 cdta Vainilla | 1 pizca de Sal |
| 60 ml aceite | 1 dta de Ron |
| 395 g Leche condensada y evaporada. | 100 ml de leche. |
- Merengue suizo y decoración:
| 113 g Claras de huevos | 25 g Azúcar |
|---|---|
| 200G Azúcar | 3 gotas de limón |
| 175 ml Agua | Chocolate (opcional) |
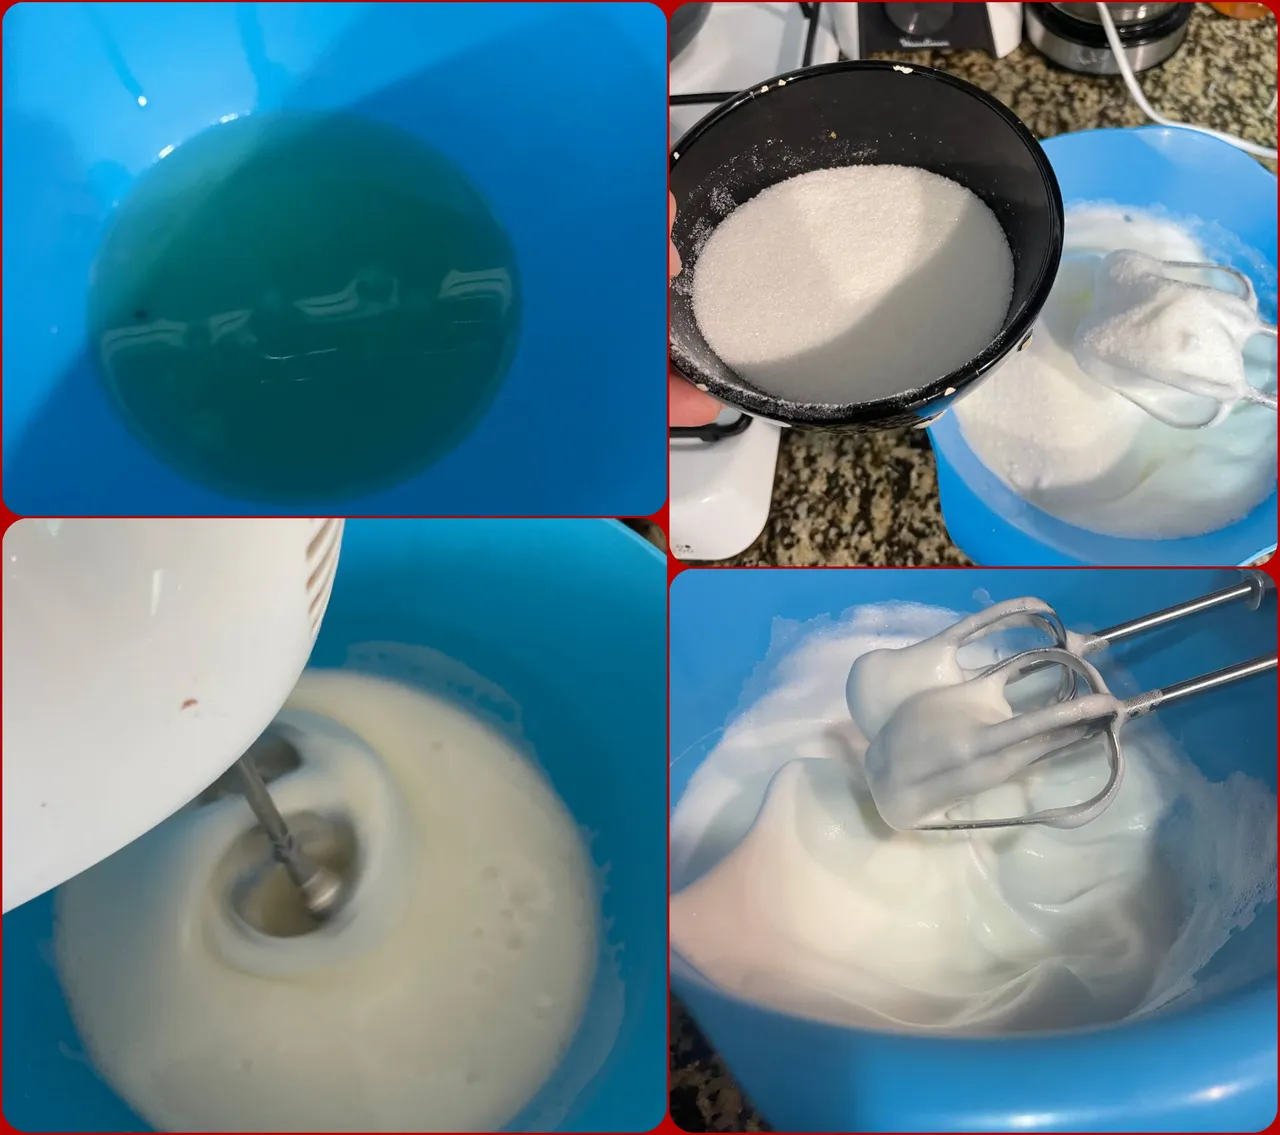
- Step 1.
One of the keys to a perfect 3 milks cake is its fluffiness. The fluffier the cake is, the richer and juicier it will be, since it will absorb the three milks more easily and quickly. Therefore, the best method to make our cake super fluffy would be to separate our egg whites and provide half of the sugar, achieving a consistency in the dough like a meringue.
ESP
- Paso 1.
Una de las claves para que un pastel de tres leches sea perfecto es su esponjosidad. Mientras más esponjoso sea el pastel, más rico y jugoso quedará, ya que absorberá las tres leches con mayor facilidad y rapidez. Por lo cual, el mejor método para hacer que nuestro pastel sea superesponjoso sería separar nuestras claras de huevo y proporcionar la mitad del azúcar, logrando una consistencia en la masa como un merengue.
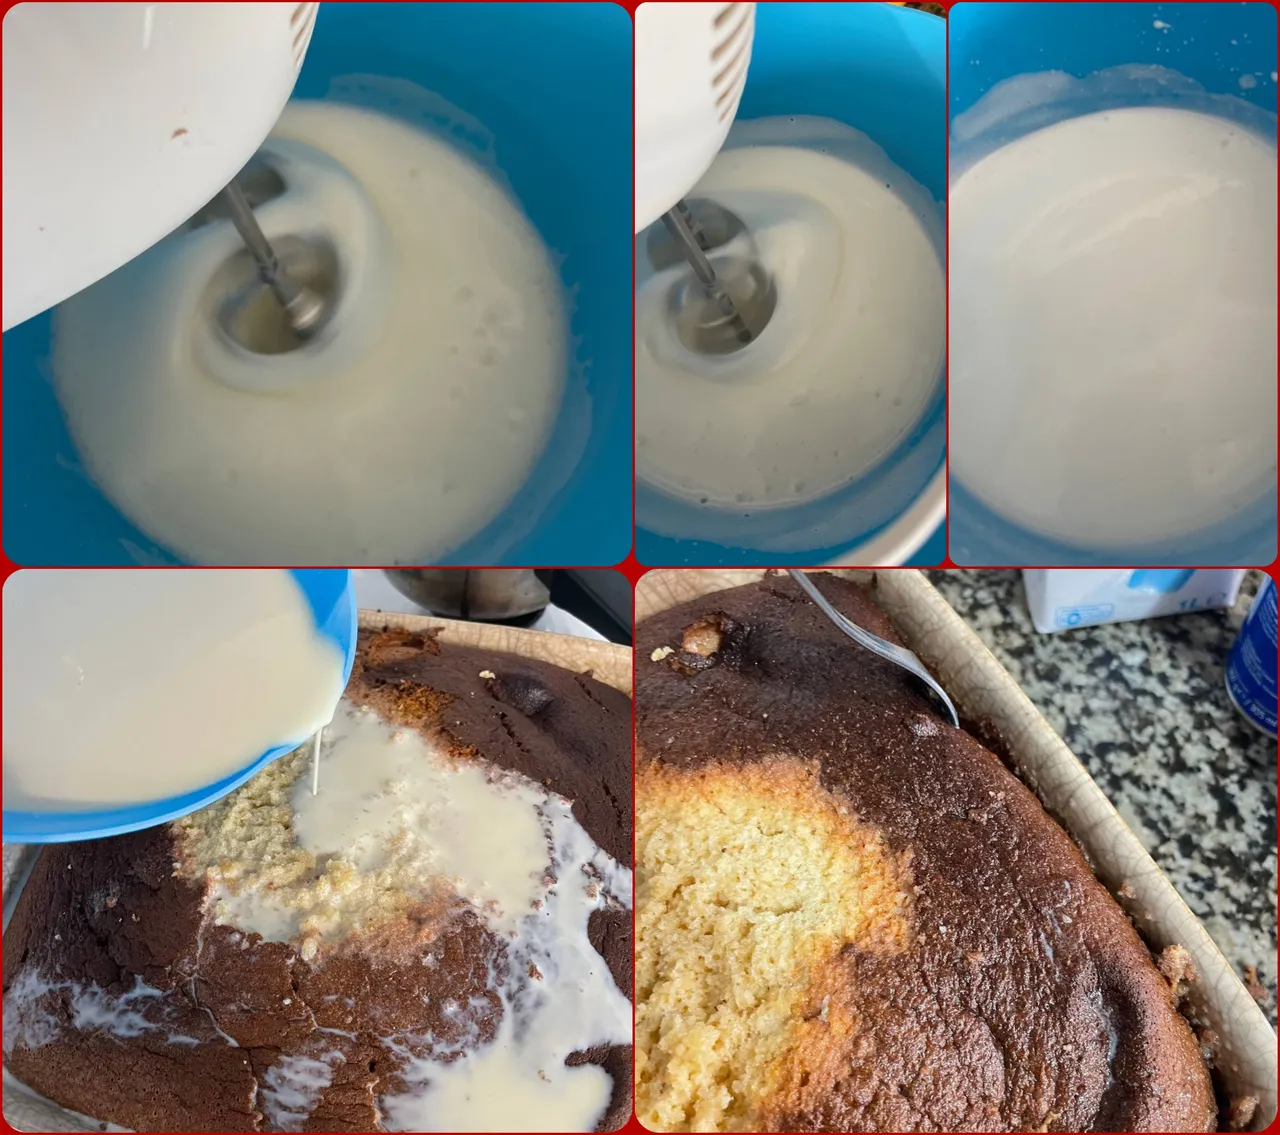
- Step 2.
Then with the yolks in another bowl we will mix the rest of the ingredients for the cake, when both mixtures are ready we will join them with spoonful and mixing them in an enveloping way, when both ingredients are ready, we will place our mixture in the preheated oven 180 degrees up and down heat; we will let it bake for about 40 m-1 h.
ESP
- Paso 2.
Luego con las yemas en otro recipiente mezclaremos el resto de los ingredientes correspondientes al pastel, cuando ambas mezclas se encuentren listas las uniremos con cucharadas y mezclándolos de forma envolvente, cuando se encuentren ambos ingredientes listos, colocaremos nuestra mezcla en el horno precalentado 180 grados calor arriba y abajo; lo dejaremos hornear por alrededor de 40 m-1 h.


After our cake is baked, it is time to assassinate it, by that I mean that with a fork we will open holes around the whole cake to absorb the three milks successfully, since the goal of the cake is to be as moist as possible, I had to cut a little the top, as I needed a flat base to decorate successfully.
For the liquid that will moisten our cake is very easy to prepare, simply place the liquid milk, evaporated milk, a little rum and condensed milk together, with our mixer we mix them and then begin to pour it all over our cake, you will notice that it will absorb the liquids without problem, as the cake will be very fluffy.
ESP
Luego que nuestro pastel se encuentre horneado, es momento de asesinarlo, con eso me refiero que con un tenedor vamos a abrir huequitos alrededor de todo el pastel para que absorba las tres leches con éxito, ya que el objetivo del pastel es quedar lo más húmedo posible, tuve que cortar un poco la parte de arriba, ya que necesitaba una base plana para decorar con éxito.
Para el líquido que humedecerá nuestro pastel es muy fácil de prepararlo, simplemente colocaremos la leche líquida, evaporada, un poco de ron y leche condensada juntas, con nuestra batidora las mezclamos y luego comenzamos a verterlo por todo nuestro pastel, observarán que absorberá los líquidos sin problema, ya que el pastel quedo muy esponjoso.
To decorate ours will be in a super simple way, we will make a Christmas tree with only meringue and a piping bag. To make our meringue we have to put the water and sugar to cook until the ball point, has this term because we know that the syrup is ready because when you pour a little cold water, you can manipulate it and form a ball, if you desase it means that it is not ready while waiting for the syrup to reach its proper point we will be with the mixer on low volume beating and placed the three drops of lemon OJO that the syrup will have the 220 g and the 25 will be beaten together with the egg whites. When our syrup is ready we will have to raise the volume of the whisk and pour in the form of thread to the whisk, when this all vertigo, we will continue beating up to 10 minutes without pause, then you will obtain a meringue superfirme perfect for decorating, separate half of the meringue, since you needed to color it with green coloring, in case you have yellow and blue you can combine them and you will have a green like mine, it is advisable coloring in gel, since in powder or liquid can alter the consistency of the meringue.
ESP
Para decorar el nuestro será de una manera súper simple, vamos a hacer un árbol de navidad con solo merengue y una manga pastelera. Para realizar nuestro merengue tenemos que colocar el agua y el azúcar a cocinar hasta el punto bolita, tiene este término porque sabemos que el almíbar se encuentra listo porque al momento de verter un poco en agua fría, puedes manipularlo y formar una bolita, si se desase significa que no se encuentra listo mientras esperamos que el almíbar llegue a su punto adecuado estaremos con la batidora en volumen bajo batiendo y colocado las tres gotas de limón OJO que el almíbar tendrá los 220 g y los 25 van a ser batidos juntos a las claras de huevos. Cuando nuestro almíbar este listo tendremos que subir el volumen del batidor y verter en forma de hilo al batidor, cuando este todo vértigo, seguiremos batiendo hasta 10 minutos sin pausa, luego obtendrán un merengue superfirme perfecto para decorar, separe mitad del merengue, ya que necesitaba colorarlo con colorante verde, en caso de que tengas amarillo y azul puedes combinarlos y tendrás un verde como el mío, es aconsejable colorante en gel, ya que en polvo o líquido puede alterar la consistencia del merengue.

If you are new to decorating I advise you to make a support base on the cake you can do it with a knife or toothpick, so you can support yourself to where we will place the meringue and in what way you will direct it; the directions are always in a form from top to bottom or from top to bottom and in the form of chain we make the meringue forms, I advise you that the easiest way is from bottom to top you will have some peaks that then you will use them as support to know that you will place the pastry balls that will be the backdrops to decorate, you can choose any of the supermarket even place chocolate chocolates or m&m whatever you have within reach, the creativity is up to you. For the trunk I had the idea of melting some chocolate to the point of being able to mold it and with a stick I made lines to make it look like a real one. With the rest of the meringue with another piping bag, I made dots for all the empty spaces to make the snow paper.
ESP
Si eres nuevo en decorar te aconsejo en que realices una base de apoyo en el pastel puedes hacerlo con un cuchillo o palillo, así podrás apoyarte hasta donde colocáremos el merengue y en que forma lo direccionaras; las direcciones son siempre en una de forma de arriba para abajo o de arriba para abajo y de forma de cadena hacemos las formas de merengue, te aconsejo que la forma más fácil es de abajo para arriba te quedaran unos picos que luego los usaras de apoyo para saber que colocaras las bolitas pasteleras que serán las bambalinas para decorar, puedes escoger cualquiera del súper incluso colocar bombones de chocolate o m&m lo que tengas al alcance, la creatividad la colocas tú. Para el tronco tuve la idea de derretir un poco de chocolate hasta el punto de poder moldearlo y con un palito hice líneas para que parezca uno real. Con el resto del merengue con otra manga, hice puntos por todos los espacios vacíos para hacer el papel de nieve.
Tip: If you are looking for a completely white meringue, do not add vanilla because it will alter the color, for a firm meringue it is important to follow the measures and the quantity each process is important to follow, the containers where you will work the meringue must be completely clean because it is easy that it can absorb fat and alter our work.
ESP
Consejo: Si estas en busca de un merengue completamente blanco, no coloques vainilla porque alterara el color, para un merengue firme es importante seguir las medidas y la cantidad cada proceso es importante de seguir, los recipientes donde trabajaras el merengue tienen que estar completamente limpio ya que es facil que pueda absorber gordura y alterar nuestro trabajo.

Thank you very much for reading my post. I hope you had a nice Christmas, and in case you still have a dinner or family gathering, you can surprise them with this quick and simple recipe that is perfect for this time of the year.🤶🎁
Muchas gracias por leer mi post. Espero que tuvieran una linda Navidad, y en caso de que todavía tengas una cena o reunión familiar, puedes sorprenderlos con esta rápida y simple receta que es perfecta para estas épocas.🤶🎁
