Hi all👋🏻
I want to share with you all today my fully Airbrushed “Painting” as a Step By Step!
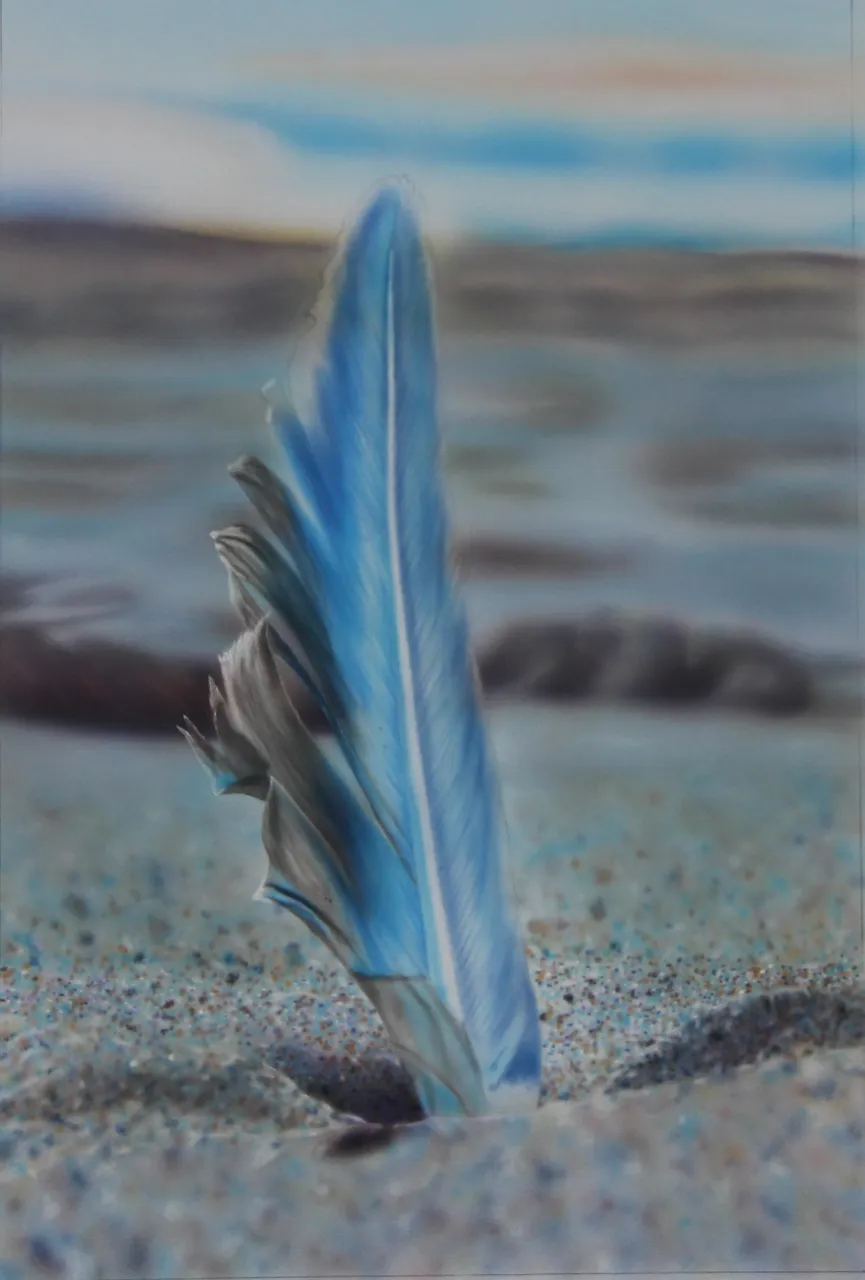
Title: “Tranquillity”
(🇪🇸Español debajo de la parte inglesa.)
As said I would post in your community @camiloferrua 😉 so here is my first post.
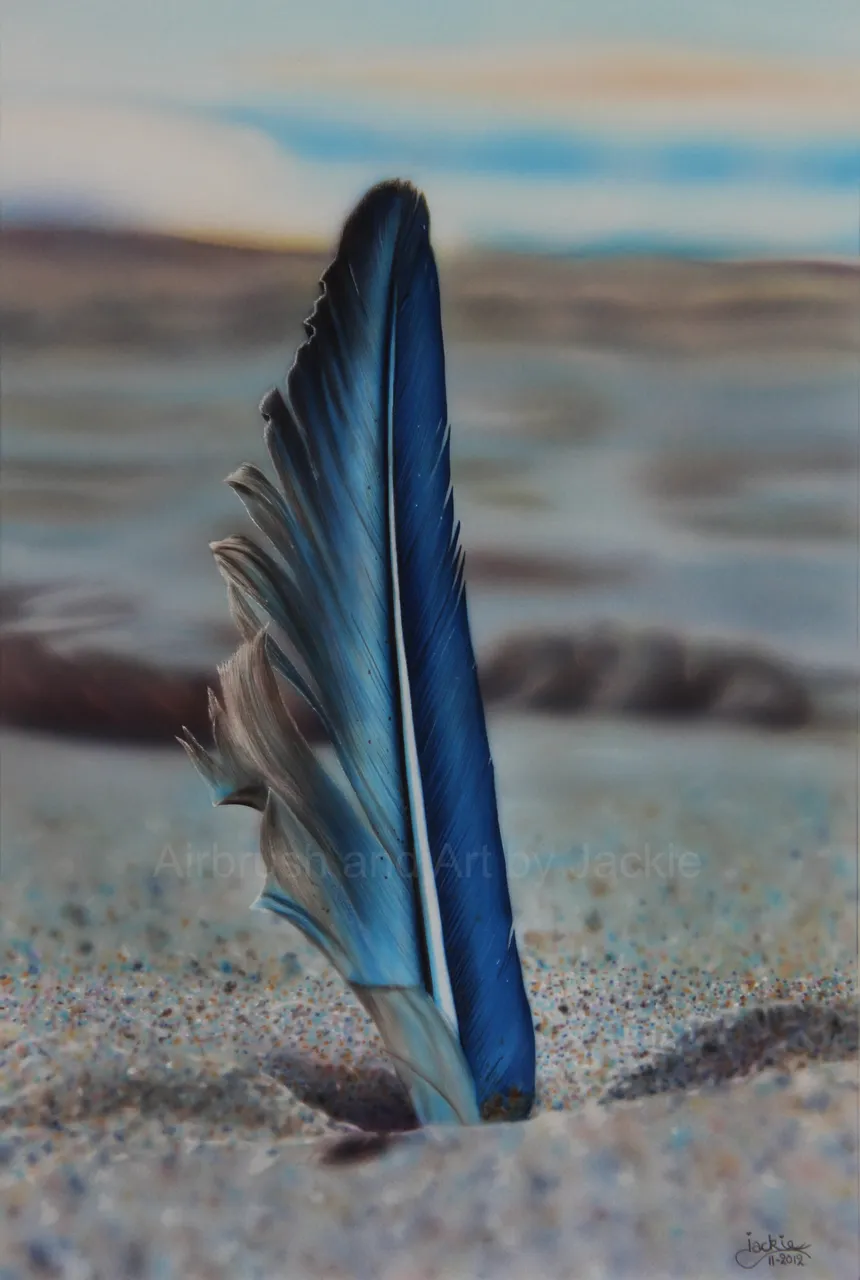
I Airbrushed a feather stuck in the sand on the beach in 2012. The reference photo was used with permission from Mark Osbourne.
I will guide you through my process of airbrushing this artwork/ airbrushwork.
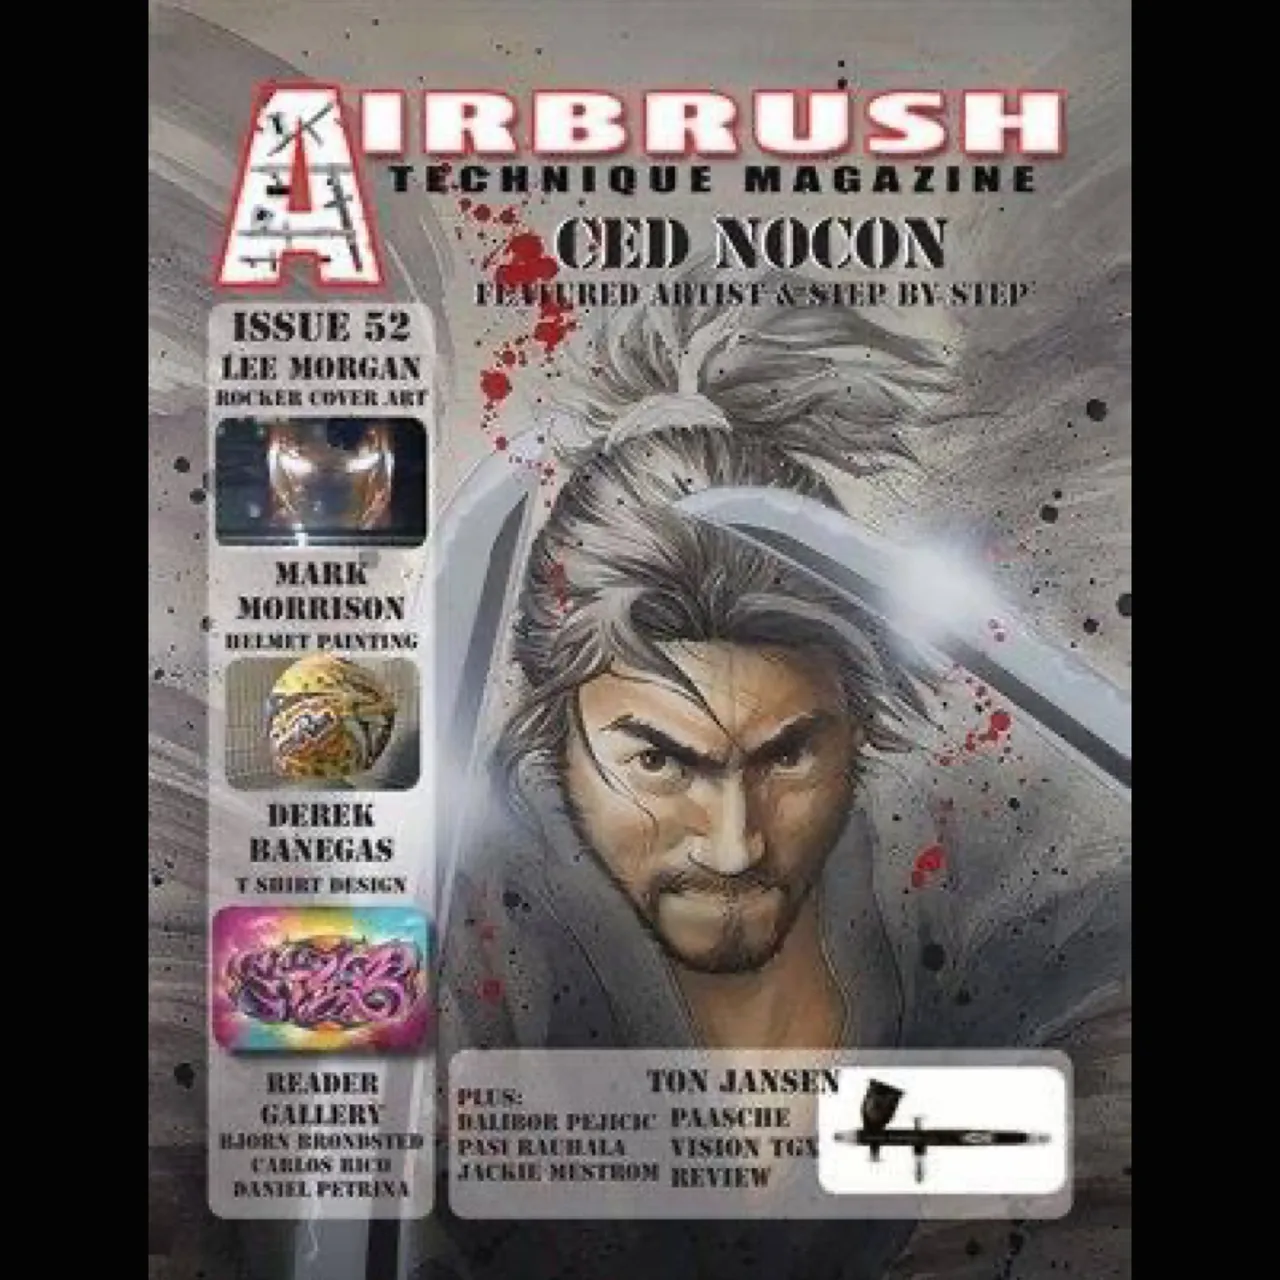
With this SBS I was published in an Airbrush Magazine in the USA. Airbrush Technique Magazine. Issue 52, 31-03-2014
Love to share my art and help others along the way 😎
So here it goes:
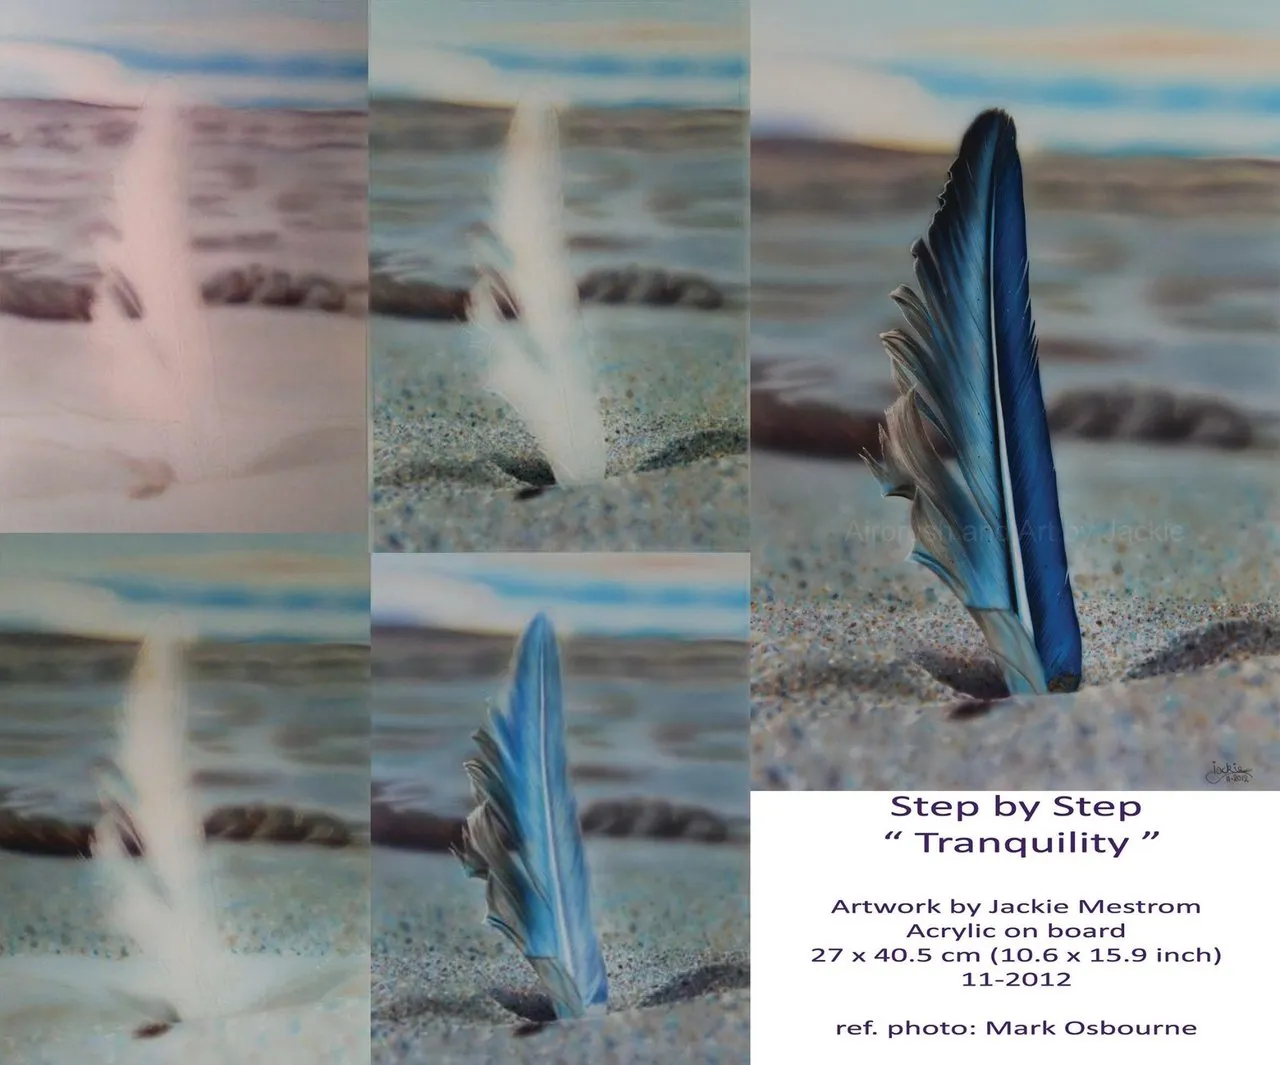
SBS airbrush painting “Tranquility”
Acrylic on illustration board 27 x 40.5 cm / 10.6 x 15.9 inch, Finished 11-2012
Ref. Mark Osbourne
- Airbrush paint: Schmincke Aero Color
- Airbrush gun: Harder & Steenbeck Infinity 0.15mm
- Board: Schoellershammer 4G
I first print out a template from the reference image to determine the painting size and it will be easy to have on the side, to see if the proportions are right after the sketch.
I draw/ sketch out only the important main lines that I need, with a graphite pencil 2B.
From now on I will work from my computer screen, where I display my reference photograph.
And if I need it, I can zoom in on the reference photo to see all the important details that I so need for my airbrush painting.
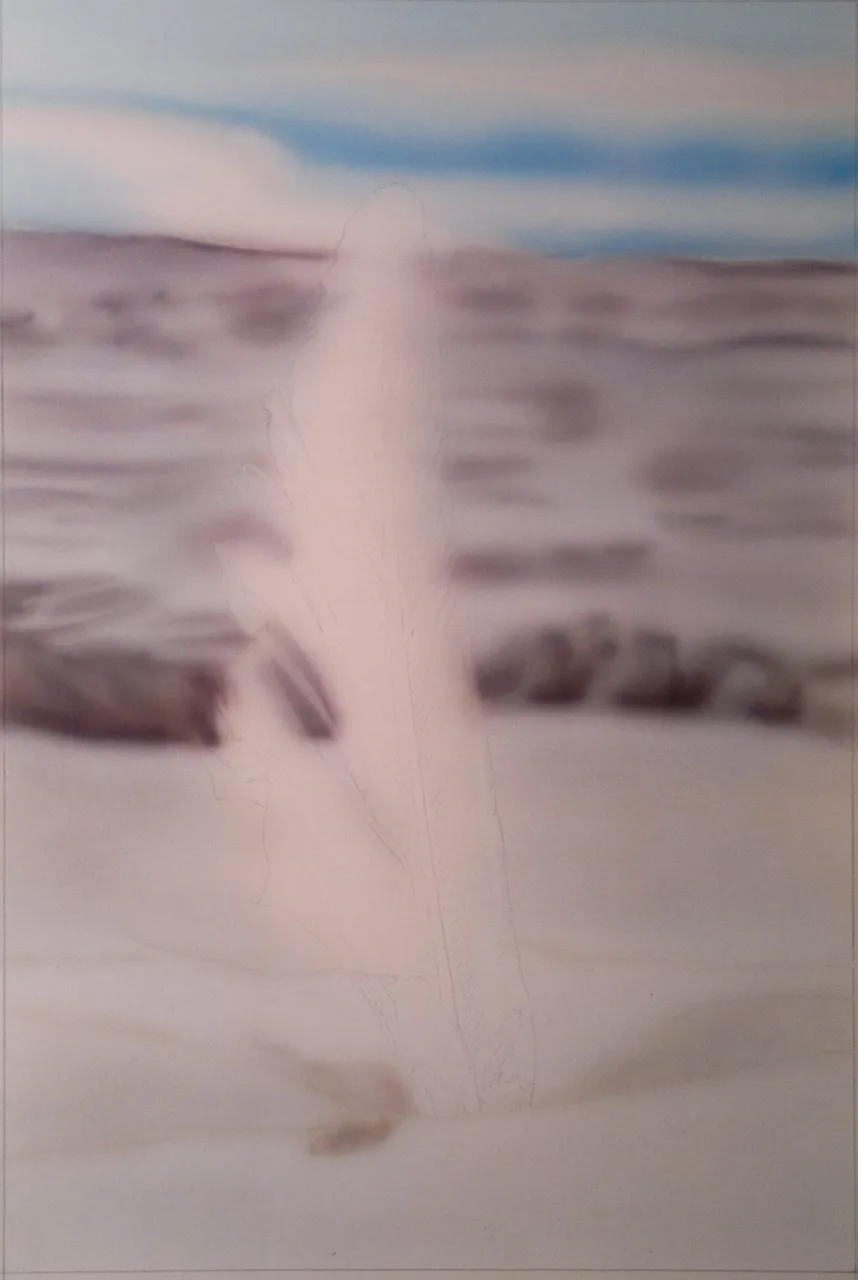
1: You can see in the first picture, I have drawn only the main lines for my sketch with the pencil.
I work with transparent and opaque colors in this airbrush work, but mostly the transparent ones. First I airbrushed with grey the main features from the beach in the background… like a roadmap for further use. I did this freehanded to get the soft look and because I want it blurred out, I didn’t want sharp lines in it. In the front of the beach, around the feather, I airbrushed lightly the shadow parts. I did not mask the feather off, I just sprayed around it. (And the little overspray I get on the feather does not bother me, because the feather will be darker and the colors I use in the background will be also in the feather later) After that I airbrushed the sky with blue.
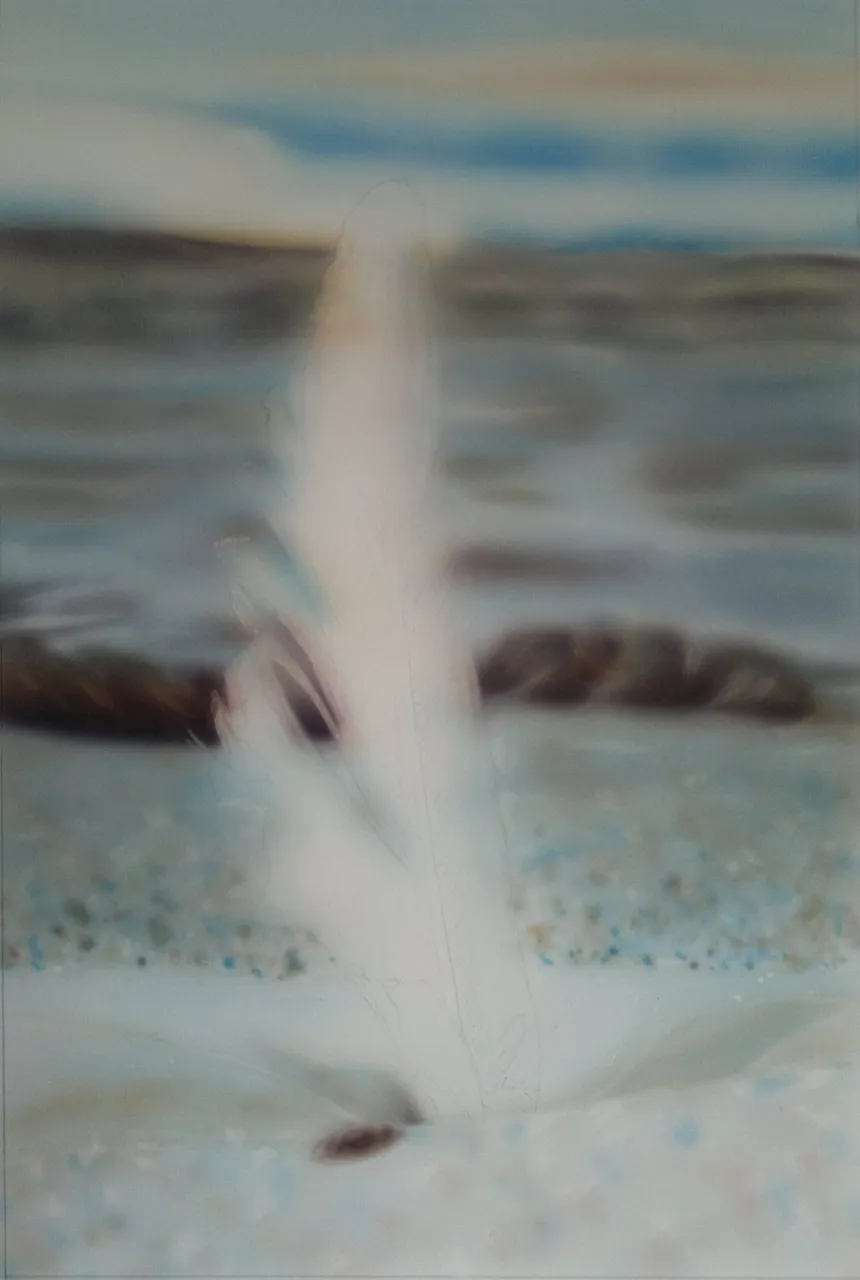
2: From now on every color I use on the entire painting, when my airbrush cup is not empty, I spray onto the foreground as sand grains. All the sand/grains you see around the feather are airbrushed little dots, in a variety of sizes, blurred dots, sharp dots and in many colors.
In this picture you see I added some warm colours to the background and also in the sky, to give it a bit of an evening glow. I airbrushed it with the color flesh… really thinned down with water 50-50. I also added transparent blue in the background from the beach. I airbrushed now more grey and a little sepia to make the background darker.
When the colors are in the right spot, I take a soft eraser, to erase some spots, where I need some highlights. But again no sharp lines… So I erase them softly. I went then over it with the grey / blue and flesh. If you look closely you see I used all of those colors so far, also for the sand grains in the front of the picture. Mostly are still blurred in this stage.
Now I want to define the light and shadow parts more in the foreground, to create depth in the sand. I sprayed lightly flesh and sepia, both thinned down really good, in the parts that needed it. After that, I erased the upper lines / the top from the little sand hills and I also highlighted and erased out some sand grains with the eraser in the foreground. I made sure those grains are blurred. Now you can see slightly some sharper lines, and this is what I wanted, only in the foreground. The entire background will remain blurred out/ out of focus. Now you can see more depth appear in the overall picture.
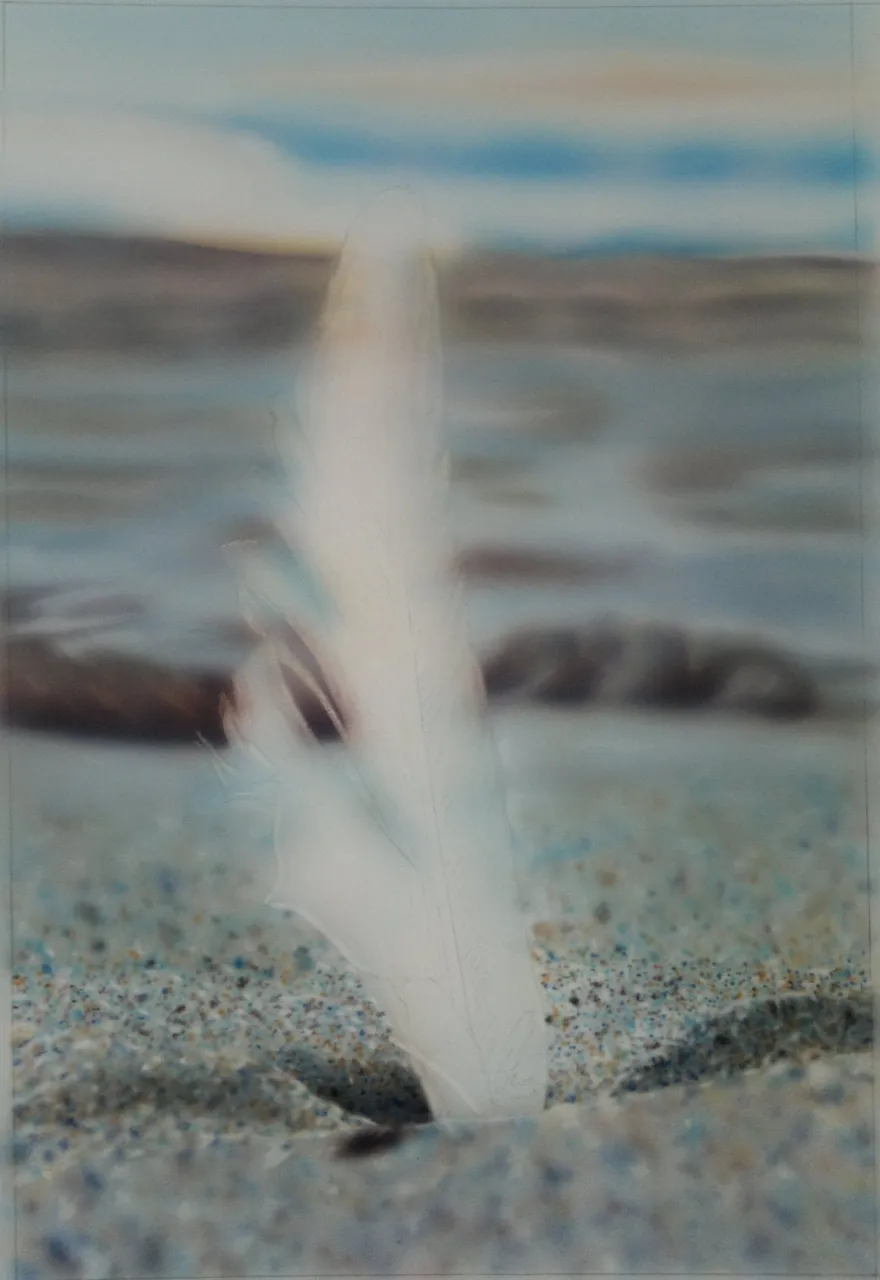
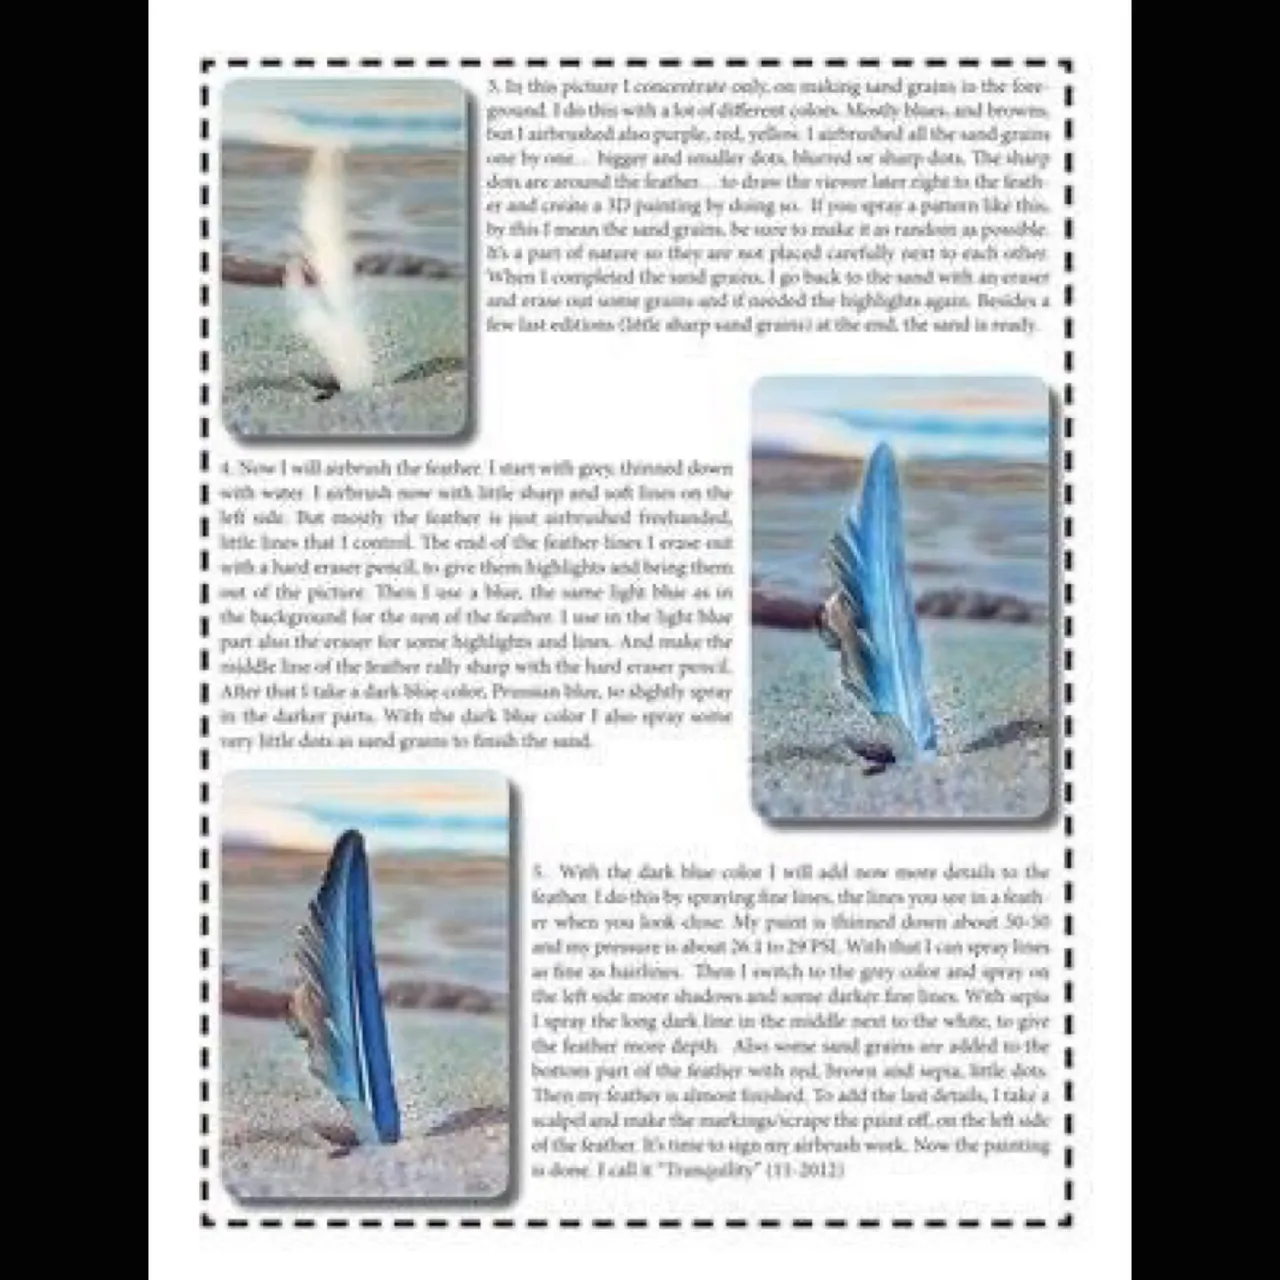
3: In this picture I concentrate only on making sand grains in the foreground. I do this with a lot of different colors. Mostly blues, and browns, but I airbrushed also purple, red and yellow. I airbrushed all the sand grains one by one... bigger and smaller dots, blurred or sharp dots. The sharp dots are around the feather... to draw the viewer right in to the feather and create a 3D painting by doing so. If you spray a pattern like this, by this I mean the sand grains, be sure to make it as random as possible. It's a part of nature so they are not placed carefully next to each other.
When I completed the sand grains, I go back to the sand with an eraser and erase out some grains and if needed the highlights again. Besides a few last additions (little sharp sand grains) at the end, the sand is ready.
4: Now I will airbrush the feather. I start with watered down brown. I airbrush now with little sharp lines and soft lines on the left side. In the places I don't want to have a lot of overspray I use my hand or fingers to cover off the other parts of the painting. But mostly the feather is just airbrushed freehanded, little lines that I control. The end of the feather lines I erase out with a hard eraser pencil, to give them highlights and bring them out of the picture. Then I use a blue, the same light blue as in the background for the rest of the feather. Also little lines, until I complete the feather. I use in the light blue part also the eraser for some highlights and lines. And make the middle line of the feather really sharp with the hard eraser pencil. After that I take a dark blue color, Prussian blue, to lightly spray in the darker parts and I add some more little lines. With the dark blue color I also spray some very little dots as sand grains to finish the sand.
5: With the dark blue color I will add now more details to the feather. I do this by spraying fine lines, the lines you see in a feather when you look closely. My paint is thinned down about 50-50 and my pressure is about 1.8 to 2 bar/ 26.1 to 29 PSI With that I can spray lines as fine as hairlines. With a little piece of printer paper I cut out just some random forms/ curves, so I can protect my background by holding it in my hand, at the outlines of my feather only there where needed. I like to freehand my airbrush works, so I don't use masks. When all the detail lines are completed I spray, with the same blue, at the borders and next to the inner line the shadow parts of the feather. Then I switch to the grey color and spray on the left side more shadows and some darker fine lines. With sepia I spray the long dark line in the middle next to the white, to give the feather more depth. And a little bit more on the right side of the feather, the shadow part and some lines. Also some sand grains are added to the bottom part of the feather with red, brown and sepia, little dots. Then my feather is almost finished. To add the last details, I take a scalpel and make the markings/scrape the paint off, carefully not to damage the board, on the left side of the feather... the outlines you see. With that I lift the feather out of my painting. It's now time to sign my airbrush work and the painting is done. I call it "Tranquility" (11-2012) I hope you have received through my little SBS an insight into my airbrush and art Journey.
If you would like to know more about airbrushing, I will write a blog about it. Just let me know 😎 what you would like to be included in there.!!!!!
I can explain the technique to you some more and what equipment you could use.
Here is the publication from 2014:


And the SBS in one photo:

Thank you for looking and reading.
Any questions or comments, let me know. Always happy to help.😊
If you want to know a little bit more about me… have a look at my introduction to Hive post.
Click here for my introduction Post.
Here are some posts from my other Artworks if you are curious to see some of my Art/ paintings and drawings:
Black Kite painting in Gouache “The Hunter”
Graphite Drawing “Longing Eyes”
Have a great day all 😎👋🏻
Grtz Jackie
Unless stated otherwise: All art and photos used in my posts are taken, created and owned by me. If you wish to use any of my photographs, please contact me first. As I have used some commercially myself.
Here you find PRINTS from my art and Photography.
🇪🇸🇪🇸🇪🇸🇪🇸🇪🇸🇪🇸🇪🇸🇪🇸🇪🇸🇪🇸🇪🇸🇪🇸🇪🇸🇪🇸🇪🇸🇪🇸🇪🇸🇪🇸🇪🇸🇪🇸🇪🇸
Hola a todos👋🏻
(Hope my Spanish is sufficient 🙂)
¡Quiero compartir con ustedes hoy mi Pintura completamente con aerógrafo como paso a paso!
Título: "Tranquility"
Aerografié una pluma clavada en la arena de la playa en 2012. La foto de referencia se usó con el permiso de Mark Osbourne.
Te guiaré a través de mi proceso de aerografía de esta obra de arte / aerografía.
Con este SBS fui publicado en una revista Airbrush de Estados Unidos. Revista Airbrush Technique. Edición 52
Me encanta compartir mi arte y ayudar a otros en el camino 😎
Así que aquí va:
Pintura con aerógrafo de SBS "Tranquility"
Acrílico sobre tablero de ilustraciones 27 x 40,5 cm / 10,6 x 15,9 pulgadas, Terminado 11-2012
Ref. Mark Osbourne
- Pintura de aerógrafo: Schmincke Aero Color
- Pistola de aerógrafo: Harder & Steenbeck Infinity 0,15 mm
- Tablero: Schoellershammer 4G
Primero imprimo una plantilla de la imagen de referencia para determinar el tamaño de la pintura y será fácil de tener en el lateral, para ver si las proporciones están justo después del boceto.
Dibujo solo las líneas principales importantes que necesito, con un lápiz de grafito 2B.
A partir de ahora trabajaré desde la pantalla de mi ordenador, donde muestro mi fotografía de referencia.
Y si lo necesito, puedo acercar la foto de referencia para ver todos los detalles importantes que tanto necesito para mi pintura con aerógrafo.
1: Puedes ver en la primera imagen, he dibujado solo las líneas principales para mi boceto con el lápiz.
Trabajo con colores transparentes y opacos en este trabajo de aerógrafo, pero sobre todo los transparentes. Primero, retoqué con gris las características principales de la playa en el fondo ... como una hoja de ruta para su uso posterior. Hice esto a mano alzada para obtener un aspecto suave y, como lo quiero difuminado, no quería líneas nítidas. En el frente de la playa, alrededor de la pluma, retoqué ligeramente con aerógrafo las partes de la sombra. No enmascaré la pluma, solo rocié alrededor de ella. (Y el pequeño exceso de spray que pongo en la pluma no me molesta, porque la pluma será más oscura y los colores que uso en el fondo también estarán en la pluma más adelante) Después de eso, retoqué el cielo con azul.
2: A partir de ahora, cada color que uso en toda la pintura, cuando mi copa de aerógrafo no está vacía, rocío sobre el primer plano como granos de arena. Toda la arena / granos que ves alrededor de la pluma son pequeños con aerógrafo puntos, en una variedad de tamaños, puntos borrosos, puntos nítidos y en muchos colores.
En esta imagen, ves que agregué algunos colores cálidos al fondo y también en el cielo, para darle un poco de brillo nocturno. Lo retoqué con el color de flesh... muy diluido con agua 50-50. También agregué azul transparente en el fondo de la playa. Apliqué con aerógrafo ahora más gris y un poco de sepia para hacer el fondo más oscuro.
Cuando los colores están en el lugar correcto, tomo un borrador suave para borrar algunos puntos, donde necesito algunos resaltados. Pero de nuevo sin líneas nítidas... Así que las borro suavemente. Luego lo revisé con el gris / azul y flesh. Si miras de cerca, verás que usé todos esos colores hasta ahora, también para los granos de arena en el frente de la imagen. La mayoría todavía están borrosos en esta etapa.
Ahora quiero definir las partes de luz y sombra más en primer plano, para crear profundidad en la arena. Rocié ligeramente flesh color y sepia, ambos diluidos muy bien, en las partes que lo necesitaban. Después de eso, borré las líneas superiores / la parte superior de las pequeñas colinas de arena y también resalté y borré algunos granos de arena con el borrador en primer plano. Me aseguré de que esos granos estuvieran borrosos. Ahora puedes ver algunas líneas un poco más nítidas, y esto es lo que quería, solo en primer plano. Todo el fondo permanecerá borroso o desenfocado. Ahora puede ver que aparece más profundidad en la imagen general.
3: En esta imagen me concentro solo en hacer granos de arena en primer plano. Hago esto con muchos colores diferentes. Mayormente azules y marrones, pero también retoqué con el aerógrafo morado, rojo y amarillo. Apliqué con aerógrafo todos los granos de arena uno por uno... puntos más grandes y más pequeños, puntos borrosos o puntiagudos. Los puntos nítidos están alrededor de la pluma... para atraer al espectador directamente a la pluma y crear una pintura en 3D al hacerlo. Si rocía un patrón como este, con esto me refiero a los granos de arena, asegúrese de hacerlo lo aleatorio como sea posible. Es parte de la naturaleza, por lo que no se colocan con cuidado uno al lado del otro.
Cuando completé los granos de arena, vuelvo a la arena con una goma de borrar y borro algunos granos y, si es necesario, los reflejos nuevamente. Además de algunas últimas adiciones (pequeños granos de arena afilados) al final, la arena está lista.
4: Ahora pintaré la pluma con el aerógrafo. Empiezo con marrón aguado. Ahora pinto con aerógrafo con pequeñas líneas nítidas y líneas suaves en el lado izquierdo. En los lugares en los que no quiero tener mucho exceso de aerosol, uso mi mano o mis dedos para cubrir las otras partes de la pintura. Pero la mayoría de las veces la pluma está retocada a mano alzada, pequeñas líneas que controlo. El final de las líneas de plumas lo borro con un lápiz de goma duro, para darles resultados y sacarlos de la imagen. Luego utilizo un azul, el mismo azul claro que en el fondo para el resto de la pluma. También pequeñas líneas, hasta completar la pluma. En la parte celeste utilizo también el borrador para algunas luces y líneas. Y afila la línea media de la pluma con el lápiz de goma duro. Después de eso, tomo un color azul oscuro, azul de Prusia, para rociar ligeramente en las partes más oscuras y agrego algunas líneas más pequeñas. Con el color azul oscuro también pulverizo unos puntitos muy pequeños como granos de arena para terminar la arena.
5: Con el color azul oscuro agregaré ahora más detalles a la pluma. Hago esto rociando líneas finas, las líneas que ves en una pluma cuando miras de cerca. Mi pintura se diluye aproximadamente 50-50 y mi presión es de aproximadamente 1.8 a 2 bar / 26.1 a 29 PSI Con eso puedo rociar líneas tan finas como líneas finas. Con un pequeño trozo de papel de impresora, recorto solo algunas formas / curvas aleatorias, para poder proteger mi fondo sosteniéndolo en mi mano, en los contornos de mi pluma solo donde sea necesario. Me gusta pintar a mano alzada mis trabajos con aerógrafo, así que no uso máscaras. Cuando se completan todas las líneas de detalle, pulverizo, con el mismo azul, en los bordes y junto a la línea interior las partes de sombra de la pluma. Luego cambio al color gris y rocío en el lado izquierdo más sombras y algunas líneas finas más oscuras. Con sepia rocío la línea larga oscura en el medio junto al blanco, para darle más profundidad a la pluma. Y un poco más en el lado derecho de la pluma, la parte de la sombra y algunas líneas. También se agregan algunos granos de arena a la parte inferior de la pluma con puntitos rojos, marrones y sepia. Entonces mi pluma está casi terminada. Para agregar los últimos detalles, tomo un bisturí y hago las marcas / raspo la pintura, con cuidado para no dañar la tabla, en el lado izquierdo de la pluma... contornos que ves. Con eso levanto la pluma de mi pintura. Ahora es el momento de firmar mi trabajo de aerógrafo y la pintura está lista. Lo llamo "Tranquility" (11-2012) Espero que hayas recibido a través de mi pequeño SBS una idea de mi viaje con el aerógrafo y el arte.
Si desea saber más sobre aerografía, escribiré un blog al respecto. Solo déjame saber 😎 qué te gustaría incluir allí.!!!!!
Puedo explicarte la técnica un poco más y qué equipo podrías usar.
Aquí está la publicación de 2013:


Y la SBS en una foto:
Gracias por mirar y leer.😎🙏
Cualquier duda o comentario, házmelo saber. Siempre feliz de ayudar.
Si quieres saber un poco más sobre mí… echa un vistazo a mi introducción a la publicación de Hive.
Haga clic aquí para ver mi publicación de introducción
Aquí hay algunas publicaciones de mis otras obras de arte si tiene curiosidad por ver algunas de mis obras de arte / pinturas y dibujos:
Pintura de cometa negra en Gouache "El cazador"
Dibujo de grafito "Ojos anhelantes"
Que tengas un gran día todos 😎👋🏻
Grtz Jackie
A menos que se indique lo contrario: todo el arte y las fotos utilizadas en mis publicaciones son de mi propiedad, creadas y propiedad de mí. Si desea utilizar alguna de mis fotografías, comuníquese conmigo primero. Como yo mismo he usado algunos comercialmente.
Aquí encontrará IMPRESIONES de mi arte y fotografía.