
Saludos comunidad, hoy continúo con los tutoriales sobre Hashking, para mí uno de los juegos con mayor probabilidad crecimiento y fortalecimiento económico en la Red de Hive.
Con este nuevo tutorial espero dar respuesta a la pregunta que nos han realizado varios jugadores nuevos en el Discord de @MundoVirtual, quienes han manifestado sus dudas sobre cómo deben realizar el arrendamiento y la siembra de tierras.
La pregunta de cómo arrendar las tierras, se hace recurrente, dado que @MundoVirtual, le está dando a los nuevos jugadores un pack de inicio que consta, de semillas y agua, además también hace un sorteo semanal para el préstamo de tierras, para apoyar a los nuevos jugadores que no tienen como invertir.
Sin embargo, la mayoría de los nuevos jugadores deciden rentar una tierra para sembrar las semillas que se le da en el pack de inicio.
Razón por la cual hacemos este nuevo tutorial paso a paso, donde explicamos como rentar y sembrar una tierra.
Paso 1
Ingresamos al juego y en la página principal nos dirigimos al icono de renta.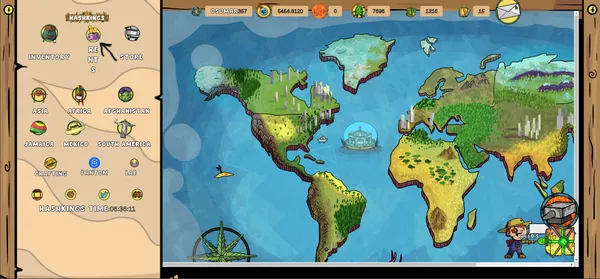
Paso 2
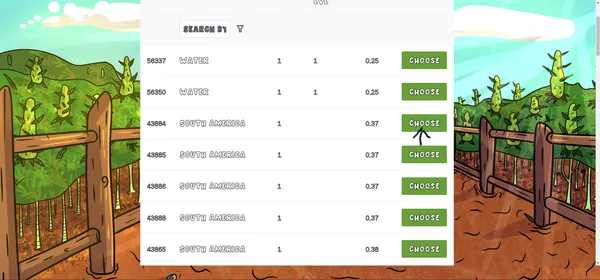
Buscamos la tierra que deseamos rentar en la lista que se despliega y escogemos la que que queremos. Vale la pena recordar que además de tierras de diferentes regiones, también podemos torres de agua de diferentes niveles.Para este ejemplo vamos a arrendar una tierra de Sudamérica, pero el procedimiento de arrendamiento es el mismo para cualquier tipo de arrendamiento que deseemos realizar en el juego.
Paso 3
Aprobamos la transacción en nuestra Hive Heychain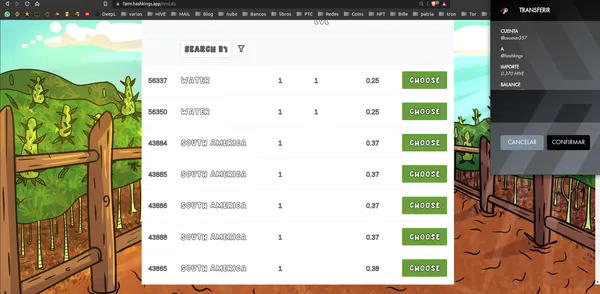
Paso 4
El juego nos avisa que la tierra fue rentada con éxito y le damos al botón aceptar en el cuadro de dialogo.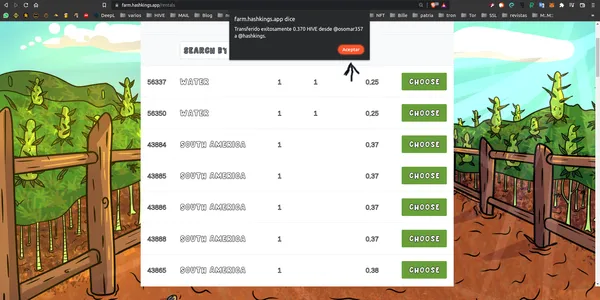
Paso 5
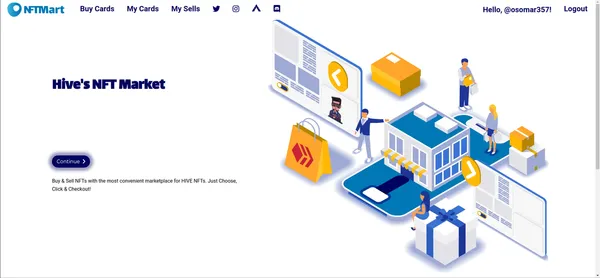
Este paso es sólo para las personas que van a rentar sin haber recibido el Pack de inicio gratuito de @MundoVirtual en el Discord del mismo nombre. La dirección del Discrod se colocará al final del Post.Si estamos arrendando tierras y no hemos recibido el pack de inicio gratuito, debemos comprar las semillas que vamos a sembrar, para hacerlo nos dirigimos a la página de NFTMart, para hacerlo.
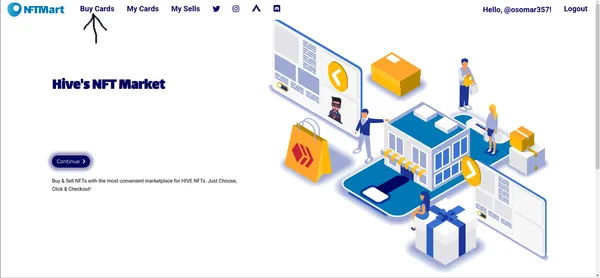
Cuando estemos en la página principal nos logueamos con nuestro usuario de Hive y se nos dará acceso a través de la Hive Keychain.
Una vez que nos hayamos logeado, vamos a pisar sobre la pestaña Buy Card, la cual nos llevará a la página interna, para poder comprar las semillas.
Paso 6
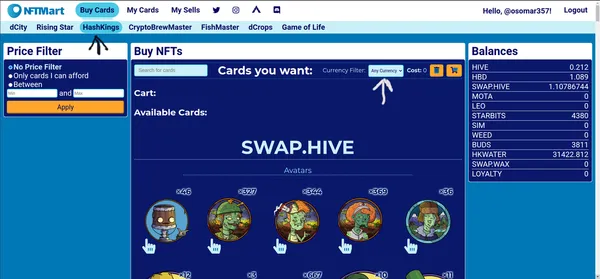
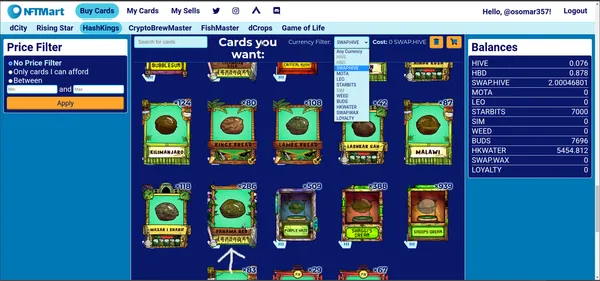
Una vez dentro de la plataforma, verificamos que estamos dentro del apartado de Hashking. En la imagen de abajo se ve la pestaña en color azul claro y esta marcada con una flecha negra.También al lado derecho, marcado con una flecha blanca en la imagen, están las opciones de las monedas con las que podemos pagar, pero para este ejemplo lo haremos con Saw-Hive.
Una vez que entremos al aparto de Hashking, nos saldrá la pantalla como la vemos en la imagen, lo que vamos a hacer es dirigirnos hacia abajo con el mause hasta llegar al lugar donde estén las semillas.
Paso 7
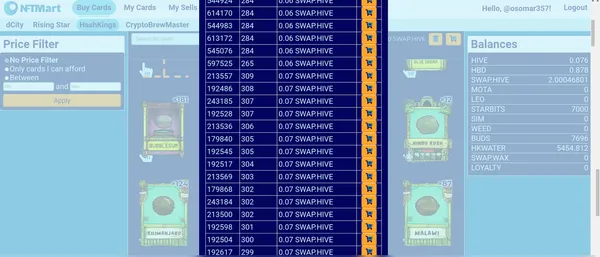
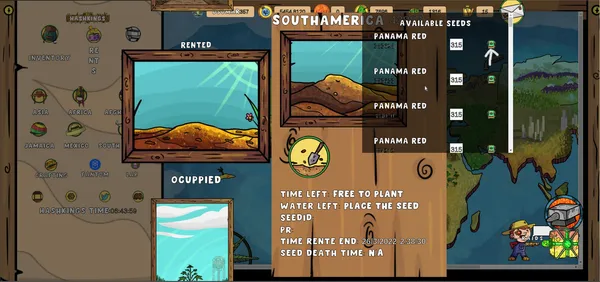
Una vez que localizamos las semillas, escogemos la que deseamos comprar en el caso de la tierra de Sudamérica, sólo hay dos tipos de semilla que se pueden alquilar, la Colombia Gold y la Panamá Red.
Al pisar sobre la semilla se nos abrirá una segunda ventana en donde nos aparecen las semillas en venta con el precio y la cantidad de buds que nos da cada semilla.
Nos aseguramos de escoger la que nos dé la mayor cantidad de semillas y que tenga mejor precio.
Paso 8
Nos dirigimos a la página de Hashking y entramos a las pestaña que dice Sudamérica en el lado izquierdo y pisamos sobre ella.
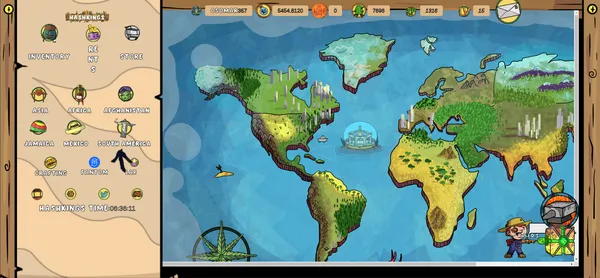
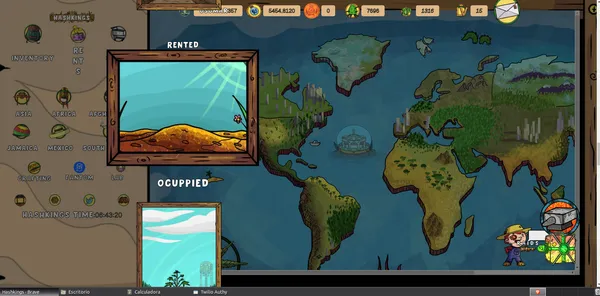
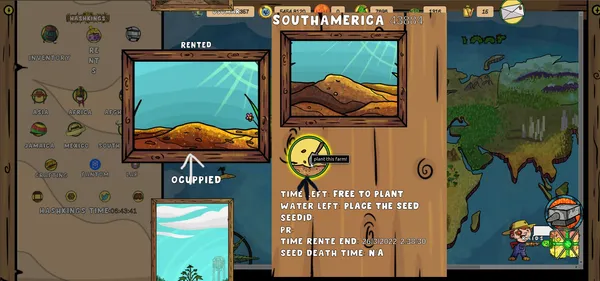
Al pisar sobre la región de Sudamérica se nos abrirá una pestaña donde van aparecer todas las tierras que tengamos en esa región y las que rentemos aparecerán con el título de RENTED como se ve en la imagen.
Paso 9 Para sembrar la tierra hacemos lo siguiente, pisamos sobre la imagen de la tierra rentada y nos va a aparecer la tierra que rentamos identificada con su número de NFT y en la parte de abajo nos va a aparecer un círculo amarillo con una pala, tal cual como se muestra en la imagen de abajo.
Cuando aparezca la imagen de la pala, vamos a pisar sobre ella, ya que es el comando para sembrar y, al hacerlo, se nos abrirá otra ventana, donde van aparecer las semillas que compramos.
Cuando aparezcan las semillas, vamos a seleccionar la semilla que queremos sembrar apretando sobre el icono que está a su derecha como lo muestra la imagen que colocamos a continuación.
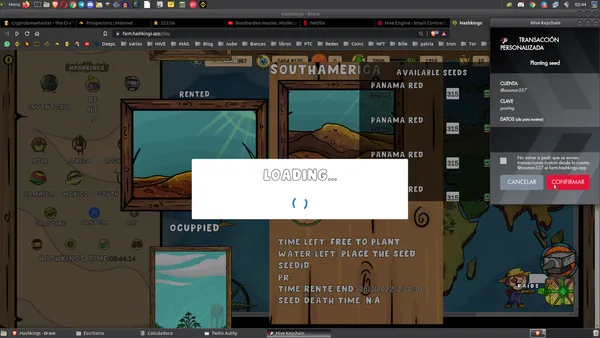
Después aprobamos la transacción en nuestra Hive Keychain y ya hemos realizado la siembra. Es importante que después de sembrar actualicemos la página y esperemos un par de minutos a que se complete la transacción.
Paso 10
Procedemos a comprar el agua. Debo recordar que ese paso es sólo para los jugadores que no han recibido el pack de inicio gratuito que da @MundoVirtual.
Lo primero que debemos hacer es dirigirnos a la página de Hive Engine.

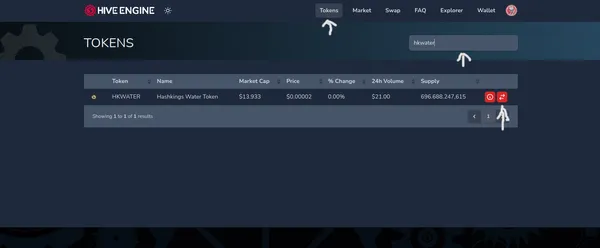
Después dentro de la página de Hive Engine, bucamos la pestaña que dice Tokens, en la barra de búsqueda, vamos a colocar HKWater y nos aparecerá la imagen como se muestra a continuación, finalmente le vamos
a dar un clip sobre las dos líneas horizontales cruzadas que tenemos a la derecha como lo muestra la imagen.
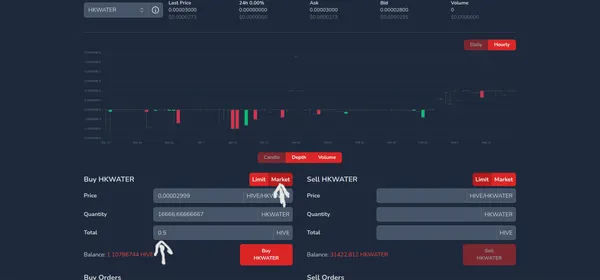
A continuación cuando se abra la nueva ventana, nos va a llevar al área de traiding, hay vamos a marcar sobre el botón rojo que dice Market posteriormente en la parte de abajo a la izquierda vamos a colocar en la columna que dice Hive, la cantidad de Hive que deseamos comprar, para este ejemplo yo coloqué 0.5 Hive, pero para empezar con pocas tierras con 0.1 Hive es suficiente. Ver imagen de abajo.
Fuente
Fuente
Fuente
Fuente
Fuente
Image made with resources from the Hashking page and the logos of Virtual World, Oneup and staff. Using the Gimp image editor free Linux software
Source
Source
Source
Source
To go to the NFTMart page in another window step on this link
Source
Source
Source
Source
Source
Source
Source
Source
Source
Source
To go to the Hive Engine page in another window step on this link
[Source](https://hive-engine.com /)
[Source](https://hive-engine.com /)
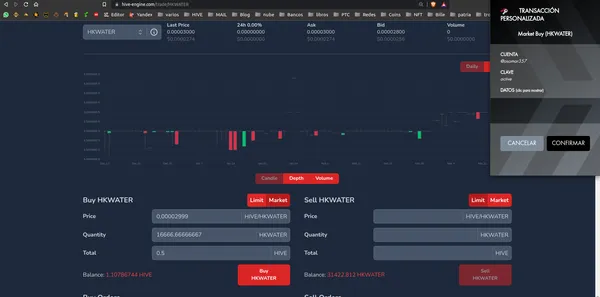
Finalmente aprobamos la transacción en nuestra Hive Keychain, y el agua se reflejará tanto en la página de Hive de Engine, así como en nuestra cartera de Hive Keychain en el apartado donde dice tokens, como en el tablero principal del juego.
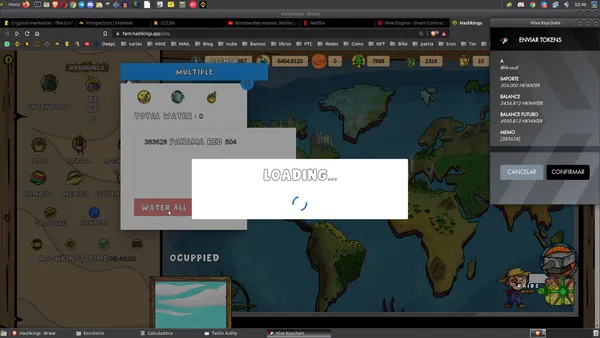
Paso 11
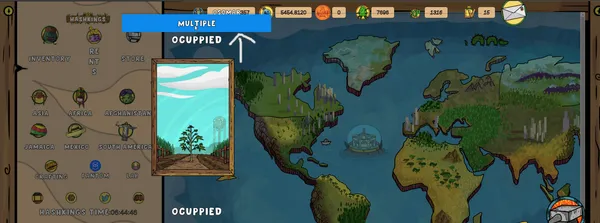
Ahora procedemos a regar nuestra planta. Para hacerlo una vez que hayamos actualizado la página, ingresamos nuevamente a la región de Sudamérica y le vamos a dar sobre la tierra, sólo que ahora en en vez de decir Rented, nos va a decir Ocuppied. Una vez que aparezca la imagen le vamos a dar a la opción Multiple que está en azul, como se ve en la imagen.
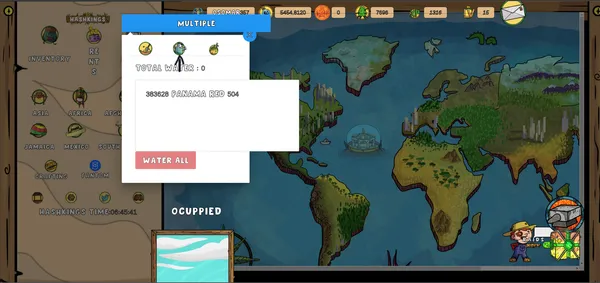
Una vez que seleccionemos la opción múltiple, se nos va a abrir un cuadro de dialogo con algunas imágenes, vamos a elegir la jarra y de manera automática nos mostrará las tierras que faltan por regar, seleccionamos las tierras que aparezcan, le damos a regar y después aprobamos la operación con la Hive Keychaing y listo, ya tenemos nuestra tierra sembrada y regada.
Esta es la forma en que arrendamos y sembramos las tierras, debemos recordar que este procedimiento debemos hacerlo cada vez que cosechemos las semillas y sembremos de nuevo.
Finalmente recordar que las tierras arrendadas tienen una duración mínima de un mes.
Espero les haya gustado este post y que les sea de utilidad, de ser así, no dudes en apoya mi trabajo con tu voto y a la vez te invito a seguirme para que estés al tanto de mis publicaciones.
Greetings community, today I continue with the tutorials on Hashking, for me one of the games with the greatest probability growth and economic strengthening in the Hive Network.
With this new tutorial I hope to answer the question that several new players have asked us in the @MundoVirtual Discord, who have expressed their doubts about how they should carry out the lease and the planting of land.
The question of how to lease the land, becomes recurrent, since @MundoVirtual, is giving new players a starter pack consisting of seeds and water, in addition also makes a weekly draw for the loan of land, to support new players who do not have how to invest.
However, most new players decide to rent a land to sow the seeds given to them in the starter pack.
Which is why we make this new step-by-step tutorial, where we explain how to rent and plant a land.
Step 1
We enter the game and on the main page we go to the rental icon.
Step 2
We look for the land we want to rent in the list that opens and choose the one we want. It is worth remembering that in addition to lands from different regions, we can also water towers of different levels.For this example we are going to lease a land in South America, but the leasing procedure is the same for any type of lease that we want to make in the game.
Step 3
We approve the transaction in our Hive Heychain
Step 4
The game notifies us that the land was successfully rented and we click the accept button in the dialog box.Step 5
This step is only for people who are going to rent without having received the free Starter Pack from @MundoVirtual on the Discord of the same name. The address of the Discrod will be placed at the end of the Post.If we are leasing land and we have not received the free starter pack, we must buy the seeds that we are going to sow, to do so we go to the NFTMart page, to do so.
When we are on the main page we log in with our Hive user and we will be given access through the Hive Keychain.
Once we have logged in, we are going to step on the Buy Card tab, which will take us to the internal page, to be able to buy the seeds.
Step 6
Once inside the platform, we verify that we are inside the Hashking section. In the image below you can see the tab in light blue and it is marked with a black arrow.Also on the right side, marked with a white arrow in the image, are the options of the currencies with which we can pay, but for this example we will do it with Saw-Hive.
Once we enter the Hashking section, the screen will appear as we see it in the image, what we are going to do is go down with the mause until we reach the place where the seeds are.
Step 7
Once we locate the seeds, we choose the one we want to buy in the case of the land of South America, there are only two types of seed that can be rented, the Colombia Gold and the Panama Red.
When stepping on the seed, a second window will open where the seeds for sale appear with the price and the amount of buds that each seed gives us.
We make sure to choose the one that gives us the most seeds and that has the best price.
Step 8
We go to the Hashking page and enter the tab that says South America on the left side and step on it.
When stepping on the region of South America, a tab will open where all the lands we have in that region will appear and the ones we rent will appear with the title of RENTED as seen in the image.
Step 9
To sow the land we do the following, we step on the image of the rented land and the land we rent identified with its NFT number will appear and at the bottom a yellow circle with a shovel will appear, as shown in the image below.
When the image of the shovel appears, we are going to step on it, since it is the command to sow and, when doing so, another window will open, where the seeds we bought will appear.
When the seeds appear, we are going to select the seed we want to sow by clicking on the icon that is to its right as shown in the image that we place below.
Then we approve the transaction in our Hive Keychain and we have already done the seeding. It is important that after sowing we refresh the page and wait a couple of minutes for the transaction to complete.
Step 10
We proceed to buy the water. I must remember that this step is only for players who have not received the free starter pack that @MundoVirtual gives.
The first thing we need to do is go to the Hive Engine page.
Then inside the Hive Engine page, select the tab that says Tokens, in the search bar, we are going to place HKWater and the image will appear as shown below, finally we are going to
to give a clip about the two crossed horizontal lines that we have on the right as shown in the image.
Then when the new window opens, it will take us to the training area, there we are going to mark on the red button that says Market later in the bottom left we are going to place in the column that says Hive, the amount of Hive we want to buy, for this example I placed 0.5 Hive, but to start with few lands with 0.1 Hive is enough. See image below.
[Source](https://hive-engine.com /)
[Source](https://hive-engine.com /)
Source
Source
Source
This post was translated with Yandex Translator


We finally approved the transaction on our Hive Keychain, and the result will be reflected both on the Engine Hive page, as well as in our Hive Keychain wallet in the section where it says tokens, and on the main game board.
Step 11
Now we proceed to watering our plant. To do this once we have updated the page, we enter the South American region again and we are going to give you about the land, only now instead of saying Rented, it will tell us Ocupied. Once the image appears we are going to give the Multiple option that is in blue, as seen in the image.
Once we select the multiple option, a dialog box will open with some images, we are going to choose the jar and it will automatically show us the lands that are missing to irrigate, we select the lands that appear, we give to irrigate and then we approve the operation with the Hive Keychaing and voila, we already have our land sown and irrigated.
This is the way we lease and sow the lands, we must remember that this procedure we must do every time we harvest the seeds and sow again.
Ingresa al Discord de Mundo Virtual de manera directa desde aquí
Ingresa al Discord de 1UP en inglés y español de manera directa desde aquí
Ingresa al Discord de Hashking en inglés y español de manera directa desde aquí
Ingresa al Discord de Infernal Coliseum en inglés y español de manera directa desde aquí