
Antes que nada saludos, hoy continuamos con la segunda guía paso a paso, sobre el juego de Hashking, ya en la guía número uno (1), aprendimos como abrir una cuenta en Hive y cómo colocar y activar la cartera o Wallet de Hive de nombre Hive Keychain. Puedes ver esa guía en este post
En esta oportunidad aprenderemos cómo adquirir Hive, cómo pasarlo a la Hive Keychain, de hay a Tribaldex o Hive Engine, que son los echange más conocidos y utilizados en la Red de Hive, para poder comprar o alquilar las tierras en el juego, al igual que el agua, los avatares y otros NFT.
Hay dos vías para hacer la adquisición de Hive,la primera y tal vez la más usada es a través de Binance, en este echange puedes hacer la compra de Hive a través de dinero FIAT o criptomonedas, sin embargo tiene la limitación de que para poder hacer cualquier compra a través de Binance, necesitas un mínimo de 10 dólares, lo que es una limitación para posibles jugadores de algunos países.
La otra vía, sobre todo para Venezuela y para algunos otros países de Sudamérica y EEUU, es a través de la plataforma Orinoco.io, donde se puede hacer la compra de Hive a partir de un dólar (1$) o un dólar y medio (1.5$) y de igual manera se puede comprar con dinero FIAT o a través de algunas Criptomonedas. Pero este método lo explicaremos en el próximo post
Empecemos con el tutorial paso a paso:
Tutorial paso a paso, para comprar Hive desde Binance:
Paso 1: Registrarse en Binance y hacer la verificación. Si no tienes cuenta en Binance, Registrate aquí
Es importante que se haga la verificación, dado que la misma, permite tanto al usuario como a la plataforma aumentar los niveles de seguridad.
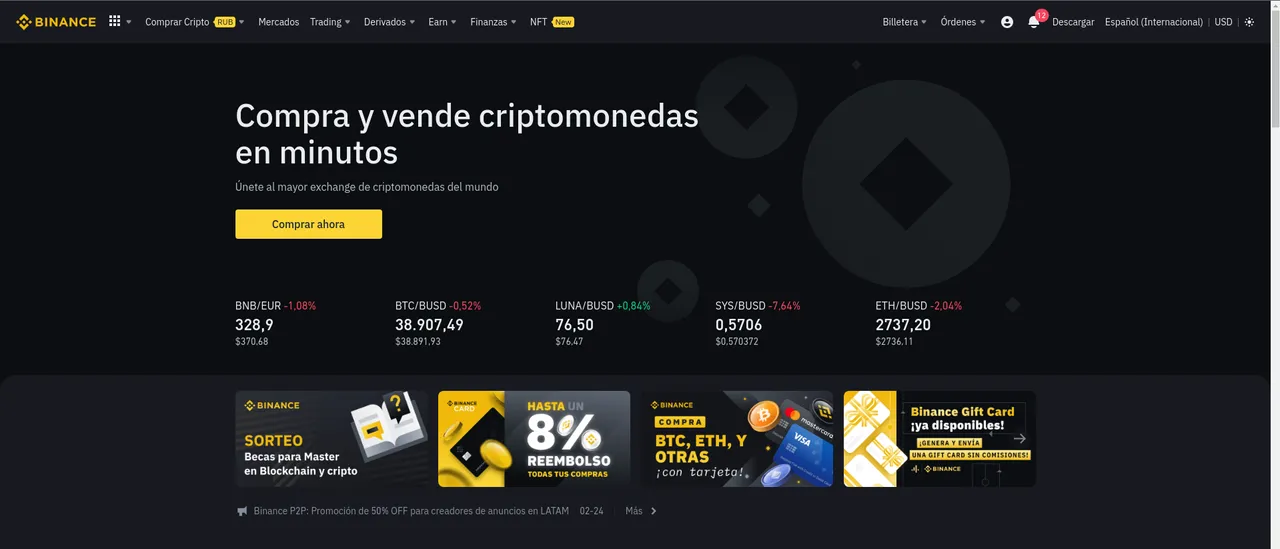
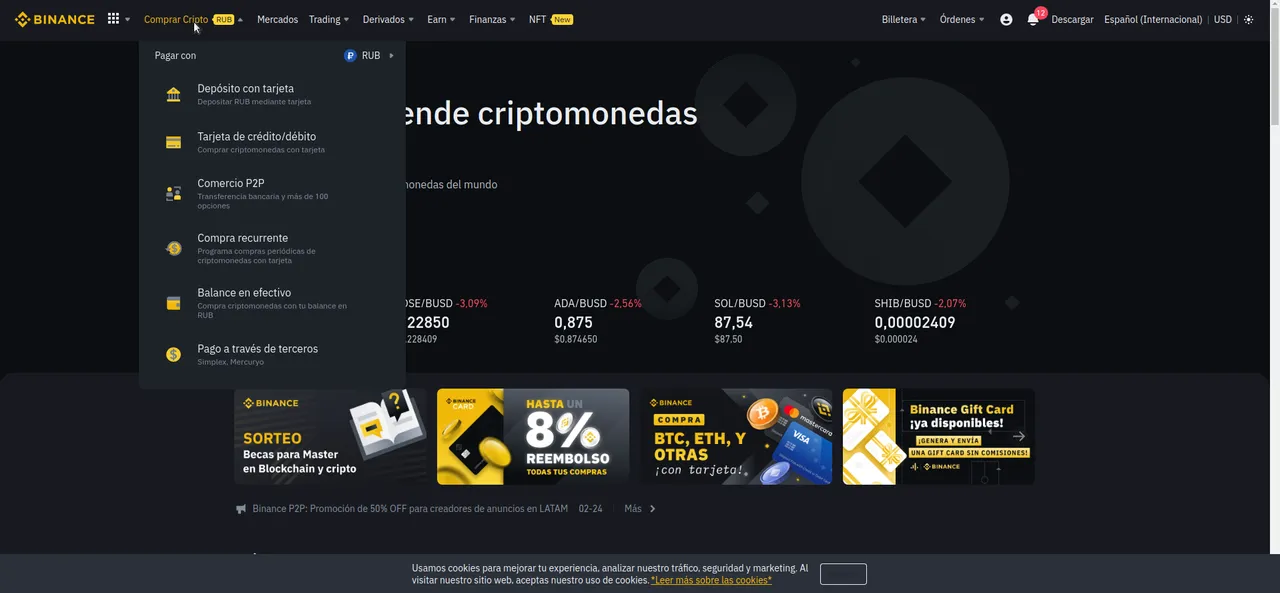
Paso 2: Una vez registrado y verificado en Binance y ya dentro de la plataforma, para comprar con dinero FIAT nos vamos a la opción que dice Compra Cripto en el menú.
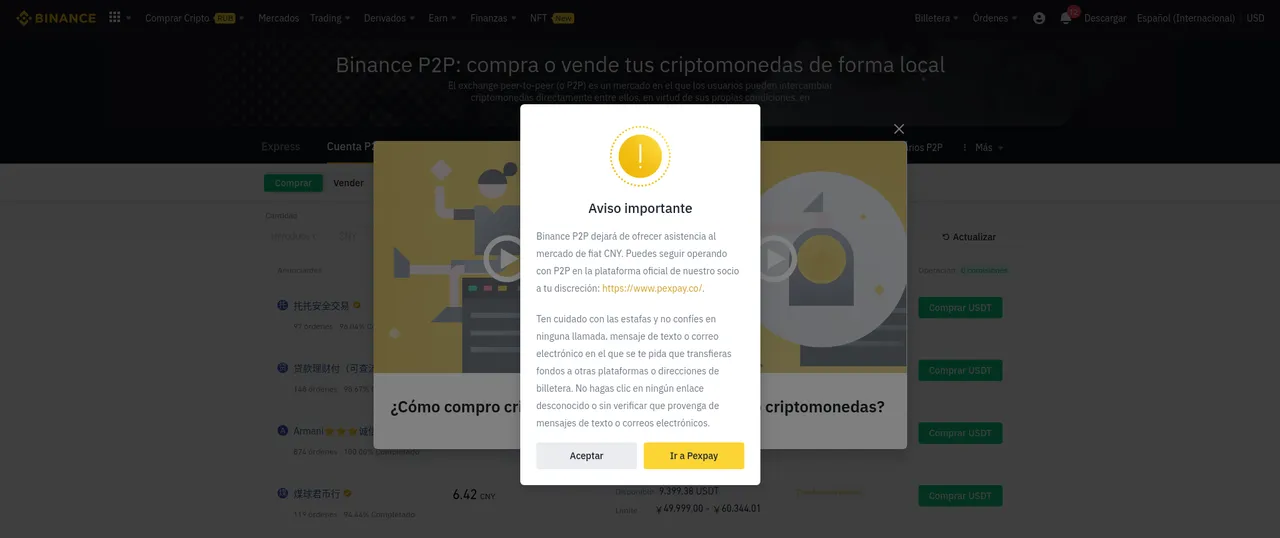
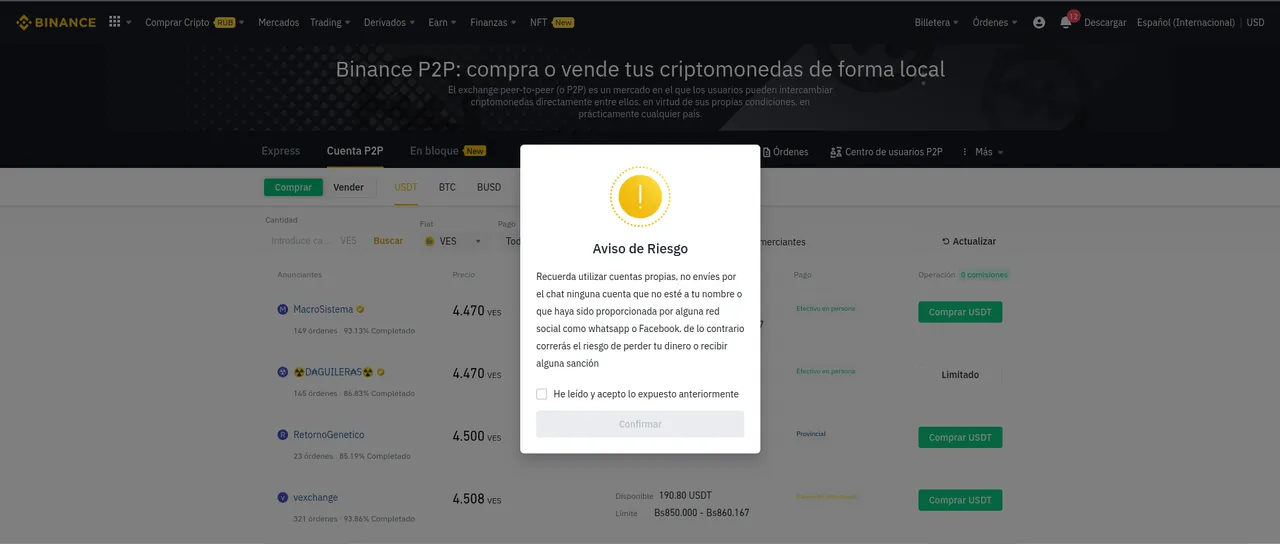
Paso 3: Entramos a la pestaña de P2P, ahí Binance nos avisa a través de un cartel los riesgos que hay al comprar criptomonedas de esta forma y nos da ciertos consejos. Para evitar ser estafados
Paso 4: Una vez dentro de la pestaña de compras de monedas a través del P2P, escogemos la moneda FIAT con la que vamos a realizar la transacción, en este caso vamos a escoger bolívares ya que este ejemplo se monta desde Venezuela.
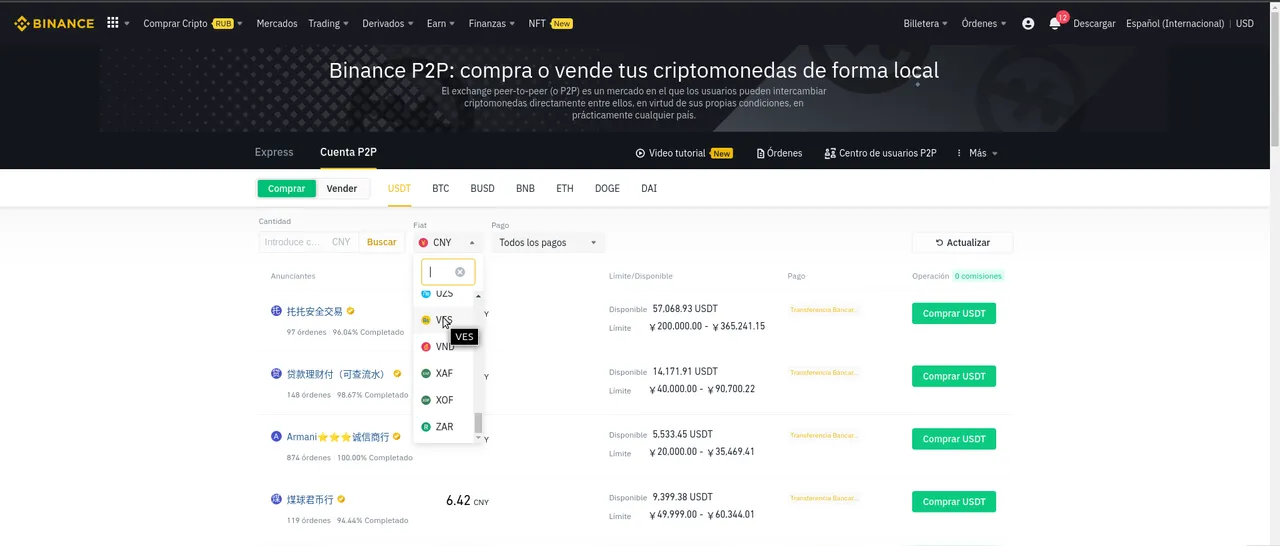
Paso 5: Cuando escogemos la moneda y se carga la nueva información en la pestaña, nos aparecen las personas que están vendiendo la criptomoneda USDT, la cual debemos comprar por bolívares o con cualquier otra moneda FIAT con la que estemos haciendo la transacción.
En este punto debemos ser muy cuidadosos, escoger al vendedor que tenga la mejor reputación y el mayor numero de ventas o transacciones concretadas. Y por favor, bajo ningún concepto, realicen ningún tipo de operación fuera de la plataforma, no importa que les ofrezcan descuento o el mismo cielo. La única garantía que tenemos de no perder el dinero es seguir los pasos dentro de la plataforma.
Paso 6: Seguimos todos los pasos que nos da la página, hacemos la transacción bancaria de manera directa con el comprador, pero siempre a través de la plataforma de Binance.
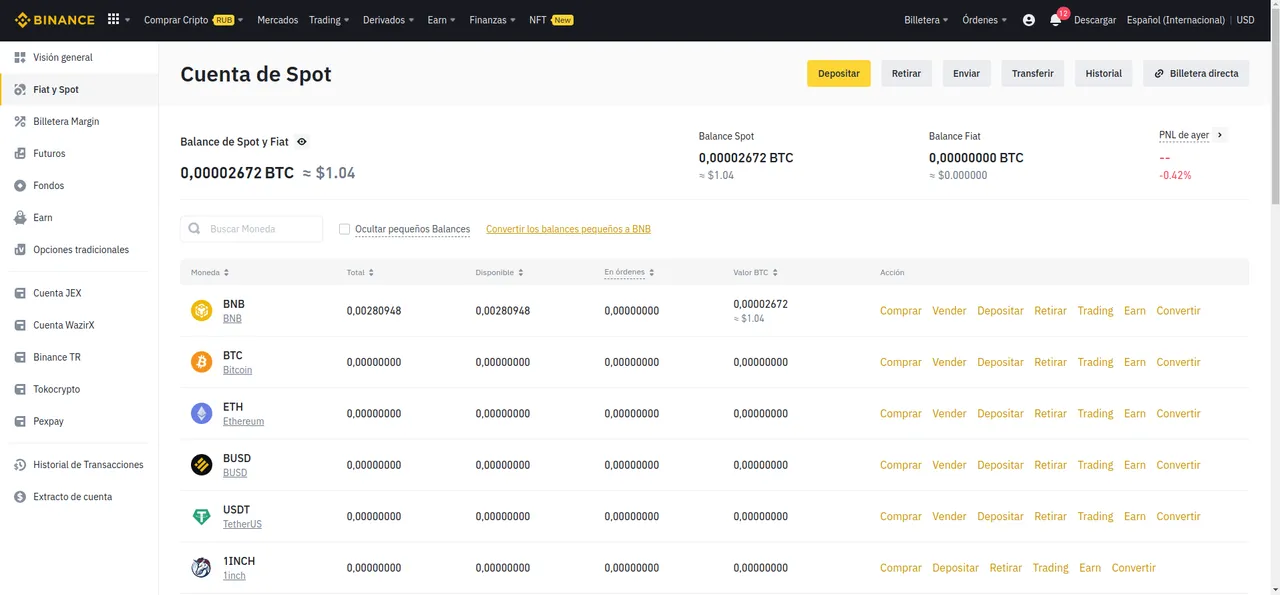
Una vez que la operación este realizada, y recibamos la comunicación del vendedor y de Binance de que ya se realizó la operación, nos dirigimos a la pestaña que está en la parte superior derecha y vamos donde dice Billetera Spot, y hay nos aparecerá nuestro saldo en USD
En mi caso no va a aparecer sino un pequeño saldo que tengo en BNB dado que en este momento no tengo saldo en mi cuenta de Binance, pero muestro la página y los procesos, ya que todos son iguales y sirven bien para ejemplo.

Paso 7: Cuando lleguen los USD a nuestra Billetera de Binance, nos vamos a dirigir a la las pestaña superior de la página de Binance y hacia el ala izquierda en el menú está la pestaña de Traiding. Cuando se abra la pestaña, nos dirigimos al sub-menú clásico y lo pisamos.

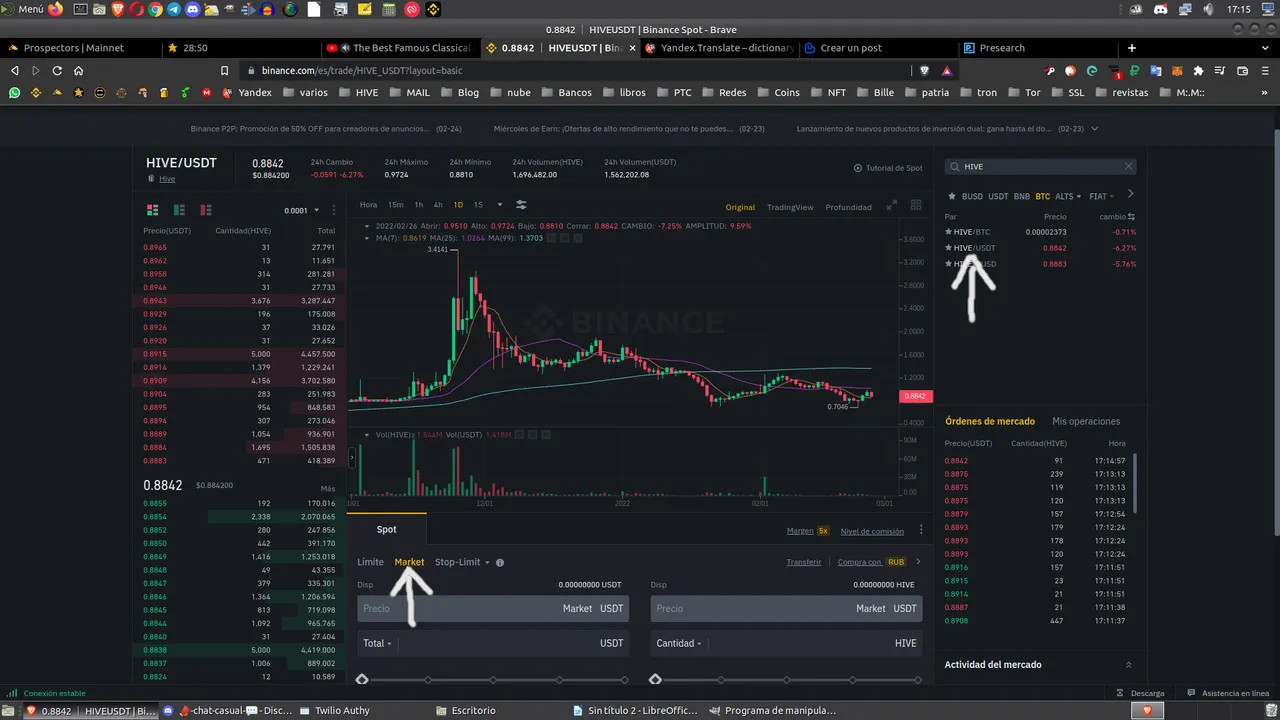
Paso 8: Una vez que entramos a la ventana de Traiding Clásico, nos dirigimos a la parte superior derecha y colocamos al lado de la lupa de búsqueda Hive, cuando nos muestre los cambios de Hive elegimos Hive USDT, y hacemos clip sobre el mismo.
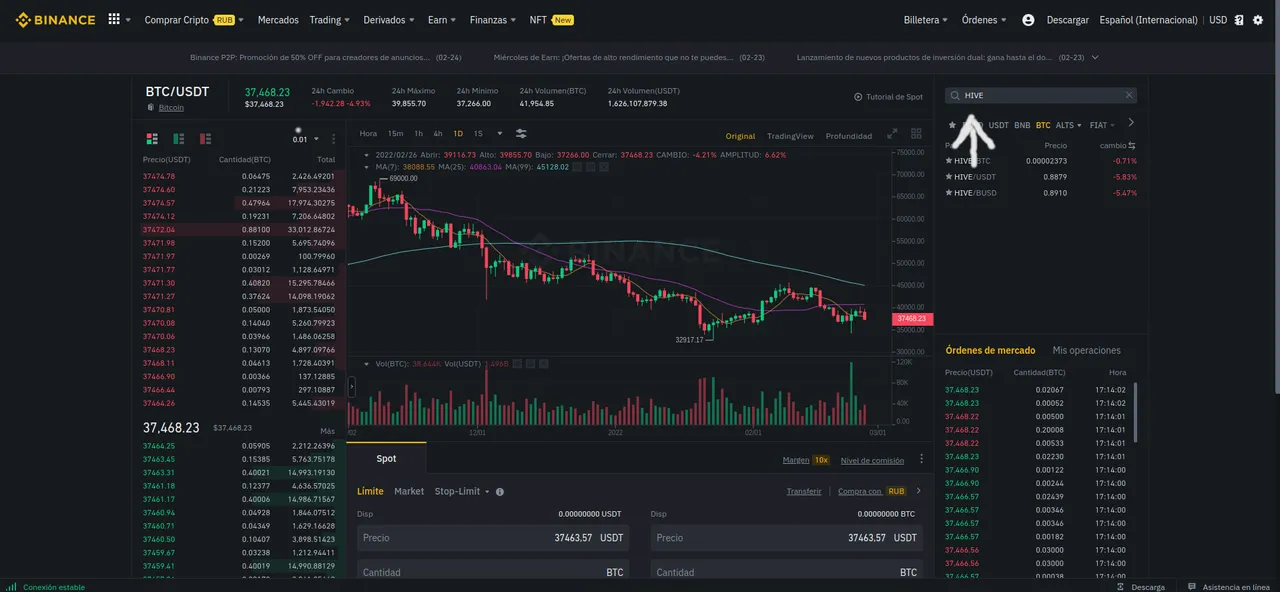
Después cuando estemos en la pestaña de traiding de USDT - Hive, escogemos la pestaña que dice mercado, en el apartado de compra, ponemos la barra al máximo, o elegimos el monto con la barra o colocando la cifra donde dice cantidad, pero siempre tomando en cuenta que la compra en Binance siempre debe ser de 10 dólares o más. Ver imágenes.
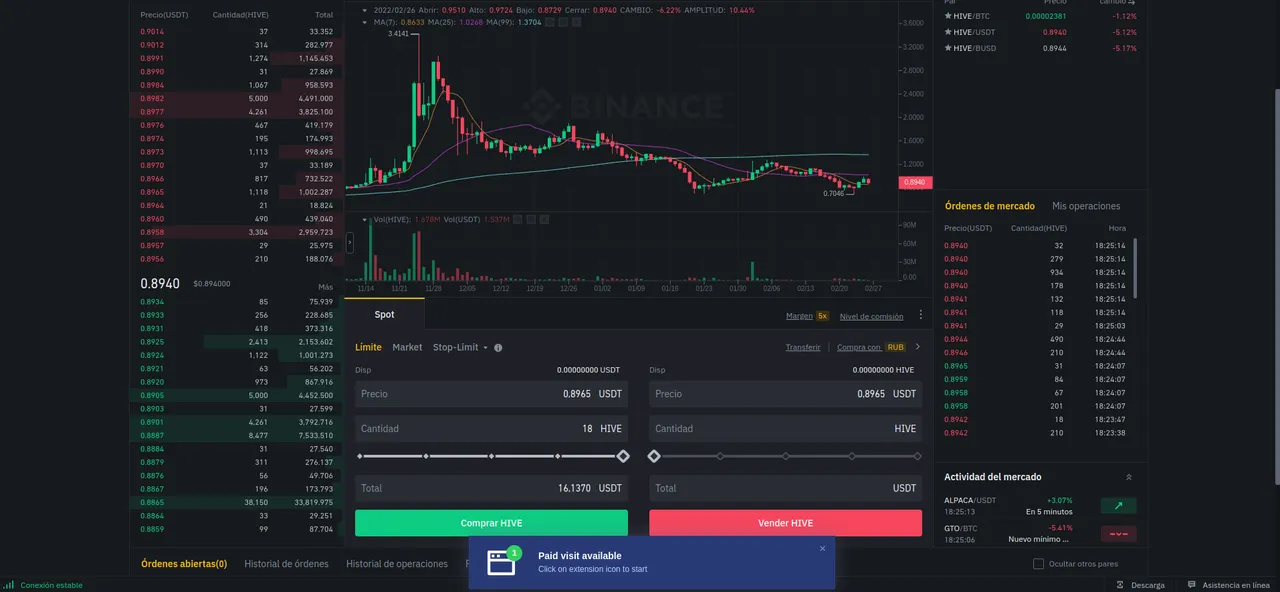
Paso 9: Después de haber realizado la compra, (Cuando compramos una criptomoneda en Binance, en la opción de Mercado, la transacción se hace de inmediato), vamos al menú y regresamos de nuevo a Billetera Spot.
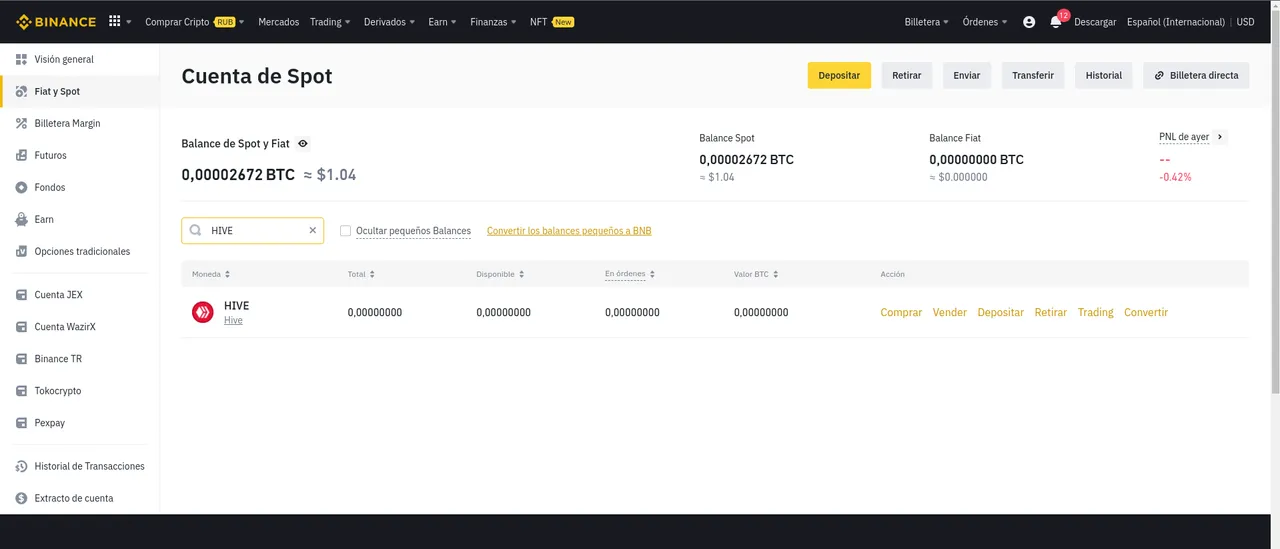
Si sólo hemos realizado una sola transacción en Binance, que es la compra de los Hive, nos va aparecer de primero la opción de Hive en la billetera, dado que es la moneda donde tenemos saldo.
Una vez ahí, le vamos a dar a la pestaña retirar y nos va a abrir otra pestaña que se verá como en la imagen que viene a continuación.
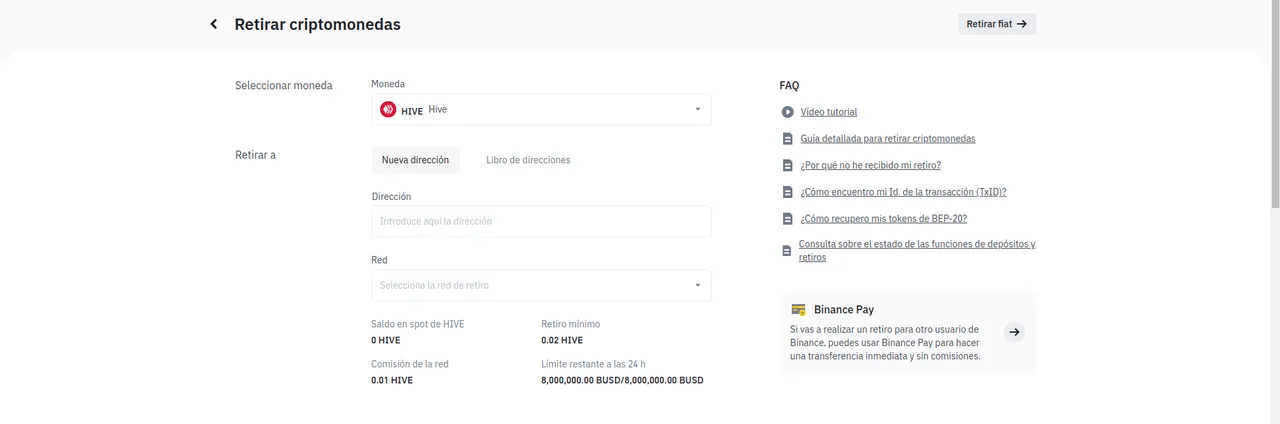
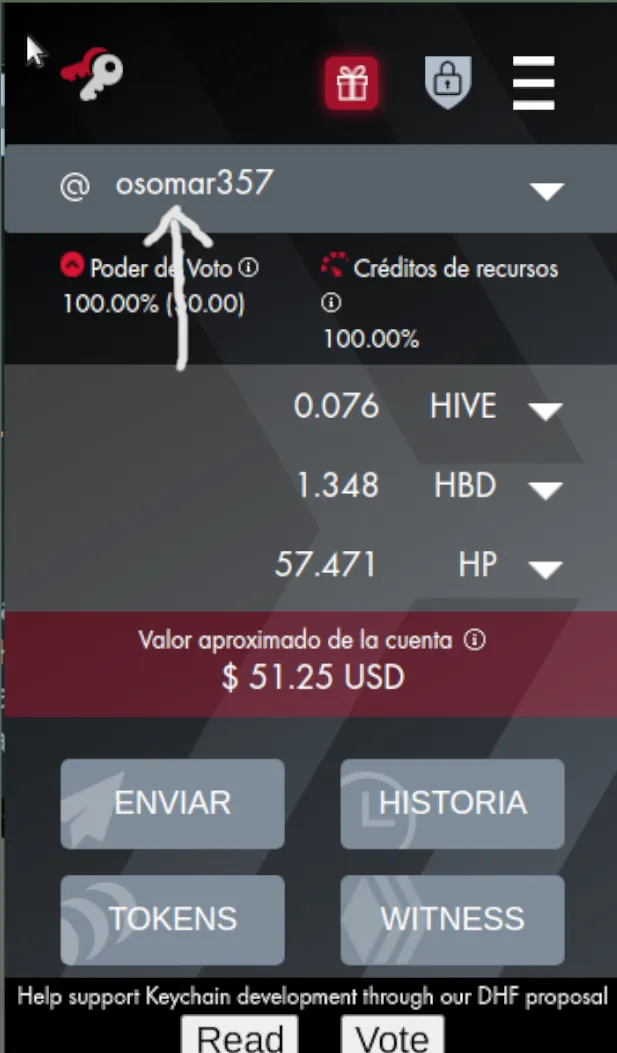
Cuando nos abra la ventana, nos va a pedir la dirección de la cartera de Hive donde vamos a enviar los Hive. Deben recordar que en Hive su dirección es su nombre de usuario, que es el mismo que aparece en la cartera de Hive Keychain, como se muestra a continuación.
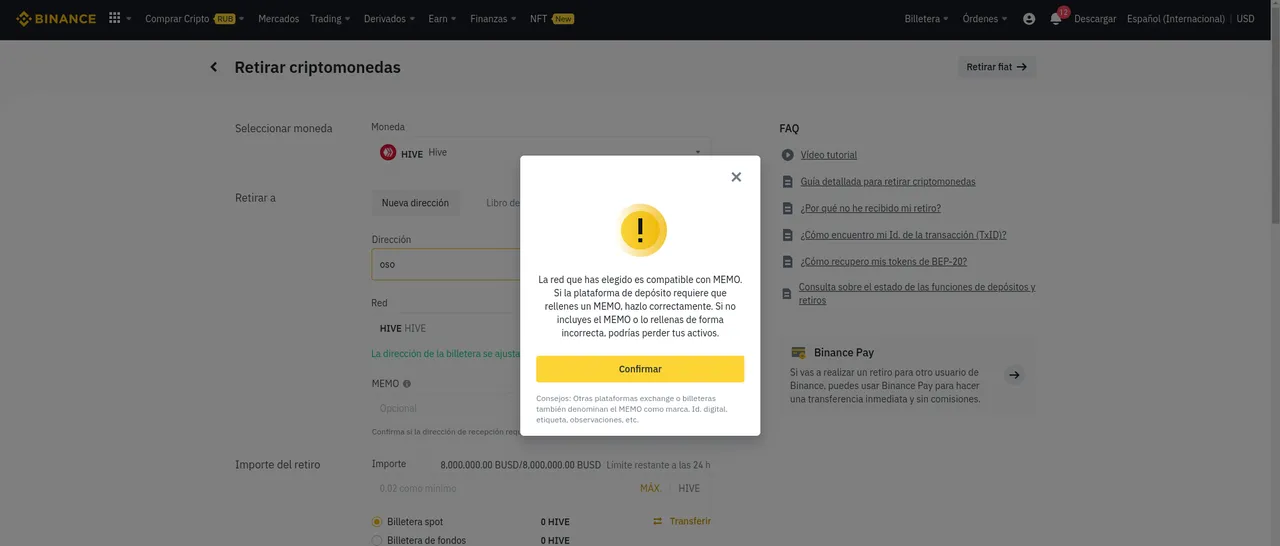
Cuando empecemos a colocar la dirección de nuestra cartera, nos va a salir un cartel, donde nos dice que la dirección donde vamos a enviar nuestros Hive, necesita un memo.
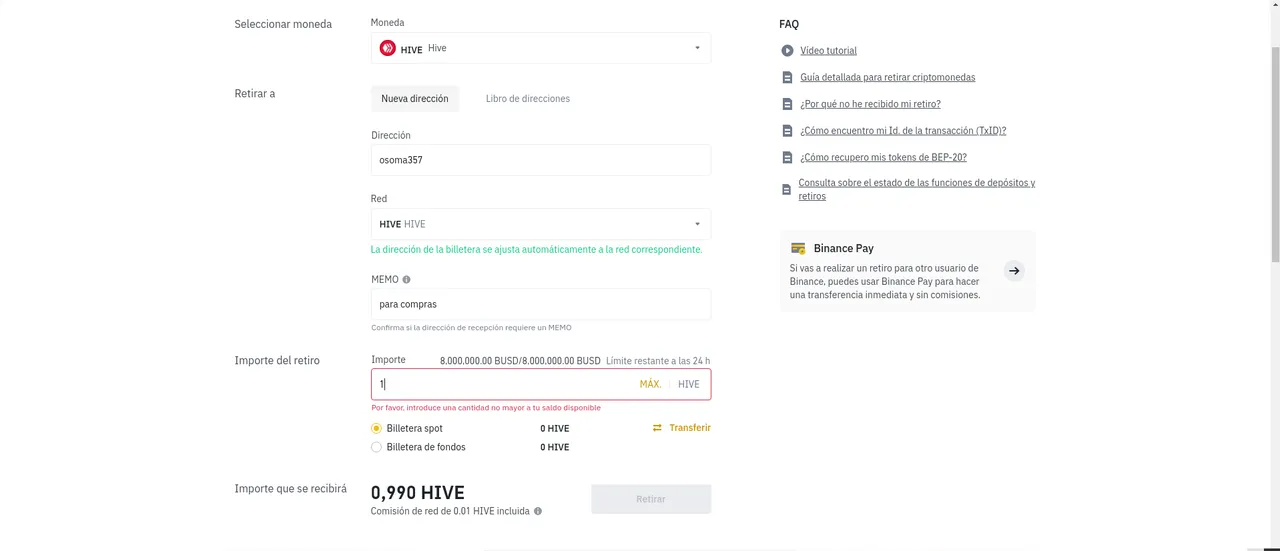
Para enviar los Hive a nuestra cartera no se necesita memo, solo la dirección de nuestra cartera. El memo es necesario cuando vamos a enviar los Hive a un intercambio de monedas o Echange, pero no cuando depositamos a nuestra cartera de Hive. Pero si queremos podemos poner una nota, que diga algo así cómo "Para Compras" en el memo, pero no es necesario, si vamos a enviar los Hive a nuestra cartera de Hive Keychaing.
Finalmente, cuando terminemos de llenar los datos que nos pide la página de retiro de Binance, quedará parecido a como se ve en la imagen de abajo. A continuación le damos a retirar y seguimos los pasos que nos va a pedir la página que son, colocar el código de verificación que vamos a recibir en nuestro correo, el que vamos a recibir en nuestro teléfono y finalmente colocar el código del Factor de Doble autentificación. Después de hacer eso le damos a retirara, esperamos unos 5 minutos y ya tendremos el dinero en nuestra cartera de Hive.
Así colocamos Hive en nuestra cartera a través de Binance, comprando con Dinero Fiat.
En el Próximo post explicaré como se hace el procedimiento desde Orinoco.io, para luego pasar al otro paso del tutorial, que es comprar la tierra, sembrar y cosechar.
Pero como explicamos en el primer post de la guía paso a paso, para entrar en Hashking, la idea es responder a todas a las preguntas que los nuevos jugadores nos hacen a través del Discord y otras redes sociales.
Espero te haya gustado el post, de ser así, no dudes en seguirme para que recibas todos los post de esta guía paso a paso de Hashking y no se te olvide darle un like.
Mis saludos y mejores deseos, nos vemos o mejor dicho nos leemos en el próximo post.

Hashking más que un juego, es una plataforma de inversión segura y confiable, te invitamos a conocer el proyecto y a participar en en él.
Hashking más que un juego, es una plataforma de inversión segura y confiable, te invitamos a conocer el proyecto y a participar en en él.
Te invitamos a unirte al Discord de Hashking y al Discord de Mundo Virtual
First of all greetings, today we continue with the second step-by-step guide, about the Hashking game, already in guide number one (1), we learned how to open an account in Hive and how to place and activate the Hive wallet named Hive Keychain. You can see that guide in this post
In this opportunity we will learn how to acquire Hive, how to pass it to the Hive Keychain, from hay to Tribaldex or Hive Engine, which are the most known and used echange in the Hive Network, to be able to buy or rent the lands in the game, as well as water, avatars and other NFT.
There are two ways to make the acquisition of the Hive,the first and perhaps the most used is through Binance, in this'echange you can make the purchase of the Hive through FIAT money or criptomonedas, however it has the limitation that in order to make any purchase through Binance, you need a minimum of $ 10, which is a limitation for potential players from some countries.
The other way, especially to Venezuela and some other countries of South america and the US, it is through the platform Orinoco.io, where you can make the purchase of the Hive from a dollar ($1) or a dollar and a half (1.5$) and in the same way you can buy with FIAT money or through some Criptomonedas.
Let's start with the step by step:
Step by step tutorial, to buy Hive from Binance:
Step 1: Register with Binance and do the verification. If you don't have an account on Binance, Register here
It is important that the verification is done, since it allows both the user and the platform to increase security levels.
Step 2: Once registered and verified in Binance and already inside the platform, to buy with FIAT money we go to the option that says Buy Crypto in the menu.
Step 3: We enter the P2P tab, there Binance warns us through a poster the risks there are when buying cryptocurrencies in this way and gives us certain tips.
Step 4: Once inside the coin purchases tab through the P2P, we choose the FIAT currency with which we are going to make the transaction, in this case we will choose bolivars since this example is mounted from Venezuela.
Step 5: When we choose the currency and the new information is loaded in the tab, we see the people who are selling the USDT cryptocurrency, which we must buy for bolivars or with any other FIAT currency with which we are doing the transaction.
this point we must be very careful, choose the seller that has the best reputation and the largest number of sales or transactions. And please, under no circumstances, make any kind of operation outside the platform, no matter if they offer you discount or the sky itself. The only guarantee we have of not losing money is to follow the steps within the platform.
Step 6: We follow all the steps that the page gives us, we make the bank transaction directly with the buyer, but always through the Binance platform.
Once this done, and we receive the communication of the seller and Binance already performed the operation, we went to the tab that is at the top right and go to where it says Wallet Spot, and there we will see our balance in USD
In my case it will not appear but a small balance that I have in BNB since at the moment I do not have a balance in my Binance account, but I show the page and the processes, since they are all the same and serve well as an example.
Step 7: When the USD arrives in our Binance Wallet, we will go to the top tab of the Binance page and to the left wing in the menu is the Traiding tab. When the tab opens, we go to the classic sub-menu and step on it.
Step 8: Once we enter the Classic Traiding window, we go to the top right and place next to the Hive search magnifier, when it shows us the Hive changes we choose Hive USDT, and make clip on it .
Then when we are in the traiding tab of USDT-Hive, we choose the tab that says market, in the purchase section, we put the bar to the maximum, or we choose the amount with the bar or placing the figure where it says amount, but always taking into account that the purchase in Binance must always be 10 dollars or more. See images.
Step 9: After you have made the purchase, (When we buy a cryptocurrency on Binance, in the Market option, the transaction is made immediately), we go to the menu and return back to Spot Wallet.
If we have only made a single transaction in Binance, which is the purchase of the Hive, we will first appear the option of Hive in the wallet, since it is the currency where we have balance.
Once there, we will give the remove tab and we will open another tab that will look like in the image that comes next.
we open the window, it will ask us for the address of the Hive wallet where we are going to send the Hives. They should remember that in Hive your address is your username, which is the same as it appears in the Hive Keychain wallet, as shown below.
When we start putting the address of our wallet, we will get a poster, where it tells us that the address where we are going to send our Hives, needs a memo.
To send the Hive to our portfolio no memo is needed, only the address of our portfolio. The memo is necessary when we are going to send the Hive to a currency exchange or Echange, but not when we deposit to our Hive wallet. But if we want we can put a note, that says something like "For Purchases" in the memo, but it's not necessary, if we're going to send the HIve to our Hive Keychaing wallet.
When we finish filling in the data requested by the Binance withdrawal page, it will look like as seen in the image below. Then we give you to withdraw and follow the steps that will ask us the page that are, place the verification code that we will receive in our mail, the one that we will receive in our phone and finally place the code of the Double Authentication Factor. After doing that we give you withdraw, we wait about 5 minutes and we will already have the money in our Hive wallet.
So we put Hive in our portfolio through Binance, buying with Fiat Money.
In the next post I will explain how the procedure is done from Orinoco.io, and then move on to the other step of the tutorial, which is to buy the land, sow and harvest.
But as we explained in the first post of the step by step guide, to get into Hashking, the idea is to answer all the questions that new players ask us through Discord and other social networks.
I hope you liked the post, if so, do not hesitate to follow me so that you receive all the posts of this step-by-step Hashking guide and do not forget to like it.
My cruel and best wishes, see you or rather we read in the next post.
Hashking is more than a game, it is a safe and reliable investment platform, we invite you to know the project and participate in it.
Hashking is more than a game, it is a safe and reliable investment platform, we invite you to know the project and participate in it.
We invite you to join the Discord de Hashking y al Discord de Mundo Virtual