Welcome to the next instalment of my refurbishment of a spare engine for the Z650 I've been gradually restoring !
In yesterday's post, I took the oil pan or sump off, mostly so I could have a good look at what was going on in the bottom end of the engine. I'm glad I did, I discovered a lot of crud in the pan, and the oil pump mesh was pretty badly blocked.
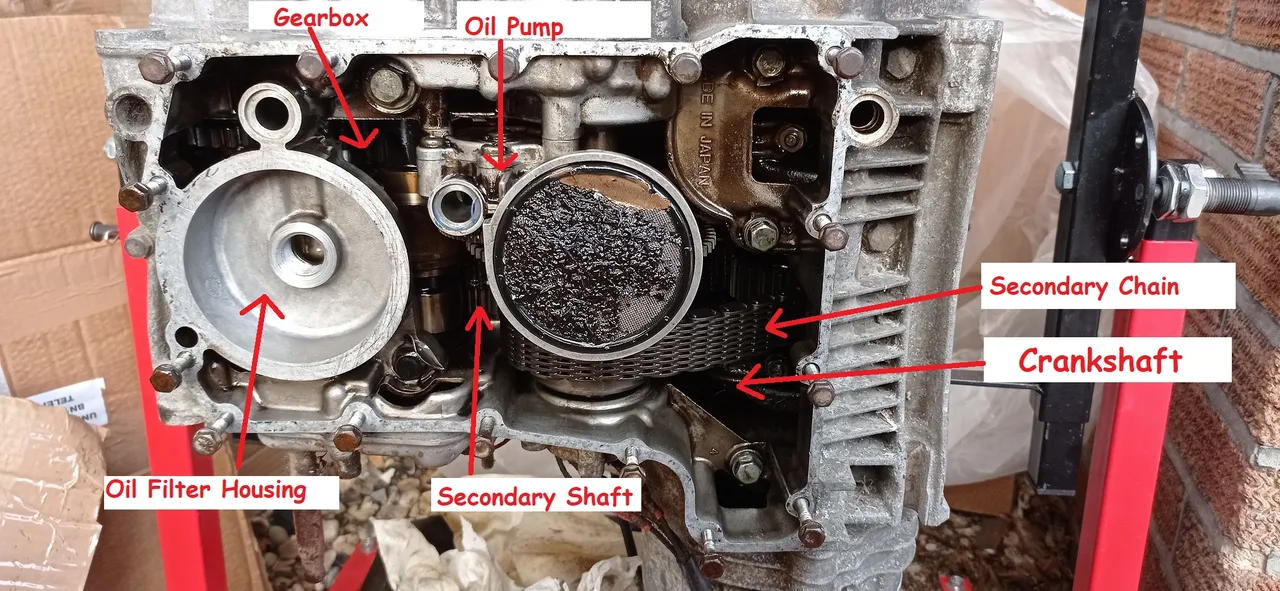
With the engine turned 90 degrees in the cradle, I was able to get a good look at what was going on in the bottom end. I've labelled the image above to give you an idea of what the various key parts are.
Apart from the oil pump mesh, everything else appears to be in good condition. There is some staining, but that is to be expected on an engine this age. The residual oil (there's always some hiding in passages that appears when you move the engine !) is clean and uncontaminated. I couldn't see any sign of excessive wear or damage on the primary chain or various gears that were visible.
Note that I've temporarily popped the sump bolts back in their holes. It prevents me losing any, keeps each one in the right place, and prevents any crud getting into the threads.

As mentioned in yesterday's post, outstanding jobs were to check the oil pressure relief valve and O-rings. The O-rings were in perfect condition, and hadn't even age-hardened.
To inspect the relief valve, I had to remove it. You can see it in this photo sitting in the oil pan. Once it was out, it's checked by using a wooden stick or similar ( I used the back end of a small paint brush) and pushing on the metal ball inside. It should move smoothly and freely against the resistance of the spring, which it did. When re-fitted, it needs to be tightened to the correct torque (11 ft-lb, which is 1.5 kg-m) with a little bit of thread lock to stop it coming loose.

Getting the mesh off the bottom of the oil pump was hard work ! It is supposed to be a push-fit item, but it had been in place for at least the last 30 years. I ended up having to use a small screwdriver to prise it out.
The inside of the oil pump was stained and dirty, and had some cooked-on oil, but I was very relieved indeed to find it didn't have any loose particles hiding inside.

The photo above shows the mesh cleaned and re-fitted. When I cleaned the mesh, I discovered that it had evidence of a previous repair, not done by me - the grey chemical metal on the right hand side in the photo above. Whoever did it had done a good job, it was still firmly in place after all these years ! However, this is definitely an item I'll be monitoring and looking to replace at some point in the future.

Finally, here's the new sump gasket. I've decided to take a chance and avoid applying any hylomar. The oil pan end engine surfaces are both in excellent condition. The combination of a new gasket and doing all the bolts up with the correct torque (87 in-lbs, or 1.0 kg-m) should mean I don't need any gasket sealant. The manual says I don't, and after what I found in the sump it's something I'll avoid if I possibly can ! Despite surface rust on the heads that's an inevitable consequence of living at the bottom of the engine, the thread on all the bolts was in good condition. They'll still be on my list of bits to replace if the engine progresses from mechanically sound to getting it cosmetically pretty.
Next time I'm aiming to either take the clutch cover off, or remove the starter motor, in both cases to see what's going on inside and clean where appropriate. I am looking forward to the weather being warm enough that I can focus on the actual bike and work out why it's still not playing nice !