Hola querida comunidad de @hivefood.
Hoy traigo un post que llevo semanas esperando poder escribir, y es que desde el momento en que mi cliente me llamó y me puso este reto, he tenido a mi marido loco con que iba a escribir este post.
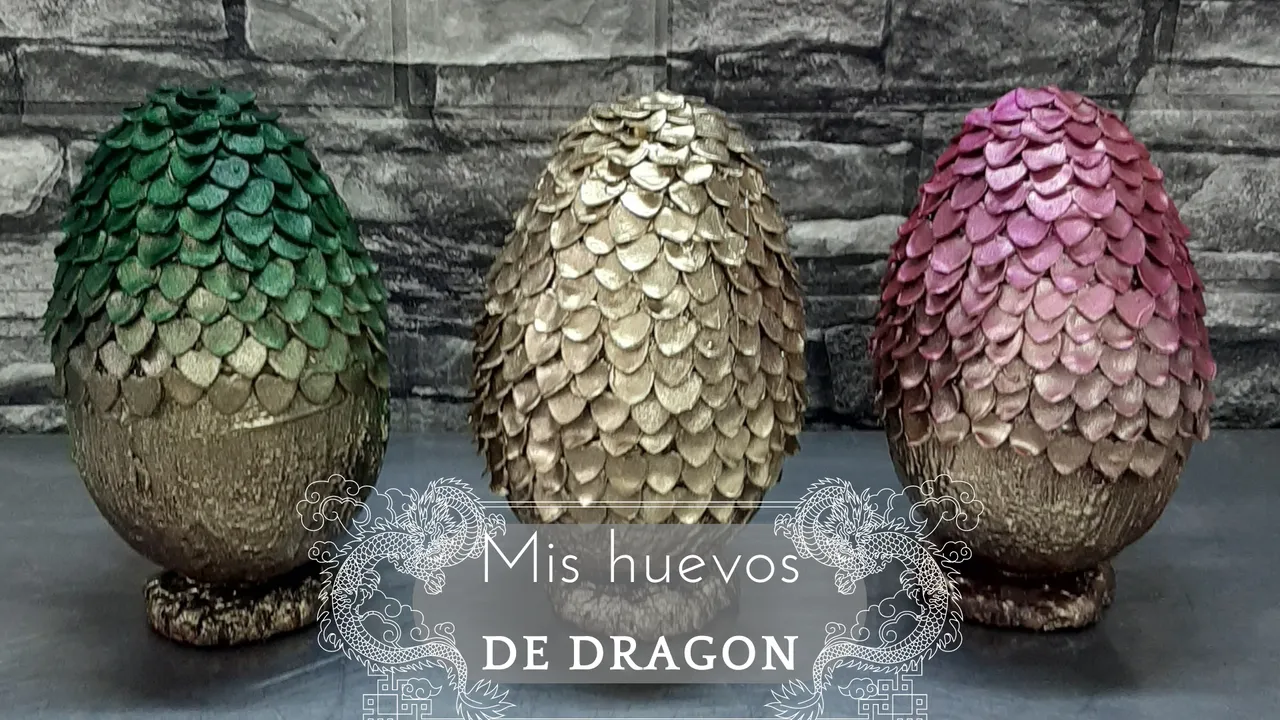
Yo soy fiel fan de Game of thrones, y además de la emoción que me produce realizar estos huevos de dragón, está la emoción que me produce ver cómo alguien hace realidad los sueños de otra persona.
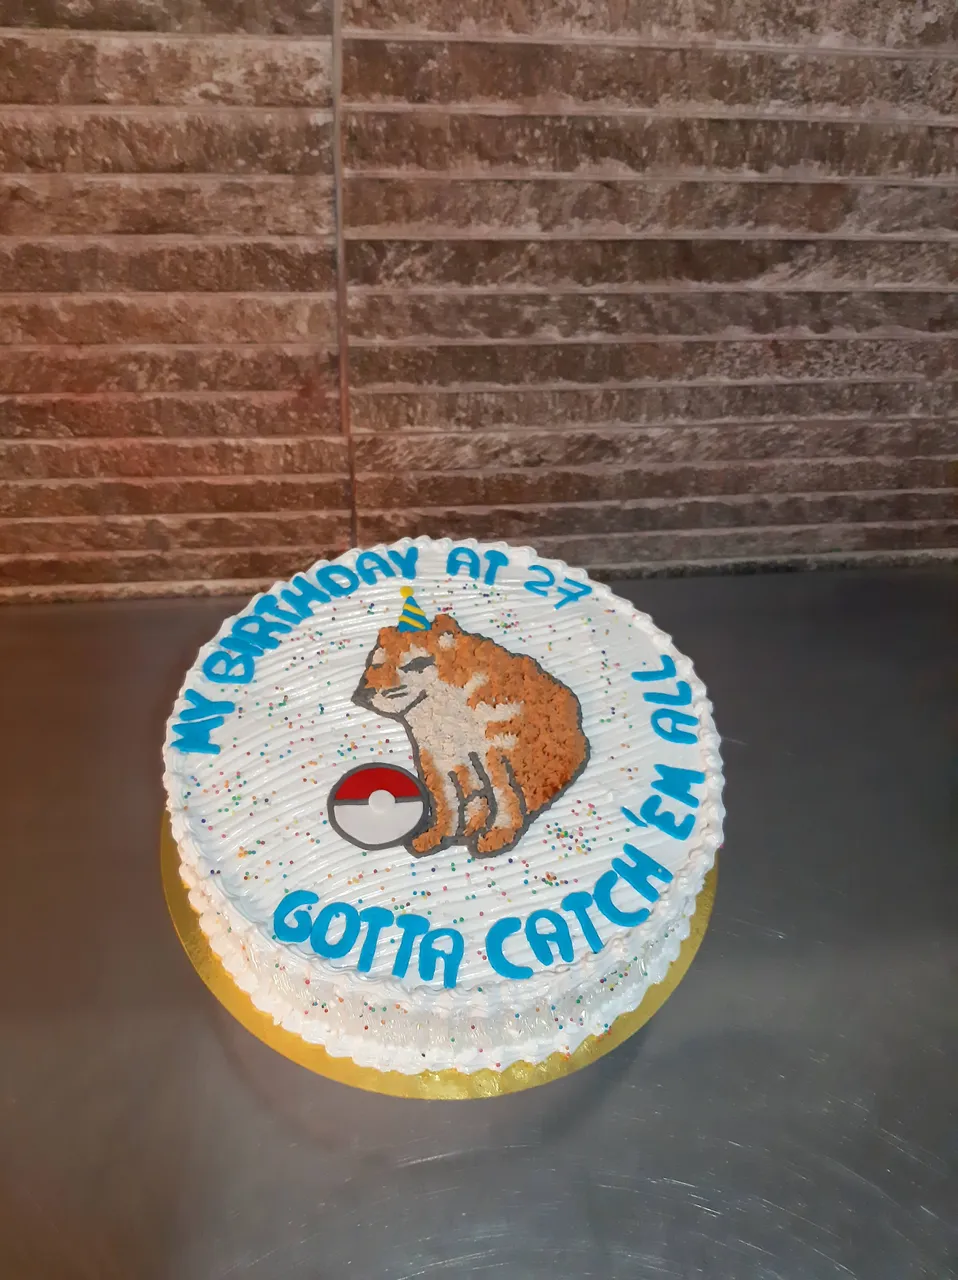
El año pasado él estaba en Venezuela, desde donde nos contactó y nos pidió una torta con un cheems y una pokebola, con una inscripción de You gotta catch em all, ¿tú sabes lo que hay que hacer para pagar desde Venezuela?
¡Y este chamo, pago por adelantado esa torta!
No teníamos ni la dirección de entrega, pues el plan era que el festejado iría a comer a un local, y mientras ellos estaban en videollamada, nosotros les caeríamos con su torta. Y así se hizo. Cuando me retiré ví lágrimas en los ojos del festejado y me sentí orgullosa de nuestro trabajo.
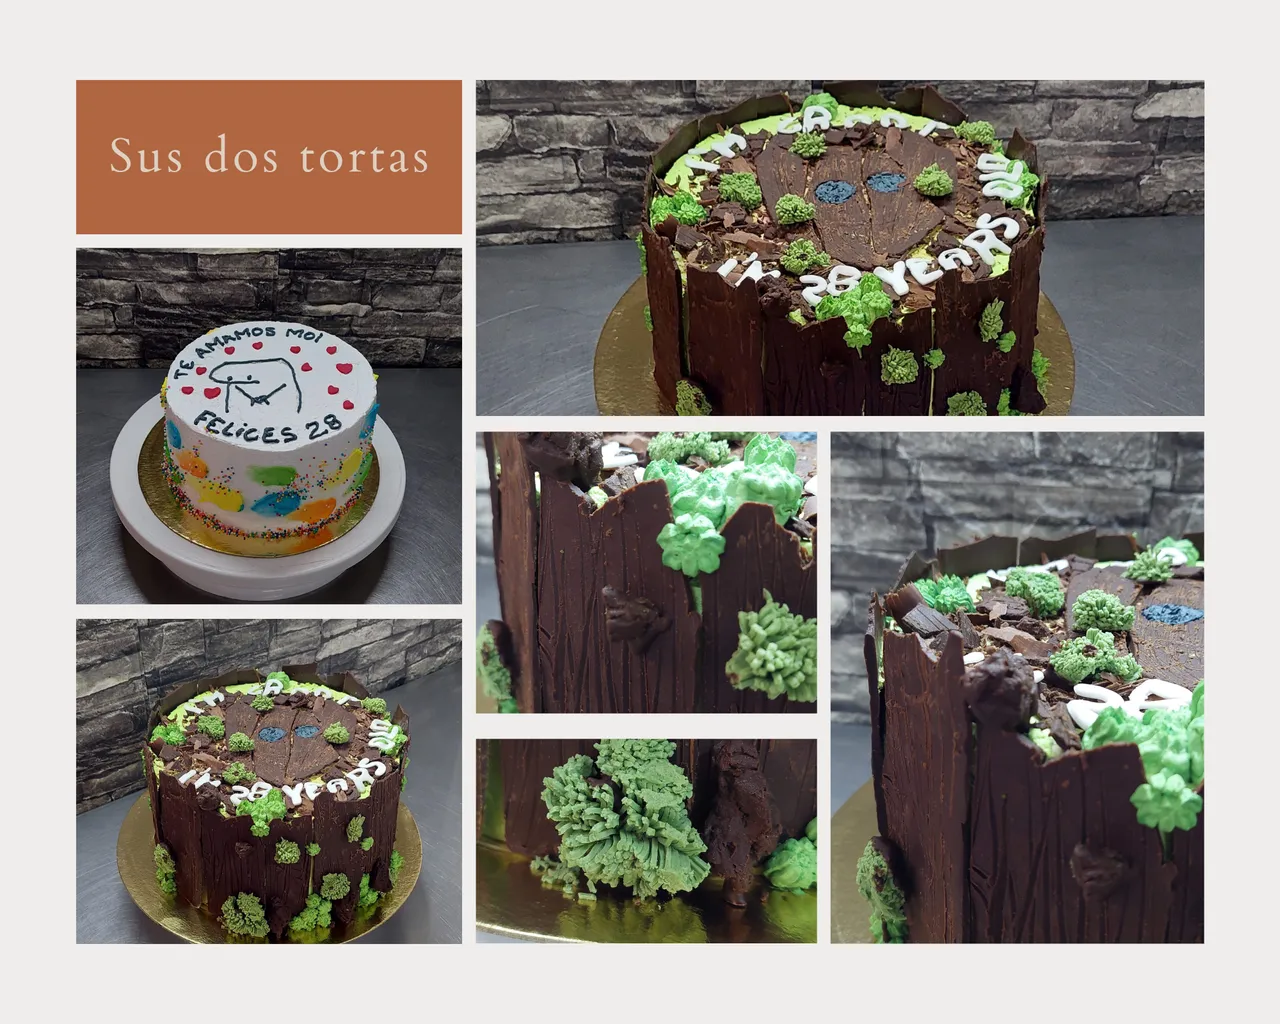
Este año primero nos contactó el festejado, nos encargó una torta con un groot, una torta de chocolate, rellena de chocolate y decorada con escamas de chocolate que asemejaran ser un árbol. Y también encargó una meme cake, que enviaba la familia desde Venezuela. El pedido fue realizado y entregado, recibimos muchos halagos, el más grande de ellos fue: "logro desbloqueado"
Y una semana después me escribe el mismo chamo que me escribió desde Venezuela, y me dice: necesito una torta tres leches, con relleno de frutas, pero que arriba lleve un Pokémon. Y yo le dije dalo por hecho.
Faltaba casi un mes para la entrega, pero igual cotice la torta y le pase el presupuesto. Estaba recién la pascua y las publicaciones de huevos de pascua, entonces me preguntó acerca de ellos. Y me dijo: "mira, si hay alguien que sea capaz de hacerlo, eres tú, así que te voy a plantear lo que quiero"
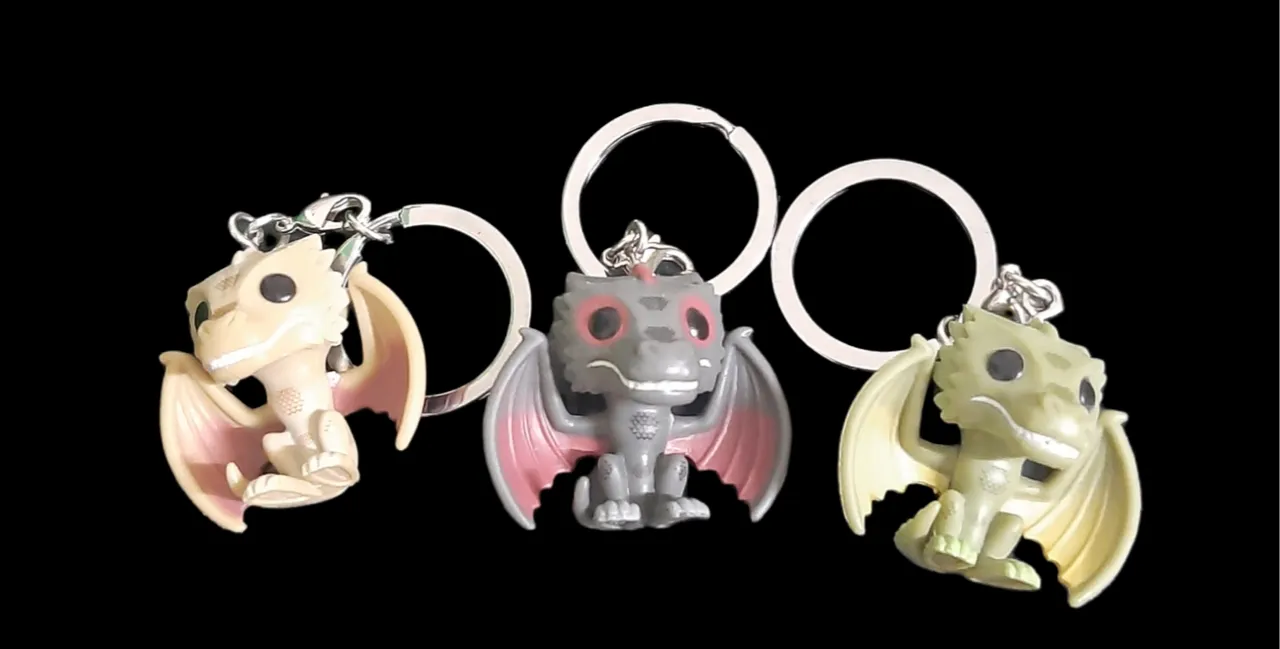
Y me dice que compró los llaveros de los dragones de Game of Thrones y que quiere que ponga cada uno de ellos en un huevo de chocolate y que los entregue junto a la torta. Al principio sentí bastante miedo, pues no hay este molde disponible en el país, pero luego de analizar cómo podríamos realizarlo, estuvimos muy emocionados de hacer este proyecto.
La semana pasada nos entregó los dragones, los amé desde que los vi, y no podía parar de pensar en lo genial que es esta sorpresa.
Hoy que tengo los huevos listos puedo decir que nos llevaron muchísimo trabajo. Pero estoy orgullosa de nuestro trabajo, y ver la cara de mi cliente al recibir su sorpresa fue algo asombroso. Me sentí absolutamente feliz, el cliente hasta me dió un abrazo.
Ahora sí. Vamos a lo que vinimos. El paso a paso de cómo los hicimos.
Chocolate cobertura negro. 1 kilo.
Chocolate plástico 200 gramos.
Colorantes comestibles en polvo, dorado, rose gold y verde metalizado.
Alcohol de cereales.
Galletas
Rocklets
Bombones de chocolate.
Molde de huevo de pascua.
Olla y bowl para fundir el chocolate.
Bandeja metálica para calentar y así unir las dos piezas de los huevos.
Aerógrafo manual para aplicar los colorantes.
Espátulas para raspado y temperado del chocolate.
Pincel.
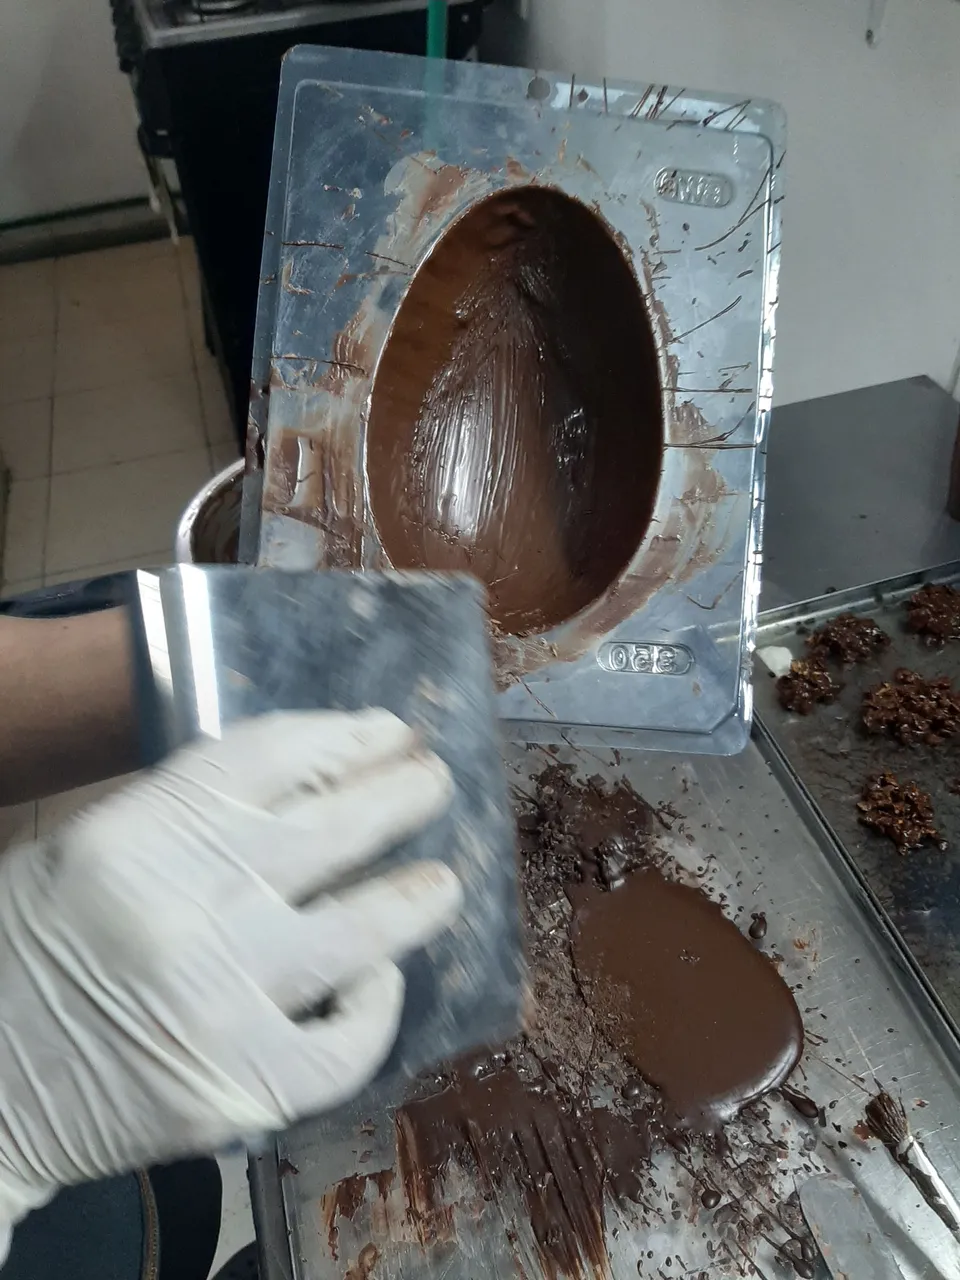
Cortar y colocar un kilo de chocolate a fundir, utilizamos baño de María, por lo cual removía constantemente el chocolate para evitar que se quemara y arruinara. (Puedes hacerlo en el microondas poniendo intervalos de 20 segundos y removiendo constantemente)
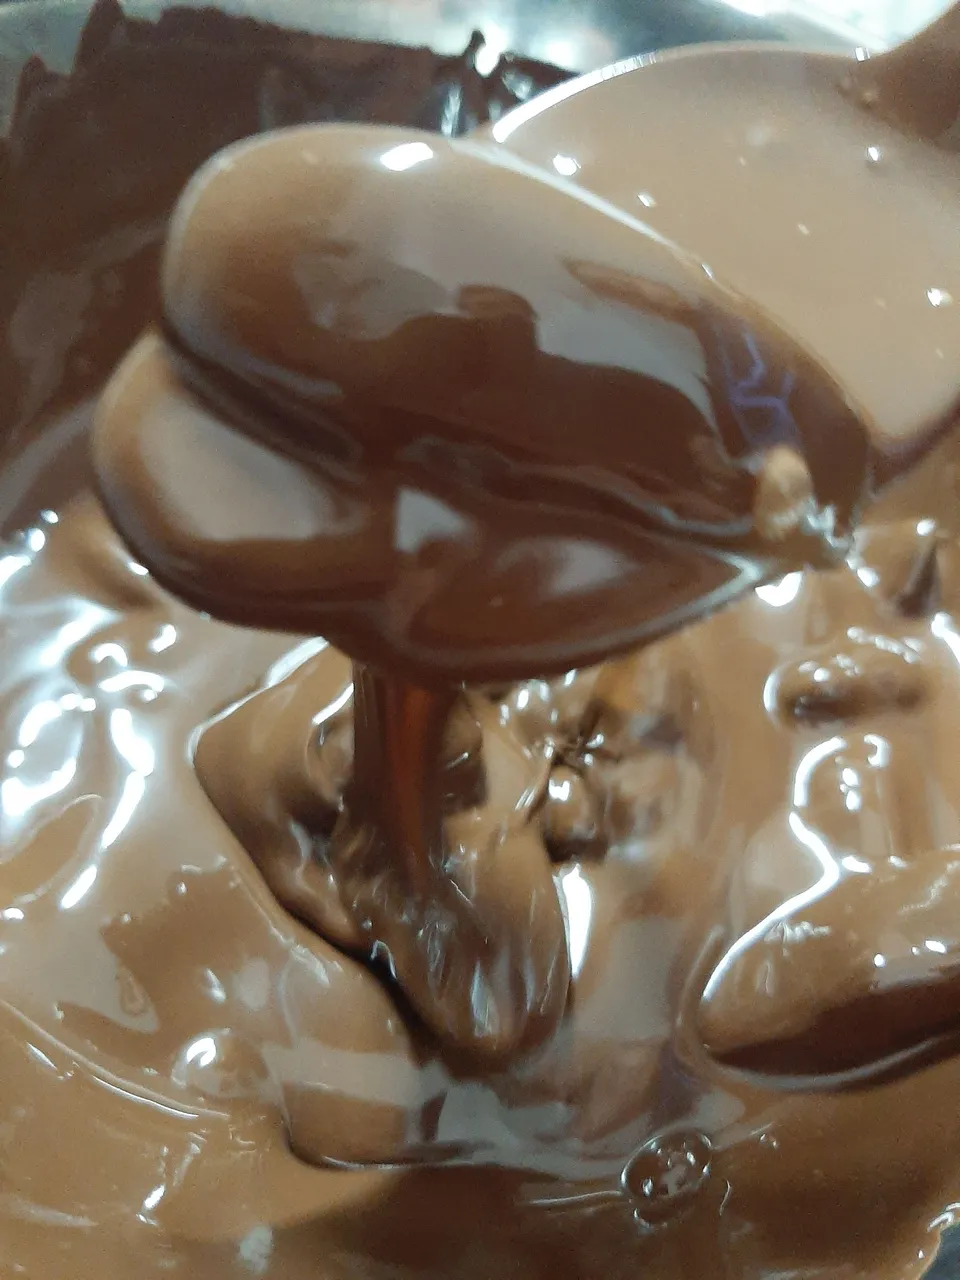
Temperar el chocolate.
Este es un proceso que consiste subir y bajar, de manera controlada, la temperatura del chocolate para que esté tenga un brillo y un aspecto más profesional.
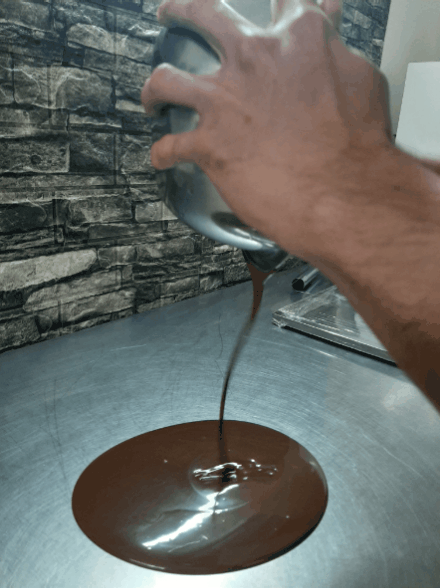
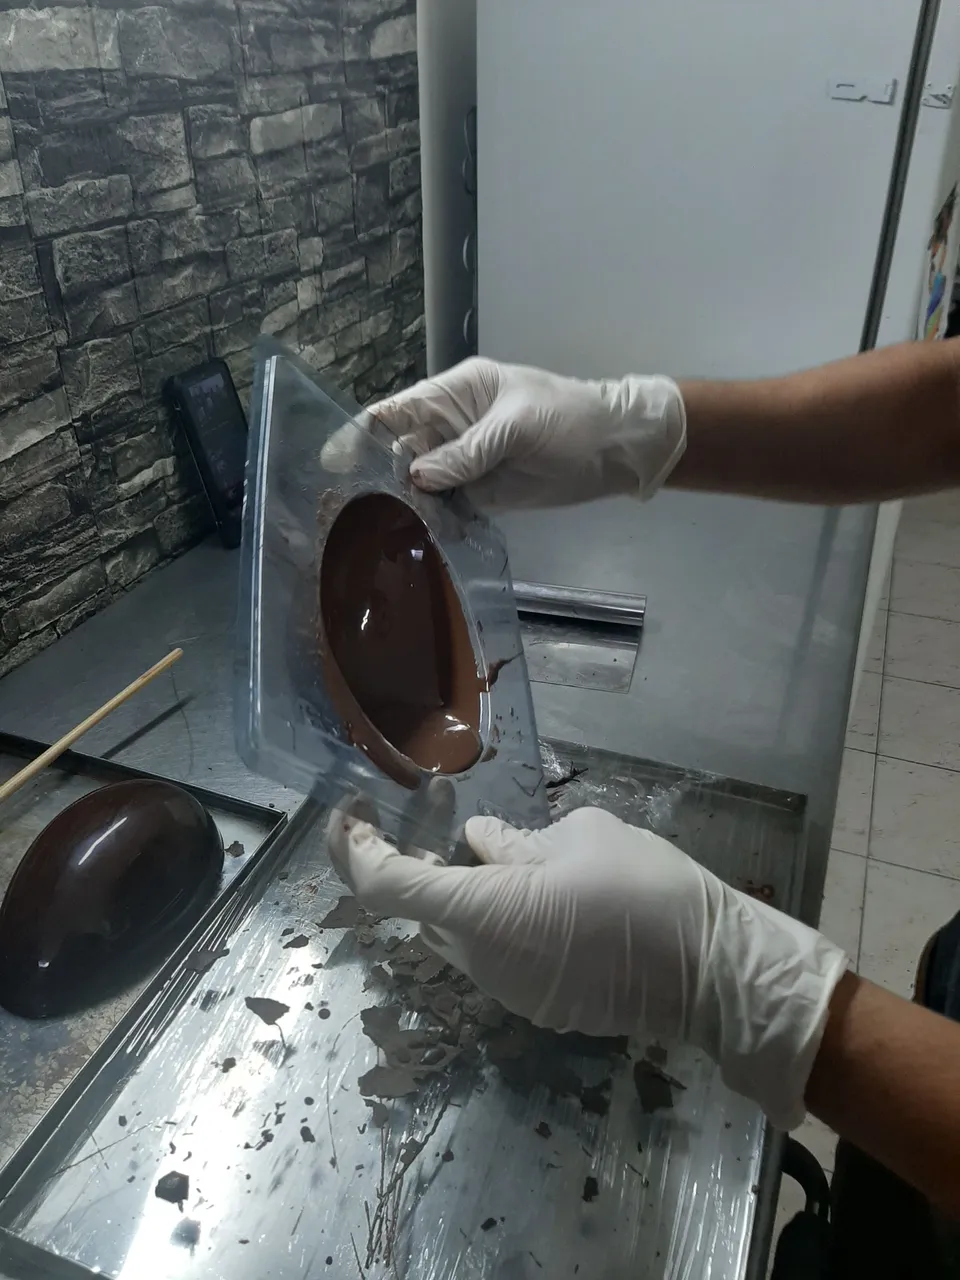
Vaciamos en el molde, nuestro molde es grande, para lo cual necesitamos unos 100 a 150 gramos de chocolate, lo movemos suavemente para que se reparta por todos los lados del molde y procedemos a volcar el chocolate sobre la mesada o alguna bandeja, así sale el exceso del chocolate.
Refrigeramos para que endurezca el chocolate.
Después podemos repetir esta acción o ayudarnos con un pincel para que quede un poco más grueso y no se rompan con facilidad.
 |  |
|---|---|
 | 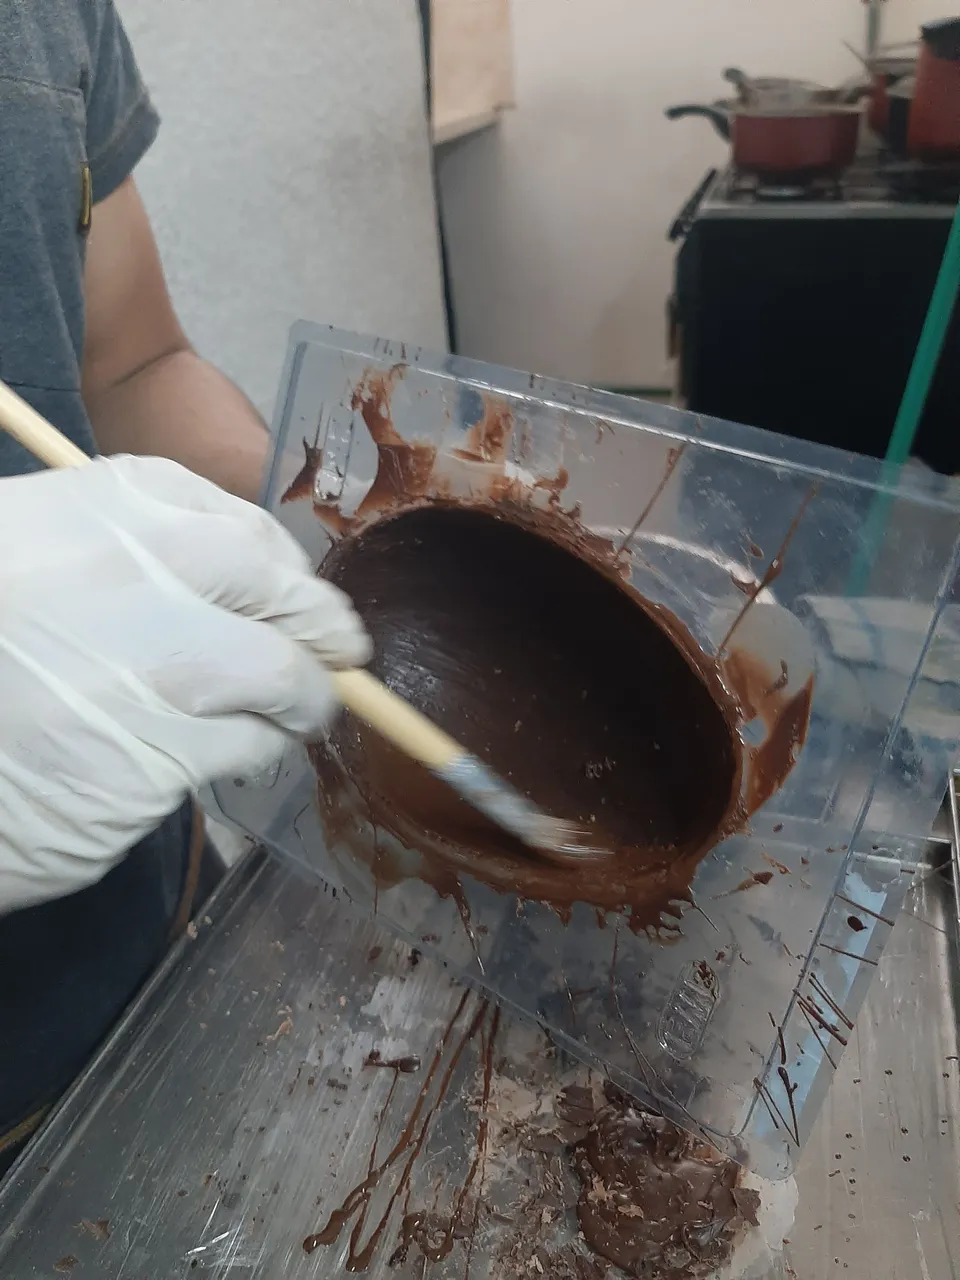 |
Hicimos 4 veces este vaciado para asegurar la firmeza de los mismos.
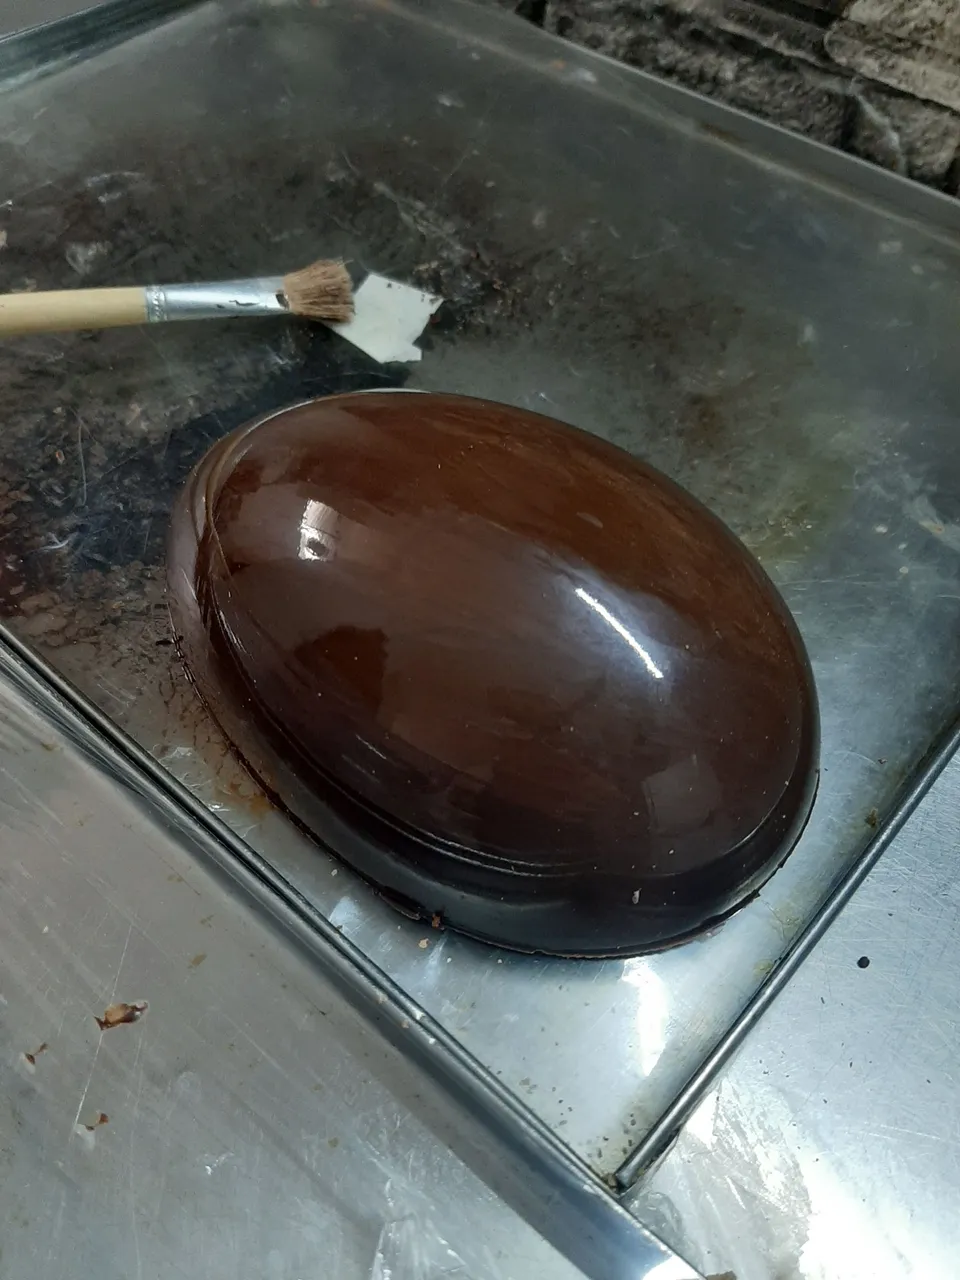
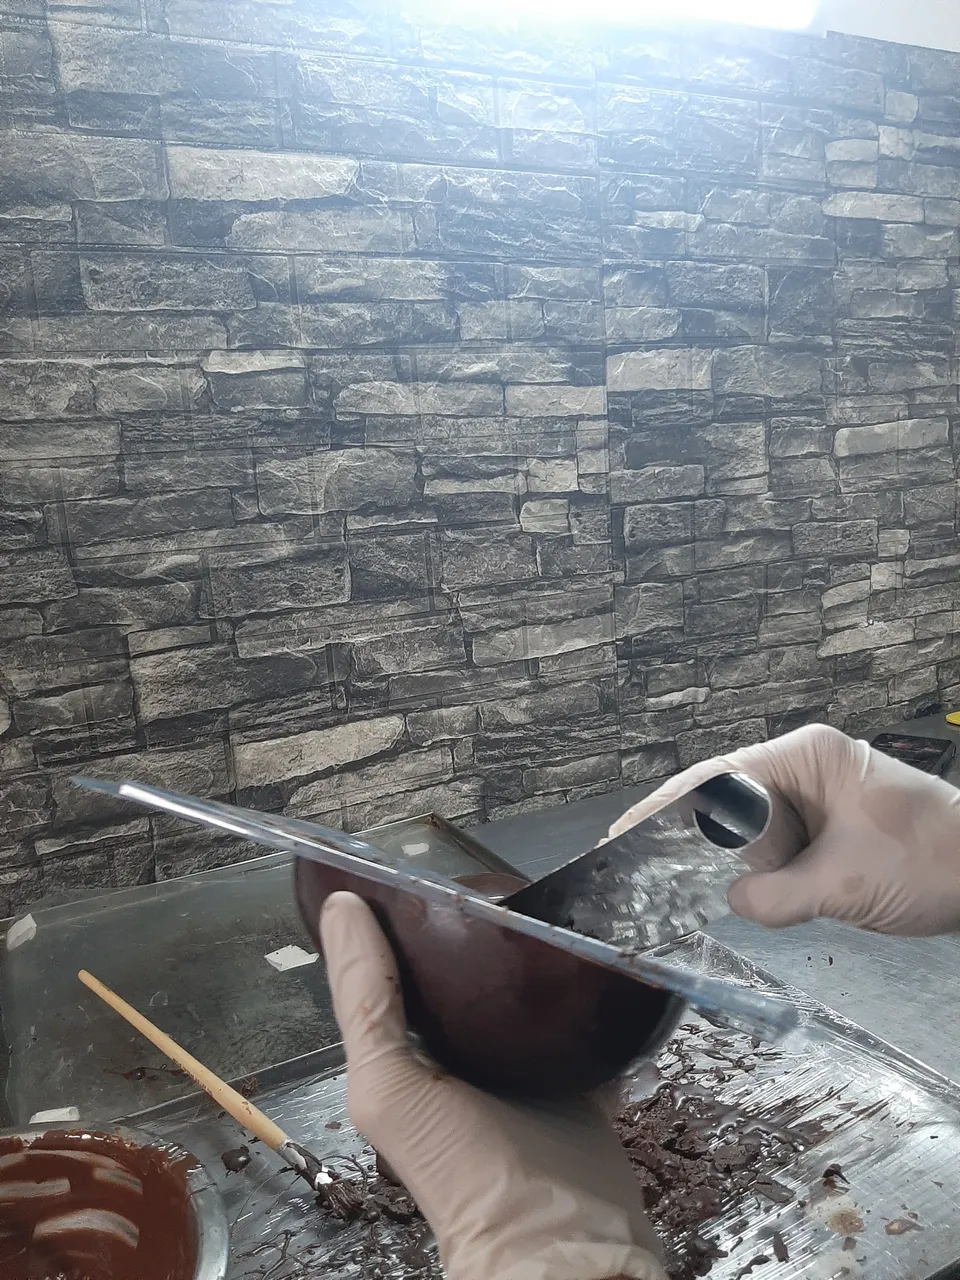
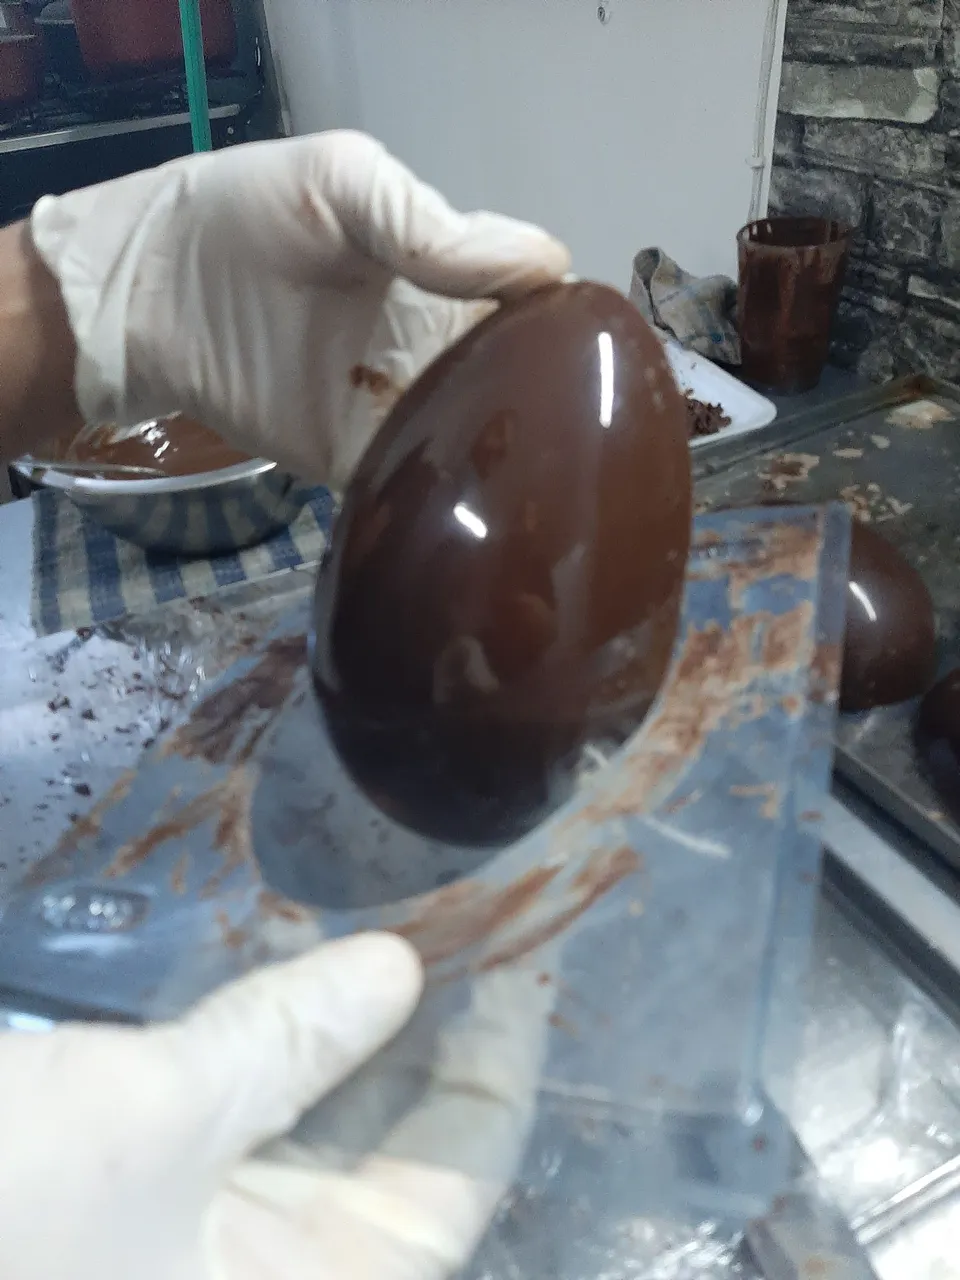
Con un poco de presión suave desmoldamos la cáscara del huevo que debe estar bien fría para que no se rompa.
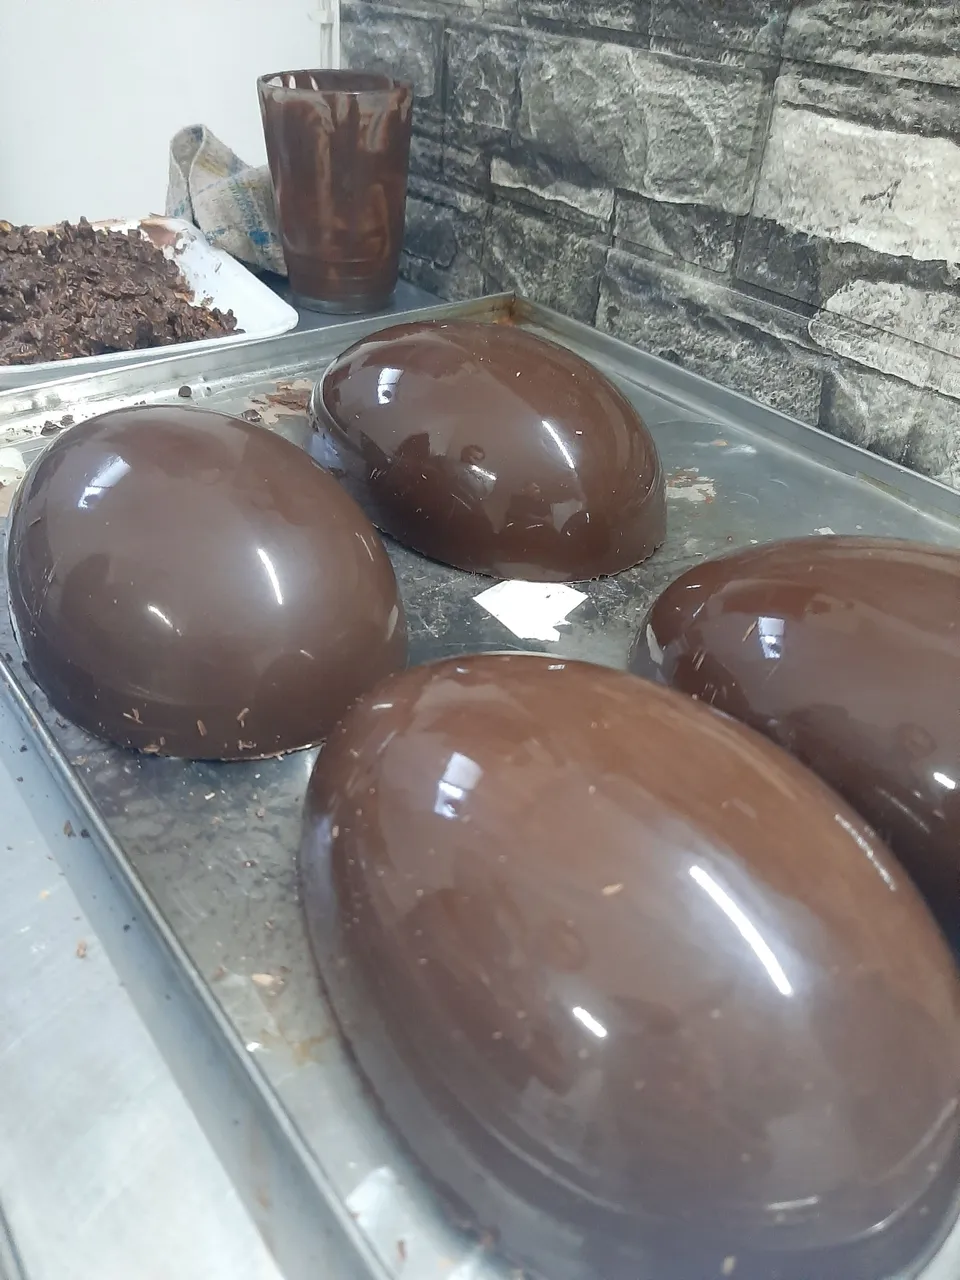
Repetimos los anteriores pasos hasta lograr las 6 mitades de los huevos.
 |  |
|---|---|
 |  |
Las figuras de dragones fueron envueltas en papel film para evitar contaminación.
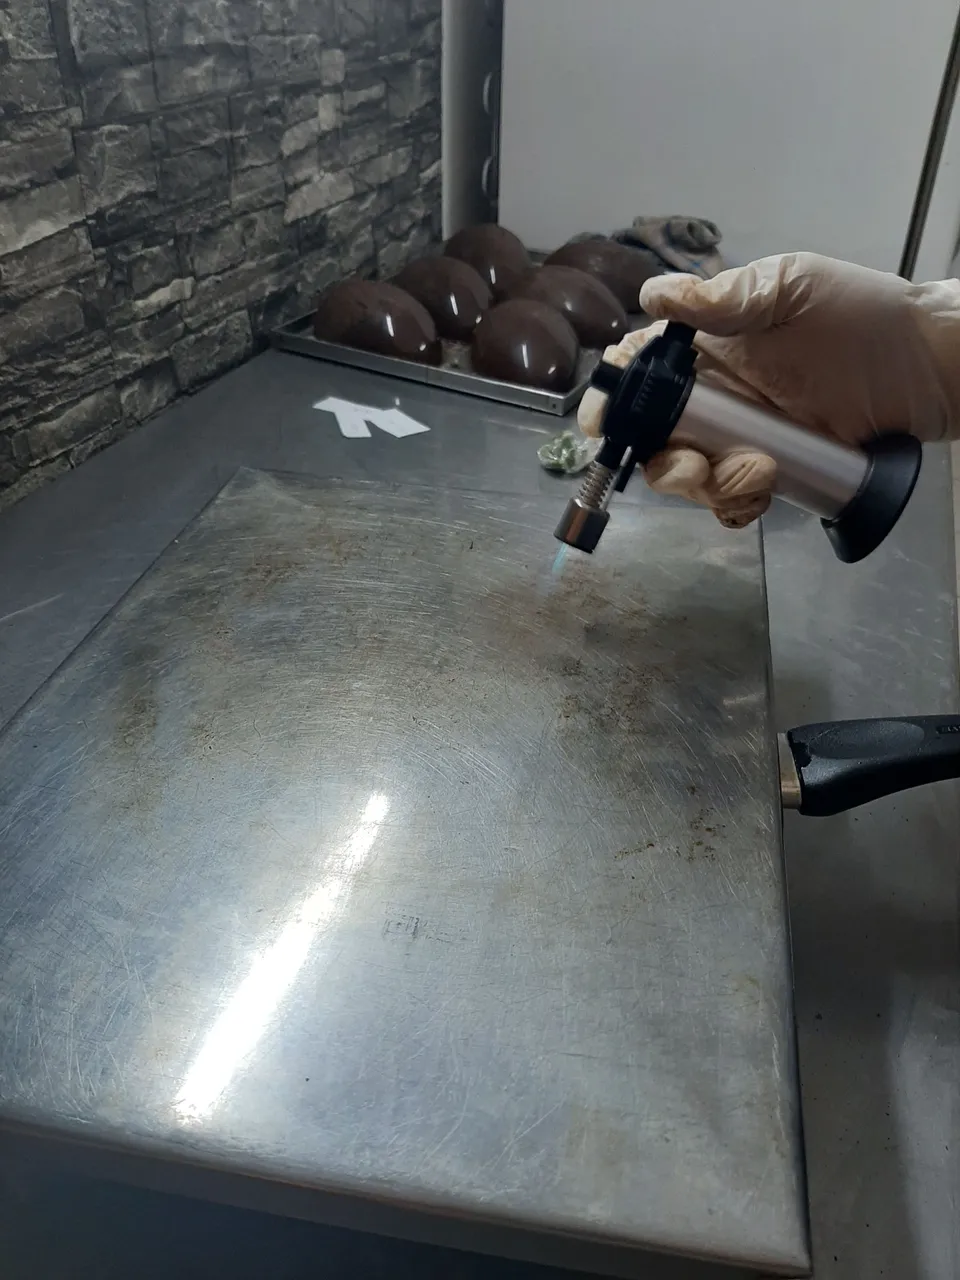
Usando una olla de agua hirviendo y una bandeja de aluminio, tuvimos una plancha ligeramente caliente, que nos permite derretir las caras de los huevos y con esto eliminar imperfecciones, además de permitir el correcto sellado de las caras.
 |  |
|---|---|
 |  |
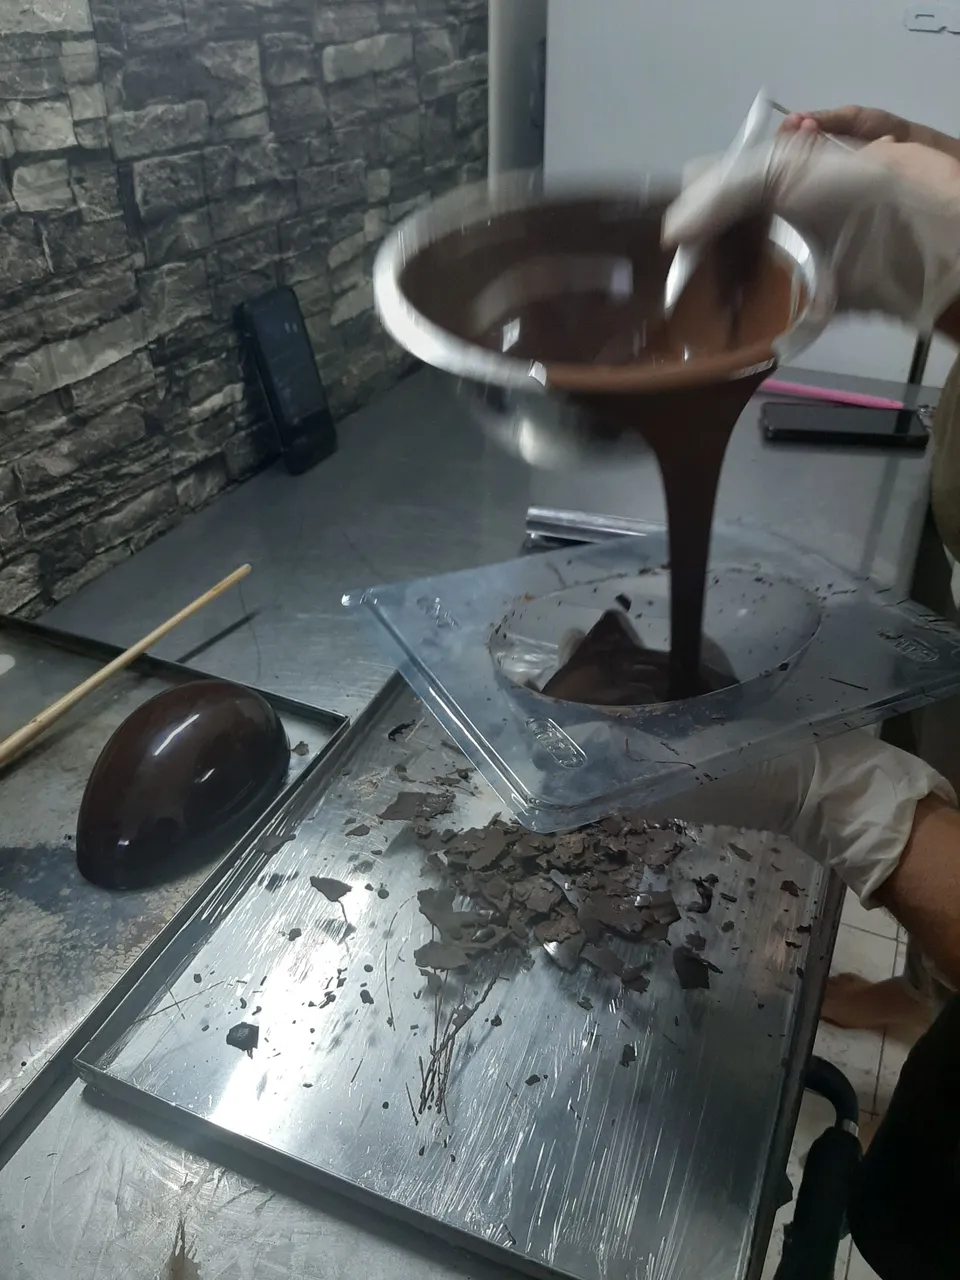
Se agregan los dulces que irán en el relleno junto a los dragones envueltos.
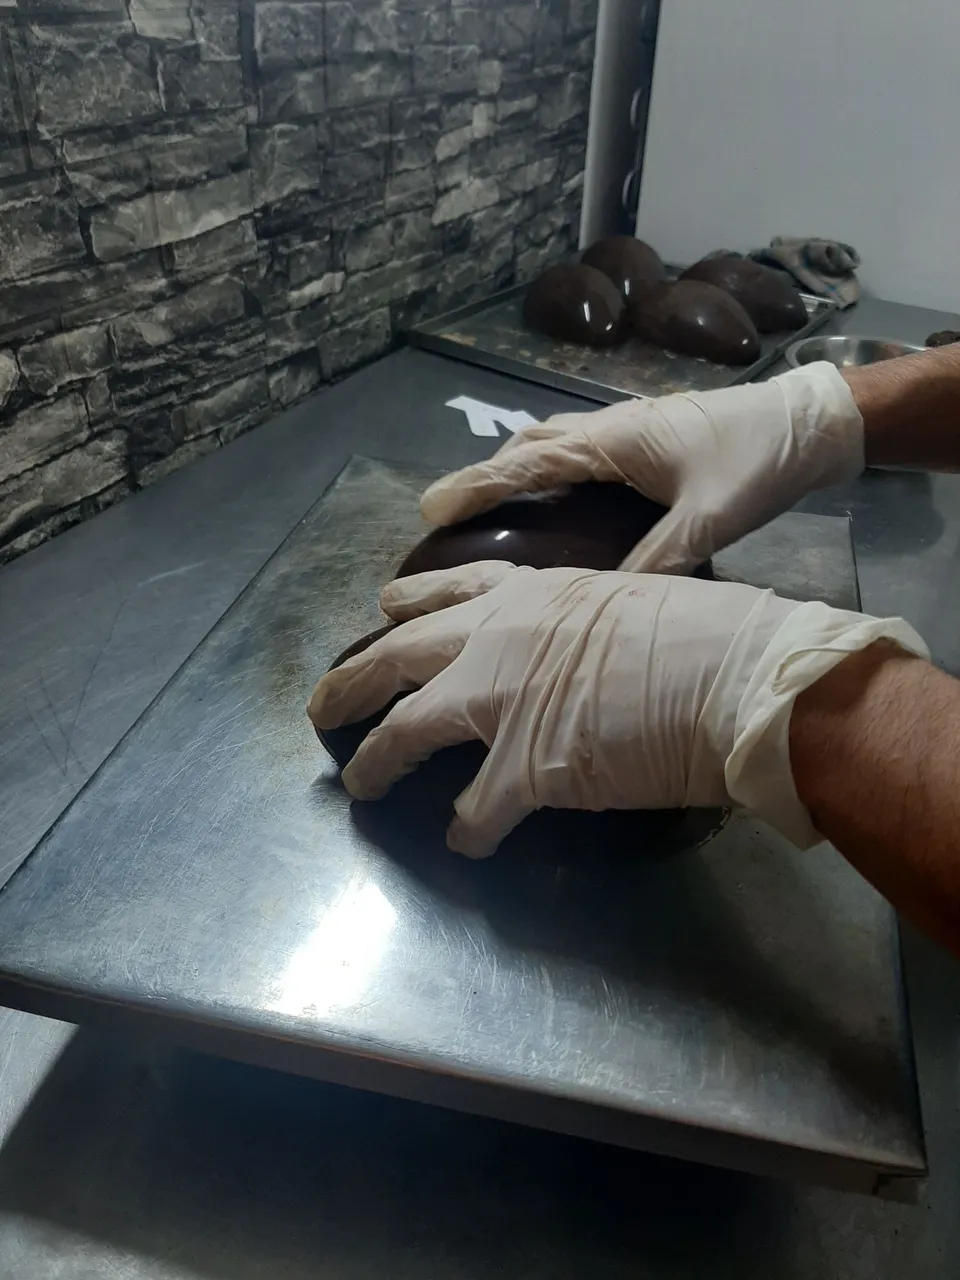
Se alisa la otra cara del huevo y se procede a pegar utilizando chocolate derretido.
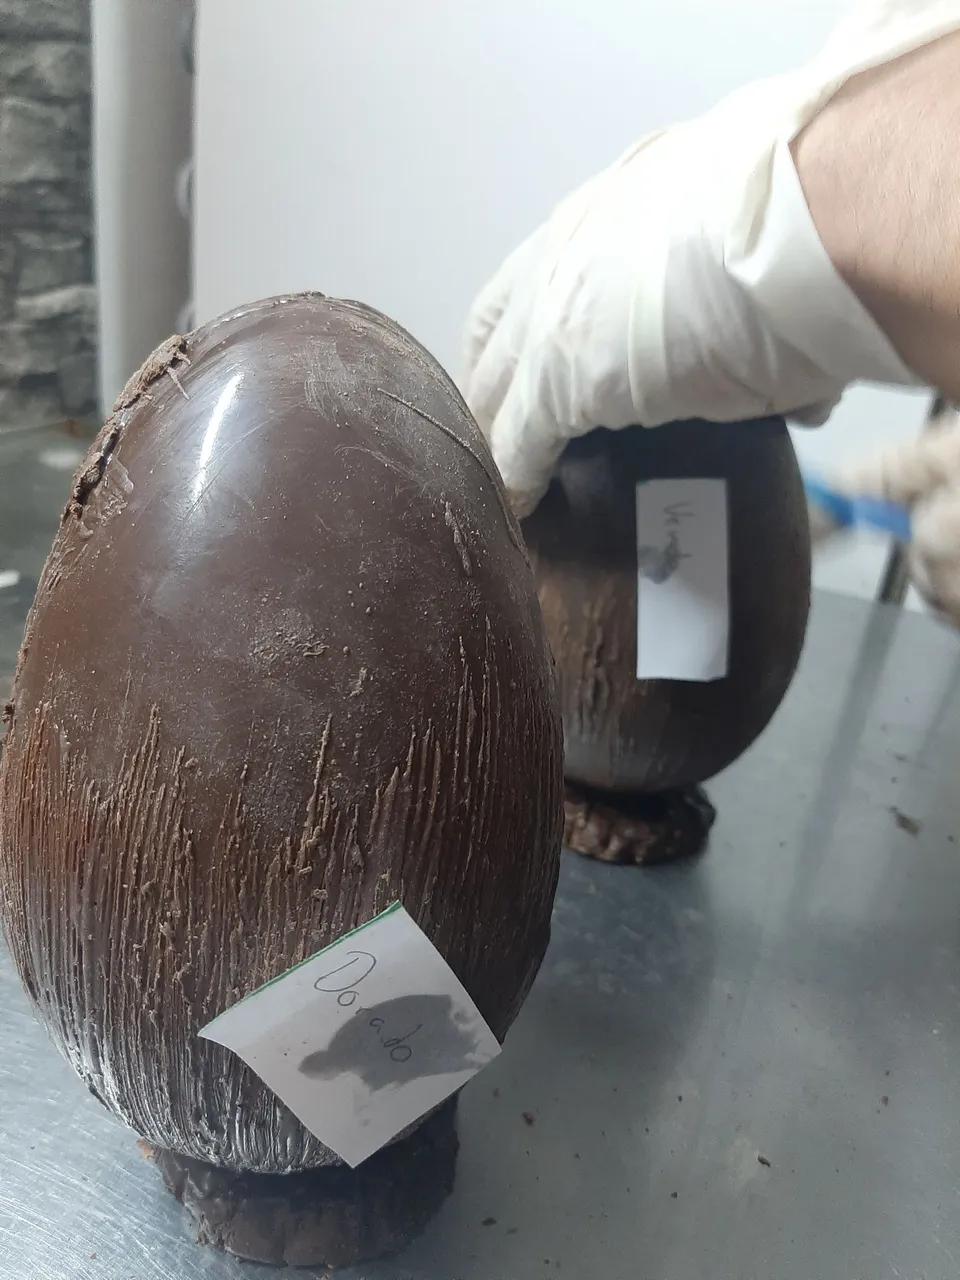
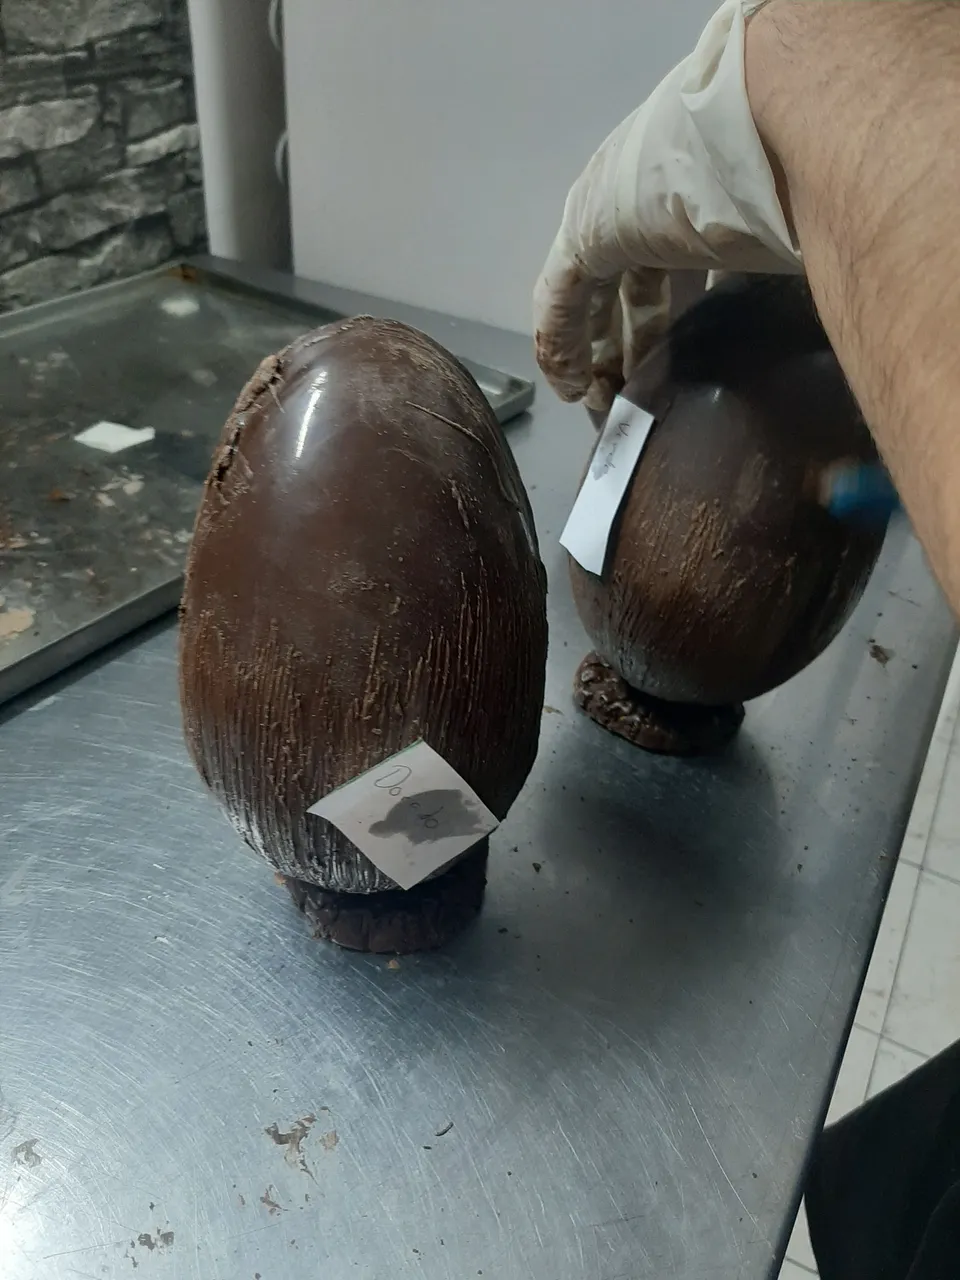
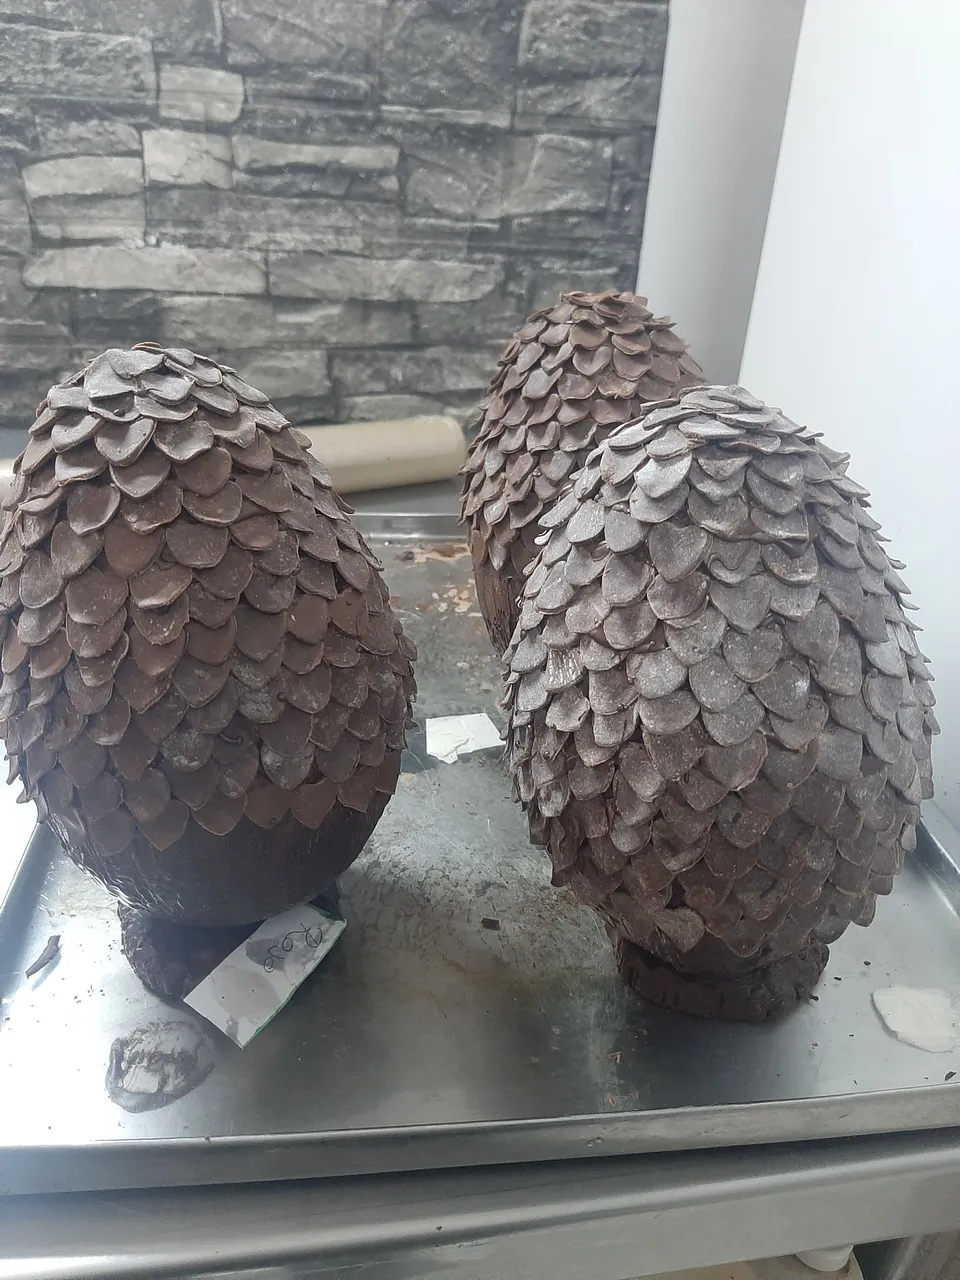
Realizamos una base de chocolate para poder parar cada huevo, a medida que fuimos rellenando los huevos pegamos un papel para poder identificar qué dragón estaba dentro, y con esto saber qué color utilizar para pintarlos. Los dejamos reposar.
 |  |
|---|---|
 |  |
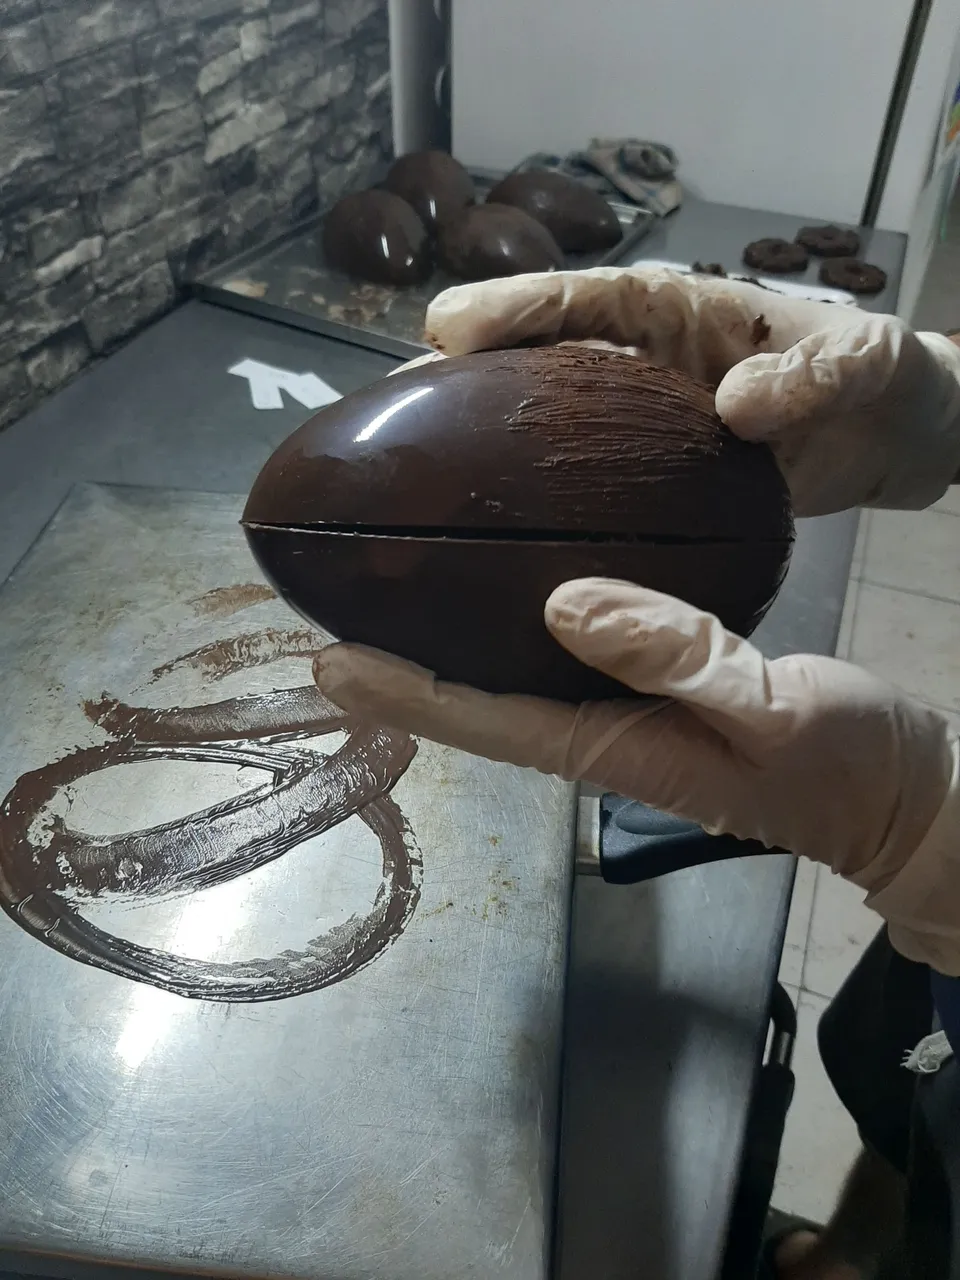
El más difícil de todos.
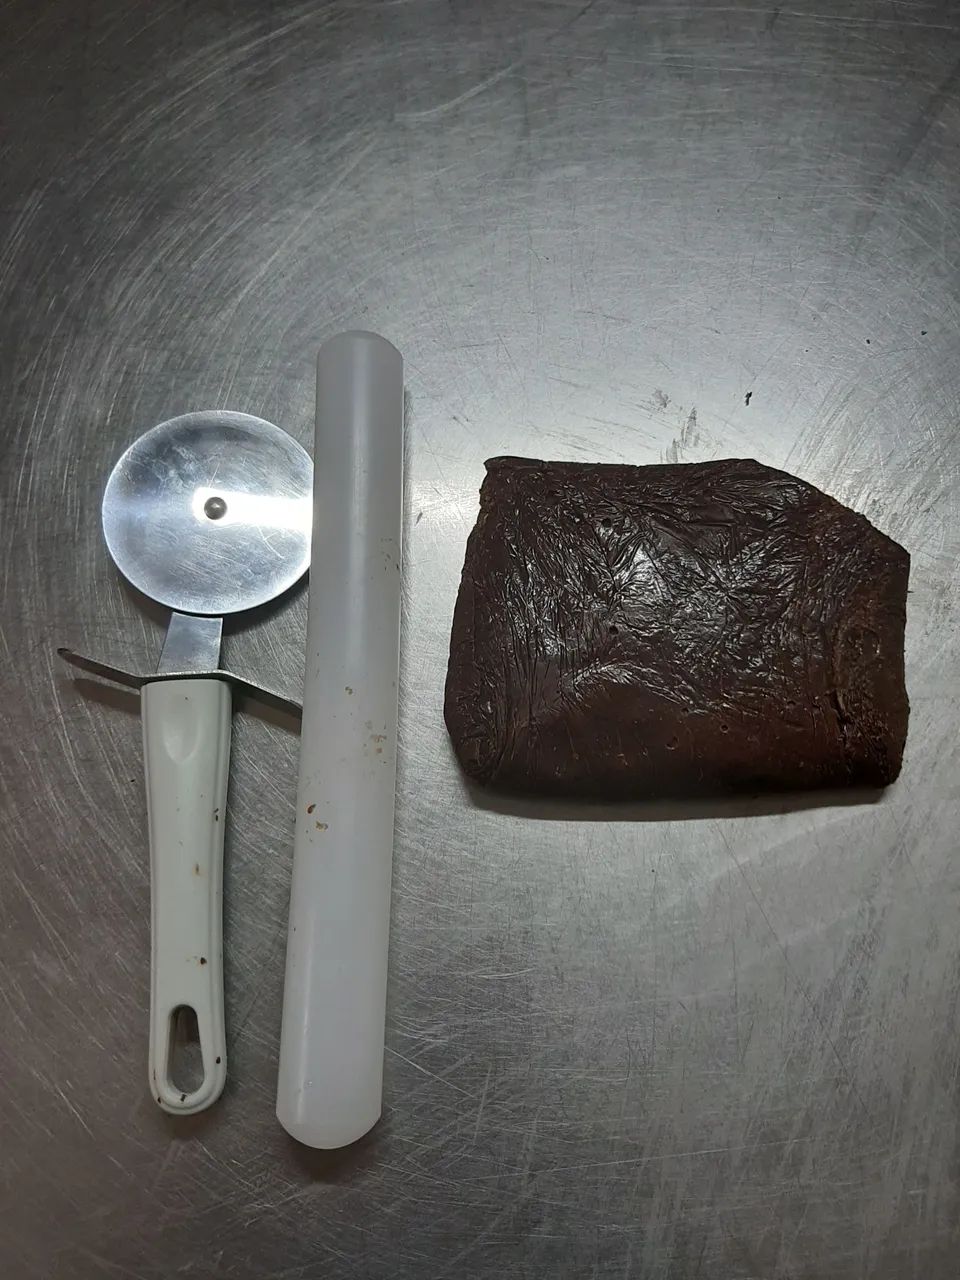
Creamos las escamas de chocolate plástico.
Para ello debimos amasar, si, con este frío fue agotador, y estiramos en rectángulos muy finitos.
 |  |
|---|---|
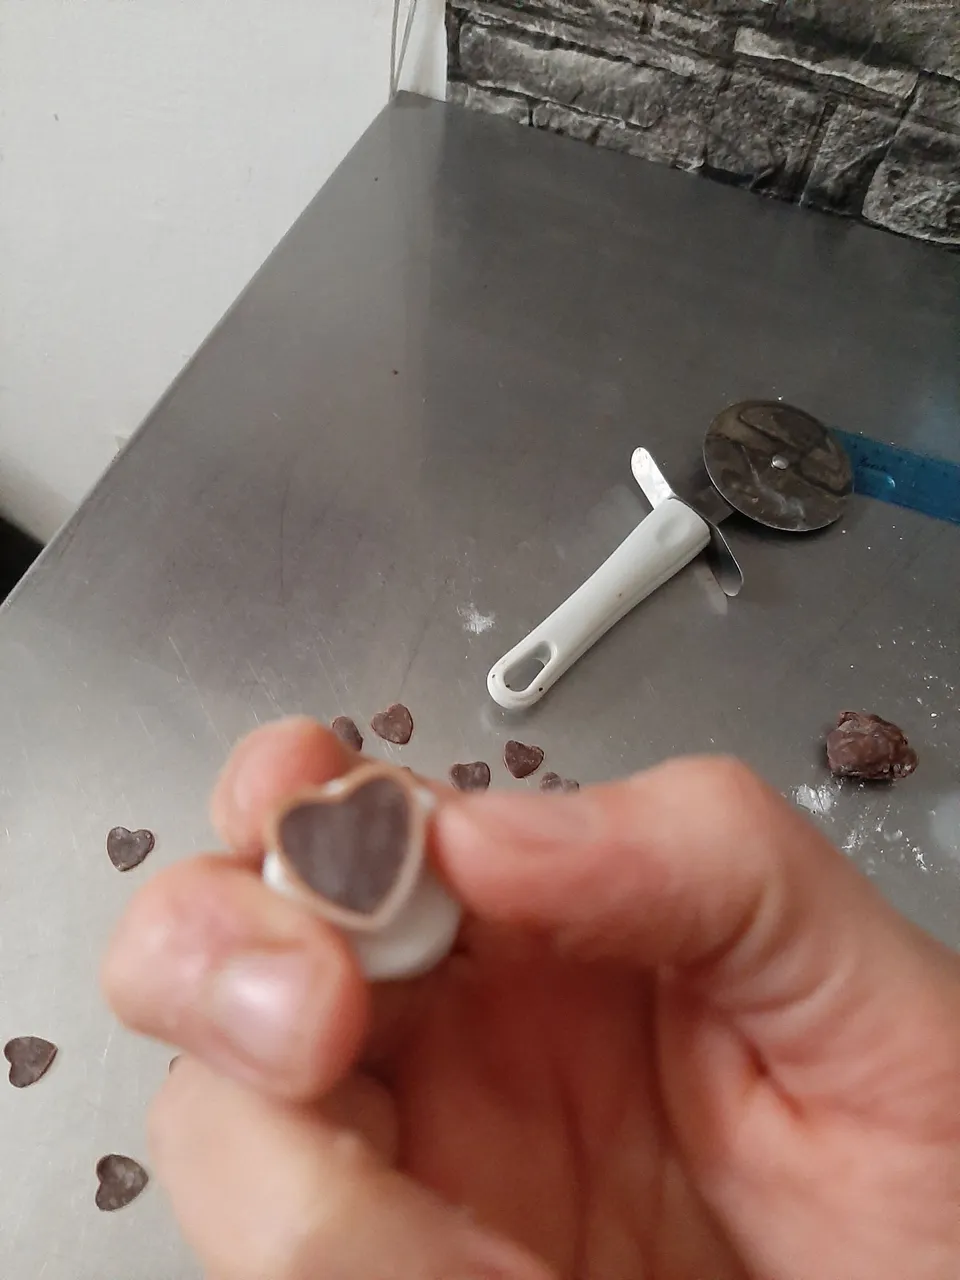 | 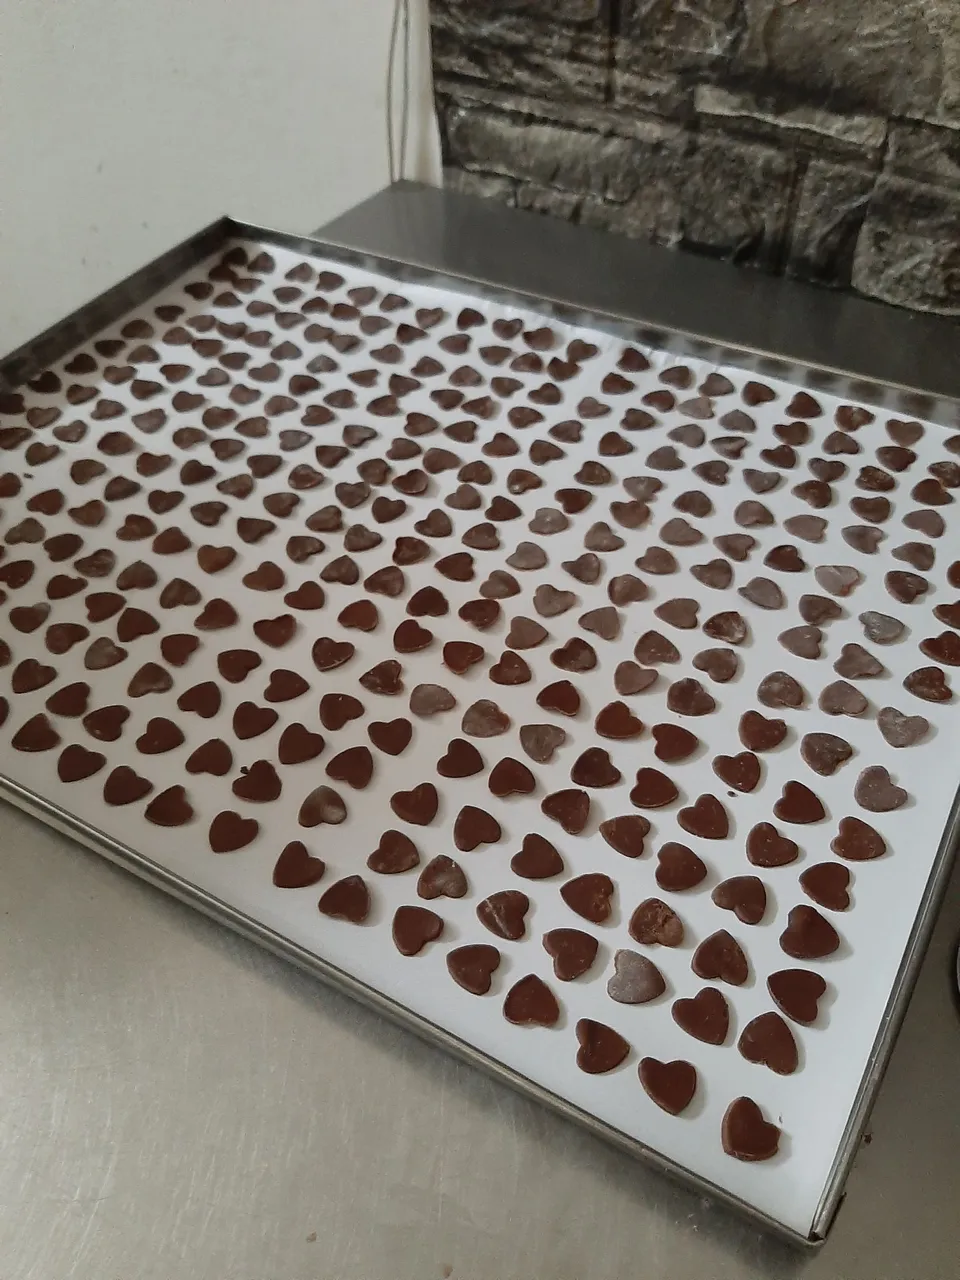 |
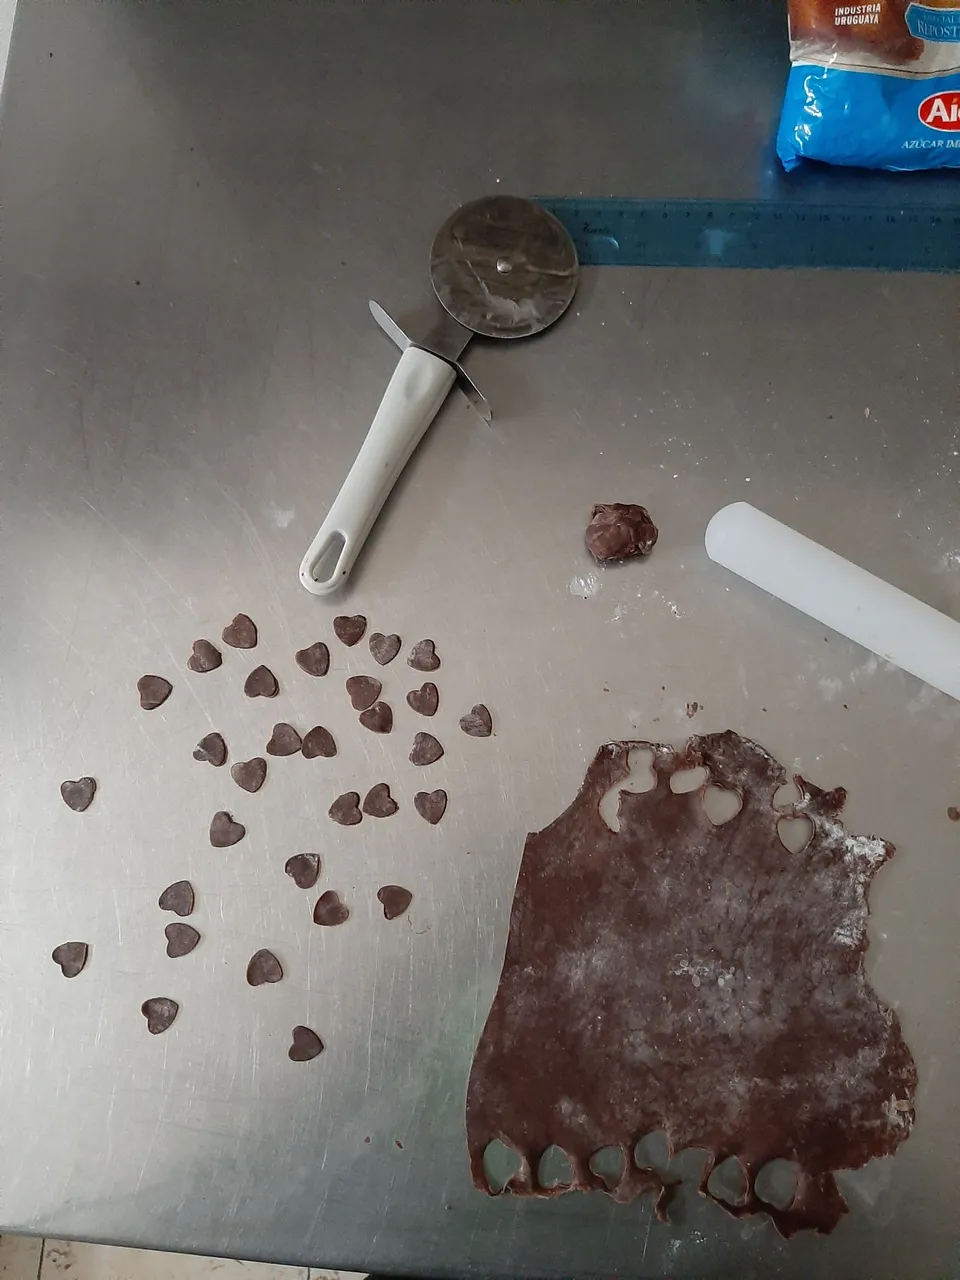
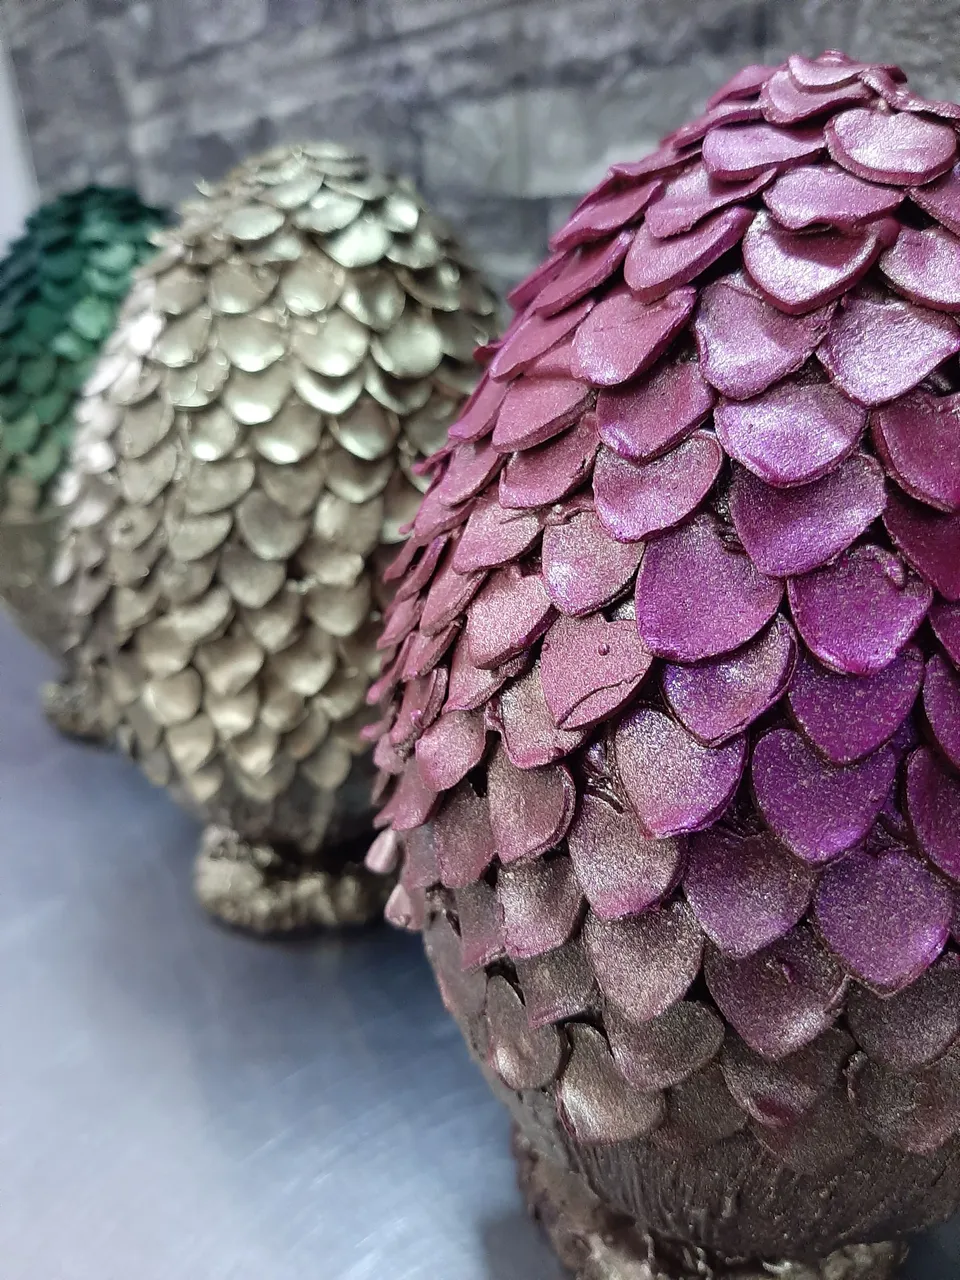
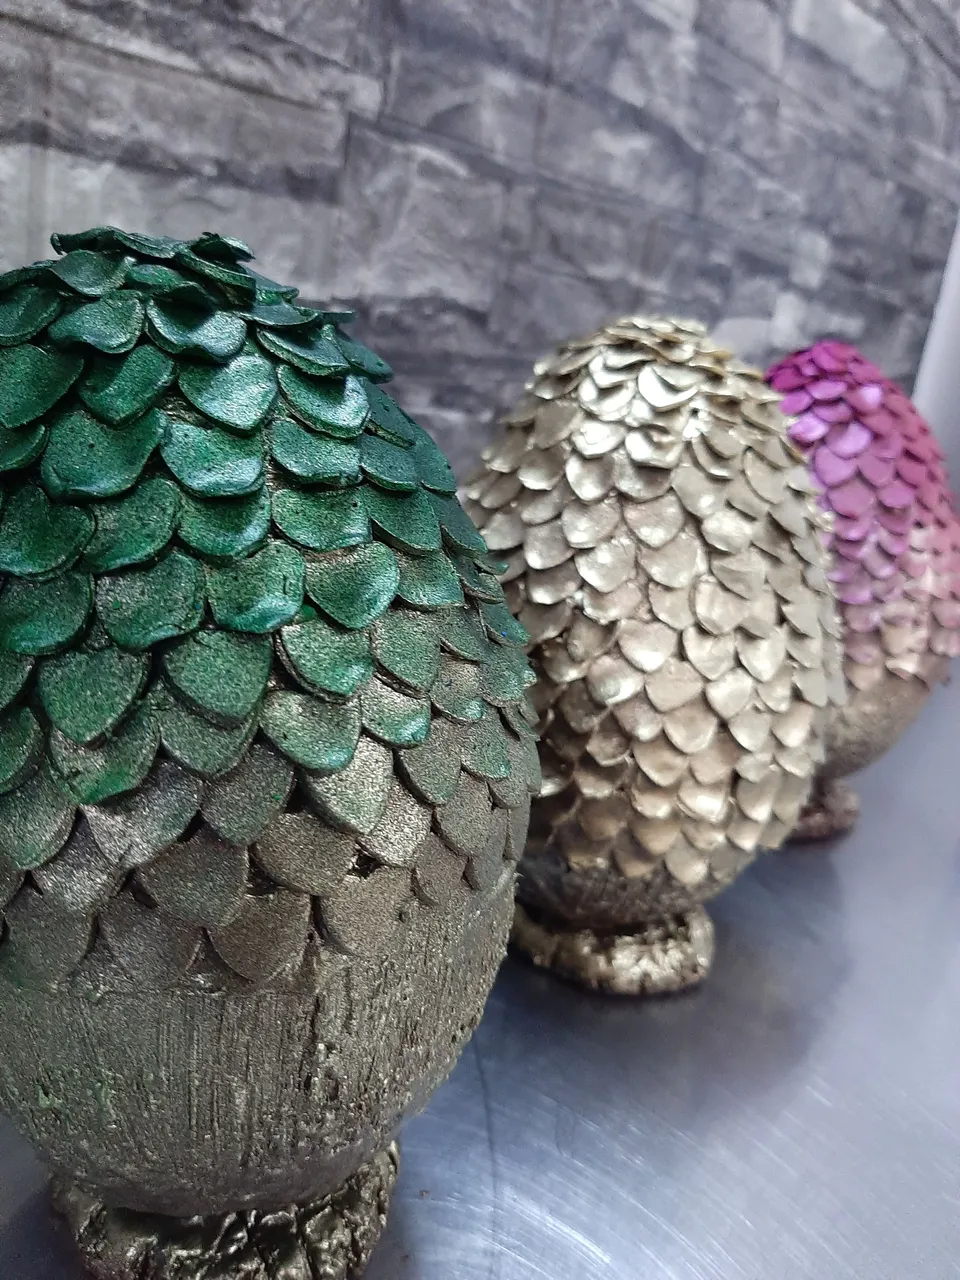
Luego, con un cortador en forma de corazón hice 360 escamas, pensando que sería suficiente. Las dejé en una bandeja para que endurecieran un poco.
Para mi sorpresa en menos de un huevo ya había agotado más de la mitad de las escamas, así que las 360 escamas, que me habían dejado los dedos adoloridos de tanto cortar, eran insuficientes. Así que tuve que cortar casi el doble de esa cifra para poder cubrir los huevos como habíamos planeado.
 |  |
|---|---|
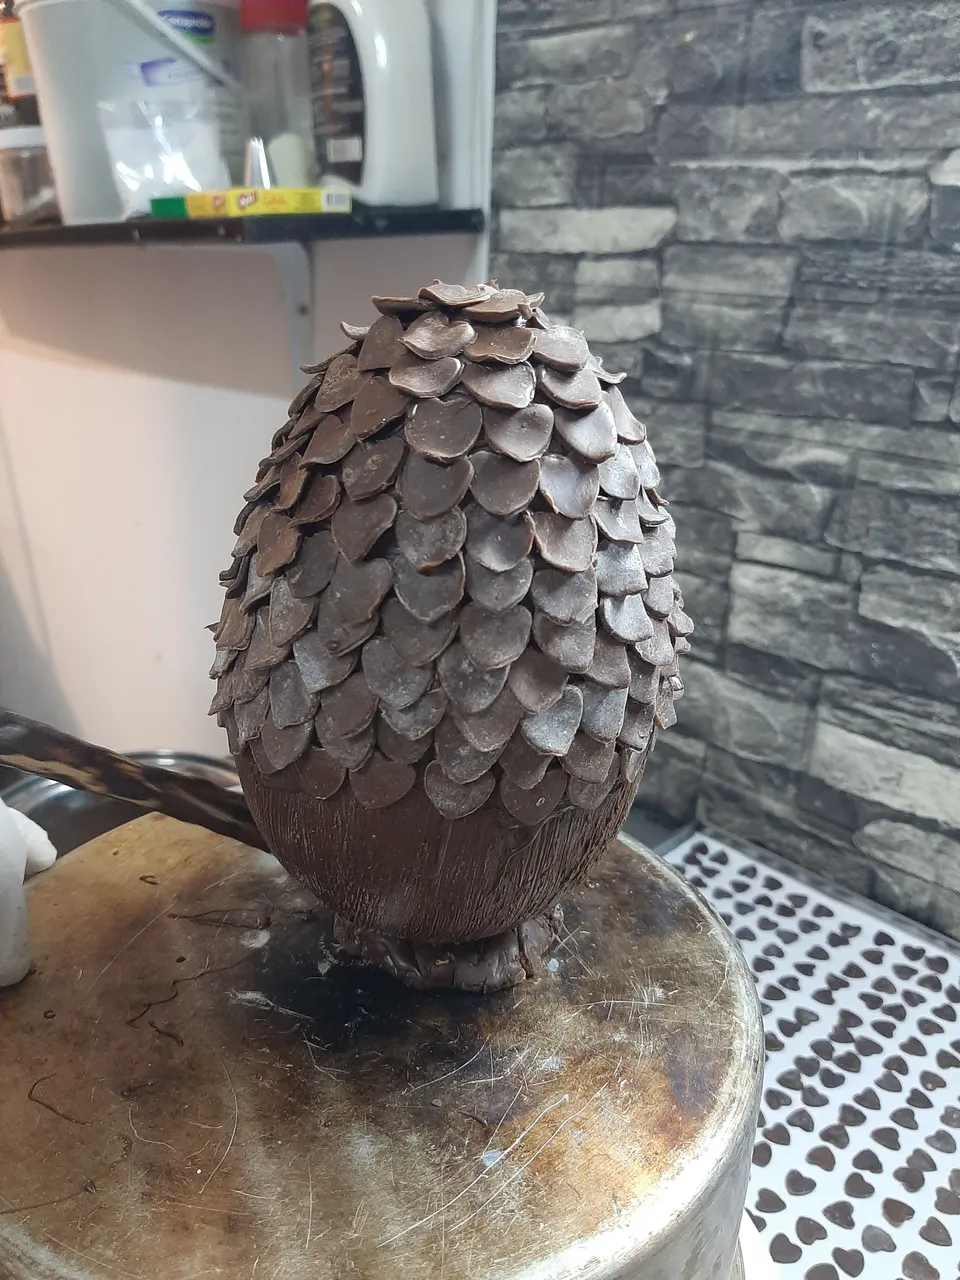 | 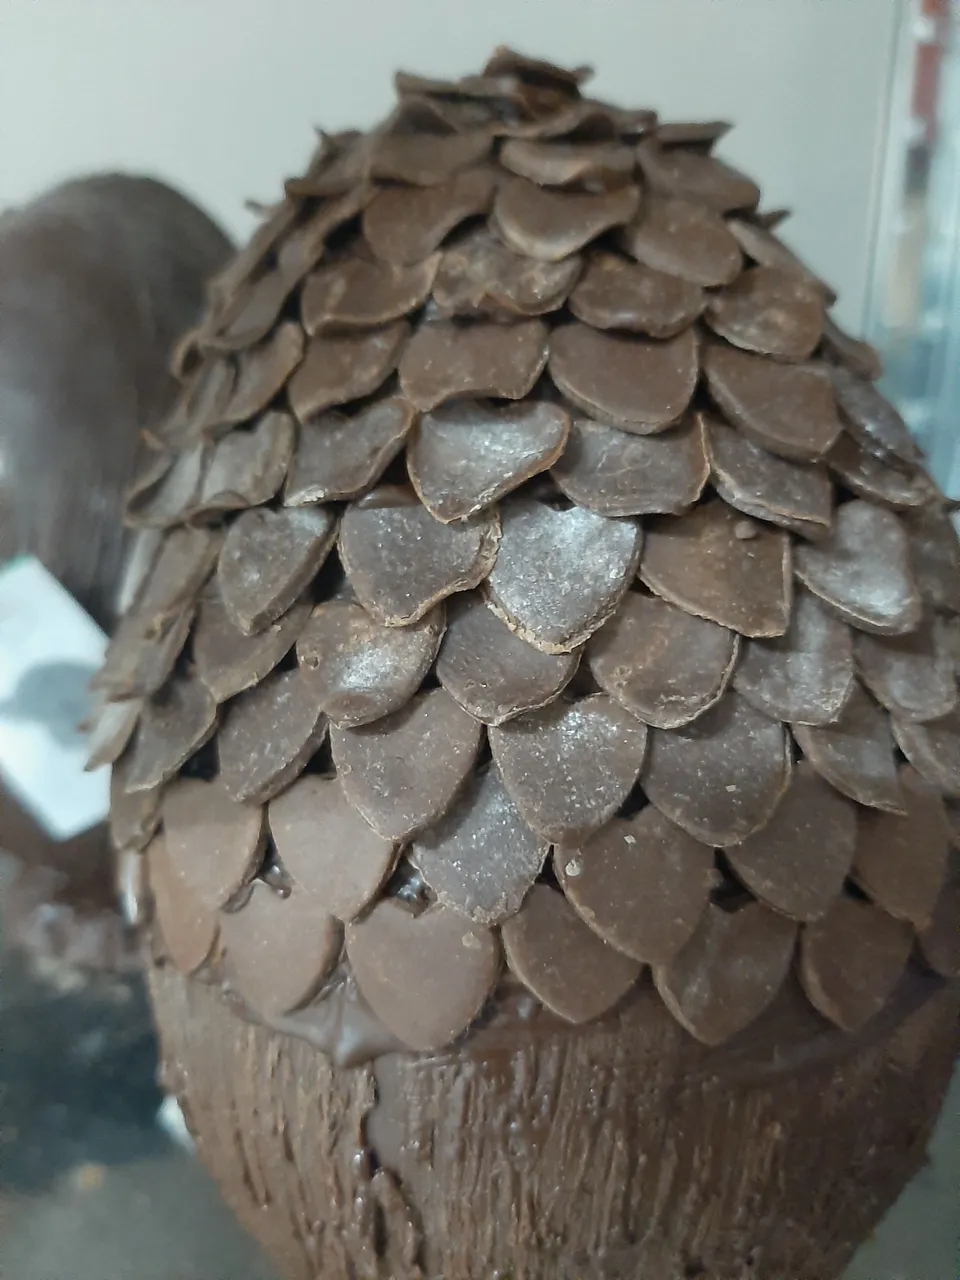 |
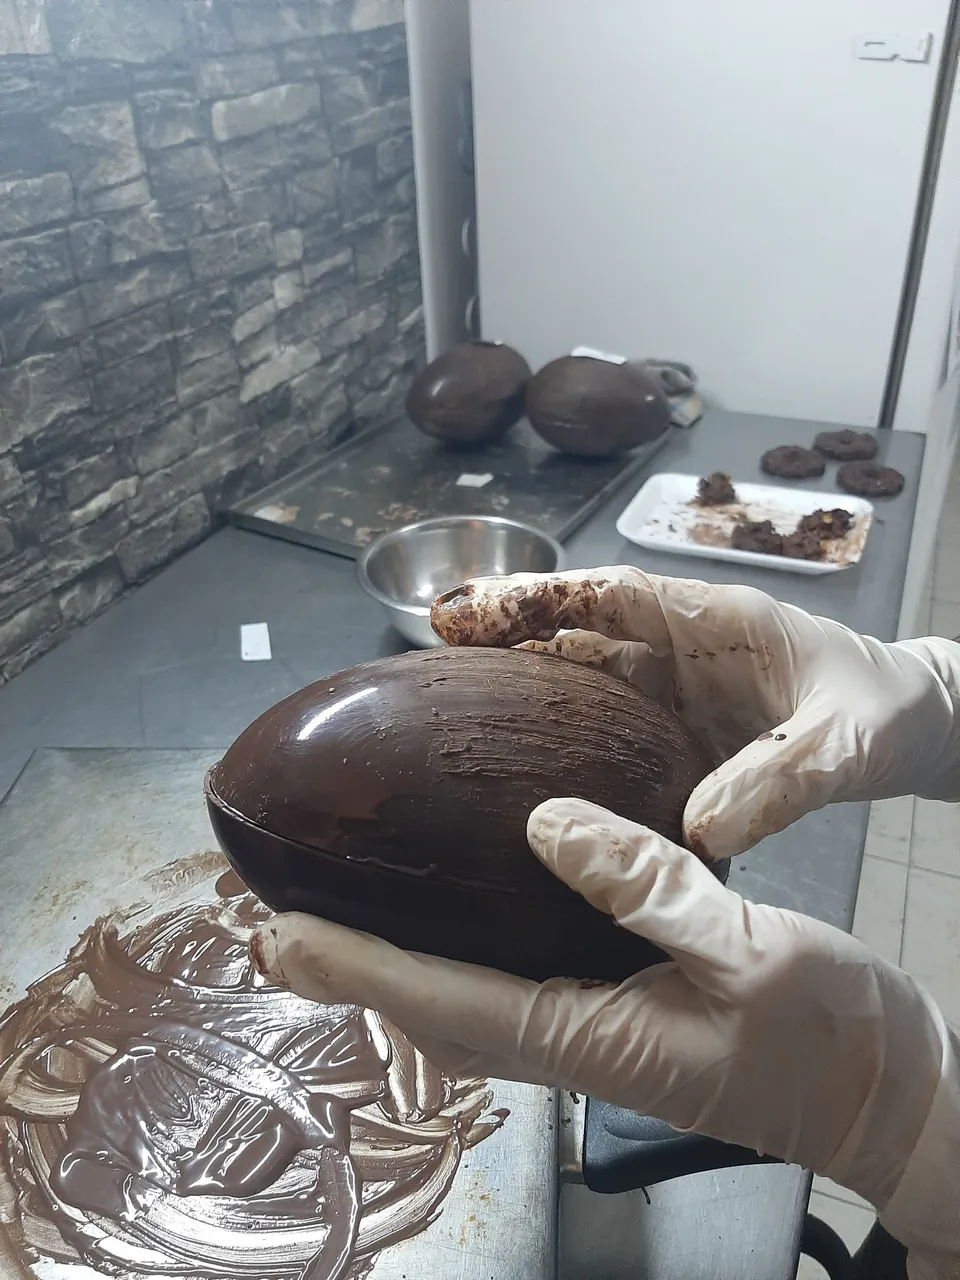
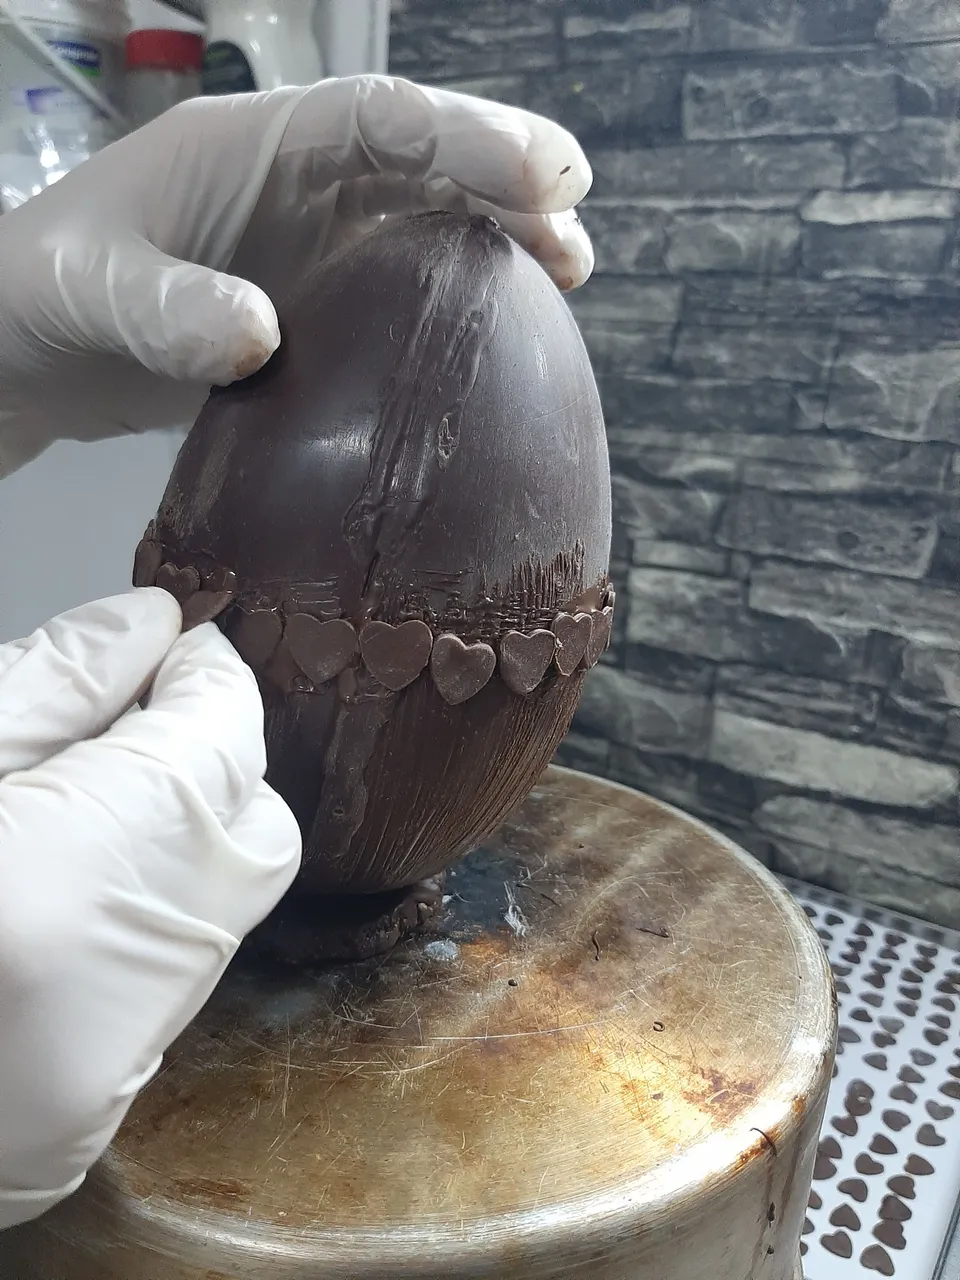
Pegando escama por escama con la ayuda de chocolate derretido tarde más de 3 horas.
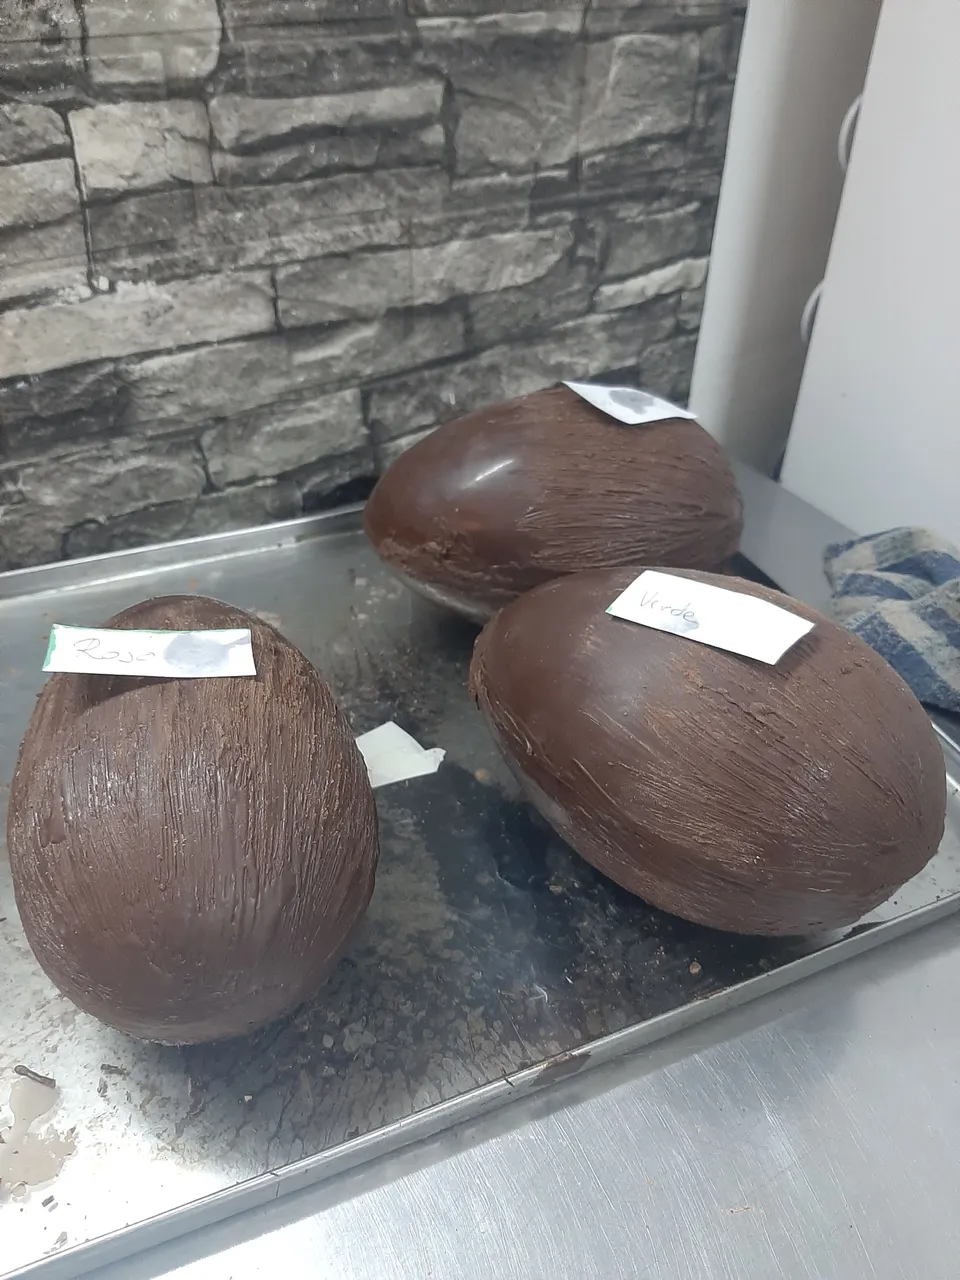
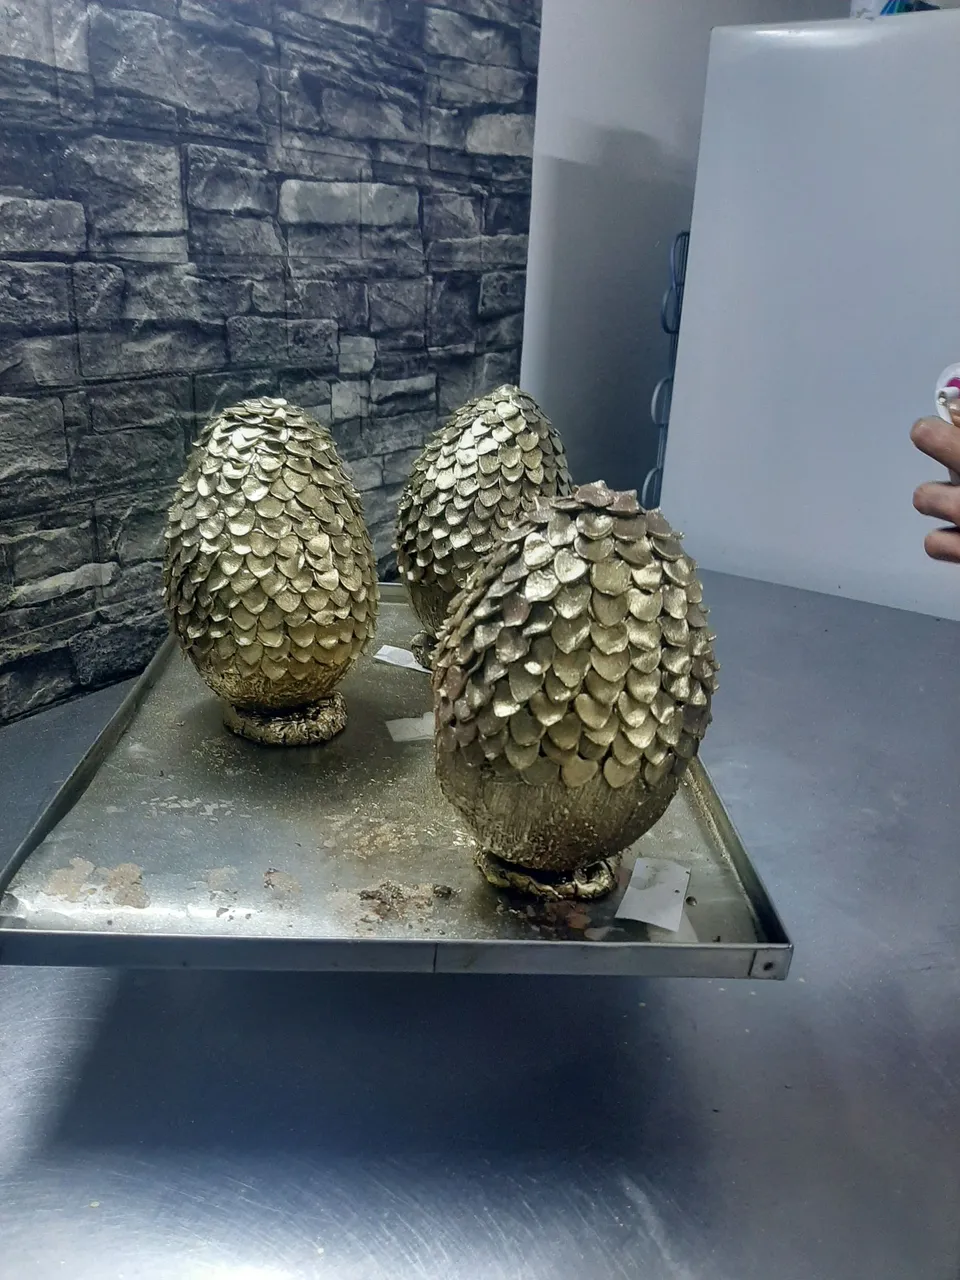
Al principio el plan era aplicar el polvo sobre los huevos con ayuda de un pincel, pero por lo delicado y la cantidad de tiempo que llevaría hacerlo así,
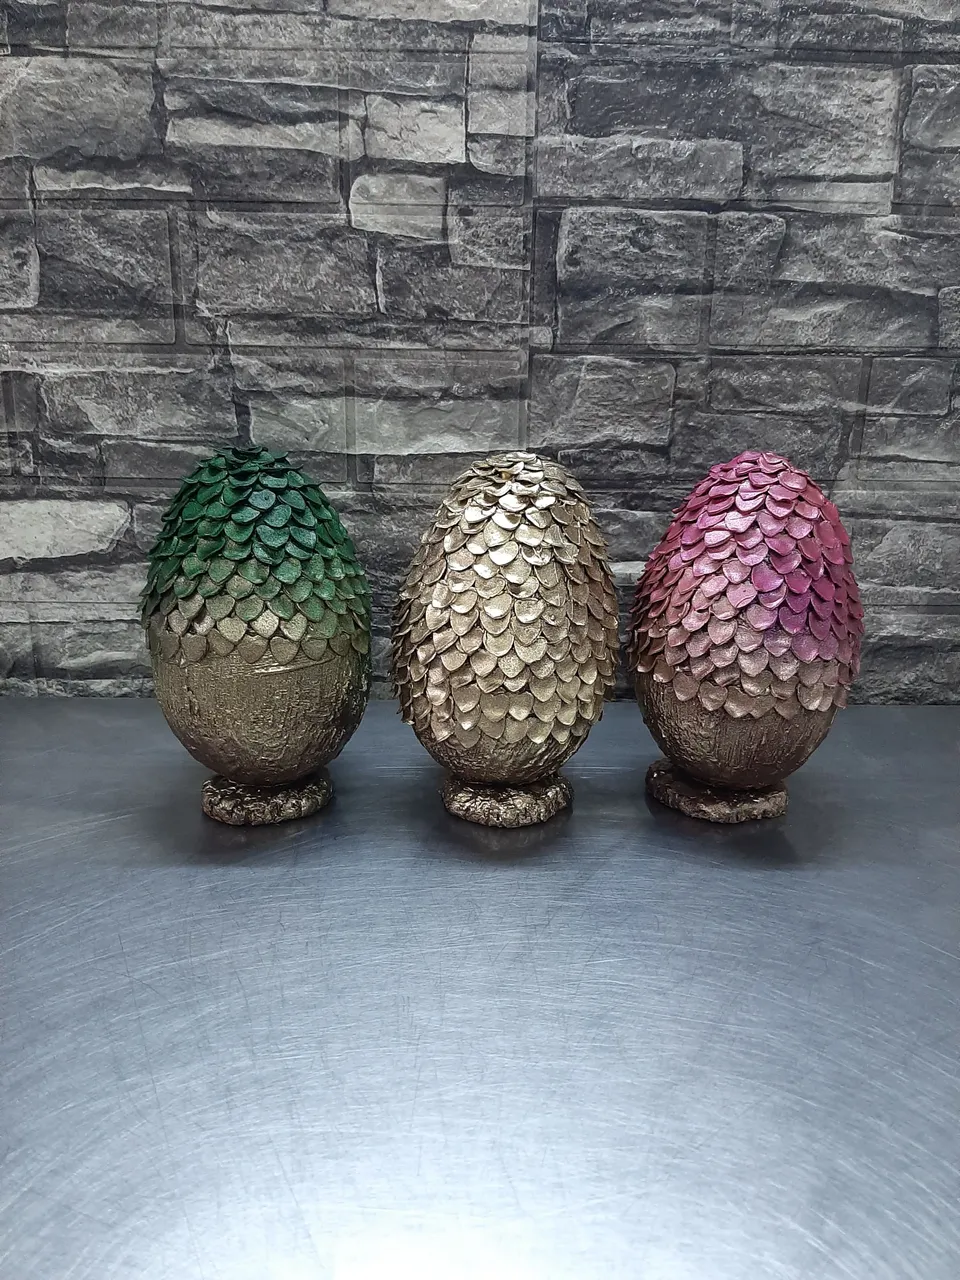
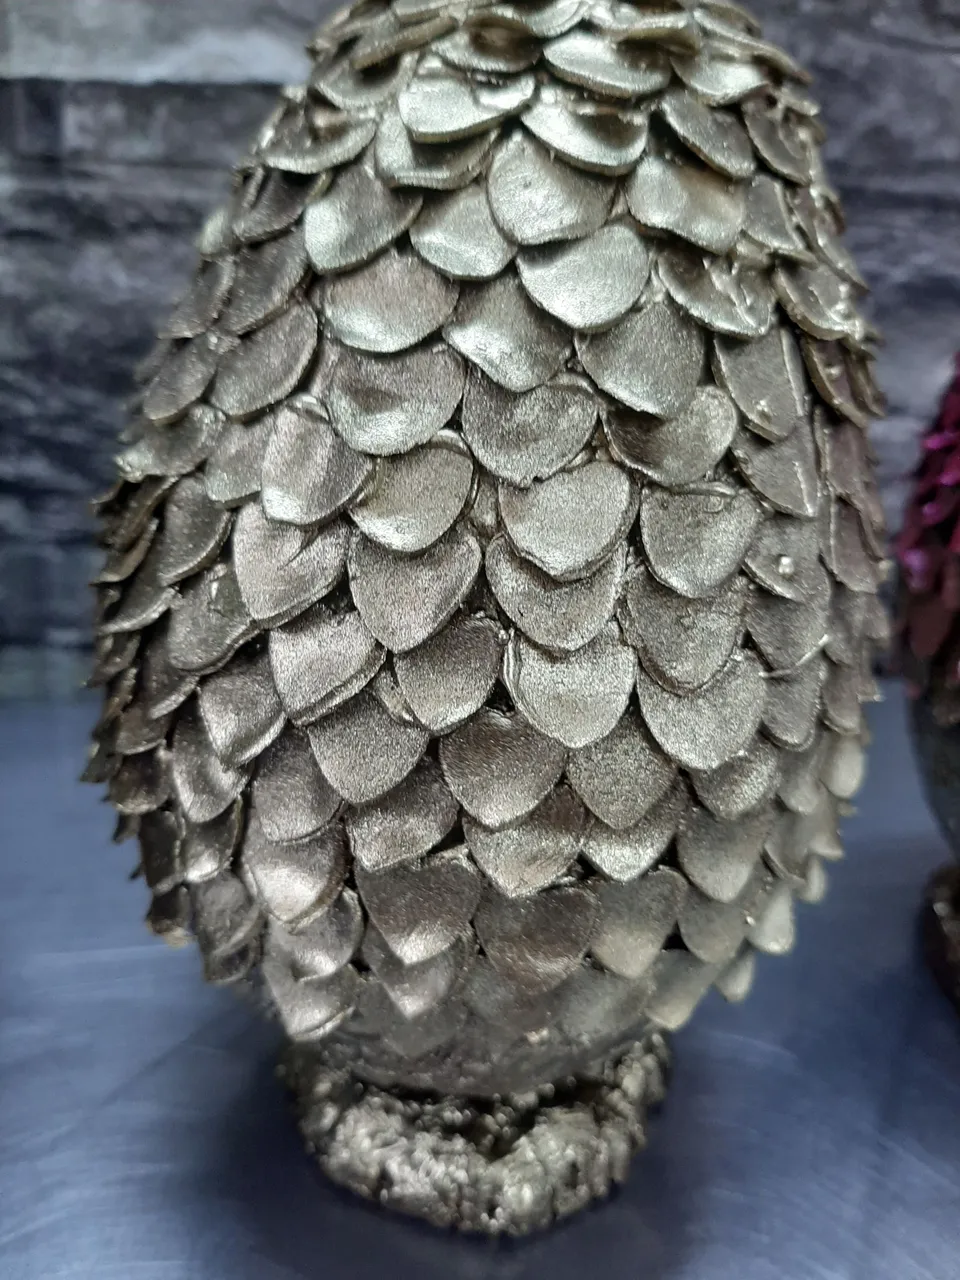
Procedimos a usar el aerógrafo manual, debo decir que es una de las mejores inversiones que he tenido hasta ahora, preparamos el dorado con alcohol y procedimos a pintar los huevos con una capa de dorado primero.
Luego uno de ellos se pulverizó con polvo rose gold. Y amamos el resultado.
En el tercero pulverizamos el color verde metalizado. Los dejamos reposar para que sequen.
 |  |
|---|---|
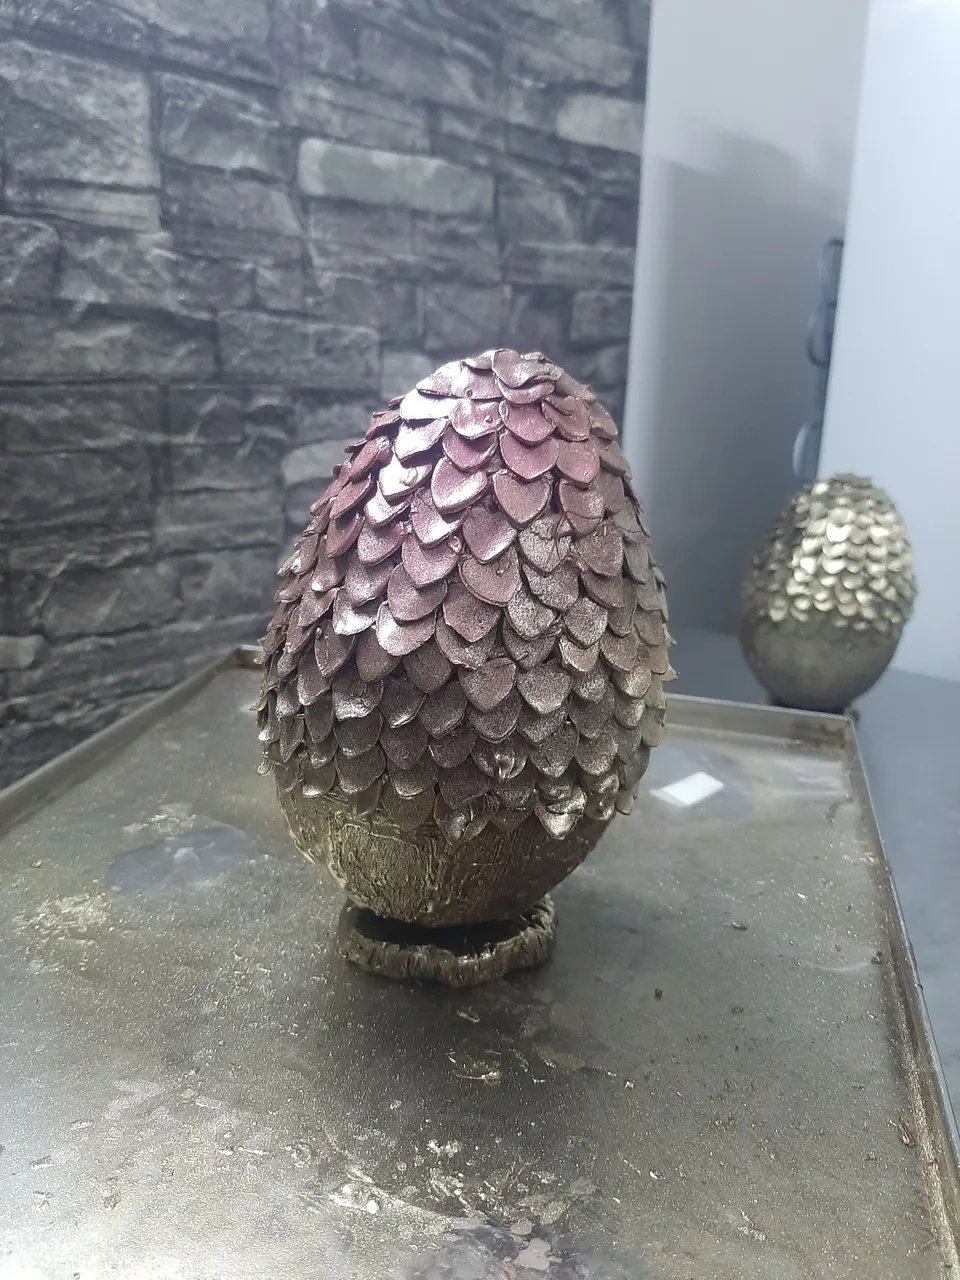 | 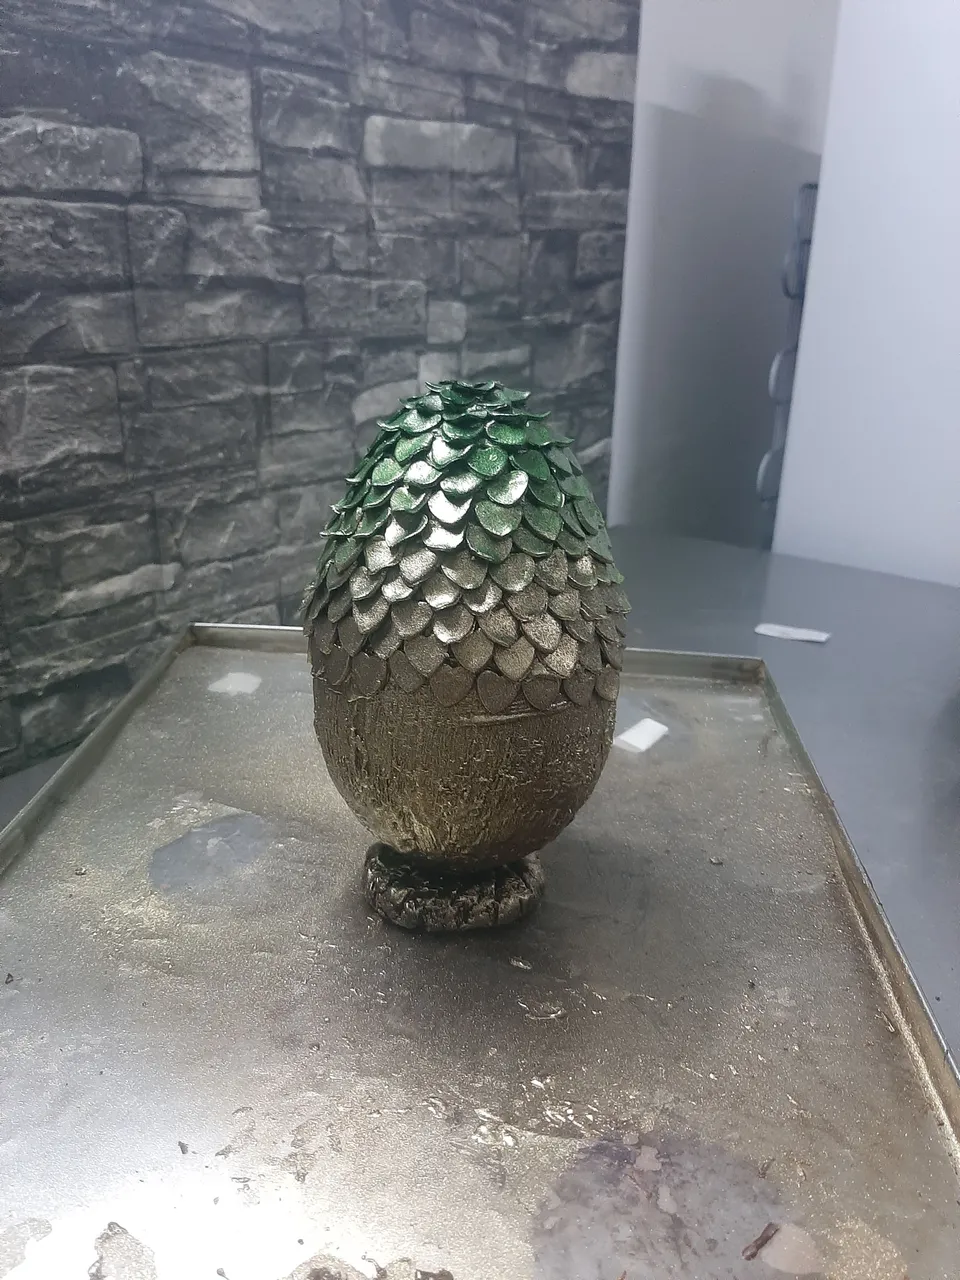 |
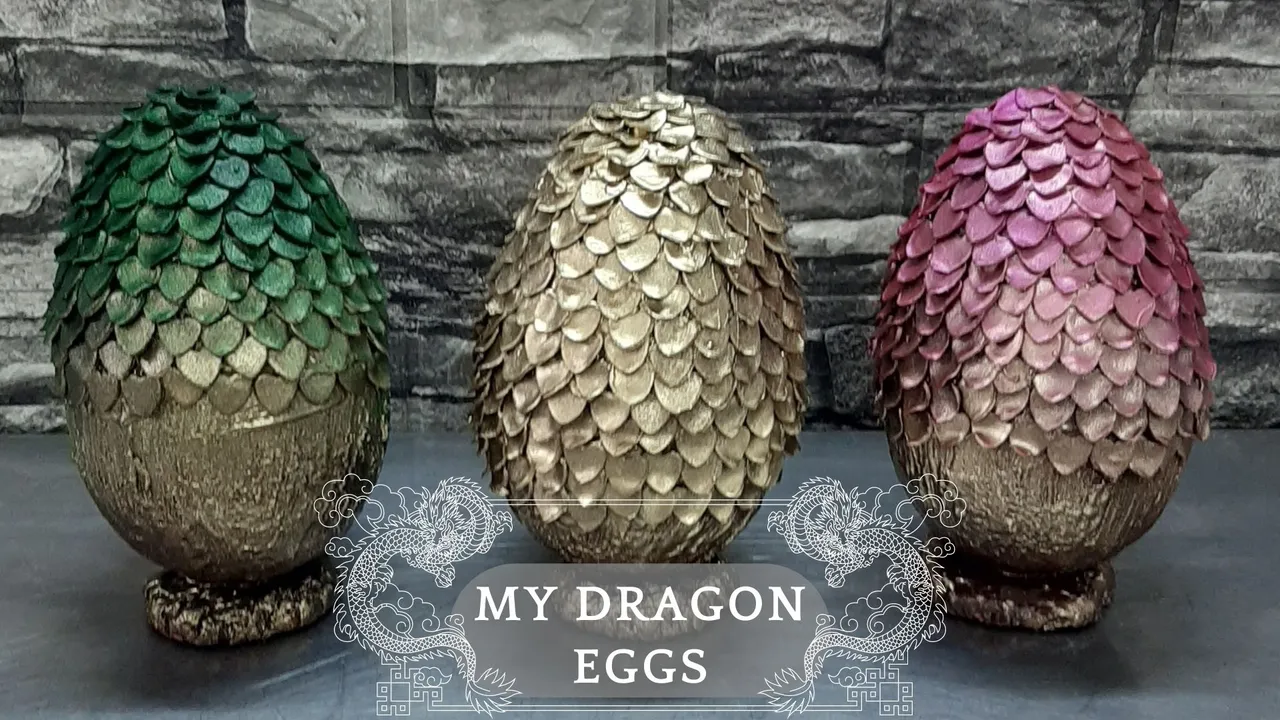
Y listo. Aquí los tienen.
Mis hermosos huevos de dragón al estilo Game of Thrones
 |  |
|---|---|
 |  |
Todas las imágenes usadas en este post fueron tomadas por mí, usando mi celular Samsung A50.
La foto de portada y otras imágenes editadas fueron realizadas en canva
Y el gif utilizado fue realizado con la app: Gif Maker
Si deseas apoyar nuestro emprendimiento, puedes hacerlo siguiéndonos en Instagram: Atenas_food

Hello dear community of @hivefood.
Today I bring a post that I've been waiting weeks to write, and is that from the moment my client called me and gave me this challenge, I've had my husband crazy that I was going to write this post.
I am a loyal fan of Game of Thrones, and in addition to the excitement I get from making these dragon eggs, there is the excitement I get from seeing how someone makes someone else's dreams come true.
Last year he was in Venezuela, from where he contacted us and asked us for a cake with a cheems and a pokeball, with an inscription of You gotta catch em all, do you know what you have to do to pay from Venezuela?
And this guy, he paid for that cake in advance!
We didn't even have the delivery address, because the plan was that the celebrant would go to eat at a local place, and while they were on video call, we would drop them their cake. And so it was done. When I left I saw tears in the birthday boy's eyes and felt proud of our work.
This year we were first contacted by the birthday boy, he ordered a groot cake, a chocolate cake, filled with chocolate and decorated with chocolate flakes that resembled a tree. He also ordered a meme cake, sent by the family from Venezuela. The order was placed and delivered, we received many compliments, the biggest of which was: "achievement unblocked".
And a week later the same guy who wrote me from Venezuela wrote me and said: I need a tres leches cake, with fruit filling, but with a Pokémon on top. And I told him to take it for granted.
It was almost a month before delivery, but I still quoted the cake and gave him the budget. It was just Easter and the Easter egg publications, so he asked me about them. And he said, "look, if there's anyone who can do it, it's you, so I'm going to tell you what I want".
And he tells me that he bought the Game of Thrones dragon keychains and he wants me to put each of them in a chocolate egg and deliver them along with the cake. At first I was quite scared, as there is no such mold available in the country, but after analyzing how we could make it, we were very excited to do this project.
Last week she delivered the dragons, I loved them from the moment I saw them, and I couldn't stop thinking about how great this surprise is.
Today that I have the eggs ready I can say that they took a lot of work. But I am proud of our work, and seeing my client's face when he received his surprise was amazing. I felt absolutely happy, the client even gave me a hug.
Now we're back to what we came for. Let's get to what we came for. The step by step of how we made them.
Dark chocolate couverture. 1 kilo.
Plastic chocolate 200 grams.
Edible coloring powder, gold, rose gold and metallic green.
Cereal alcohol.
Cookies
Rocklets
Chocolate bonbons.
Easter egg mold.
Pot and bowl to melt the chocolate.
Metal tray to heat and thus join the two pieces of eggs.
Manual airbrush to apply the colorants.
Spatulas for scraping and tempering the chocolate.
Brush.
Cut and place a kilo of chocolate to melt, we used bain-marie, so I constantly stirred the chocolate to prevent it from burning and ruining. (You can do it in the microwave by putting 20 second intervals and stirring constantly).
Temper the chocolate.
This is a process that consists of raising and lowering, in a controlled manner, the temperature of the chocolate so that it has a more professional shine and appearance.
We pour into the mold, our mold is large, for which we need about 100 to 150 grams of chocolate, we move it gently so that it is distributed on all sides of the mold and proceed to pour the chocolate on the counter or a tray, so the excess chocolate comes out.
Refrigerate so that the chocolate hardens.
Then we can repeat this action or help us with a brush to make it a little thicker so that they do not break easily.
| |
|---|---|
| |
We made 4 times this emptying to ensure the firmness of them.
With a little gentle pressure we unmold the egg shell, which must be very cold so that it does not break.
We repeat the previous steps until we get the 6 egg halves.
| |
|---|---|
| |
The dragon figures were wrapped in plastic wrap to avoid contamination.
Using a pot of boiling water and an aluminum tray, we had a slightly hot iron, which allows us to melt the faces of the eggs and thus eliminate imperfections, in addition to allowing the correct sealing of the faces.
| |
|---|---|
| |
Add the candies that will be in the filling next to the wrapped dragons.
Smooth the other side of the egg and proceed to glue using melted chocolate.
We made a chocolate base to be able to stop each egg, as we were filling the eggs we pasted a paper to be able to identify which dragon was inside, and with this to know which color to use to paint them. We let them rest.
| |
|---|---|
| |
The most difficult of all.
We created the plastic chocolate flakes.
For this we had to knead, yes, with this cold it was exhausting, and we stretched in very thin rectangles.
| |
|---|---|
| |
Then, with a heart-shaped cutter I made 360 flakes, thinking that would be enough. I left them on a tray to harden a little.
To my surprise, in less than an egg I had used up more than half of the flakes, so the 360 flakes, which had left my fingers sore from so much cutting, were insufficient. So I had to cut almost double that number in order to cover the eggs as planned.
| |
|---|---|
| |
Gluing flake by flake with the help of melted chocolate took more than 3 hours.
At first the plan was to apply the powder on the eggs with the help of a brush, but because of the delicacy and the amount of time it would take to do it this way,
We proceeded to use the manual airbrush, I must say it is one of the best investments I have had so far, we prepared the gilding with alcohol and proceeded to paint the eggs with a layer of gilding first.
Then one of them was sprayed with rose gold powder. And we loved the result.
On the third one we sprayed the metallic green color. We left them to dry.
And that's it. Here they are.
My beautiful dragon eggs, Game of Thrones style.
| |
|---|---|
| |
All the images used in this post were taken by me, using my Samsung A50 cell phone.
The cover photo and other edited images were made in canva
And the gif used was made with the app: Gif Maker
If you want to support our venture, you can do so by following us on Instagram: Atenas_food